Copper is one of the first metals you need in Subnautica 2, and it gates several core blueprints including the battery, the Scanner, and the Habitat Builder. The good news is that copper sits very close to your starting lifepod, and the densest deposits cluster in predictable cave systems and biome borders rather than out in the open seabed.
Quick answer: Break copper outcrops inside the cave directly below your lifepod first, then expand to limestone outcrops along the Sparse Plains shallows and the Plateaus biome border. Caves out-yield open water by a wide margin.
How copper spawns in Subnautica 2
Copper does not appear as a raw rock you can simply pick up on the seabed. Instead, it is hidden inside limestone outcrops, the small grey rock formations scattered across shallow biomes. Striking an outcrop with the Survival Multitool breaks it and drops one of several materials, with copper and titanium being the two most common results in early biomes.
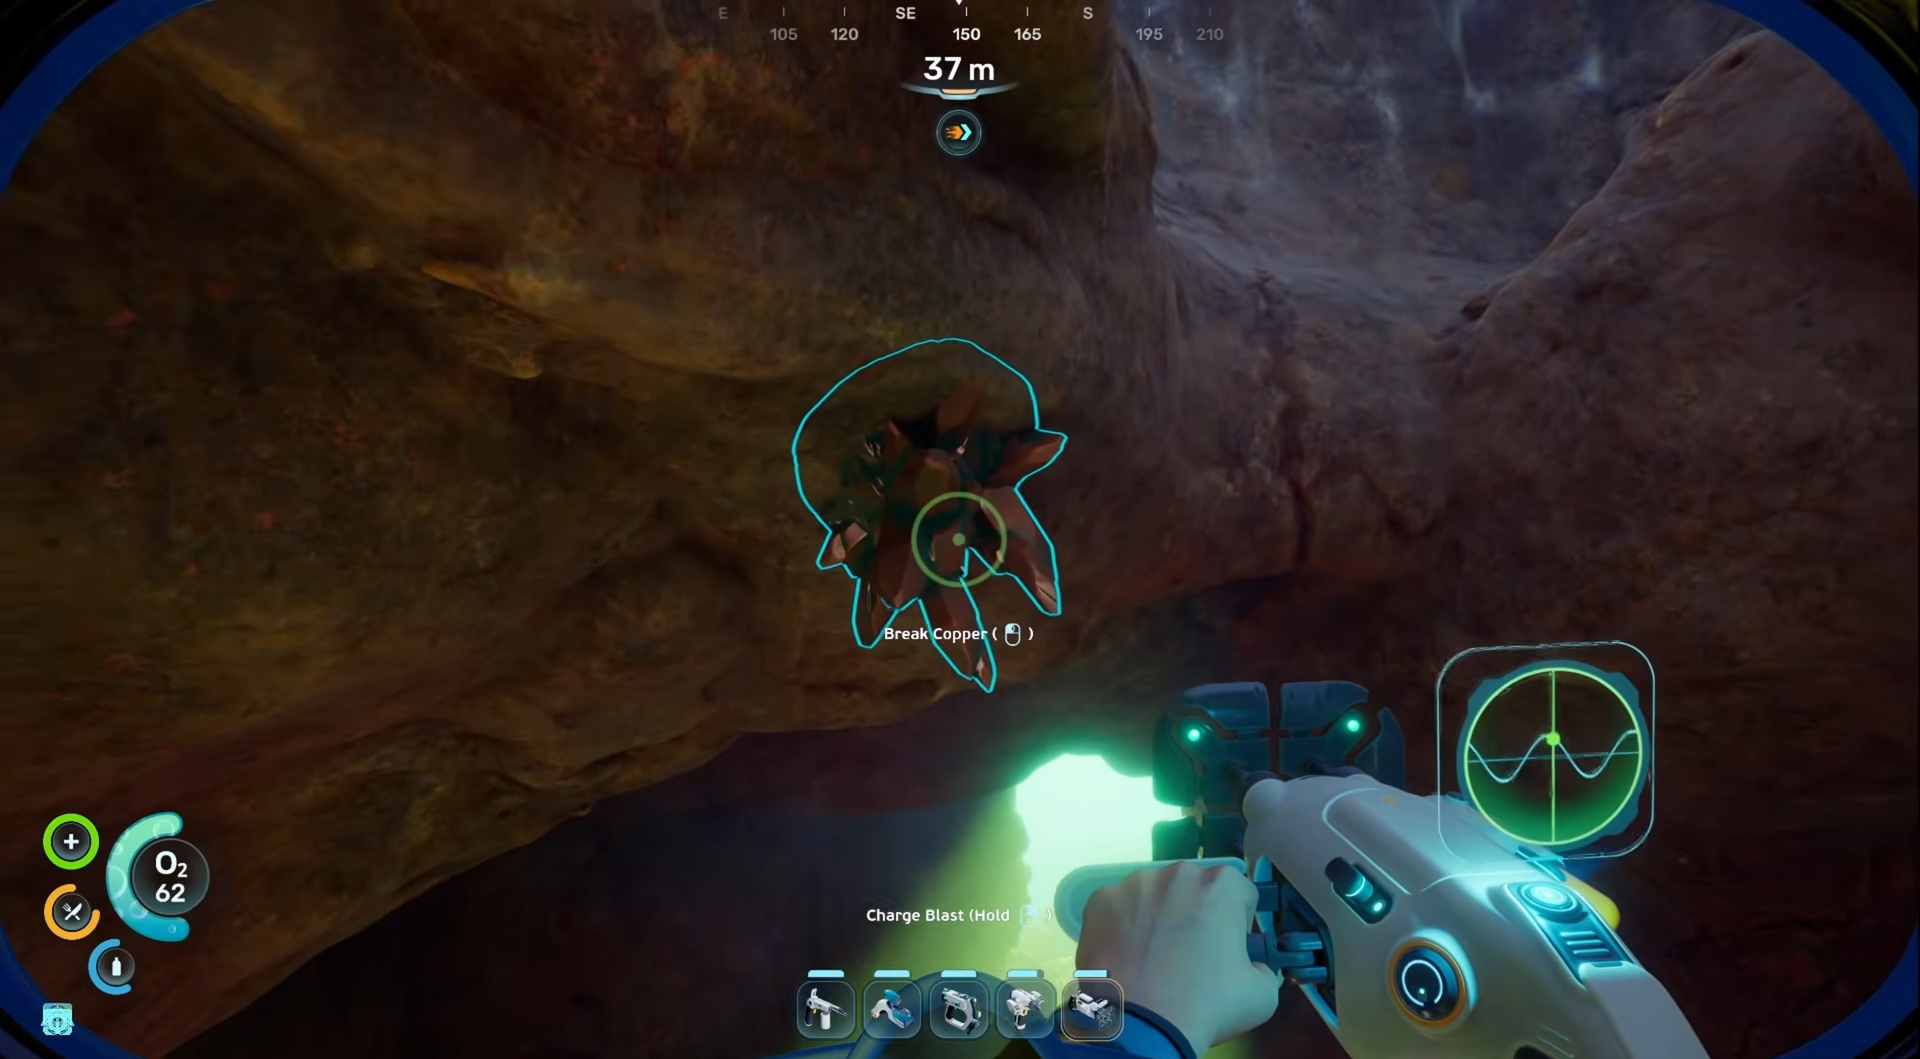
A second source is the copper outcropping that grows directly out of cave walls and ceilings. These nodes glow faintly, sit in clusters, and yield copper reliably on the first hit. They respawn over time, so the same cave can be farmed in loops.
Best copper farming locations
The strongest early-game routine is a short circuit between the cave under your lifepod and the surrounding shallow biomes. Each location below is reachable without a vehicle.
| Location | Depth range | Copper source | Notes |
|---|---|---|---|
| Cave below the lifepod | Surface to ~40 m | Wall copper outcroppings | Fastest spawn density in early game. Also contains Acidic Raion Pouches needed for batteries. |
| Sparse Plains shallows | 0 to 100 m | Limestone outcrops | Scattered nodes across open seabed. Lower density but very safe. |
| Plateaus biome border | 50 to 200 m | Limestone outcrops, small cave pockets | Higher outcrop concentration along rock walls and around ledges. |
| Jelly Plateaus | ~150 to 300 m | Limestone outcrops, wall deposits | Useful once you have a Standard O2 Tank and Fins. Watch oxygen on deeper pockets. |
| Overgrown Ruins | Deeper mid-game | Mixed mineral deposits | Mixed yields. Visit after you have a Seaglide and improved oxygen capacity. |
The cave under the lifepod is the priority target. It is the only location where you can collect copper, Acidic Raion Pouches, and quartz fragments in the same dive, which is exactly what the early crafting chain demands.
Lifepod cave route

How much copper you actually need
| Item | Copper required | Why it matters |
|---|---|---|
| Battery | 1 | Powers the Scanner, Seaglide, and flashlight. |
| Scanner | 1 (inside the battery) | Required to unlock fragment-based blueprints. |
| Habitat Builder | 4 | Unlocks base building and the fabricator blueprint chain. |
| Wiring Kit | 1 copper wire (1 copper) | Needed for advanced base modules and tools. |
A single pass through the lifepod cave usually covers the battery, Scanner, and Habitat Builder requirements. Plan for at least six to eight copper before your first base run so you do not get stuck mid-craft.
Faster copper once you have better tools
Once you unlock the Seaglide, copper farming shifts from “find any outcrop” to “loop the densest pockets.” The Seaglide cuts travel time between the cave under your lifepod and nearby Plateaus pockets, which lets you bank larger stacks in the same oxygen budget.
Later in progression, the Prawn Suit Drill Arm becomes the most efficient method. It extracts copper directly from large mineral deposits in deeper biomes without the outcrop random-drop step, removing the need to break dozens of small rocks for a single unit.
Tip: A Scanner Room with range upgrades will pin copper deposits on your HUD inside its radius. If you settle a base near the Plateaus or Jelly Plateaus border, scanning copper turns repeat farming runs into direct travel instead of search loops.
Common reasons copper runs fail
- Trying to hit copper outcroppings without the Survival Multitool. Bare hands will not break them.
- Searching the open seabed instead of going into caves. Caves carry the dense, glowing wall nodes; the open floor has only scattered limestone outcrops that may drop titanium instead.
- Running out of oxygen before exiting the cave. Carry a Standard O2 Tank before pushing into the deeper chambers under the lifepod.
- Mistaking copper for an open-world pickup. Copper only drops from broken outcrops or wall nodes; it does not lie loose on the seafloor.
Stick with the lifepod cave for your first stockpile, expand to the Plateaus border once you have a Seaglide, and switch to Prawn Suit drilling for sustained late-game supply. That sequence covers every copper-gated blueprint in the Early Access build without forcing risky leviathan-adjacent detours.