
The Euphoria Coast Automech Repair Center (ARC) is a Protectorate-controlled hub on Paradise Island, east-southeast of Fairfield. It’s the gatekeeper for several early-game threads: Kaur’s sabotage plan, Donelson’s facility work order, and the gear you need to safely move through Zyranium. Here’s how to get inside, what to do once you’re in, and how each path plays out.
Automech Repair Center location and what’s inside
| Region | Paradise Island, east-southeast of Fairfield |
|---|---|
| Faction | The Protectorate |
| Hazard | Zyranium gas permeating the main hangar |
| Key areas | Automech Repair Hangar Facility; Chief Deviser Delphinia Bryant’s lab; Marshal Donelson’s office; Human Repair Center (clinic); Hazel’s Automated Wares and Repairs (vendor); ARC quarters |
| Notable NPCs | Chief Deviser Delphinia Bryant; Marshal Donelson; Chief Mechanist Woodrow Contos; gate guard Tierney |
| Related quests | Above and Beyond Repair (Kaur); “Vexing Vapors” (appears as Vanishing/Vanquishing); An Aegis Against the Miasma; The Saga of the Malfunctioning Mechanicals (Westport/Hogarth) |
How to enter the Automech Repair Center (ARC)
You have two straightforward entry routes:
- Use Engineering 3 at the gate to pose as a repair tech.
- Print an ARC Access Pass at the Ministry of Accuracy and hand it to the front guards.
Printing the ARC Access Pass at the Ministry
- Travel west of Fairfield to the Ministry of Accuracy. Raptidons have overrun the grounds; expect acid spitters and chargers.
- Use Tactical Time Dilation to set up clean shots. Sweep the outbuildings if you want minor loot, then enter the main structure.
- Inside, you’ll encounter Inez. After the conversation, proceed to the next large room.

- Climb the ladder on the northern wall to the second floor, jump the broken walkway to the south side, and access the terminal by the next ladder.
- Select “ALERT: Overdue Deliverable” and print the ARC Access Pass.
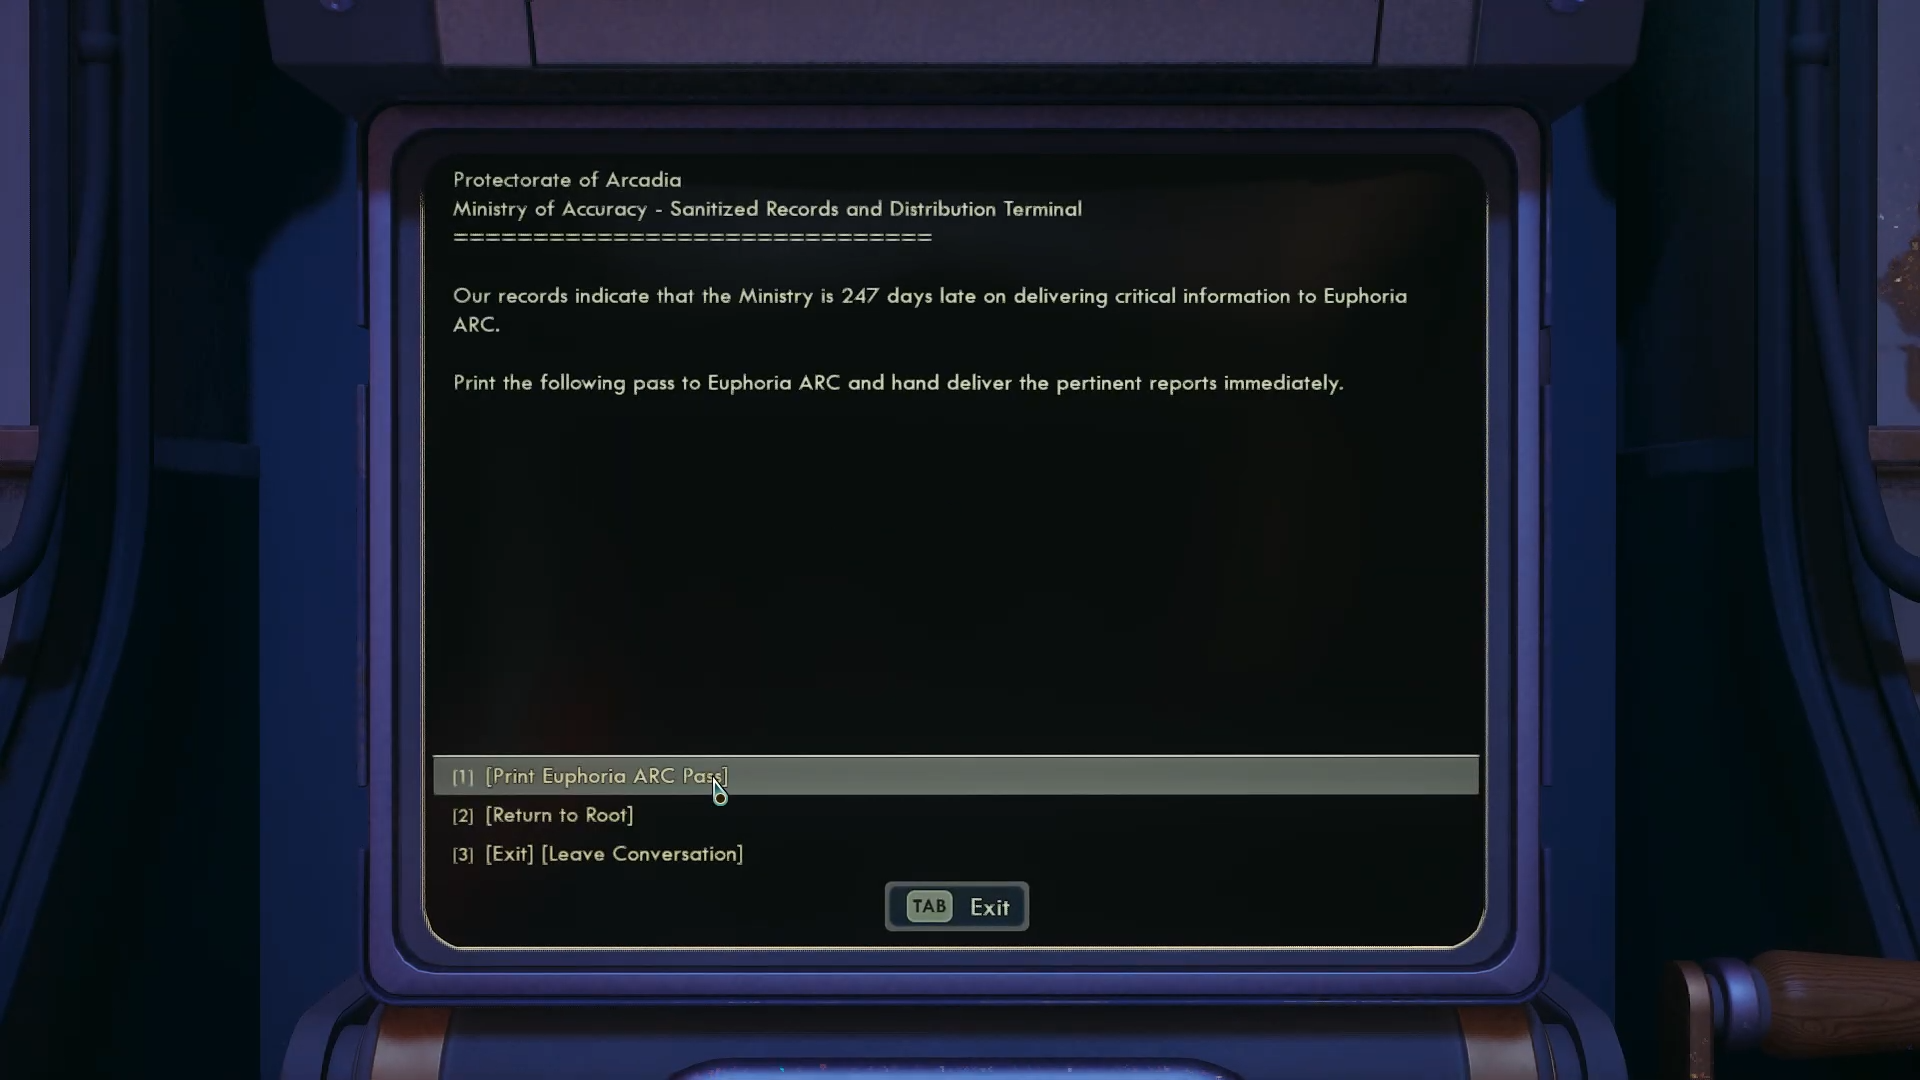
- Return to the ARC gate and present the pass to Tierney. With a pass, the facility behaves neutrally, letting you explore and pick up related quests.
Deal with Zyranium first: An Aegis Against the Miasma
The hangar where you’ll make the critical fix/sabotage call is saturated with Zyranium gas. Before you wade in, complete “An Aegis Against the Miasma” to earn a temporary protection gadget.

Steps to secure the Gas Energy Deflection Apparatus
- Speak with Chief Deviser Delphinia Bryant in the lab on the north side of the ARC grounds.
- Collect a Zyranium sample from the cloud southwest of the facility and return it to her.
- Bring a power source for her experiment:
- Option A — Catalytic amplifier: salvage one from a Protectorate Dragoon. Chief Mechanist Woodrow Contos will object, but you can persuade him (Leadership 2 or Speech 3) or learn leverage from Marshal Donelson’s office logs near the entrance. If you can’t persuade him, find a wrecked Dragoon along the western coastline, guarded by crabbles.
- Option B — Holo-Emitter (Science 4): instead of the amplifier, offer a Holo-Emitter from Fairfield. Climb the scaffolding to the town hall roof to remove the large Auntie’s Choice ad and pick up the emitter.
- Return the requested device. You’ll receive the Gas Energy Deflection Apparatus, a Gadget that briefly shields you from incoming damage and Zyranium poisoning.
Tip: The shield duration is limited. Plan your route through the hangar before you activate it.
Sabotage or stabilize the ARC (“Vexing Vapors”)
Once you’re protected against Zyranium, head for the big western hangar to resolve the facility’s gas flow. The quest label varies by screen (“Vanishing” or “Vanquishing the Vexing Vapors”), but the sequence is the same.
Access the hangar and reach the control room
- Equip the Gas Energy Deflection Apparatus, activate the shield, and pass the caution signs into the Zyranium-filled automech bay.
- Drop into the central vent to a larger chamber with malfunctioning Protectorate Wasps. They’re fragile; stealth takedowns are effective.
- Loot the High Security Lockbox from the shelves before you clear the room.
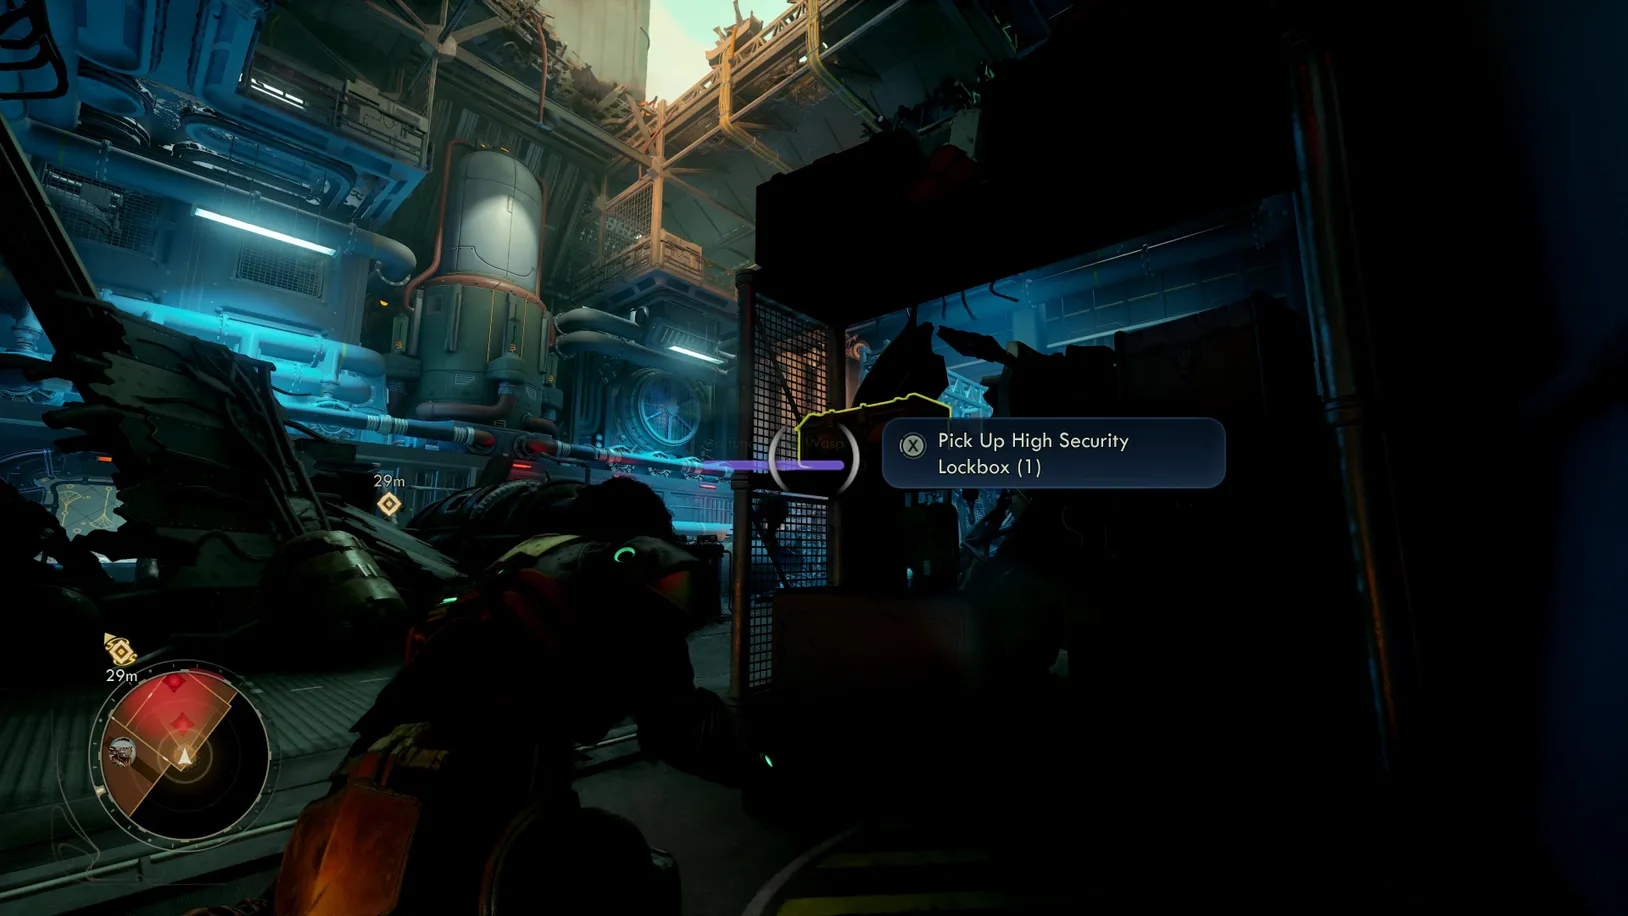
- Sprint into the northeastern control room and use the terminal to seal the area and vent local gas.
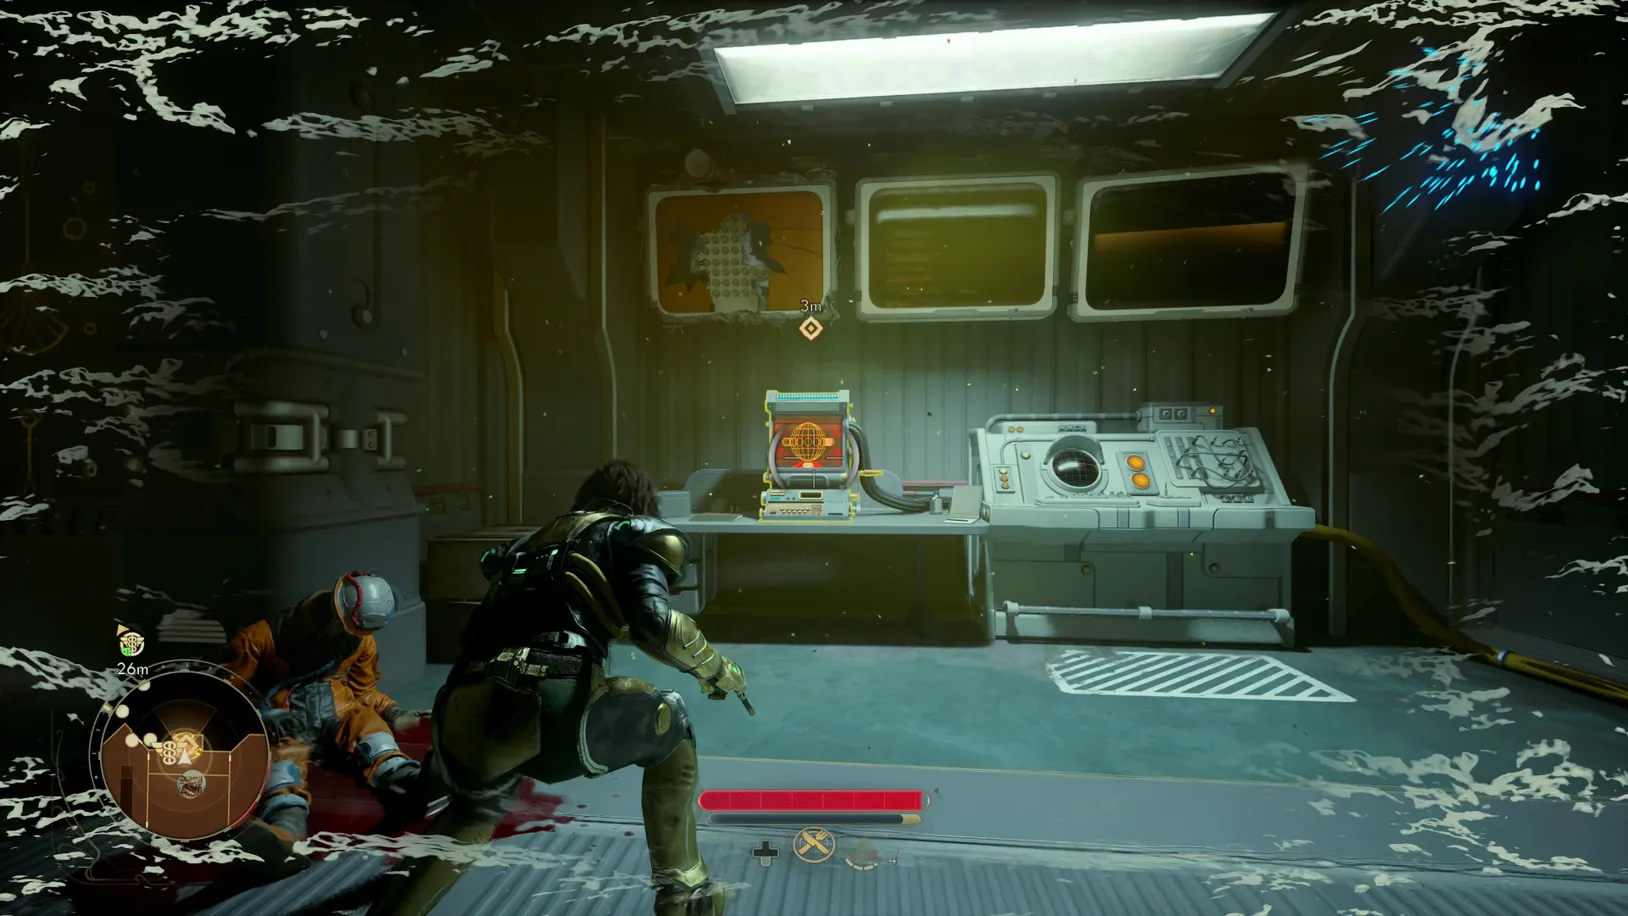
Make the call: fix or force a shutdown
On the terminal, “access flow control systems” and then “initiate Zyranium flow shutdown.” You’ll be warned that both intake conduits must be closed for a safe shutdown; both are open.
- Override safety and force the shutdown to sabotage the facility. This makes the situation worse by design—report back to Marshal Donelson to complete the step and collect a large XP reward.
- Alternatively, close conduits and stabilize the flow (if you’re pursuing a fix-oriented outcome tied to Donelson’s request chain).
Finishing the sabotage path lets you return to Officer Kaur in Fairfield to conclude “Above and Beyond Repair.” The reward is Kaur’s Kuirass, a replica heavy armor piece.
Hogarth’s request: Automech Replacement Parts for Westport
Separately, Vigilant Hogarth in Westport asks for Automech Replacement Parts as part of “The Saga of the Malfunctioning Mechanicals.” The ARC is the logical place to grab them once you’re in.
Where to find the parts
- With an ARC Access Pass, guards allow you to explore. If you invest in Observation, you’ll spot a broken mech that hints at something above it.
- Climb onto the nearby roof overlooking the damaged unit. The Automech Replacement Parts are stashed up there.
Delivering the parts helps Hogarth restore Westport’s machines and can net you unique gear and a document to ease entry at the Vox Relay—though you may still need Speech or Leadership checks at the gate there.
Skill checks and small details that change your route
- Engineering 3: Bluff your way through the ARC gate without a pass.
- Science 4: Swap the catalytic amplifier for the Fairfield Holo-Emitter during “Aegis.”
- Leadership 2 or Speech 3: Persuade Chief Mechanist Woodrow to release the amplifier; Donelson’s office logs provide extra leverage.
- Combat notes: Raptidons at the Ministry are quick and mix spitters with chargers—Tactical Time Dilation makes headshots and target swaps manageable.
- Traversal: At the Ministry terminal, reach the second floor via the north ladder, then jump a broken walkway to the south side; the terminal sits beside the ladder to the third floor.
What each path unlocks
- “Aegis” completion gives you the Gas Energy Deflection Apparatus, enabling safe passage through Zyranium for timed windows.
- Sabotaging the ARC (Kaur’s path) advances “Above and Beyond Repair” and pays out Kaur’s Kuirass, plus XP from Donelson for the messy shutdown.
- Stabilizing the ARC supports Donelson’s objectives and aligns with a repair-focused outcome for the facility.
- Supplying Westport’s parts advances Hogarth’s arc and can ease future access to the Vox Relay, though gate checks may still apply.
Handled in this order—access pass, Zyranium protection, then hangar decisions—the ARC becomes a clean early-game pivot. Decide whose objectives matter most to your build, make the call at flow control, and cash in the right reward before you move on to the Vox Relay.