With the rise of video conferencing, having a high-quality webcam has become more important than ever. Unfortunately, many laptop cameras offer mediocre quality at best. If you're looking to enhance your video call experience, you can transform your Canon DSLR camera into a high-definition webcam using the EOS Webcam Utility software. This guide will walk you through the steps to set up your Canon camera as a webcam on popular platforms like Zoom, Google Meet, and Microsoft Teams.
Supported Canon cameras for EOS Webcam Utility
The EOS Webcam Utility software by Canon supports a range of EOS DSLR, EOS Mirrorless, and PowerShot camera models. Below is a list of compatible cameras:
EOS DSLR Cameras
- EOS-1D X Mark II
- EOS-1D X Mark III
- EOS 5D Mark IV
- EOS 5DS
- EOS 5DS R
- EOS 6D Mark II
- EOS 7D Mark II
- EOS 77D
- EOS 80D
- EOS 90D
- EOS 200D / Rebel SL2 / Kiss X9
- EOS 250D / Rebel SL3 / Kiss X10
- EOS 1300D / Rebel T6 / Kiss X80
- EOS 750D / Rebel T6i / Kiss X8i
- Canon EOS 800D / Rebel T7i Kiss X9i
- EOS 850D / Rebel T8i / Kiss X10i
- EOS 3000D / EOS 4000D / Rebel T100
EOS Mirrorless Cameras
- EOS M6 Mark II
- EOS M50
- EOS M200
- EOS R
- EOS RP
PowerShot Cameras
- PowerShot G5X Mark II
- PowerShot G7X Mark III
- PowerShot SX70 HS
If your Canon camera is listed above, you can proceed to use it as a webcam with the EOS Webcam Utility. If not, you might consider third-party applications like SparkoCam as an alternative.
Note: The EOS Webcam Utility is currently in beta. Canon is actively working to support more camera models. If your camera is compatible with the 'EOS Utility' software, there's a good chance it will be supported by the EOS Webcam Utility in the future.
Downloading the EOS Webcam Utility
Canon offers the EOS Webcam Utility as a beta version for users to test on their systems.
Supported platforms: Microsoft Windows 10 64-bit only.
Note: The utility is not yet available for Mac or other versions of Windows.
You can download the EOS Webcam Utility directly from Canon's servers using the link below, or by visiting the Canon support site and selecting your camera model.
The download will contain a file named EOSWebcamUtilityBeta-WIN0.9.0.zip. Extract it to obtain the EOS-Webcam-Utility-Beta.msi installer file.
Setting up the EOS Webcam Utility
Step 1: Install the EOS Webcam Utility on your Windows 10 computer by running the EOS-Webcam-Utility-Beta.msi installer extracted from the zip file.

Click 'Next' in the installer window and follow the on-screen instructions to complete the installation. Once done, click 'Close' to exit the installer.
Important! Restart your computer after installing the EOS Webcam Utility to ensure it appears as a camera input device in your video conferencing apps.
The EOS Webcam Utility does not have a standalone interface. Instead, it functions as a virtual camera that can be selected within your video conferencing applications.
Step 2: Prepare your camera for use with the EOS Webcam Utility:
✅ Turn on your Canon DSLR camera.
✅ Set the camera to Video Recording mode.
✅ Connect the camera to your computer using the USB cable provided (Type A to Mini Type B cable).
Important Note: If you have the 'EOS Utility' software installed, disable the 'Start EOS Utility automatically when the camera is connected' option and ensure the application is closed while using the EOS Webcam Utility. This prevents conflicts that may stop the webcam utility from displaying your camera feed.
Using the EOS Webcam Utility with Zoom
With the EOS Webcam Utility installed and your camera connected, you can use your Canon DSLR as a webcam in Zoom meetings.
Step 1: Open the Zoom application on your computer and click the 'Settings' gear icon at the top-right corner.
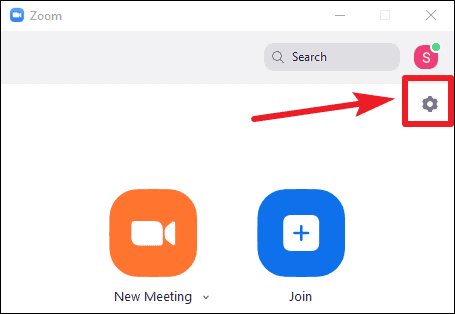
Note: If Zoom was open prior to installing the EOS Webcam Utility, restart the application to detect the new camera option.
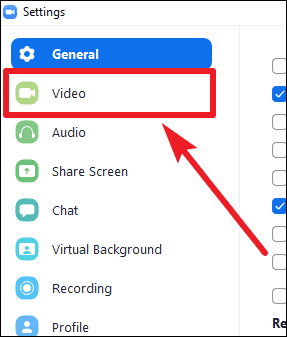
Step 2: In the settings window, select 'Video' from the left-hand menu to access video settings.
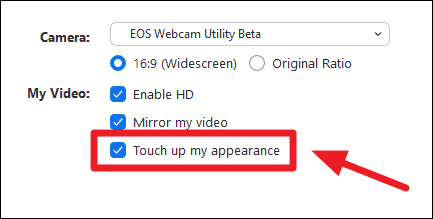
Step 3: In the 'Camera' drop-down menu, choose 'EOS Webcam Utility Beta' from the list of available devices. This selection will persist for future meetings unless changed.
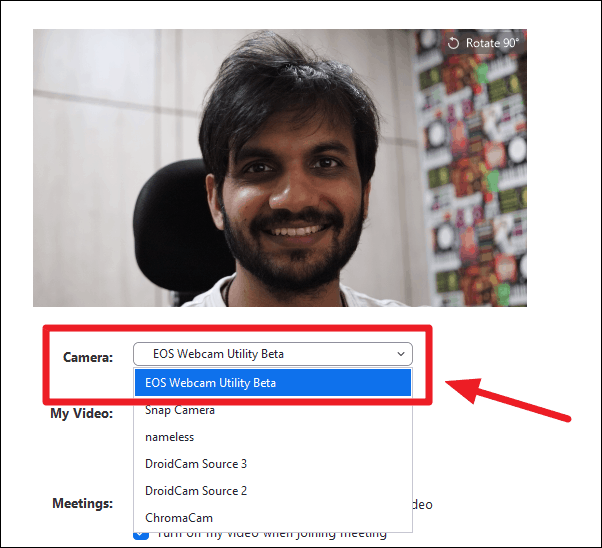
After selecting the EOS Webcam Utility, you'll notice an immediate improvement in video quality. The depth of field provided by your DSLR camera will offer a natural background blur, enhancing your on-screen presence.
For an even better appearance, enable Zoom's 'Touch up my appearance' option found in the video settings.
Using the EOS Webcam Utility with Google Meet
If Google Meet is your platform of choice, you can also utilize your Canon DSLR as a webcam with the EOS Webcam Utility.
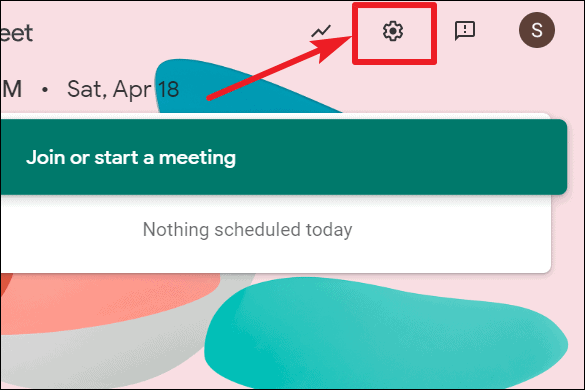
Step 1: Navigate to meet.google.com. Click on the 'Settings' icon located in the upper-right corner.
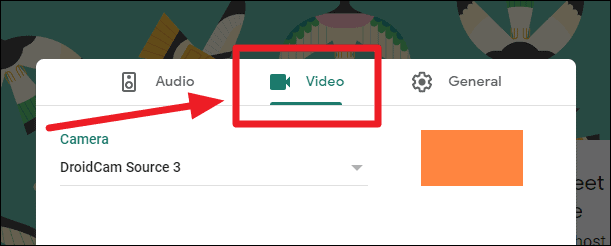
Step 2: In the settings pop-up, select the 'Video' tab to access video settings.
Step 3: From the 'Camera' drop-down menu, select 'EOS Webcam Utility'. You should see a preview displaying the feed from your DSLR camera, showcasing superior video quality compared to a standard webcam.
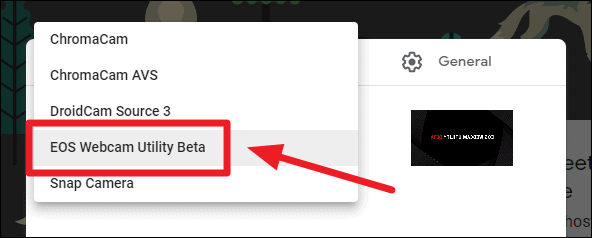
Note: If the 'EOS Webcam Utility' option isn't visible, try refreshing the page.
Using the EOS Webcam Utility with Microsoft Teams
For Microsoft Teams users, integrating your Canon DSLR as a webcam can enhance your video meetings significantly. Here's how to set it up:
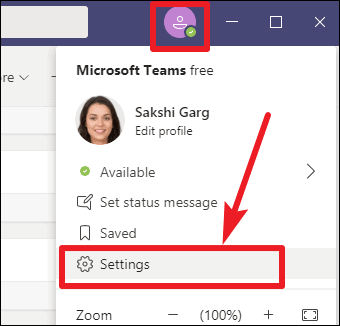
Step 1: Open Microsoft Teams and click on your 'Profile' icon in the Title Bar. Select 'Settings' from the dropdown menu.
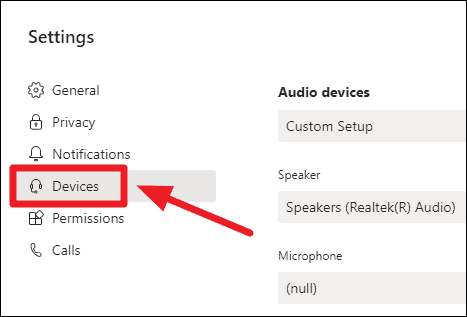
Step 2: In the Settings window, choose 'Devices' from the left-hand menu to access device settings.
Step 3: Scroll down to the 'Camera' section and select 'EOS Webcam Utility' from the drop-down menu. This setting will remain for future calls unless changed.
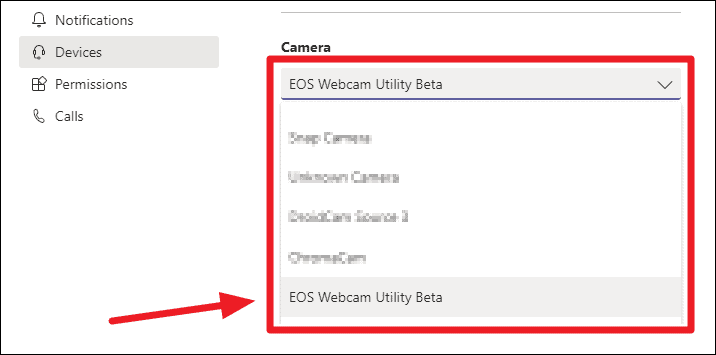
Note: If you don't see the 'EOS Webcam Utility' in the list, restart the Microsoft Teams application.
During a call: If you're already in a meeting, you can still switch to your DSLR camera.
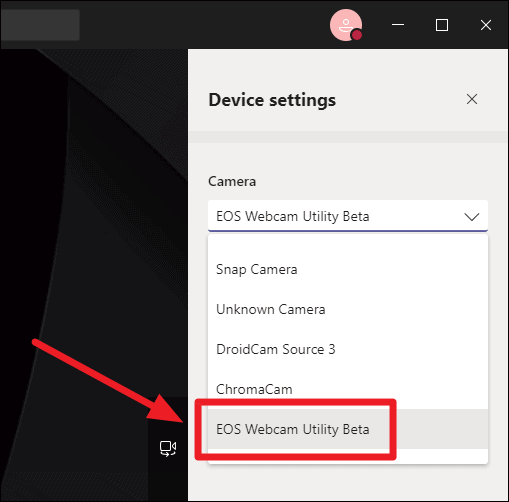
Step 4: Click the 'More options' icon (three dots) during the call and select 'Show Device Settings'.
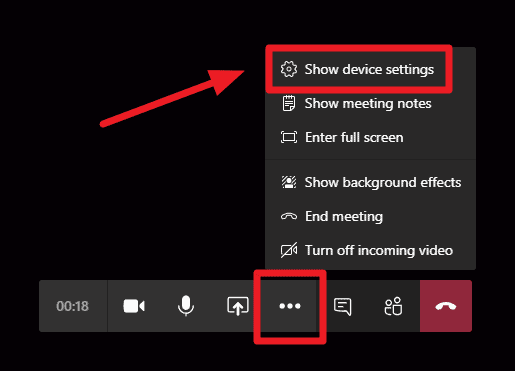
Step 5: In the device settings pane that appears on the right, go to the 'Camera' section and select 'EOS Webcam Utility'. This change will take effect immediately and be saved for future meetings.
By using the EOS Webcam Utility, you can significantly improve the quality of your video calls. Your Canon DSLR camera offers superior image quality and depth of field, ensuring that you look your best during online meetings. The natural background blur provided by the camera lens helps to keep the focus on you, enhancing your professional appearance.

