Boss Talents in Where Winds Meet are a separate progression layer built entirely around repeatable boss content. Instead of broad stat boosts, they give permanent, fight-specific bonuses in Sword Trial and Group Dungeon encounters, plus a small set of global loot perks once multiple trees are maxed.
How the boss talent tree works
Boss Talents are tied to individual encounters rather than your overall character build.
Each featured boss has its own mini-branch with three functional nodes:
- Offensive – extra damage to that boss, usually when they are Exhausted.
- Defensive – mitigation or sustain against a signature mechanic in the fight.
- Strategic – a general damage and healing multiplier for that boss encounter.
Every one of these nodes is unlocked by clearing a specific challenge condition during the relevant Sword Trial or Group Dungeon version of the fight. Once a challenge is completed, the matching talent becomes available and can be ranked up; higher ranks strengthen the same effect on a simple scaling curve.
There is no respec. Challenges permanently unlock a given node, and its points stay with that boss branch. The upside is that you cannot misallocate anything long-term; the downside is that you cannot “move” boss-specific power to a different encounter.
How to open and navigate the boss talent menu
Step 1: Open the main menu and go to the Develop screen. This is the same hub used for other talent types and long-term character growth.
Step 2: Select Talents in the upper-left corner. This switches the view from gear and stats to your various talent trees.
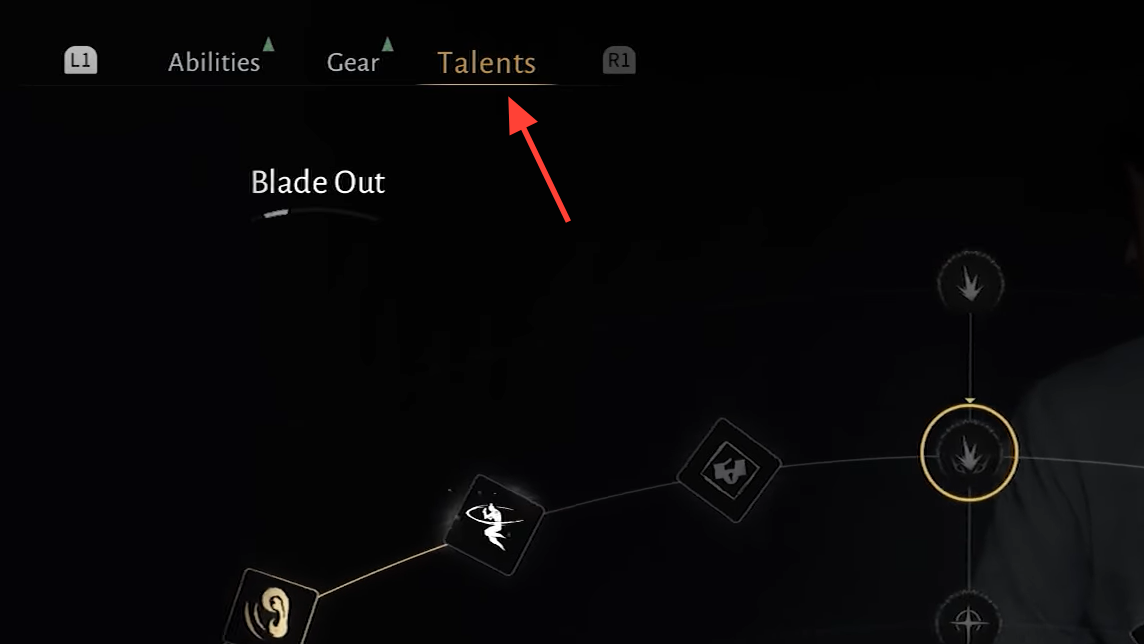
Step 3: On the left-side tabs, choose Boss. The panel on the right will switch to a boss-by-boss layout, showing each encounter that currently has a dedicated branch.
Step 4: Highlight a boss in the list to see its three challenges and the Offensive, Defensive, and Strategic nodes they unlock, along with flavor titles that appear once the branch is fully upgraded.
What boss talents actually do in combat
Boss Talents only apply in the encounters they name. The bonuses are always on for those fights; you do not need to equip or toggle them per run.
Three patterns show up repeatedly across the branches:
- Exhausted-state damage spikes. Almost every boss tree has an Offensive node that increases damage by 10% at rank one, 20% at rank two, and 30% at rank three when that boss is in the Exhausted state. The Void King (The Formless), Ye Wanshan, Lucky Seventeen, Sleeping Daoist, Murong Yuan, Twin Lions, and Ghost Prince all follow this pattern.
- Mechanic-specific mitigation or sustain. Defensive nodes are tailored to the fight’s main hazard: knockback zones, siege mechanics, exploding barrels, or key adds. These effects typically scale from 5–20% at the low end and reach 15–60% at max rank, or shift into strong sustain like life-steal versus certain targets.
- Flat damage and healing multipliers. Strategic nodes give a combined damage and healing increase that is always active in that fight, usually 5% at rank one, 10% at rank two, and 15% at rank three. Sleeping Daoist, Murong Yuan, Twin Lions, Ghost Prince, Lucky Seventeen, Ye Wanshan, and The Void King all share this structure, with slightly higher starting values in Group Dungeon content.
The end result is that once a branch is leveled, your damage curve and survivability in that specific encounter jump noticeably, even if your gear stays the same. Repeated farming of the same boss becomes faster, safer, and more forgiving of small mistakes.
Boss-by-boss talent breakdown
The following table summarizes the core effects of each branch. Values are cumulative per node, not per challenge.
| Boss | Content type | Offensive talent (rank 1–3) | Defensive / utility talent (rank 1–3) | Strategic talent (rank 1–3) | Full-branch title |
|---|---|---|---|---|---|
| The Void King (The Formless) | Sword Trial | +10% / +20% / +30% damage while she is Exhausted. | -20% / -40% / -60% damage taken when knocked away by Wind Strike’s wind zone. | +5% / +10% / +15% damage and healing in the fight. | Formless Seer |
| Ye Wanshan | Sword Trial | +10% / +20% / +30% damage while he is Exhausted. | 20% / 50% / 100% chance to reduce twice the War’s Fury when killing mounted Phantom Cavalry. | +5% / +10% / +15% damage and healing in the fight. | Coldsteel Armor |
| Lucky Seventeen | Sword Trial | +10% / +20% / +30% damage while he is Exhausted. | +5% / +10% / +15% damage to Seventeen’s rapier. | +5% / +10% / +15% damage and healing in the fight. | The Humble Blade |
| Sleeping Daoist | Group Dungeon | +10% / +20% / +30% damage while he is Exhausted. | Restore 2% / 4% / 6% of damage dealt when hitting donkeys. | +7.5% / +15% damage and healing in the fight. | Unbound Donkey Rider |
| Murong Yuan | Group Dungeon | +10% / +20% / +30% damage while she is Exhausted. | -5% / -10% / -15% damage from Wooden Kite and Explosive Barrels. | +7.5% / +15% damage and healing in the fight. | Soaring Skyward |
| Twin Lions | Group Dungeon | +10% / +20% / +30% damage while they are Exhausted. | -5% / -10% / -15% damage taken from special skills (including Golden Ball mechanics). | +7.5% / +15% damage and healing in the fight. | Lion Dancer |
| Ghost Prince (Ghost Master branch naming) | Group Dungeon | +10% / +20% / +30% damage while he is Exhausted. | +5% / +10% / +15% damage to the sedan. | +7.5% / +15% damage and healing in the fight. | Shadow Severer |
Unlock challenges for each boss talent branch
Each node is attached to a concrete objective that must be completed in the relevant dungeon or Sword Trial. The objectives always reflect that encounter’s main mechanics rather than generic “kill the boss quickly” checks.
| Boss | Offensive unlock objective | Defensive unlock objective | Strategic unlock objective |
|---|---|---|---|
| The Void King (The Formless) | Defeat The Formless in Sword Trial and land two successful deflects during a single Whirlwind Frenzy. | Defeat The Formless in Sword Trial without being knocked away by the Wind Strike wind zone. | Defeat The Formless twice in Sword Trial – Formless Calamity and claim the reward. |
| Ye Wanshan | Defeat Ye Wanshan in Sword Trial and prevent all Wraiths from self-destructing. | Defeat Ye Wanshan in Sword Trial without taking damage from Wraith Cavalry during the “Undying Fire” phase. | Defeat Ye Wanshan twice in Sword Trial – Cold Mountain Pass and claim the reward. |
| Lucky Seventeen | Defeat Seventeen in Sword Trial and successfully catch a tossed player once. | Defeat Seventeen in Sword Trial and solo destroy one rapier. | Defeat Seventeen twice in Sword Trial – Forging of Years and claim the reward. |
| Sleeping Daoist | Defeat Sleeping Daoist in Group Dungeon and catch a falling teammate while you are transformed into a donkey. | Defeat Sleeping Daoist in Group Dungeon without taking damage during Donkey Stampede. | Defeat Sleeping Daoist once in Group Dungeon – Dream Jinming Pool and claim the reward. |
| Murong Yuan | In Group Dungeon, during Sea of Fire, let the flames burn four Explosive Barrels without triggering any chain explosions, then defeat Murong Yuan. | Defeat Murong Yuan in Group Dungeon without taking explosion damage within 5m of any Explosive Barrel. | Defeat Murong Yuan once in Group Dungeon – Dream Jinming Pool and claim the reward. |
| Twin Lions | Defeat Twin Lions in Group Dungeon, snatching the Golden Ball twice after the battle starts (at least one using Heavenly Snatch) and throwing them away before the bar fills. | Defeat Twin Lions in Group Dungeon and successfully deflect “Clouds Above” twice and “Blooming Ground” twice. | Defeat Twin Lions once in Group Dungeon – Blazing Gale Dance and claim the reward. |
| Ghost Prince | Defeat Ghost Prince in Group Dungeon without being hit by “Vanished Trail” and “Soul Abyss,” or by successfully blocking every cast of “Eternal Extinction.” | Defeat Ghost Prince in Group Dungeon while surviving transformations into Golden Shackle and Silver Chain, or while affected by “Into the Sedan.” | Defeat Ghost Prince once in Group Dungeon – Sorry of Mortalbound and claim the reward. |
Completing all three challenges for a boss upgrades the full branch, unlocks the flavor title shown in the table above, and counts toward a separate set of cross-boss reward talents.
Global reward talents unlocked by multiple bosses
Beyond the boss-specific bonuses, there is a small, separate section of the Boss Talents tree that focuses on loot bonuses. These unlock only when certain pairs of bosses have their Strategic nodes fully upgraded.
| Requirement | Reward talent | Effect (rank 1–3) |
|---|---|---|
| Fully upgrade both Strategic talents for The Formless and Lucky Seventeen. | Sword Trial Reward I | 10% / 20% / 30% chance to receive an extra Sword Trial Appearance Chest when you collect the Blade Out season’s Sword Trial boss reward. |
| Fully upgrade both Strategic talents for Sleeping Daoist and Rong Yuan. | Group Dungeon Reward I (Attune Stone) | 10% / 20% chance to receive an extra Attune Stone when you collect the Blade Out season’s Sword Trial boss reward. |
| Fully upgrade both Strategic talents for Twin Lions and Ghost Prince. | Group Dungeon Reward I (Gear) | 10% / 20% chance to receive an extra piece of gear when you collect the Blade Out season’s Group Dungeon boss reward. |
| Fully upgrade all three loot talents above. | Custom: Gear Gold Chest | Unlocks a chest that lets you choose one piece of gear from a fixed selection, once you reach Solo Mode level 10. |
These nodes work globally within the eligible season. Once ranked, they add a roll on top of the normal reward chest, which is why heavy Sword Trial and Group Dungeon players tend to prioritize Strategic nodes first when planning a long grind.
How to “farm” boss talents efficiently
Boss Talents are not bought with generic points. The only way to progress them is to:
- Clear higher-level variants of each encounter.
- Deliberately play toward their challenge conditions during those runs.
Because the objectives are tightly bound to mechanics, “farming” here means practicing specific timing and positioning rather than simply repeating an easy difficulty. Examples include mastering deflect windows on The Formless’s Whirlwind Frenzy, controlling add waves around Ye Wanshan’s Wraith Cavalry, or managing explosives around Murong Yuan’s Sea of Fire so no chain reaction ever triggers.
There is no respec, so there is no penalty for completing challenges “out of order.” However, you gain the largest functional benefit once Offensive and Strategic nodes are leveled, as these drive most of the damage increase in the fight.
Boss talents versus Basic and Arena talents
The talent system in Where Winds Meet is split across three separate trees, each with a different scope:
- Basic Talents affect open-world and general combat. They cover critical stats, Affinity damage, HP, defense, and utility abilities like Divinecraft – Fire, Poison, and Water, or Surging Meridian survivability passives in Solo exploration.
- Arena Talents are exclusive to 1v1 Arena. They stack penetration, resistances, conversion effects, and low-HP/Qi safety nets, but they are disabled everywhere else.
- Boss Talents only function in the named Sword Trial and Group Dungeon encounters, plus a few loot bonuses tied to those modes.
Because the trees do not overlap in effect, investment decisions are mostly about where you spend your time: exploration and PvE progression, competitive 1v1, or repeatable raid-style content. Boss Talents are the most targeted of the three, but they also provide the most dramatic impact on a single fight once maxed.
If a particular encounter feels out of line with the rest of your progression, it is often because the corresponding boss branch is still incomplete. Once those nodes are unlocked and leveled, the same mechanics become far more manageable, especially when combined with food buffs, Divinecraft consumables, and a build tuned for the encounter’s damage type.
Used well, the boss talent tree turns repeated clears of the same encounters from a grind into a predictable progression path. The branches reward clean play, punishing mechanics become safer to handle, and fully maxed trees pay out extra gear and cosmetics on top of the raw power boost.

