
Windows 11 steers new setups toward an online Microsoft account, but you can still create and use a local account during installation. The exact steps depend on the build you’re installing. Below are the reliable methods, including a one-time command you run during setup and an install USB that bakes the bypass in.
Which method to use (by build)
| Scenario / build | Where to stop in setup (OOBE) | Open Command Prompt | Run this command | What happens next |
|---|---|---|---|---|
| Release builds (Windows 11 24H2) | “Choose your country” screen | Press Shift + F10 | OOBE\BYPASSNRO |
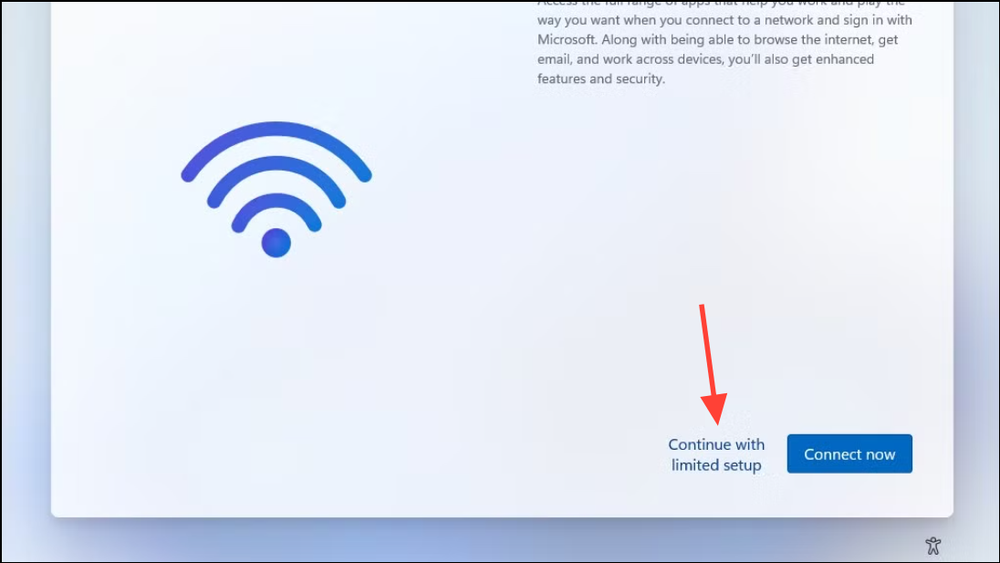
Setup restarts, adds an “I don’t have Internet” path; choose “Continue with limited setup,” then create a local user. |
| Newer builds (26100/26200 (25H2) and beyond) | Microsoft account Sign-in screen | Press Shift + F10 | start ms-cxh:localonly |
A “Create a user for this PC” dialog opens; enter a local username and optional password. |
Note: Microsoft periodically changes the out-of-box experience (OOBE), so wording can vary. The commands above remain the pivot point.
Install Windows 11 with a local account (current release method)
Use this on current release builds (24H2). You’ll briefly cut the network and trigger the local account path.
- Start Windows 11 setup and proceed to the “Choose your country” screen.
- Press Shift + F10 to open Command Prompt.
- After the automatic reboot, return to the network prompt.
- When prompted, select “I don’t have Internet,” then “Continue with limited setup.”
- At “Who’s going to use this device?”, enter a local username, then set an optional password.
Either disconnect Ethernet/Wi‑Fi physically, or press Shift + F10, then run:
ipconfig /releaseType the following and press Enter:
OOBE\BYPASSNROTip: Leaving the password blank creates a passwordless local account. That’s convenient but not recommended for devices that leave your home or office.
Install Windows 11 with a local account (25H2, newer builds 26100/26200+)
On newer builds, the previous bypass is removed. Use the new command that opens the local user dialog directly.
- Proceed through setup until you see the Microsoft account Sign-in screen.
- Press Shift + F10 to open Command Prompt.
- When “Create a user for this PC” appears, enter a local username and optional password, then continue setup.
Type the following and press Enter:
start ms-cxh:localonlyCreate a bootable USB that removes the online account requirement
If you’re doing a clean install on multiple machines, creating the installer with Rufus lets you pre-select options that remove the Microsoft account requirement and even prefill a local username.
- Download the Windows 11 ISO from Microsoft: Windows 11 download page.
- Use Rufus to write the ISO to a USB drive. When prompted, enable:
- Remove requirement for an online Microsoft account
- Create a local account with username (optional)
- Set regional options to the same values as this user (optional)
- Boot from the USB and start setup. At the “Choose your country” screen, ensure the PC is offline:
- Select “I don’t have Internet,” then “Continue with limited setup.”
- Enter your local username and optional password when prompted.
Press Shift + F10, then run:
ipconfig /releaseNote: Writing the installer will erase the USB drive. Back up any files on it first.
Create an additional local user after setup
If the PC is already set up with a Microsoft account, you can still add a local user from Settings.
- Open Start > Settings > Accounts > Family & other users.
- Select “Add account” under Other users.
- Choose “I don’t have this person’s sign-in information,” then “Add a user without a Microsoft account.”
- Enter a username and optional password.
In short. you can still set up Windows 11 without tying the device to a Microsoft account. Use OOBE\BYPASSNRO on current releases, switch to start ms-cxh:localonly on newer builds, or prep an installer that removes the online requirement entirely.