Every hero in TBH: Task Bar Hero is locked to a single role, and the fastest way to clear stages is to commit each character entirely to that role instead of spreading stats thin. Knight tanks, Priest sustains, Sorcerer and Hunter handle area damage, Ranger scales on attack speed, and Slayer ramps melee damage on kills. The builds below reflect the current v1.00.17 client.
Quick answer: Build Priest around Sanctuary plus Blessing of Might, Ranger around Swift Surge plus Skewer Shot, Sorcerer around Fireball plus Flame Hydra, Knight around Aegis Field plus Sacred Blade, Slayer around Crushing Blow plus Axe Spin, and Hunter around Explosive Shot plus Frost Shot. Match gear to each role and never split points across two roles.
Stat priorities by role
Crit Chance and Attack Speed have no hard cap in this engine, so damage dealers keep scaling into them, and crit can even pass 100%. Take flat Attack Damage early because percentage attack-speed bonuses stay weak until your base damage is high.
| Role | Prioritise | Notes |
|---|---|---|
| DPS | Attack Damage, Attack Speed, Crit Chance | Flat damage first at low levels; percentage attack speed pays off later. |
| Tank | Armor, HP, Damage Reduction | Add HP Regeneration to survive Act 3 and beyond. A small splash of Attack Damage is fine. |
| Support | Healing and buff power, some HP | The Priest’s heals and buffs scale the whole team, so keep her alive behind the tank. |
Best build for every class
The table below lists the recommended two skills, the passive order with level requirements and point investment, and the gear loadout for each hero. Each row also explains why the setup works.
| Class | Skills, passives and gear | Why it works |
|---|---|---|
| Priest Healer / Buffs |  Skills: Sanctuary (Lv 20, 5pts), Blessing of Might (Lv 1, 5pts) Passives: Health Enhancement (Lv 1, 5pts), Armor Enhancement (Lv 10, 10pts), Cooldown Reduction (Lv 30, 3pts), Skill Heal Enhancement (Lv 30, 2pts), Health Enhancement (Lv 40, 10pts), Cast Speed Enhancement (Lv 50, 10pts), All Elemental Resistance (Lv 60, 10pts), Cooldown Reduction (Lv 70, 10pts) Gear: Hero Scepter, War Tome, Crystal Helmet, Great Armor, Eternal Gloves, Plate Boots, Eclipse Amulet, Astral Earring, Amethyst Ring, Ethereal Bracer | Sanctuary heals the whole team continuously while Blessing of Might raises ally attack by 140%, covering sustain and damage in two slots. Cooldown Reduction and Cast Speed keep both skills active, so Priest can hold the front herself in the meta team. |
| Ranger Attack-speed DPS |  Skills: Swift Surge (Lv 30, 5pts), Skewer Shot (Lv 50, 5pts) Passives: Attack Speed Enhancement (Lv 1, 10pts), Critical Chance Enhancement (Lv 20, 10pts), Projectile Damage Enhancement (Lv 30, 5pts), Attack Speed Enhancement (Lv 40, 10pts), Dodge Chance Enhancement (Lv 50, 5pts), Life Leech Enhancement (Lv 60, 10pts), Projectile Damage Enhancement (Lv 70, 10pts) Gear: War Bow, Hunter’s Arrow, Red Helmet, Empire Armor, Empire Gloves, Rune Boots, Amber Pendant, Crystal Earring, Amethyst Ring, Ethereal Bracer | Swift Surge boosts attack speed by 140%, letting Ranger stack Skewer Shot’s lodged arrows and trigger Bleeding faster than any other setup. Life Leech and Dodge Chance keep her alive through long boss fights while she leans on attack-speed scaling. |
| Sorcerer AoE Mage |  Skills: Fireball (Lv 1, 5pts), Flame Hydra (Lv 30, 5pts) Passives: Cooldown Reduction (Lv 1, 5pts), Area of Effect Enhancement (Lv 20, 10pts), Fire Damage Enhancement (Lv 30, 5pts), Lightning Damage Enhancement (Lv 40, 5pts), Health Enhancement (Lv 40, 5pts), Cooldown Reduction (Lv 50, 10pts), Cast Speed Enhancement (Lv 60, 10pts), Area of Effect Enhancement (Lv 70, 10pts) Gear: Void Staff, Prophecy Orb, Chain Helmet, Empire Armor, Shadow Gloves, Rune Boots, Bronze Amulet, Copper Earring, Ethereal Ring, Abyss Bracer | Fireball deals strong area damage and Flame Hydra keeps attacking without extra input, giving steady clear speed across waves. Both skills are fire, so heavy Fire Damage Enhancement is more efficient than splitting points across damage types. Keep her behind a tank since her health is low. |
| Knight Tank | 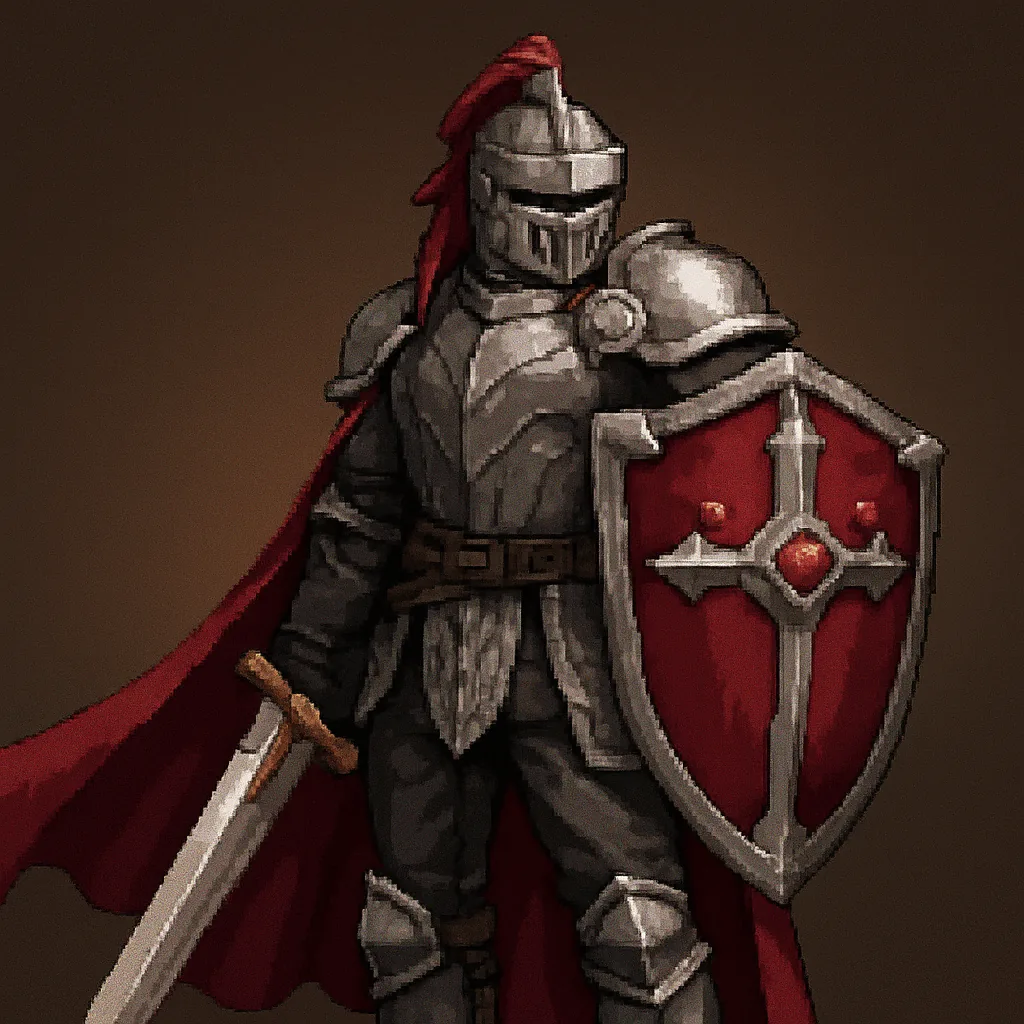 Skills: Aegis Field (Lv 20, 5pts), Sacred Blade (Lv 30, 5pts) Passives: Health Enhancement (Lv 1, 8pts), Armor Enhancement (Lv 10, 8pts), HP Regen Enhancement (Lv 10, 5pts), HP Per Kill Enhancement (Lv 20, 10pts), Health Enhancement (Lv 30, 10pts), HP Regen Enhancement (Lv 40, 10pts), HP Per Kill Enhancement (Lv 50, 10pts), All Elemental Resistance (Lv 60, 10pts), Damage Reduction Enhancement (Lv 70, 10pts) Gear: Fate Sword, Radiant Shield, Fighter’s Helmet, Shine Armor, Shine Gloves, Shine Boots, Eclipse Bracer, Ethereal Amulet, Ethereal Earring, Ethereal Ring | Aegis Field shields the entire team for 110 damage regardless of formation, making Knight a team-wide tank rather than a self-only one. Sacred Blade adds attack while healing 2 HP per kill, so he stays alive as a long-term tank instead of running a stat-light pure-tank line. |
| Slayer Melee Bruiser | 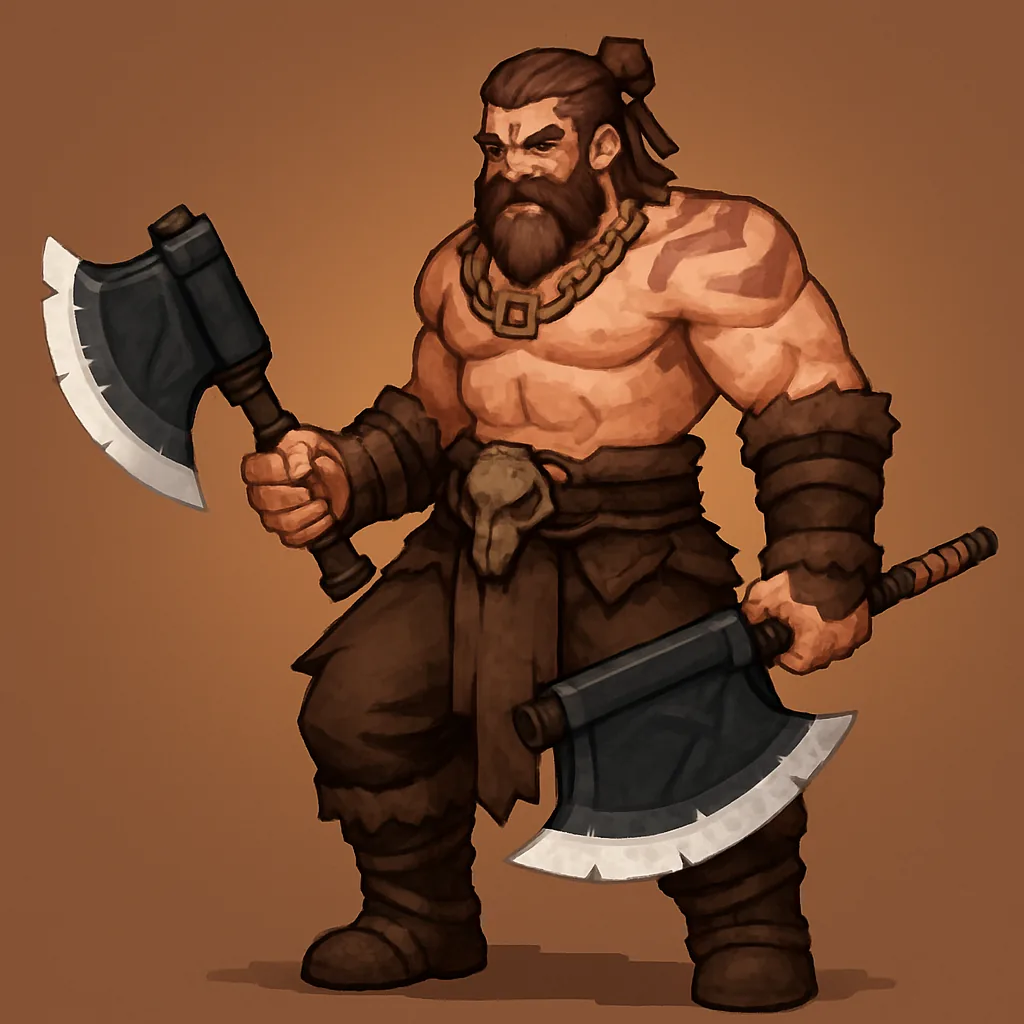 Skills: Crushing Blow (Lv 0, 5pts), Axe Spin (Lv 30, 5pts) Passives: Attack Damage Enhancement (Lv 1, 5pts), Health Enhancement (Lv 1, 5pts), Area of Effect Enhancement (Lv 10, 8pts), HP Per Kill Enhancement (Lv 10, 8pts), Physical Damage Enhancement (Lv 20, 10pts), Attack Damage Enhancement (Lv 30, 10pts), Physical Damage Enhancement (Lv 40, 10pts), Area of Effect Enhancement (Lv 50, 10pts), Health Enhancement (Lv 60, 10pts), AoE Damage Enhancement (Lv 70, 10pts) Gear: Limitless Axe, Dimensional Hatchet, Dimensional Helmet, Dimensional Armor, Shine Gloves, Dimensional Boots, Eclipse Amulet, Ethereal Earring, Eclipse Ring, Ethereal Bracer | Axe Spin hits all nearby enemies with a chance to apply Bleed, which stacks bonus damage from every other source striking that target, useful against bosses and packs. Crushing Blow adds a heavy single hit that triggers shockwave damage on kill, paying off the Physical and AoE investment. He is not tanky, so pair him with Knight or Priest. |
| Hunter Elemental DPS |  Skills: Explosive Shot (Lv 0, 5pts), Frost Shot (Lv 0, 5pts) Passives: Attack Damage Enhancement (Lv 0, 5pts), Critical Damage Enhancement (Lv 10, 8pts), Fire Damage Enhancement (Lv 20, 10pts), Cold Damage Enhancement (Lv 20, 10pts), Physical Damage Enhancement (Lv 40, 10pts), Attack Damage Enhancement (Lv 50, 10pts), Attack Speed Enhancement (Lv 70, 10pts), HP Per Hit Enhancement (Lv 70, 10pts) Gear: Dimensional Crossbow, Haste Bolt, Dimensional Helmet, Dimensional Armor, Shine Gloves, Dimensional Boots, Eclipse Amulet, Ethereal Earring, Eclipse Ring, Ethereal Bracer | Frost Shot deals 255% area damage and freezes everything it hits, disabling packs while Explosive Shot detonates for a large burst. Fire and Cold investment buffs both abilities, and crit pushes burst higher. Her HP is low, so keep her behind a tank and a healer. |
Which classes are free and which are paid
Knight, Sorcerer, and Ranger are free base classes, and Priest is free DLC that becomes useful almost immediately for its team-wide heals and buffs. Hunter and Slayer are paid DLC. The Hunter class sells for $4.99 on its own, with a Class Bundle that adds Slayer and a Full Package Bundle that adds extra packs and the soundtrack.
| Class | Role | Access |
|---|---|---|
| Knight | Tank | Free base class |
| Sorcerer | AoE Mage | Free base class |
| Ranger | Attack-speed DPS | Free base class |
| Priest | Healer / Buffs | Free DLC |
| Hunter | Elemental DPS | Paid DLC |
| Slayer | Melee Bruiser | Paid DLC |
You can grab the free base game and try the free classes first before deciding on any paid unlocks.
How to apply a build and confirm a DLC class
Note: Locked base classes can also be unlocked from the Formation tab for a small amount of in-game currency, around 500 coins.
Best teams to slot these builds into
A finished build is only half the job, since the trio you field decides how the builds combine. The strongest overall team is Knight, Hunter, and Priest, with the Knight holding the line, the Hunter freezing and shredding packs, and the Priest keeping both alive while buffing damage. The best fully free team swaps the paid Hunter for the Sorcerer, giving you Knight, Sorcerer, and Priest with no purchases needed.
Gear ties everything together through the Hero-dric Cube, which unlocks at level 4. Use Synthesis with nine same-rarity items to push rarity, switch the cube to Alchemy to turn junk gear into gold, and socket stat materials into Blue or better gear that matches each hero’s role. Put attack speed on the Ranger, spell power on the Sorcerer, and armor on the Knight, and your builds will carry through Act 3 and beyond.