The Rogue in SpiritVale rewards fast attacks, constant movement, and stacking poison rather than standing still and trading blows. The strongest current leveling setup builds around Venom Strike, feeds it with dual Bonefangs, and leans on the Venom Bloom Grimoire to spread that poison across whole packs of enemies. Done right, you can kite a crowd, apply poison to everything at once, and clear maps like Goblin Cave without taking much damage.
Quick answer: Wield two Bonefangs, stack AGI, Attack Speed, and Multistrike, run Venom Strike with the Venom Bloom Grimoire, and pair the Silent Death Rune with the Bloodbind artifacts for poison damage plus HP and MP sustain.
Weapons: Dual Bonefangs and card slots
Two Bonefang daggers form the backbone of the build. Running them in a Dual Wield stance keeps your attack rate high, which matters because every hit is a chance to apply and refresh poison. Focus the weapon substats on Attack Speed, Multistrike, and AGI so your basic swings and Venom Strike fire off as quickly as possible.
The Bonefang carries useful modifiers for this playstyle, including extra Multistrike, additional Venom Strike hits, and extra Venom Strike chains. Slot a Snakelet Card to raise Venom Strike damage by 10%. An Archangel Card is another solid choice for the second slot depending on what you have available.
Attributes and stat priorities
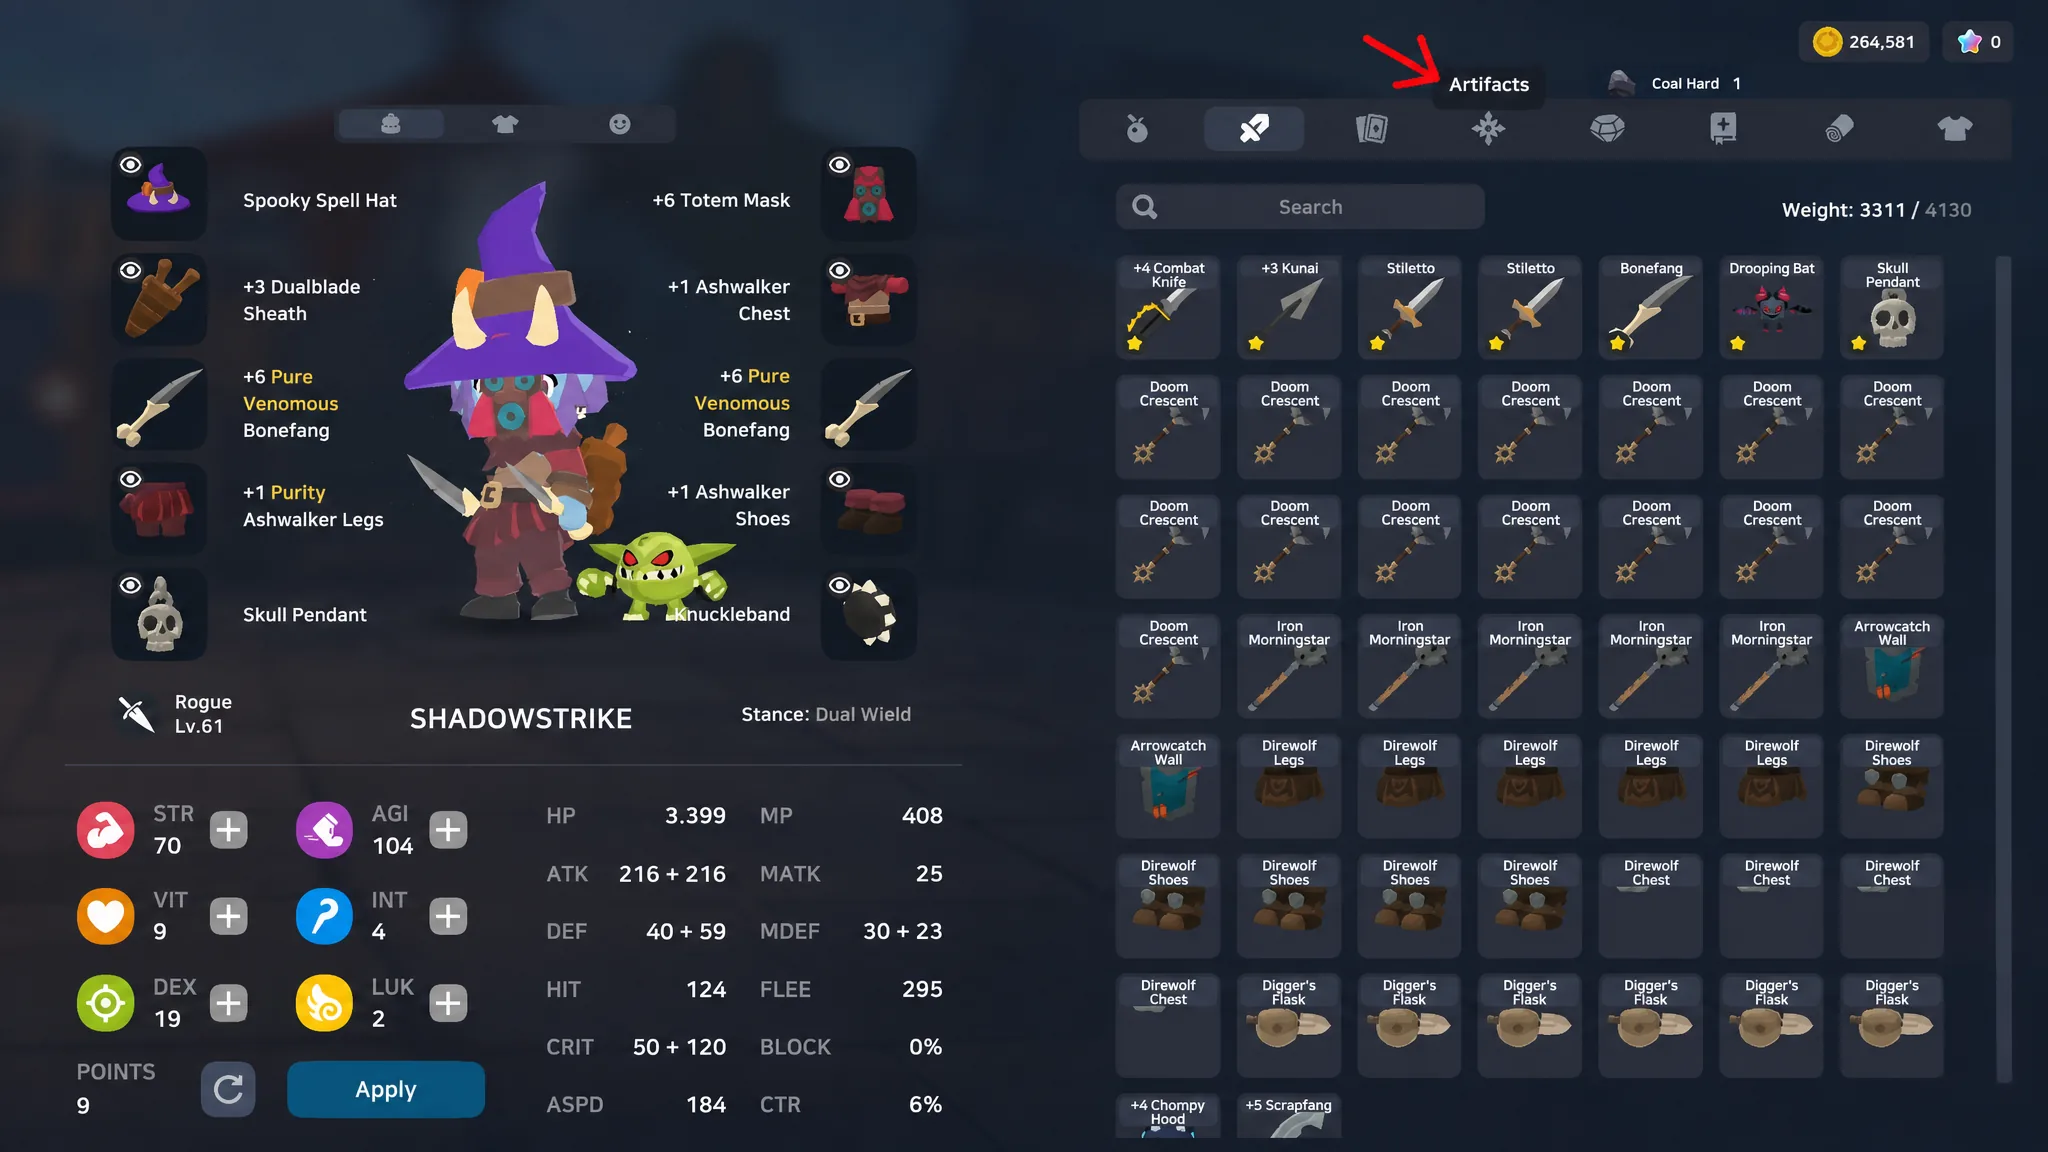
This is a speed-first build, so AGI is your main attribute. High AGI drives Attack Speed and Flee, letting you hit fast while dodging most incoming damage as you kite. A working reference sheet for this style sits around AGI 104, with a smaller amount of STR for raw damage and just enough INT for mana.
| Attribute | Role | Priority |
|---|---|---|
| AGI | Attack Speed, Flee, mobility | Highest |
| Multistrike | Extra hits per attack, more poison uptime | High |
| Attack Speed | Faster Venom Strike casts | High |
| STR | Physical damage | Moderate |
| CRIT | Reliable hits and damage spikes | Moderate |
| INT / VIT | Mana and survivability | As needed |
Note: Attack Speed has a practical cap tied to AGI and gear. Once you reach a comfortable ASPD, extra points do more work in damage, crit, or survivability stats instead of pushing speed further.
Armor and gear for mobility and sustain
The Ashwalker pieces anchor the defensive side of the build. Together they hand you mobility, Attack Speed, HP siphon, and defense, so you stay both fast and durable while grinding. The Siphon HP in particular lets you keep swinging through longer fights without stepping out.
| Slot | Item | What it gives |
|---|---|---|
| Headgear | Dropping Bat | Defense; slot a Snake Card for Level 2 Venom Strike and a 10% chance to auto-cast Venom Strike on attack |
| Face | Totem Mask | +5% double attack per refine, plus defense |
| Chest | Ashwalker Chest | Attack Speed, Siphon HP, defense |
| Legwear | Ashwalker Legs | HP regen, MP regen, defense, Flee, crit |
| Shoes | Ashwalker Shoes | Mobility and Attack Speed |
| Accessory | Skull Pendant | General stat support |
The Dropping Bat headgear is worth calling out. With a Snake Card slotted it upgrades Venom Strike to Level 2 and adds a 10% chance to auto-cast Venom Strike whenever you attack, which quietly adds damage during chaotic pulls.
Artifacts: Silent Death Rune and Bloodbind
The artifact loadout does two jobs. The Silent Death Rune raises Venom Strike damage, so it stays in the setup as your primary offensive artifact. The Bloodbind pieces cover sustain, restoring health and mana on kill, which keeps you topped up as you chain through packs. A Blitzcore Jewel rounds out the set well.
Venom Bloom Grimoire: the core of the build
The single most important piece to chase is the Venom Bloom Grimoire. It turns Venom Strike from a single-target poke into an area tool by auto-casting Venom Bloom when you cast Venom Strike, and again on kill against any target that already has Poison. That is what makes leveling smooth, because poison spreads across a whole pack instead of one enemy at a time.
Venom Bloom is a melee effect dealing 100% ATK across an area of 3, costing 3 mana plus 1 per level, and it applies Poison. Grab this Grimoire as early as you can, because the rest of the build is designed around it.
Skill tree allocation
Prioritize the skills that raise melee damage, keep poison up, and support the fast hit-and-run rhythm. Blade Mastery lifts your overall melee output, while Lightning Reflexes and Haste push movement and attack speed to match the Rogue’s pace. Smoke Screen grants nearby allies the Cloak effect, which is handy in a group.
| Skill | Points | Purpose |
|---|---|---|
| Blade Mastery | 10/10 | Overall melee damage |
| Multistrike | 5/5 | Extra hits, more poison |
| Venom Strike | 5/5 | Core poison attack |
| Venom Coating | 5/5 | Supports poison uptime |
| Lightning Reflexes | 5/5 | Speed and evasion |
| Dual Wield Mastery | 5/5 | Enables the dual-dagger stance |
| Haste | 5/5 | Movement and AGI |
| Smoke Screen | 4-5/5 | Cloak for nearby allies |
Also pick up Shadow Step, Cloaking, Blade Dance, Enchant Poison, and Cure as your points allow. Bind Venom Strike to a mouse button so you can kite with WASD and keep firing it while you reposition. Keep the rest of your active skills on number keys for quick access.
How to play it and confirm it works
The rotation is simple once the pieces are in place. Gather a group, keep moving, and spam Venom Strike so Venom Bloom spreads poison to everything nearby. Watching green damage numbers tick across the whole pack, rather than a single enemy, tells you Venom Bloom is firing correctly. If poison is only landing on one target, you are missing the Venom Bloom Grimoire, which is the usual reason the build feels weak.
One thing to watch on farm runs is inventory weight. An Overweight warning slows you down and breaks the kiting loop, which is a fast way to die in the middle of a crowd. Clear your bags between pulls, keep Haste and your speed buffs active, and lean on the Ashwalker Siphon HP plus Bloodbind sustain to stay in the fight. If your stat or skill choices aren’t landing, you can rebuild at the Waybinder NPC near the Waypoint in Nevaris.