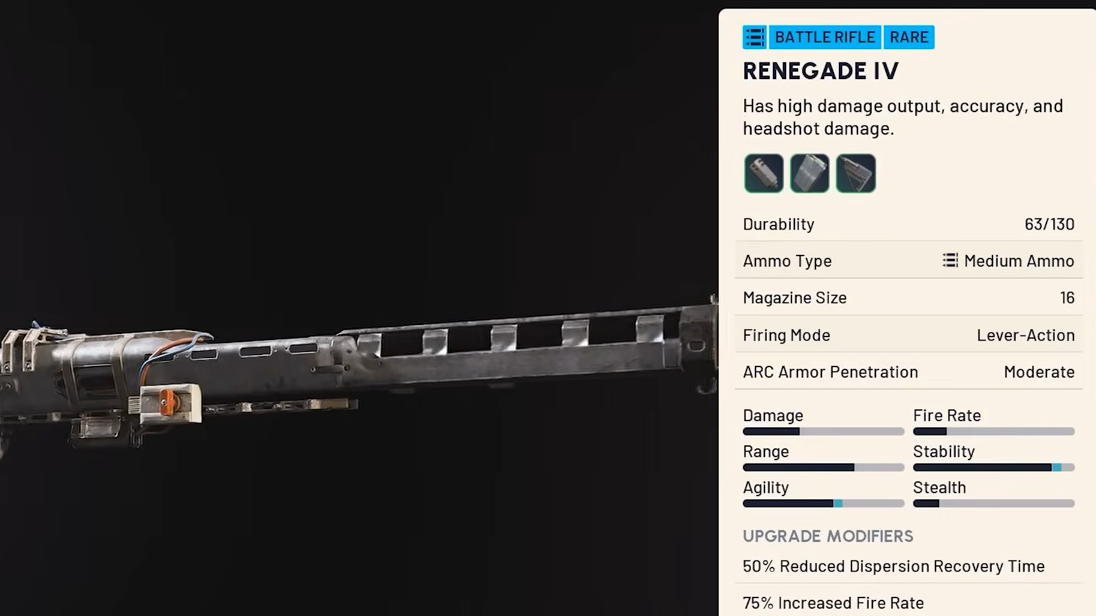
The Renegade sits near the top of the semi-auto rifle pool in ARC Raiders thanks to a high fire rate and heavy per-shot damage. The catch is that its accuracy lives and dies by how fast its reticle resets between shots, which puts most of the loadout decisions on the stock and muzzle slots. The right combination turns it into a reliable mid-to-long-range weapon; the wrong one leaves shots drifting off target even when aim is clean.

Why stock choice drives the build
The Renegade’s biggest weakness is dispersion recovery, or how long the crosshair takes to tighten back up after each shot. Because it fires fast for a semi-auto, pulling the trigger before the reticle resets causes shots to drift wide, even when the aim point is perfect. Stocks are the only slot that directly shortens that window.
Stable Stock II cuts recoil and dispersion recovery time by 35% with no downsides to equip speed, which is why it shows up in nearly every budget Renegade loadout. Stable Stock III pushes that to 50%, but adds 20% increased equip and unequip time, which matters if the Renegade is a backup weapon you need to pull out in a hurry.
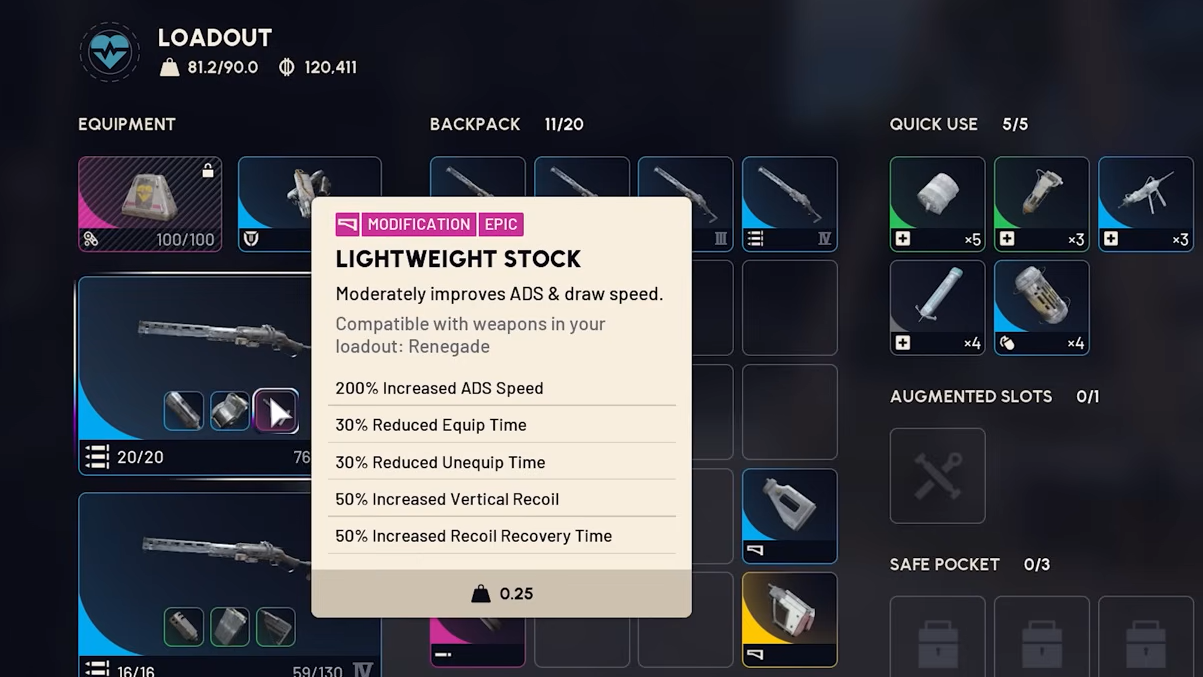
Lightweight Stock is the other popular pick. It boosts ADS speed by 200% and cuts swap time by 30%, at the cost of 50% increased vertical recoil and 50% increased recoil recovery time. Players who time their shots carefully can still land hits with it, but the weapon punishes spamming.
Padded Stock reduces vertical and horizontal recoil by 15% and per-shot dispersion by 20%, but it slows ADS speed by 30% and adds equip time penalties. It works on Renegades used at close-to-mid range where you tend to stay shouldered.
Muzzle: Compensator over Muzzle Brake
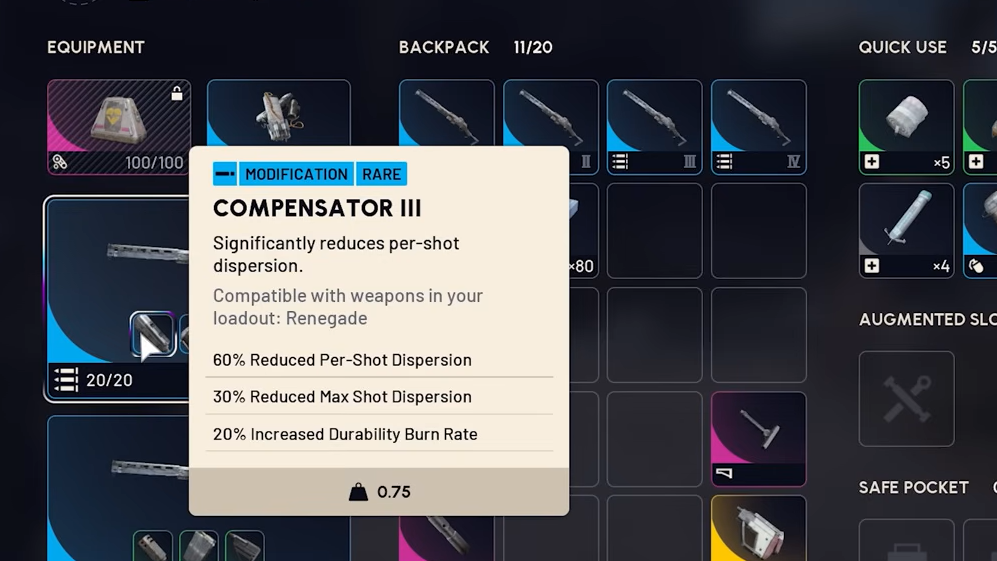
Dispersion can only be reduced by compensators; grips and brakes handle recoil. Because the Renegade’s main problem is per-shot spread rather than violent kick, the Compensator line almost always wins out.
Compensator II delivers a 40% reduction to both per-shot and max-shot dispersion with no durability penalty, which makes it the most cost-effective option. Compensator III increases per-shot dispersion reduction to 50% but adds a 20% increased durability burn rate, meaning more frequent repair trips. Muzzle Brake II or III works if you already have stockpiles of brakes and want tighter recoil control, though the brake’s main benefit overlaps with what grips already provide.
A silencer is a viable alternative for stealth-focused raids, though the muffling effect fades in extended engagements once opponents pinpoint your position from visual cues.
Magazine and barrel considerations
The Renegade uses medium mags. Extended Medium Mag II adds 8 rounds, and Mag III adds 12. Magazines carry no downsides at any tier, so running the highest available mag is always correct if you can afford it. Some players skip extended mags entirely on the theory that a Renegade fight extending past its base magazine usually means a third party is incoming, but the default position is to equip the best mag you own.
Extended Barrel increases bullet velocity by 25% at the cost of 15% increased vertical recoil. On long-range Renegade play it reduces the need to lead moving targets, which matters for hitting runners at 40+ meters. At close to medium range, the tradeoff is less valuable, and the extra vertical kick pairs poorly with a Lightweight Stock.
Full builds by budget
| Build | Muzzle | Mag | Stock |
|---|---|---|---|
| Budget primary | Compensator II | Extended Medium Mag II | Stable Stock II |
| Endgame primary | Compensator III | Extended Medium Mag III | Stable Stock III |
| Secondary / quick-swap | Compensator II | Extended Medium Mag II | Lightweight Stock |
| Close-mid range | Muzzle Brake II | Extended Medium Mag II | Padded Stock |
| Long range | Extended Barrel | Extended Medium Mag III | Stable Stock III |
The budget primary build is the easiest to maintain. Stable Stock II costs mechanical components rather than mod components, and Compensator II does not burn durability faster, so repair trips stay manageable. The endgame version trades resources for the tightest possible reticle reset.
Upgrade level matters more than attachments
The Renegade gains significant stat improvements as it levels up to IV, including reduced recoil and dispersion. A Renegade IV with green attachments often outperforms a Renegade II stacked with purple mods. Prioritize upgrading the weapon itself before investing rare crafting materials into Compensator III or Stable Stock III.
Attachments can be removed and swapped without cost, so there is no risk in trying different stock configurations across raids to find which one fits your playstyle. If you miss shots because the crosshair has not reset, move toward Stable Stock III. If you survive fights by repositioning and need faster weapon swaps, Lightweight Stock is the better fit.
Verifying the build works
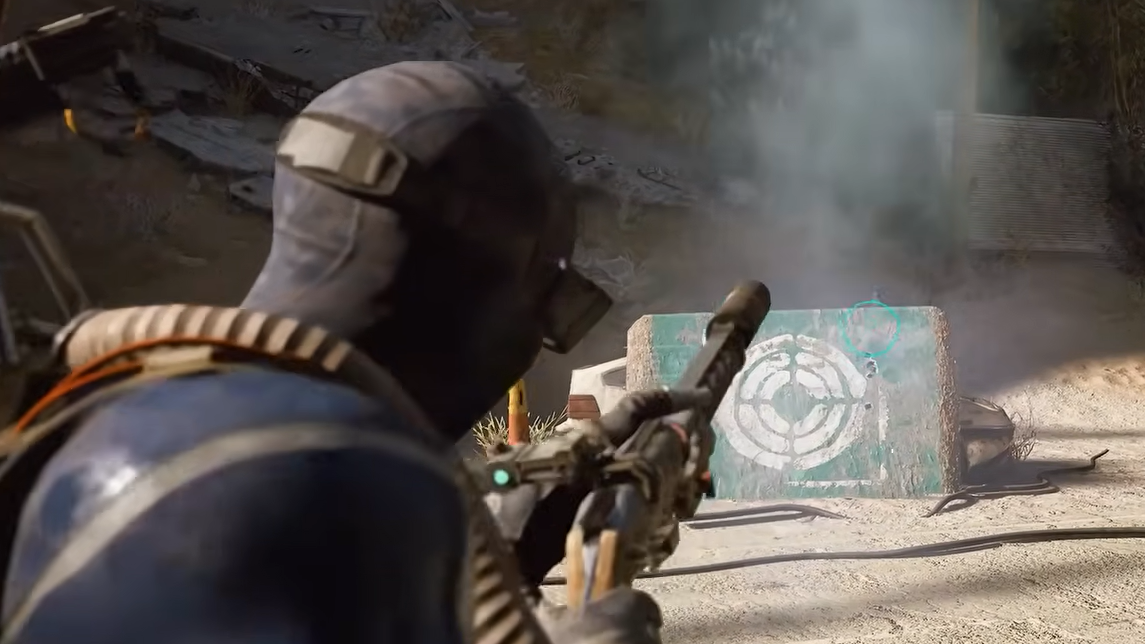
Two quick checks confirm the loadout is doing its job. First, fire three shots at a stationary target around 30 meters away at a deliberate cadence; with a Stable Stock and Compensator, the reticle should visibly shrink between each shot. Second, compare time-to-kill against a mid-tier ARC; if the gun feels like it is pulling upward with every trigger press, swap to a Compensator or add an Angled Grip equivalent through a Padded Stock.
Running low on Mod Components is the most common reason players stay on Stable Stock II rather than III. That tradeoff is fine; the gun still performs at a high level, and the saved materials go further toward repairs and the next weapon upgrade tier.