College Football 27 is now on PC alongside the PlayStation 5 and Xbox Series X|S versions, and the PC build hands you a full menu of display, advanced, and per-scene graphics controls instead of a locked Performance or Fidelity toggle. That flexibility is the whole point, but cranking everything to Ultra is the fastest way to give up frames. The setup below prioritizes a steady 60 FPS during snaps and routes so on-field action stays responsive, with visual extras dialed back where they cost the most.
Quick answer: Cap the frame rate at 60 FPS, turn VSync and Raytraced Lighting off, drop Crowd Quality, Sideline Quality, and 3D Grass to their lowest, hold Mesh, Shadow, VFX, and Lighting at Medium, and turn off Bloom, Lens Flares, and High Res Circular DOF. This holds a stable 60 FPS on a system near the recommended requirements.
Display settings for stable frame pacing
Start in the display menu. These controls decide how the game outputs to your monitor and set the ceiling everything else works under. The full breakdown of each option lives in the official PC Deep Dive, but the values below are what you want for consistency over raw sharpness.
| Setting | Value |
|---|---|
| Window Mode | Personal preference (Fullscreen for focus, Borderless for streaming) |
| Resolution | Your monitor’s native resolution |
| Monitor Refresh Rate | Auto |
| Frame Rate Cap | 60 FPS |
| Global Visuals | Custom |
| Cutscene Visuals | Auto |
The game does offer an Auto (60/30) cap and higher targets, and Auto can push gameplay toward 120 FPS. A flat 60 FPS cap trades that headroom for fewer dips, which matters more when you’re reading coverage than a higher number on the overlay. Once you change any individual slider, Global Visuals will flip to Custom on its own. That label just means your settings no longer match a preset, and nothing is broken.
Advanced settings that recover the most FPS
The advanced menu is where the biggest frame rate savings live. Raytraced Lighting is the single heaviest option here, so turning it off drops the game to a simpler lighting model and gives back meaningful performance on a mid-tier GPU. Sideline density and strand-based hair are two more background costs you won’t notice during live play.
| Setting | Value |
|---|---|
| VSync | Off |
| HDR | Auto |
| Performance Overlay | On |
| Raytraced Lighting | Off |
| Lighting Quality | Medium |
| Advanced Hair | Low |
| Sideline Quality | Low |
| Higher Texture Quality | Off |
Keep VSync off unless you actually see screen tearing or hit stutters, since leaving it off cuts input latency. If lag shows up, turning VSync on is the first thing to try. Leave the Performance Overlay on while you tune, because that frame counter is how you confirm each change is doing what you expect. On a gaming laptop, check the Graphics Adapter option too, since the default may point at integrated graphics instead of your dedicated card.
Gameplay visual settings for on-field play
These options appear twice, once for gameplay and once for cutscenes. The gameplay column is where a smooth 60 FPS is won or lost, so lean on the values below during active play. Crowd Quality and 3D Grass are the two heaviest draws while the ball is live, which is why both sit at the bottom of the list.
| Setting | Gameplay value |
|---|---|
| Mesh Quality | Medium |
| Crowd Quality | Low |
| Shadow Quality | Medium |
| 3D Grass | Off |
| VFX Quality | Medium |
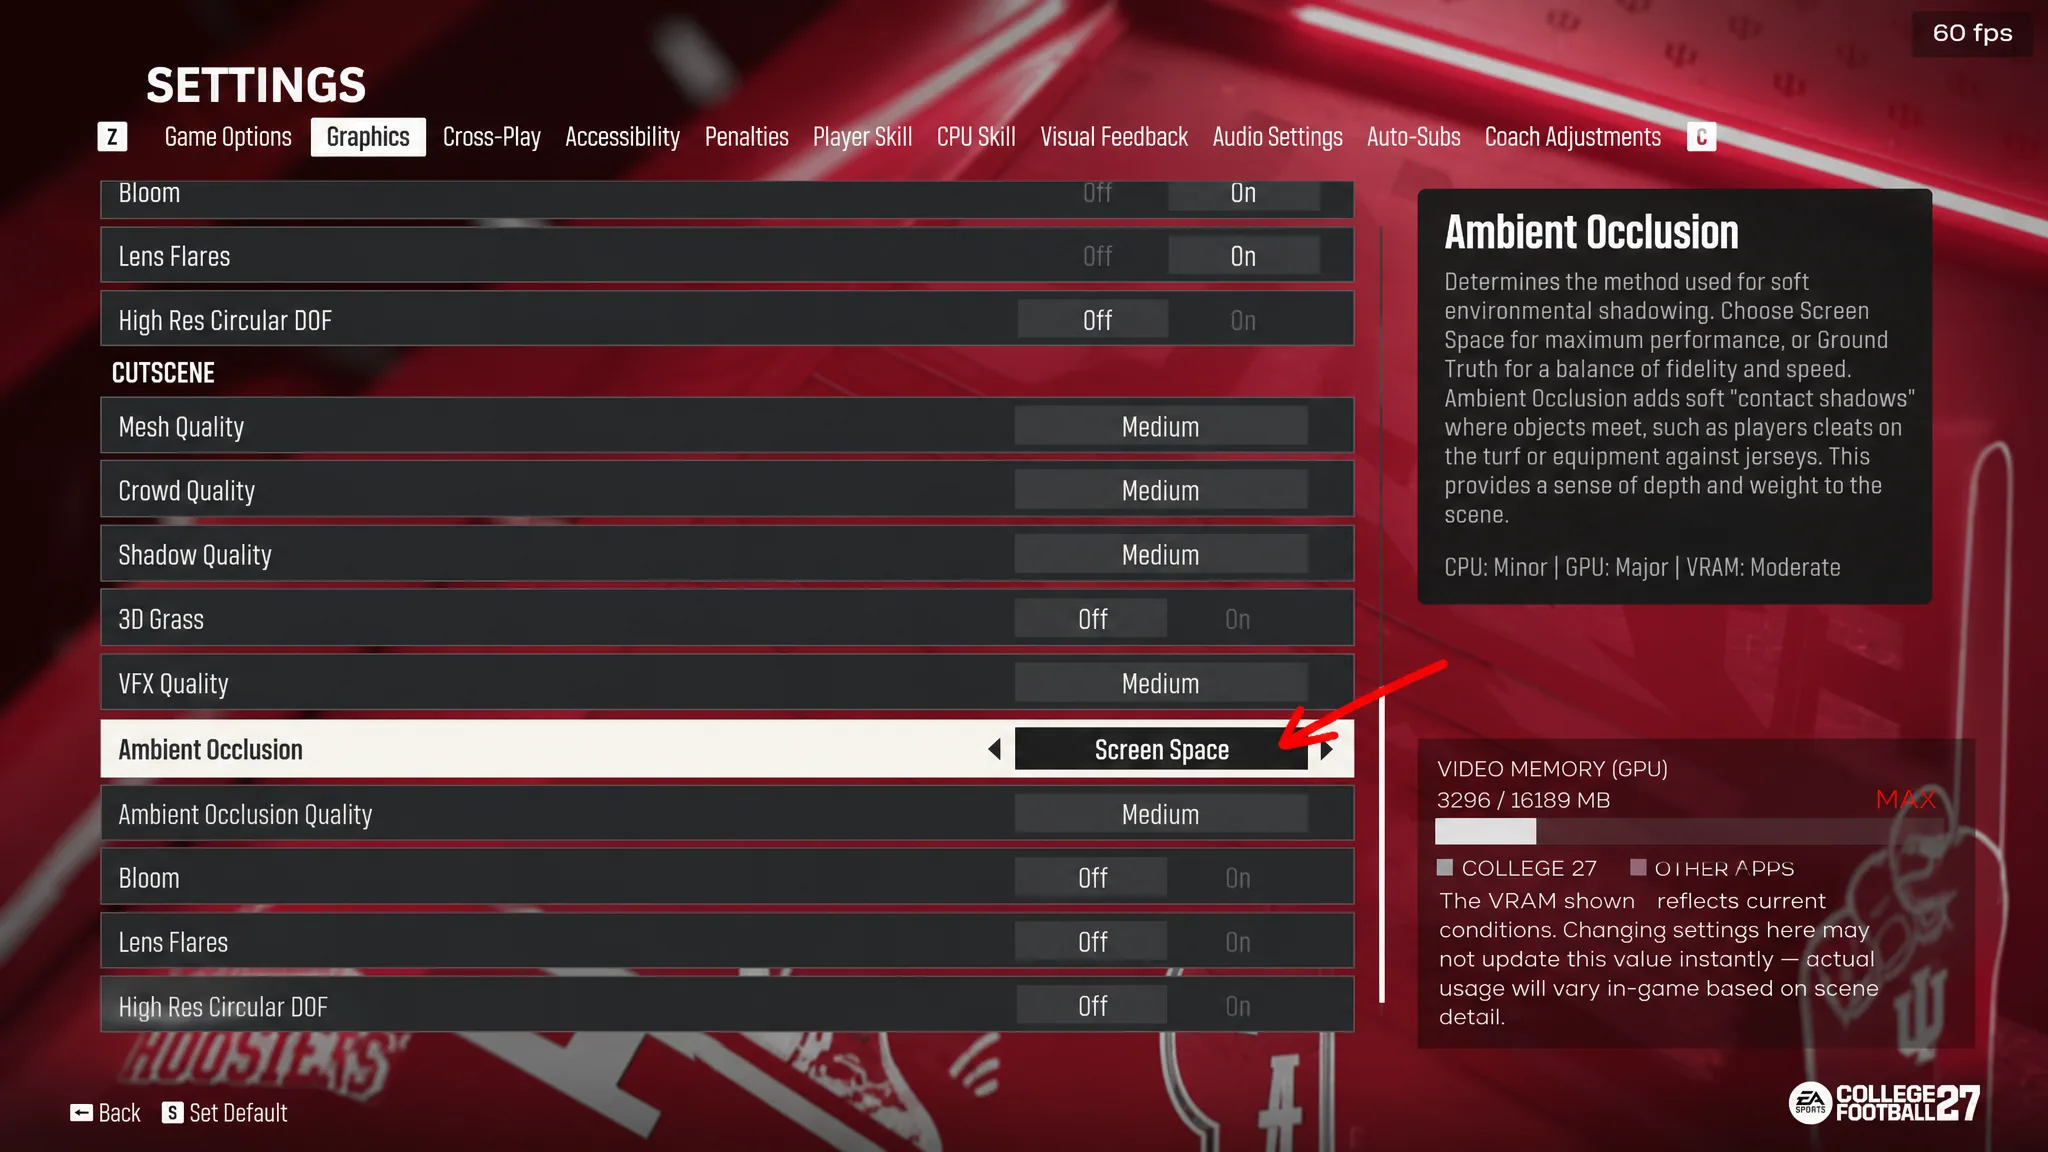
| Ambient Occlusion | Screen Space (SSAO) |
| Ambient Occlusion Quality | Medium |
| Bloom | Off |
| Lens Flares | Off |
| High Res Circular DOF | Off |
Screen Space ambient occlusion (SSAO) is the lighter of the two AO methods and stays clean during full-speed play, so there’s no reason to switch to the heavier GTAO mode for gameplay. Bloom, Lens Flares, and High Res Circular DOF are presentation effects you barely register mid-snap, so turning them off is a free win here.
Set cutscene visuals to Low
The cutscene column controls replays, team entrances, and other non-interactive moments. Because those scenes don’t affect how you play, set the same list to Low. You’re watching, not reacting, so there’s nothing to gain from spending frames on them, and keeping them lean helps overall stability. If your card has room to spare, this is the only place you’d bump effects like High Res Circular DOF or Bloom back up, since GPU headroom opens during those breaks.
Confirm the settings are working
Load into a Play Now match with the Performance Overlay on and watch the frame counter through a full drive. A working setup holds at or near 60 FPS during snaps, routes, and tackles without visible stutter. If the number sags during heavy moments, step down Crowd Quality and 3D Grass first, then Sideline Quality, since those are the largest live-play costs. If you see tearing instead of frame drops, switch VSync on. This tuning targets a system around the recommended tier, so a card near the minimum spec may need Mesh, Shadow, and VFX Quality moved to Low as well.
Performance should stay steady with these values, and EA is likely to ship patches that smooth things further over time. Treat this as a strong baseline, then adjust one slider at a time with the overlay visible so you always know exactly what each change costs or saves.