
Unwanted autocorrect and spellcheck features in Windows 11 can disrupt typing accuracy, especially when working in multiple languages or entering specialized terms. Disabling these features restores manual control over your input and prevents automatic changes that may lead to confusion or lost productivity. Below are several methods to turn off autocorrect and spell check in Windows 11, with each approach explained in detail.
Turn Off Auto Correct and Spell Check Using Windows Settings
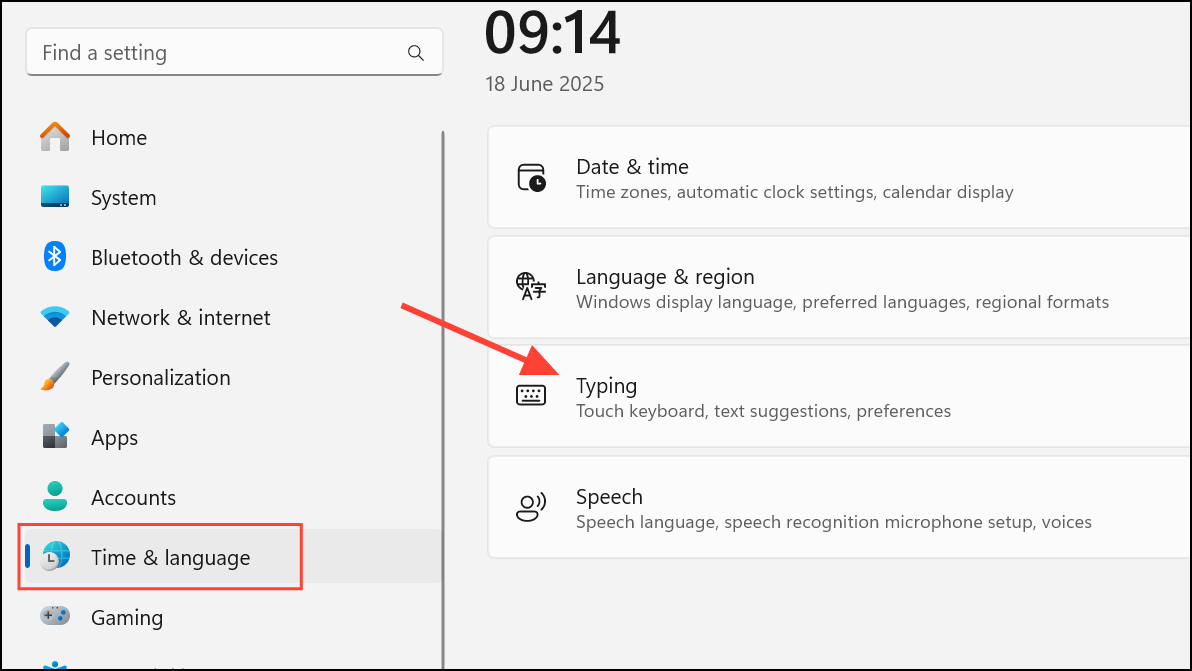
Step 1: Open the Windows Settings app. You can do this by clicking the Start menu and selecting Settings, or by pressing Windows + I on your keyboard.
Step 2: In the Settings window, select Time & language from the sidebar. Then, click on Typing in the main pane.
Step 3: Under the Typing section, locate the options labeled Autocorrect misspelled words and Highlight misspelled words. Toggle both switches to the Off position. This disables both the automatic correction of typos and the red underline for spelling mistakes across most Windows 11 apps.
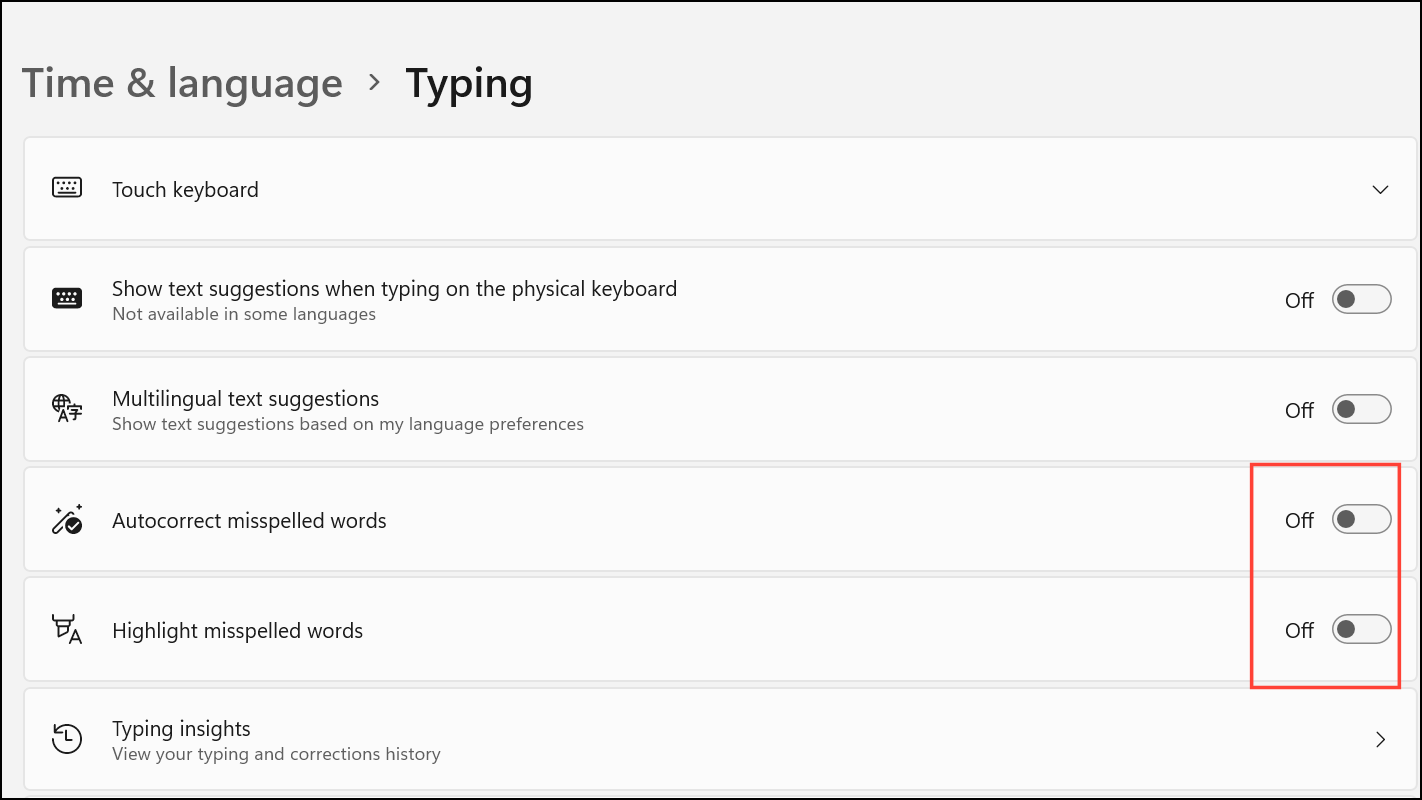
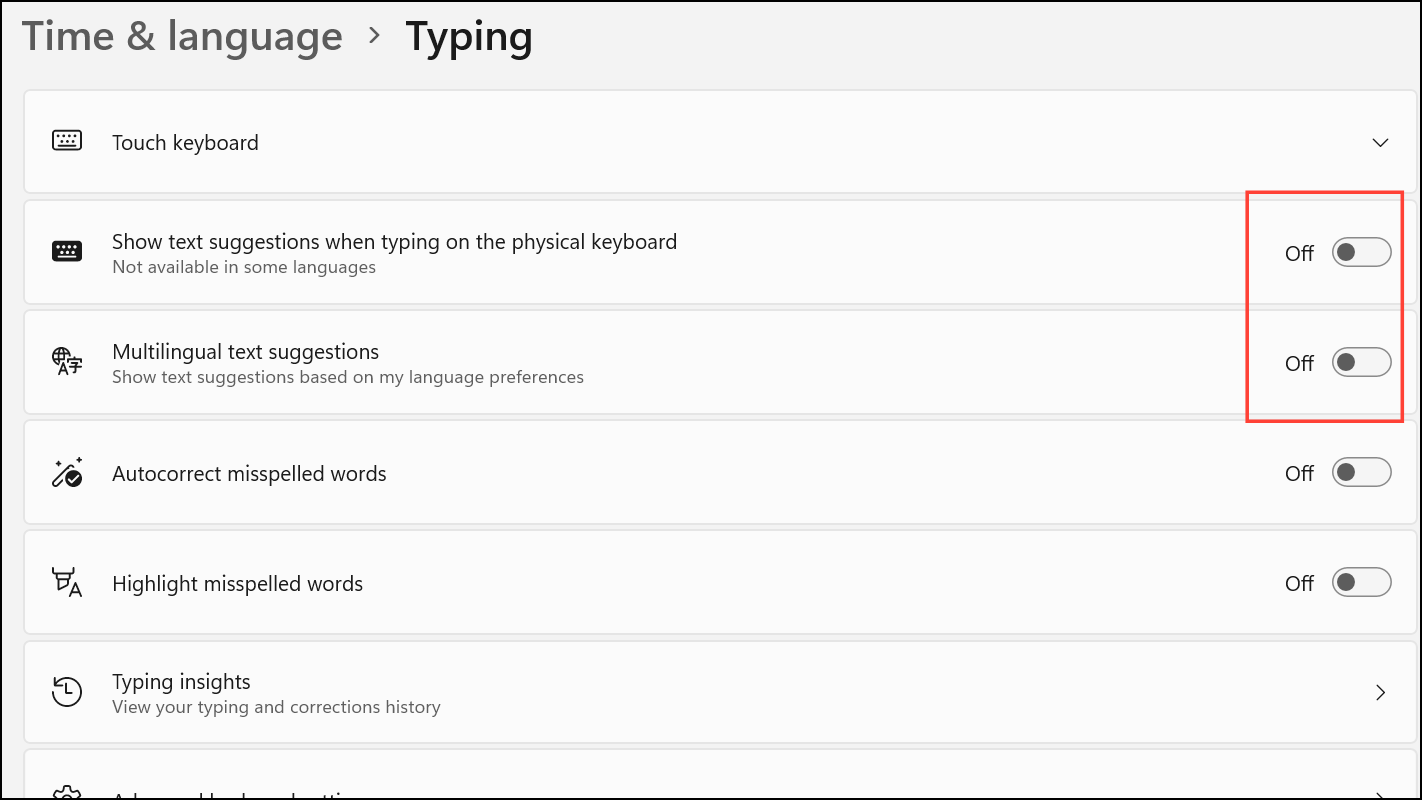
Step 4: If you also want to stop word suggestions as you type, turn off Show text suggestions when typing on the physical keyboard and Multilingual text suggestions if available.
Disabling these settings ensures that Windows will no longer automatically correct or highlight spelling errors in most text fields and applications that use the system typing framework.
Disable Auto Correct and Spell Check via Group Policy Editor
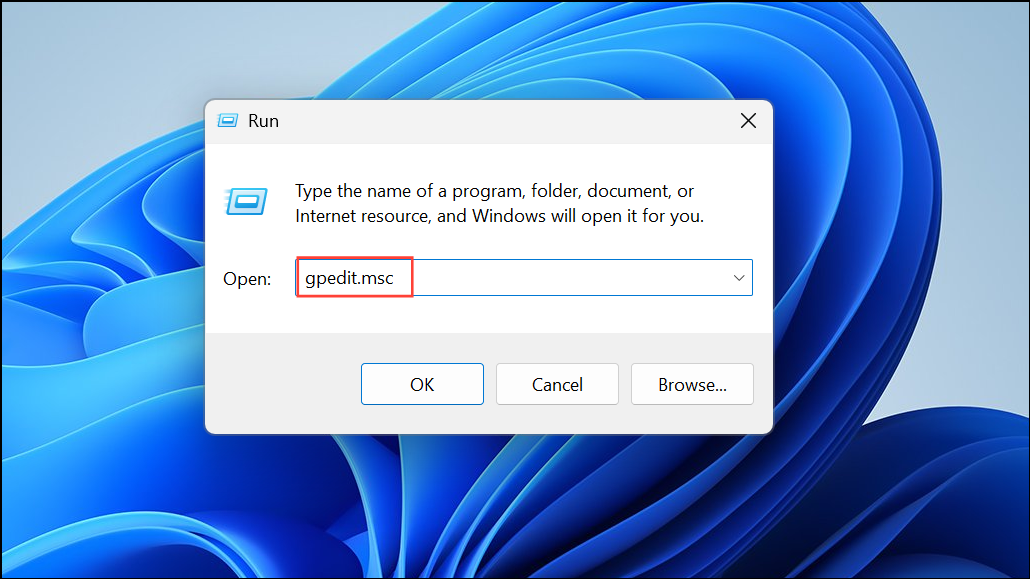
Step 1: Open the Group Policy Editor by pressing Windows + R to open the Run dialog, then typing gpedit.msc and pressing Enter.
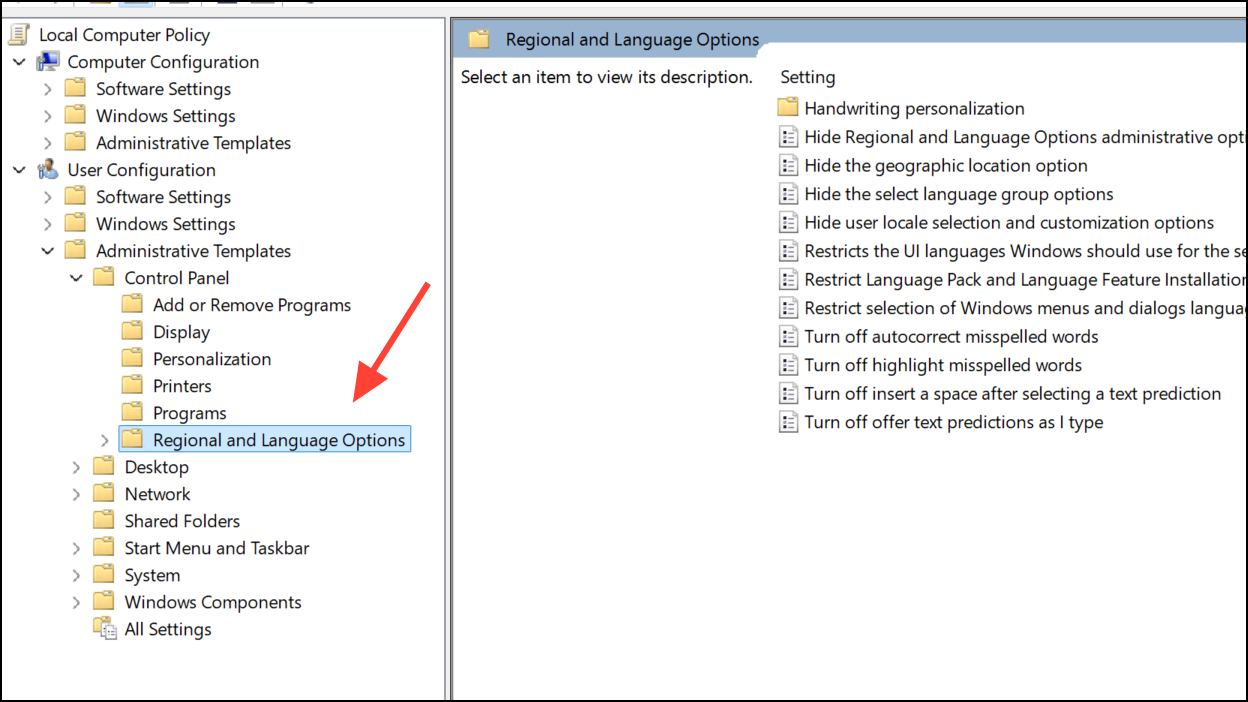
Step 2: In the Group Policy Editor, navigate to User Configuration > Administrative Templates > Control Panel > Regional and Language Options.
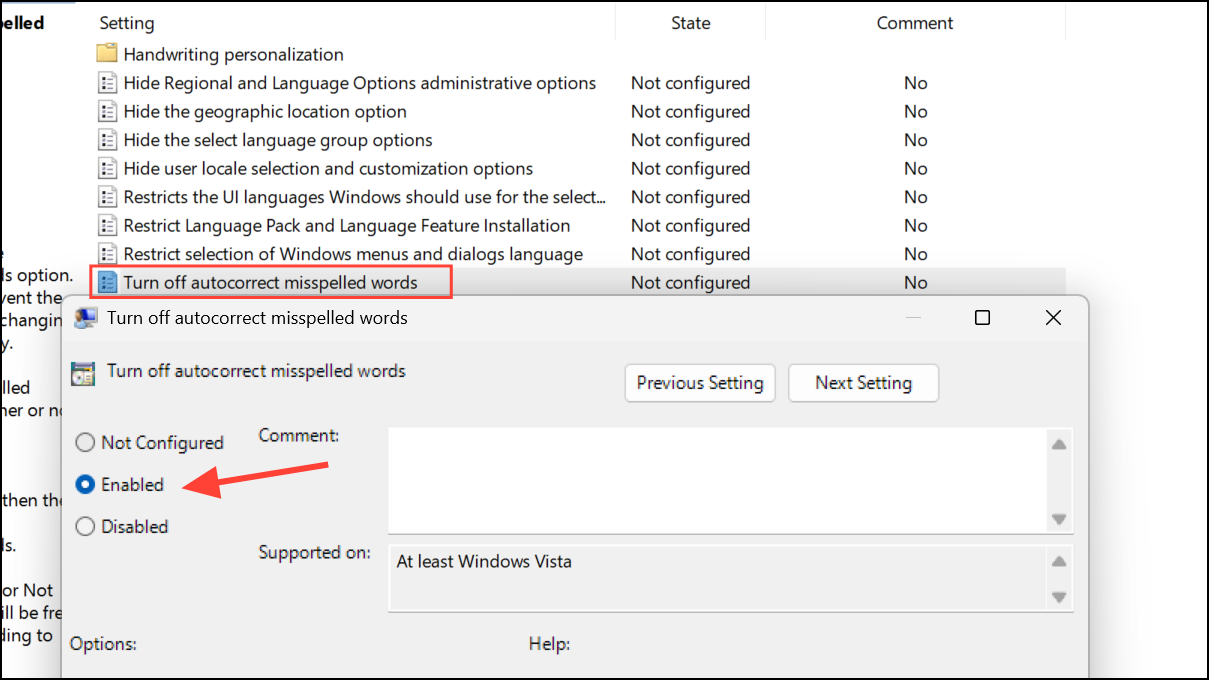
Step 3: Double-click on Turn off autocorrect misspelled words. In the window that appears, set the policy to Enabled to disable system-wide autocorrect. Click Apply and then OK.
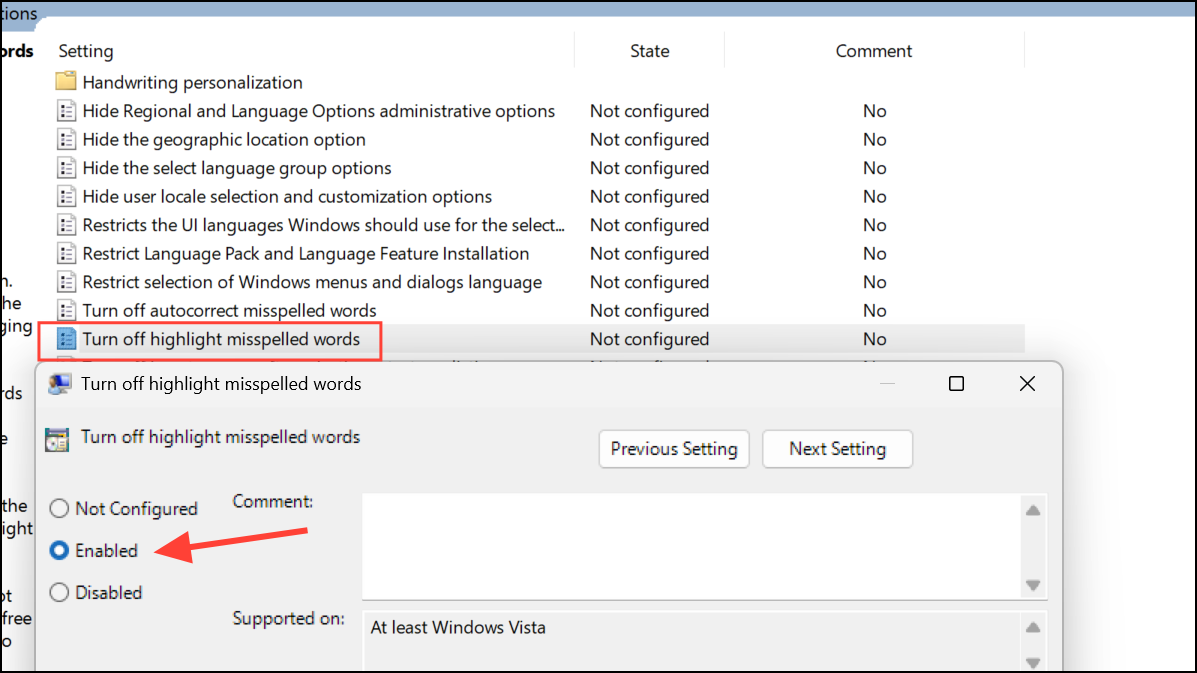
Step 4: To also disable the red squiggly underline for spelling errors, double-click on Turn off highlight misspelled words and set this policy to Enabled as well.
These policy changes will lock autocorrect and spellcheck features in the off state for all users on the machine, unless overridden by an application’s own settings. Note that Group Policy Editor is available only in Windows 11 Pro, Enterprise, and Education editions.
Turn Off Auto Correct and Spell Check Using the Registry Editor
Modifying the Windows Registry allows for granular control over autocorrect and spellcheck features, especially on editions of Windows 11 that lack Group Policy Editor. Always back up your registry before making changes to prevent system issues.
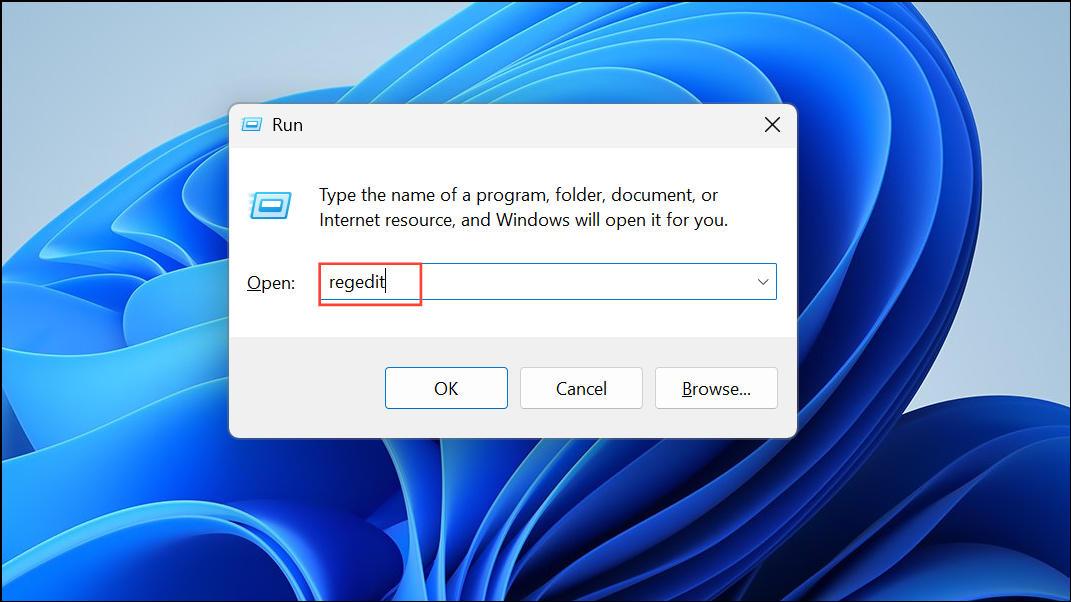
Step 1: Press Windows + R to open the Run dialog, type regedit, and press Enter. If prompted by User Account Control, click Yes to continue.
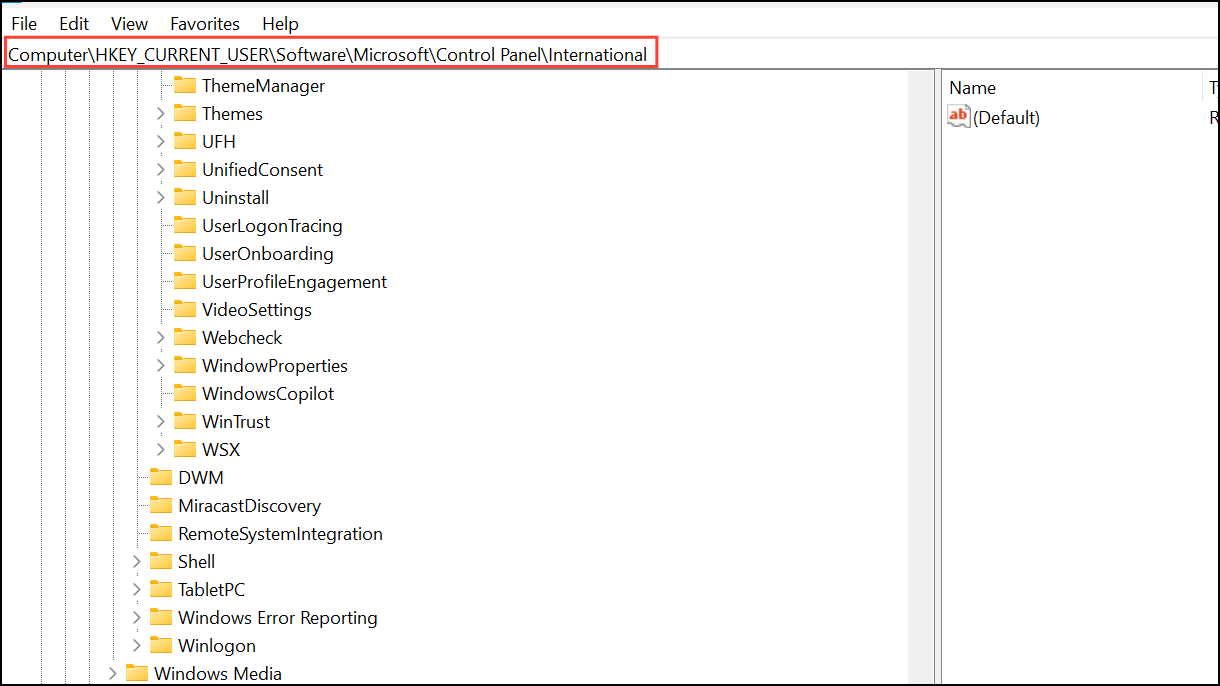
Step 2: In the Registry Editor, navigate to HKEY_CURRENT_USER\Software\Microsoft\Control Panel\International. If the Control Panel or International keys do not exist, right-click to create them as new keys in the appropriate location.
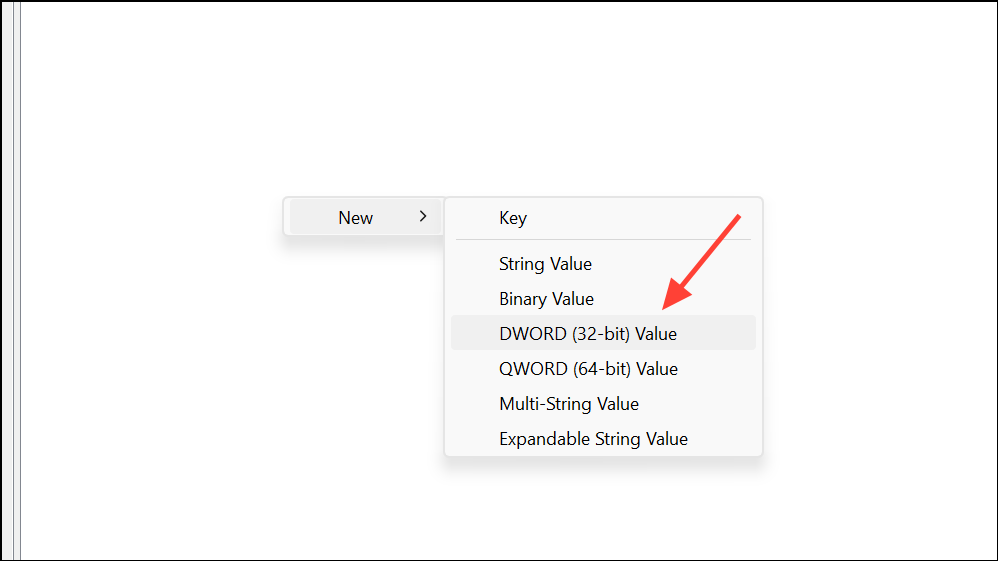
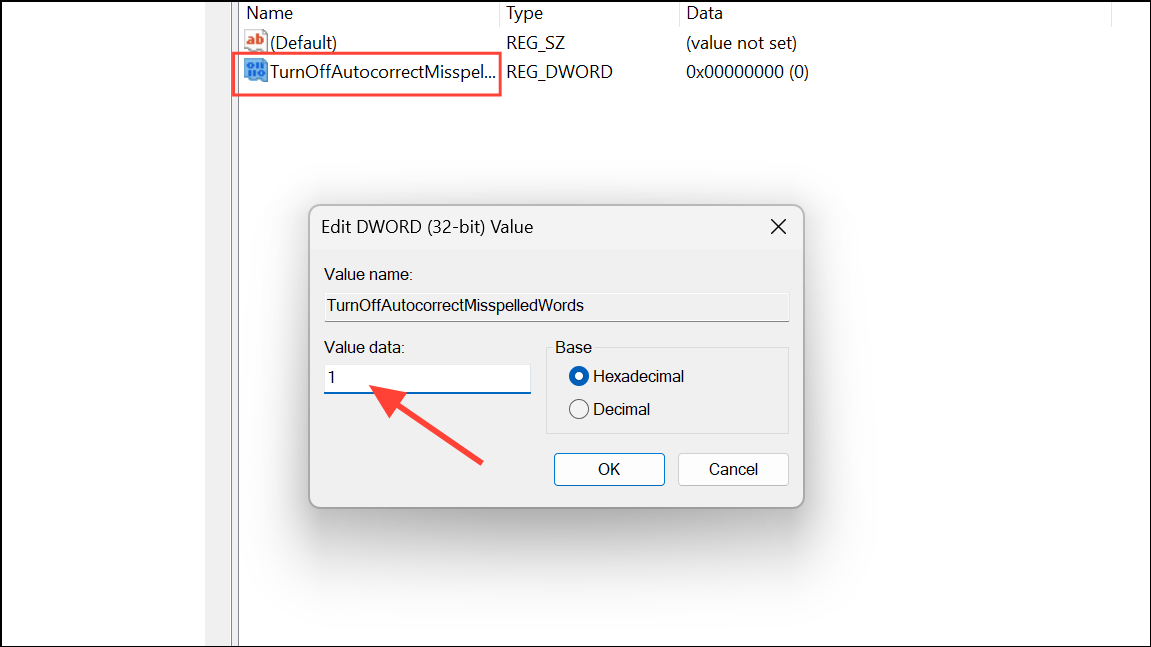
Step 3: In the International key, right-click in the right pane and select New > DWORD (32-bit) Value. Name the value TurnOffAutocorrectMisspelledWords. Double-click it and set its value data to 1 to disable autocorrect. To re-enable, set it to 0.
Step 4: Repeat the process to create another DWORD named TurnOffHighlightMisspelledWords. Set its value to 1 to turn off the spellcheck underline, or 0 to enable it.
Close the Registry Editor and restart your computer for the changes to take effect.
Disable Auto Correct and Spell Check in Specific Apps
Notepad
Recent versions of Notepad in Windows 11 include their own spellcheck and autocorrect settings. To turn these off:
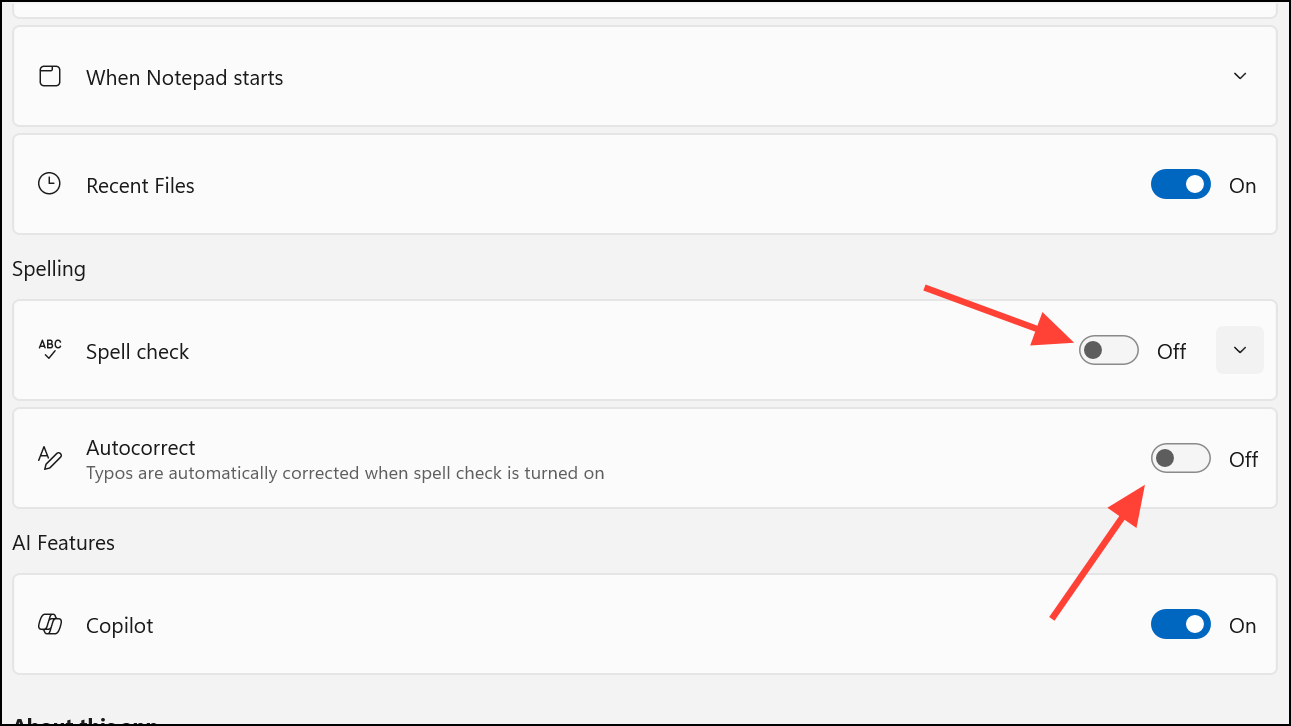
Step 1: Open Notepad. Click the gear icon (Settings) in the top-right corner.
Step 2: In the settings menu, toggle off both Spell check and Autocorrect. You can also specify which file types should have spellcheck disabled or enabled.
Microsoft Edge
Microsoft Edge has integrated grammar and spellcheck tools. To disable them:
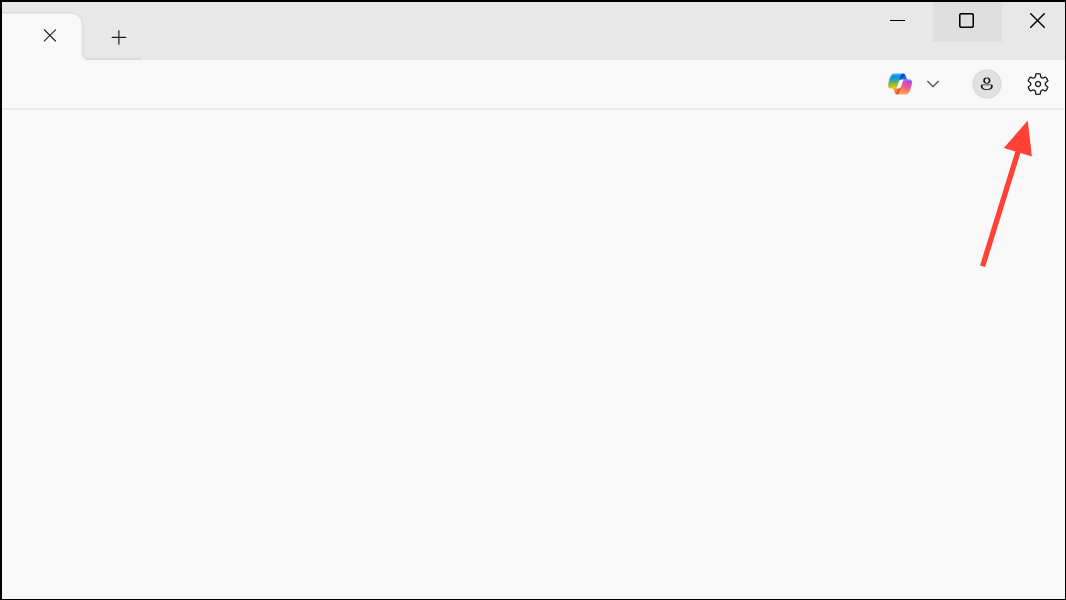
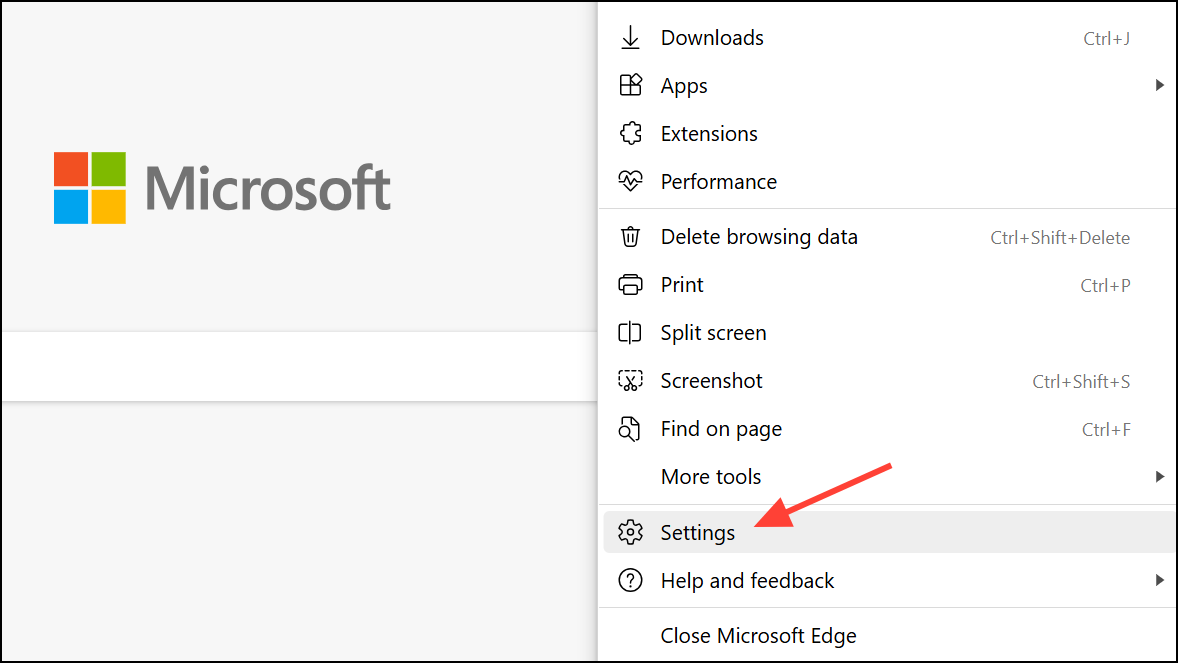
Step 1: Open Edge and click the three-dot menu in the top-right corner, then select Settings.
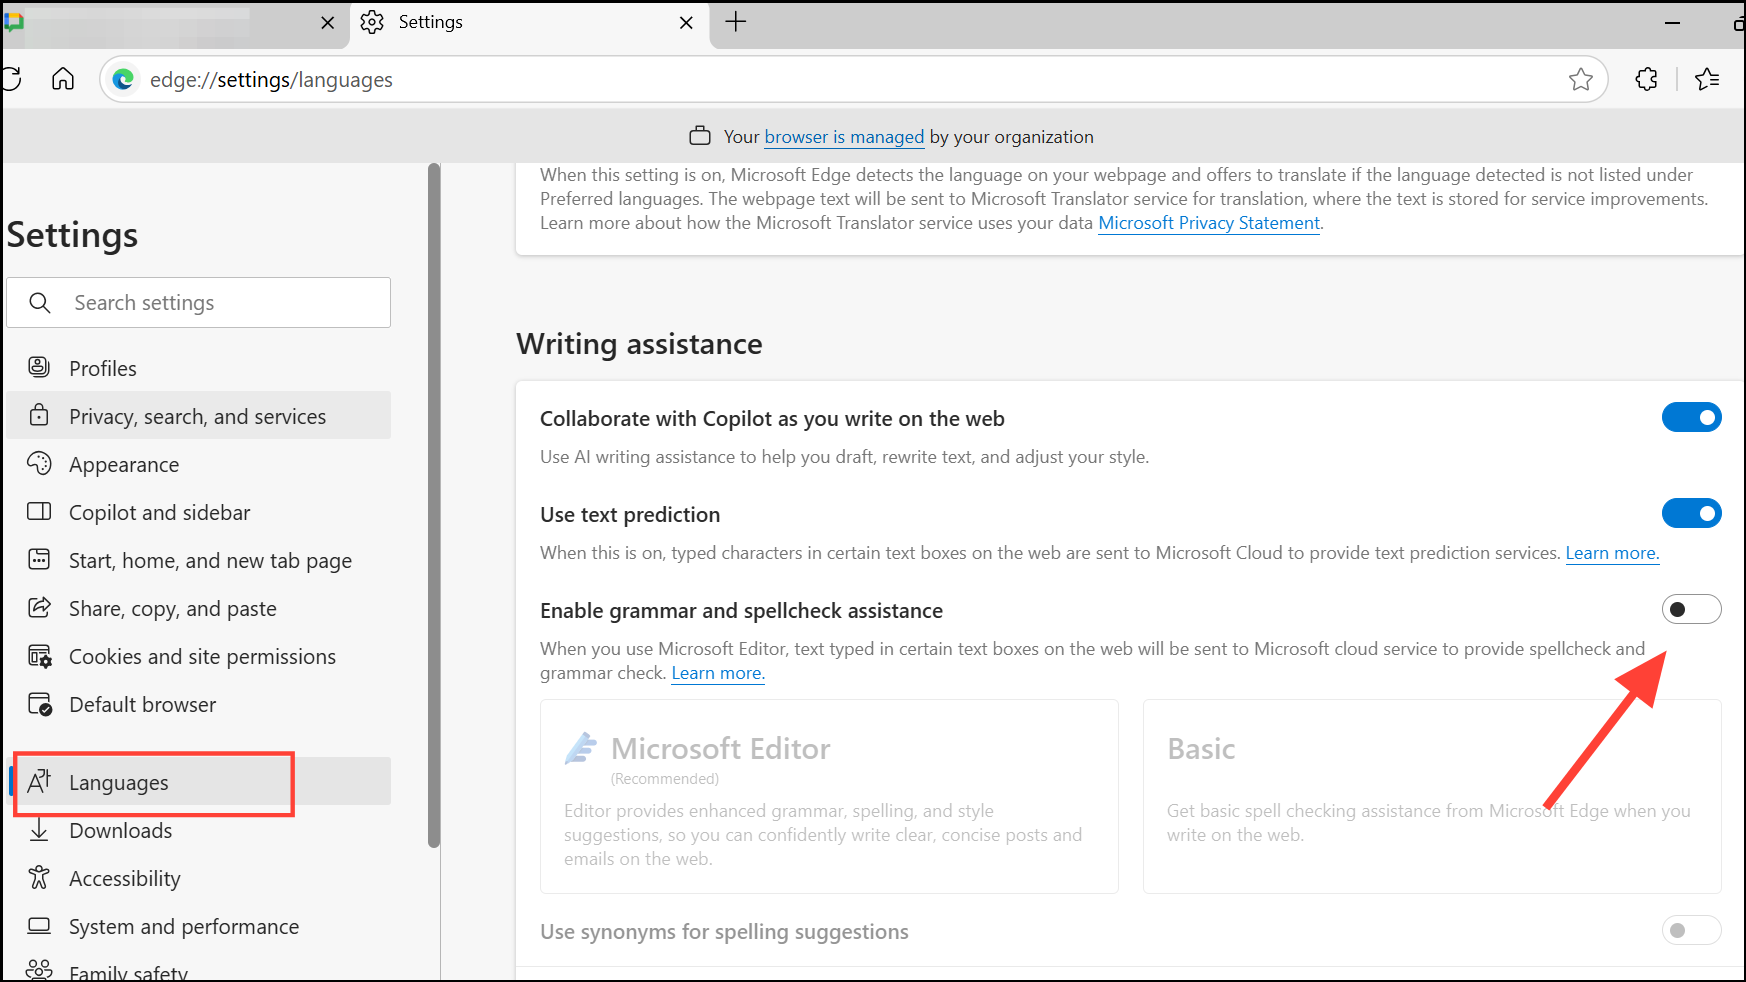
Step 2: Choose Languages from the sidebar. Turn off Enable grammar and spellcheck assistance and any related options for Microsoft Editor or text predictions.
Outlook and Microsoft 365 Apps
For Outlook and Office apps like Word, Excel, and PowerPoint, spellcheck and autocorrect are managed within the app itself.
Step 1: In Outlook, start a new message, go to the Options tab, and open Editor Settings. Turn off Enable auto correct and Text predictions.
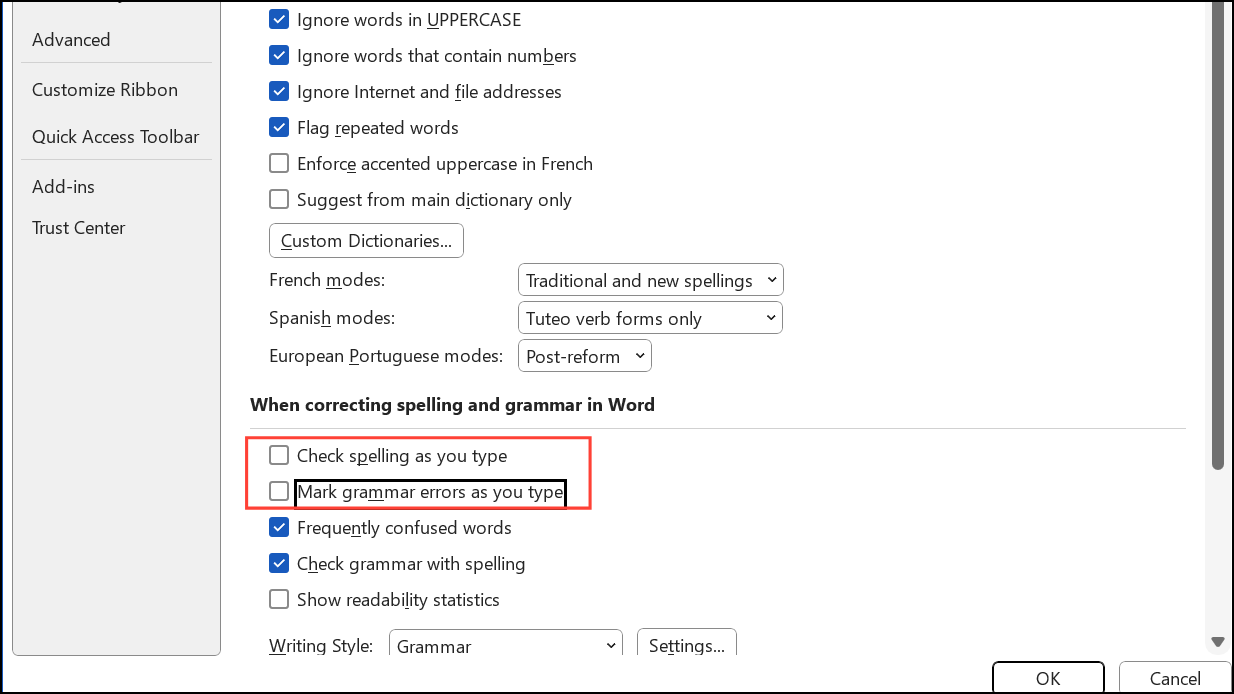
Step 2: In Word or other Office apps, go to File > Options > Proofing. Uncheck Check spelling as you type and Mark grammar as you type. Click AutoCorrect Options to further refine or disable automatic corrections.
Disabling autocorrect and spellcheck in Windows 11 gives you full control over your typing, prevents unwanted changes, and streamlines your workflow. Revisit these settings whenever you need to adjust how Windows and its apps handle spelling and corrections.