
Black screens that appear after updating to macOS 15 Sequoia signal a breakdown in the normal startup process, leaving users unable to access their desktop or applications. This issue can stem from incomplete updates, software conflicts, corrupt system files, or hardware compatibility problems. In many cases, the Mac powers on—fans or keyboard lights may activate—but the display remains black, and the system is unresponsive. Addressing this problem requires a structured approach that prioritizes data safety while restoring system functionality.
Force Restart and Power Check
Step 1: Hold down the power button for at least 10 seconds to ensure the Mac is completely powered off. This clears any temporary glitches that may prevent a normal boot.
Step 2: Connect your Mac to a reliable power source using the original charger. Inspect the charging cable and adapter for visible damage. If the Mac is a laptop, confirm that the battery indicator light turns on or that the charging symbol appears. Allow the Mac to charge for several minutes before attempting to power on again.
Step 3: Press the power button once to turn the Mac back on. Listen for startup sounds or fan activity. If the screen remains black, proceed to further troubleshooting.
Disconnect All Peripherals
Step 1: Unplug all external devices from your Mac except the power cable. This includes USB drives, external monitors, printers, hubs, and any other accessories.
Step 2: Wait a few minutes to ensure the system is fully reset. Sometimes, connected devices can interfere with the boot process due to driver conflicts or power draw issues.
Step 3: Attempt to restart the Mac. If the display comes on, reconnect devices one at a time to identify any problematic peripherals.
Start in Safe Mode
Safe Mode loads only essential system files and disables third-party extensions, making it a powerful diagnostic tool for startup problems.
Step 1: For Intel Macs, hold the Shift key immediately after pressing the power button. For Apple Silicon Macs, press and hold the power button until startup options appear, select your startup disk, then hold Shift and click "Continue in Safe Mode."
Step 2: Release the key when the login window appears. Log in and observe whether the desktop loads correctly.
Step 3: If Safe Mode succeeds, uninstall or update any recently added software or system extensions that may have caused the black screen. Restart normally to check if the problem is resolved.
Reset NVRAM and SMC
The NVRAM (non-volatile random-access memory) stores settings like display resolution and startup disk selection. The SMC (System Management Controller) manages power, battery, and hardware functions. Resetting these components can resolve persistent startup issues.
Step 1: To reset NVRAM on Intel Macs, power off your Mac. Turn it on and immediately hold Option + Command + P + R for about 20 seconds. Release the keys after you hear the startup sound a second time or see the Apple logo appear and disappear twice.
Step 2: For SMC reset (Intel Macs), shut down your Mac. Hold Shift + Control + Option + Power for 10 seconds, then release and turn on the Mac as usual.
Step 3: On Apple Silicon Macs, SMC and NVRAM reset automatically during certain troubleshooting steps, so manual intervention is not required.
Step 4: After resetting, try restarting the Mac to see if the display functions normally.
Boot Into macOS Recovery and Repair Startup Disk
macOS Recovery provides tools for repairing disk errors and reinstalling the operating system without erasing user data.
Step 1: For Intel Macs, turn off the Mac, then hold Command + R while turning it on. For Apple Silicon Macs, press and hold the power button until startup options appear, then select "Options" and click "Continue."
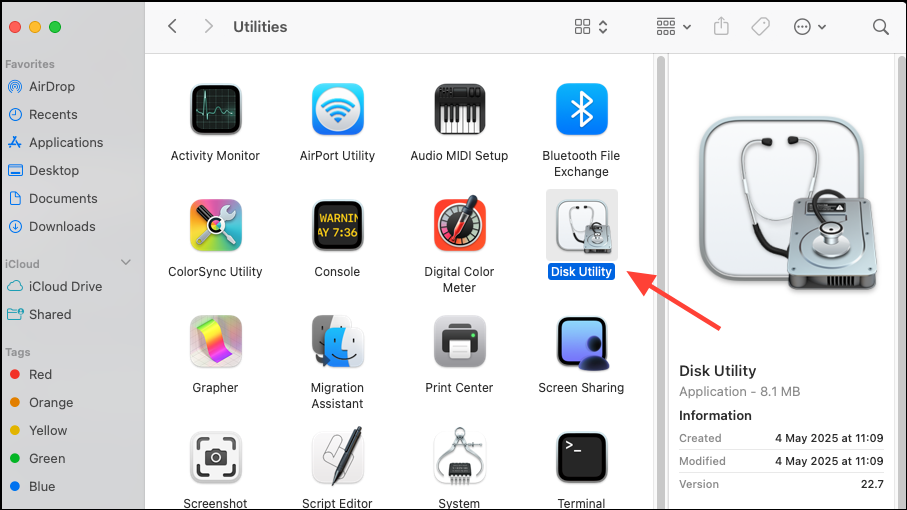
Step 2: In the macOS Utilities window, select "Disk Utility" and click "Continue."
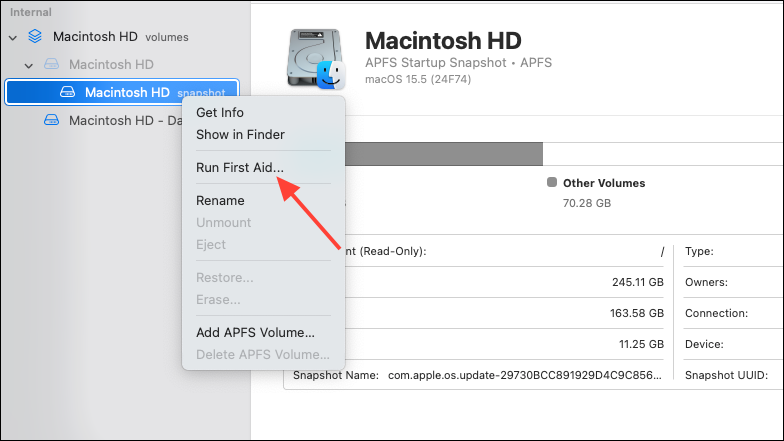
Step 3: Choose your startup disk (usually named "Macintosh HD") from the sidebar. Click "First Aid," then "Run" to scan and repair disk errors. Wait for the process to complete.
Step 4: If errors are found and repaired, restart your Mac. If the issue persists, proceed to reinstall macOS.
Reinstall macOS Without Erasing Data
Reinstalling the operating system can restore corrupted system files while preserving user documents and settings. A stable internet connection is required.
Step 1: Enter macOS Recovery as described above.
Step 2: In the Utilities window, choose "Reinstall macOS" and click "Continue." Follow the on-screen instructions to select your disk and begin installation.
Step 3: Allow the installation to complete without closing the MacBook lid or letting it sleep. The process may involve several automatic restarts and periods where the screen appears blank.
Step 4: After installation, log in and check if the black screen issue is resolved.
Restore from Time Machine Backup
If you regularly back up your Mac with Time Machine, restoring to a previous version can reverse issues caused by problematic updates.
Step 1: Connect your Time Machine backup drive to the Mac.
Step 2: Boot into macOS Recovery and select "Restore from Time Machine Backup."
Step 3: Follow the prompts to choose your backup disk, select a backup date prior to the update, and restore the system. This process will revert your Mac to its earlier state, including the previous macOS version and user data.
Remove Problematic Kernel Extensions (Advanced)
Unsigned or incompatible kernel extensions (.kext files) can cause startup failures after updates. Removing them may restore normal booting, but this step is intended for advanced users.
Step 1: Boot into macOS Recovery and open Terminal from the Utilities menu.
Step 2: Mount your startup disk if it is encrypted or not yet mounted. Use the command:
diskutil mountDisk /dev/disk0Step 3: Navigate to the /Volumes/[YourDisk]/Library/Extensions/ directory. List the contents and identify third-party or unsigned extensions.
Step 4: Remove suspicious extensions using:
rm -r [ExtensionName].kextStep 5: Restart your Mac. If the Mac boots normally, the removed extension was likely the cause.
Check Display Brightness and External Monitors
Sometimes, the Mac is working but the display appears black due to brightness settings or external display conflicts.
Step 1: Adjust the brightness using your keyboard's brightness keys or the Touch Bar slider.
Step 2: If using an external monitor, ensure it is powered on and set to the correct input. Try disconnecting and reconnecting the display cable, or switch to a different port or cable type (such as from HDMI to DisplayPort).
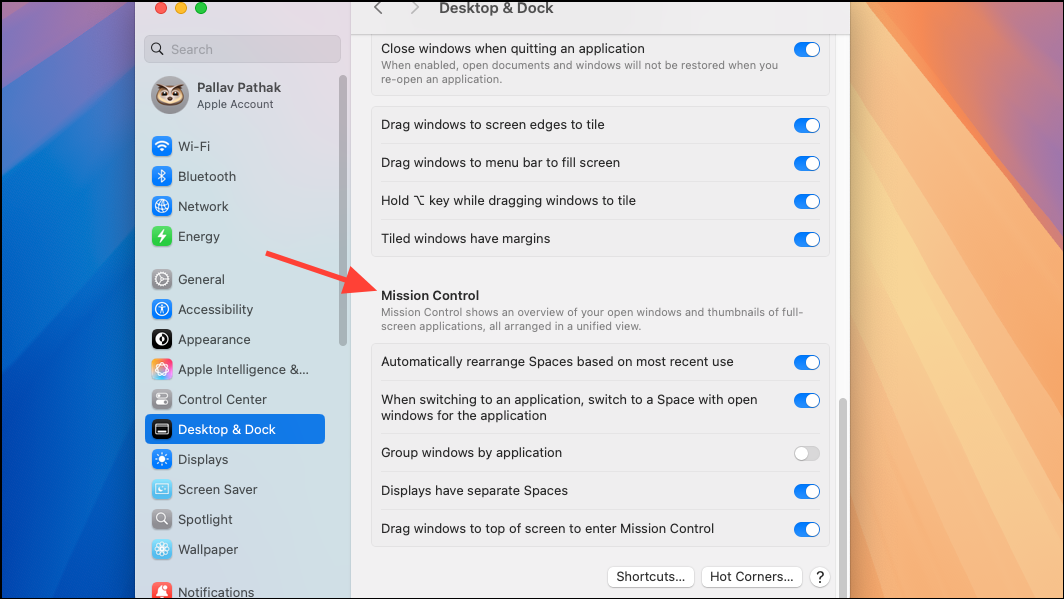
Step 3: For dual-monitor setups, enable "Displays have separate Spaces" in System Settings > Desktop & Dock > Mission Control to resolve display detection issues.
Contact Apple Support or Visit a Service Center
If none of these steps resolve the black screen, the issue may be hardware-related, such as a failed display, logic board, or internal cable. At this point, schedule a visit to an Apple Store or authorized service provider for diagnostics and repair. Running Apple Diagnostics by holding D at startup can help identify hardware faults.
By systematically applying these methods, most black screen issues after a macOS 15 update can be resolved without data loss or major disruption. Regular backups and careful update practices provide added protection against future problems.