
Let a Wardenfly’s cage close on Hornet to reach The Slab early; after you’ve been to The Slab once, caged Wardenflies stop appearing in the overworld. This guide explains where they spawn, how the capture works, and clean ways to handle their attacks without unnecessary damage.
Spawn rules and where to find Wardenflies
Wardenfly is a stout, armored jailer enemy in Hollow Knight: Silksong. Before you visit The Slab, it can appear in the wild carrying a metal cage. If the cage connects, Hornet is taken to The Slab’s jail and all non‑movement items and tools are confiscated until recovered inside the prison. Once you’ve visited The Slab, overworld Wardenflies no longer carry cages.
Expect consistent Wardenfly spawns inside The Slab, especially in upper sections, but without cages. Outside The Slab (and only before your first visit), there’s a chance to encounter a caged Wardenfly in certain parts of Pharloom, notably select rooms in Deep Docks, Bilewater, and Greymoor. These overworld placements vary and are not guaranteed on every save.
1. Find (and farm) Wardenflies in The Slab
Step 1: Enter The Slab through normal progression or by being captured by a caged Wardenfly. This area has the densest, most reliable Wardenfly presence.
Step 2: Navigate to the upper prison blocks and adjoining corridors. Patrols here frequently include Wardenflies, often accompanied by other guards.

Step 3: Use nearby benches to create safe checkpoints. Wardenfly hits remove 2 Masks, so arrive with a health buffer to avoid long backtracks.
Step 4: For the Hunter’s Journal, defeat 10 Wardenflies to complete the entry. Plan short loops between benches and patrol rooms for steady progress.
2. Reach The Slab early via Wardenfly capture
Step 1: Confirm you have not yet visited The Slab. Caged Wardenflies only appear in the wild before your first visit.
Step 2: Unlock the Cling Grip skill. You’ll need it to access the relevant route in Deep Docks.

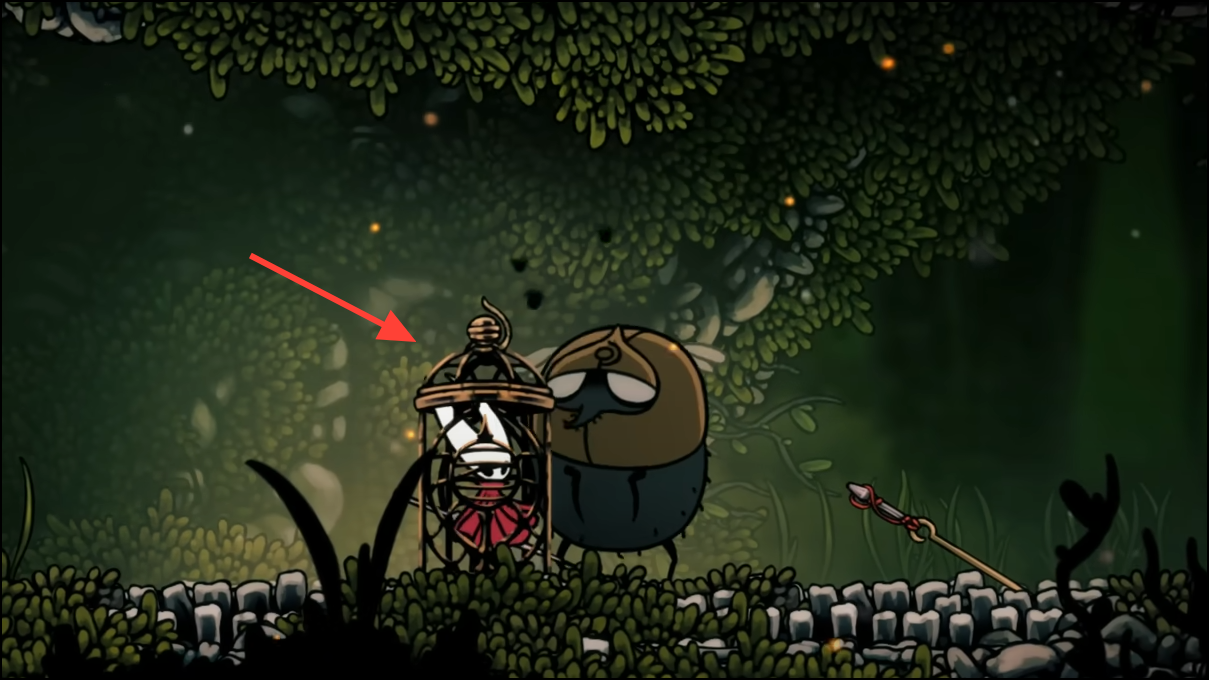
Step 3: From Deep Docks, take the top‑right‑most path heading east toward Far Fields. In the new section, watch for a large fly carrying a Hornet‑sized cage.
Step 4: Stand where the Wardenfly can slam the cage directly onto Hornet. Do not dodge the slam; allowing the cage to close triggers the transport to The Slab.
Step 5: Expect your non‑movement items and tools to be held in The Slab until you navigate the prison and recover them. Early escape requires careful platforming and key collection.
Step 6: If a caged Wardenfly doesn’t appear on that route, explore additional pre‑Slab spawn rooms in Bilewater or Greymoor. Overworld spawn placement varies by playthrough.
3. Hunt pre‑Slab spawns in the overworld
Step 1: Scout select rooms in Deep Docks, Bilewater, and Greymoor before visiting The Slab. These are the only times and places you’ll see Wardenflies carrying cages outside the prison.
Step 2: If a room is empty or the Wardenfly was previously defeated, revisit later or progress nearby areas. Spawns are not fixed and may be one‑time placements per save.
Step 3: If you’ve already been to The Slab, stop searching for caged overworld Wardenflies and use Method 1 instead.
Combat behavior and reliable counters
- Glue Trap: Wardenfly spits goo puddles that don’t deal damage but immobilize on contact. Break free with rapid inputs, and clear puddles when safe—they disappear on their own or after a few hits. Getting stuck makes you vulnerable to follow‑ups, so keep the floor clean.
- Body Slam: It targets your current position, then dives. Move horizontally late to sidestep, then punish the short recovery with quick strikes.
- Two‑Step Lunge: It lunges, briefly staggers, then lunges again. Don’t overcommit after the first dash; wait out the second, then counter.
- Group pressure: Wardenfly threats escalate when paired with other guards (for example, Guardfly). Avoid glue near walls and spikes, and reposition to prevent a slam while immobilized.
- Damage profile: Every Wardenfly hit costs 2 Masks. Treat it as a mid‑tier bruiser—short, safe punishes are better than long strings.
Fight plan (quick, step‑by‑step)
Step 1: Hold a mid‑range gap to bait Body Slam rather than random lunges. This stabilizes the fight flow and creates predictable punish windows.
Step 2: Dash laterally just before impact to avoid the dive. Land 1–3 quick hits during the recovery, then reset spacing.
Step 3: After the first lunge in the Two‑Step pattern, keep distance. Only commit after the second lunge to avoid trading.
Step 4: Remove nearby glue puddles during lulls. Two to four hits typically clear a patch, reducing the risk of getting pinned.
Step 5: In multi‑enemy rooms, kite toward open floor and avoid corners. Denying glue‑plus‑slam setups reduces sudden mask losses.
Drops, Journal progress, and notes
- Drops: 12 Rosaries and 4 Shell Shards per Wardenfly.
- Hunter’s Journal: 10 defeats are required to complete the entry.
- Post‑Slab rule: After you’ve visited The Slab, Wardenflies in the overworld no longer carry cages; they remain common inside The Slab’s upper areas.
How to avoid capture if you don’t want The Slab right now
Step 1: When a caged Wardenfly lifts the cage, backdash or hop out of the drop zone. Keep the fight centered to avoid a cornered slam.
Step 2: Focus on short punish windows after Body Slam, then disengage. This limits exposure to sudden cage attempts during long combos.
Step 3: If the cage lands on Hornet, transport is guaranteed. Finish your current goals first if you’d rather not start The Slab sequence.
Use The Slab for dependable Wardenfly farming, and the Deep Docks route for early capture if you want the prison sequence sooner. With the patterns above, you’ll either control the fight or control when it happens.