
Experiencing non-responsive brightness keys on your Ubuntu system can be a common issue, particularly with certain hardware configurations. If you find that the brightness controls on your keyboard aren't working, there's a straightforward method to fix this problem.
Step 1: Open your terminal and edit the GRUB configuration file by executing the following command:
sudo vim /etc/default/grub
Step 2: Within the GRUB file, locate the line that begins with GRUB_CMDLINE_LINUX_DEFAULT. You'll need to modify this line to include specific kernel parameters that address the brightness control issue. Update the line so it looks like this:
GRUB_CMDLINE_LINUX_DEFAULT="quiet splash acpi_backlight=vendor acpi_osi=linux"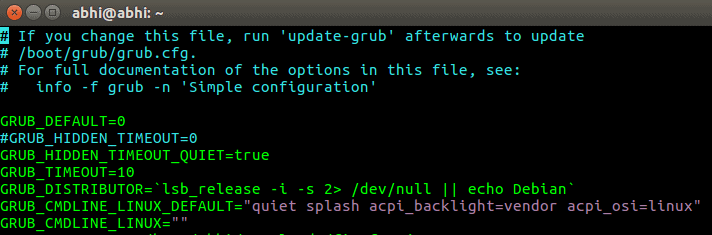
Step 3: Save the changes you've made to the file. If you're using vim, press Escape to enter command mode, then type :wq and press Enter to write the changes and quit the editor.
The parameters acpi_backlight=vendor and acpi_osi=linux inform the kernel to use the vendor-specific ACPI (Advanced Configuration and Power Interface) driver for backlight control instead of the generic kernel driver. This adjustment can resolve incompatibilities between the Linux kernel and your system's hardware that affect brightness keys functionality.
Step 4: Update GRUB to apply the changes by running the following command in the terminal:
sudo update-grubStep 5: Restart your computer to ensure the new settings take effect. After rebooting, test your brightness keys to confirm they are now working correctly.
By following these steps, you should regain control over your screen brightness using your keyboard's dedicated keys, improving your overall experience with Ubuntu.