
The "Hard Drive Not Installed" error message appears when your Dell laptop cannot detect its internal storage device during startup, causing it to fail to boot into Windows. Common causes include incorrect BIOS settings, loose hardware connections, or a damaged hard drive. Below are the most effective methods to fix this issue.
Method 1: Verify and Correct BIOS Boot Settings
Step 1: Turn on your Dell laptop and immediately press the F2 key repeatedly to enter the BIOS setup menu.
Step 2: Inside BIOS, navigate to the "Boot Sequence" or "Boot Configuration" settings. Ensure the primary boot device is set to "Windows Boot Manager" or your laptop's internal hard drive or SSD. Use the arrow keys to move the correct boot device to the top of the list.
Step 3: Next, check the "Secure Boot" setting. Make sure it is set to "Enabled" as Windows 11 typically requires Secure Boot to function correctly.
Step 4: Confirm that "SATA Operation" is set to "AHCI" mode. If this setting is on RAID or another mode, change it to AHCI.
Step 5: Press F10 to save your BIOS settings and restart your laptop. Check if the error persists.
Method 2: Run Built-in Dell Hardware Diagnostics
Dell laptops come equipped with built-in diagnostic tools to identify hardware failures.
Step 1: Restart your laptop and repeatedly press the F12 key during startup to open the boot menu.
Step 2: Select "Diagnostics" from the menu and press Enter. Allow the diagnostics to complete fully.
Step 3: Pay attention to the results of the hard drive test. If the diagnostic reports a failure or error code such as "2000-0155," your hard drive likely needs replacement. If the hard drive passes, proceed to the next method.
Method 3: Physically Check and Reconnect the Hard Drive
A loose or disconnected hard drive can trigger the "Hard Drive Not Installed" error.
Step 1: Turn off your laptop completely, disconnect the AC adapter, and remove the battery if it is removable.
Step 2: Press and hold the power button for about 30 seconds to discharge residual electricity.
Step 3: Carefully open the back panel of your Dell laptop. Locate the hard drive or SSD, usually secured with screws or brackets.
Step 4: Disconnect the hard drive carefully and reconnect it firmly. Ensure the SATA connector is securely attached.
Step 5: Replace the back panel, reconnect the battery and AC adapter, and power on your laptop to test if the issue is resolved.
Method 4: Update or Reset BIOS Firmware
Outdated or corrupted BIOS firmware can cause hardware detection issues.
Step 1: Visit the Dell Support website and enter your laptop's service tag to find the latest BIOS update.
Step 2: Download the BIOS update file and follow Dell's instructions carefully to install the update.
Step 3: After successfully updating, restart your laptop and check if the hard drive is detected.
Method 5: Repair Windows Boot Files
If the hard drive itself is functional, corrupted Windows boot files might cause this error.
Step 1: On another working computer, create a Windows 11 bootable USB drive using Microsoft's Media Creation Tool.
Step 2: Insert this USB drive into the problematic Dell laptop. Restart and press F12 to select the bootable USB from the boot menu.
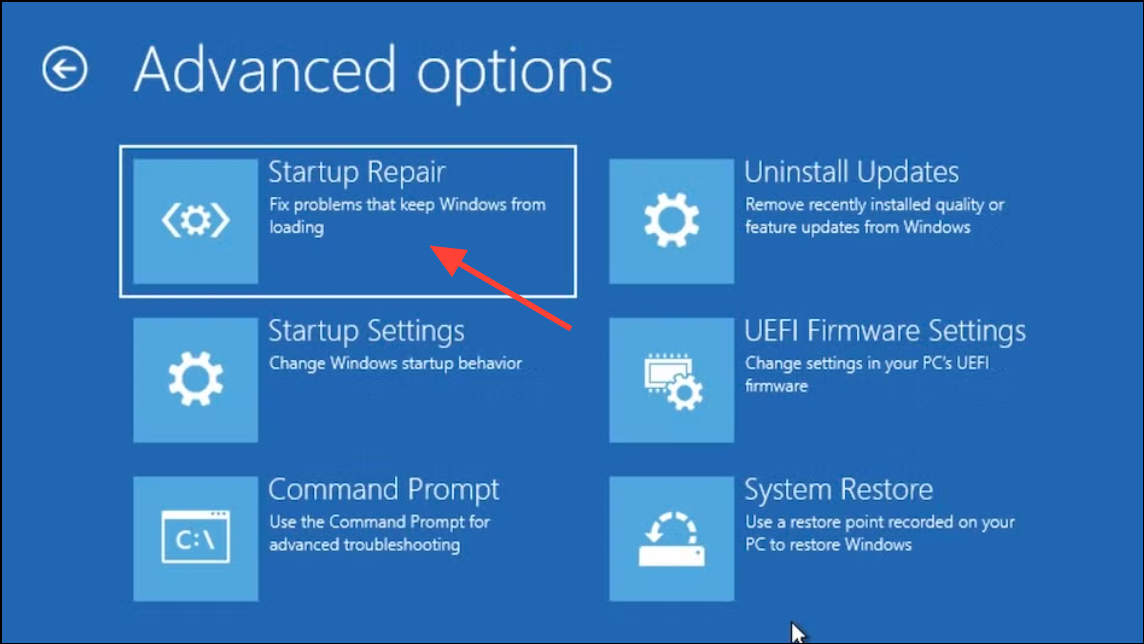
Step 3: When the Windows installation screen appears, select "Repair your computer" and navigate to "Troubleshoot" > "Advanced Options" > "Startup Repair." Follow the prompts to repair Windows boot files.
Step 4: After the repair is complete, restart your laptop normally.
Method 6: Scan and Repair Hard Drive Errors
Check the hard drive for errors or bad sectors by connecting it to another working computer.
Step 1: Connect the hard drive to another computer using a USB-to-SATA adapter or internally if possible.
Step 2: Open Command Prompt as administrator and run the following command:
chkdsk /r X:
(Replace "X" with the drive letter assigned to your hard drive.)
Step 3: Allow the scan to complete, then reconnect your hard drive to the Dell laptop and test if it boots correctly.
Method 7: Replace the Hard Drive or SSD
If all previous methods fail and diagnostics confirm a hardware issue, replacing the hard drive or SSD is necessary.
Step 1: Purchase a compatible replacement drive. Consider upgrading to an SSD for improved performance.
Step 2: Follow Dell's service manual or instructional videos available on Dell's official support channels to install the new drive correctly.
Step 3: Reinstall Windows 11 using a bootable USB drive and restore your data from backups afterward.
After following these detailed steps, your Dell laptop should once again detect the hard drive and boot normally. If you continue to face issues, contacting Dell Support or a professional technician is recommended.