Microsoft Teams is a widely used tool for online collaboration and remote work communication. However, like any software, it can have issues, such as microphone or camera malfunctions within the app. Sometimes, these problems might not be with Microsoft Teams itself but with your computer.
There are various reasons why your microphone may not work with Microsoft Teams. These include hardware issues with your PC's microphone, outdated or missing drivers, issues with the Teams app itself, the microphone being muted or disabled, connection problems, or other factors.
This guide will help you troubleshoot and fix common microphone problems in Microsoft Teams, ensuring smoother communication.
Basic Fixes for Microsoft Teams Microphone Not Working
Before going through complex troubleshooting procedures, try these obvious solutions that might solve the microphone not working problem. Most of the times Microphone issues arise due to simple reasons like the microphone being muted, outdated Microsoft Teams app, etc. If your Microphone is not working for the Teams app, you will see an error similar to this:
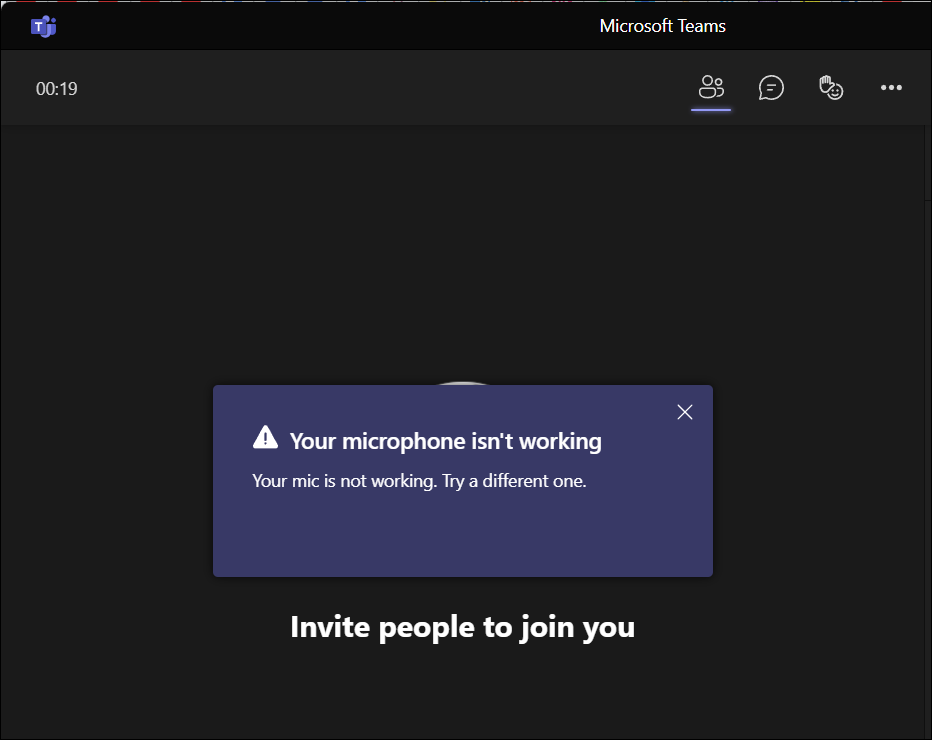
Sometimes, your Microphone may work fine for you but the person on the other side is not able to hear you properly or entirely. In such cases try these simple fixes and see if it helps:
Make Sure the Mic is Not Muted on MS Teams
When you initiate a video from your Microsoft Teams or receive a call, the Microphone is turned On by default. It may be a bug on the app or you turned off Microsoft accidentally by pressing the shortcut, either way, check and make sure that the Microphone is not muted on MS Teams app. If you see the mic symbol crossed off, it means it’s disabled. Open the app and ensure that the Mic is Enabled.
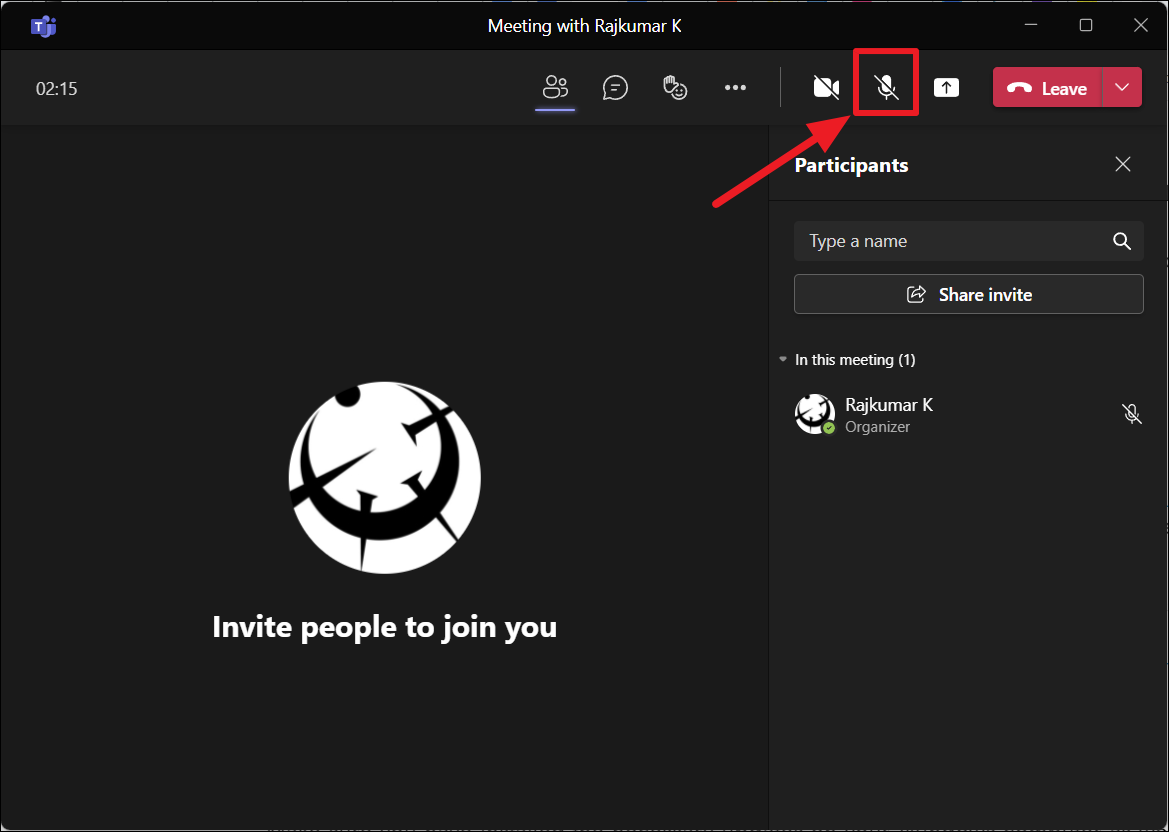
You can also try toggling the mic On/Off multiple times and see if it fixes the problem.
Some headphones or audio devices may have a button for a Microphone. So check and make sure that a button on the device does not mute the Microphone.
Restart Microsoft Teams
You can also try closing the Microsoft Teams entire and launching it again. Open the system tray or from the Taskbar corner, right-click the on Teams app icon and select ‘Quit’.
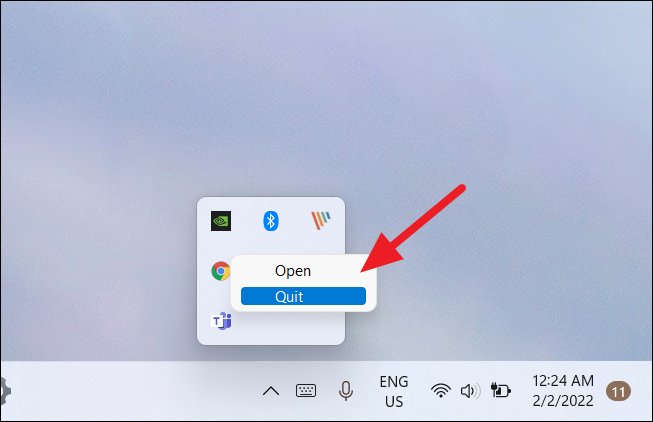
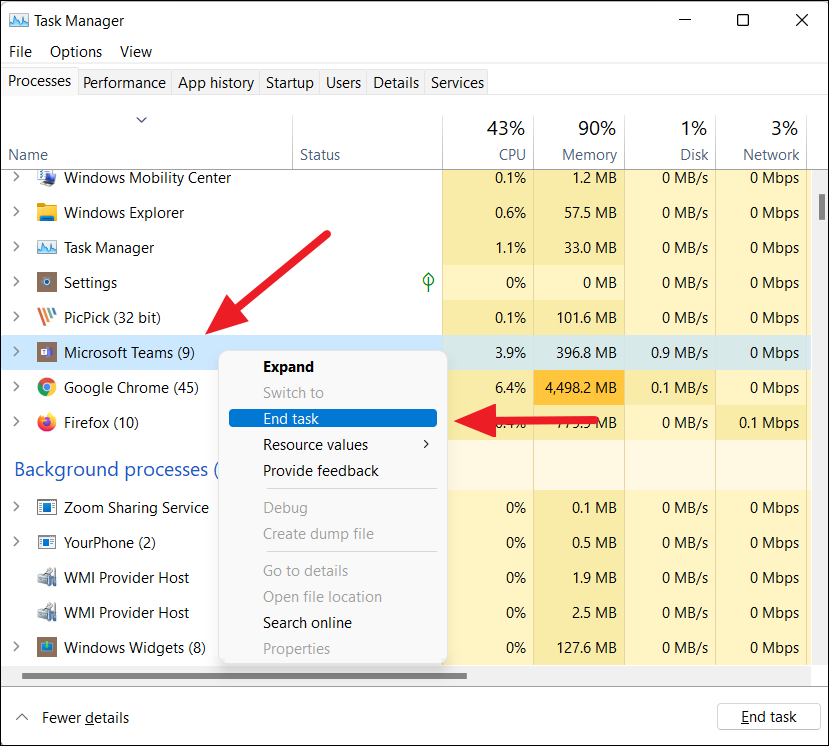
If the app is still running in the background, terminate it from the Task Manager. To do that, open Task Manager by pressing Ctrl+Shift+Esc on your keyboard.
Under the Processes tab, locate the ‘Microsoft Teams’ process, right-click on it and select ‘End task’. Once the app is closed, launch it again and check whether Mic is working or not.
Restart Your Computer
If restarting the app doesn’t fix it, you can try restarting your computer. When you reboot your computer, it will clear the PC memory (RAM) and initialize the microphone device again. This could possibly fix your microphone issues.
Check the Microphone Hardware
If you are using a headphone mic or an external Microphone device, make sure your microphone hardware is not faulty. You can make sure whether the Microphone is working or not by using it on a voice recording app, connecting, and using it on other devices like your mobile, tablet, or another computer. And if the Microphone device is working, try the below solutions.
Connect Microphone Before Calls
There are cases when you plug in the audio device with a microphone in the middle of a voice and video calls in Teams, the Teams app may fail to recognize the microphone of your audio device. In such cases, connect your audio device before making the call or close the Microsoft Teams app, connect the audio device with a microphone and start the app again.
Update Your Windows and Microsoft Teams app
Make sure you have installed the necessary updates on your Windows computer as well as the latest version of the Teams app. If there are known bugs or issues with Microphone or the Microsoft Teams app, Windows will patch those issues with its cumulative or features updates.
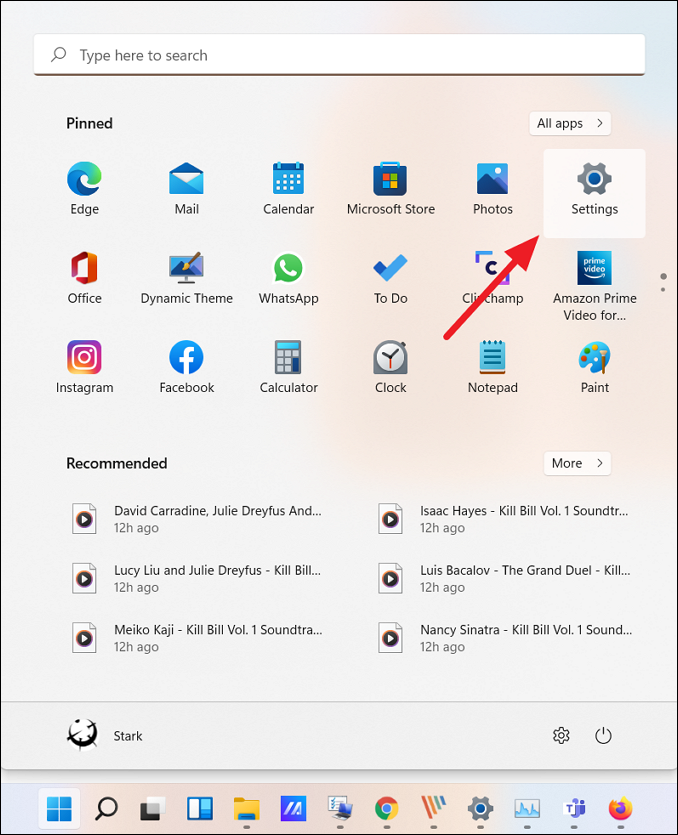
To check for Windows updates, first, open Windows Settings by clicking the Start menu and selecting the ‘Settings’ option or by pressing Windows+I.
When the Settings app launches, click the ‘Windows Update’ section on the left panel. Then, click the ‘Check for updates’ button on the right pane.
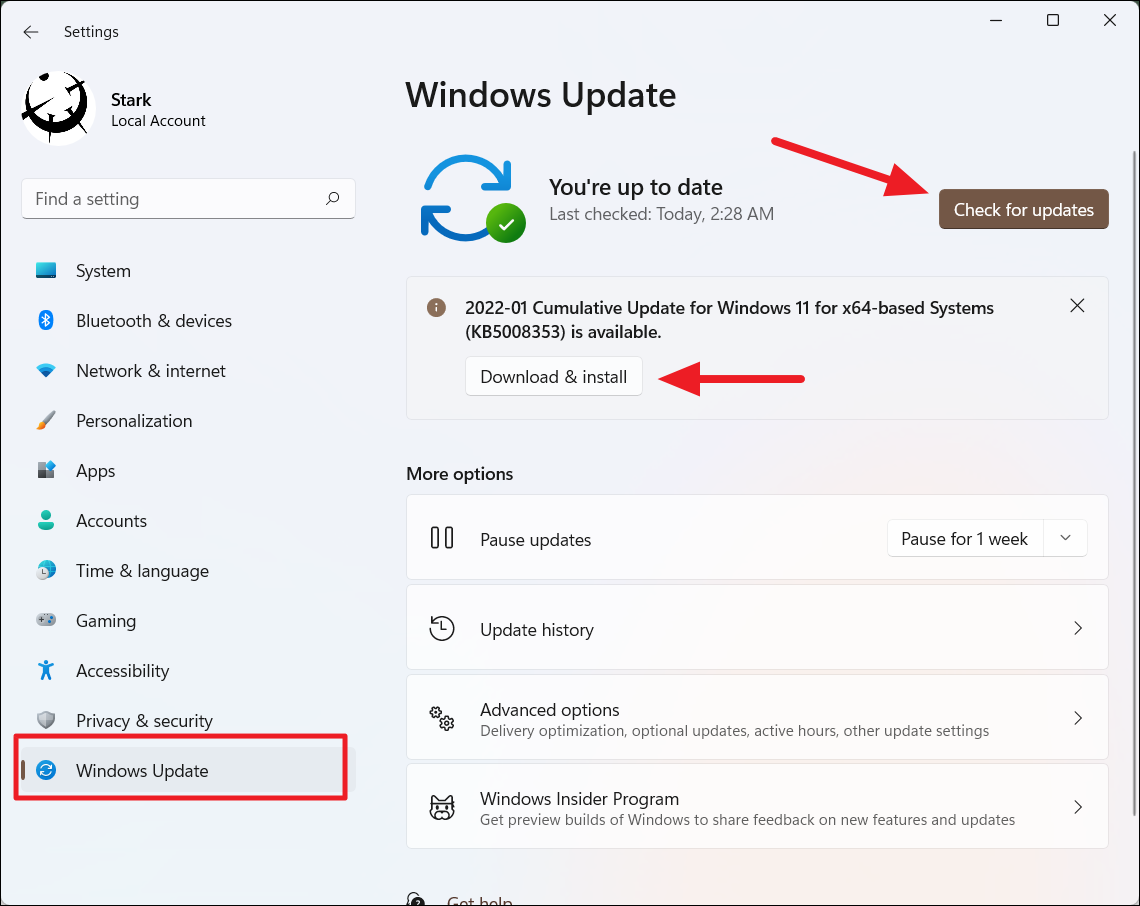
If there are any updates pending, download and install them. Then restart your PC to apply the changes.
To install the latest version of the Teams app, follow these steps:
Launch Microsoft Teams and click the three dots (ellipsis) button and select ‘Settings’.
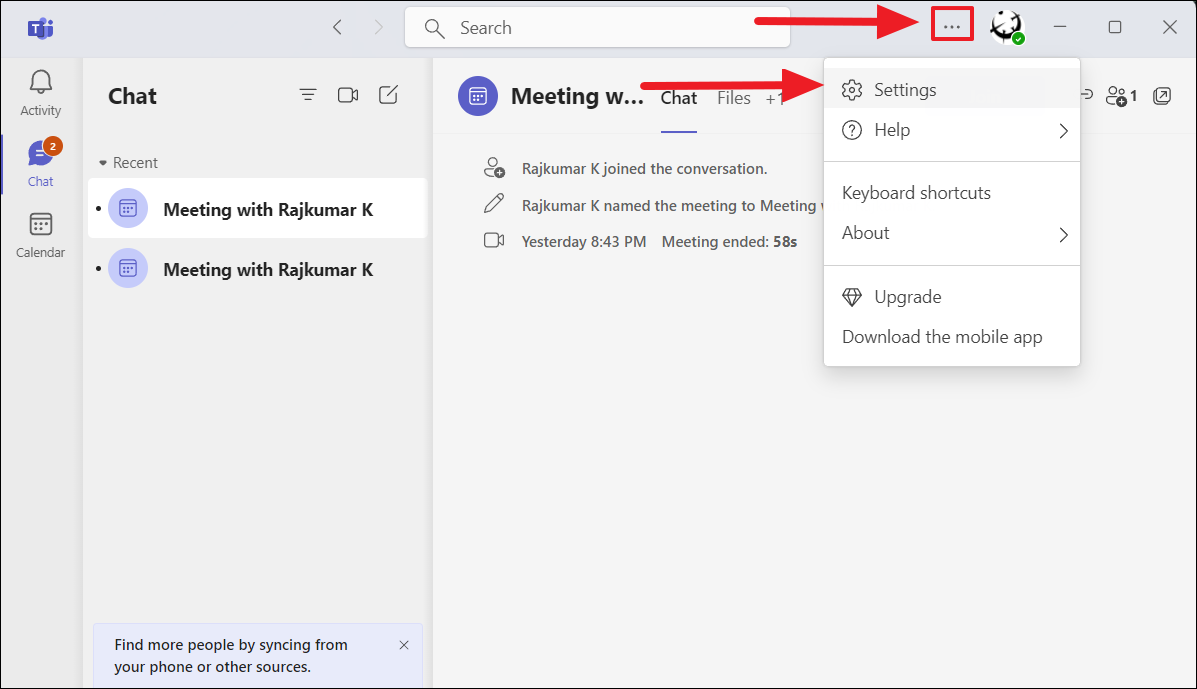
On the bottom of the left panel, click the ‘About Teams’ option and if you see the ‘Check for Updates’ button on the right, click on it.
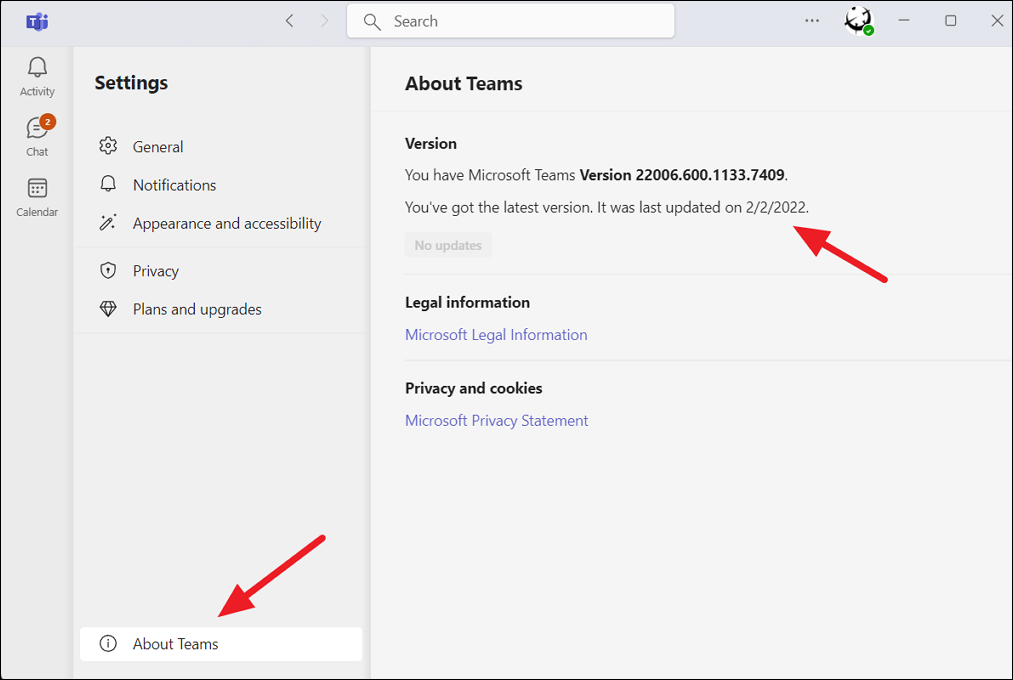
If the app is already updated, you will “You’ve got the latest version” message.
Check If Your Microphone is In Use
Another reason your microphone may not be working is that it’s already in use by a differnt app or a service. You can try closing all other apps that might be using your microphone and try it again or restart your computer.
Use Different Microphone
If you are using an external microphone device and it’s not working with the Microsoft device, you can try connecting a different microphone device, a different cable, and a different USB port.
If you have more than one microphone device connected to your device, then try disconnecting all the others except the one you want to use. If you already have a built-in microphone (usually Realtek), disconnect all the other external audio devices and test the built-in mic. If the built-in mic doesn’t work, connect an external and test whether it works on MS Teams.
Ensure Microphone is Enabled in Windows Settings
You need to check if your Microphone is turned off in the settings on your computer. If it is disabled, you won’t be able to use it with Microsoft Teams or any other app on your PC. So you need to turn on your Windows Microphone and ensure your PC recognizes it as your default input device.
If you are a Windows 10 or older OS user, right-click the speaker icon in the lower right corner of your PC’s taskbar and select the ‘Open Audio Settings’ option. If you are a Windows 11 user like me, open the Settings app (Win+I). Then, click ‘Privacy & security’ from the left pane and select ‘Microphone’ under App permission on the right pane.
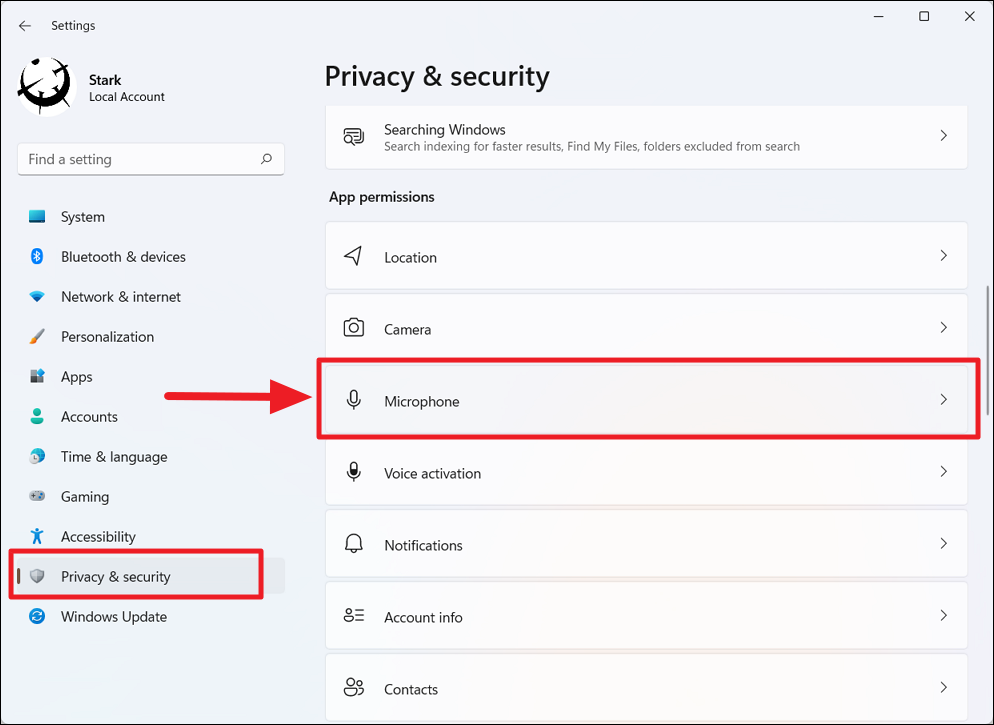
To enable the microphone on your device, turn on the toggle for ‘Microphone access’ on the Microphone settings page.
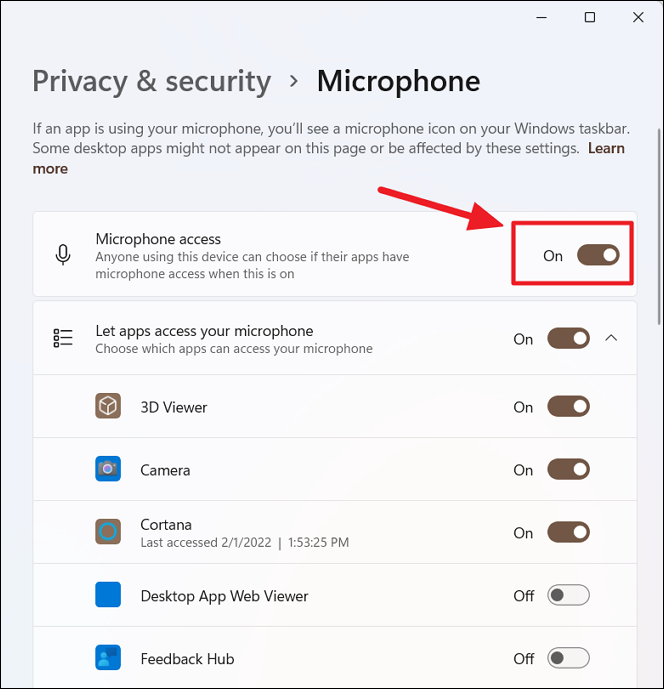
Enabling this option gives microphone access to all apps as long as you enable permission for those apps as well.
Enable Mic Permission for the Microsoft Teams app
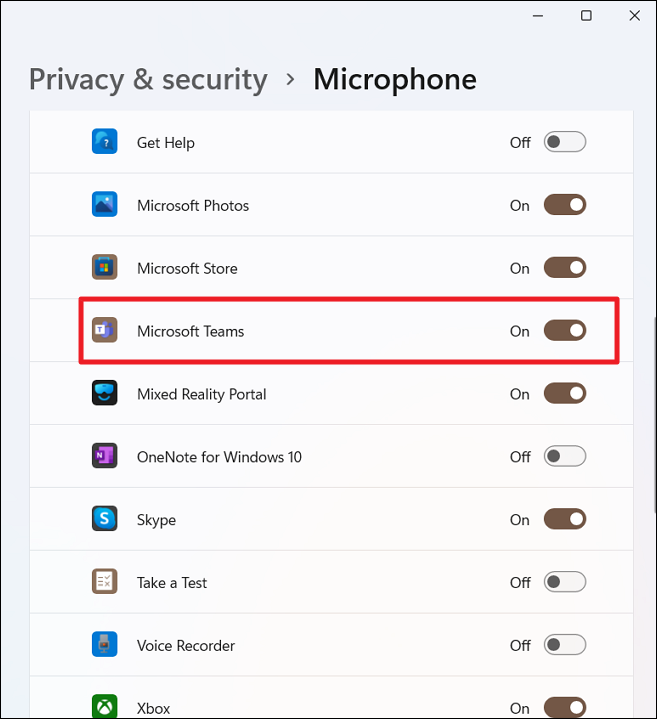
After enabling Mic on your Windows computer, you need to verify that Microphone access is enabled for the Microsoft Teams app. To do that, go to ‘Settings’, click ‘Privacy and security’, and then select ‘Microphone’ under App permission.
On the Microphone settings page, make sure that ‘Let apps access your microphone’ is enabled.
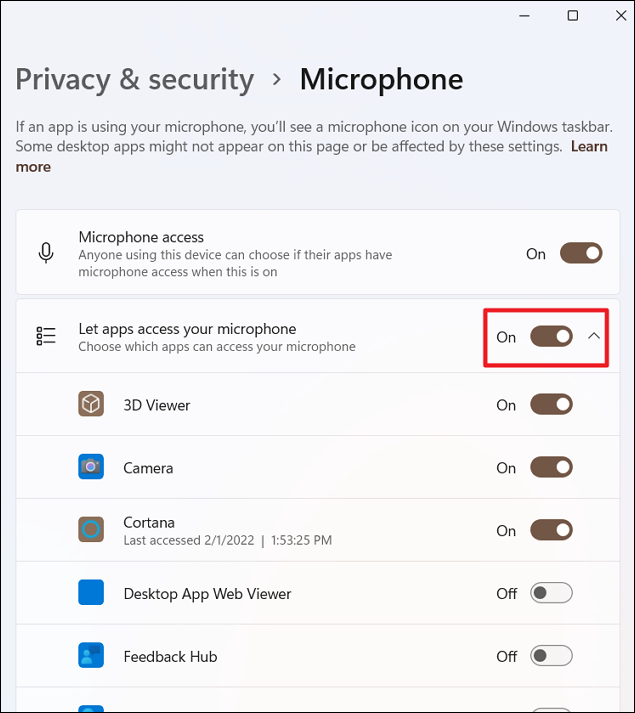
Then, scroll down the list of apps and enable the toggle for ‘Microsoft Teams’.
Select Correct Microphone Device in the Microsoft Teams app
If you selected the wrong microphone device on the Microsoft Teams app, it might not work when trying to make a call. You need to choose the right microphone device that works properly and set it up in the Teams app. Here’s how you do this:
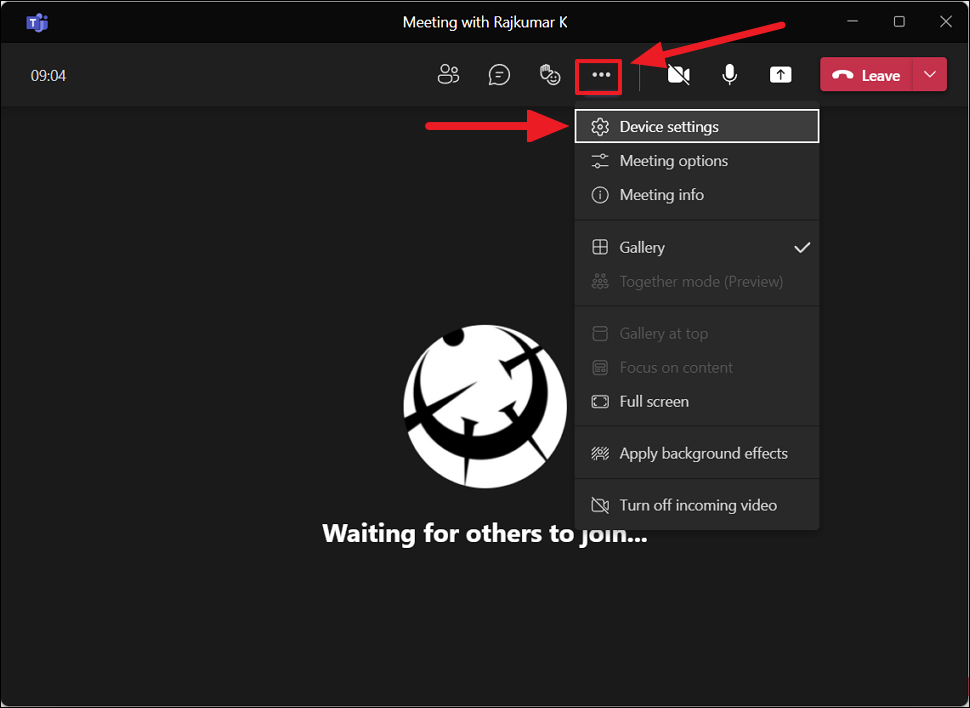
When you are making or receiving a call on the Teams app, click the ‘More actions’ button and choose ‘Device settings’.
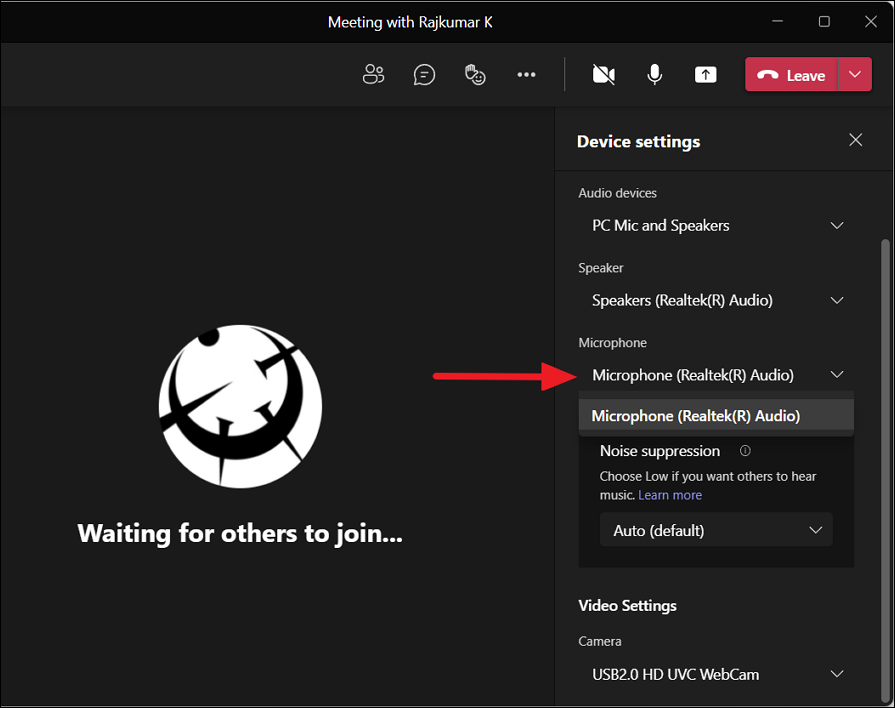
Under Device settings, click the ‘Microphone’ dropdown and select the correct audio device.
Configure Microphone from the Settings App (Windows 11)
When your microphone is not working properly or entirely, it could be due microphone is not configured properly in the Windows settings. You can change the microphone format, input volume, or even enhance the audio quality to fix your mic problems. You can follow these steps to do that:
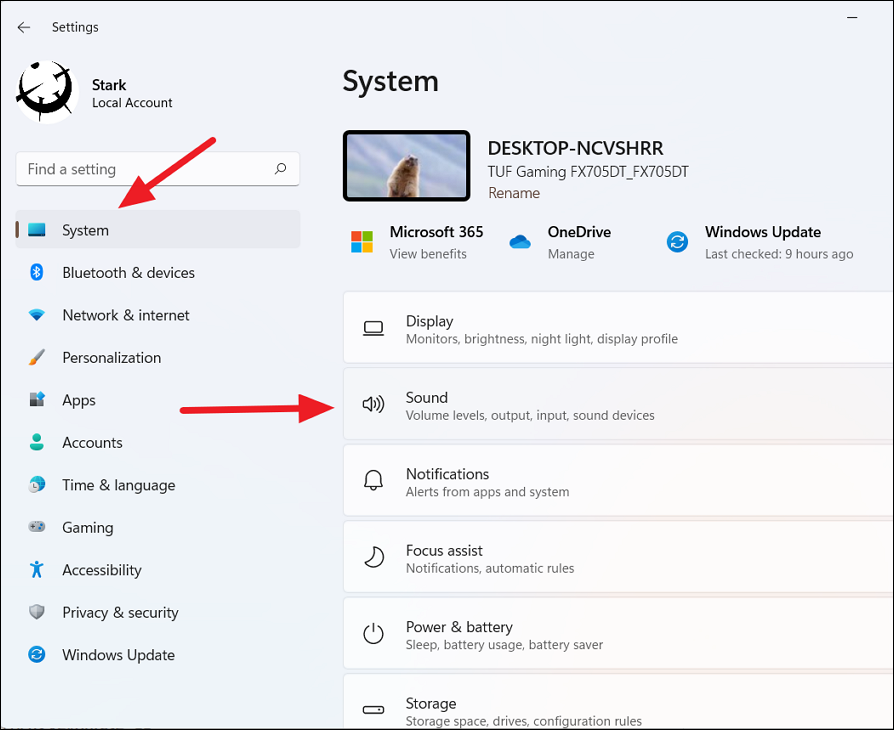
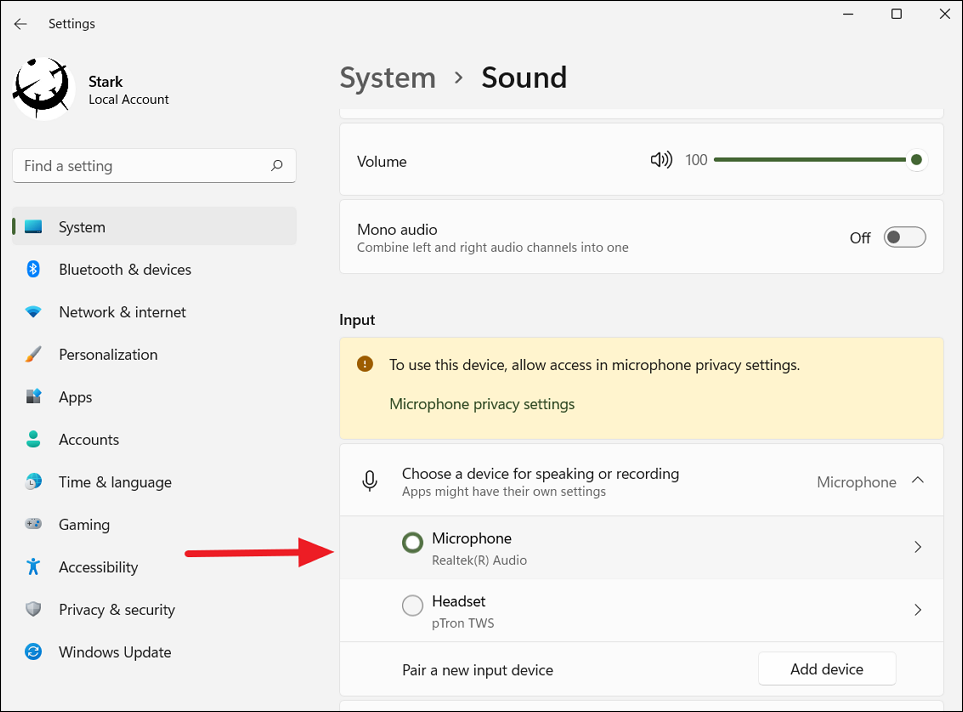
Open Windows Settings, click ‘System’ on the left, and select ‘Sound’ on the right pane.
On the Sound settings page, select your microphone device under the Input section.
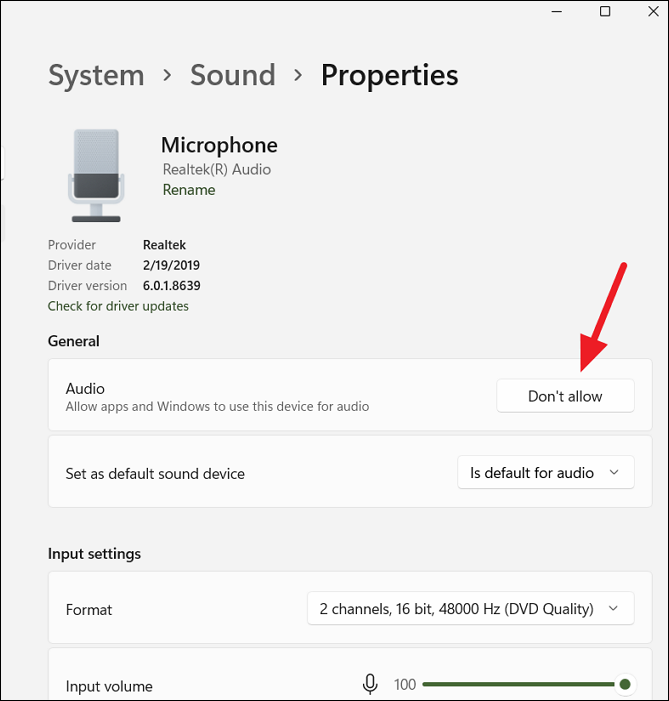
Then, make sure ‘Don’t allow’ is showing on the button next to ‘Audio’ under the General section. If you click the ‘Don’t allow’ button, the mic will be disabled, so don’t do that. And if you see ‘Allow’ on the button, click on it to enable the mic.
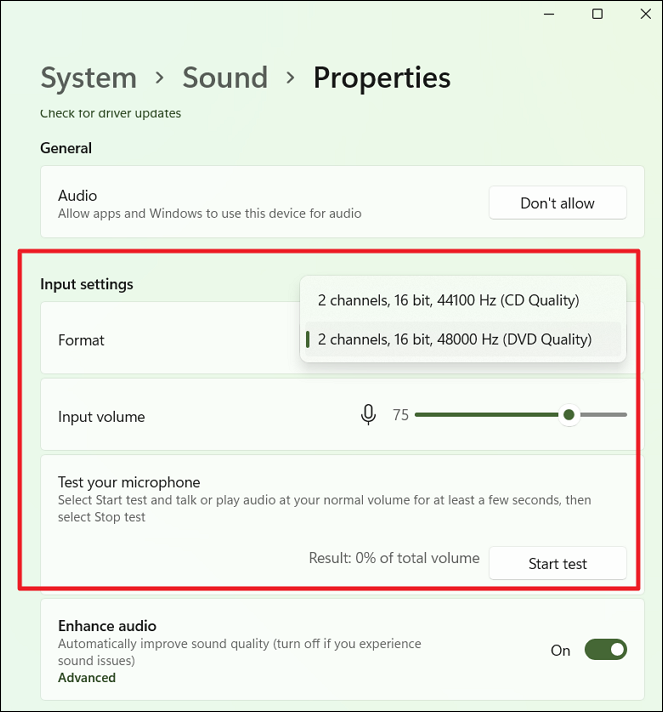
Under the Input settings section, you can change the input volume and format (sample frequency and bit depth) to improve the audio quality of the mic. Choose the correct audio format from the ‘Format’ drop-down and use the ‘Input volume’ slider to increase the mic volume. Then, click the ‘Start test’ button and speak for a few seconds and click the ‘Stop test’ button to test how much volume it receives.
Turn off Enhance audio
Sometimes microphone problems can be caused by audio enhancement features. Turning it off may fix your microphone problem. Turn off the toggle next to ‘Enhance audio’ to disable audio enhancements.
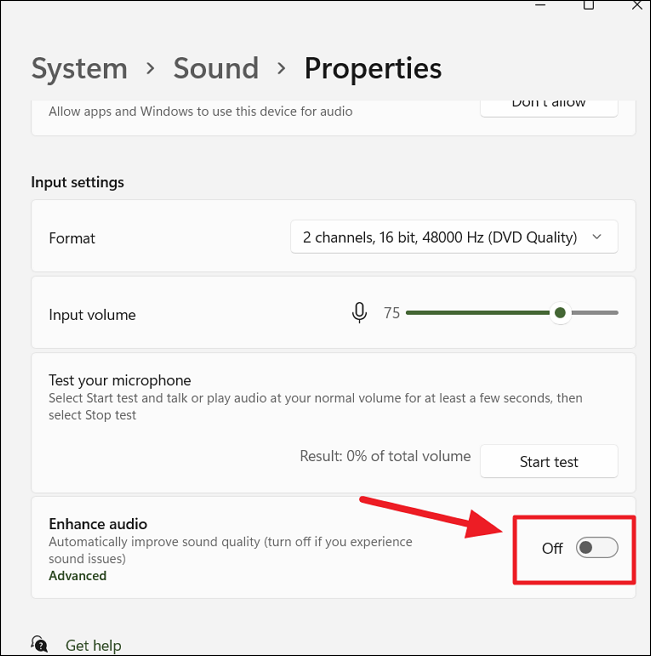
In some cases, enabling the ‘Enhance audio’ feature could improve your Microphone audio quality. You can toggle the feature on and off and see which works best for you.
Configure the Microphone Settings from the Control Panel
You can also configure Microphone settings from the Sound control panel. The above method is only available for Windows 11, but you can this method to set up a microphone in almost any Windows version. Here’s how you do this:
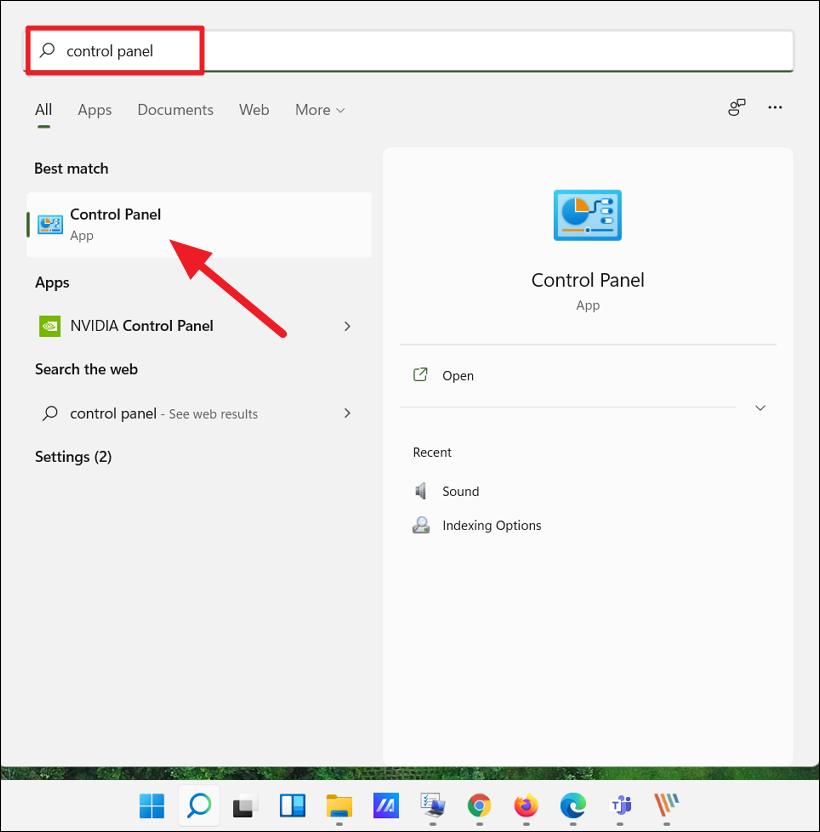
First, search for ‘control panel’ in the Windows search and choose ‘Control Panel’ from the results to launch it.
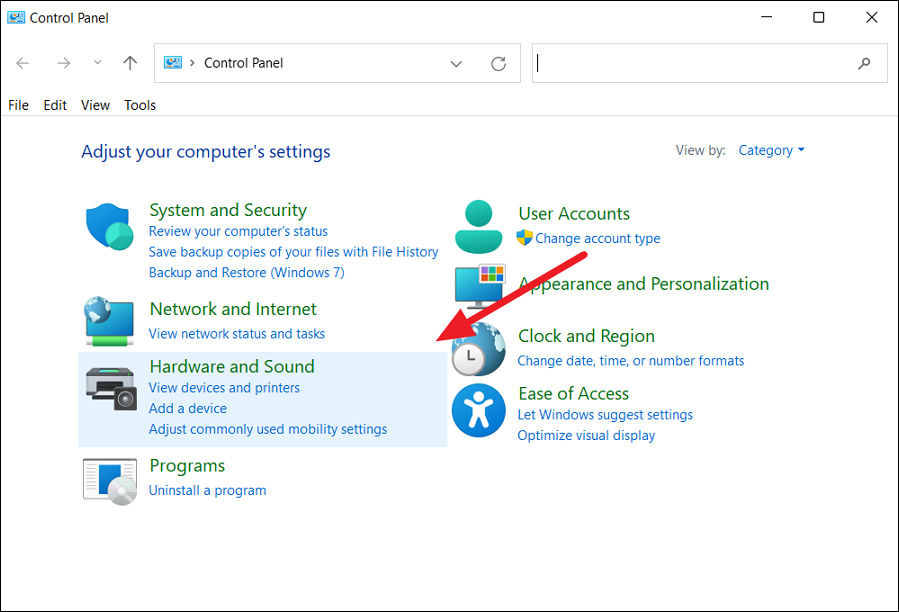
In the Control panel, make sure you are viewing the settings in category view and select the ‘Hardware and sound’ category.
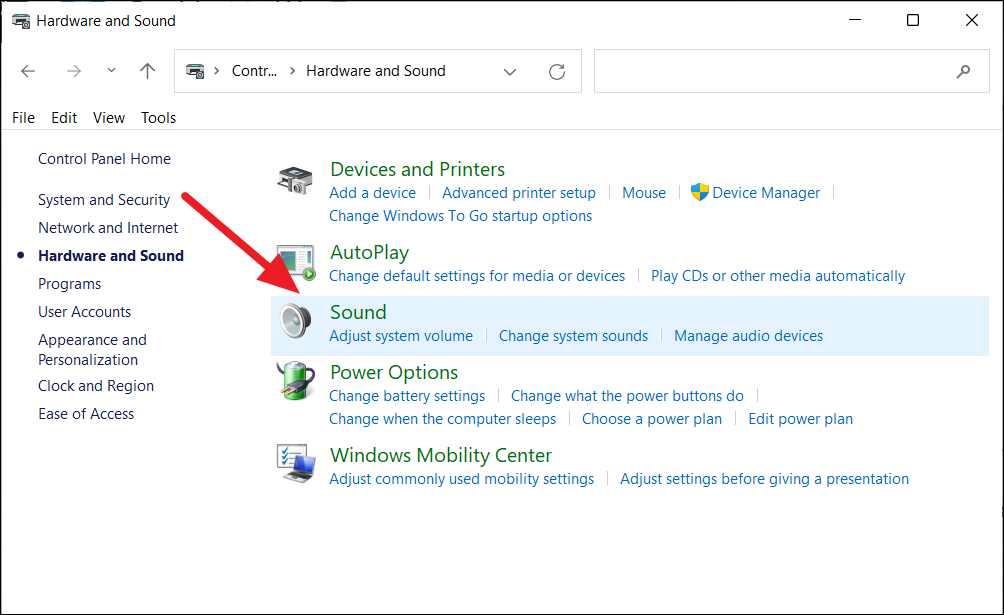
In the next window, you can either click the ‘Sound’ option or the ‘Manage audio devices’ link to open the Sound Properties dialog box.
This opens up the Sound dialog box where you can configure various sound settings.
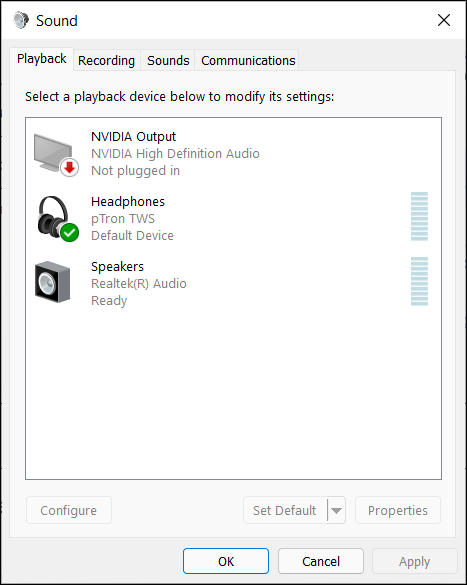
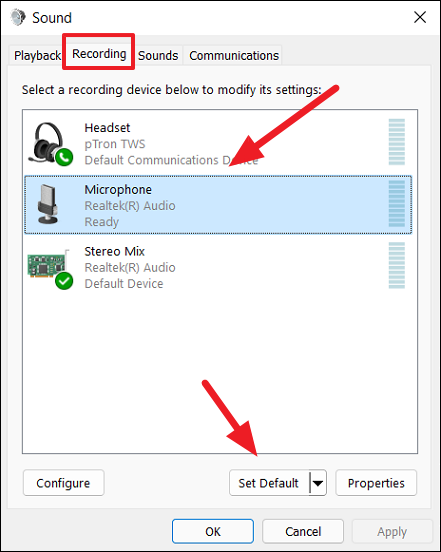
Then, go to the ‘Recording’ tab and select the correct input device and select the ‘Set Default’ button below to set that device as default.
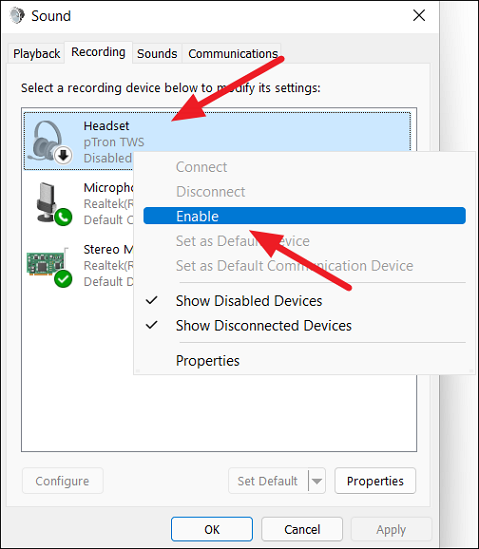
To enable a microphone device, right-click on a recording device and select ‘Enable’.
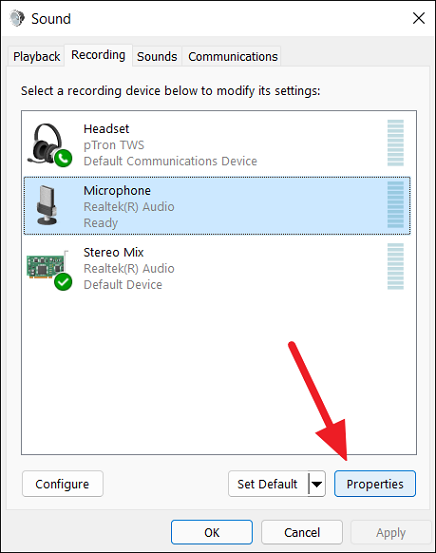
To change the microphone settings, select the microphone and click the ‘Properties’ button.
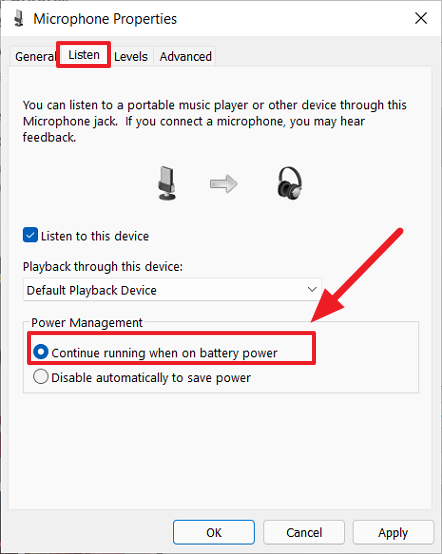
Windows automatically disables the mic whenever the PC is on battery. To prevent this, go to the ‘Listen’ tab and make sure that the ‘Continue running when on battery power’ option is selected under the Power Management as shown below.
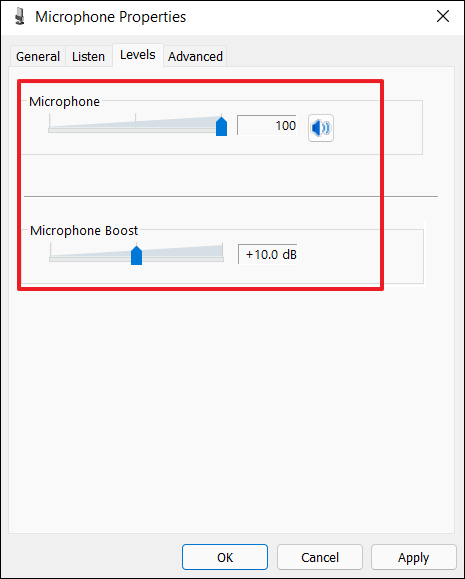
Next, switch to the ‘Levels’ tab in the Microphone Properties dialog box. Here, you can adjust the intensity level by dragging the Microphone volume slider left and right to ensure that you have the right level of the input volume. You can also try boosting the Microphone by adjusting the ‘Microphone Boost’ slider to improve the microphone sound.
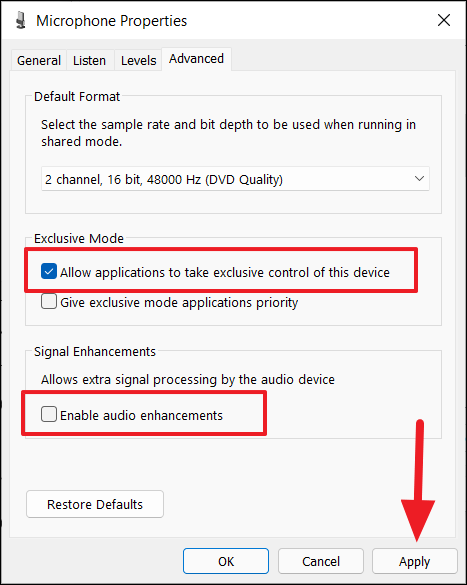
Under the ‘Advanced’ tab, you can also change the sample rate and bit depth frequency from the ‘Default Format’ drop-down. Then, check the ‘Allow applications to take exclusive control of this device’ option to let Microsoft Teams and other apps take full control of the audio device.
After that deselect the ‘Enable audio enhancements’ option and click ‘Apply’ and then ‘OK’ to save the changes.
Reinstall/Update Audio Drivers
One of the common reasons for microphone malfunctioning is corrupted or outdated audio device drivers. You are more likely to experience this especially if you’re using a USB microphone or microphone integrated into the webcam you are using. So it’s better to reinstall or update your audio device drivers on your computer.
If you are using a USB microphone or webcam, you can visit the manufacturer’s website and search for the latest version of the driver for your Windows version (e.g., Windows 11 64bit).
You can also update, uninstall, or reinstall drivers from the Windows Device Manager console. To do that follow these steps:
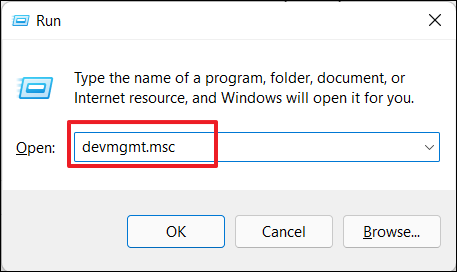
Open the Run command by pressing Win+R and enter devmgmt.msc to open Device Manager. Or you can search for ‘Device Manager’ from the Start menu and open it from the results.
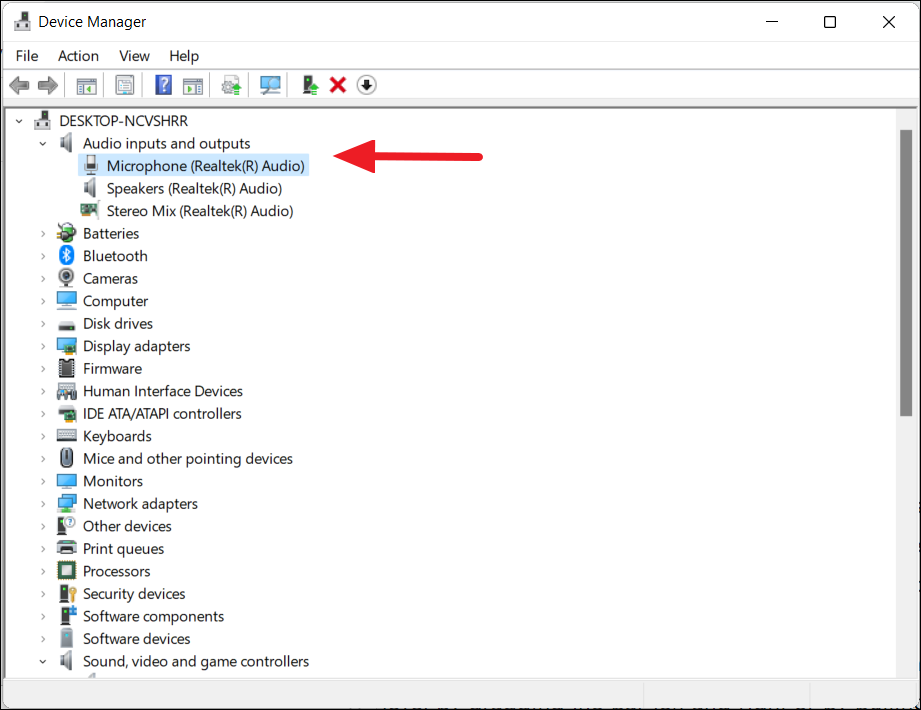
In the Device Manager, expand ‘Audio inputs and outputs’ and you will see your microphone listed under there.
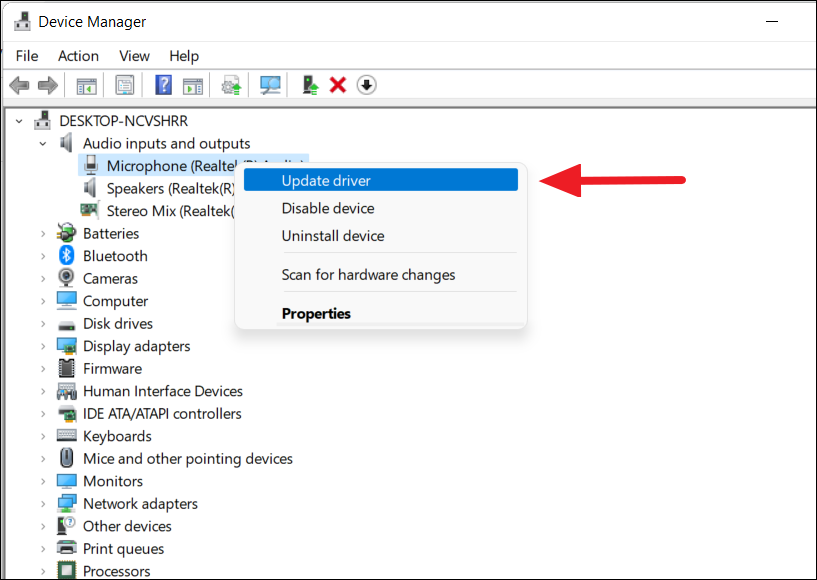
To update the driver, right-click on the microphone device you want to update, and select ‘Update driver’.
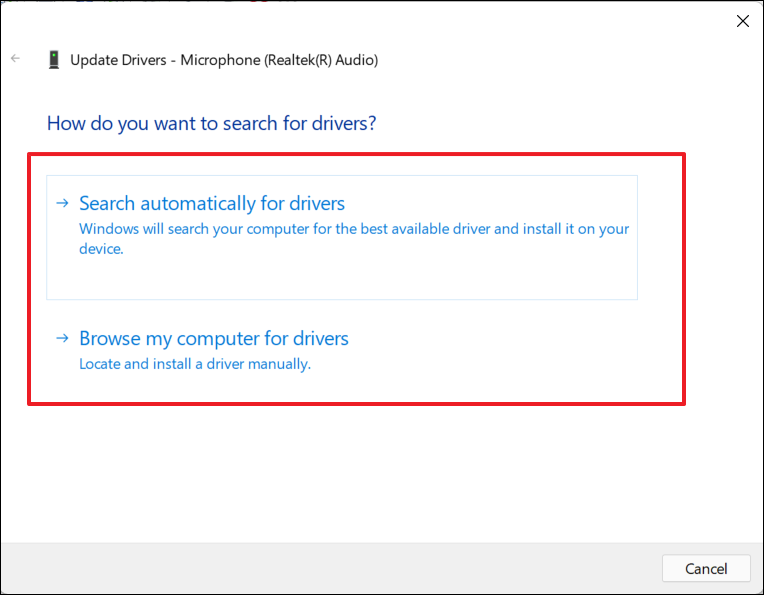
In the Update Drivers windows, choose ‘Search automatically for drivers’ if you want to let windows search for the best available drivers and install it. Or, choose ‘Browse my computers for drivers’ if you want to manually locate and install the driver you downloaded and stored on your computer.
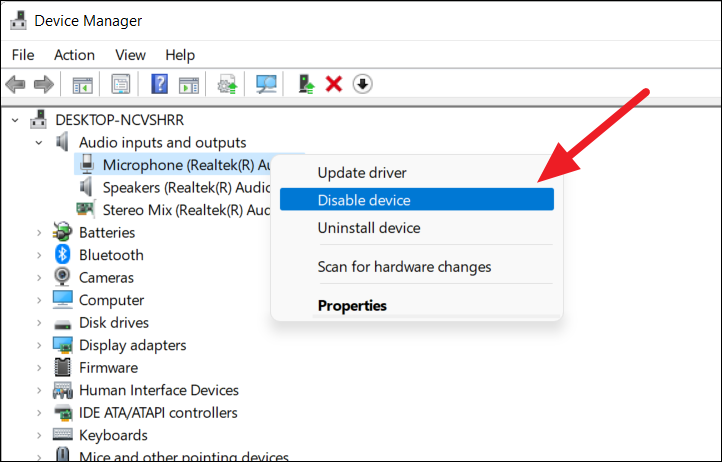
You also try disabling and enabling the input device and see if it fixes the microphone problem. Right-click on the microphone device and select ‘Disable device’.
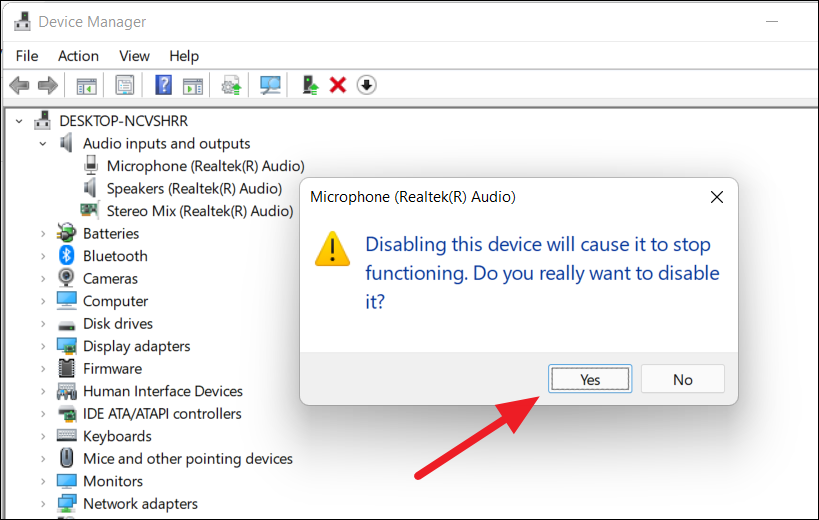
Click ‘Yes’ to the confirmation box.
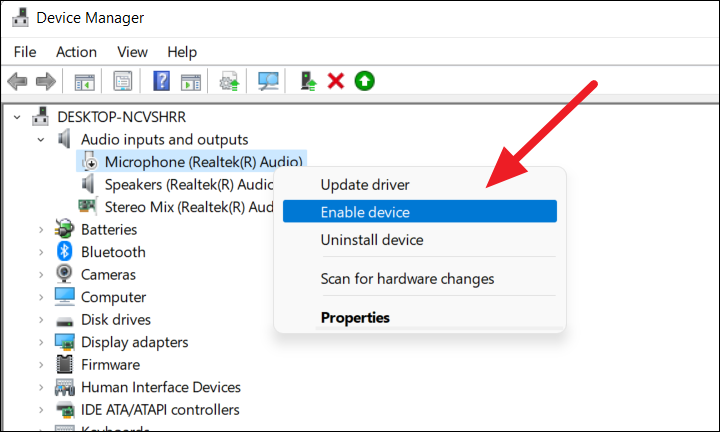
Then, re-enable it by right-clicking the device and selecting ‘Enable device’
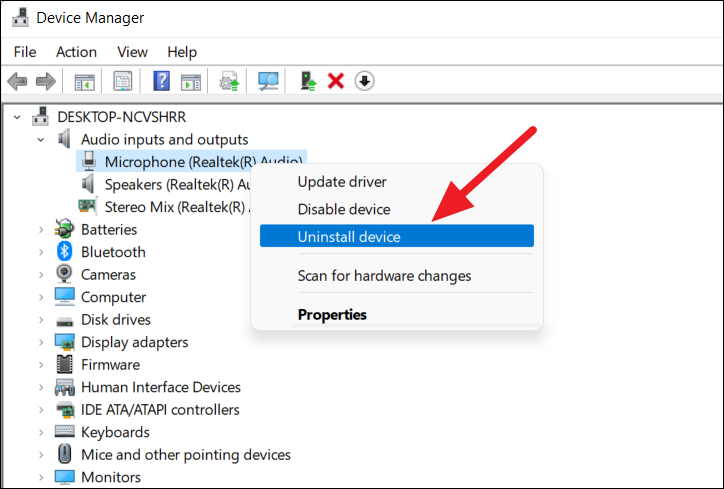
To uninstall a device, right-click on the microphone and select the ‘Uninstall device’ option.
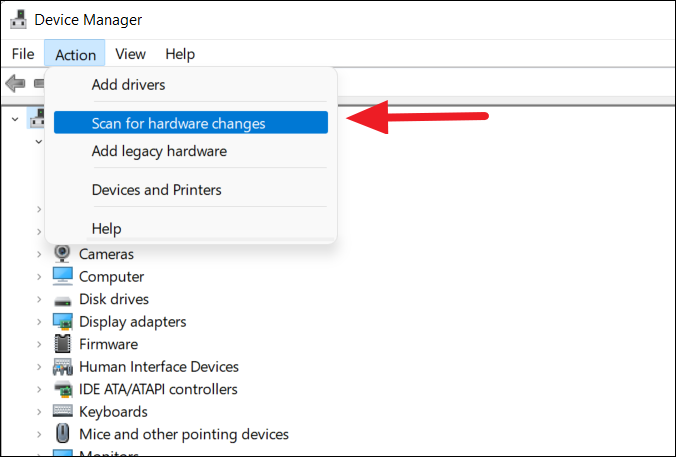
After that search for the right audio driver for your system on the internet, download, and install it. Or you can click the ‘Action’ menu and select ‘Scan for hardware changes’. This will reinstall the drivers on your computer.
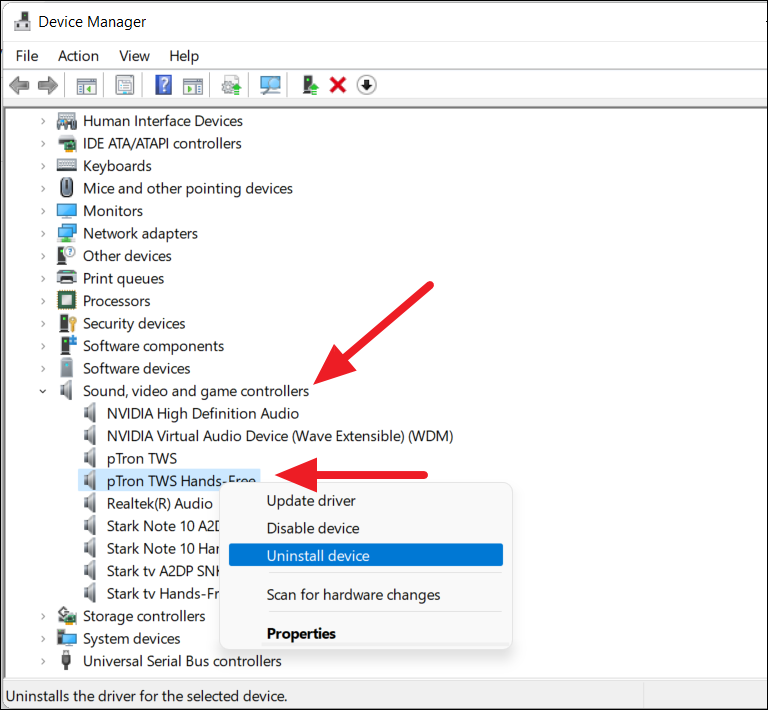
If you are using a separate microphone device like a USB mic or webcam, expand the ‘Sound, video, and game controllers’ and you will find your device under there. Then, right-click the device and update, disable or uninstall the device.
Update Skype App
Microsoft Teams is a collaboration app and it is integrated with other Microsoft apps like Calendar, Skype, etc. For some users, updating the Skype app or Skype Business Client application could fix the Microphone issue.
You can search for the Skype app on the Microsoft Store and update it to its latest version. You can also visit the Skype official website or Skype for Business website and download and install the latest version of the software.
Disable Skype Autorun
As you know Skype application comes preinstalled in Windows 10 and Windows 11. Also even if you manually install Skye applications, it is set to automatically start with Windows whenever your start your computer and run in the background. Sometimes, when the Skype app running in the background, it takes exclusive control of your microphone device which causes the Microphone not to work on your Microsoft Teams app.
In such cases, you need to stop the Skype app from running in the background and prevent the app from starting up automatically during Windows startup. Here’s how you do this:
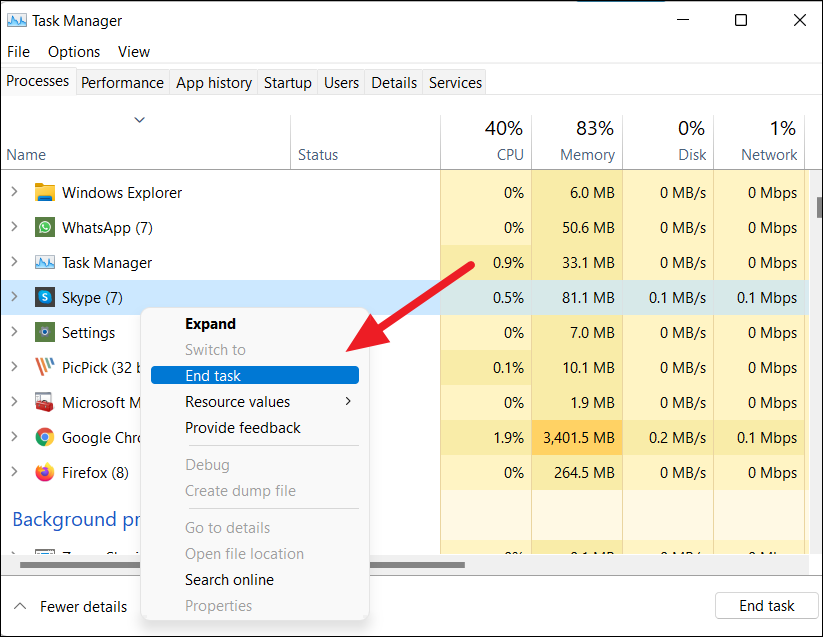
Open Task Manager by searching for it in Windows search or by pressing the Ctrl+Shift+Esc shortcut. In the Task Manager, locate ‘Skype’, right-click on it, and select ‘End Task’.
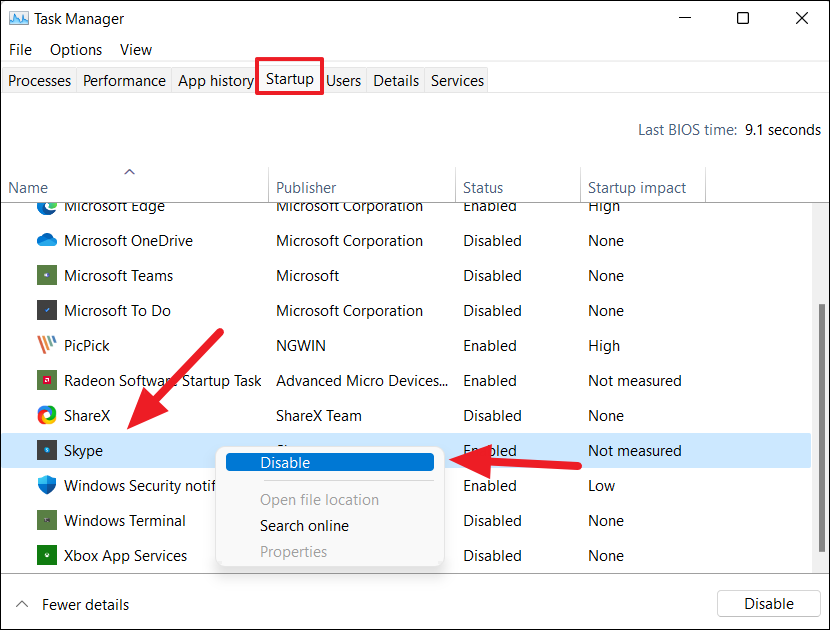
To disable Skype from autorun, switch to the ‘Startup’ tab. Then locate ‘Skype’, right-click on it, and select ‘Disable’.
Check Windows Audio Service
Windows Services is a collection of essential services that automatically start with every Windows startup. Windows Audio Services is an important Windows service that manages audio for Windows-based programs. Occasionally, malware and virus could alter these services to affect your computer. So if the Windows Audio Service is stopped or its startup type is set to manual, any service that depends on it (like Microphone) will not work properly.
In such cases, you need to restart the audio service and change the startup type to automatic. Here’s how you can do that:
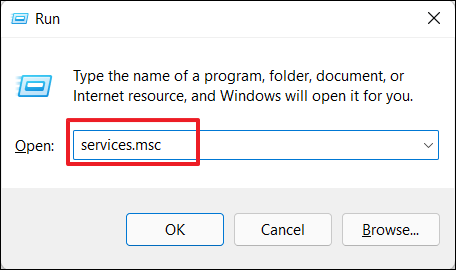
First, open the Run command box by pressing Win+R and type services.msc and then press Enter.
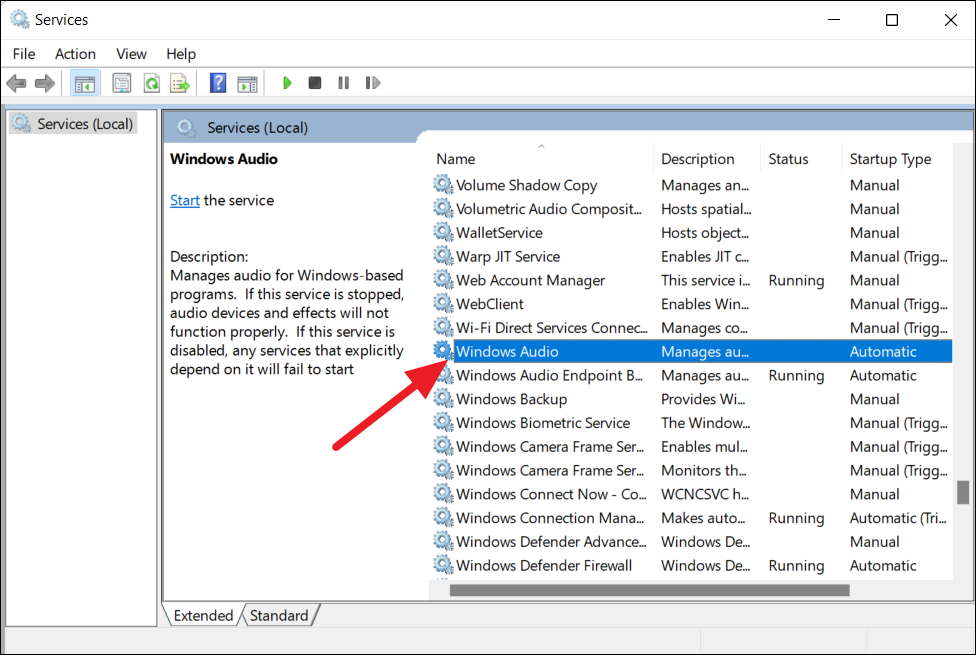
When the Windows Services window launches, scroll down till you find the ‘Windows Audio’ service. Then, double-click on it.
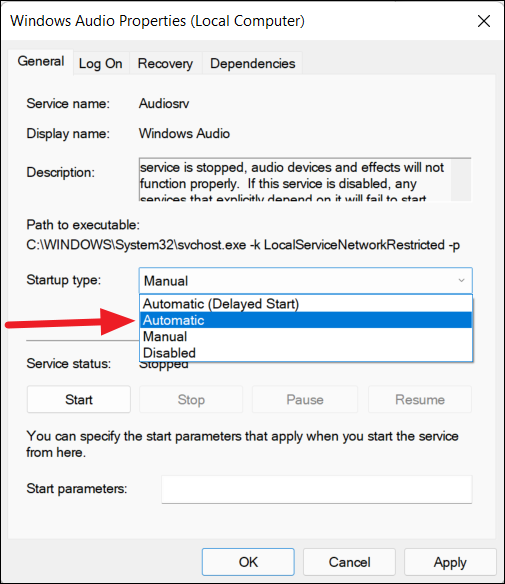
This will open the Windows Audio Properties dialog box. Here, click the ‘Startup type:’ drop-down and select ‘Automatic’.
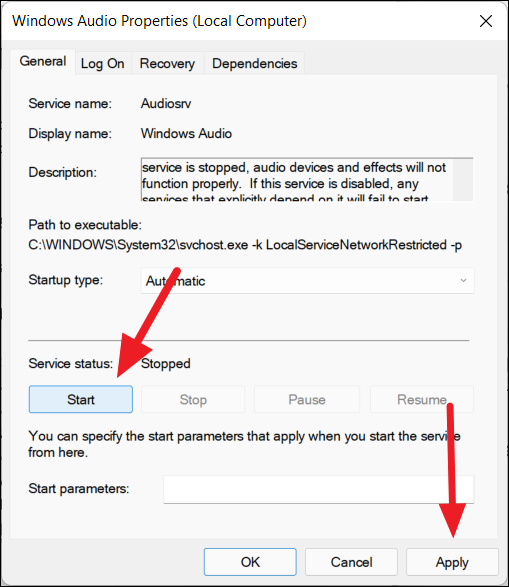
If the Service status is Stopped, click the ‘Start’ button to start the audio services. Then, click ‘Apply’ and then ‘OK’.
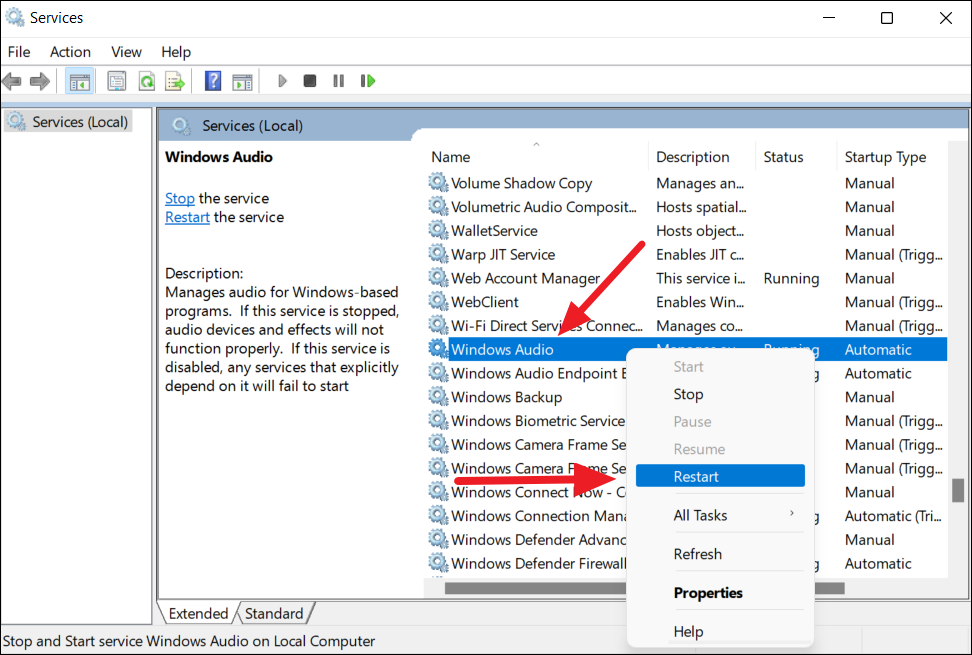
If you wish to simply restart the service, right-click the ‘Windows Audio’ service and choose ‘Restart’.
Run Recording Audio Troubleshooter
Running the recording audio troubleshooter can fix most of the common microphone-related issues that you might experience. Follow these instructions to run the input audio troubleshooter:
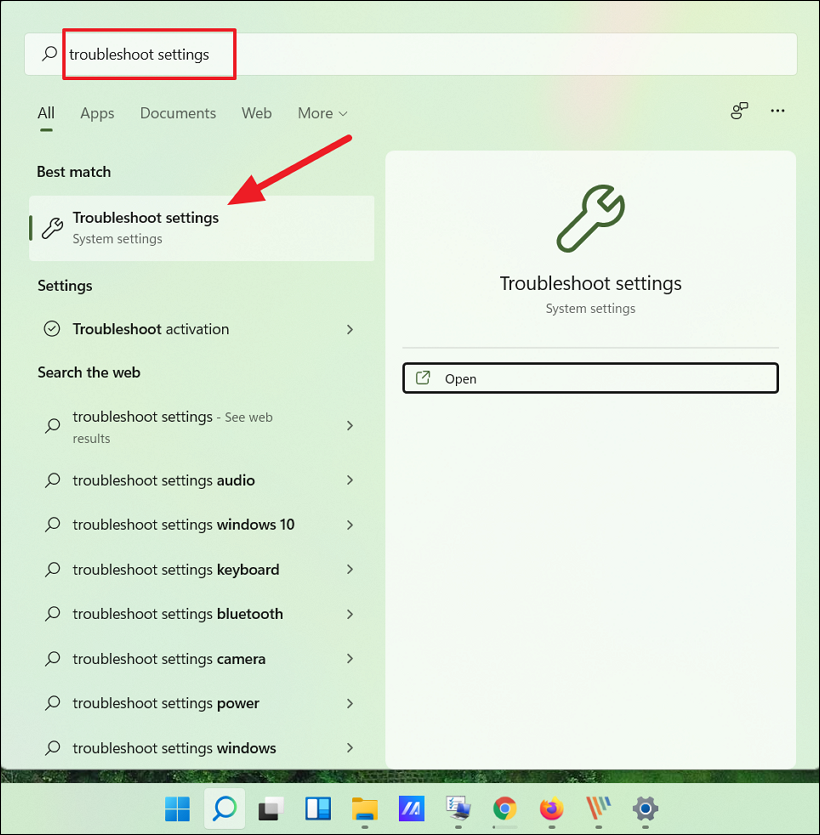
First, click on the Start menu and search for ‘Troubleshoot settings’ in the Windows search. From the search results, open ‘Troubleshoot settings’.
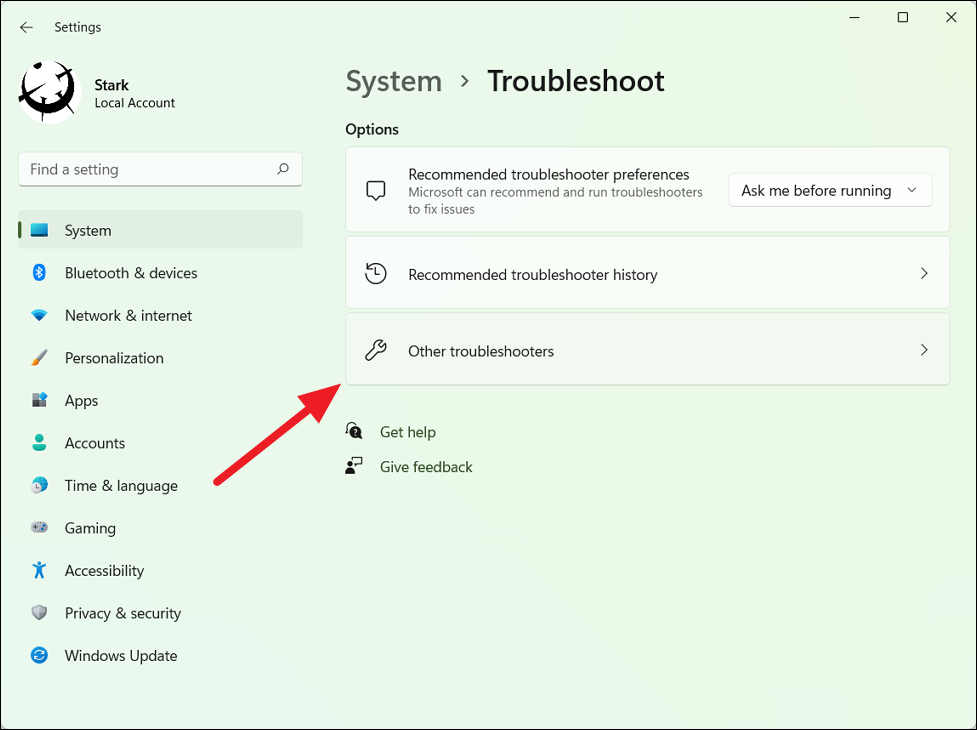
In the Troubleshoot windows, select the ‘Other troubleshooter’ option (for Windows 11). If you are using Windows 10, click the ‘Additional troubleshooters’ option.
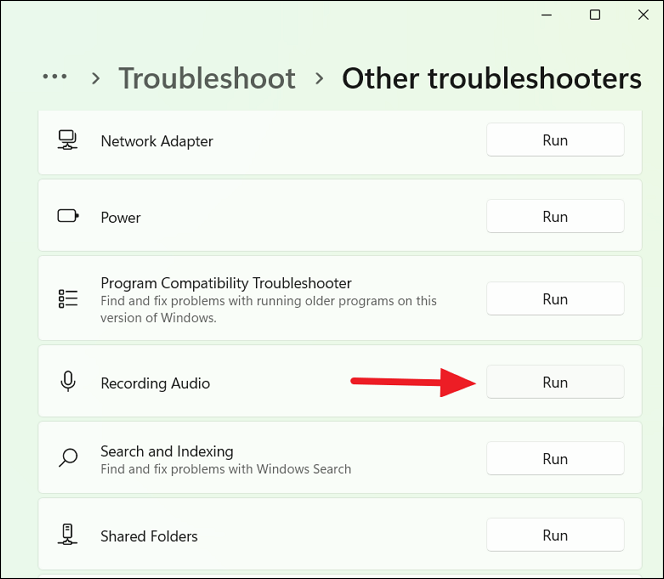
Scroll down and locate ‘Recording Audio’ in the list of options. If you are using Windows 10, click on the ‘Recording Audio’ and click the ‘Run the troubleshooter’ button. In case, if you are using Windows 11, click the ‘Run’ button next to the ‘Recording Audio’ option.
In the Recording Audio window, select a microphone or device with an inbuilt audio adaptor and click ‘Next’.
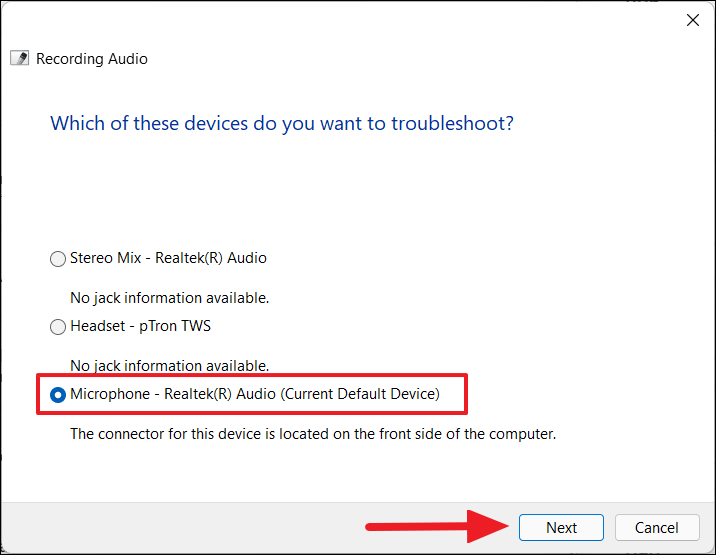
Once you do that, the troubleshooter will run and try to find any issues with your device’s microphone and fix them.
Reinstall Microsoft Teams
If installing the latest version and other troubleshooting methods didn’t fix your microphone issue, it’s possible that some of the Microsoft Teams program files are corrupted. The only way to fix it is to uninstall the app and make a clean installation of the app.
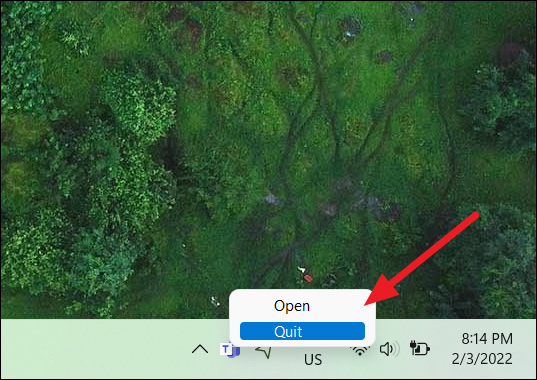
First, completely close the Teams app by right-clicking the ‘Teams’ icon in the taskbar corner overflow and clicking ‘Quit’.
Next, open Windows Settings, click ‘Apps’, and select ‘Apps & features’.
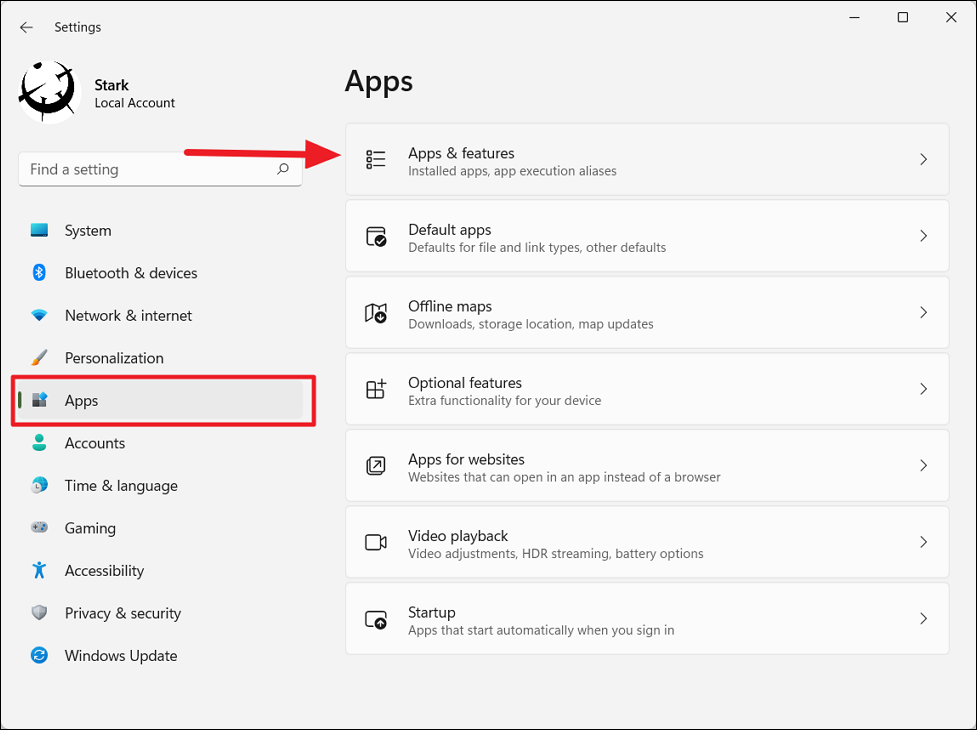
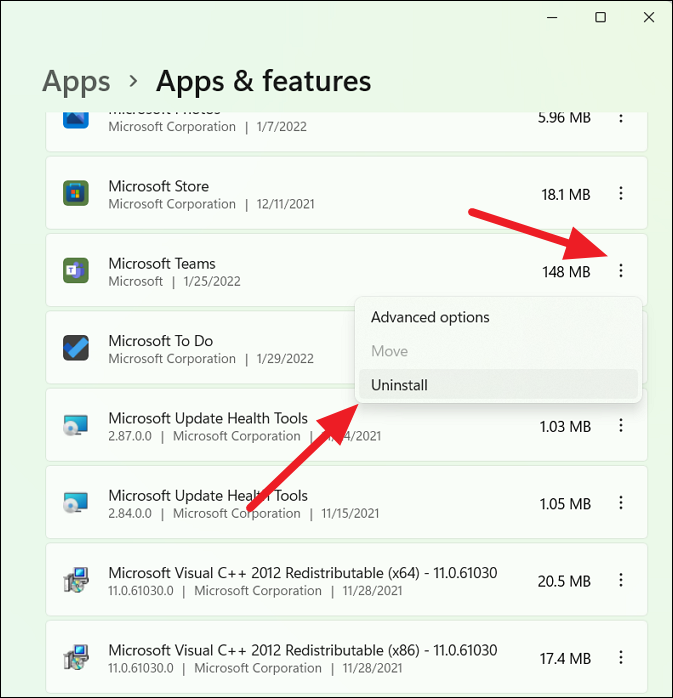
Then, choose the ‘Microsoft Teams’ app from the list of apps and select ‘Uninstall’.
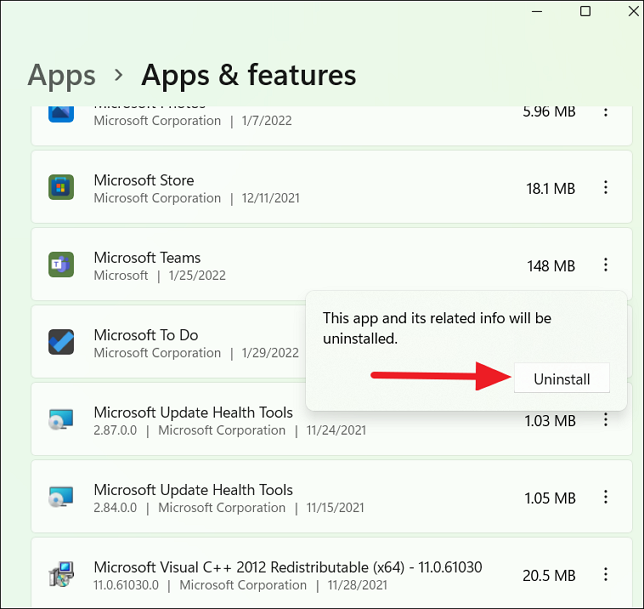
Then, click the ‘Uninstall’ button again.
Alternatively, you can also uninstall the app from the Programs and Features control panel. After uninstalling the app, you may need to delete the MS Teams residual files that are left behind.
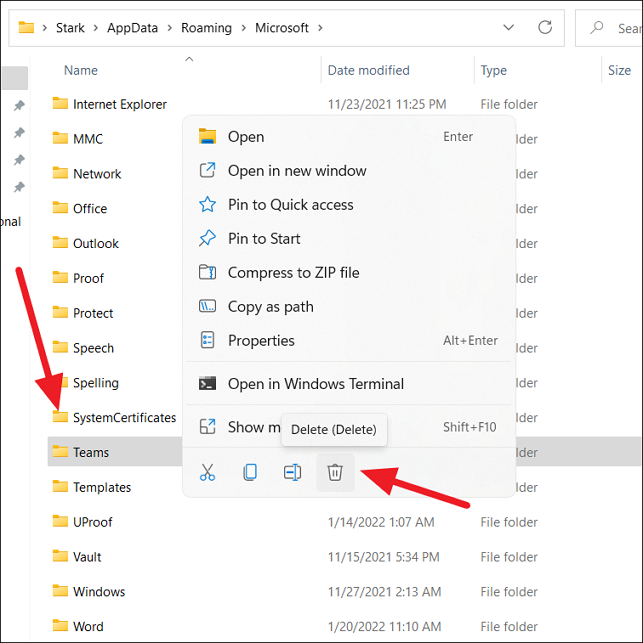
To do that, open the Run dialog box by pressing Win+R, then type %appdata% and press Enter. Then navigate to the ‘Microsoft’ folder and if you see the ‘Teams’ folder in there, right-click on the ‘Teams’ folder and select ‘Delete’. Then, close the folder.
After that, type %Programdata% in the Run command and click ‘OK’. This will take you to the hidden ProgramData folder. Now, locate the ‘Teams’ folder here and delete it. Then, restart your PC.
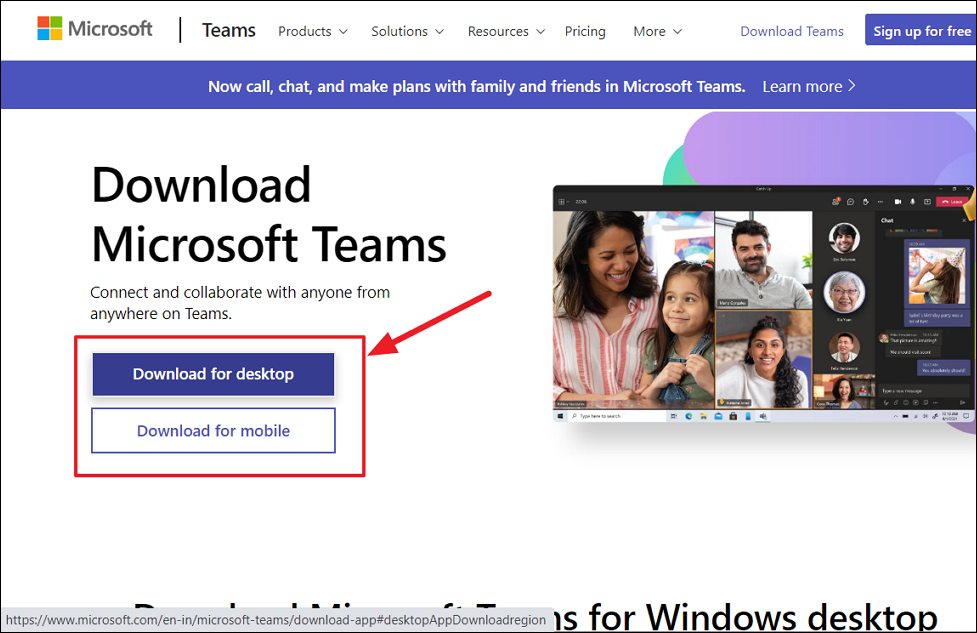
To install the app, go to the Microsoft Teams official website and click ‘Download for desktop’ for the desktop version.
Then, choose the edition for MS Teams app (like, for Windows 11) on the next page.
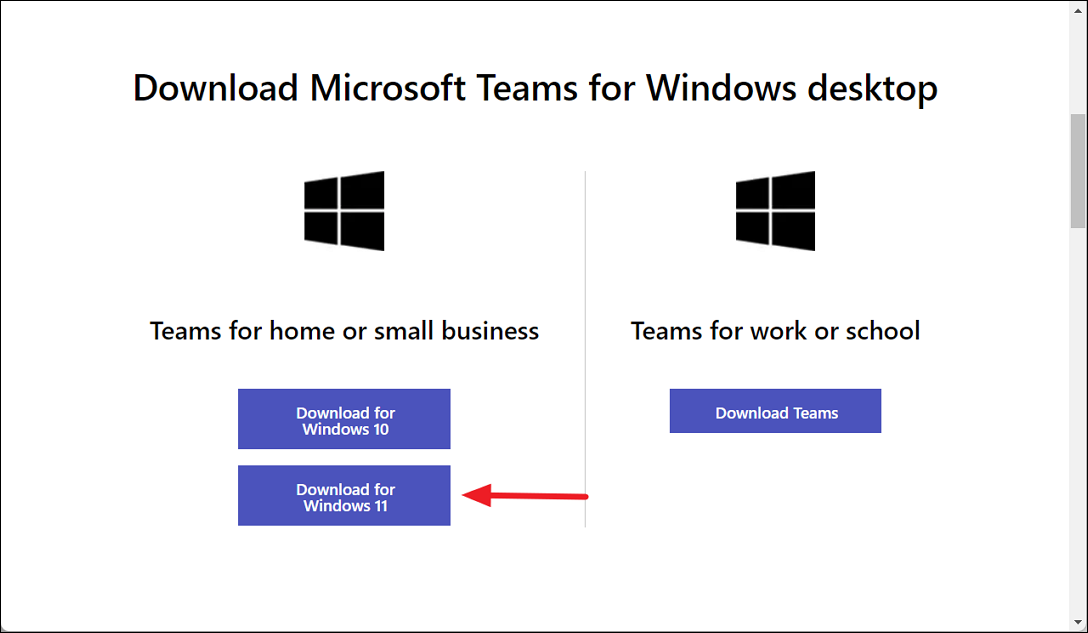
Once the app is downloaded, run the installer ‘MicrosoftTeams-x64.msix’ file to install the app. This will most likely fix your mic problem. If all else fails, try the next method.
Use System Restore to Fix Mic (Last Resort)
If none of the above methods get your Microphone to work with Microsoft Teams, then some of your Windows system files may be corrupted. The only solution is to restore your system to a particular point in time. A restore point is created whenever there’s a major change to the system like during program installation, installation, Windows update, etc.
You can use those restore points to revert your system file and settings to a previous state, including drivers, registry files, applications, system files, and more. To do this follow these steps:
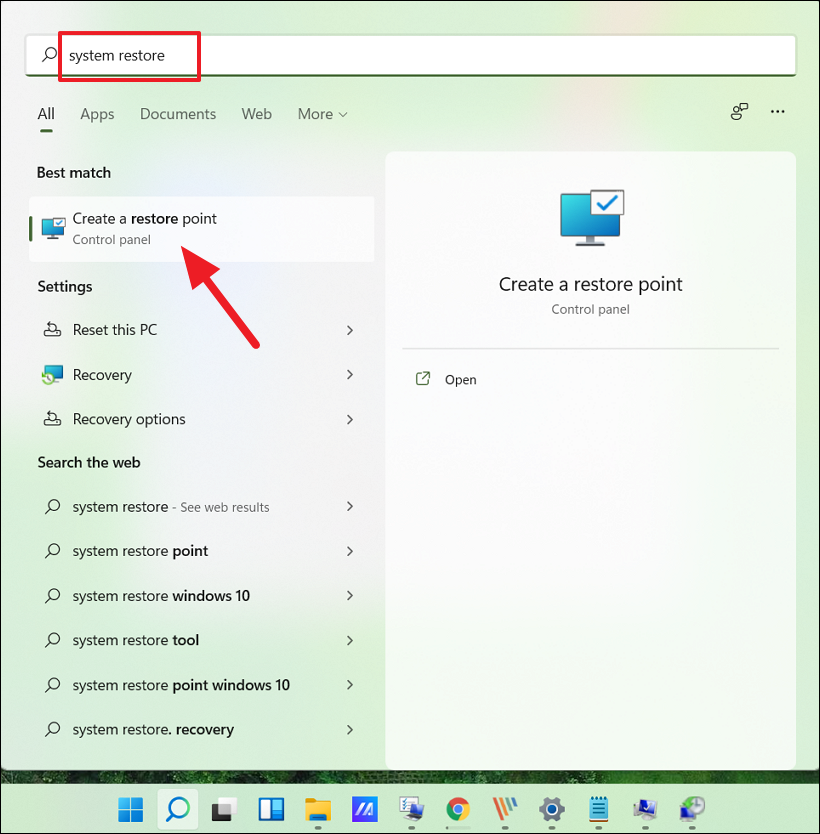
First, search for ‘System restore’ in the Windows search and select ‘Create a restore point’ control panel.
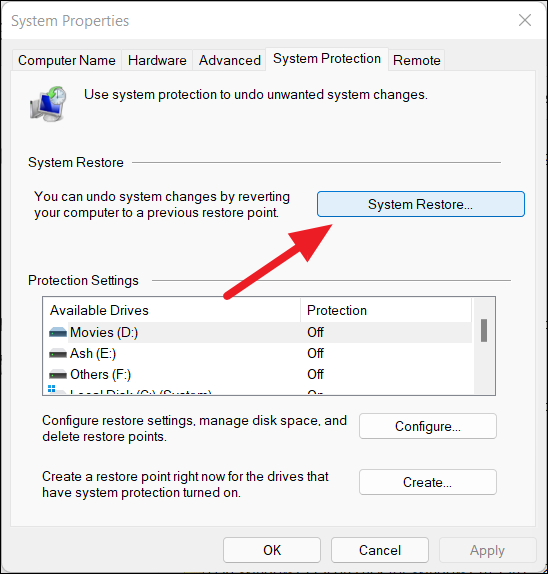
In the System Properties windows, click the ‘System Restore’ button.
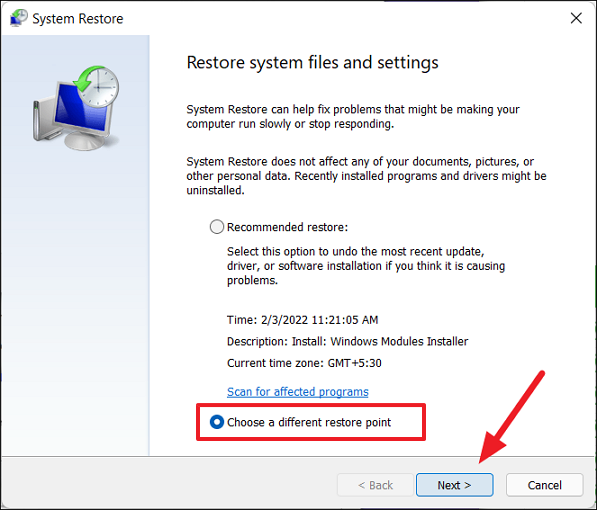
In the System Restore Windows, select the ‘Choose a different restore point’ option and click ‘Next’.
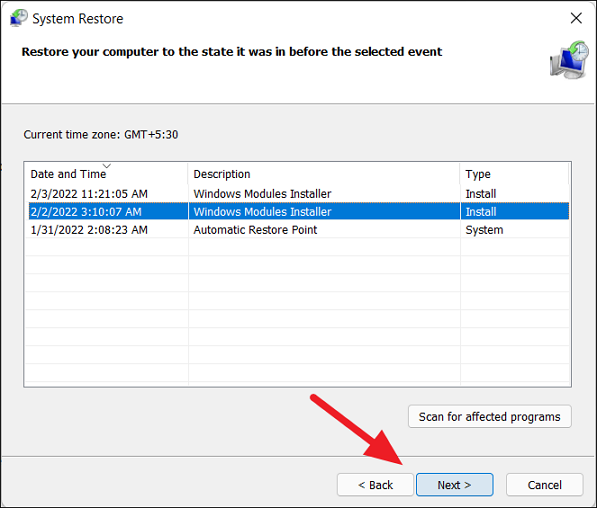
In the next screen, choose an automatically or manually created restore point from the list, and click ‘Next’. Make sure you choose a restore point that was created before you started experiencing the microphone problem.
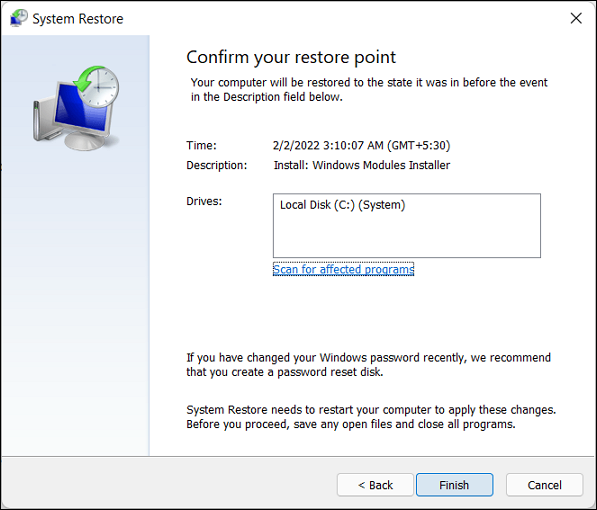
Finally, click ‘Finish’ to start the process. Now, your system will restart to apply the changes. Make sure to save your work and close all programs before continuing this process.
System restore will not delete any personal files, but it will recover and restore your settings, drivers, and applications. This will resolve all of your microphone-related and other problems on your computer.
If the problem still persists, then there is a strong possibility that the problem is with the core Windows files. In that case, you can use the System File Checker (sfc scan) or DISM command to restore system files. Or, create a new user profile (in case the current profile is corrupted), install MS Teams in it, and try using it.
If you’re still facing issues, then it’s likely a physical fault with the audio device or problems with the Windows OS. If you think the problem is with OS, you have no choice but to reinstall your Windows operating system.
That’s it.

