
Windows 11 requires Secure Boot to be active for installation and certain security features. However, some users find that Secure Boot is enabled in BIOS but still shows as inactive or “off” within Windows. This mismatch can block system updates, prevent certain software from running (like anti-cheat for games), and stop you from using device encryption. The root cause often involves BIOS configuration modes, CSM (Compatibility Support Module) settings, or missing platform keys. Fixing this ensures your system’s boot process only loads trusted software, which strengthens protection against firmware attacks.
Method 1: Switch BIOS Secure Boot Mode and Restore Factory Keys
Step 1: Restart your computer and enter BIOS/UEFI settings. This is typically done by pressing DEL, F2, F10, or F12 during startup, depending on your motherboard.
Step 2: Navigate to the Secure Boot section, usually found under the “Boot,” “Security,” or “Authentication” tab. Take note if Secure Boot Mode is set to “Setup” or “User.” If it’s in “Setup” mode, Secure Boot is not actually active.
Step 3: If Secure Boot is enabled but the mode is “Setup,” first disable Secure Boot. Save and exit BIOS if prompted.
Step 4: Re-enter BIOS. Change Secure Boot Mode from “Standard” to “Custom.” Accept any prompts or warnings.
Step 5: Now switch Secure Boot Mode back from “Custom” to “Standard.” When prompted, accept restoring or installing “Factory Defaults” or “Factory Keys.” This step installs the platform keys required for Secure Boot to become active.
Step 6: Re-enable Secure Boot. Save changes and exit BIOS. Allow the system to reboot.
Step 7: After rebooting, check Secure Boot status in Windows. Press Win + R, type msinfo32, and press Enter. In the System Information window, look for “Secure Boot State.” It should now show as “On.”
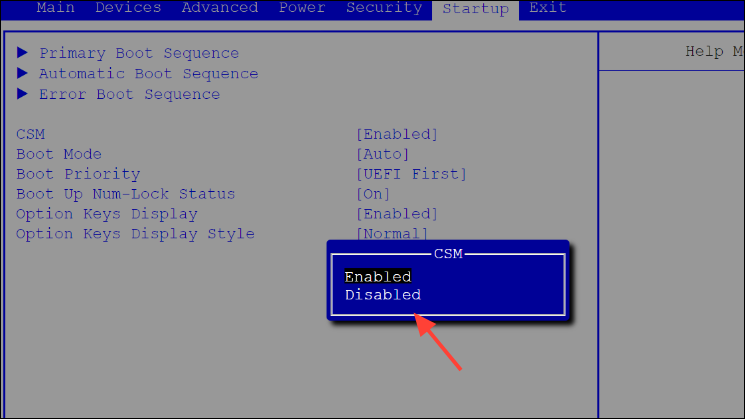
Method 2: Disable Compatibility Support Module (CSM) and Ensure UEFI Boot
Step 1: Enter your BIOS/UEFI settings as described above.
Step 2: Locate the CSM (Compatibility Support Module) option, typically under the “Boot” or “Advanced” tab. CSM allows legacy BIOS booting, which is incompatible with Secure Boot.
Step 3: Set CSM to “Disabled.” This forces your system to use UEFI boot mode, which is required for Secure Boot to function. If your system drive is not formatted as GPT (GUID Partition Table), you may need to convert it from MBR (Master Boot Record) to GPT. Attempting to disable CSM on a drive that is not GPT may prevent Windows from booting, so verify your drive format first.
Step 4: Save changes and exit BIOS. Allow the system to reboot. If Windows loads successfully, Secure Boot can now be enabled and activated using Method 1 if needed.
Step 5: If your system fails to boot after disabling CSM, you may need to convert your boot drive to GPT. This can be done using the mbr2gpt tool in Windows Recovery or installation media. Always back up your data before converting disk formats.
Method 3: Update BIOS and Reset Factory Defaults
Step 1: Visit your motherboard or computer manufacturer’s support website and download the latest BIOS/UEFI firmware update for your model. Follow their instructions to update your BIOS. An outdated BIOS can cause Secure Boot activation issues.
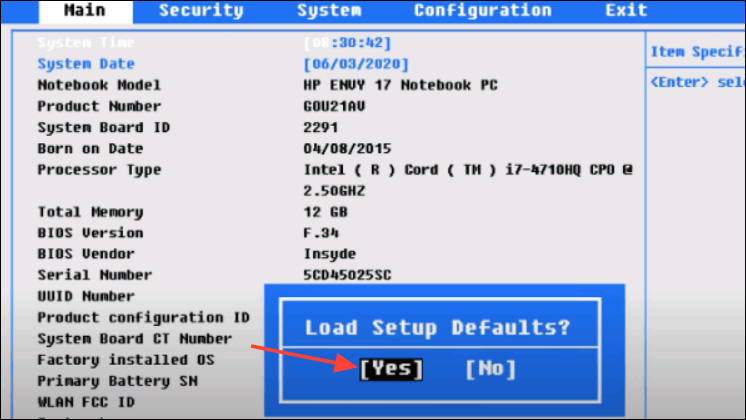
Step 2: After updating, enter BIOS again. Look for an option to “Restore Factory Defaults” or “Reset to Default Settings.” Apply this reset to clear any misconfigured settings that could block Secure Boot activation.
Step 3: Reconfigure Secure Boot as described in Method 1. Make sure to install factory keys if prompted.
Step 4: Save changes and reboot. Confirm Secure Boot status in Windows using msinfo32 as before.
Additional Tips and Cautions
- Always back up important data before making BIOS changes or converting disk formats. BIOS misconfiguration and disk conversion can result in data loss or unbootable systems.
- If you see “Secure Boot State: Unsupported” in
msinfo32, your hardware may not support Secure Boot, or UEFI is not enabled. - When toggling Secure Boot or CSM, some systems require a full shutdown (not just restart) for changes to take effect.
- Some antivirus or optimization software can interfere with Secure Boot. Temporarily disable such software if you continue to experience issues.
- If your BIOS is missing Secure Boot options, check for firmware updates or consult your manufacturer’s documentation to confirm hardware support.
With these steps, Secure Boot should now be active and recognized by Windows 11, restoring system security and compatibility for updates and applications. If issues persist, consult your motherboard’s support resources or community forums for model-specific advice.