- Windows PC randomly waking from sleep is a common issue; use the command prompt or Event Viewer to find out what is waking your PC up from sleep randomly.
- Common fixes include changing the wake timer, changing device settings, adjusting power settings, etc.
- Settings once adjusted will need to be periodically checked and reapplied, especially after software updates or hardware changes.
Find out what is waking your PC up
First, you need to determine what is waking your Windows PC up from sleep, which can be something as simple as certain connected peripherals like a keyboard, mouse, or headphones. To check that, follow these steps.
Use command prompt
- Open the Start menu, type
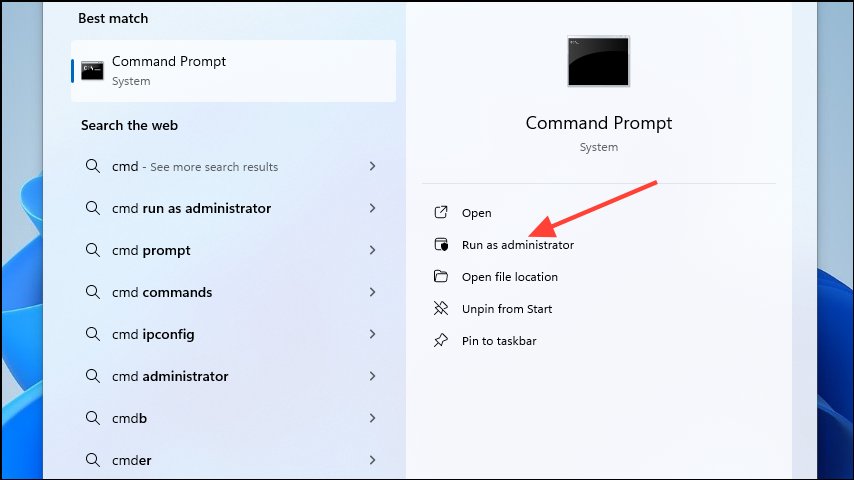
cmd, and click on 'Run as administrator'.
- In the command prompt window, type
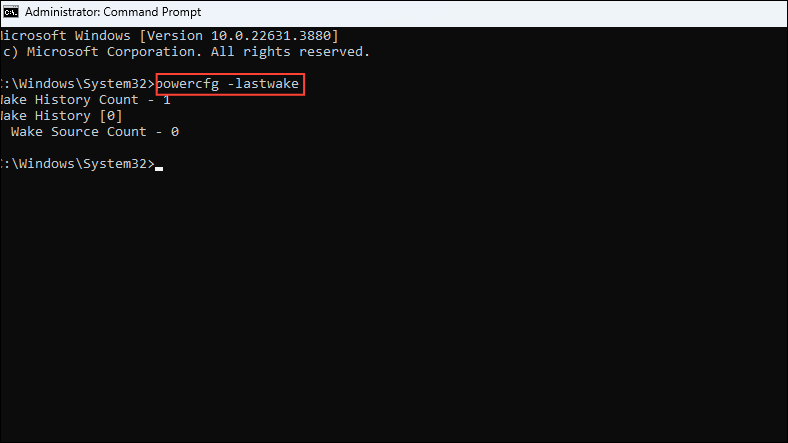
powercfg -lastwakeand press Enter. This will show you the reason your computer woke up randomly the last time, such as a USB or Bluetooth device.
- You can also check whether there is a wake timer enabled by typing
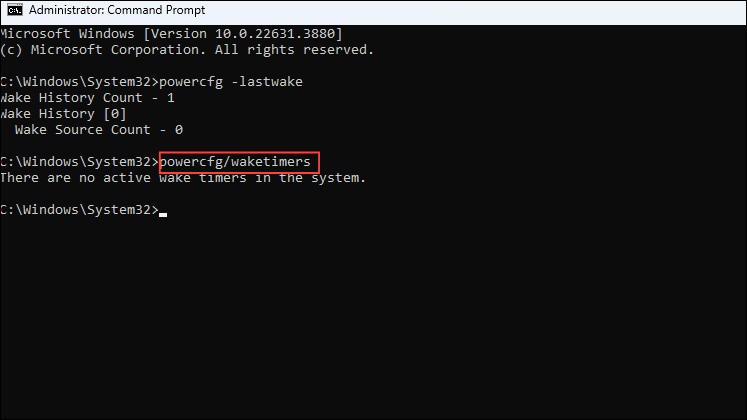
powercfg/waketimersin the command prompt window and pressing Enter.
- Follow the above command with
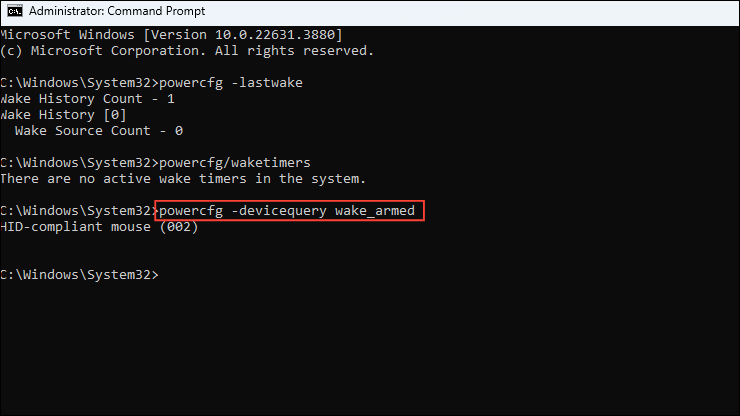
powercfg -devicequery wake_armedand press Enter to view the devices that are causing your PC to wake up randomly. The device responsible for the issue will show up in the command prompt window. For instance, here it is the HID-compliant mouse causing such an issue.
Use Windows Event Viewer
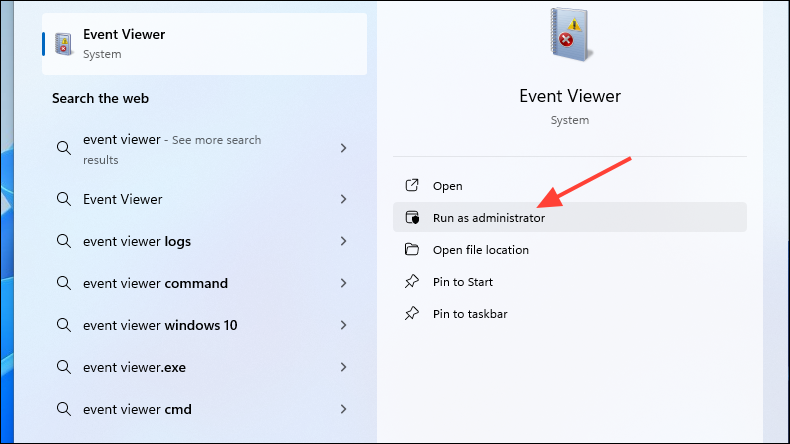
- Open the Start menu, search for 'Event Viewer', and open it as administrator.
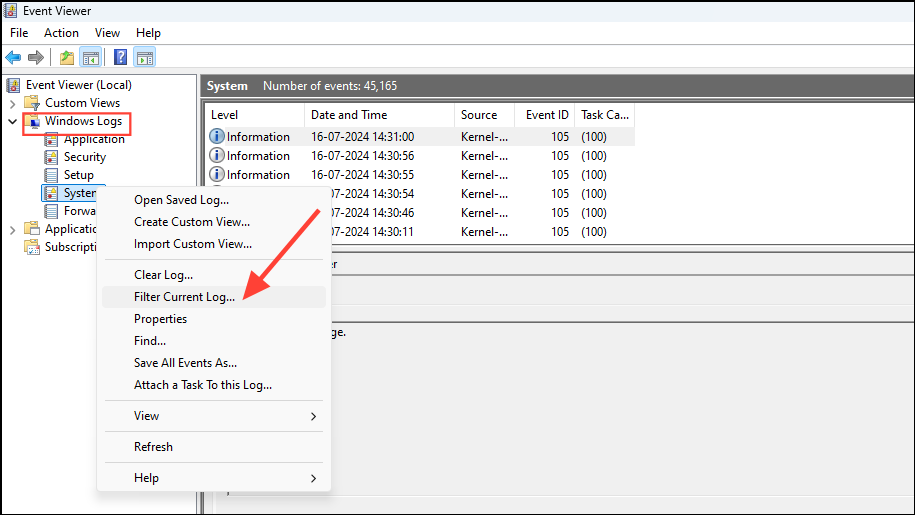
- When the Event Viewer opens, click on 'Windows Logs' on the left and right-click on 'System' before clicking on 'Filter Current Log'.
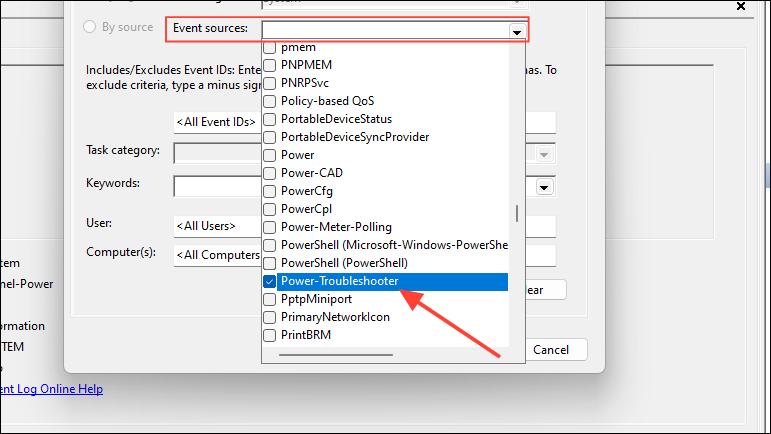
- Click on the Event Sources drop-down button and select 'Power Troubleshooter'. Then click on OK.
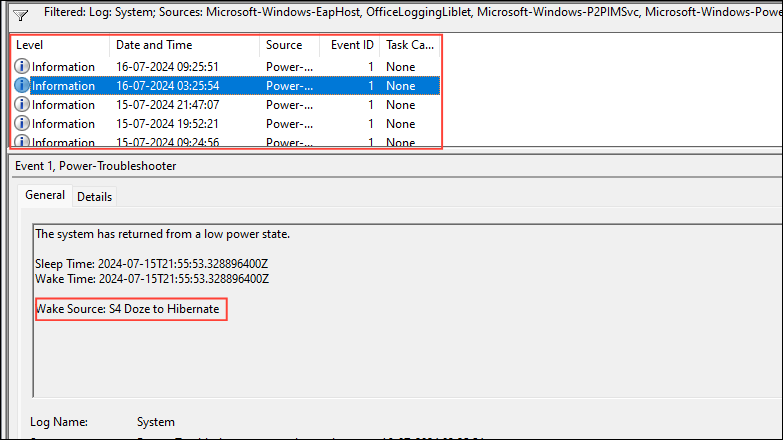
- Now you can go through the logs at the top and find the reason why your computer woke up from sleep randomly.
Fix 1: Change device settings in Device Manager
Whether you use the command prompt or the event viewer to identify the cause of the problem, there is a high chance that a connected device is waking your PC up.
- Once you've identified the device, right-click on the Start menu and click on 'Device Manager'.
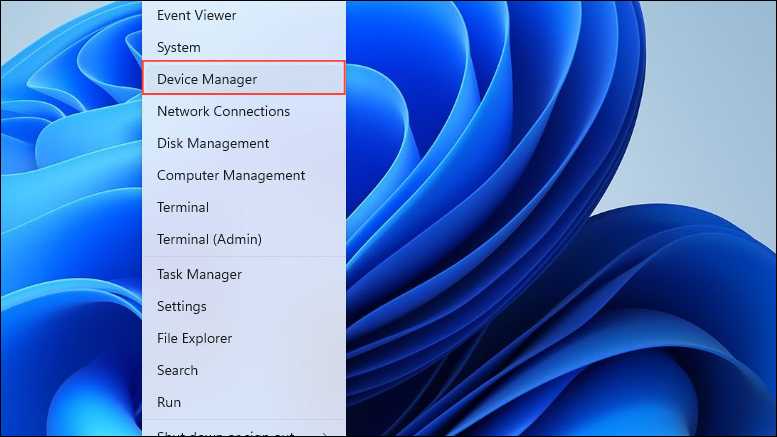
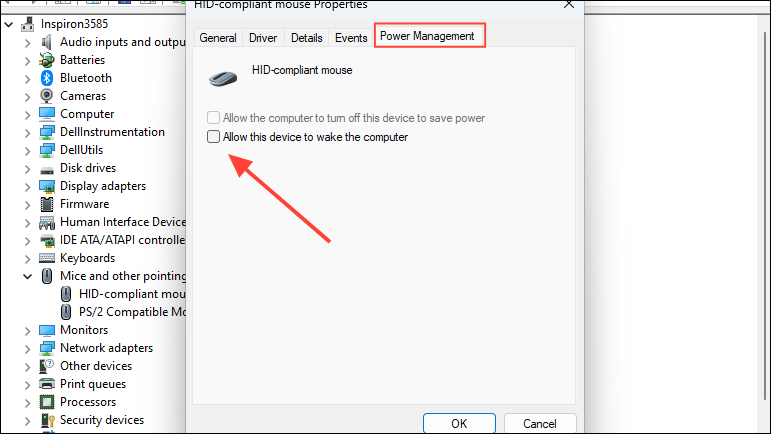
- In the Device Manager, double-click on the name of the device causing the problem.

- In the Device Properties box, click on the Power Management tab on the top and then uncheck the box next to 'Allow this device to wake the computer'. Finally, click on the 'OK' button and reboot your PC.
Fix 2: Disable UvoSvc service
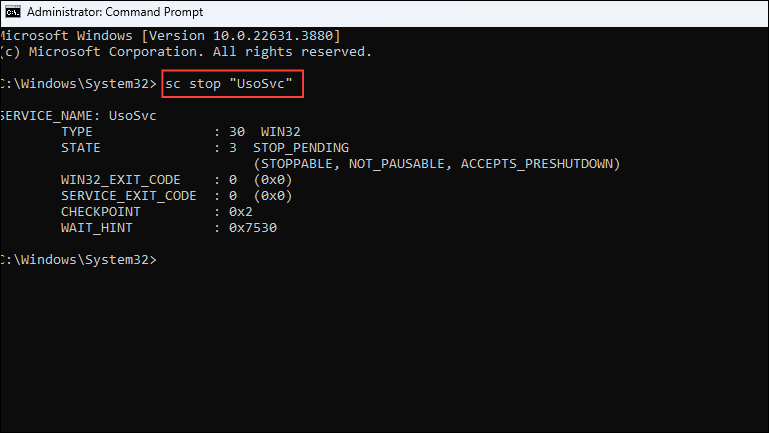
- Open the command prompt as administrator, type
sc stop “UsoSvc”and press Enter.
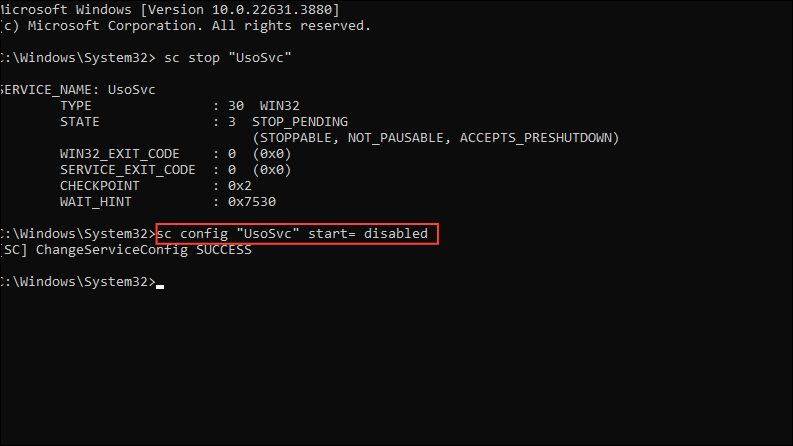
- Then, type
sc config “UsoSvc” start= disabledand press Enter.
Fix 3: Change the power settings
If a software program, such as a cloud backup application is waking up your Windows PC, follow these steps to change your PC's power settings.
- Open the Control Panel and click on Power Options.
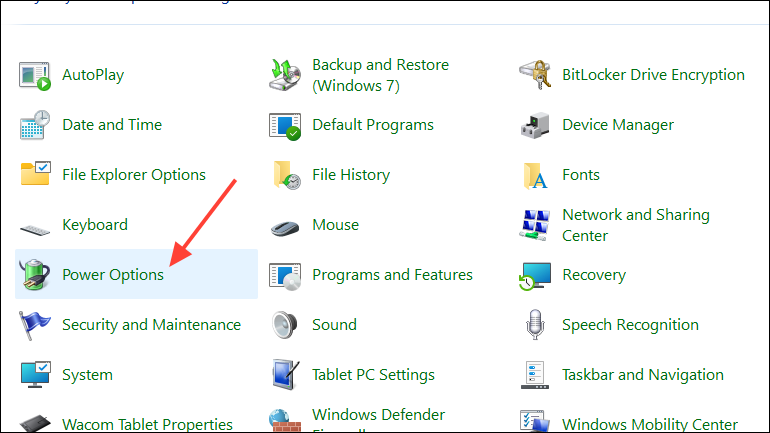
- On the Power Options page, click on 'Change Plan Settings' for your selected plan.
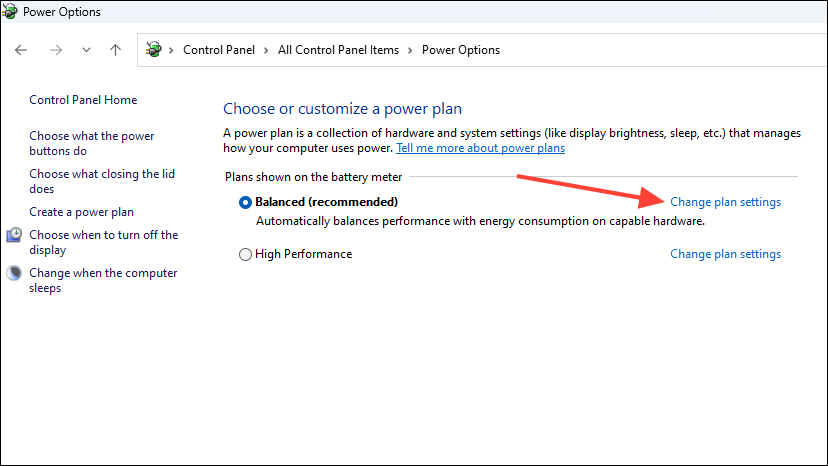
- Next, click on 'Change Advanced Power Settings'.
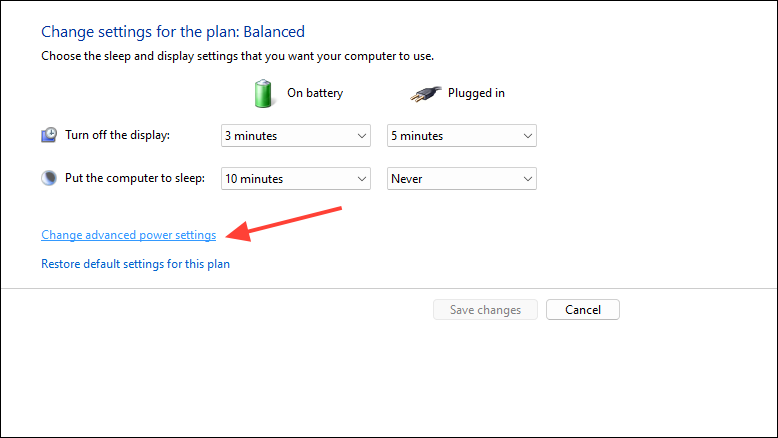
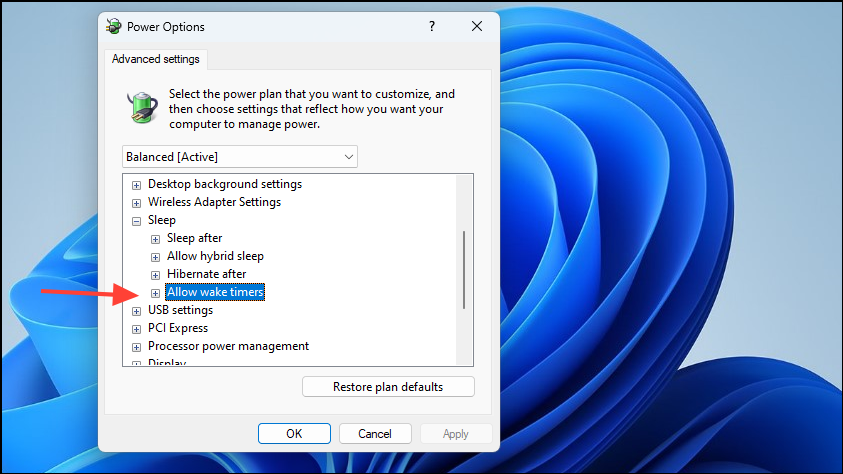
- When the Advanced Settings open up, click on the '+' sign next to the Sleep option to view related settings.
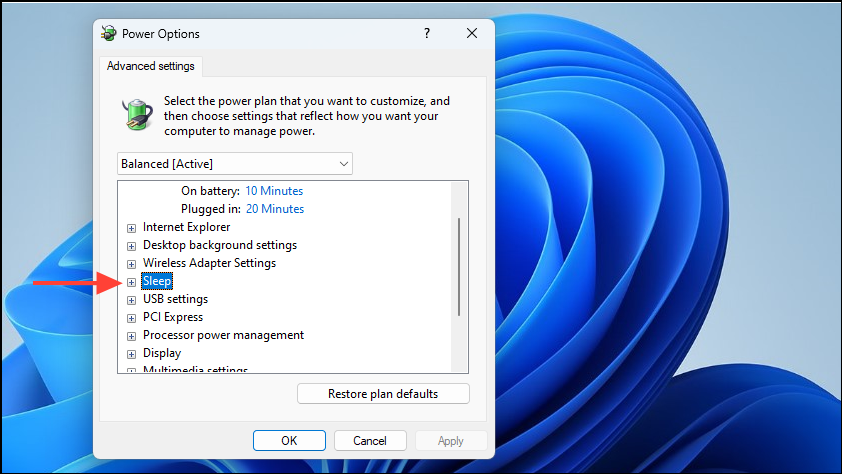
- Next, click on the '+' sign next to the 'Allow wake timers' option.
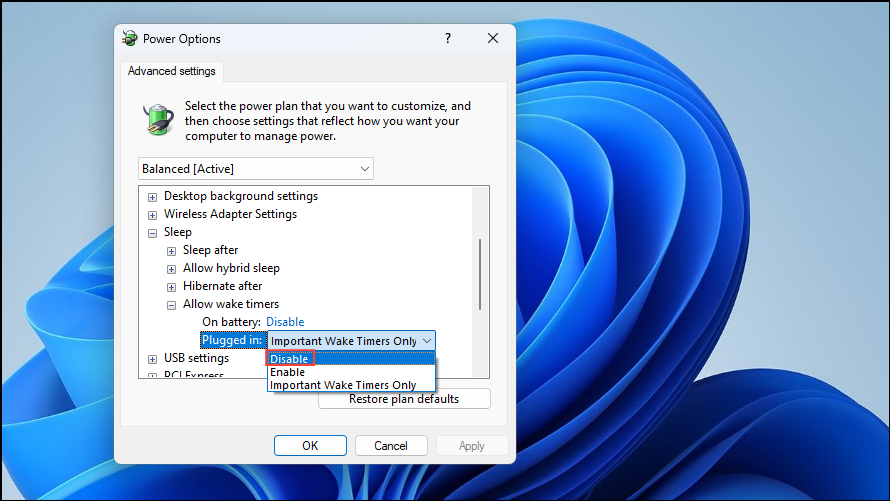
- Here, you will find two settings - one for battery and one for when your PC is plugged in. Click on both and select 'Disable' for both. Then click on the 'OK' button.
Fix 4: Adjust network adapters
If some network activity is waking up your Windows PC from sleep, consider adjusting your network adapter settings.
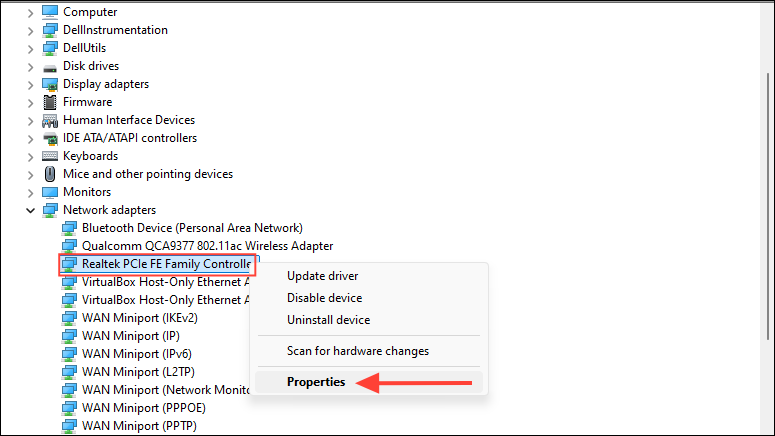
- Open the Device Manager and click on Network Adapters.

- Right-click on your network adapter, which will be either a Broadcom or Realtek device, and click on Properties.
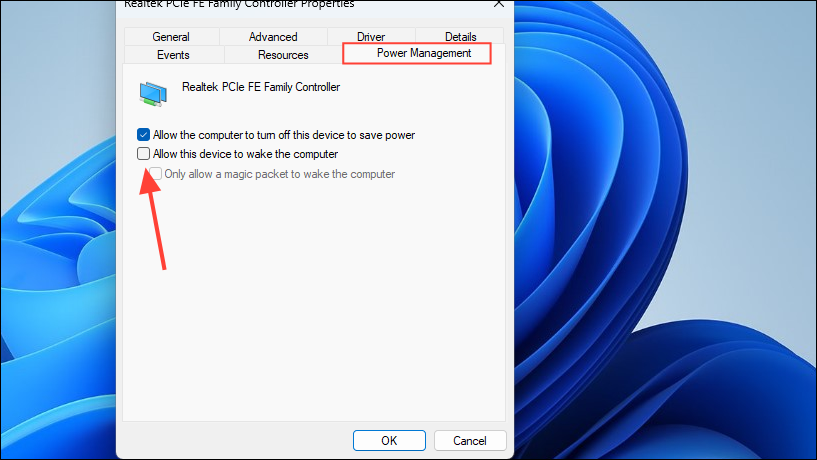
- When the Properties box opens up, click on the Power Management tab at the top and then uncheck the 'Allow this device to wake the computer' option.
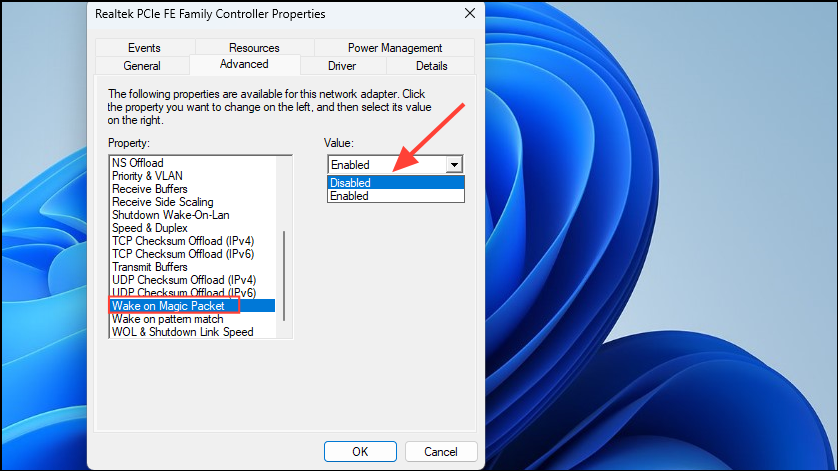
- Next, click on the 'Advanced' tab and scroll down and click on 'Wake on magic packet'. Then select 'Disabled' from the drop-down menu on the right and click on OK.
Fix 5: Tweak Windows Update settings
Windows Update is another reason why your PC might be waking up randomly from sleep. So, you can try tweaking the update settings and see if that helps.
- Open the Settings app and click on 'Windows Update' on the left.

- On the Windows Update page, click on 'Advanced Options'.
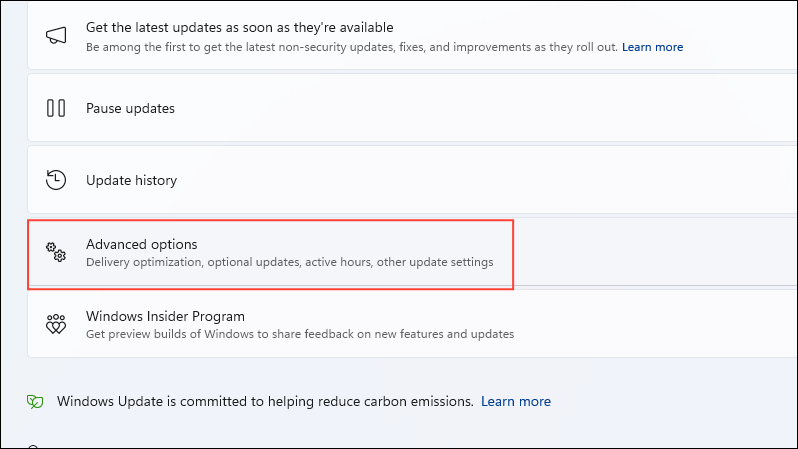
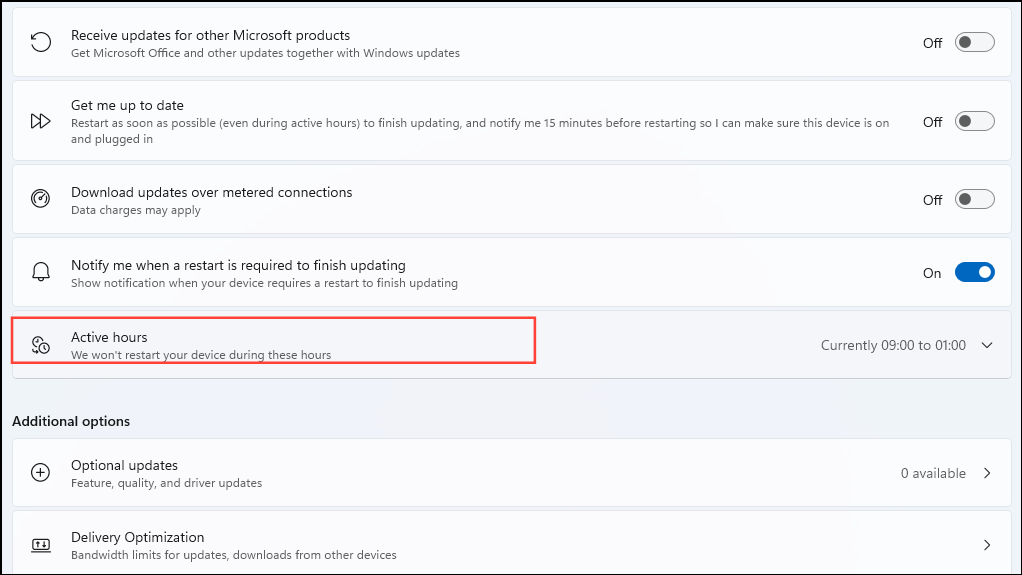
- On the next page, click on 'Active Hours'. Now, you will be able to choose the period during which Windows can install updates. Make sure to select a time when your PC is not in sleep mode so that it does not wake up automatically.
Fix 6: Adjust Group Policy Editor settings
If you are using an Enterprise or Pro version of Windows, you can adjust the Group Policy Editor settings to prevent your computer from waking up randomly.
- Open the Start Menu, search for 'group policy editor', and open it.

- When the Group Policy Editor opens, click on 'Administrative Templates' under Computer Configuration on the left, and then on 'Windows Components'.
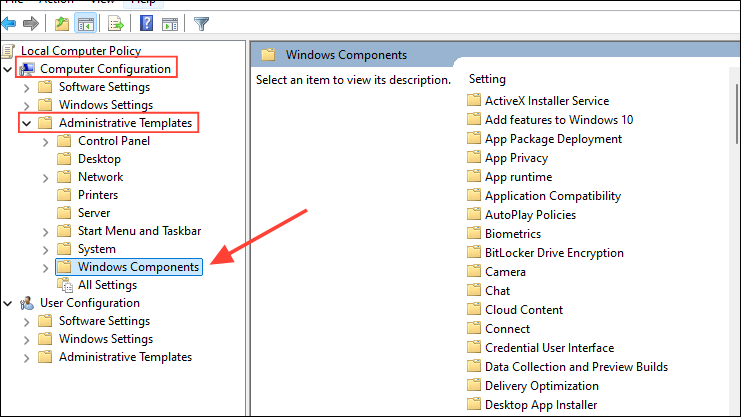
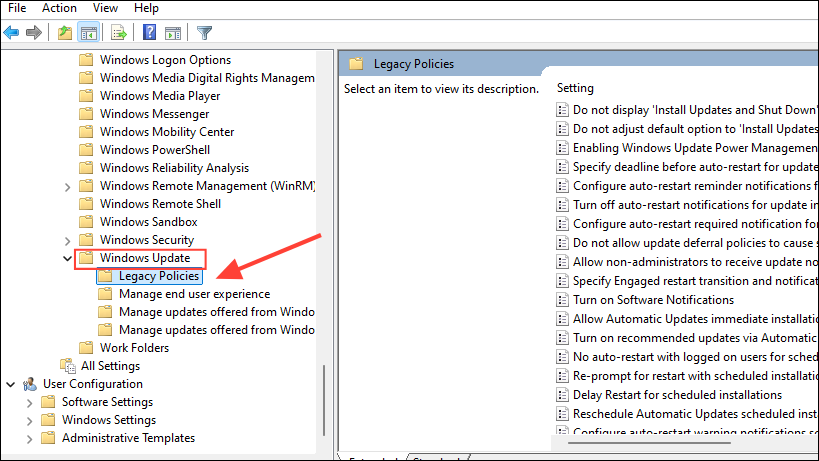
- Under Windows Components, click on 'Windows Update' and then on 'Legacy Policies'. You will see a list of Windows policies on the right.
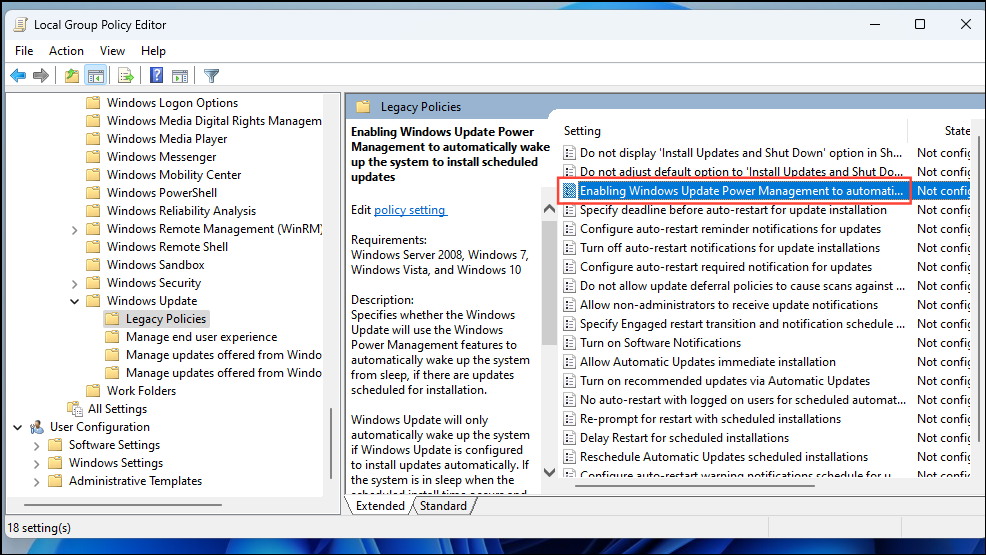
- Double-click on
Enabling Windows Update Power Management to automaticon the right.
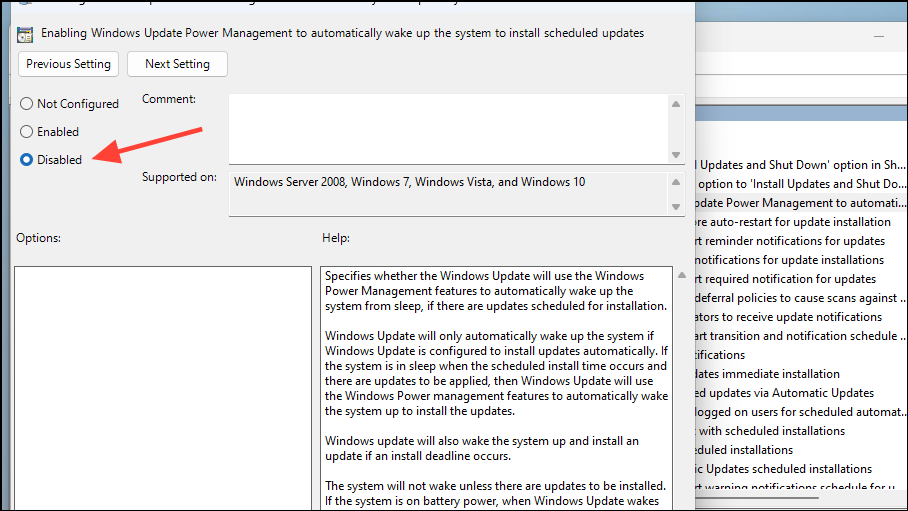
- In the pop-up that appears, click on the 'Disabled' option and then click on the 'OK' button.
Fix 7: Change Automatic Maintenance settings
Windows undertakes automatic maintenance tasks, which include performing scans, installing updates, etc. These can also cause your PC to wake up, so you can try changing the automatic maintenance settings to prevent that.
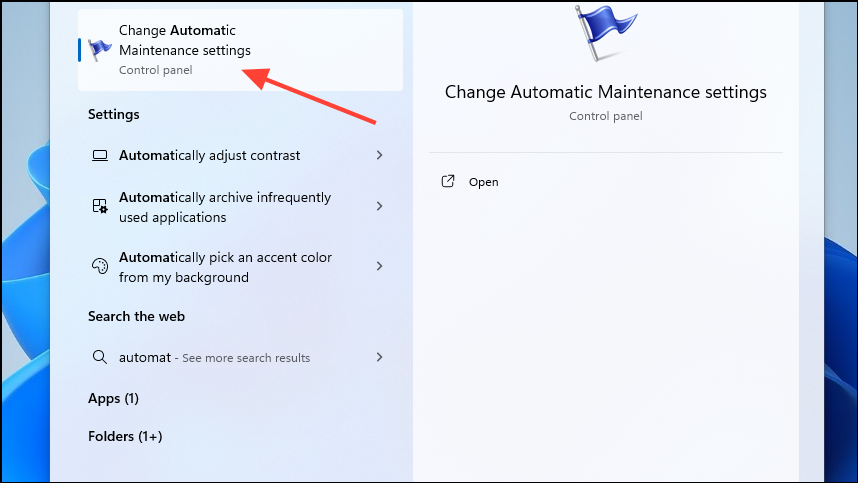
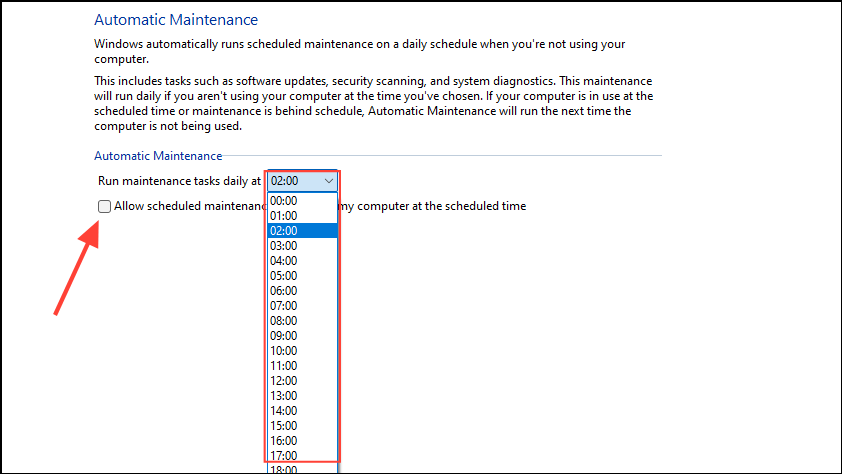
- Search for 'automatic maintenance' in the Start menu and click on 'Change Automatic Maintenance settings' when it appears.
- When the Automatic Maintenance page opens up, you can select the time when it will run by using the drop-down menu. Alternatively, click and uncheck the box next to 'Allow scheduled maintenance to wake up my computer at the scheduled time'.
Fix 8: Identify and stop scheduled tasks
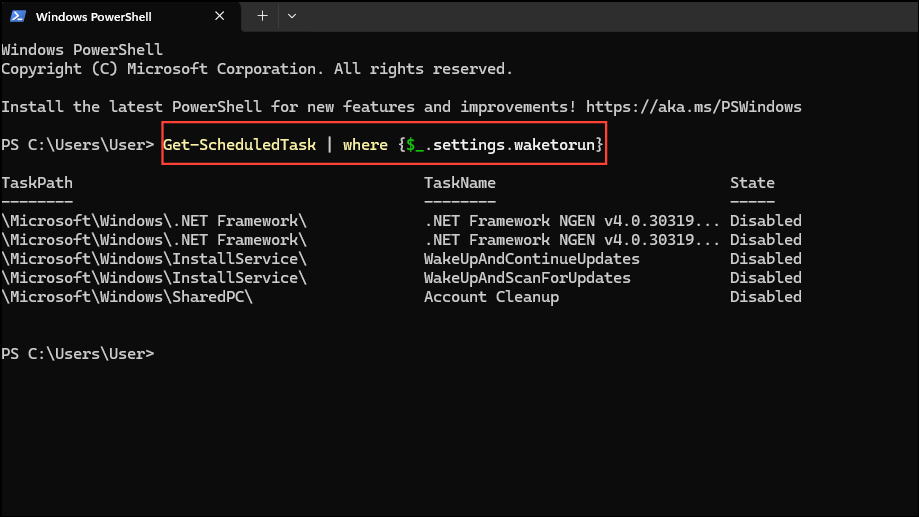
- Open Windows Powershell or Windows Terminal from the Start menu.
- Type
Get-ScheduledTask | where {$_.settings.waketorun}in the Powershell window and press Enter. This will show you scheduled tasks that can wake up your PC from sleep.
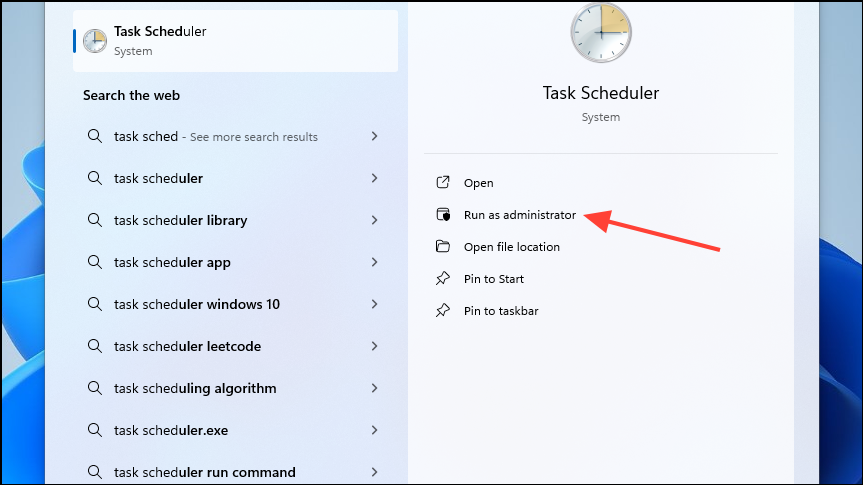
- Now, open the Start menu and search for 'Task Scheduler'. Click on 'Run as administrator' to open it.
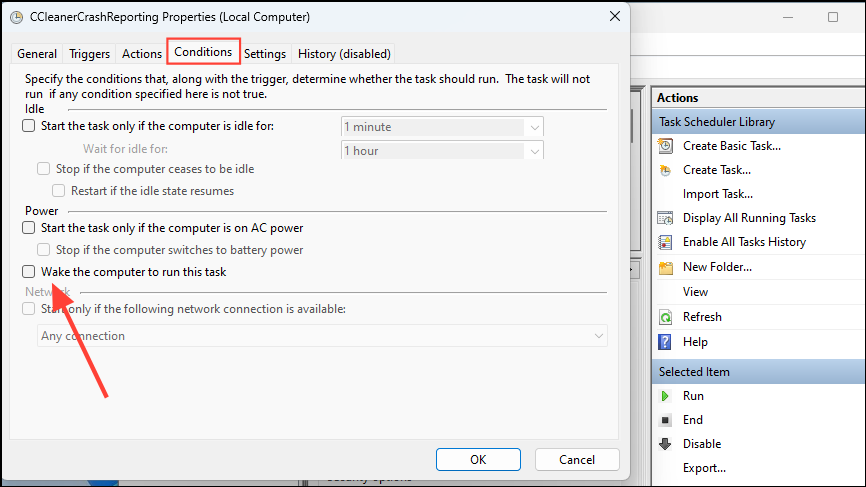
- Once the Task Scheduler opens, click on the 'Task Scheduler Library' on the left and navigate to the task you want to stop from running and waking up your PC.
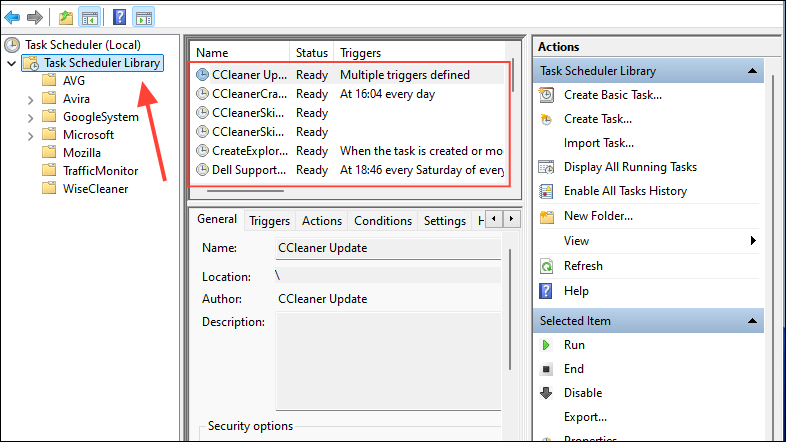
- Double-click on the task and then click on the 'Conditions' tab at the top and then uncheck the 'Wake the computer to run this task'.
Some helpful tips
- If you use wireless devices, such as wireless mouse, make sure to turn it off when putting your PC to sleep. Accidental touches can cause such devices to wake your computer up.
- Software updates and new hardware can change your power and sleep settings, so it is a good idea to periodically check and adjust them.
Depending on what is causing your Windows PC to wake up from sleep, there are different solutions you could try. Just remember, when making changes to system settings, it is a good idea to back up your system first in case something goes wrong.


