Quick Info
- You can access Windows 10 File Explorer in Windows 11 from the Control Panel, with Command Prompt, using the Registry Editor, or third-party tools.
- Most methods require you to be running Windows 11 21H2 or earlier, but some work on later versions too.
- You can restore the default Windows 11 File Explorer any time you want.
- The methods may stop working if you update Windows, especially the ones requiring registry changes.
Method 1: From the Control Panel
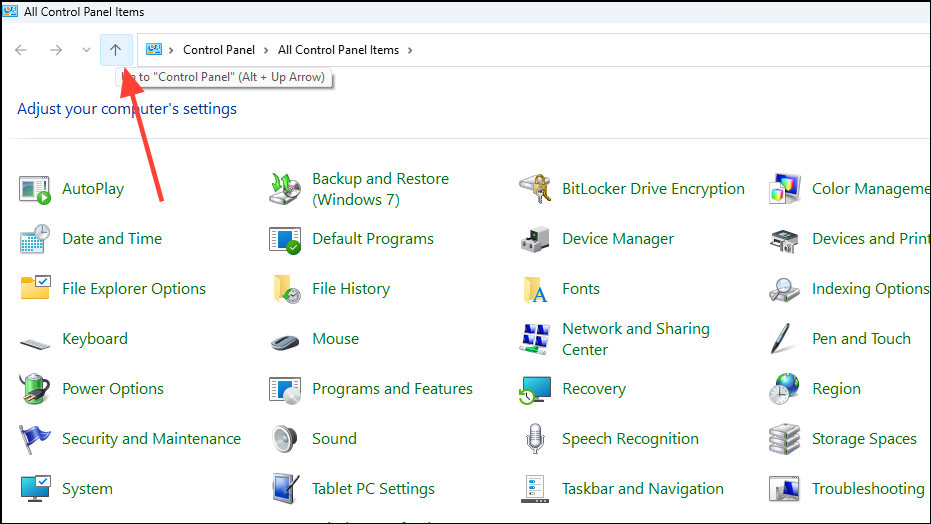
- Open the Control Panel on your PC and then click on the 'Up' arrow at the top.
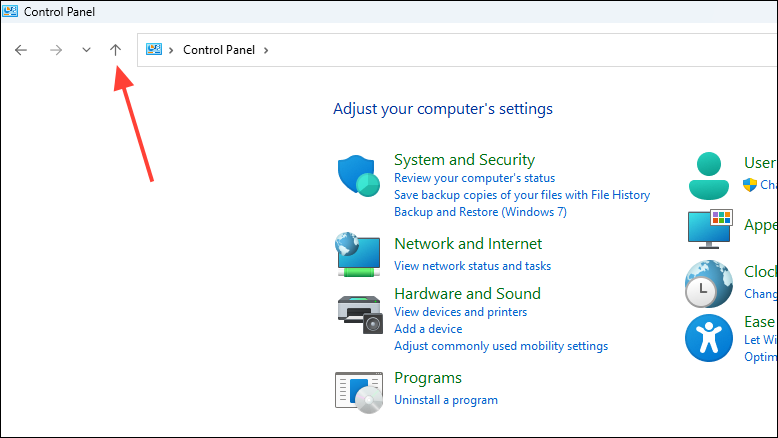
- Click on the 'Up' arrow again on the page that appears.
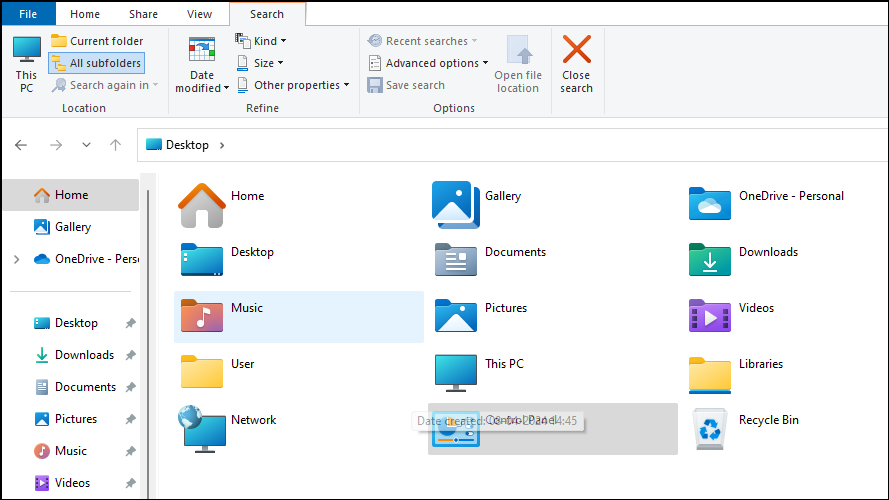
- You will see that the Windows 10 File Explorer with its ribbon interface will show up. You can now manage your files as you want, though once you close the window, it will revert to the Windows 11 File Explorer.
Method 2: With Command Prompt
If you haven't yet upgraded to Windows 11 Version 22H2, you can use the Command Prompt to access the Windows 10 File Explorer.
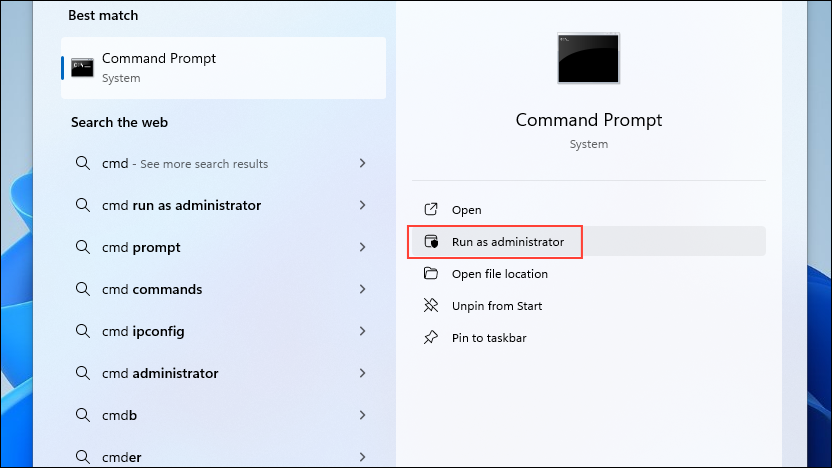
- Open the Start menu, type
cmd, and click on 'Run as administrator'.
- In the command prompt window, type
reg add "HKCU\Software\Classes\CLSID\{d93ed569-3b3e-4bff-8355-3c44f6a52bb5}\InprocServer32" /f /veand press the 'Enter' key.
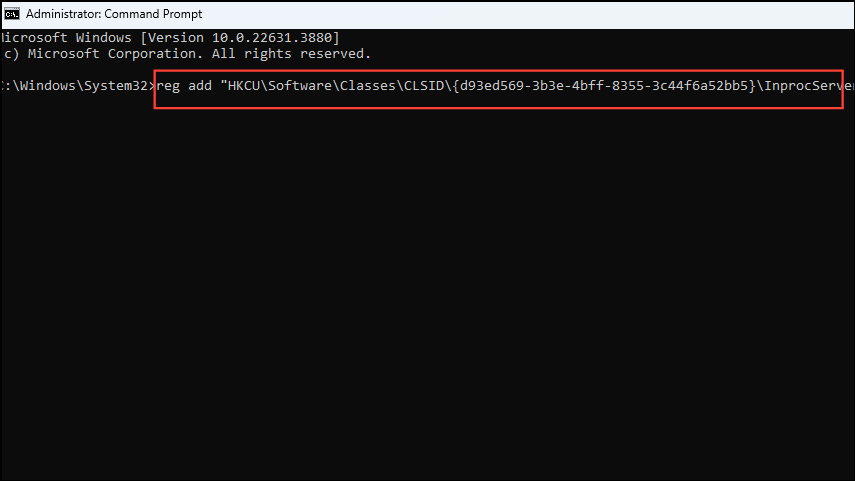
- This will bring back the classic File Explorer with its ribbon interface in Windows 11 once you restart your PC. You can revert to the regular File Explorer by using the command
reg delete "HKCU\Software\Classes\CLSID\{d93ed569-3b3e-4bff-8355-3c44f6a52bb5}" /fin command prompt.
Note: If the command for removing the command bar in Windows 11's File Explorer does not work, it may have spaces at the end. Check for them and remove them before trying the command again.
Method 3: Using the Registry Editor
On Windows 11 21H2 and earlier versions, you can manually edit the Registry to restore the Windows 10 File Explorer.
- Open the Start menu, type
regeditand then click on 'Run as administrator'.
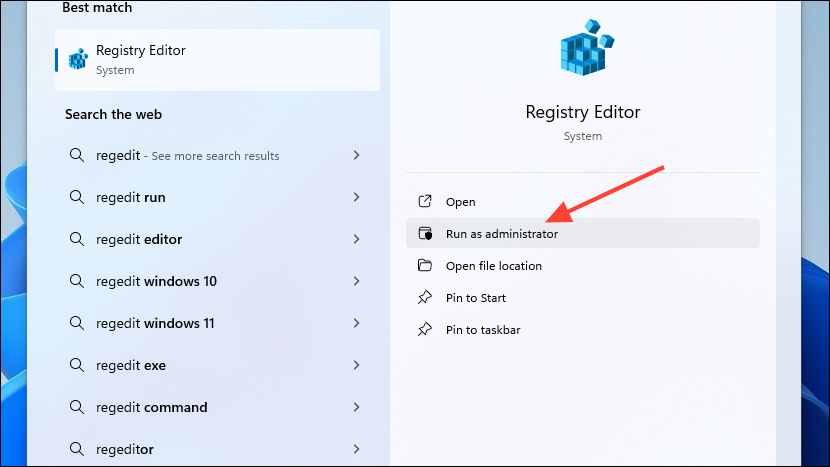
- Paste the following address:
Computer\HKEY_LOCAL_MACHINE\SOFTWARE\Microsoft\Windows\CurrentVersion\Shell Extensionsin the address bar at the top of the Registry Editor and press the 'Enter' key.
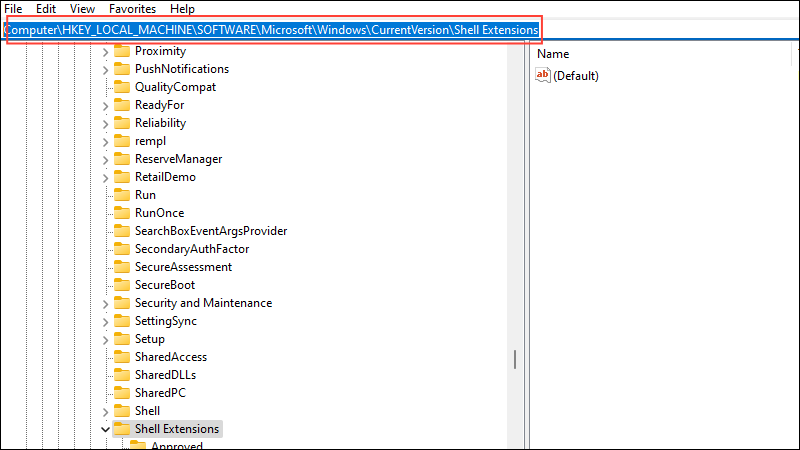
- Click on the 'Shell Extensions' folder and right-click inside the right panel. Then, click on 'New' and select 'Key'.
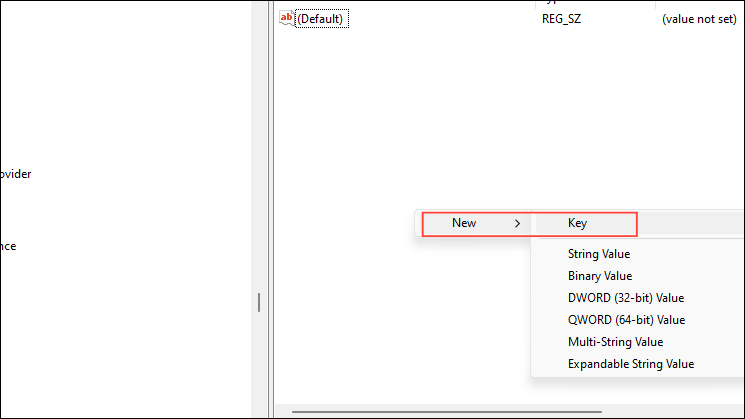
- Name the key 'Blocked', then right-click on it and select 'New' and then 'String Value'.
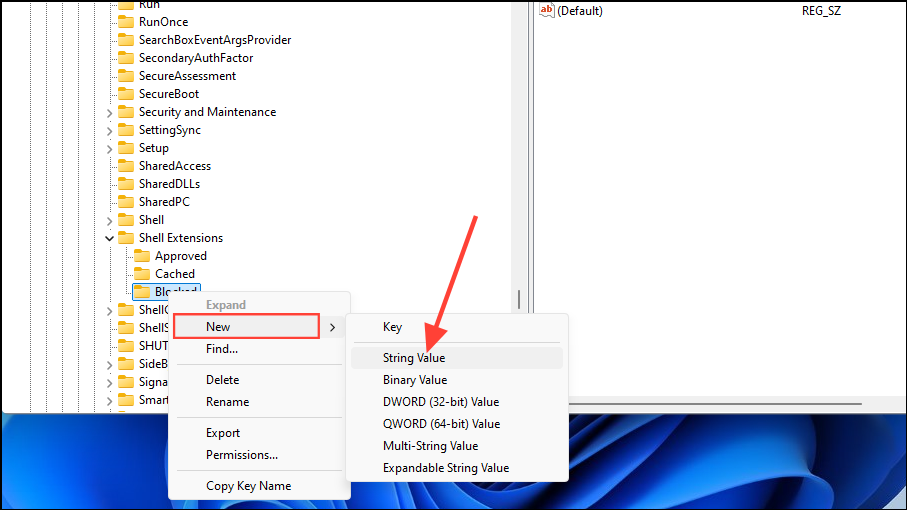
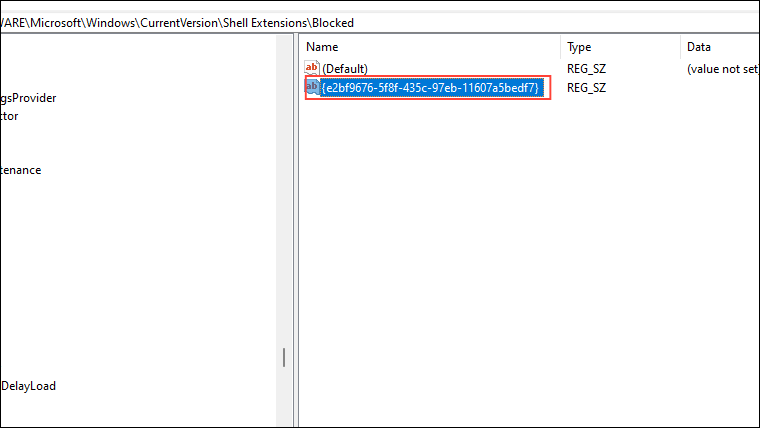
- Paste the following where the string value is created
{e2bf9676-5f8f-435c-97eb-11607a5bedf7}and then reboot your PC to get the classic File Explorer back. To get the default Windows 11 File Explorer back, just open the Registry Editor and delete the string value you created.
Note: Changes to the registry can damage your system, so it is a good idea to create a backup first. The same is true when using third-party applications that alter registry settings, so proceed with caution when relying on them.
Method 4: With ExplorerPatcher
ExplorerPatcher is a free third-party tool that lets you restore the Windows 10 File Explorer in Windows 11, even in version 22H2 and later.
- Download ExplorerPatcher by going to the link.
- When you double-click on the downloaded file, it will immediately restore your taskbar to the classic version. Click on the Start button, search for ExplorerPatcher, and open it.
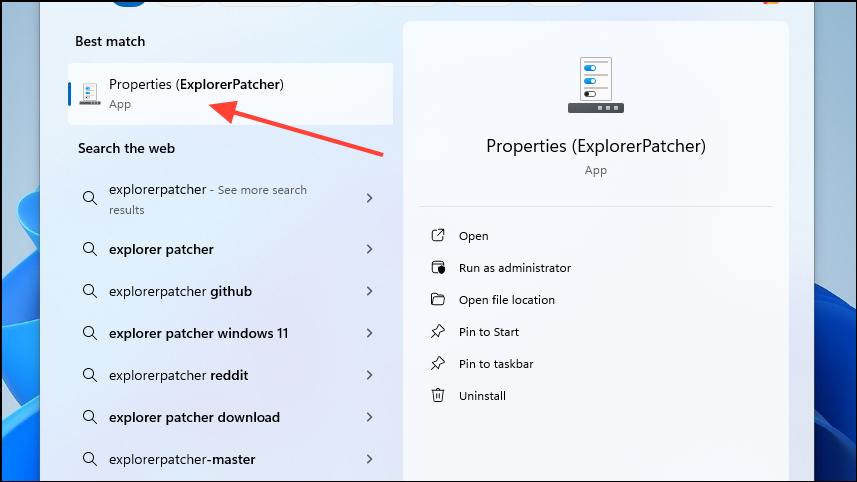
- When the application opens, click on 'File Explorer' on the left.
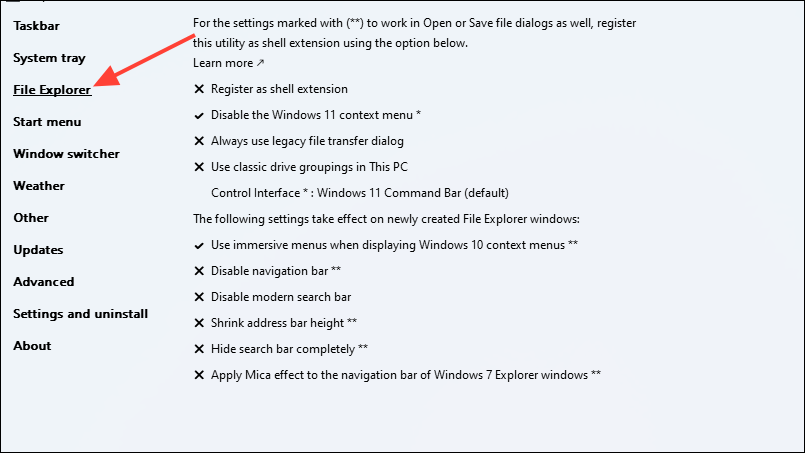
- Next, click on the 'Control Interface' option on the right and select 'Windows 10 Ribbon' from the dropdown list.
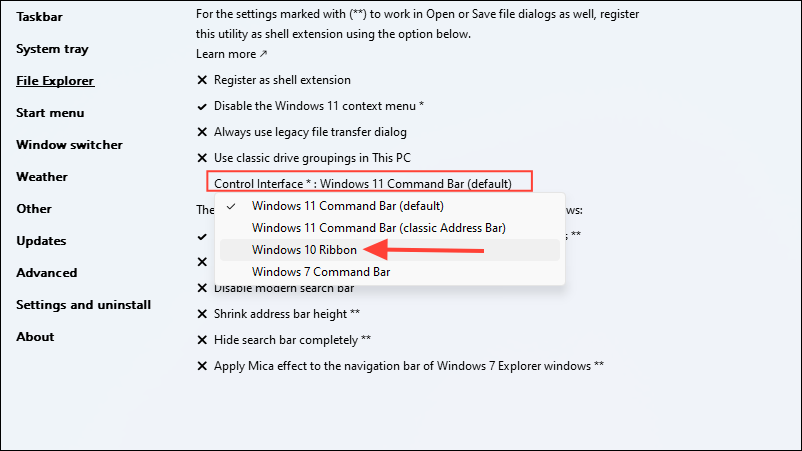
- Restart your File Explorer and you will see the Windows 10 ribbon interface in it. You can also tweak other settings, such as bringing back Windows 10's square corners and replacing Windows 11's rounded ones in the File Explorer. You can restore Windows 11's File Explorer at any time using ExplorerPatcher.
Things to know
- Windows Updates can revert any changes you make to the OS, including replacing the Windows 10 File Explorer with the default Windows 11 one.
- The methods mentioned here may not work with future updates to Windows, so you may need to check for updated instructions later on when that happens.


