Chromebooks were widely popular with schools for facilitating teaching in regular classrooms for instruction. But they’ve proved more important than ever this year as teaching shifted to a remote environment.
Many schools and teachers use their Chromebooks combined with Zoom meetings to remotely teach their students. But when using Chromebooks, one has to remember that they are different from Windows PCs and Mac systems. And so is the Zoom app when using it on ChromeOS. One such thing that Chromebook Zoom users will find different from PC or Mac is the recording feature in a Zoom Meeting.
How is Zoom Recording in a Chromebook different?
Many users, especially ones with a free account, who’ve used Zoom on another device before a Chromebook or seen another PC or Mac user use it on theirs, become perplexed as to why don’t they have the ‘Record’ button in a Zoom meeting, or why can’t they record it locally. These are all valid questions.
If you’re using Zoom on a PC or Mac, it doesn’t matter whether you’re using a free or a paid account, you will get the option to record the meeting. Of course, those options will be different. Nonetheless, it’ll be present.
For a free account, you can record a meeting only locally on your computer. And for a paid account, you can record it locally as well as the Zoom cloud, and every time you go to record the meeting, you’ll get the option to choose from both.
But when it comes to recording meetings on a Chromebook, you cannot record the meeting locally on your device. That has two implications. First, users with a free Zoom account don’t get the option to record the meeting at all. And second, users with a paid account have their options limited to only a cloud recording.
How to Record a Zoom Meeting On Chromebook
Other than that, recording a Zoom meeting on Chromebook is pretty much similar to a PC or Mac. If you have a paid or education account, go to the meeting toolbar in the meeting and click the ‘Record’ button.
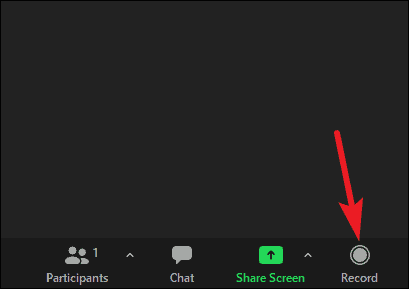
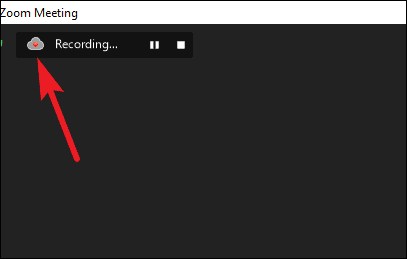
The meeting will start recording automatically to the cloud. You’ll see that it won’t present any options for where to record as there are none available.
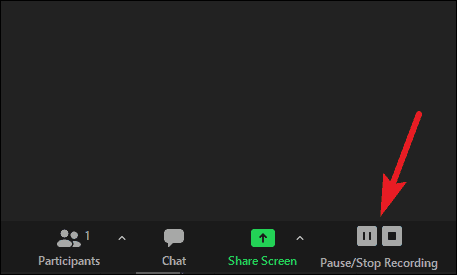
You can pause or stop the recording at any time. Go to the meeting toolbar, and click the ‘Pause/ Stop’ button.
Once the meeting is over, you can access the meeting recording from the Zoom Web portal. Go to zoom.us and log in with your Zoom account. Then, from the navigation menu on the left, go to ‘Recordings’ under Personal.
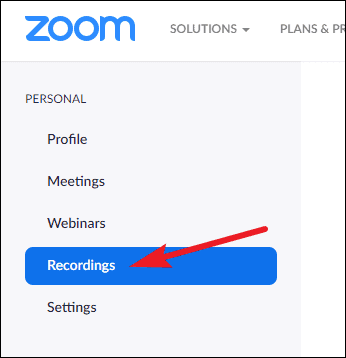
Go to ‘Cloud Recordings’, and you’ll find the recording.
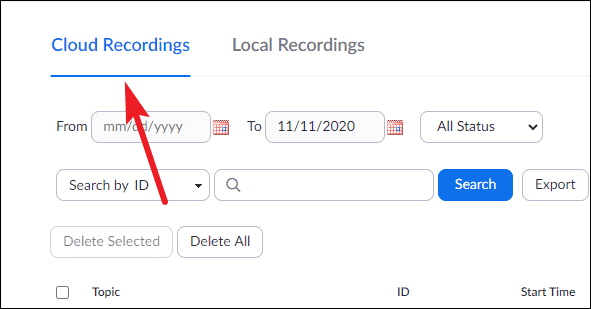
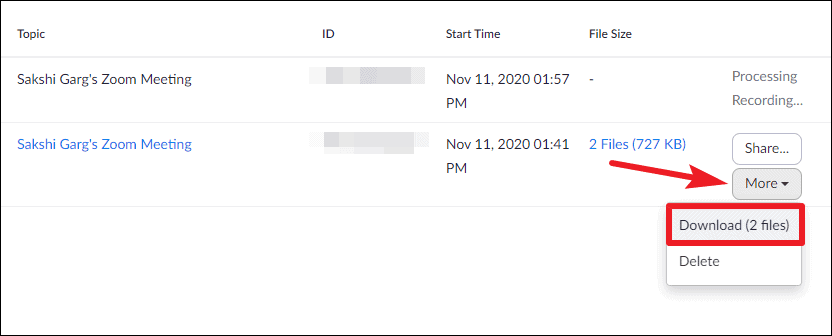
You can share the recording with a link or download it to your Chromebook. You’ll find that downloading a recording to a Chromebook is not an issue; you just can’t directly record it on the device.
To download the recording to your device, click on ‘More’ and select ‘Download’ from the options that appear.
When using Zoom on Chromebooks, users need to remember that there are certain features that they don’t have access to that are otherwise available on PC or Mac. But most of the functionality is the same, and you won’t find it too different or difficult to use either.

