
Sudden rotation of your Windows 11 device screen—especially on convertibles, tablets, or 2-in-1 laptops—can disrupt workflow and make reading or viewing content difficult. Disabling automatic screen rotation ensures your display remains in your preferred orientation, regardless of how you hold or move your device. Windows 11 provides several ways to control this feature, from straightforward toggles to advanced registry edits for persistent issues.
Disable Automatic Screen Rotation via Settings
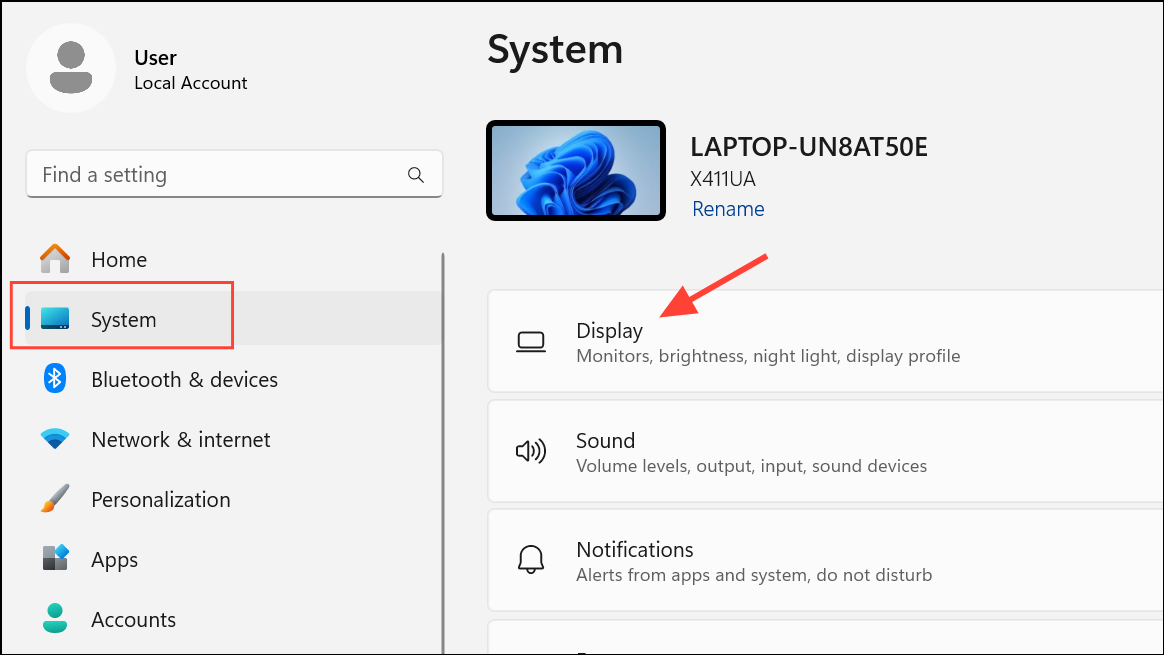
Step 1: Press Windows + I to open the Settings app.
Step 2: In the sidebar, select System, then click Display.
Step 3: Scroll to the Scale & layout section. Find the Rotation lock toggle.
Step 4: Turn Rotation lock On to prevent the screen from rotating automatically. If you want auto-rotation enabled again, set this toggle to Off.
If the Rotation lock option is grayed out or missing, try rotating your device to portrait or tent mode. On some devices, the option only appears in certain orientations or when the keyboard is detached (for tablets and convertibles).
Disable Automatic Screen Rotation Using Quick Settings
Step 1: Press Windows + A to open the Quick Settings panel.
Step 2: Click the Rotation lock button. If the button is highlighted, rotation lock is enabled and auto-rotate is disabled. If not, click it to activate rotation lock.
If you do not see the Rotation lock button, click the pencil icon to customize your Quick Settings and add it. This method offers a fast way to toggle rotation lock without navigating through menus.
Turn Off Auto-Rotate with a Keyboard Shortcut
Step 1: Press Windows + O to toggle the rotation lock on or off instantly. This shortcut works on most devices that support auto-rotation.
Disable Auto-Rotation Using the Registry Editor
For users who need a more persistent solution, especially if standard toggles reset after updates or restarts, editing the Windows Registry can help. Caution: Modifying the registry can affect system stability. Create a restore point before making changes.
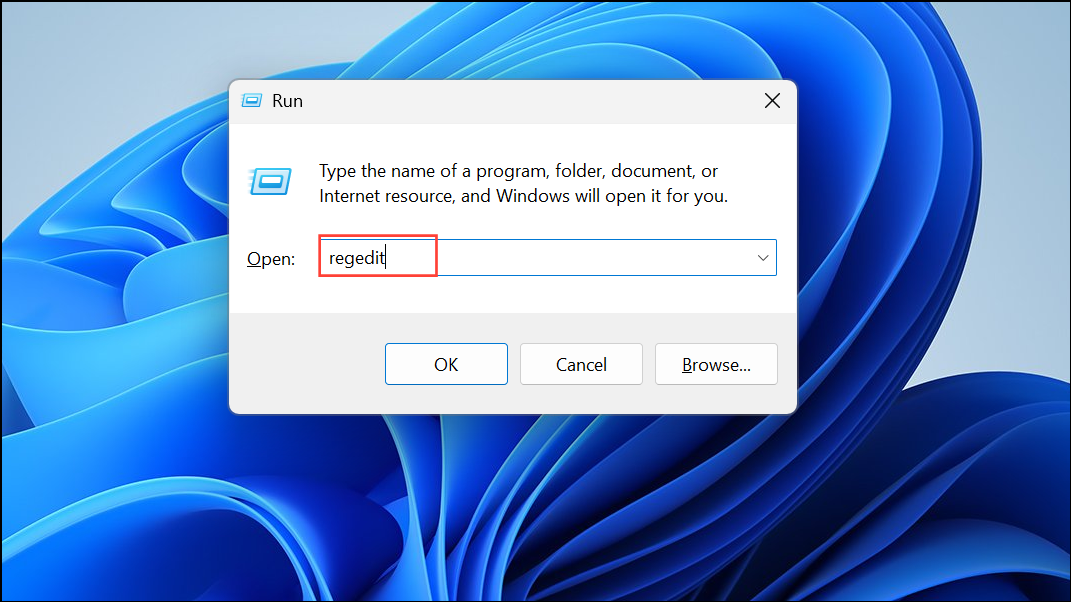
Step 1: Press Windows + R to open the Run dialog, type regedit, and press Enter.
Step 2: In Registry Editor, navigate to:
HKEY_LOCAL_MACHINE\SOFTWARE\Microsoft\Windows\CurrentVersion\AutoRotation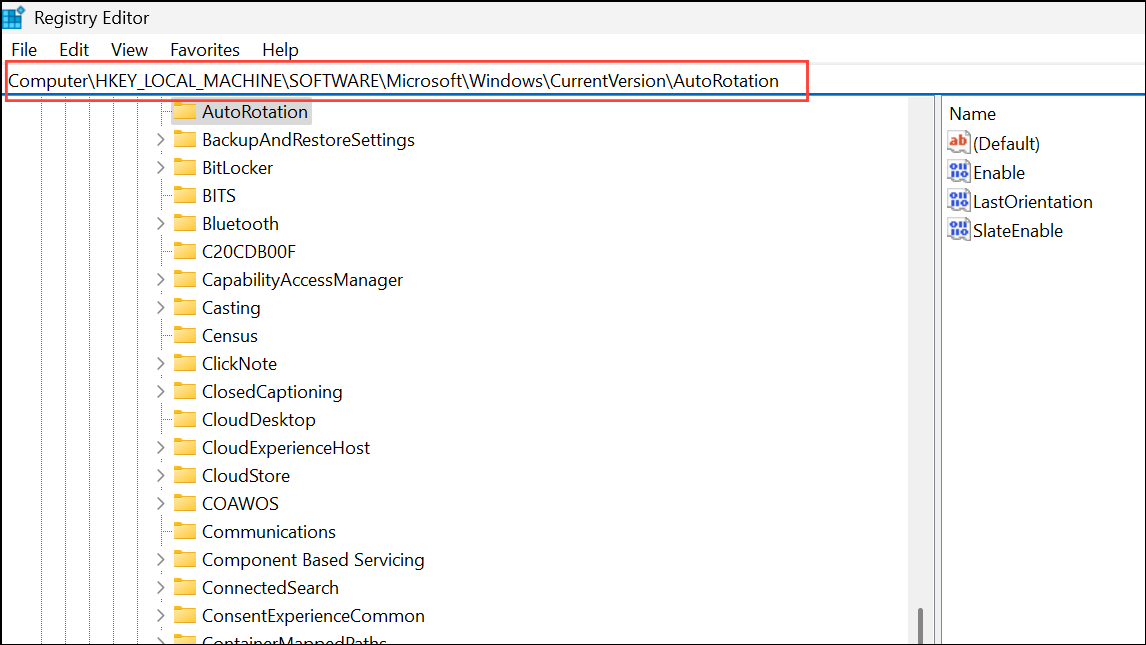
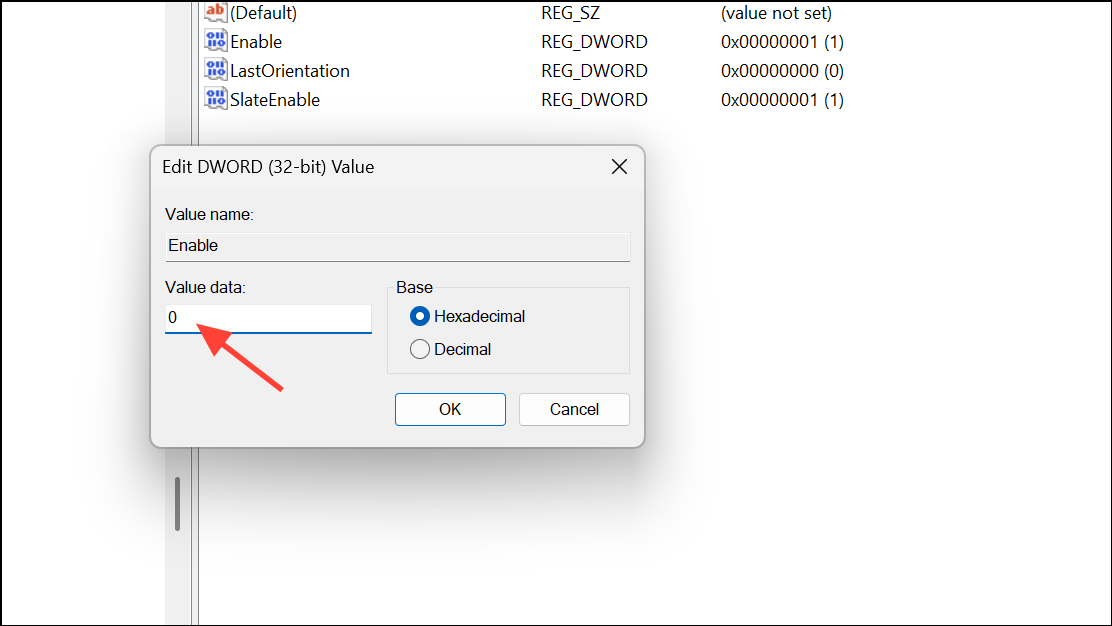
Step 3: Double-click the Enable DWORD value. Set its data to 0 to disable automatic rotation. Click OK and close Registry Editor.
Step 4: Restart your device for the change to take effect. To re-enable auto-rotation, set the value back to 1.
Troubleshooting: Rotation Lock Option Grayed Out
On some devices, especially 2-in-1 laptops or tablets with detachable keyboards, the Rotation lock toggle may be unavailable. This usually occurs when:
- The device is in standard laptop mode with the keyboard attached.
- The display orientation is not supported for rotation lock (try changing between portrait and landscape modes).
- Sensor drivers are missing or malfunctioning.
To resolve sensor driver issues:
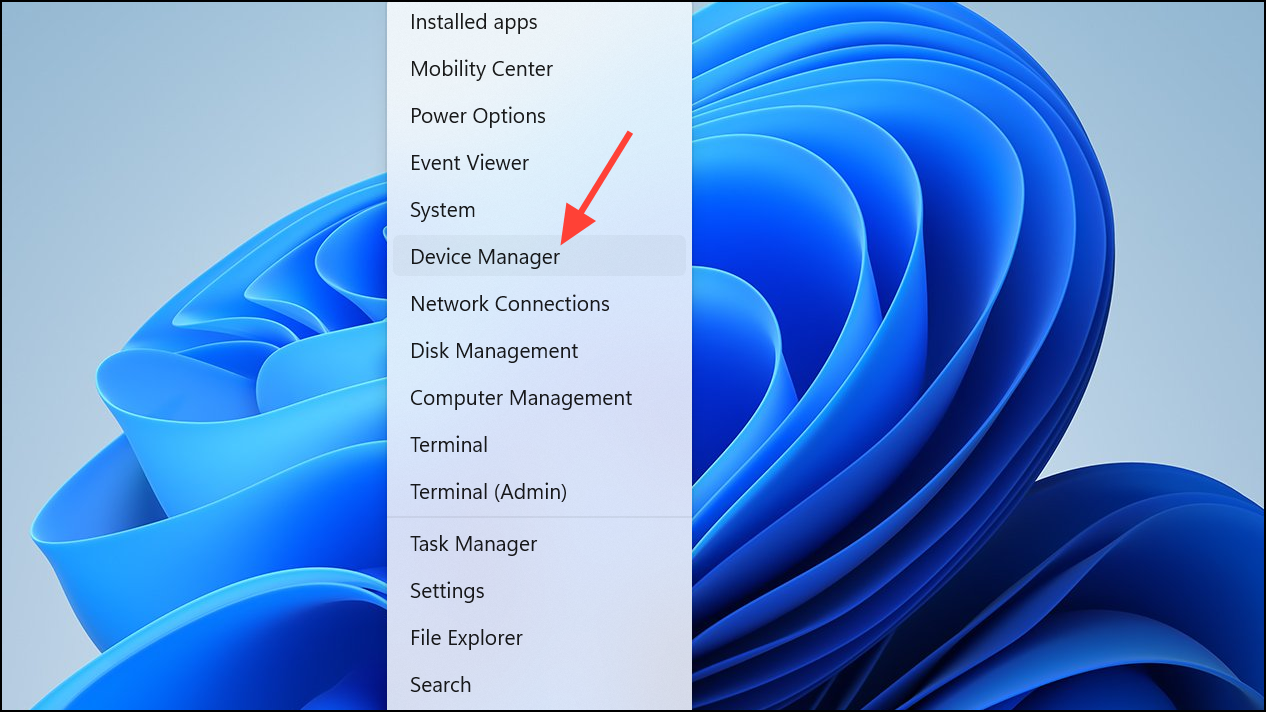
Step 1: Open Device Manager by right-clicking the Start button and selecting Device Manager.
Step 2: Expand the Sensors category. Look for entries like HID Sensor Collection V2 or similar.
Step 3: Right-click the sensor device and select Uninstall device. After uninstalling, restart your PC. Windows will attempt to reinstall the driver automatically.
If the issue persists, update your device’s BIOS, Windows updates, and graphics drivers to ensure all components recognize orientation sensors properly.
Advanced: Disable Sensor Service (Permanent Solution)
For users who want to completely stop auto-rotation and sensor-driven orientation changes, you can disable the Windows Sensor Service. This method is more advanced and will affect all sensor-based features.
Step 1: Open the Registry Editor as described above.
Step 2: Navigate to:
HKEY_LOCAL_MACHINE\SYSTEM\CurrentControlSet\Services\SensorService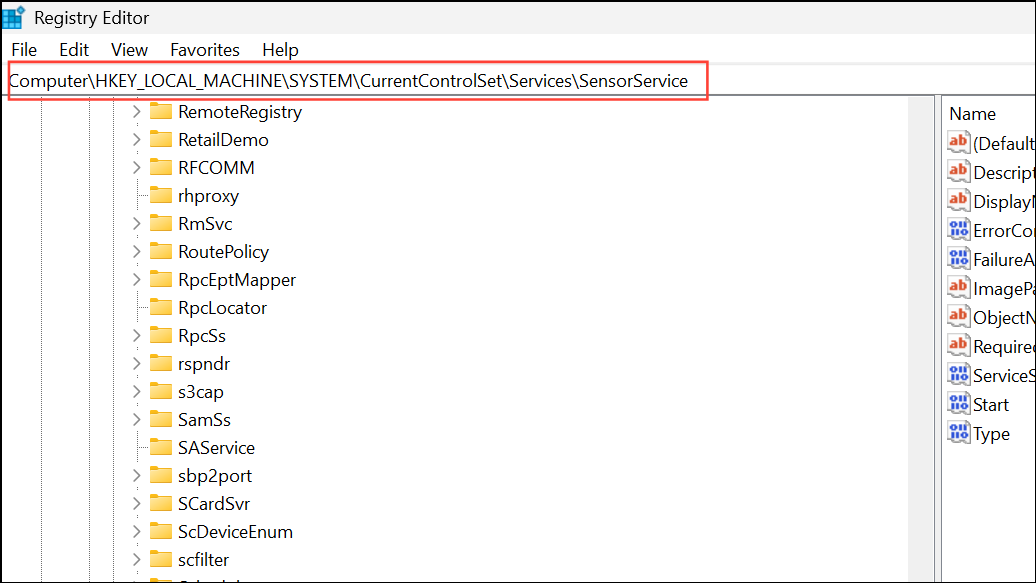
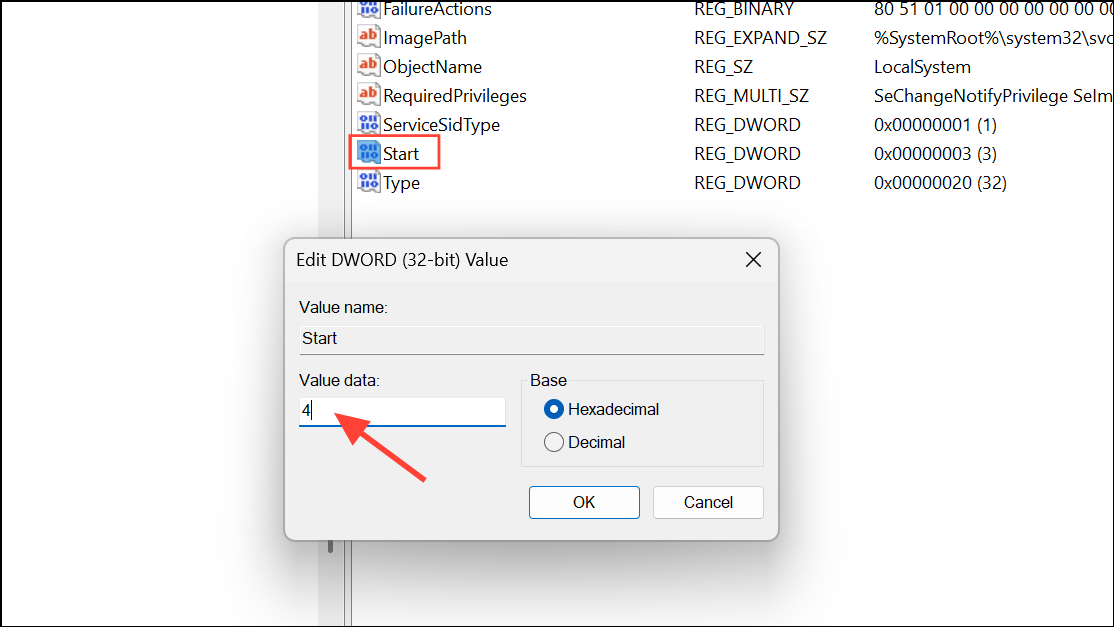
Step 3: Double-click the Start value and set it to 4 to disable the service. Restart your computer. This will prevent all sensor-based features, including auto-rotation, from functioning until you revert the change.
Disabling automatic screen rotation in Windows 11 can stabilize your display orientation and minimize distractions, whether you use a tablet, convertible, or standard laptop. If you ever need auto-rotate again, you can reverse these steps at any time.