
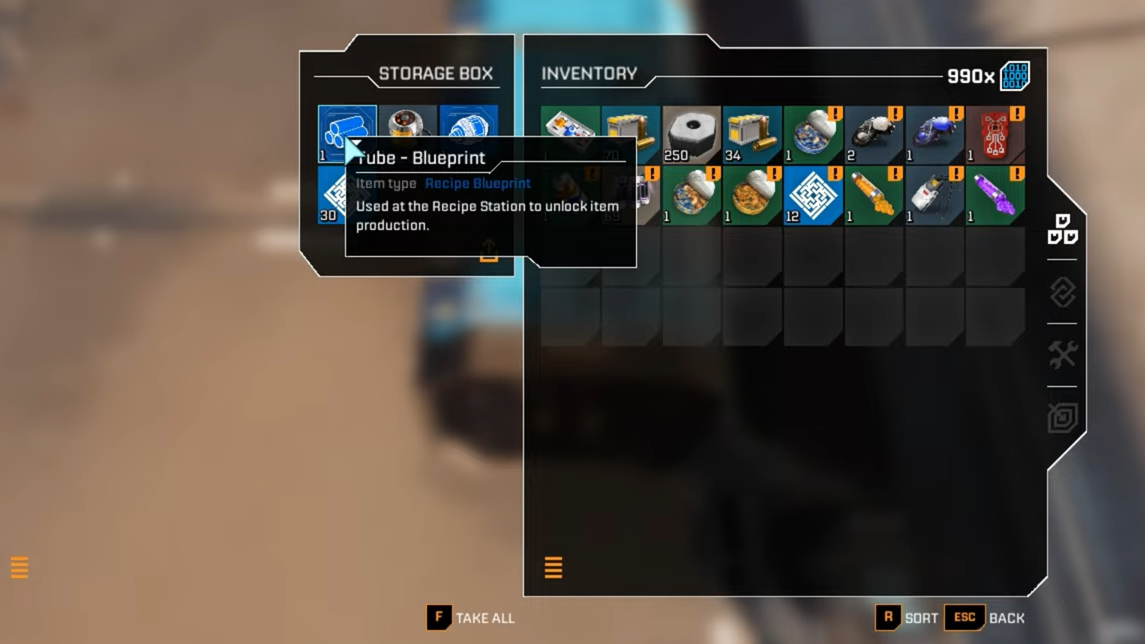
StarRupture locks a lot of its early fabrication behind a handful of core component blueprints. The Tube Blueprint is one of the most important of those early unlocks, because it sits in the critical path for expanding your base and crafting more advanced infrastructure on Arcadia-7.
The upside: you can get it very early. The downside: the outpost that holds it is crawling with alien swarms.
Why the Tube Blueprint matters
StarRupture is built around a base that gradually turns a hostile planet into something survivable. Early on, you hit a hard wall: recipes call for Tubes, but the Tube component itself is locked behind a blueprint. Until you pick that up and plug it into a recipe station, you cannot start automated production of several mid-tier items and machines.
The Tube Blueprint is also usually picked up alongside the Rotor Blueprint at the same location, which means a single successful run can unlock two essential components in one trip.
Tube Blueprint main location (northwest Selenian’s mining base)
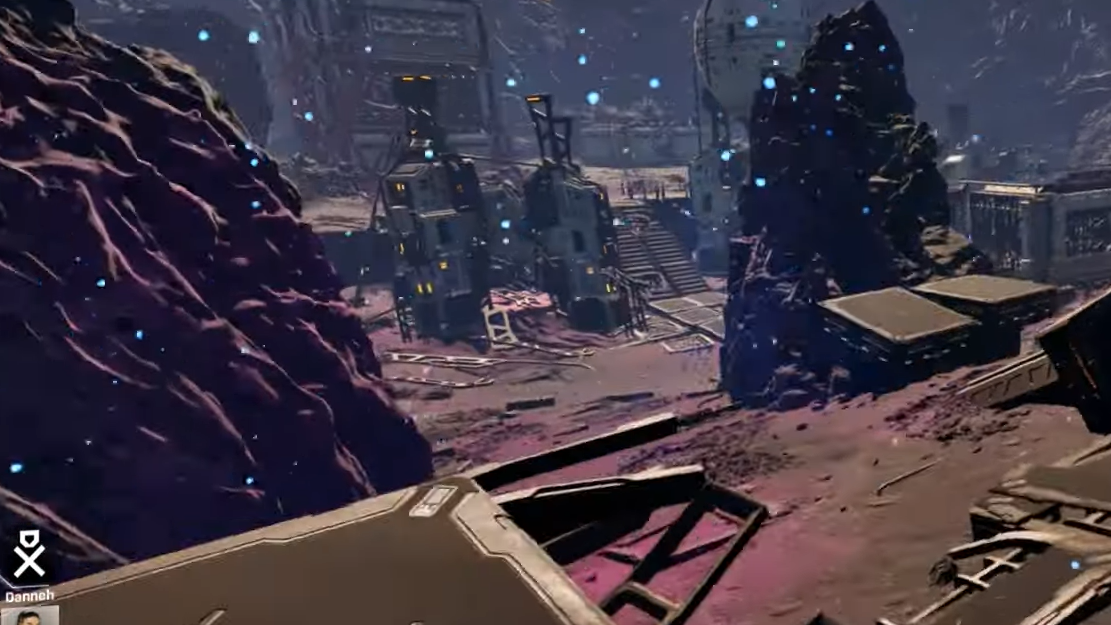
The most reliable place to get the Tube Blueprint is an abandoned industrial outpost to the northwest of the starting crash site. On the world map, this area is associated with the Selenian’s mining base and a ruined helium extraction site.
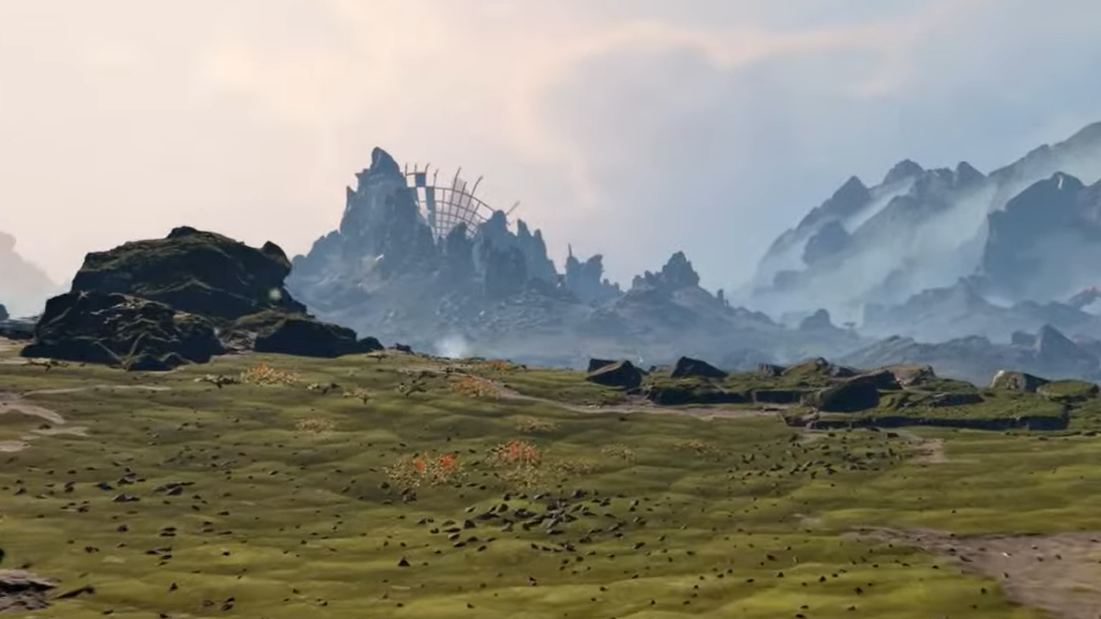
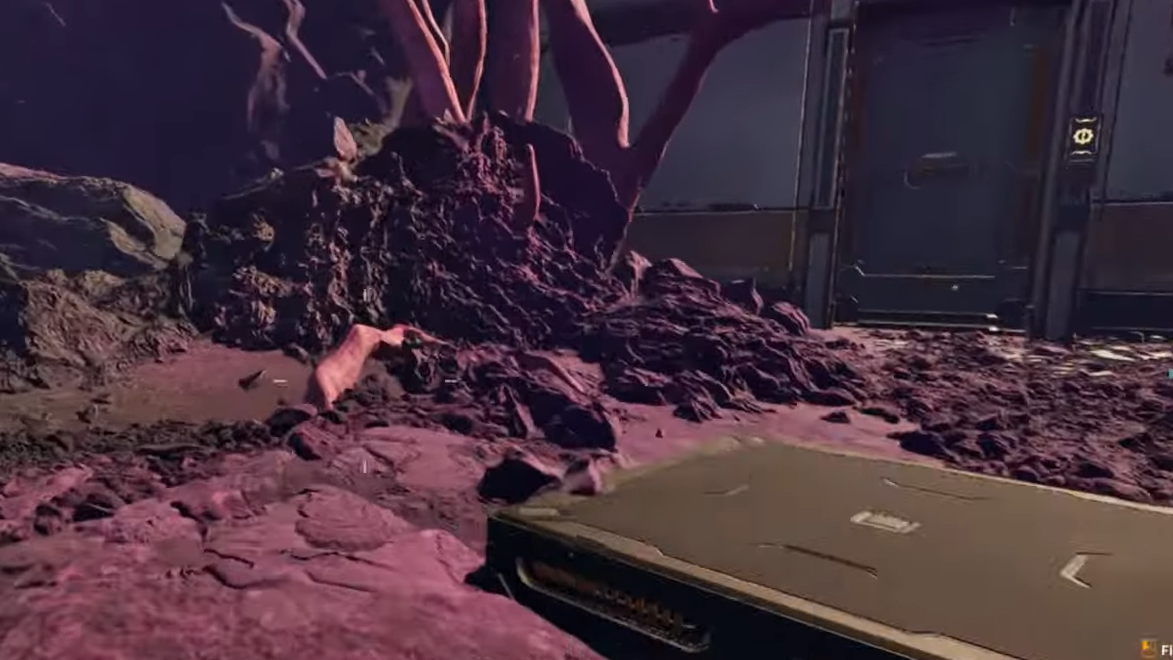
From the starting area, the landmark to look for is a large, broken satellite or dish-like structure that appears to be jammed into the side of a rocky mountain. The outpost is wrapped around that slope, with multiple buildings, shattered equipment, and purple or pink organic growths spreading across the site.
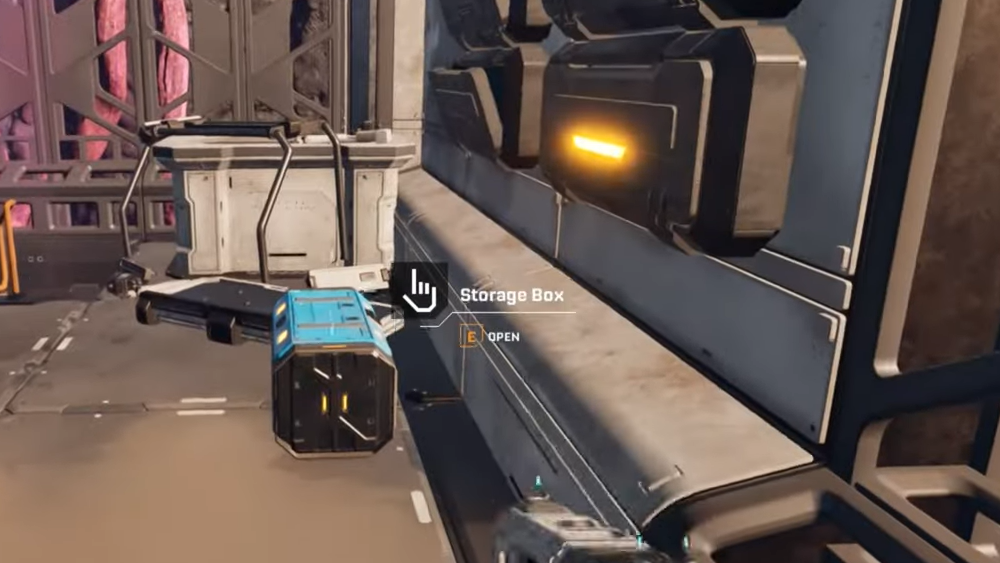
The Tube Blueprint itself sits in a blue storage box inside the largest building in the complex. That same box also contains a Rotor Blueprint in many runs, so this detour sets up both your tube and rotor production in one visit.
How to reach the Tube Blueprint from the starting area
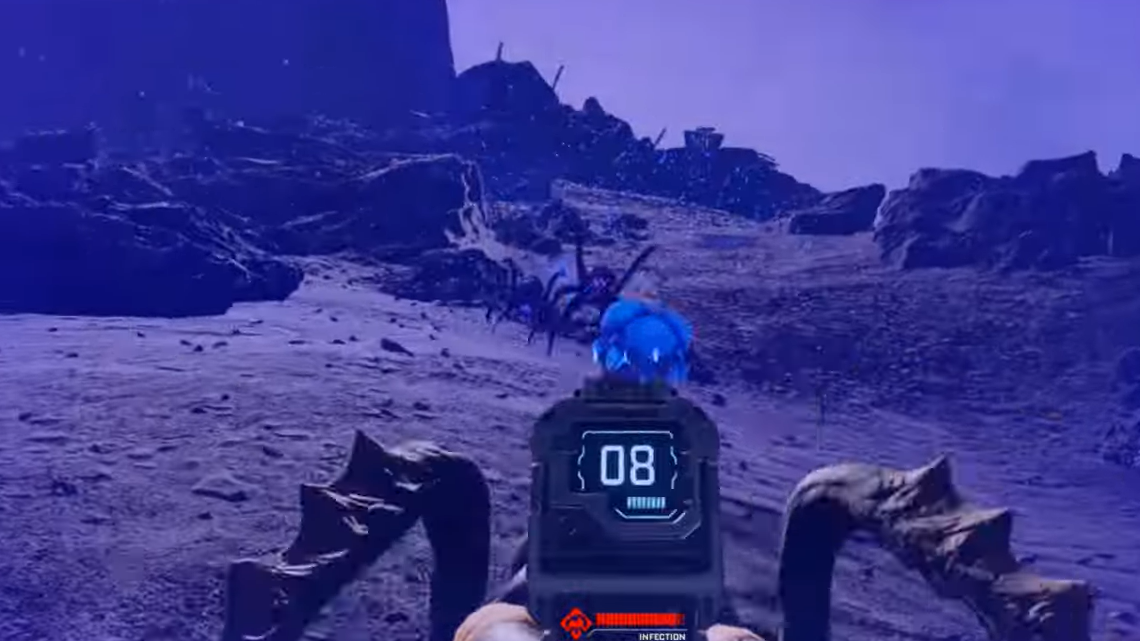
Step 1: Gear up before you leave. Bring as much pistol and rifle ammunition as you can comfortably spare, plus healing items. Expect repeated swarms of small alien creatures and tougher variants that spit acid or deal burst damage at close range.
Step 2: Leave the crash site and head toward the northwest horizon. From ground level, you should be able to spot a jagged mountain with the silhouette of a destroyed satellite or large industrial structure protruding from it. Keep that silhouette centered and move in a straight line toward it, skirting smaller points of interest if you are not ready to clear them.
Step 3: As you approach the mountain, angle toward the right-hand side rather than trying to go straight up the steepest face. The slope on the right is more forgiving and gives you better sightlines on incoming enemies, which matters once you start drawing aggro from the swarms around the facility.
Step 4: Fight your way up using space and elevation. When packs of aliens rush you, keep walking or sprinting backward while firing, instead of standing still. Aim for weak spots on their bodies to remove them faster and prevent being surrounded. If a wave feels overwhelming, kite them back down the slope to a more open firing lane and thin them out there.
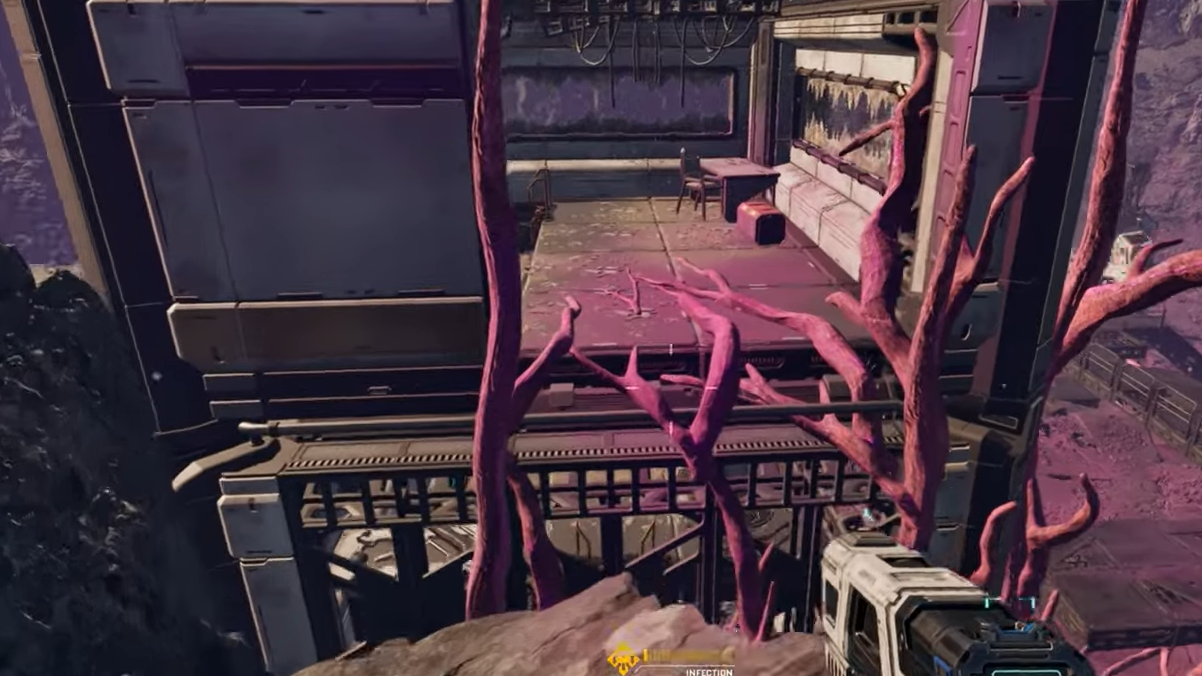
Step 5: Continue climbing until the full outpost comes into view. You will see several buildings, broken helium collectors, scattered crates, and a heavy concentration of purple or pink root-like growths around one particularly large structure. That building is your target for the Tube Blueprint.
Getting inside the outpost building that holds the Tube Blueprint
The building that holds the blueprint is easy to recognize once you are in the middle of the outpost. It is the largest structure on site and is draped in thick, pink root growths. Its main doors are either blocked or not directly accessible, so a straight walk-in does not work.
Step 1: Circle the building until you find a natural rock ridge pressed up against one side. This ridge forms an improvised ramp into the upper part of the structure. Watch for roaming enemies as you line up your approach; stepping onto the ridge can trigger additional waves.
Step 2: Run up the rock and use your double jump to clear the lip of the building and land on the interior ledge. Sometimes another small group of enemies will aggro when you drop in; be ready to move sideways and fire before they close the gap.
Step 3: Once inside, look for a route downward. The interior is partially collapsed, but there is a clear path leading to a lower level. Follow corridors and ramps until you reach a room with a distinct blue storage box.
Step 4: Interact with the blue box to loot it. This is where you obtain the Tube Blueprint. In many cases, you will also see a Rotor Blueprint in the same container, letting you unlock both components at once.
Step 5: After looting the box, expect another spawn of enemies. The game often uses blueprint pickups as a trigger for additional waves. Backtrack toward more defensible choke points rather than trying to fight in tight rooms.
Other loot and reasons to fully clear the mining base
The Selenian’s mining base is more than a single blueprint room. The complex is dotted with bodies, yellow loot chests, and unique limb upgrades (LEMs) that improve stamina, shields, and other stats.
Many corpses are marked on your map. Once looted, their markers disappear, which makes it easier to tell where you have already been. Some are in awkward positions, including on top of helium extractors; these usually require carefully timed double jumps from nearby rooftops or platforms.
It is worth making at least one full sweep of the area after you secure the Tube Blueprint, both for materials and for long-term character upgrades. The good news is that once a point of interest like this is fully cleared, you generally do not have to fight the same density of enemies again on later visits.

Combat tips for reaching the Tube Blueprint safely
Surviving the trip to the northwest outpost is mostly about pacing and positioning rather than raw weapon power.
- Travel right after a rupture when possible. Immediately after a rupture event, roaming mobs drop off for a short window while the planet stabilizes. That window makes crossing open ground and clearing facilities noticeably safer.
- Use elevation to control swarms. Hills, ridges, and building roofs let you funnel enemies into narrower approaches. Shooting down from a ledge also buys more time to react to spitters and fast melee units.
- Keep moving during fights. Standing still invites being surrounded. Backpedal in straight lines when possible, then cut sideways around obstacles to break the line of sight and split groups.
- Prioritize spitters and blue elites. Spitting enemies and tougher blue-colored variants can strip your health and shields quickly. Focus them before cleaning up basic melee creatures.
What to do after you obtain the Tube Blueprint
Once the Tube Blueprint is in your inventory, it appears in the story or special items tab. It is not consumed on death, so you keep it permanently once picked up.
Step 1: Return to your base and interact with a recipe station. The early fabricator recipes that reference Tubes will now display the blueprint requirement as fulfilled after you insert the Tube Blueprint into the appropriate slot.
Step 2: Provide the required materials for Tubes. Early Tube fabrication calls for basic processed metals such as titanium plates and titanium rods, plus data points. Exact costs are visible in the fabricator once the blueprint is active.
Step 3: Queue up your first batch of Tubes and slot them into the machines and structures that had been blocked. With Tubes and Rotors both available, you can move into more complex power, automation, and stabilization builds without hitting that early bottleneck again.
With the northwest mining base cleared and the Tube Blueprint in hand, the early game in StarRupture opens up. The same path that took you to this outpost also puts you close to other blueprint locations and ore deposits, so each later trip across Arcadia-7 becomes less about survival and more about long-term planning.