

Microsoft Teams has become an integral part of people’s lives, more than ever before. Over the course of the past year, events unfolded in a manner that changed the way we work or attend school. Microsoft Teams was a crucial part of this transition.
But that wasn’t the whole scope of it. Teams was even helping people attend birthday parties, weddings, baby showers from their homes. Even simple pleasures as watching movies with friends and loved ones were happening on the platform. Teams became personal. And it’s here to stay.
With Windows 11, Microsoft is hoping to take this personal connection with Teams to a whole new level. Windows 11 has an integration for Chat (think of it as Teams-lite) right in the taskbar. The taskbar integration is making Teams a native experience going forward rather than an app that you download if you need it.
What is Chat in Windows 11?
Chat is a toned-down version of Microsoft Teams. It sort of builds on top of Teams Personal for Friends and Family that Microsoft introduced earlier this year. It’s meant to be for people who want to use Teams and Chat for personal communication.
Just like Teams Personal, Chat cuts down the complications of Teams for work, i.e., regular Teams. Microsoft Teams is a Workstream Collaboration app, and to facilitate collaboration, it has a great number of tools. Those tools are what make Teams the right choice for remote work. But for a regular person, the sheer number of features is overwhelming. Channels alone are enough to discourage someone from using Teams for personal use.
That’s where Microsoft Teams Personal profile for Friends and Family came in. It cut down all the tools one will never need outside of work. But Microsoft Teams Personal still required you to download the Microsoft Teams app on your own.
Chat is built upon the same principle as Teams Personal, but it makes the Teams experience native to Windows 11 users, i.e., the app comes as a part of Windows now. With a Taskbar entry point, even someone who knows nothing about Microsoft Teams but clicks the icon out of curiosity can get started with Teams for personal communication in a jiffy.
Using Chat, you can not only chat with other Microsoft Teams users, but you can also have video and voice calls. It also brings group chats and calls right to your fingertips (or, rather Taskbar). And the fact that Teams is available across platforms – Windows 10, Mac, iOS, Android – magnificently increases the number of people you can contact from your taskbar. Let’s dive right into the finer details of how to use it.
Getting Started with Chat
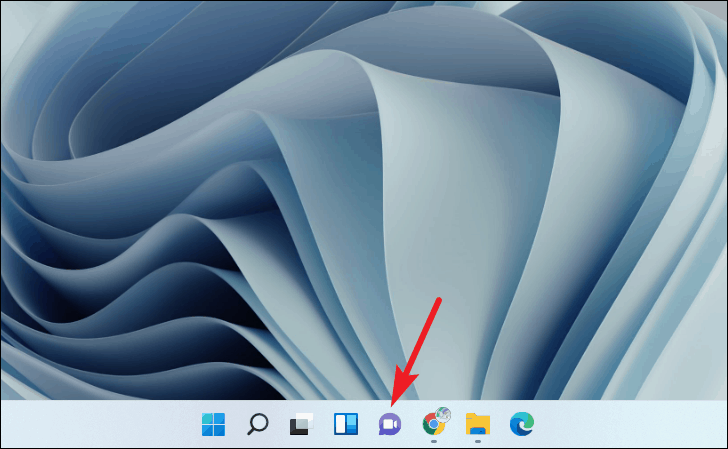
If you’re on the right build of Windows, the Chat integration will appear right in the taskbar. Update your Windows if you can’t find it.
Go to the taskbar and click the ‘Chat’ icon to get started. You can also use the Windows logo key + C keyboard shortcut to open Chat at any time.
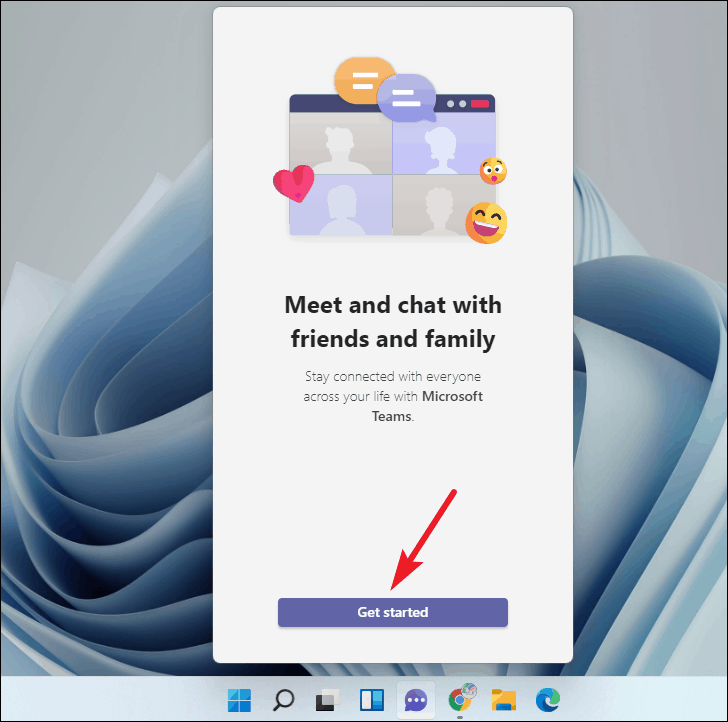
The chat flyout window will appear. Click the ‘Get Started’ button.
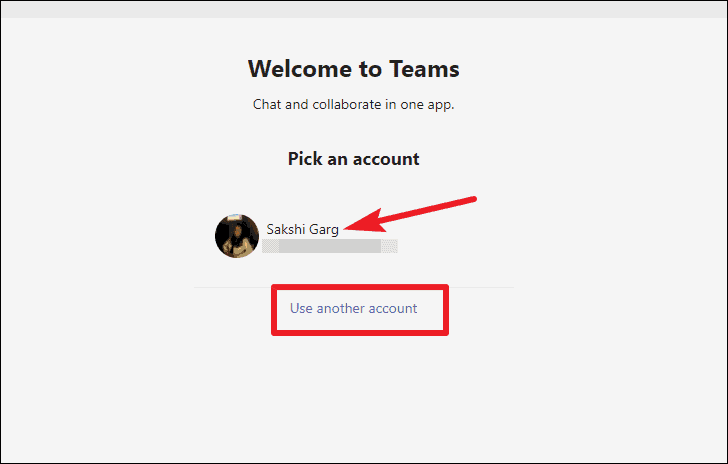
You’ll need to log in to Teams to use Chat. But there’s a slight catch with this integration. You can only use it with a personal Microsoft account. For a Work or School account, you’d have to use Teams the old-fashioned way, i.e., with the full-fledged app Teams offers. Maybe that’ll change in the future, but for now, that’s the way things are. And that may be how they’ll stay as Microsoft is making Chat for consumers, not organizations.
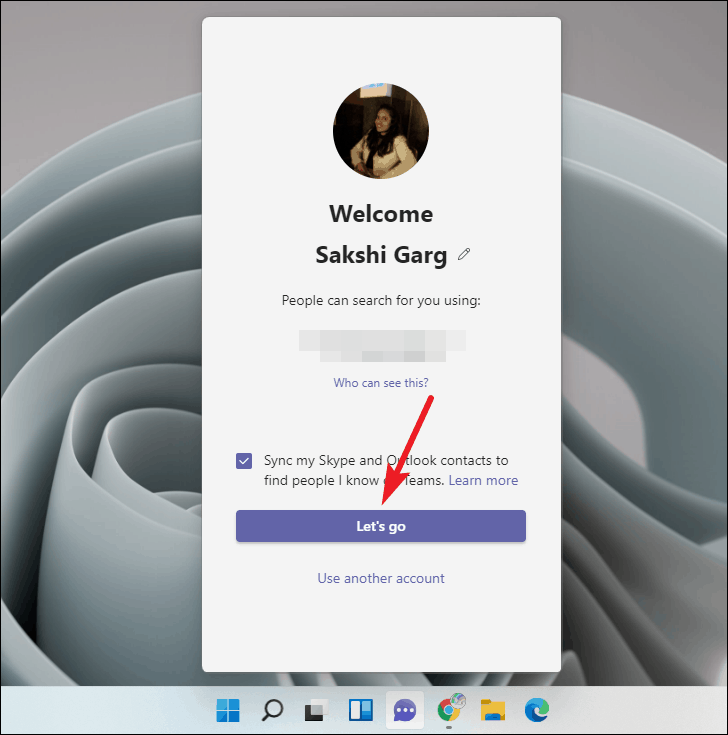
Your personal Microsoft account will appear if you’re logged into Windows, and you can continue with it. Or you can also use a different personal account. Click ‘Use another account’ to log in to another account. Otherwise, click the available account to continue with it.
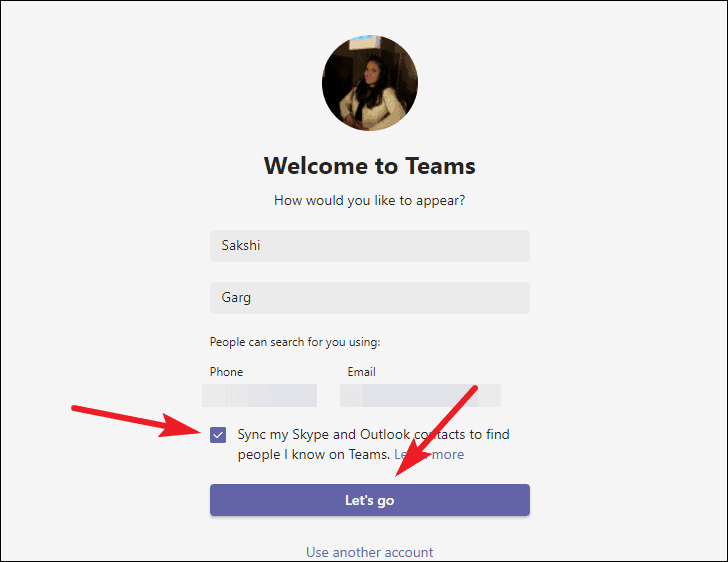
You can edit your name to decide how you appear to other users on Teams. You can also sync your Outlook and Skype contacts so you can find people you know on Teams. If those contacts are no longer relevant to you, uncheck the option. It’s your choice. Besides, you can change your preference any time later from the settings. Click the ‘Let’s Go’ button to finally use Chat.
Instead of the above windows, you might also get your account right in the flyout window. It has all the same options as above. You can click ‘Use another account’ to log in using another account or edit your name and syncing preferences.
Using Chat in Windows 11
Once you’ve completed the initial setup, you can start using Chat. Go to the Chat icon on the taskbar and click it.
The Chat Flyout Window
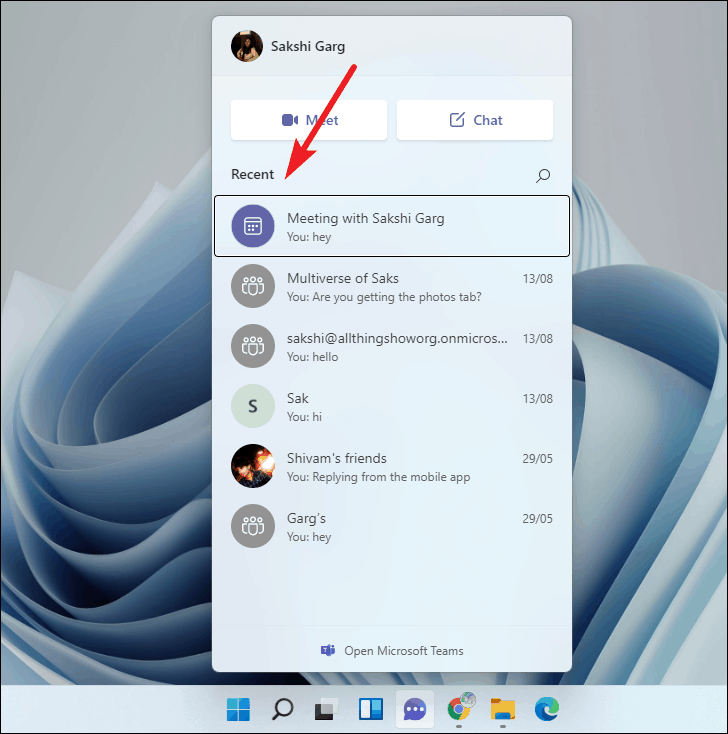
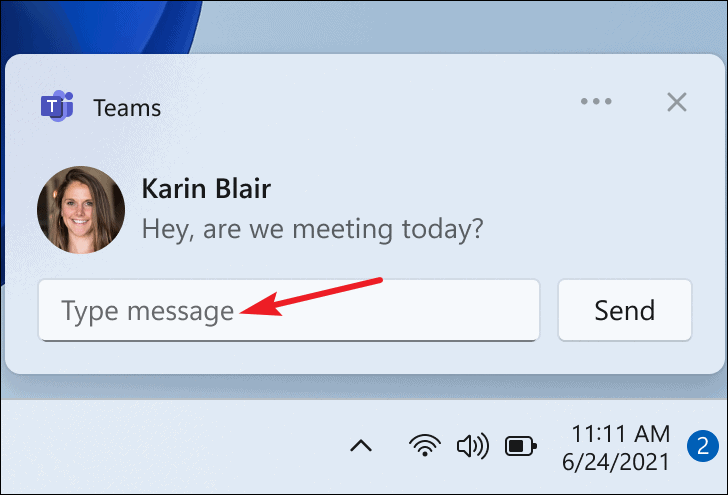
Your chats will appear in a sleek flyout right there on the desktop without even needing to open the app. That’s the beauty of it. You don’t have to open an app anytime you want to chat with someone. Microsoft hopes that the ease of access will make people more privy to using it, something the company tried (and failed) before as well, with the People option. Your most recent chats will appear on the Chat flyout. Click any present chat to continue talking with someone.
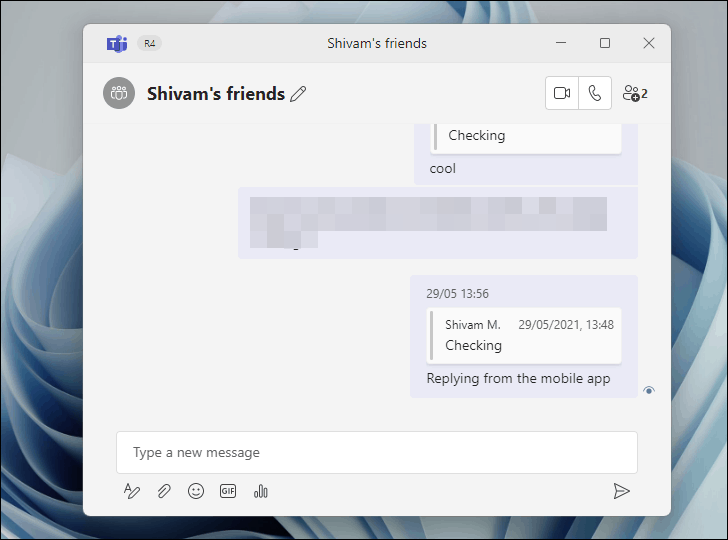
The chat will open in a separate pop-up window without the app.
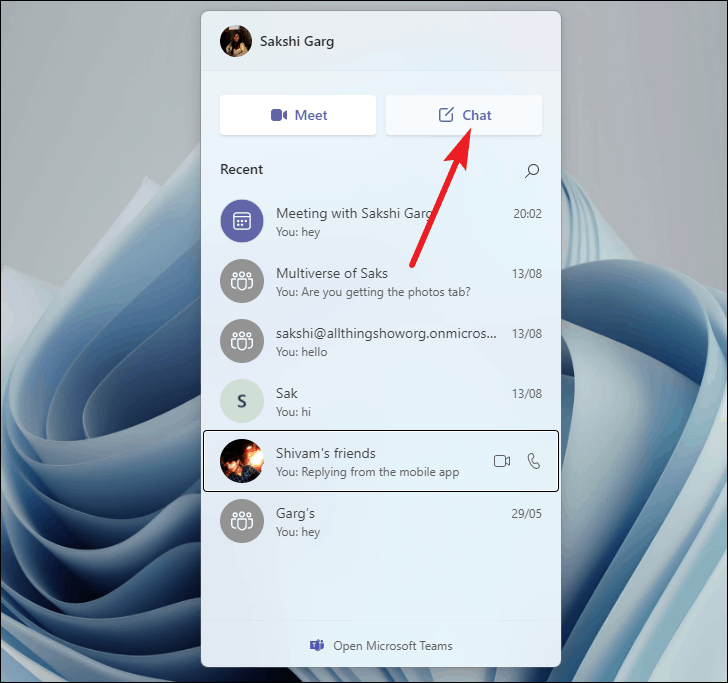
To start a new chat, click the ‘Chat’ button at the top of the flyout.
A new chat window will open. Enter the name, email, or phone number of the person you want to contact in the ‘To’ field and your message in the message box and send it.
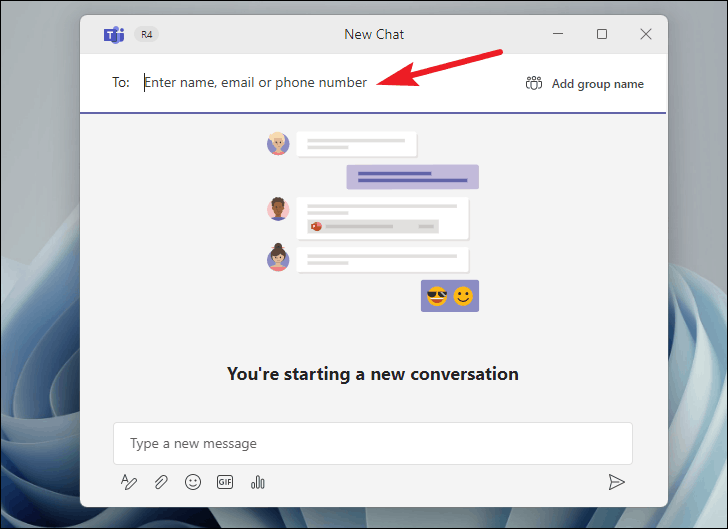
If the person does not have a Teams account, they’ll get your message via an SMS or an email (depending on how you chose to contact them) and an invite to join Teams. Once they join Teams, you can continue your communication with them.
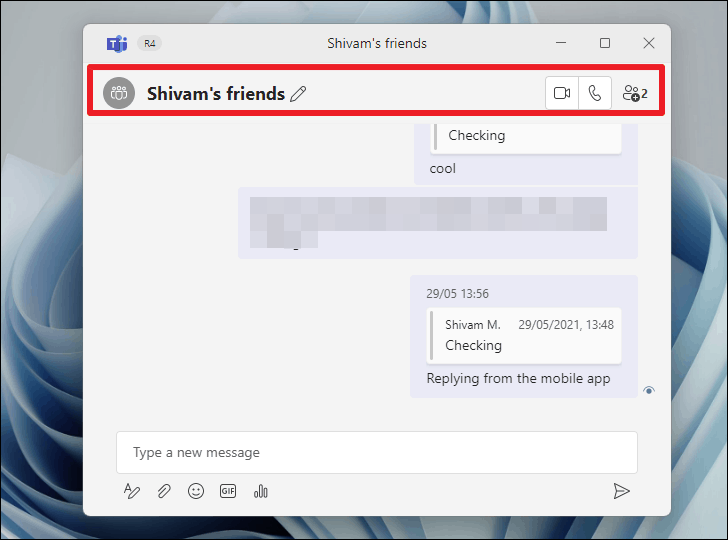
Any time you open or start a chat from the flyout window, it will open in another simplified pop-up window that won’t have the normal elements of a Teams chat interface. Few of those elements are part of the experience nonetheless, and we’ll get back to them in a moment.
The pop-up chat window will simply have your chat to keep things uncomplicated. Other than that, you can add members to the group from the pop-out, change the name of the group, or start an audio or video call.
Although things are simple in the pop-up, they aren’t entirely non-existent. The compose box has a few options to make the experience better. You can format the text, add emojis, attachments, GIF reactions, and even create polls. But that’s the whole scope of it.

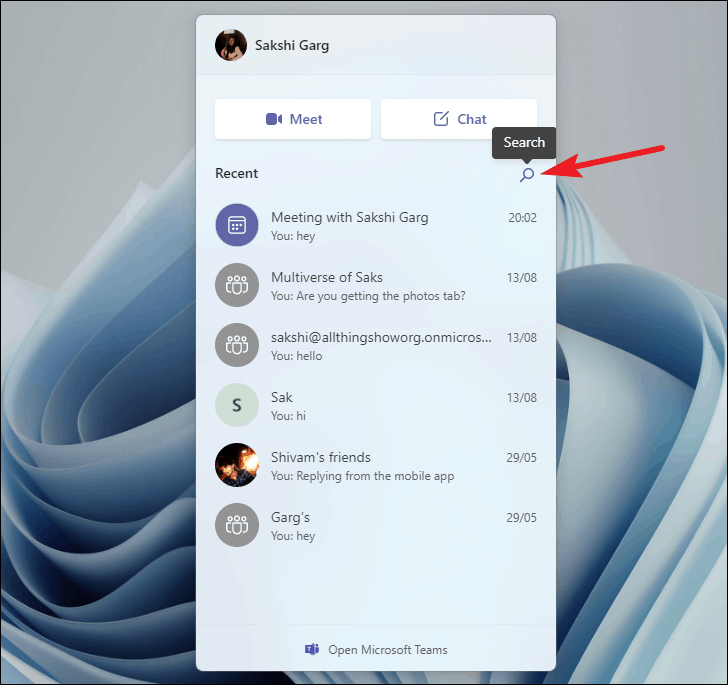
The main Chat flyout window also has a ‘Search option that you can use to search for a contact. And if the chat for that contact exists, it’ll appear. The search option in the flyout window cannot be used to find the contents of the chat, though.
When you hover over a chat, you’ll also see that the Video calling and Voice calling icons appear. Click the voice or video icon to start a new meeting.
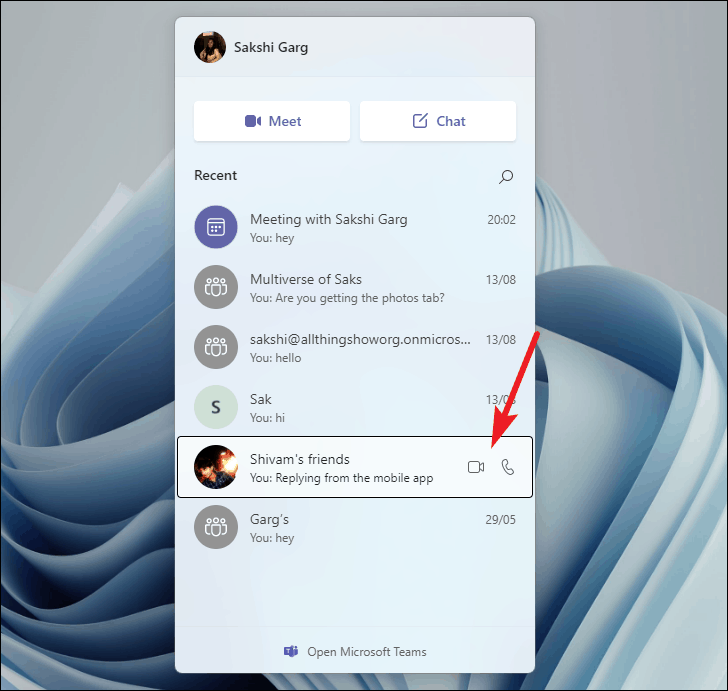
Similar to chats, the voice or video calls will happen in pop-out windows instead of opening the Microsoft Teams app. The meeting has fewer options than a traditional Teams meeting. You can see the roster of the participants and invite people to the call, toggle your camera or microphone on/ off, and share content from your screen from the meeting toolbar.
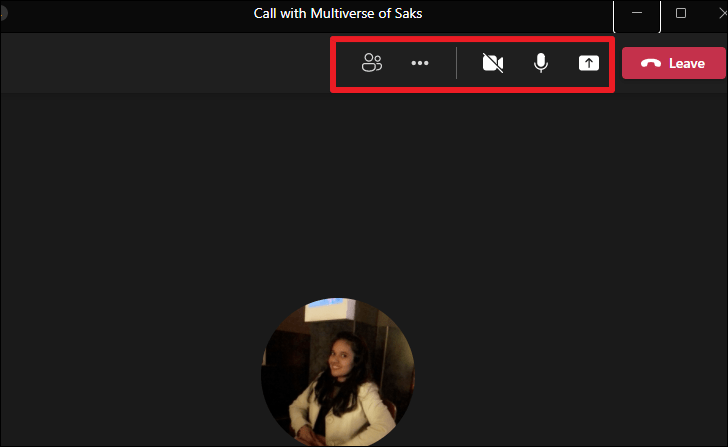
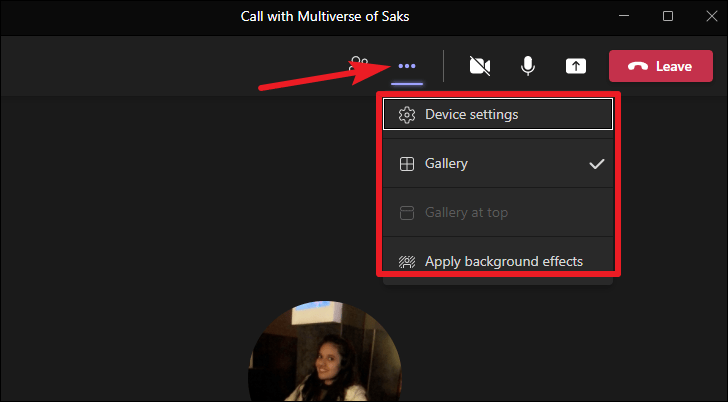
Other than that, you can change your meeting view, apply background effects, or change device settings (choose between speakers, microphone, and camera devices) from ‘More actions’ (three-dot menu) but that’s about it.
More features like Together Mode, Emoji reactions will also be coming to the Chat meeting experience in the coming months.
The Flyout Window also has the option to start a new meeting with anyone with a ‘Meet’ icon right next to the ‘Chat’ icon.
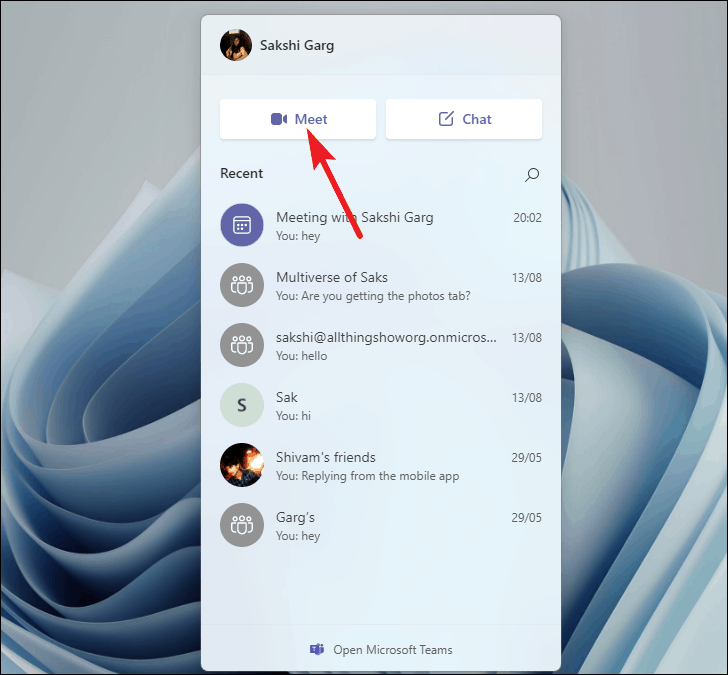
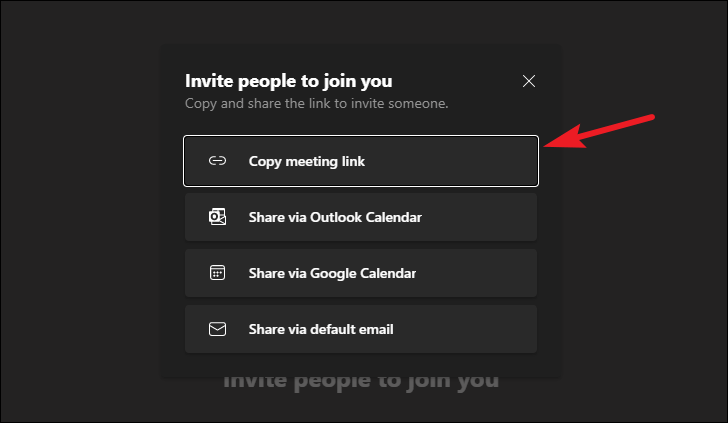
Clicking the ‘Meet’ button will start a new meeting independent of your chats. You can then invite people via the meeting link, Outlook calendar, Google calendar, or an email.
Chat also delivers your notifications right on the screen in native Windows 11 notifications so you don’t have to worry about missing any messages or calls because the app isn’t open. You can also reply to messages using inline replies straight from the notification.
Microsoft Teams (Preview) app
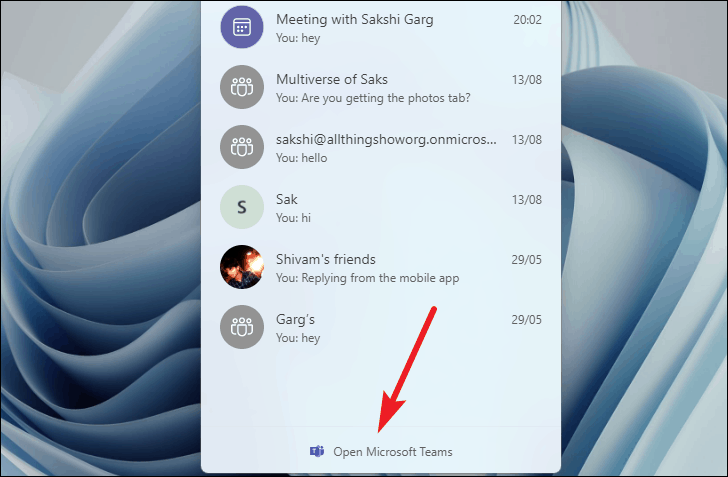
Now, the best thing is you can open the app from the Chat flyout at any time to use the rest of the features. Click the ‘Open Microsoft Teams’ option at the bottom of the Chat flyout.
The Microsoft Teams (Preview) app that will open is different than your traditional app. For starters, it loads a lot faster than the normal Microsoft Teams app. But that’s because it currently has fewer features than the traditional Teams app.
The left navigation bar has three tabs: Activity, Chat, and Calendar.
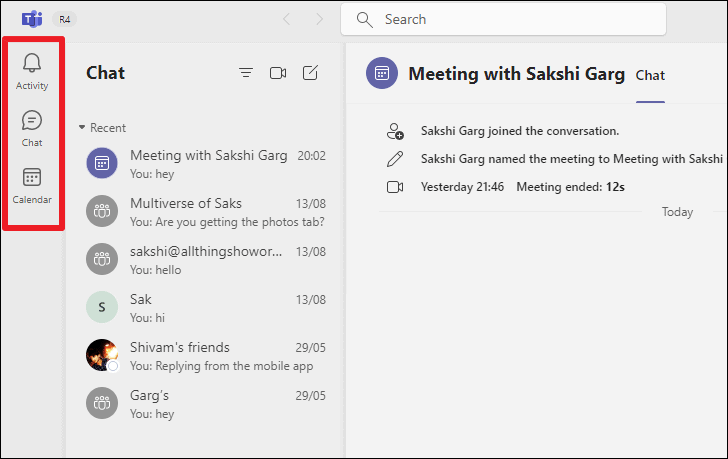
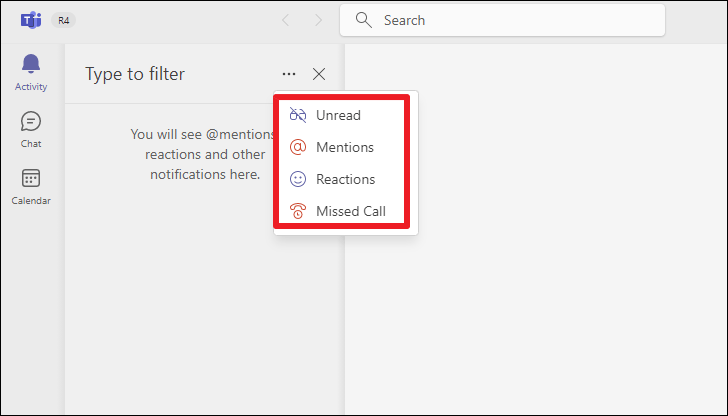
The Activity tab shows your @mentions, reactions, and other notifications you receive, like unread messages and missed calls. You can use the filter option to streamline your feed based on what you’re looking for.
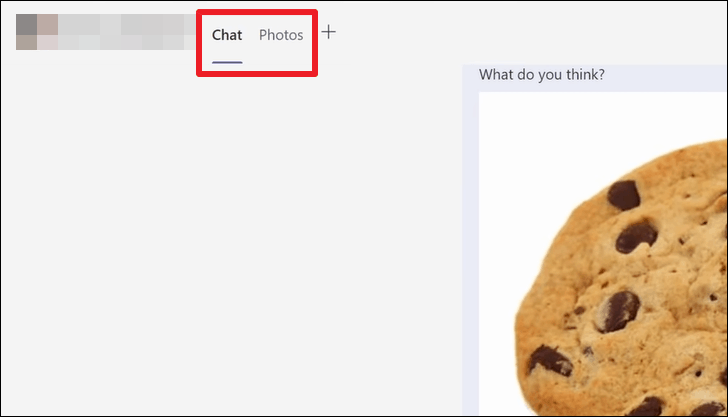
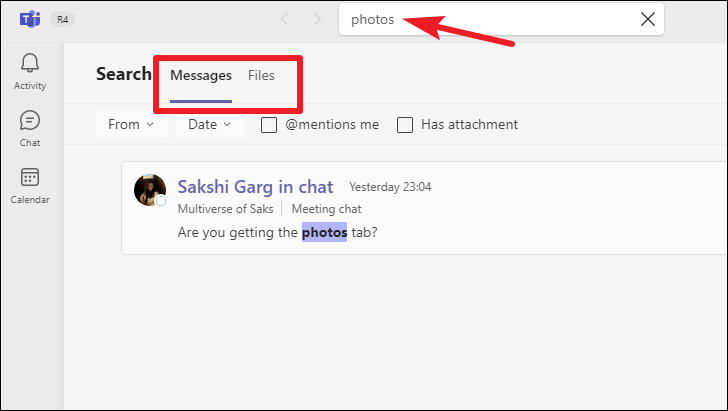
The Chat tab opens your chats but the app offers additional functionality than the pop-up flyout window. When you open a chat in the app, it’ll have your ‘Chat’ tab that has the chat history and a ‘Photos’/ ‘Files’ tab that’ll have the photos or files shared in the chat in one place if there is any shared media.
Click the ‘+’ icon and you can also add new tabs. Currently, the only tab available to add is the ‘Tasks’ tab. With tasks, you can plan family events or surprise parties rather efficiently. Click ‘Tasks’ to add it to the chat.
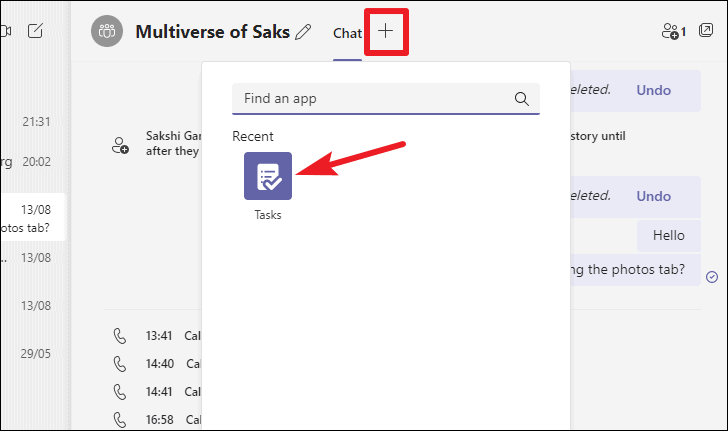
Tabs are collaborative in Microsoft Teams chat, so when you add the Tasks tab to the chat, it won’t just be on your end. Every member in the chat can see and use the tasks tab themselves.
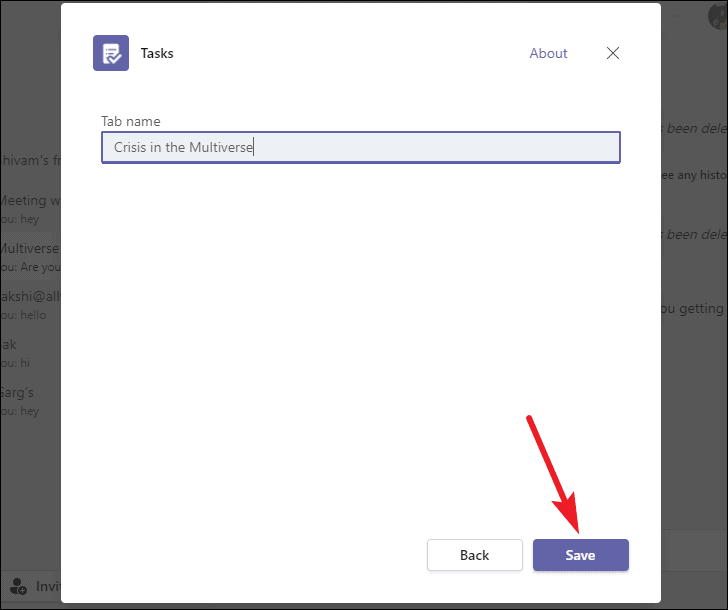
A layover window will open. You can edit the name of the tab which will be ‘Tasks’ by default. Click ‘Save’ to continue.
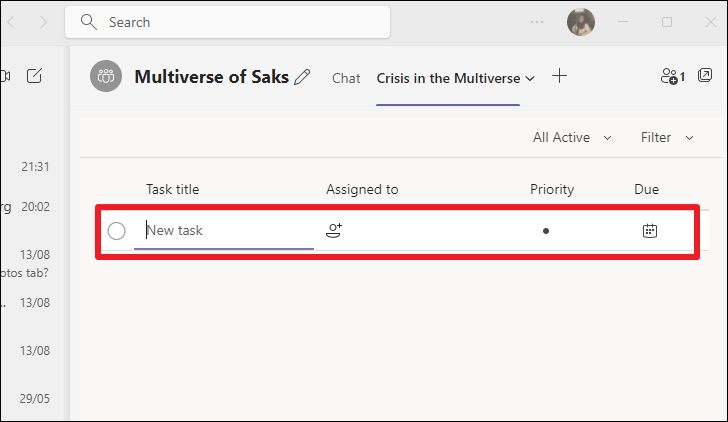
Once the tab is set up, anyone can enter new tasks and assign them to other members in the chat. You can also set the priority status and due date for the task.
The next tab on the left navigation bar is ‘Calendar’. The calendar in Microsoft Teams (Preview) is synced to your Outlook calendar. So, if there are any events on your Outlook calendar, they’ll show up in Teams too.
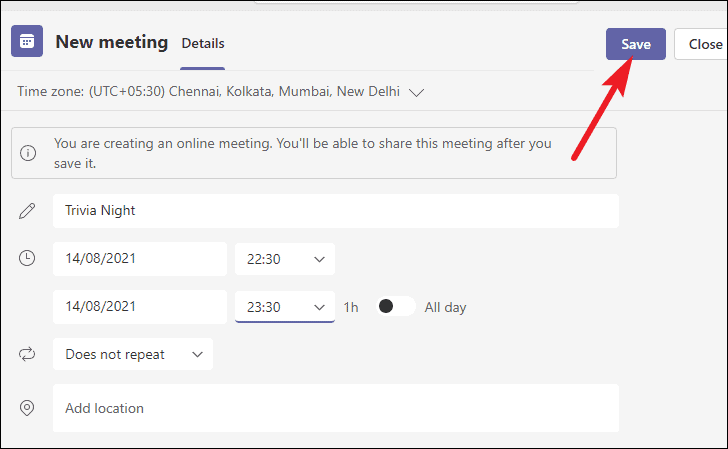
You can also create new events or meetings from the Calendar. Click the ‘New Meeting’ button at the top right corner.

The meeting details page will open. If you’ve used the traditional Teams before, you’ll find that even creating meetings is different in the preview app. You cannot invite people as you’re creating the meeting.
Once you’ve entered the relevant details for the meeting, i.e., the meeting title, date, time, duration, location, etc., click the ‘Save’ button in the upper right corner.
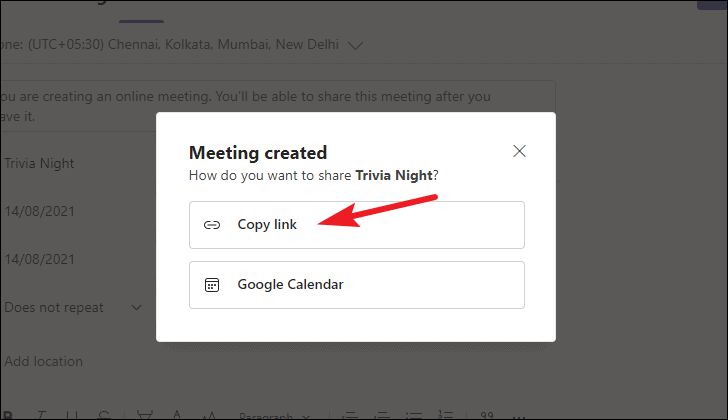
Once you’ve created the meeting event, you can get a shareable link or share the details via Google calendar.
At the top, there is the ‘Search’ bar. You can use the search bar to search for messages in your entire chat history or the files shared in your chats. If you get back a lot of results, you can even use various filters like whose the message is from, which date was the message sent/ received on, whether the messages mention you, or if they have an attachment.
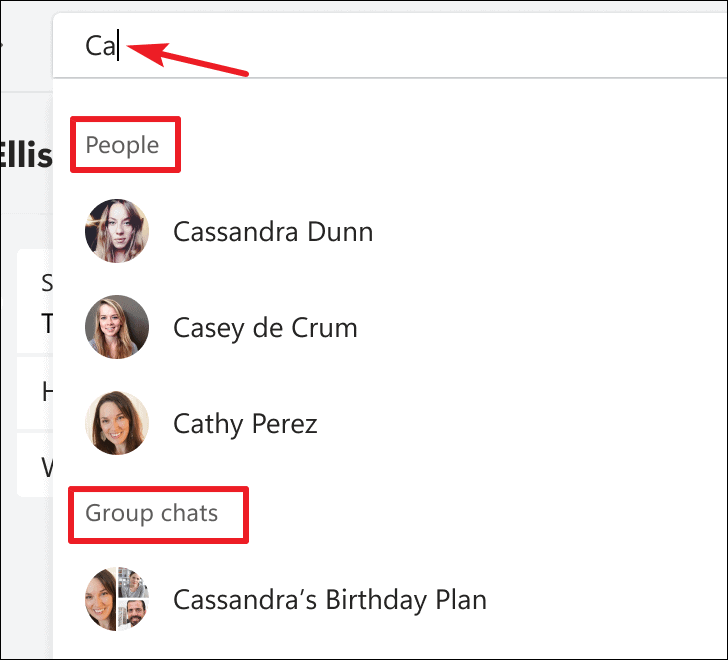
You can also search for your contacts and chats. But unlike the traditional Teams, it does not moonlight as the command bar as well.
You can manage your Teams notifications from the app as well. Go to the ‘three-dot menu’ on the Title Bar and click ‘Settings’ from the menu.
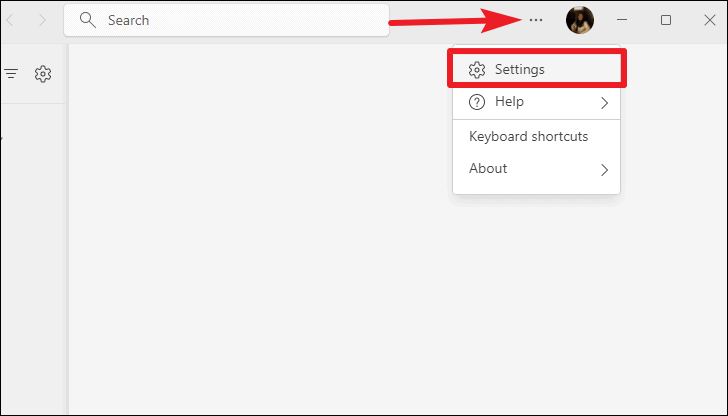
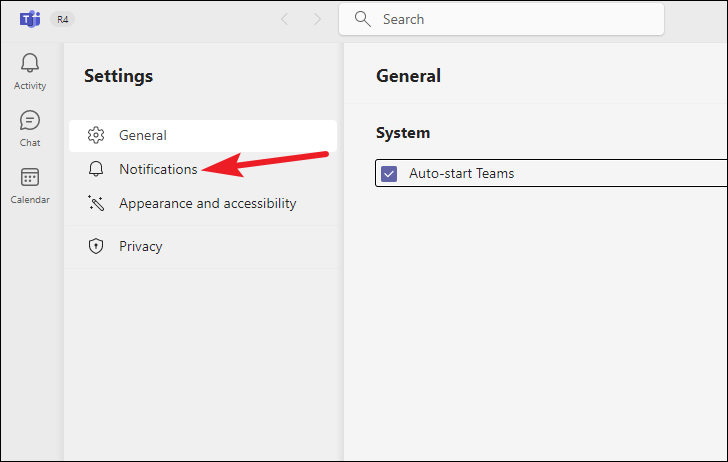
Go to ‘Notifications’ from the navigation menu on the left.
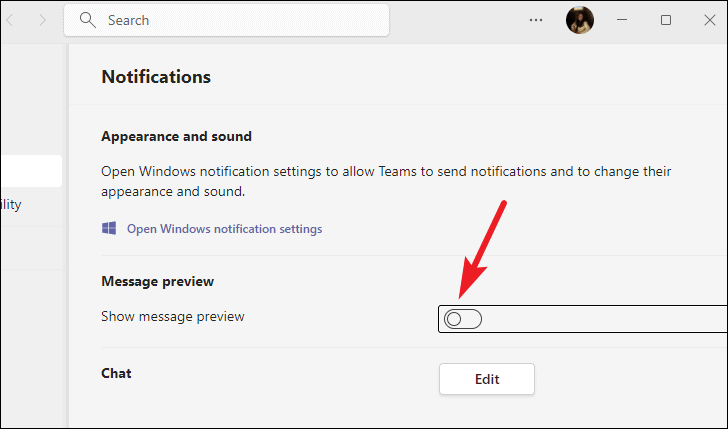
There you can change various settings for your notifications. To turn off message previews in the notification, turn off the toggle for ‘Show message preview’.
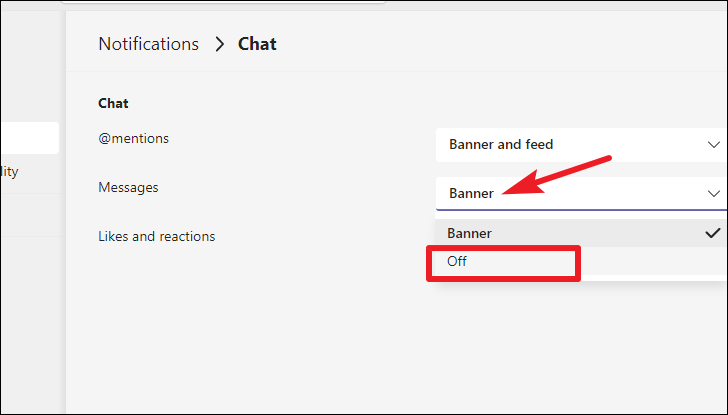
To manage what you get notifications for, click the ‘Edit’ button next to ‘Chat’.
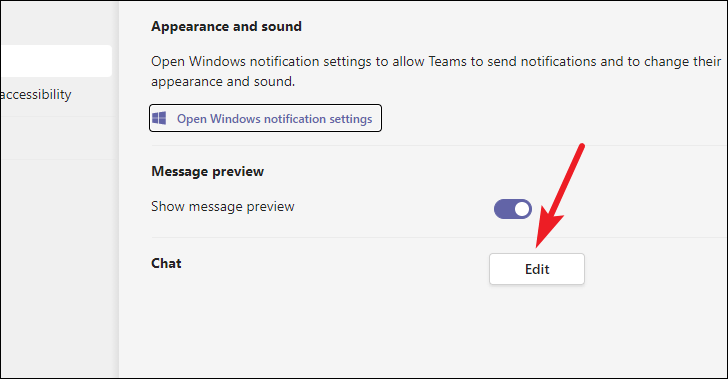
Here, you can decide what you get notifications for: ‘@ mentions’, ‘Messages’, and ‘Likes and Reactions’. You can even turn off notifications from showing on the desktop at all. Click the drop-down menu and select ‘Off’ or ‘Only Show in Feed’ depending on the options for each.
With Chat, Microsoft hopes that Teams will become the go-to for many Windows 11 users. With the Windows 11 integration, you get the best features of Teams Personal at your fingertips without the hassle of downloading the app or setting up your account. Chat makes everything faster, leaving you to only chat and contact your friends and family.


Member discussion