
Workbench progression is the backbone of Hytale’s crafting system. The basic station turns scattered rubble and tree trunks into tools and weapons, while higher tiers and specialized benches unlock farming, alchemy, armor, and late-game magic.
How to craft the first workbench in Hytale
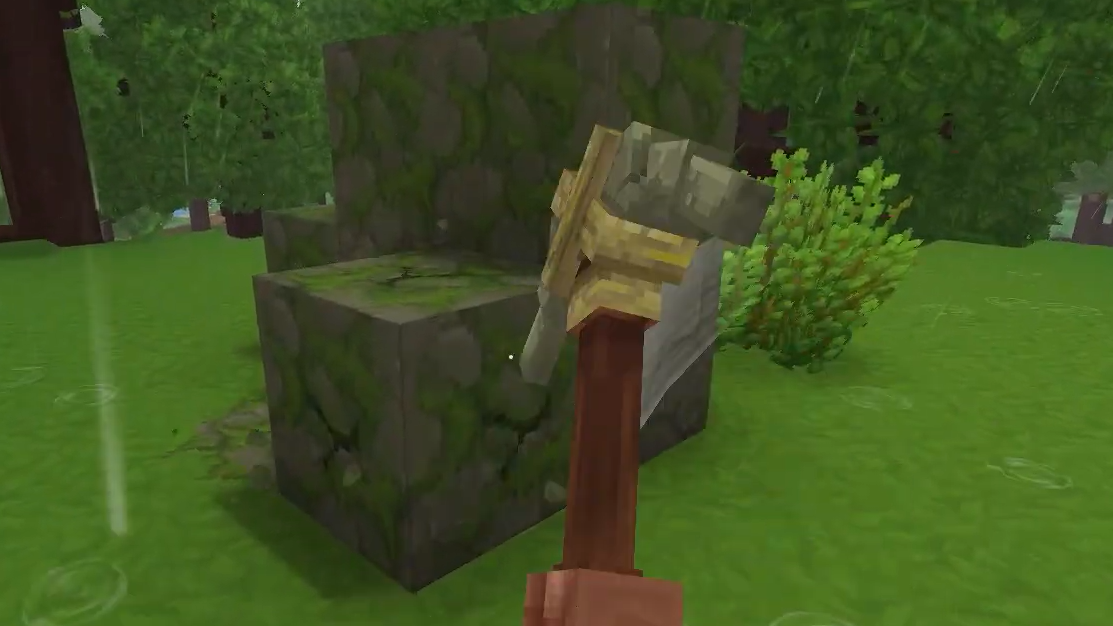
The first workbench is where the survival loop properly starts. Before crafting it, you need wood and stone.
Step 1: Gather tree trunks efficiently. Punch or mine the tree from the lowest trunk block. When the base breaks, the rest of the trunk collapses, dropping multiple Tree Trunks at once. This is much faster than chopping each block individually, and matters early on when you need a surprising amount of wood.
Step 2: Collect stone. You can mine exposed stone blocks directly, but using a pickaxe makes the process smoother once you have one. For the very first workbench, basic stone is enough.
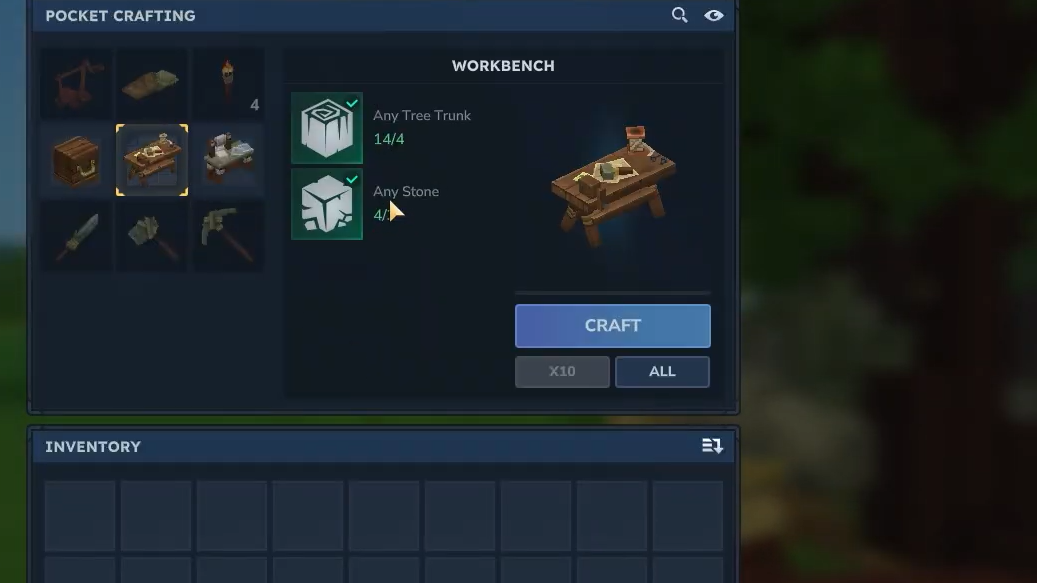
Step 3: Check you have the materials. The starter workbench requires:
| Workbench tier | Required items | Quantity |
|---|---|---|
| Tier 1 Workbench | Stone | 3 |
| Tier 1 Workbench | Tree Trunks (any) | 4 |
Step 4: Craft and place the workbench. Press Tab to open your crafting interface, select the Workbench entry, then hit Craft. Once created, place the workbench on the ground wherever it’s convenient for your base.
How workbench upgrades work
After Tier 1, upgrading the central workbench shifts from basic survival to real progression. Each upgrade tier raises the ceiling on what you can craft, but the material requirements ramp up quickly.
How to upgrade the workbench from Tier 1 to Tier 2
Tier 2 is your first significant metal upgrade. It leans on early ores and light fabrics.
| Upgrade | Required items | Quantity |
|---|---|---|
| Tier 1 → Tier 2 | Copper Ingots | 30 |
| Tier 1 → Tier 2 | Iron Ingots | 20 |
| Tier 1 → Tier 2 | Linen Scraps | 20 |
Step 1: Smelt enough copper and iron. Explore nearby caves and surface outcrops, mine copper and iron ore, then smelt them into Copper Ingots and Iron Ingots. You need 30 copper and 20 iron ingots in total.
Step 2: Farm linen scraps. Collect plants and break down appropriate fiber items to build up at least 20 Linen Scraps. These represent your first fabric bottleneck.
Step 3: Use the upgrade option on the workbench. Interact with the workbench and use its upgrade interface. Once the required materials are in your inventory, confirm the upgrade to push the workbench to Tier 2.
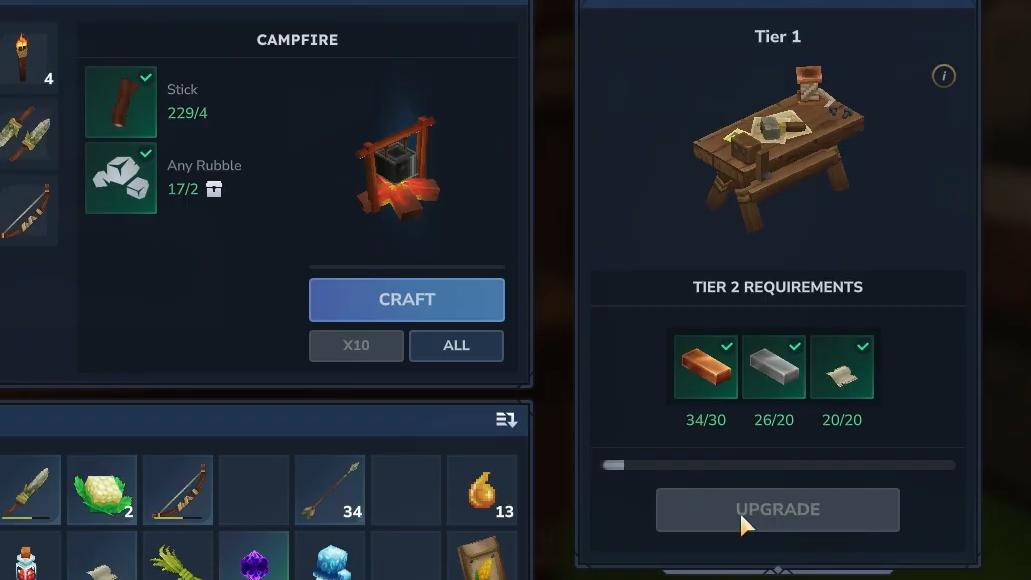
How to upgrade the workbench from Tier 2 to Tier 3
Moving from Tier 2 to Tier 3 is a major leap. The recipe forces you into deeper exploration, higher-tier biomes, and more dangerous enemies.
| Upgrade | Required items | Quantity |
|---|---|---|
| Tier 2 → Tier 3 | Thorium Ingots | 30 |
| Tier 2 → Tier 3 | Cobalt Ingots | 20 |
| Tier 2 → Tier 3 | Heavy Leather | 30 |
| Tier 2 → Tier 3 | Shadoweave Scraps | 50 |
| Tier 2 → Tier 3 | Essence of Fire | 25 |
Step 1: Gather high-tier metals. Mine and smelt enough ore to reach 30 Thorium Ingots and 20 Cobalt Ingots. These metals typically sit behind tougher enemies and more complex cave networks.
Step 2: Stockpile creature drops and fabrics. Hunt creatures that drop hides to turn into Heavy Leather, and push into darker, more dangerous areas to collect Shadoweave Scraps. You need 30 Heavy Leather and 50 Shadoweave Scraps total.
Step 3: Secure Essence of Fire. Defeating specific enemies or interacting with fire-themed locations provides Essence of Fire. Collect at least 25.
Step 4: Upgrade at the workbench. Interact with your Tier 2 workbench, open its upgrade panel, and apply the materials to unlock Tier 3. This unlocks advanced recipes that match the late-game resource investment.
Every specialized workbench in Hytale and what they do
The main workbench is only one part of Hytale’s crafting system. Specialized stations sit on top of it, each focused on a specific pillar of progression, from farming to spellcraft. Recipes for these benches often use simple building blocks, making them accessible as soon as you reach the relevant materials.
| Workbench | Primary role | Key materials | Total quantity |
|---|---|---|---|
| Farmer's Workbench | Farming tools, seeds, and agricultural upgrades | Any Tree Trunk Plant Fiber |
6 20 |
| Armorer's Workbench | Armor crafting and upgrades | Copper Ingot Any Tree Trunk Any Stone |
2 10 5 |
| Salvager's Workbench | Breaking down gear into materials | Iron Ingot Any Tree Trunk Any Stone |
6 5 5 |
| Alchemist's Workbench | Potions and alchemical items | Any Stone Gold Ingot Venom Sac Bone Fragments |
20 5 10 10 |
| Arcanist's Workbench | Magic and late-game arcane equipment | Thorium Ingot Linen Scraps Essence of the Void |
10 30 20 |
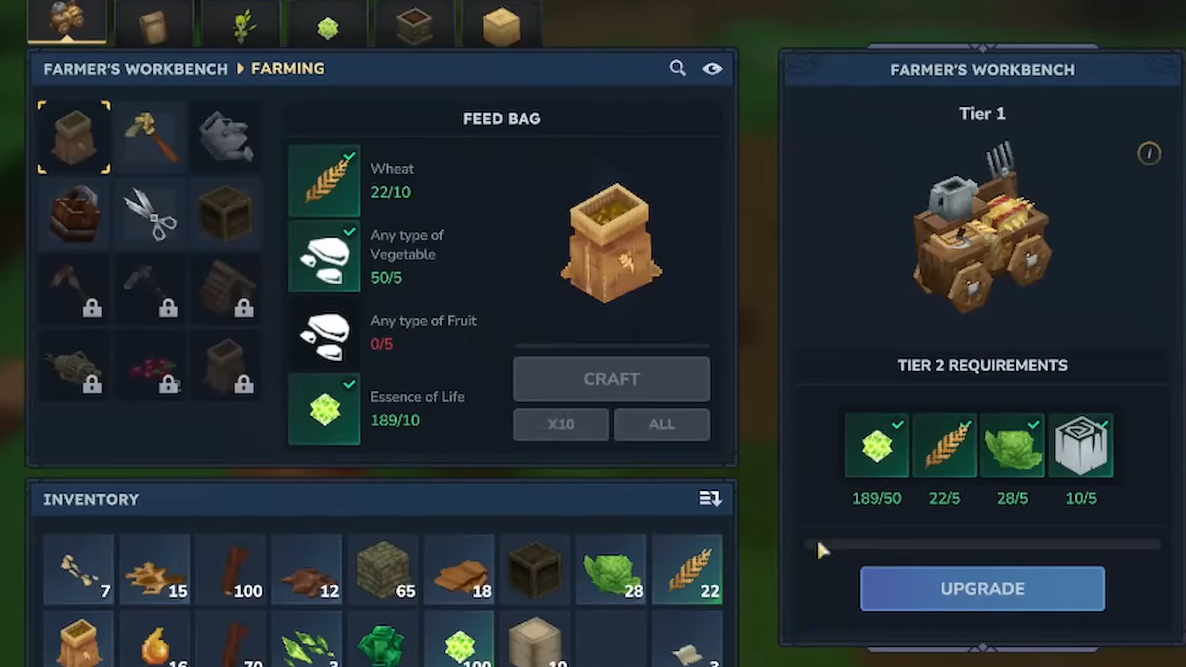
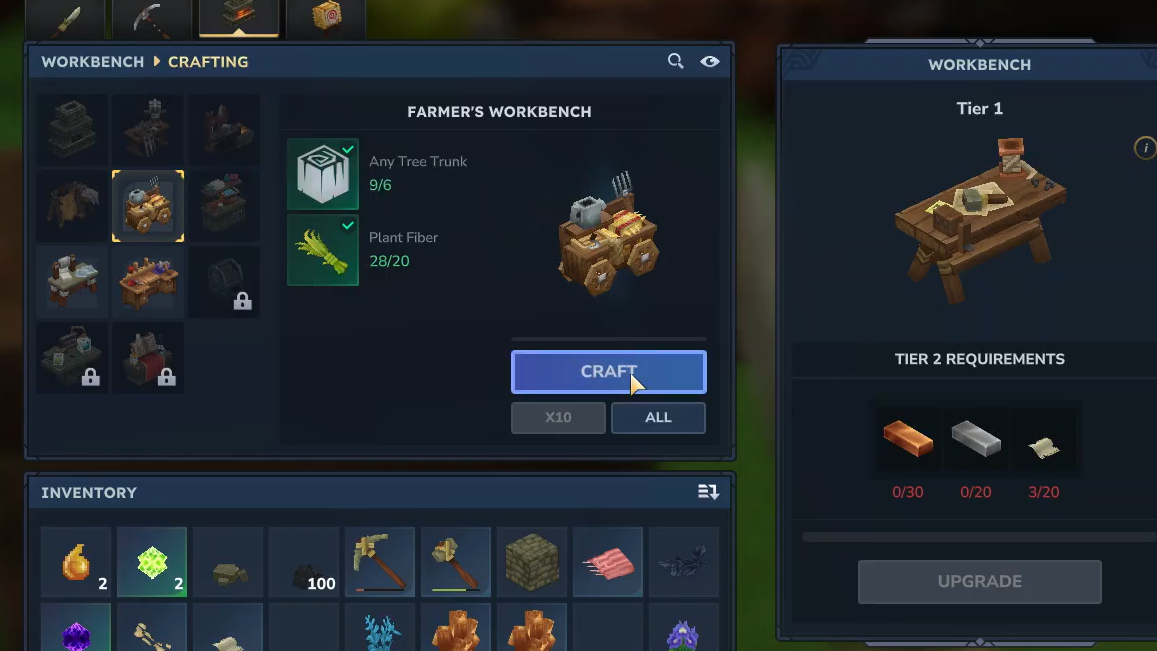
How to craft a Farmer’s Workbench
The Farmer’s Workbench underpins early agriculture. It lets you create farming tools, seed bags, and eventually higher-tier farming gear.
Step 1: Collect plant fiber. Mine small bushes and similar vegetation to obtain Plant Fiber. Berry bushes work as well; the key is to break foliage blocks until fiber drops.
Step 2: Gather any tree trunks. Chop down trees using the same base-block trick as the starter workbench. You need 6 Tree Trunks.
Step 3: Craft the Farmer’s Workbench at a standard workbench. Open your existing workbench, move to the tab that lists specialized stations, and select the Farmer’s Workbench recipe. Provide 6 tree trunks and 20 plant fiber, then craft and place it near your fields.
Once placed, the Farmer’s Workbench exposes recipes for basic farming tools such as a crude hoe, watering can, and shears, along with seed bag purchases using Essence of Life.
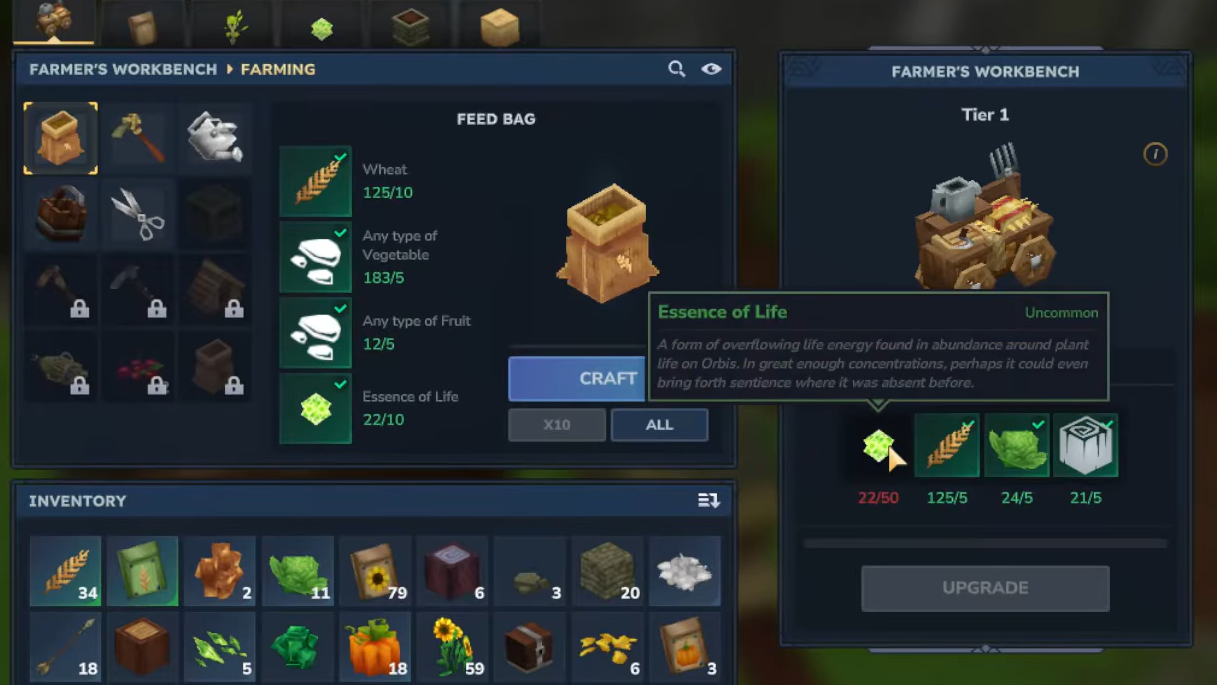
Farmer’s Workbench progression and Essence of Life
The farming loop in Hytale uses the Farmer’s Workbench as a central hub for both tools and seeds.
Step 1: Craft the core tools. Use the Farmer’s Workbench to make a crude hoe for tilling soil, a watering can to speed up growth, and shears for harvesting.
Step 2: Harvest mature crops with shears. Explore the world and look for fully grown crops such as pumpkins and wheat. Cut them using shears instead of breaking them normally. This gives you regular seeds and a chance to obtain Essence of Life.
Step 3: Spend Essence of Life on seed bags. Return to the Farmer’s Workbench and trade Essence of Life for items like wheat bags and lettuce seed bags. These seed bags let you expand your fields with more reliable crops.
Step 4: Prepare and plant fields. Right-click tilled ground with the crude hoe to create farmland, then water it to accelerate growth. Plant seeds, wait for maturity, and harvest with shears to repeat the loop and scale up Essence of Life income.
Higher tiers of the Farmer’s Workbench require soft wood such as aspen. Soft wood comes from specific tree types found in locations like tree villages. Any qualifying soft wood works, so use whatever you have when the upgrade option becomes available.
How to craft other specialized workbenches
Armorer’s Workbench
The Armorer’s Workbench focuses on armor crafting using early metals.
Step 1: Collect materials. You need 2 Copper Ingots, 10 Tree Trunks, and 5 units of Stone.
Step 2: Use a standard workbench to craft the Armorer’s Workbench. Place it near your combat gear storage so armor upgrades stay within reach.
Salvager’s Workbench
The Salvager’s Workbench turns unwanted gear into raw materials, feeding back into your crafting loop.
Step 1: Collect materials. Gather 6 Iron Ingots, 5 Tree Trunks, and 5 Stone.
Step 2: Craft and place the Salvager’s Workbench at your main base. From there, you can break down extra items to recover useful components.

Alchemist’s Workbench
The Alchemist’s Workbench is your entry point into potions and other chemical items.
Step 1: Gather base resources. Mine 20 units of Stone and 5 Gold Ingots.
Step 2: Hunt for monster drops. Collect 10 Venom Sacs and 10 Bone Fragments from suitable enemies.
Step 3: Combine these at a regular workbench to craft the Alchemist’s Workbench, then place it in a dedicated corner of your base for potion brewing and related recipes.
Arcanist’s Workbench
The Arcanist’s Workbench represents a late-game magical station, demanding rare metals, fabrics, and pure Void energy.
Step 1: Accumulate high-tier materials. Mine and smelt enough ore to reach 10 Thorium Ingots, and gather 30 Linen Scraps.
Step 2: Acquire Essence of the Void. Explore dangerous zones and interact with enemies or structures tied to the Void to obtain 20 Essence of the Void.
Step 3: Use a main workbench to craft the Arcanist’s Workbench. Place it somewhere secure, since it anchors much of the magical crafting path once you reach this stage.

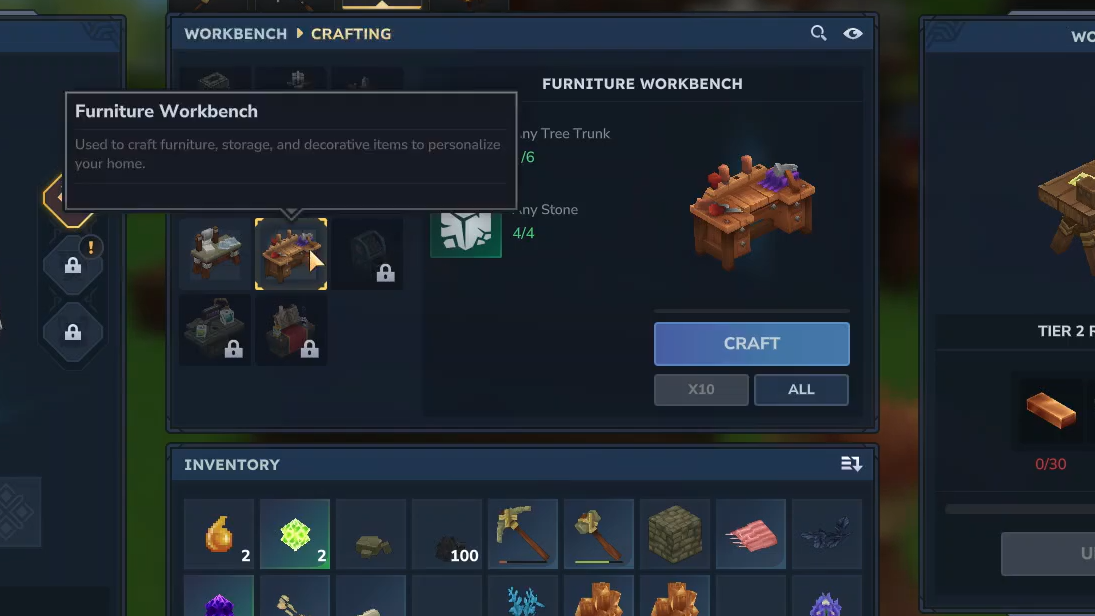
How to craft a furniture workbench
On top of the functional benches, Hytale also supports decorative building through a dedicated furniture station, often called a furniture workbench or Builder’s-style bench.
Step 1: Make sure you already have a standard workbench placed. The furniture workbench is crafted from that central station.
Step 2: Gather tree trunks and stone. Chop down trees for trunks and mine common stone or cobblestone. The recipe uses a small amount of each, similar in scale to other basic stations.
Step 3: Open the workbench and select the furniture workbench recipe. Craft it, wait for it to appear in your inventory, then place it in your base.
Interacting with the furniture workbench opens recipes for decorative items and lighting, letting you move from a functional shelter to a more deliberate build.
Why Hytale splits workbenches into tiers and roles
Instead of one all-purpose crafting block, Hytale leans on multiple workbenches with clear identities and upgrade paths. The main workbench pushes you through metals and fabrics, while specialized benches like the Farmer’s, Armorer’s, Alchemist’s, and Arcanist’s workbenches gate specific item sets behind matching resources and exploration.
In practice, that means every ore, fabric, and essence you gather tends to point at a particular bench. Copper and iron nudge you toward early armor and Tier 2 upgrades; Thorium, Cobalt, and Essence of Fire push you into Tier 3 and the Arcanist’s gear. Farming loops around the Farmer’s Workbench and Essence of Life, while salvaging and alchemy turn excess loot and monster parts back into useful materials.
Once these benches are in place and upgraded, Hytale’s progression stops feeling like random drops and starts feeling like a network of stations you return to, each with its own clear slice of your character’s growth.