In Neverness to Everness, characters do not wear armor. Each Esper carries a handheld Console, and the gear inside that Console — Cartridges and Modules — is what defines a build. Pieces are arranged on a Tetris-style grid, and the way you fit them together determines which set bonuses activate and how much stat value you actually extract.
The Console grid
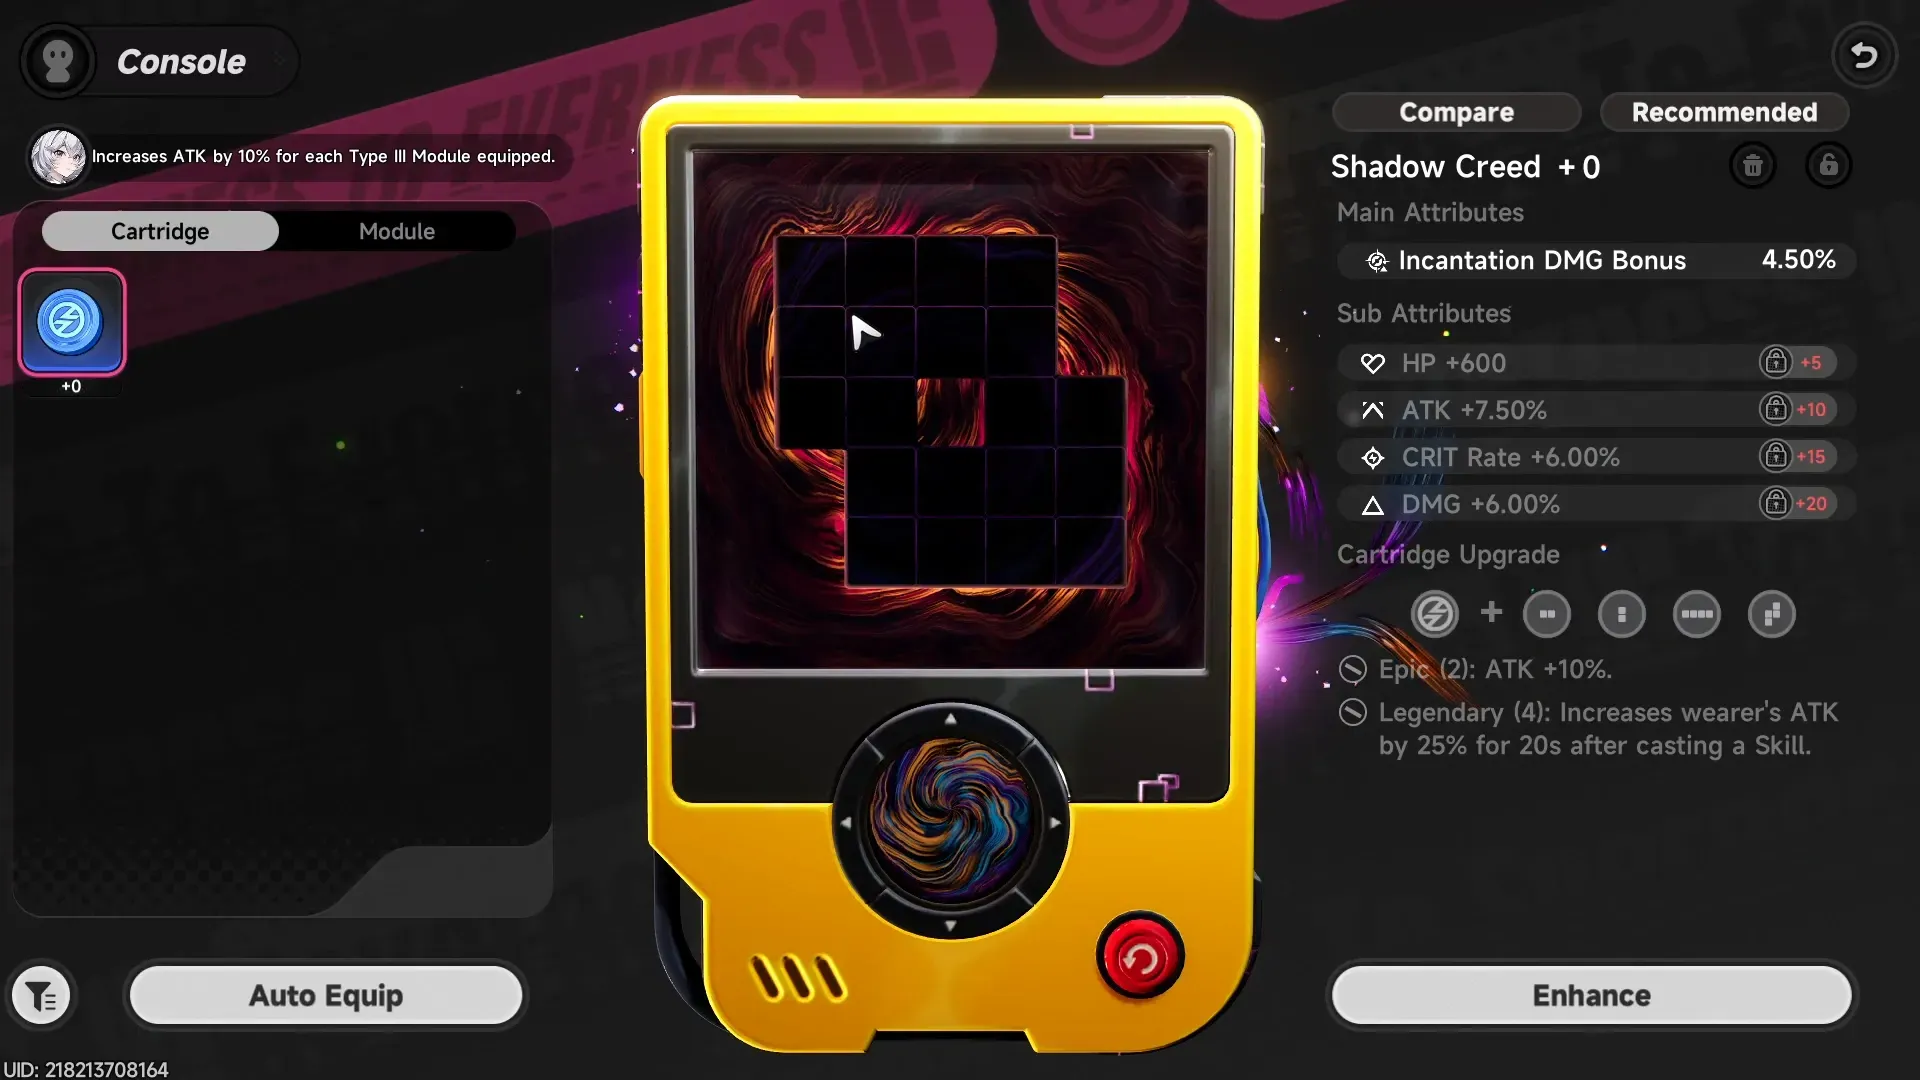
Every playable character has their own Console, displayed as a rectangular grid of cells. Cartridges and Modules occupy different shapes on that grid, and pieces can be rotated to fit. Empty cells contribute nothing, so spatial efficiency matters as much as raw stat rolls.
The grid expands as a character progresses, which makes more ambitious layouts possible at higher levels. A piece with strong substats but an awkward shape can block better arrangements, so picking the highest-rolled item is not always the right move.
Cartridges: The build anchor
Cartridges are the main gear slot. Each one belongs to a themed set and carries both a 2-piece and a 4-piece bonus printed on its description. Slotting a Cartridge declares which set you’re chasing, but the bonuses do not activate from the Cartridge alone — you have to fill the required pattern on the grid with matching pieces.
Cartridges roll one Main Stat and four Sub Stats when obtained. Main and Sub Stats can overlap, meaning the same stat line can appear in both. Leveling a Cartridge only raises its Main Stat; Sub Stats are locked at drop and unlock progressively at +5, +10, +15, and +20. Higher rarity tiers (B, A, S) roll higher Main and Sub Stat values.
Twelve Cartridge sets are currently catalogued, each tied to an element or role:
| Cartridge Set | Element / Role |
|---|---|
| Crimson: Twin Butterflies | Incantation |
| Devil’s Blood: Curse | Psyche |
| Diabolos | Chaos |
| Fireflies and the Forest | Nature |
| Kingdom’s Guard | Shield |
| Lost Radiance | Cosmos |
| Quiet Manor | Psychically |
| Shadow Creed | Attack |
| Speedy Hedgehog | Efficiency |
| Street Boxer | Lakshana |
| Thea’s Night Tavern | Heal |
| Tiny Big Adventure | Mag |
Modules: Shaped stat fillers
Modules are the generic, stat-only counterpart to Cartridges. Every Module has two fixed Main Stats — Flat HP and Flat ATK — plus four random Sub Stats. They do not contribute to set bonuses on their own; their job is to fill the grid efficiently and stack the substats your Esper needs.
Like Cartridges, Module Sub Stats are locked when the piece drops. Leveling raises Main Stats only, and the four Sub Stats unlock at +5, +10, +15, and +20.
Modules come in three size classes, named by how many cells they occupy:
| Type | Cells | Shape Variants |
|---|---|---|
| Type II | 2 | Horizontal, Vertical |
| Type III | 3 | Horizontal, Vertical, L-Shape A/B/C/D |
| Type IV | 4 | Horizontal, Vertical, Z-Shape A/B |
Type IV pieces carry the highest stat values but are hardest to fit. Type II Modules are small enough to plug awkward gaps that bigger pieces cannot reach, which makes well-rolled 2-cell pieces surprisingly valuable late in a build.
How set bonuses activate
Slotting a Cartridge tells the Console which set you’re building, but the 2-piece and 4-piece bonuses only switch on once the required pattern of cells is filled in the correct layout. The Cartridge provides the rule sheet; the Modules placed around it provide the proof. You can verify a build is complete by looking at the Console screen — if the pattern is filled, the bonus is active.
The general slotting order is straightforward. First, place every piece needed to satisfy the Cartridge set pattern. Then use whatever space is left to chase character-specific Module bonuses and preferred shapes.
Preference slots: 2-block versus 3-block
After the Cartridge pattern is satisfied, the remaining cells go to “preference” pieces. Each character has a preferred Module shape — either 2-block or 3-block — listed on their equipment page. Filling leftover space with that preferred shape grants additional bonuses that stack with the Cartridge set effect.
Ignoring the preferred shape still fills the grid and still gives you stats, but it leaves the preference bonus dormant. Optimized builds usually keep a stash of well-rolled preferred-shape Modules per character.
Stats Cartridges and Modules can roll
| Stat | Category | Notes |
|---|---|---|
| ATK | Offensive | Flat or percentage |
| HP | Defensive | Flat or percentage |
| DEF | Defensive | Flat or percentage |
| CRT Rate | Offensive | Critical hit probability |
| CRT DMG | Offensive | Critical hit damage multiplier |
| Elemental DMG Bonus | Offensive | Per element: Cosmos, Anima, Incantation, Chaos, Psyche, Lakshana |
| Energy Regen | Utility | Ultimate charge rate |
| Break Intensity | Offensive | Speed of depleting enemy break meters |
Where pieces drop
Cartridges and Modules come from endgame loot loops:
- Anomaly Dungeons — repeatable solo or 2–4 player co-op content; higher difficulty tiers drop higher rarities.
- Open-world Anomalies and bosses — drop pieces alongside other loot.
- Anomaly Commissions and missions — repeatable rewards include equipment.
- In-game shops — useful for baseline gearing, though endgame-quality pieces are not guaranteed.
Modules specifically can also be pulled from the Rabbit Hole game mode, which spends stamina per attempt and returns shaped pieces of escalating rarity based on the difficulty tier you clear.
Build priorities
A workable approach for most characters:
- Pick the Cartridge set that matches the character’s element or role.
- Slot enough pieces to activate the 4-piece bonus before chasing anything else.
- Fill remaining cells with the character’s preferred shape (2-block or 3-block) to claim the preference bonus.
- Use Type II Modules to plug small gaps the larger pieces can’t cover.
- Pour enhancement materials into S-rarity pieces you plan to keep long-term, not B-rarity placeholders.
Because Sub Stats are fixed at drop, it’s worth being patient with which pieces you commit upgrade resources to. A perfect-shape piece with poor Sub Stats may still lose to a slightly worse-shape piece with the right stat lines for your character.
Mastering the Console is less about hoarding the highest-rolled pieces and more about how cleanly you can fit a Cartridge’s required pattern, then layer the right preference shapes on top. Once that loop clicks, builds stop feeling like RNG and start feeling like a puzzle with a solvable answer.