
Beta releases of macOS often introduce instability, app incompatibilities, and unexpected bugs, especially in early developer builds. Returning to macOS 25 after trying the macOS 26 beta resets your system to a more reliable environment, restores compatibility with essential software, and prevents data loss from untested features. The process requires careful preparation, as downgrading involves erasing your Mac’s main drive and reinstalling the previous macOS version. Backups are critical, since files and settings created or changed in the beta may not transfer cleanly to the earlier system.
Downgrade Using a Bootable macOS 25 Installer
Creating and using a bootable installer is the most dependable way to revert from macOS 26 beta to macOS 25. This method completely removes the beta system, replaces it with the stable release, and allows you to restore your data from a compatible backup.
Step 1: Download the official macOS 25 installer from the Mac App Store or Apple’s support site. The installer file will appear in your /Applications folder. Avoid launching the installer at this point.
Step 2: Connect a USB drive with at least 16GB of storage. Open Disk Utility, select the USB drive under “External,” and click Erase. Choose Mac OS Extended (Journaled) as the format. This step prepares the drive for use as a bootable installer and deletes existing files.
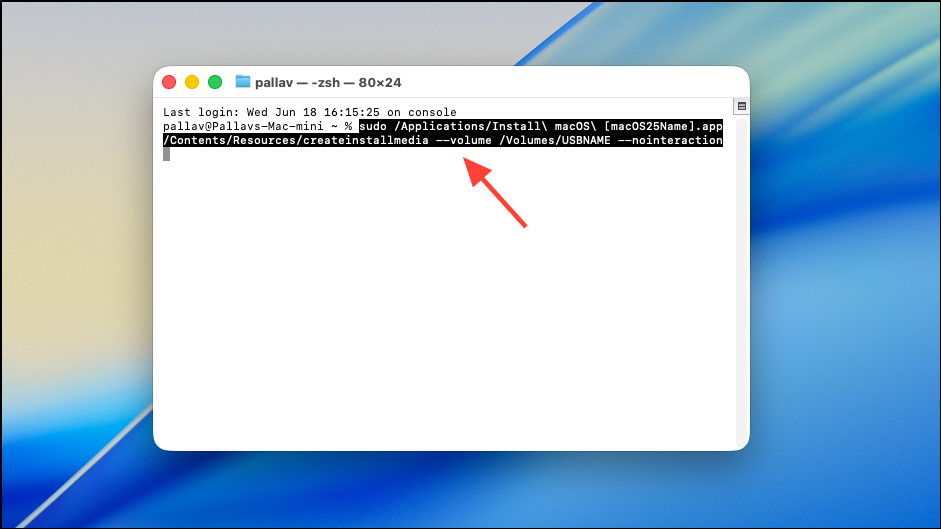
Step 3: Open Terminal and enter the following command, replacing USBNAME with your drive’s name:
sudo /Applications/Install\ macOS\ [macOS25Name].app/Contents/Resources/createinstallmedia --volume /Volumes/USBNAME --nointeractionThis command copies the macOS 25 installer to your USB drive and makes it bootable.
Step 4: Once Terminal confirms completion, shut down your Mac. Insert the bootable USB installer.
Step 5: For Intel Macs, hold Option while powering on to access boot options. For Apple Silicon Macs, hold the Power button until startup options appear. Select the USB installer from the menu.
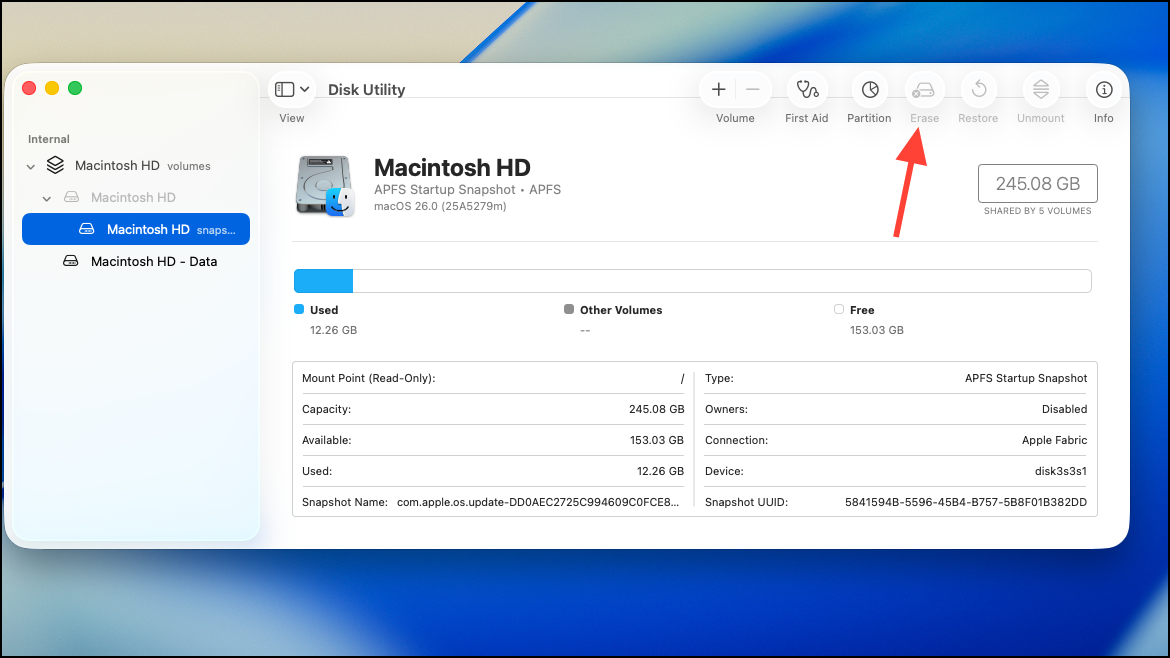
Step 6: When the macOS Utilities window loads, open Disk Utility. Select your internal drive (“Macintosh HD” by default) and click Erase. This step is required to fully remove the beta and avoid compatibility issues.
Step 7: Close Disk Utility and choose Install macOS from the Utilities window. Follow the prompts to install macOS 25 onto your freshly erased internal drive.
Step 8: After installation, your Mac will restart into the macOS 25 setup assistant. Restore your files using a Time Machine or other backup created before you upgraded to macOS 26 beta. Avoid restoring backups made while running the beta, as data formats may be incompatible.
Restore macOS 25 Using Time Machine Backup
Time Machine allows you to revert your entire system to a pre-beta state, provided you have a backup from macOS 25 or earlier. This method returns your Mac to its exact previous configuration, including apps, settings, and user files.
Step 1: Connect the external drive containing your Time Machine backup.
Step 2: Restart your Mac and immediately hold Command + R until the Apple logo or spinning globe appears, launching Recovery Mode.
Step 3: In the macOS Utilities window, select Restore from Time Machine Backup and click Continue.
Step 4: Choose your backup source and select the most recent backup made before installing the macOS 26 beta. Backups made on the beta version are not compatible with older macOS releases.
Step 5: Follow the on-screen instructions to restore your system. The process will erase your internal drive and copy over the selected backup, including the OS, apps, and files.
Step 6: Once restoration finishes, your Mac will reboot into macOS 25 with your data as it existed prior to the beta install.
Reinstall macOS 25 Using Recovery Mode
macOS Recovery Mode provides a way to reinstall the version of macOS that originally shipped with your Mac or the closest version still available. This method is useful if you do not have a Time Machine backup or bootable installer, but it may only offer the version that came with your hardware.
Step 1: Shut down your Mac. For Intel Macs, hold Shift + Option + Command + R while powering on. For Apple Silicon Macs, hold the Power button until startup options appear, then choose Options.
Step 2: Enter your administrator password if prompted, then proceed to the macOS Utilities window.
Step 3: Select Disk Utility, choose your internal drive, and erase it. This is necessary to fully remove the beta OS and avoid file system conflicts.
Step 4: Close Disk Utility and select Reinstall macOS. Follow the prompts to install the available macOS version. Note that this may not always be macOS 25; it depends on Apple’s servers and your Mac’s original OS.
Step 5: After installation, restore your data from a compatible backup if available.
Use DFU Mode and Apple Configurator (Apple Silicon Macs)
Device Firmware Update (DFU) mode can revive or restore Apple Silicon Macs that fail to boot or cannot be restored using standard methods. This approach requires a second Mac and a USB-C cable.
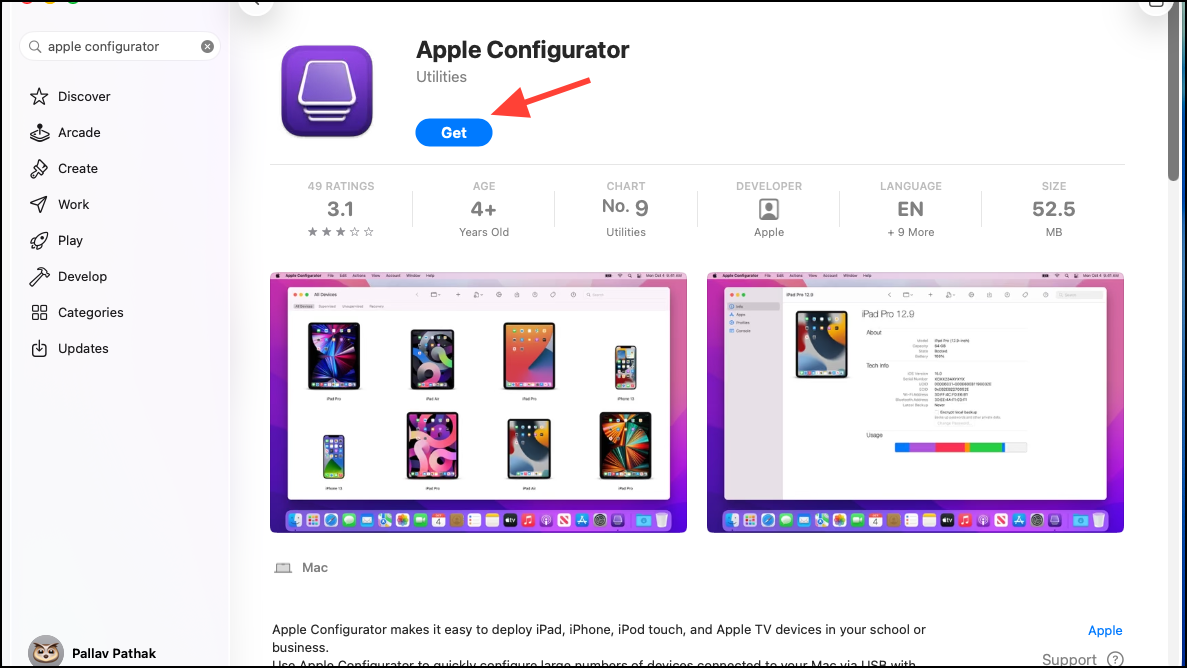
Step 1: On a working Mac, install Apple Configurator from the Mac App Store.
Step 2: Connect the malfunctioning Mac to the working Mac using a USB-C cable. On the non-working Mac, enter DFU mode by holding Power + Right Shift + Left Option + Left Control for 10 seconds, then release all but the Power button for another 10 seconds.
Step 3: Apple Configurator should detect the Mac in DFU mode. Follow on-screen instructions to restore firmware and reinstall macOS 25.
Step 4: Once complete, set up your Mac and restore your data from a pre-beta backup.
DFU restores both the operating system and device firmware, which can resolve issues caused by incomplete or failed downgrades. Use this method if standard recovery fails or if firmware compatibility problems persist after downgrading.
Key Considerations and Cautions
- Always back up your data before downgrading. Erasing your drive is required for most downgrade methods and will delete all files.
- Backups created on macOS 26 beta cannot be restored to macOS 25 due to potential changes in data formats.
- Some system files, Photos, Music, or TV libraries created or modified on the beta may not be compatible with earlier macOS versions.
- Downgrade processes may require internet access to download installers or recovery files.
- For Macs enrolled in Apple’s beta program, unenroll the device at Apple Beta Software Program to avoid future beta updates.
Switching back to macOS 25 from the macOS 26 beta restores system stability and app compatibility. Careful preparation and the right downgrade method ensure a smooth transition and reliable Mac performance.