Food on Proteus works differently than it looks. The ocean around your Lifepod is packed with fish and edible plants, but your body cannot process any of it until you unlock the Digestion Adaptation. Until that happens, the only real food is the Nutrient Blocks stashed inside your Lifepod and inside supply crates scattered nearby.
Why early food does nothing
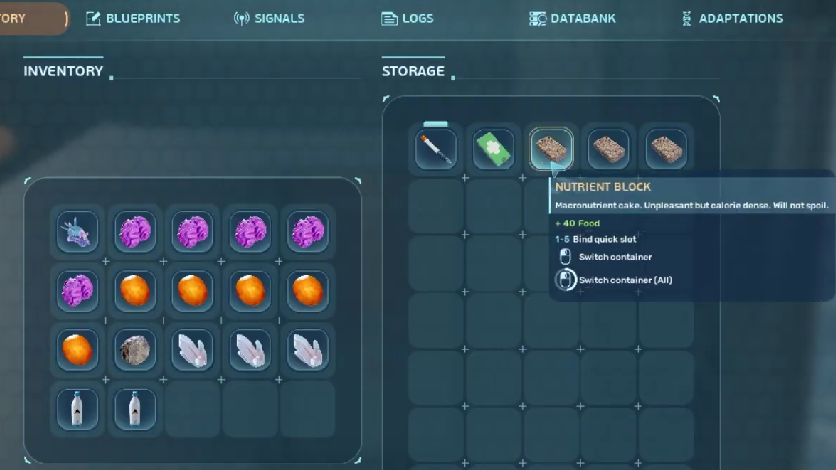
Survival Mode starts you with Digestive Incompatibility. Raw or cooked alien fish will not restore hunger, and eating them can even chip away at your health. The only things your body accepts from the start are Nutrient Blocks, which restore +40 food each. You will find three inside your Lifepod storage, plus extras inside supply crates around the shallows.
Do not eat a Nutrient Block until your food meter drops below 60. The meter caps at 100, so eating early just wastes the surplus.
Unlock the Digestion Adaptation first
The single most important early task is reaching the Angel Comb that grants Digestion. It sits roughly 160 meters from the Lifepod on a compass heading between about 15 and 30 degrees (north-northeast). A black cable runs along the seafloor, pointing you toward it, and the NOA terminal inside your Lifepod will eventually flag a colonist named Anita Gottschal, dropping a waypoint directly on the Angel Comb.

Best early food sources after Digestion
Once Digestion is active, the shallows around the Lifepod cover all your hunger needs. Cooked fish is the simplest path, Oily Salad is the lowest-effort plant option, and Threemoon Temaki is the best inventory-efficient meal for long trips. All recipes are crafted under the Sustenance tab at the Fabricator.
| Food | Recipe | Effect |
|---|---|---|
| Cooked Halfmoon | 1x Halfmoon | +25 Food |
| Cooked Harvestmoon | 1x Harvestmoon | +30 Food |
| Cooked Bluemoon | 1x Bluemoon | +25 Food, +5 Water |
| Cooked Geordie | 1x Geordie | +30 Food |
| Oily Salad | 2x Fibrous Pulp | +20 Food |
| Threemoon Temaki | 1x Halfmoon, 1x Harvestmoon, 1x Bluemoon, 1x Fibrous Pulp | +60 Food, +15 Health |
| Nutrient Block (crafted) | 1x Biofuel Block, 1x Salt | +40 Food |
Cooked fish: The Geordie is your friend
Four small fish populate the shallows near the Lifepod: Halfmoon, Harvestmoon, Bluemoon, and Geordie. The first three swim in schools of three or more and can be tricky to catch by hand before you have Basic Fins or the Wakemaker. The Geordie is the outlier. It clings to the outer shells of coral domes and stays completely still, making it the easiest catch and one of the highest-value fish at +30 food cooked.
Cook fish at the Fabricator before heading out. Raw fish restores fewer food points and trims health on the way down. Cooked fish also decays over time, so prepare what you need for the next dive instead of stockpiling a freezer’s worth.
Oily Salad: The low-effort plant option
Oily Salad needs two Fibrous Pulp and restores +20 food. Fibrous Pulp comes from cutting plants with the Survival Multitool, which costs 3 Titanium at the Fabricator. The best early sources are the Curtain Gorgon mushrooms growing on coral surfaces and the Feather Kelp inside the caves near the Lifepod. A single cave sweep usually yields enough Pulp for several salads.
Plants do not swim away. If chasing schools of Halfmoon is wearing you down, Oily Salad is the steadier food loop.
Threemoon Temaki for long expeditions
Threemoon Temaki is the best early meal when inventory space matters. One slot delivers +60 food and +15 health, which roughly doubles the value of a cooked Geordie while also patching minor damage. The recipe needs one each of Halfmoon, Harvestmoon, and Bluemoon, plus one Fibrous Pulp.
For supply runs 400 meters or more from base, pack Temaki instead of a stack of cooked fish. The free inventory slots translate directly into more loot capacity on the return trip.
Water belongs in the same trip
Thirst drains faster than hunger, so handle it in parallel. Water Slugs sit on the seafloor and rocks around the Lifepod — small, glowing blue-and-pink creatures that move slowly enough to scoop by hand. One Water Slug crafts into one Water at the Fabricator, restoring +40 hydration. Cooked Bluemoon also adds a small +5 Water on the side.
Avoid eating Water Slugs raw. The trade is +15 water for -5 food, which is a bad deal before your food economy is stable.
Mistakes that waste early hours
- Treating Digestive Incompatibility as a bug or a crafting puzzle. The only fix is the Angel Comb.
- Swimming due north or due east. The Angel Comb heading is between 15 and 30 degrees off north.
- Eating Nutrient Blocks while above 60 food. The +40 overfill is wasted.
- Stockpiling cooked fish. Decay drops their food value over time — cook on demand.
- Leaving on long dives without one food and one water item slotted.
Once Digestion is unlocked and the Fabricator routine clicks — Geordie for fast meals, Oily Salad for bulk, Temaki for travel — hunger stops being a survival pressure and becomes background bookkeeping. From there, the next priorities are scanning Habitat Builder fragments, expanding oxygen capacity, and pushing into deeper biomes for Salt and Sugar of Saturn, which unlock the higher-tier recipes like Halfmoon Jerky, Coral Mash, and Pavlova.