
Missing the Compatibility tab in file properties can prevent users from adjusting settings that help older applications run correctly on Windows 11. The Compatibility tab allows you to configure options like running apps in compatibility mode for previous versions of Windows or running as administrator. When this tab is hidden, it often results from group policy settings, registry changes, or file permission issues. Restoring or removing the Compatibility tab ensures you can manage legacy app behavior or restrict user access as needed. The following methods detail how to add or remove the Compatibility tab using Local Group Policy Editor, the Windows Registry, and alternative troubleshooting steps.
Add or Remove Compatibility Tab Using Local Group Policy Editor
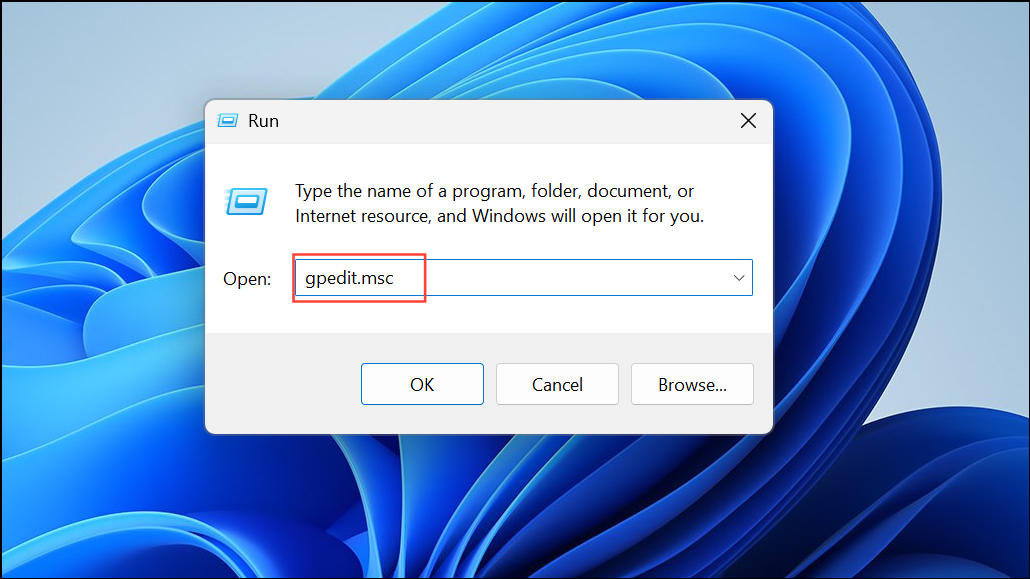
Step 1: Open the Local Group Policy Editor by pressing Windows + R, typing gpedit.msc, and pressing Enter. Note that this tool is available on Windows 11 Pro, Enterprise, and Education editions.
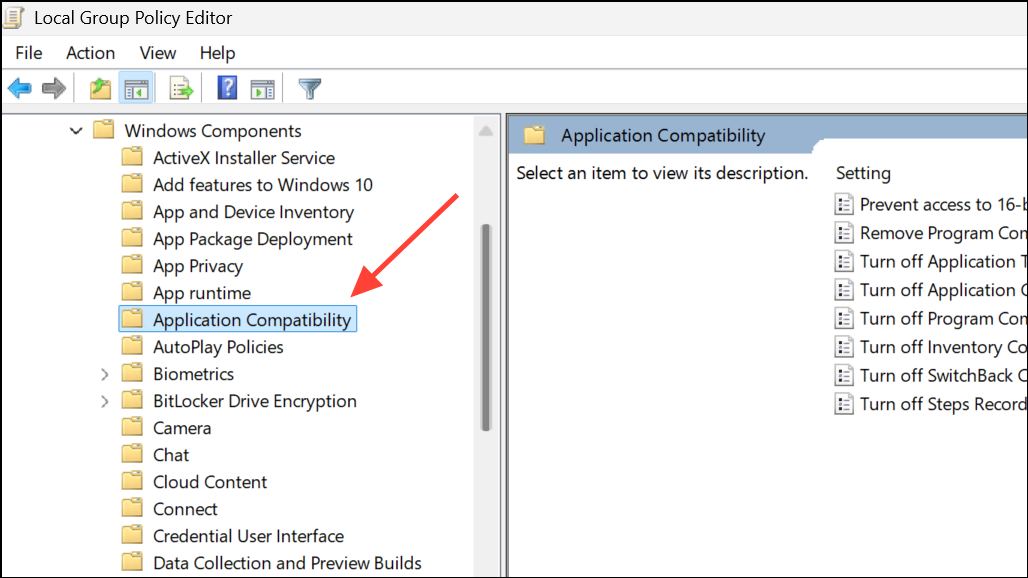
Step 2: In the left pane, navigate to Computer Configuration > Administrative Templates > Windows Components > Application Compatibility.
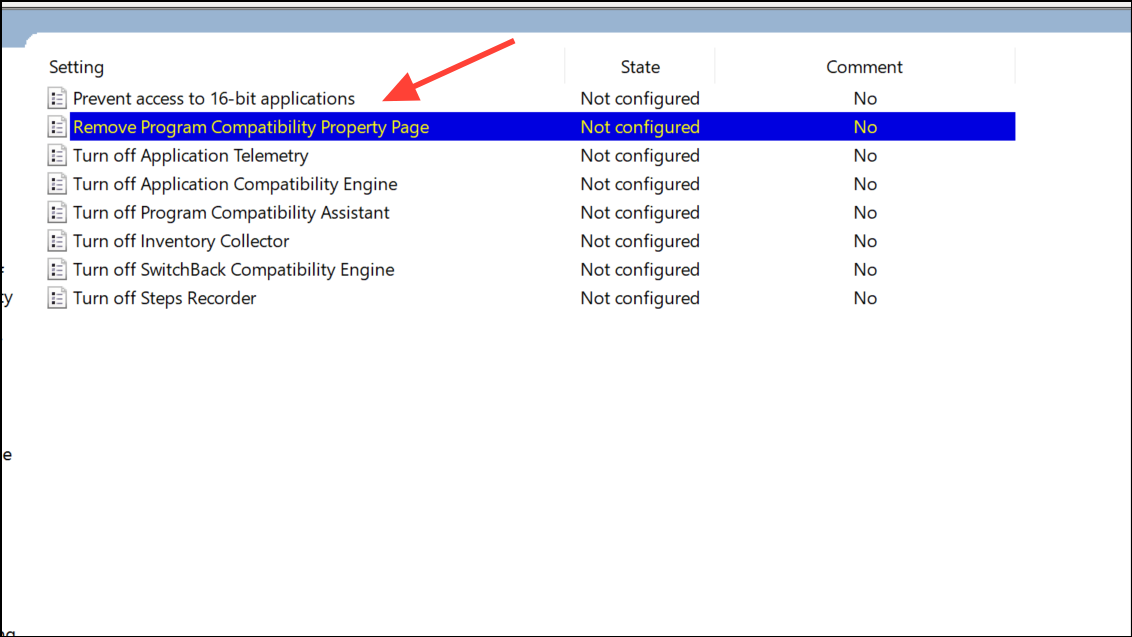
Step 3: In the right pane, double-click on the policy named Remove Program Compatibility Property Page.
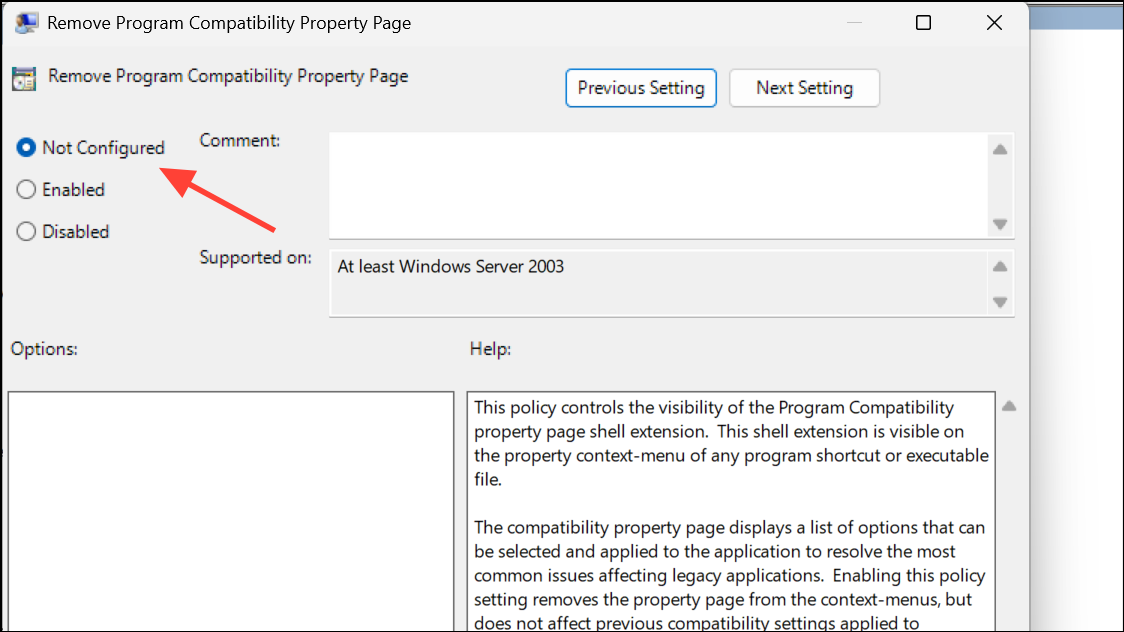
Step 4: To show the Compatibility tab, select Not Configured or Disabled. To hide the Compatibility tab, select Enabled. Click OK to confirm.
Step 5: Close the Local Group Policy Editor. You may need to restart your computer or sign out and back in for the changes to take effect.
Add or Remove Compatibility Tab Using Windows Registry
For users without access to the Group Policy Editor (such as Windows 11 Home), the registry offers a direct way to control the Compatibility tab’s visibility.
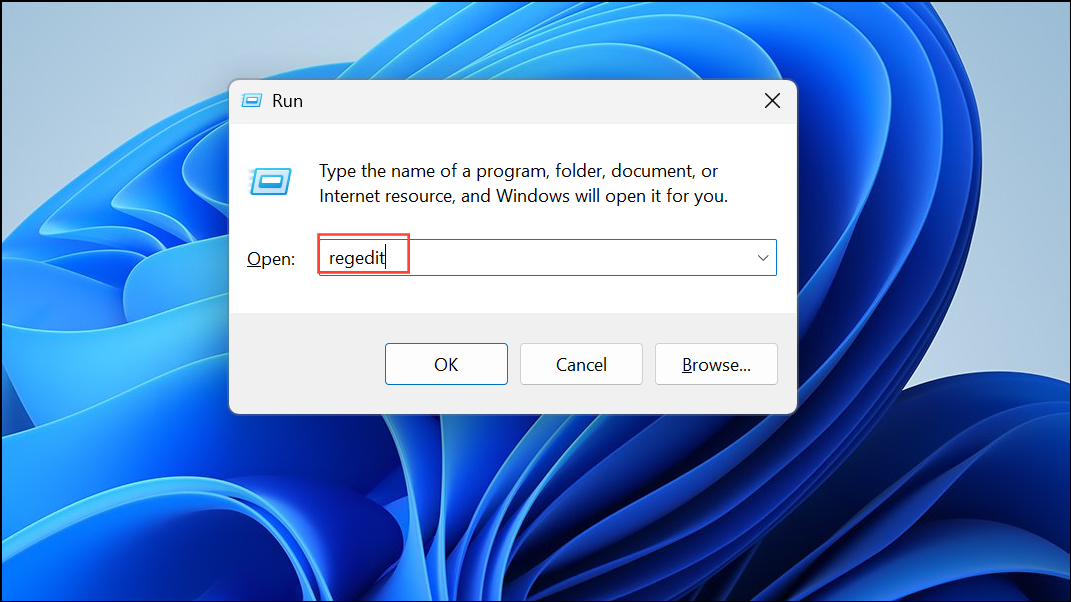
Step 1: Press Windows + R, type regedit, and press Enter to open the Registry Editor. If prompted by User Account Control, choose Yes.
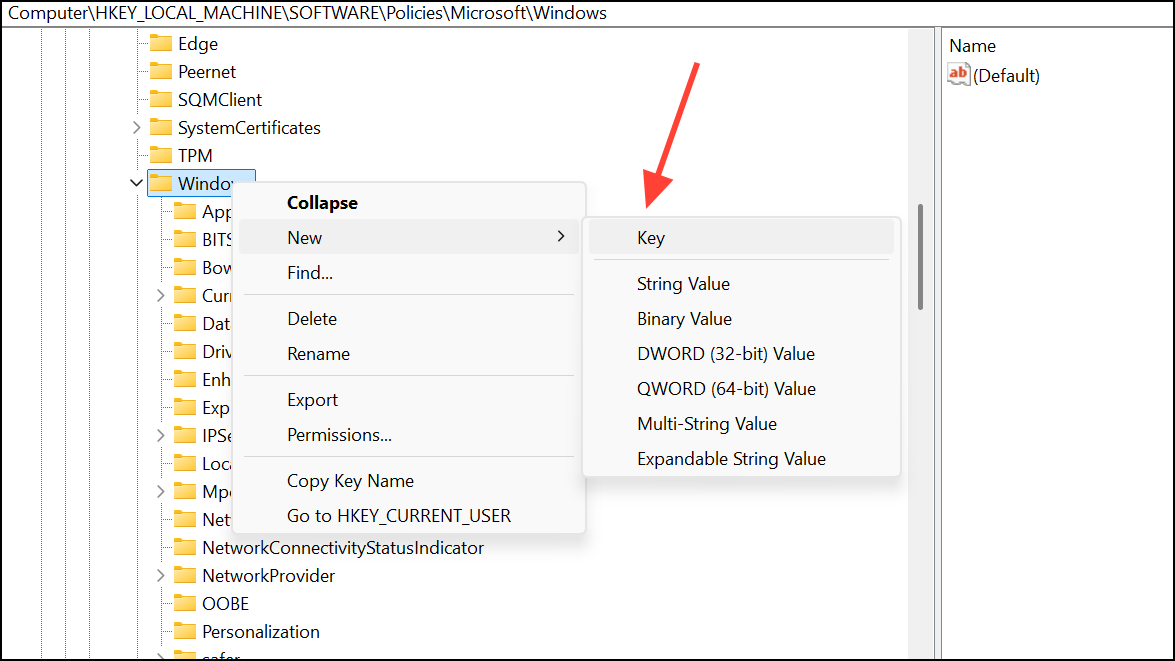
Step 2: Navigate to HKEY_LOCAL_MACHINE\SOFTWARE\Policies\Microsoft\Windows\AppCompat. If the AppCompat key does not exist, right-click on Windows, select New > Key, and name it AppCompat.
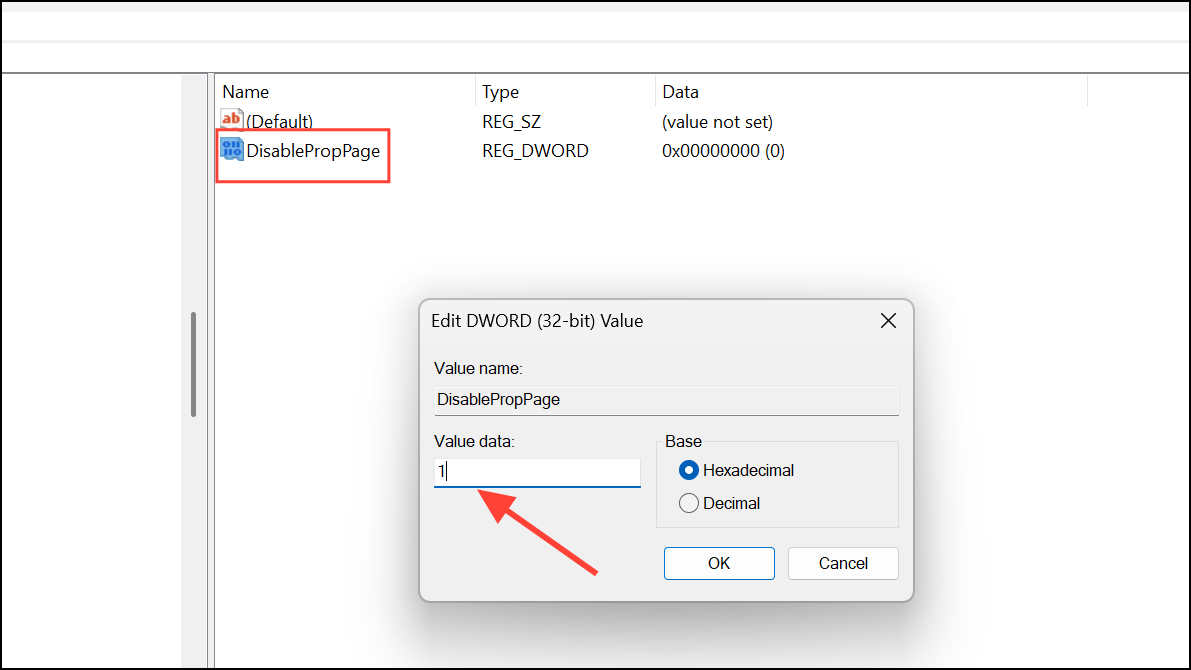
Step 3: To remove the Compatibility tab, create or modify a DWORD value named DisablePropPage and set its value to 1.
    Windows Registry Editor Version 5.00

    [HKEY_LOCAL_MACHINE\SOFTWARE\Policies\Microsoft\Windows\AppCompat]
    "DisablePropPage"=dword:00000001
To add or restore the Compatibility tab, delete the DisablePropPage value or set it to 0.
    Windows Registry Editor Version 5.00

    [HKEY_LOCAL_MACHINE\SOFTWARE\Policies\Microsoft\Windows\AppCompat]
    "DisablePropPage"=-
Step 4: After making changes, close the Registry Editor and restart your computer for the new settings to apply.
Check File Selection and Permissions
Sometimes, the Compatibility tab is missing due to how the file is selected or because of insufficient permissions.
Step 1: In File Explorer, ensure you select the file with a single left-click before right-clicking and choosing Properties. If you right-click a file without selecting it first, the Compatibility tab may not appear.
Step 2: If the tab is still missing, switch to the Security tab in Properties and verify that your user account has Full Control. If not, click Edit, select your user, and check Full Control. Apply the changes, then reopen Properties to see if the Compatibility tab appears.
Rename Executable or Move File
Some executable files—especially installers or those from virtual drives—may not show the Compatibility tab due to security restrictions or file attributes.
Step 1: Copy the executable file to your local hard drive if it’s currently on a virtual or network drive.
Step 2: Rename the file (for example, change setup.exe to install.exe), then right-click and check Properties again. Sometimes, this triggers Windows to display all property tabs, including Compatibility.
Advanced: Apply Compatibility Settings Directly in the Registry
If the Compatibility tab is unavailable but you need to set compatibility options, you can apply these settings directly in the registry.
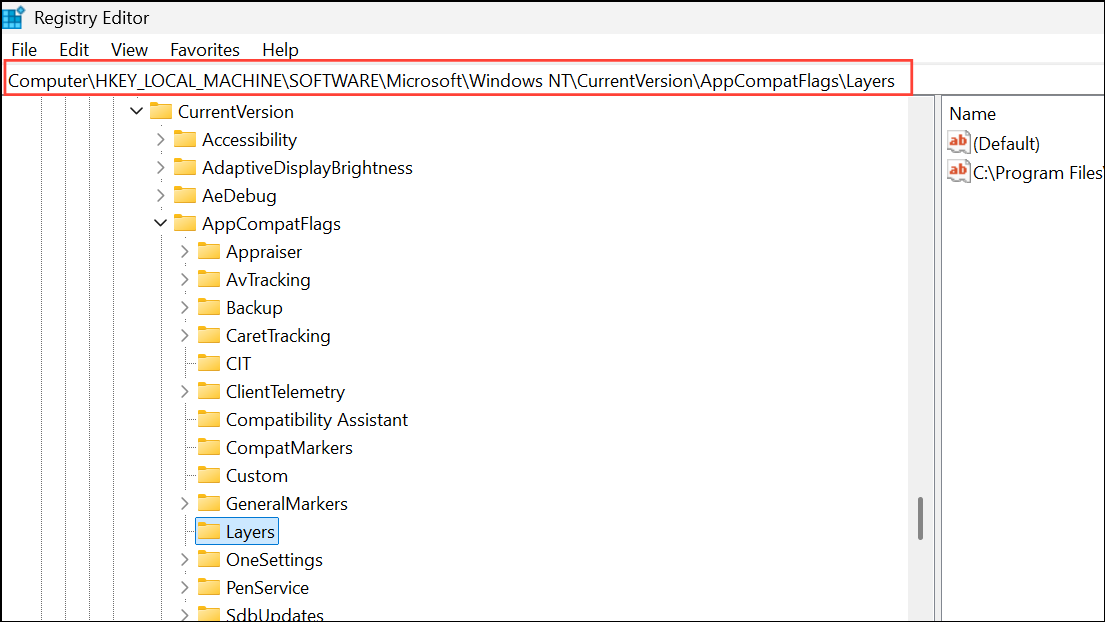
Step 1: Navigate to HKEY_LOCAL_MACHINE\SOFTWARE\Microsoft\Windows NT\CurrentVersion\AppCompatFlags\Layers.
Step 2: Add a new string value where the name is the full file path to your executable, and the value data contains the desired compatibility flags (such as RUNASADMIN, VISTARTM, etc.). This method mimics the settings available in the Compatibility tab, but requires precise knowledge of the flags and their effects. Reference lists of compatibility flags are available on community forums and Microsoft support sites.
Step 3: Restart your computer for the settings to take effect.
Restoring or hiding the Compatibility tab in Windows 11 file properties allows you to control legacy app settings as needed. If standard methods do not resolve the issue, adjusting permissions or applying registry tweaks can provide a solution.