The Paladin’s Blessed Shield build turns a one-handed weapon and shield into a fast leveling vehicle that carries from the opening zones into Torment difficulty. It leans on Thorns scaling, Resolve stacks, and the Juggernaut Oath to stay durable while clearing packs and bursting bosses, and it does not require specific legendary aspects or unique items to function during the climb to level 60.
Why Blessed Shield works for leveling
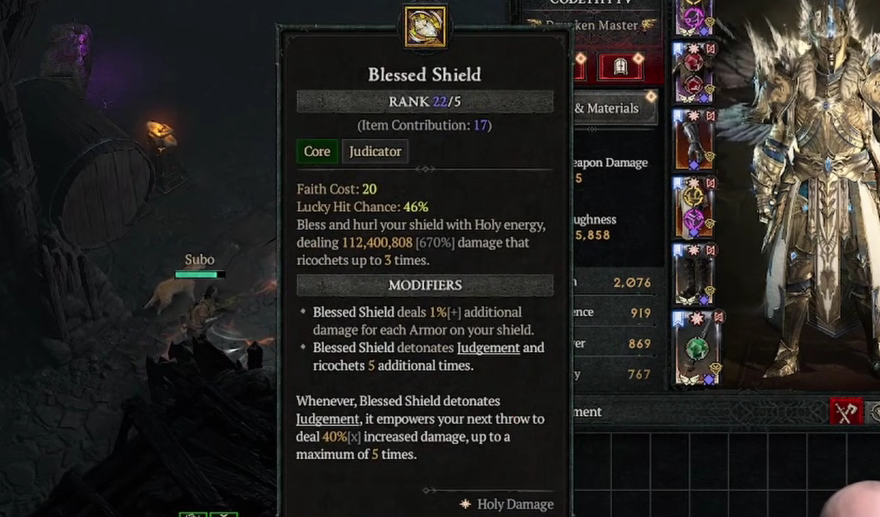
Blessed Shield is a Juggernaut-tagged Core skill that hurls your shield, pulses Thorns damage on impact, then detonates for a burst. Because the build stacks Thorns through Clash, Defiance Aura, and Retribution procs, the shield throw scales with defensive stats rather than weapon rolls, which is why it functions on whatever gear drops during the leveling rush.
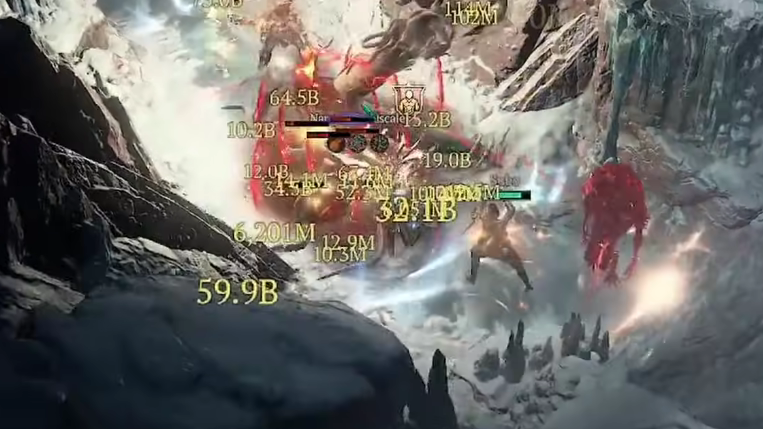
The setup clears tier 55 Pit runs and progresses into Torment 4 without specialized affixes, and it transitions cleanly into endgame Shield of Retribution variants once you reach level 60 and start target-farming.
Skill bar and role of each ability
Six skills cover damage, resource, defense, and mobility. Each one feeds the next, so dropping any of them weakens the whole rotation.
| Skill | Type | Role |
|---|---|---|
| Clash | Basic | Generates Faith and 2 Resolve stacks per hit, applies Crusader’s March for Thorns and Retribution chance. |
| Blessed Shield | Core (Juggernaut) | Primary damage. Pulses Thorns on hit, then bursts. |
| Rally | Valor | Restores Faith and grants movement speed. Counters Blessed Shield’s resource drain. |
| Consecration | Justice | Heals you, increases damage in the circle, Weakens enemies inside it. |
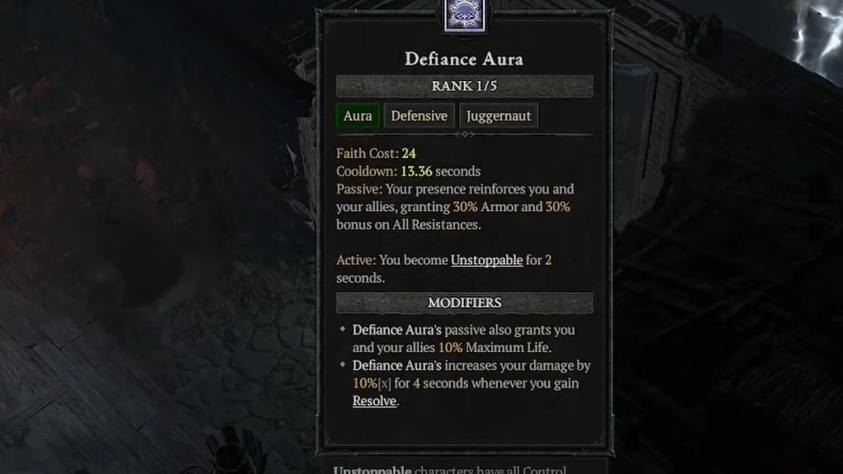
| Defiance Aura | Aura | Passive armor, resistance, max life, and Thorns. Active grants Unstoppable and a Thorns nova. |
| Falling Star | Valor | Two-charge mobility skill for crossing zones and clipping over terrain. |
Resolve stacks raise your damage reduction by 20% while active, and Clash builds them quickly. Weakened enemies hit by Consecration take more damage from your build’s passive nodes while dealing less damage back, which is the single biggest survivability swing during the campaign.
Oath choice at level 15
Pick Juggernaut as soon as the Oath system unlocks. Blessed Shield carries the Juggernaut tag, so the Oath grants 60% increased damage and 20% increased size for 5 seconds when 8 Resolve stacks are consumed. The more important effect is the minimum Resolve guarantee, meaning your damage reduction never fully drops off when you take a hit.
The other three Oaths (Zealot, Judicator, Disciple) do not synergize with shield-throw mechanics and should be skipped for this leveling path.
Mercenary setup
Mercenaries are flexible while leveling, but a tested pairing covers detection, crowd control, and damage amplification.
| Slot | Mercenary | Key skills |
|---|---|---|
| Hired | Subo | Seeker (reveals enemies), Wire Trap (stun), Ready At Hand (movement speed), Cover Fire (slow), Opening Fire (crit damage). |
| Reinforcement | Varyana | Bloodthirst (attack speed when triggered by your casts). |
Seeker is the standout because it strips the guesswork from finding stragglers in dungeons, which speeds up XP per minute more than any single passive node.
Setup steps before you start grinding
Gearing rules from level 1 to 60
The build is intentionally gear-agnostic during leveling. Swap to whatever item has the higher item power, regardless of affixes, until you hit 60. Starting around level 40, begin tempering pieces you plan to keep, because tempered affixes are where most of the damage and survivability spike comes from before endgame target farming.
Once you reach 60, stop equipping by item power and start farming specific affixes for the endgame Shield of Retribution direction, which keeps the same core skill but layers in aspects like Bulwark’s, Indomitable, and shield-specific uniques.
How to tell the build is working
You should see Resolve stacks pinned at maximum during combat once Juggernaut is unlocked, Blessed Shield two-shotting white packs by the mid-30s, and Thorns numbers visibly stacking when you block. If Blessed Shield is hitting for low numbers, the usual cause is missing Resolve stacks (use Clash more frequently) or a two-handed weapon equipped by mistake.
From there, the path into Torment 4 is largely a gear upgrade curve rather than a skill rotation change, and the same bar carries into early endgame content while you decide which Shield of Retribution or Auradin variant to commit to.