
Unexpected system slowdowns and failed updates often trace back to error 0x8007045A, commonly accompanied by the message ERROR_DLL_INIT_FAILED. This issue interrupts essential Windows 11 operations, typically surfacing during Windows Update or when launching specific programs. The root cause usually lies in corrupted or missing DLL files, particularly those related to Microsoft XML Core Services (MSXML). Addressing this error promptly prevents further system instability and potential data loss.
Run DISM and SFC Scans to Repair System Files
Corrupted or missing system files frequently trigger error 0x8007045A. Windows 11 provides built-in tools—Deployment Image Servicing and Management (DISM) and System File Checker (SFC)—to identify and restore these files.
Step 1: Open the Start menu by pressing Windows + S. Type Command Prompt, right-click the result, and choose Run as administrator.
Step 2: When prompted by User Account Control, click Yes to continue.
Step 3: In the Command Prompt window, enter the following command and press Enter:
dism /online /cleanup-image /restorehealth
This command checks the Windows image for corruption and initiates repairs as needed. The process may take several minutes.
Step 4: After DISM completes, type the next command and press Enter:
sfc /scannow
SFC scans all protected system files and replaces any corrupted or missing ones with the correct versions. Wait for the scan to finish.
Step 5: Restart your computer to apply repairs. After rebooting, check if the error persists during Windows Update or when launching affected applications.
Re-Register and Replace Damaged MSXML DLL Files
MSXML DLL files, such as msxml3.dll and msxml6.dll, are vital for Windows Update and other system processes. If these files are corrupted or missing, manually re-registering or replacing them can resolve initialization errors.
Step 1: If possible, obtain fresh copies of the following DLL files from a working Windows 11 system with the same build:
msxml3.dllmsxml3a.dllmsxml3r.dllmsxml6.dllmsxml6r.dll
Copy these files into C:\Windows\System32 on your affected PC. Overwrite only if the files are confirmed to be corrupted and you have backups.
Step 2: To re-register the DLLs, open Command Prompt as administrator. For each DLL, type the following command and press Enter:
regsvr32 C:\Windows\System32\msxml3.dll
regsvr32 C:\Windows\System32\msxml3a.dll
regsvr32 C:\Windows\System32\msxml3r.dll
regsvr32 C:\Windows\System32\msxml6.dll
regsvr32 C:\Windows\System32\msxml6r.dll
Repeat for each file. Successful registration will display a confirmation message.
Step 3: Restart your PC. Test Windows Update and other affected functions to verify the fix.
Update the Microsoft XML Parser
Outdated or faulty Microsoft XML Core Services can cause initialization errors. Upgrading to the latest version ensures compatibility and stability.
Step 1: Visit the official Microsoft XML Core Services download page. Download the latest supported version for Windows 11.
Step 2: Run the installer and follow on-screen instructions to complete the update. If prompted, restart your computer.
Step 3: After rebooting, attempt Windows Update or open previously affected applications to check if the error is resolved.
Scan for Malware and Remove Faulty Software
Malware infections or incompatible third-party programs can corrupt DLL files and disrupt system processes. Performing regular scans and managing installed applications helps maintain system integrity.
Step 1: Use a reputable anti-malware tool to scan your computer. Remove any threats detected during the scan. This prevents further damage to system files.
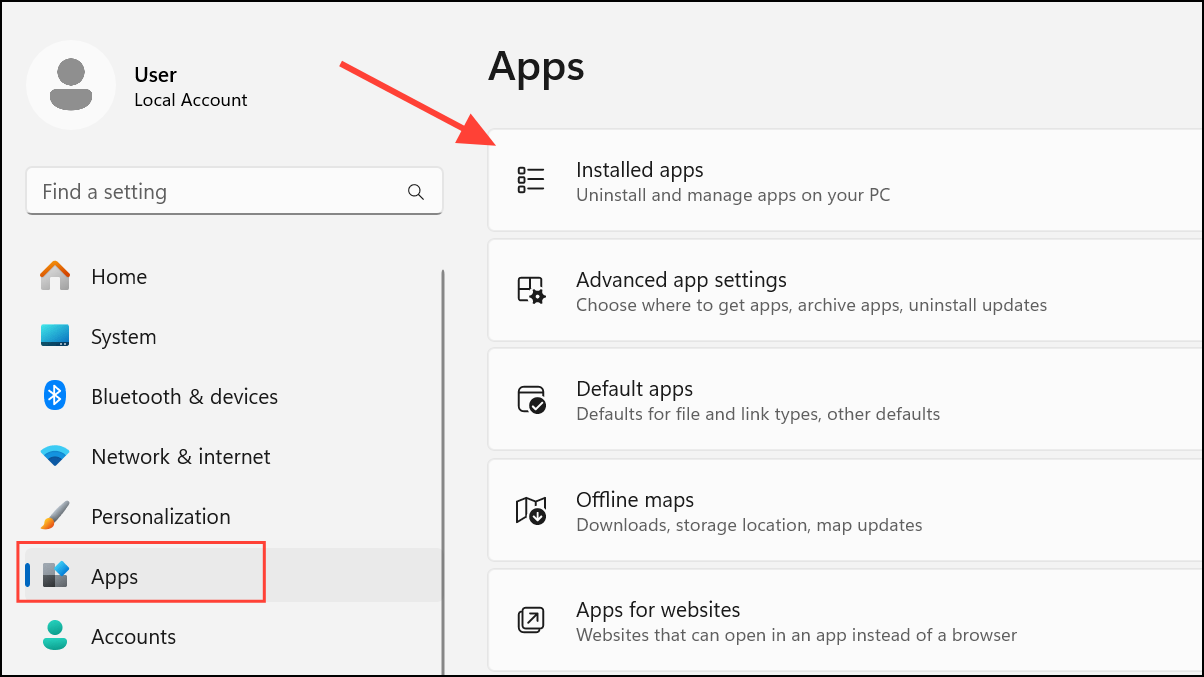
Step 2: Review recently installed software, especially utilities that interact with system components (such as motherboard control apps). Uninstall any suspicious or unnecessary programs via Settings > Apps > Installed apps. Confirm removal and restart your PC.
Restore System Using a Previous Restore Point
If the error began after a recent system change, such as a software installation or Windows update, restoring your computer to an earlier state may resolve the problem.
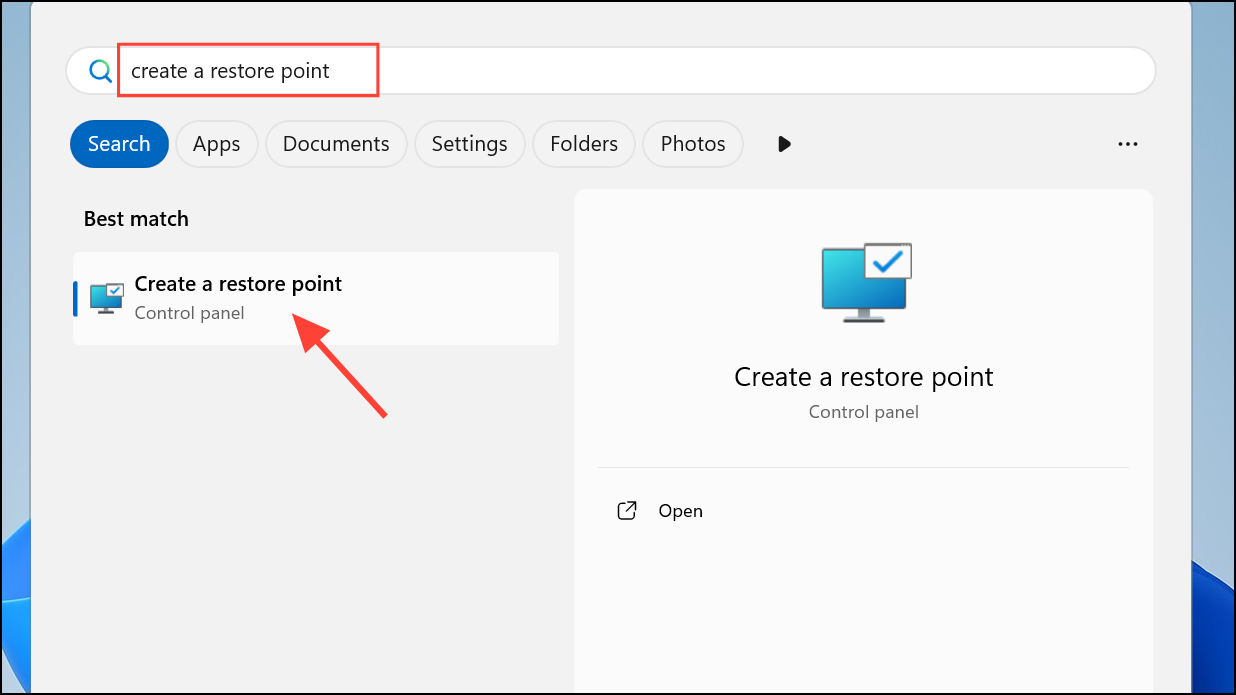
Step 1: Press Windows + S and type Create a restore point. Select the matching result.
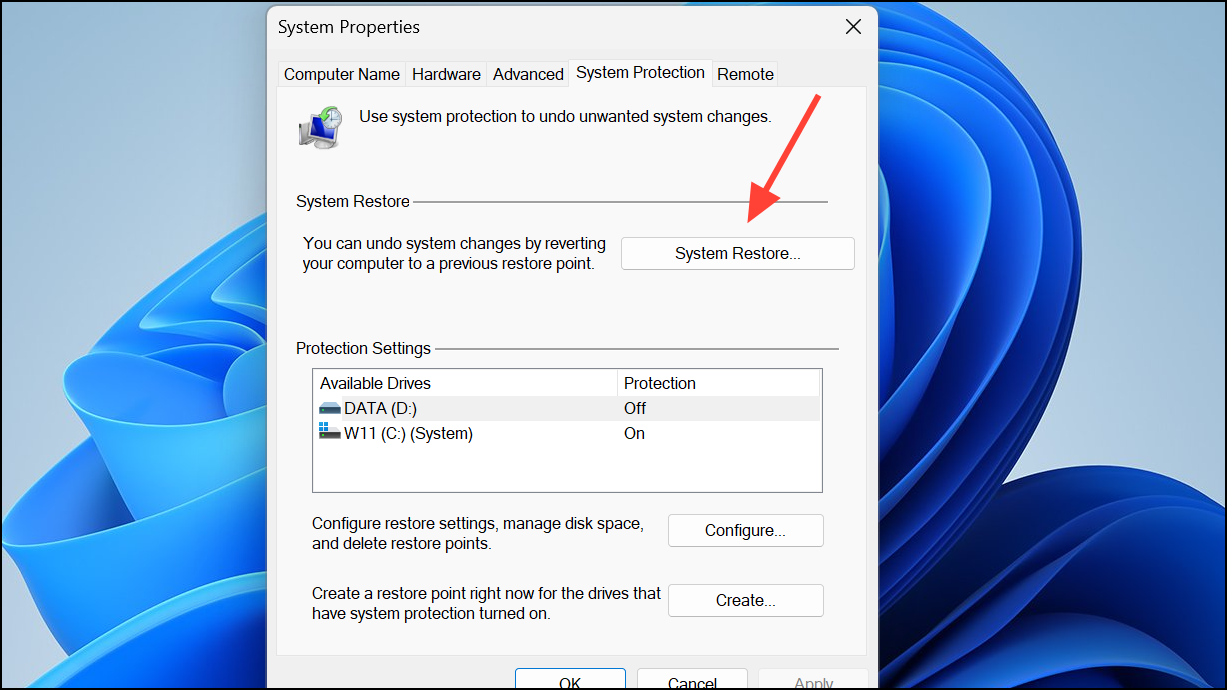
Step 2: In the System Properties window, click System Restore. Choose a restore point dated before the error appeared and follow prompts to complete the process. Your PC will restart during restoration.
After restoration, check if error 0x8007045A is resolved. Note that apps installed after the restore point may need to be reinstalled.
Addressing error 0x8007045A in Windows 11 often involves repairing system files, updating or re-registering DLLs, and ensuring your system is free from malware. Regular backups and keeping Windows updated help prevent future occurrences.