Google Chrome is one of the extensively used browsers across the globe. Users rely on it, both for work-related purposes or to simply browse the web. However, there are times when Chrome stops playing audio altogether.
This could be due to a lot of reasons but the fact of the matter remains that your Chrome experience takes a hit. Therefore, it’s paramount that you troubleshoot the error at the earliest.
Before we move to the fixes, it’s imperative that you understand what leads to the audio playback error in Google Chrome.
What’s Leading to the Audio Playback Error on Chrome?
There are multiple reasons that could be leading to the audio playback error. The process of fixing the error simplifies once you identify the underlying cause. We have listed the most common issues that lead to the error.
- Malfunctioning Hardware
- Muted Website on Chrome
- Browser Settings
- Misconfigured System Settings
- Corrupt or Outdated Audio Driver
- Conflicting Extensions
- Running an Older Version of Windows
Any of the above-listed causes can be leading to the audio playback error with Chrome on your system. If you have made any changes to the settings, revert them and check if that fixes the error. In case you are unable to pinpoint a specific issue, execute the fixes below in the same sequence they are listed.
1. Try Other Websites and Audio Output Devices
When you encounter the audio playback error on Chrome, first check if it’s limited to a specific website or is encountered on all websites. In case, the audio playback error is encountered on all the websites, switch to a different browser and check if the audio works fine. If it does, move to the fixes listed later in the article.
If the audio does not work at all on any browser or other applications, there could be an issue with the audio output device itself. Try using another device and check if the issue is resolved. If the audio works fine now, it’s the audio output device at fault.
2. Unmute the Website
Many a time, if you have muted a particular website, it could be leading to the audio playback error on Chrome. If you mute a website, it will continue to remain muted on any news tabs or windows that’s it opened on. Also, if a website is muted, a ‘Muted Speaker’ sign will be displayed on the address bar.
To unmute a website, right-click on the tab and select the ‘Unmute site’ option from the context menu.
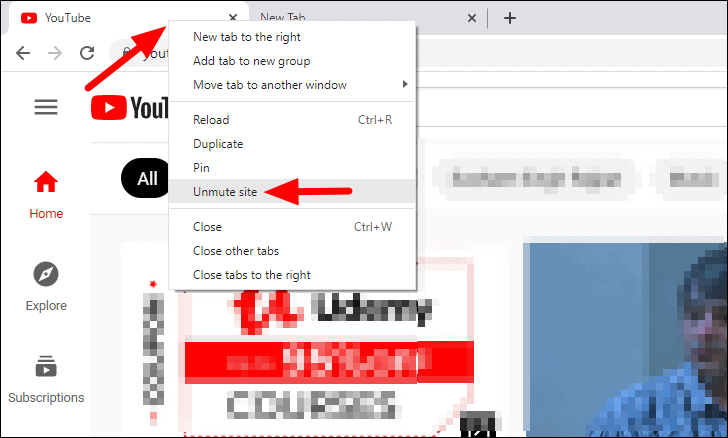
The sounds should now play on Chrome without any issue. In case, you find the ‘Mute site’ option instead of ‘Unmute site’, the website hasn’t been muted and you should move to the next fix.
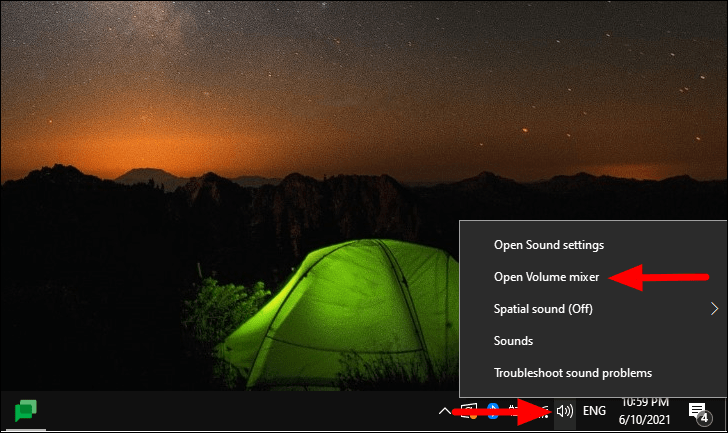
3. Check Volume Mixer
While you may have set the volume to maximum on the system, if the sound for a particular app is muted, you would encounter this error. Windows allow you to change the volume level for particular apps as well. Therefore, if you are encountering an audio playback error on Chrome, check the ‘Volume Mixer’.
To check the Chrome volume in ‘Volume Mixer’, right-click on the ‘Speaker’ icon in the ‘System Tray’, and then select ‘Open Volume mixer’ from the menu.
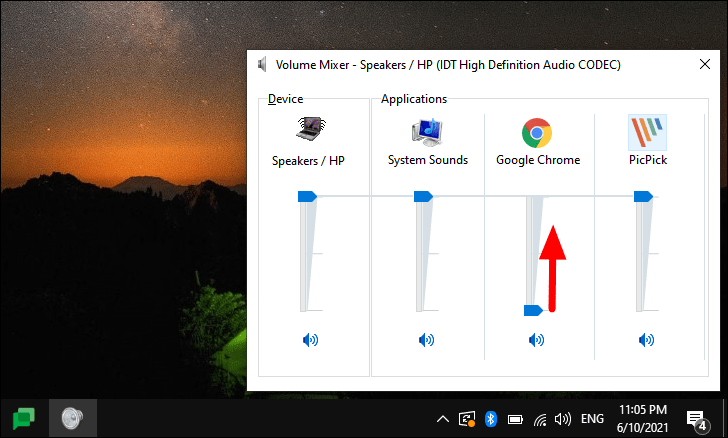
In the ‘Volume Mixer’ box, check if ‘Google Chrome’ is muted. If it is, click on the ‘Speaker’ icon at the bottom to unmute it.
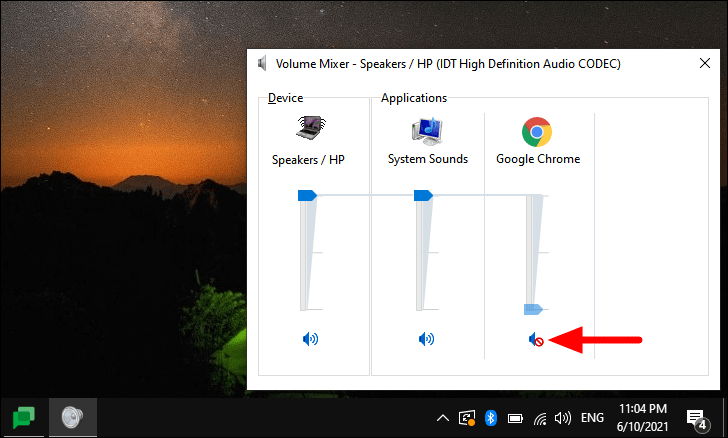
Now, check the position of the slider after unmuting Chrome, as it indicates the volume level. If it’s set at the bottom, hold and drag the slider upwards to the desired level.
The Chrome audio issues should now be resolved. In case you are still encountering issues with it, move to the next fix.
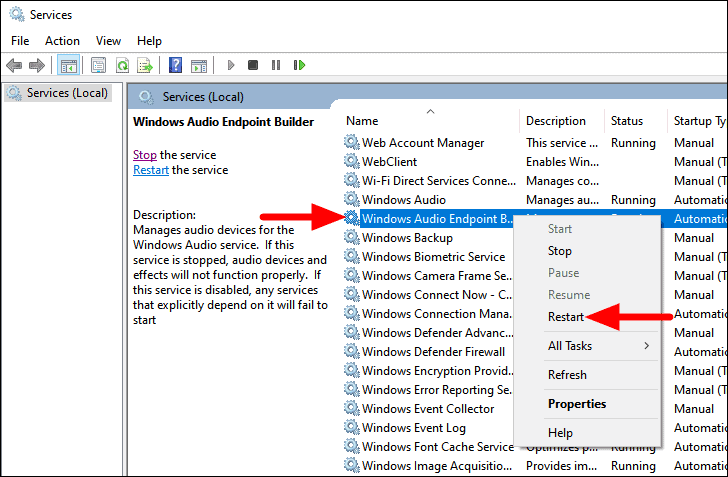
4. Restart the ‘Windows Audio Endpoint Builder’ Service
Windows Audio Endpoint Builder is a service that manages the various audio devices connected to the system, either it be the built-in speakers or the external speakers and earphones/headphones. If the service runs into an error, you might encounter issues with the audio playback on Google Chrome. In this case, all you need is to restart the service.
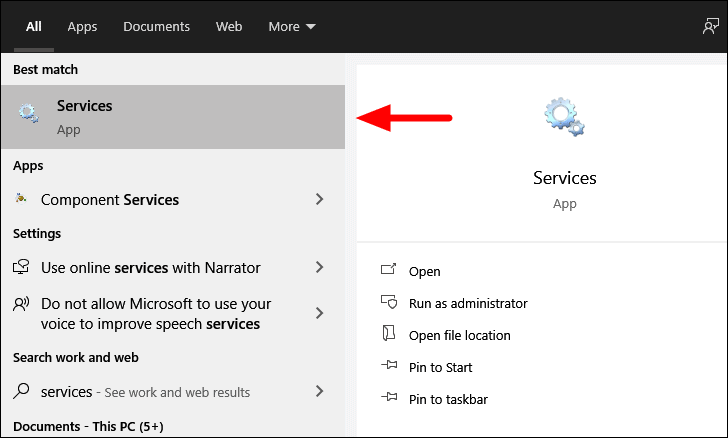
To restart the ‘Windows Audio Endpoint Builder’ service, search for ‘Services’ in the ‘Start Menu’, and then click on the relevant search result to launch the app.
In the ‘Services’ app, scroll down and locate the ‘Windows Audio Endpoint Builder’ service. Since the options are listed in alphabetical order by default, you can easily locate it. After you have found the service, right-click on it, and then select ‘Restart’ from the context menu.
A confirmation box will now pop up, click ‘Yes’ to confirm the change.
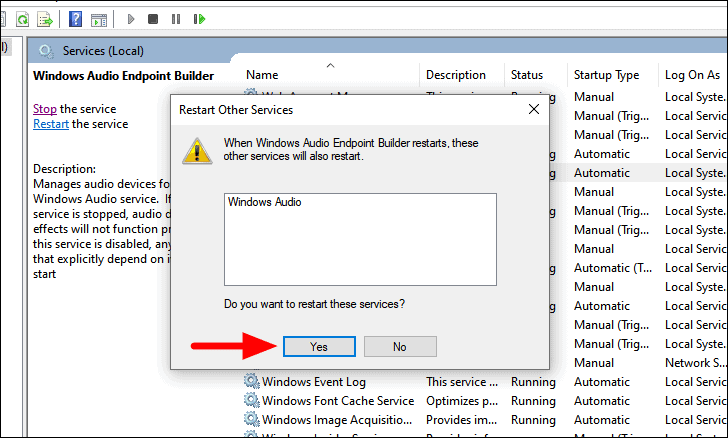
A new box will pop up that will show you the status of the restart. Once the service is restarted, launch the Chrome browser, and check if the audio works fine.
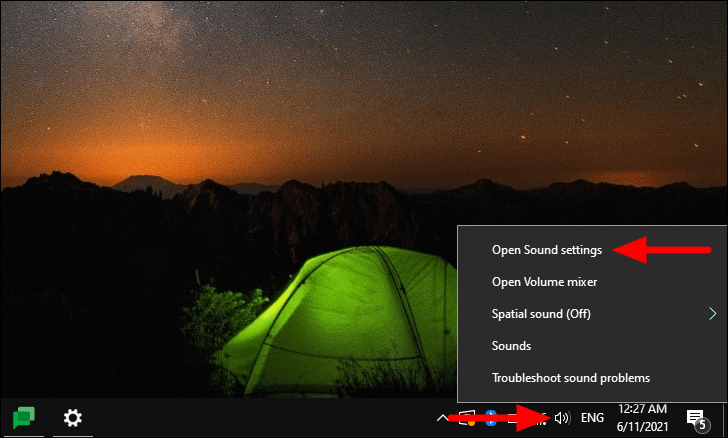
5. Check Default Audio Output Device
If you have connected multiple audio output devices to the system and keep toggling between them, Windows might sometimes not choose the desired one. In this case, although the audio is played, you might not be able to hear it since the system is routing it to another device. To fix the error, you have to manually select the desired output device.
Before you proceed, launch Chrome and play any audio or video.
To check the default audio output device, right-click on the ‘Speaker’ icon in the system tray, and then click on ‘Open Sound settings’ from the menu.
In the ‘Sound’ settings, click on the box under ‘Choose your output device’, and select the desired output device from the drop-down menu.
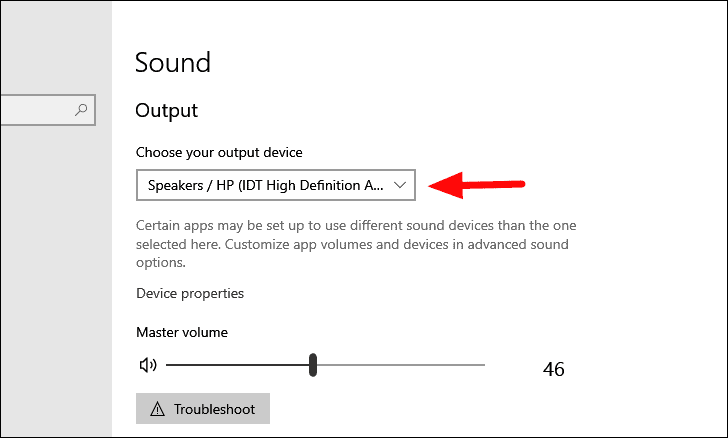
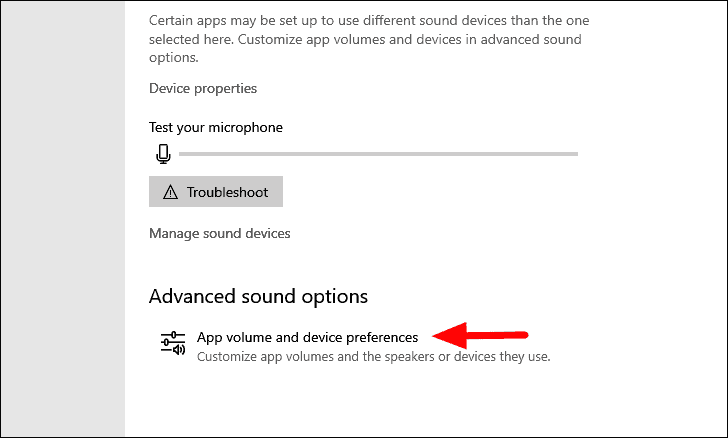
Although you have selected an output device, certain apps may still be using other sound devices. To ensure that the desired output device is chosen for Chrome, scroll down, and click on the ‘App volume and device preferences’ option.
Now, locate the ‘Google Chrome’ option, click on the ‘Output’ dropdown menu, and select the required output device.
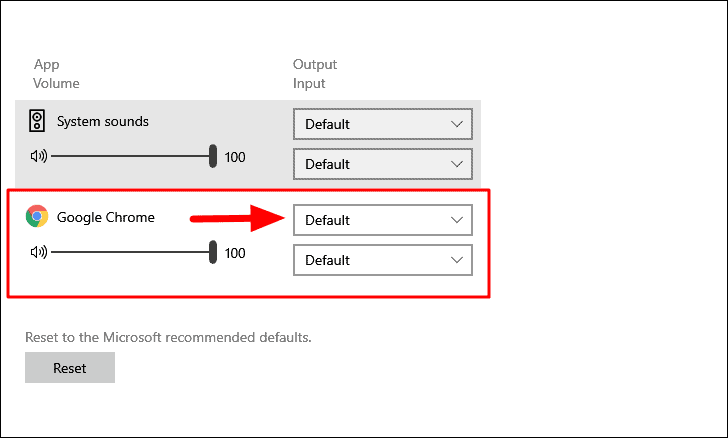
After you have made the changes, the audio error on Chrome should be fixed. In case the error persists, move to the next fix.
6. Check Google Chrome Settings
Chrome offers settings to disable sound output for specific websites or all of them. In case the setting is enabled, you would encounter audio issues on Chrome. The setting is disabled by default, however, if the above fixes have not worked, checking it is worth a shot.
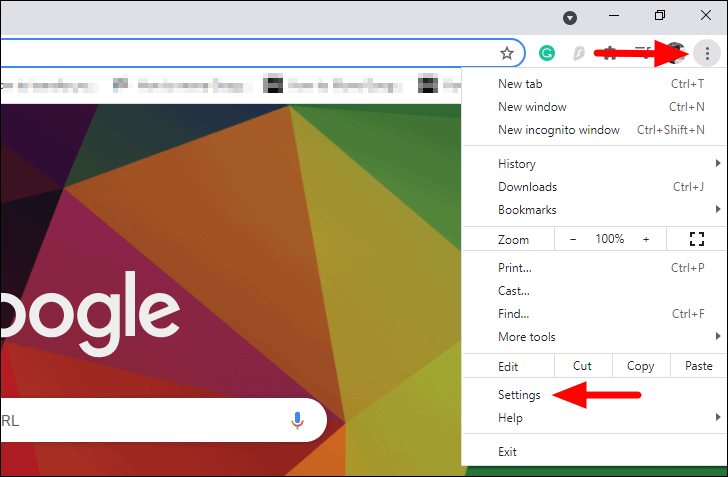
To check Chrome audio settings, click on the ellipsis at the top-right corner of the browser, and then select ‘Settings’ from the drop-down menu.
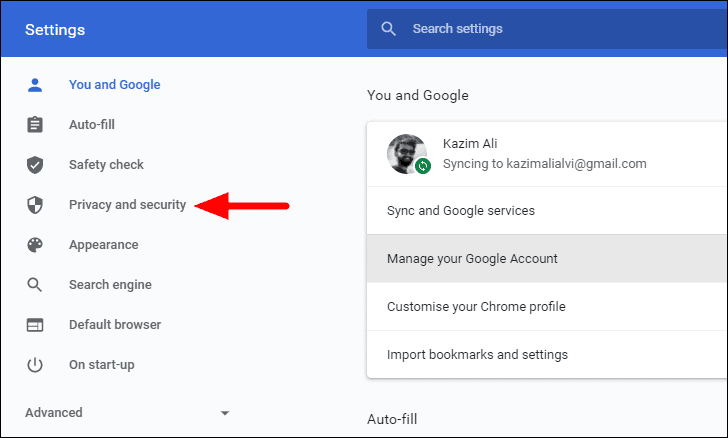
In ‘Chrome’ settings, you will find multiple tabs listed on the left. Select the ‘Privacy and security’ tab.
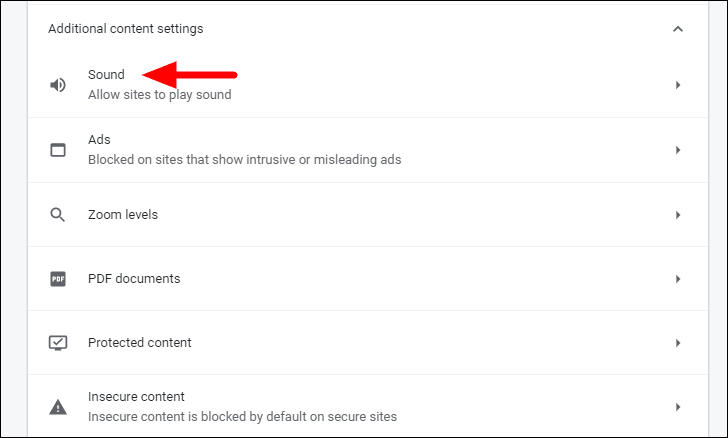
Now, scroll down and click on ‘Additional content settings’ at the bottom.

In the ‘Additional content settings, select the ‘Sound’ option.
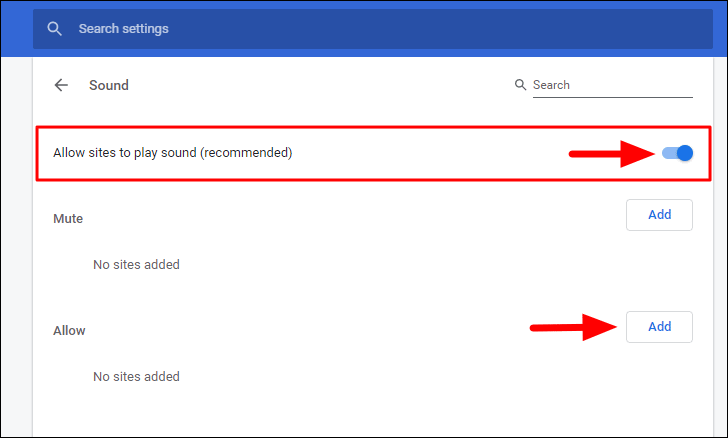
Next, ensure that the toggle next to ‘Allow sites to play sound’ is enabled. In case it’s disabled, click on it to turn on the setting. You also have the option to allow specific websites to always play sound, no matter what the browser audio settings are.
To allow a website to play sound, click on the ‘Add’ option under the ‘Allow’ section of the ‘Sound’ settings on Chrome.
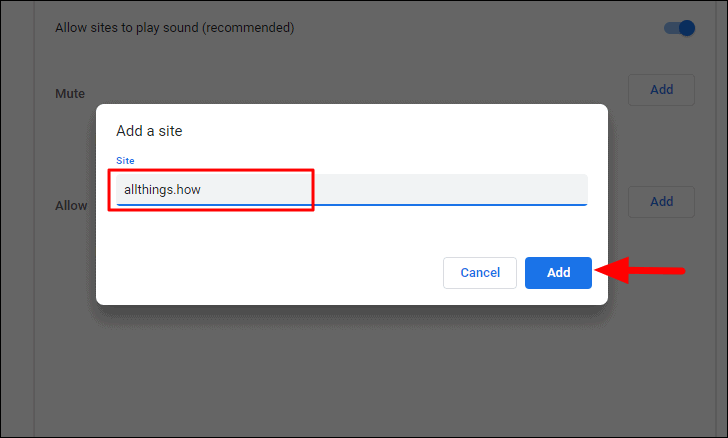
Next, enter the URL of the website and click on ‘Add’ at the bottom. The website has now been saved to the list of websites that will always play sounds.
Now, check if the Chrome audio works fine.
7. Clear Chrome Cache and Cookies
Your browser saves cookies from websites to help load them faster in the future. Over a period of time, when this data becomes overwhelming, it might affect the functioning of the browser, thus leading to the audio error on Chrome. Therefore, it’s recommended that you clear the browser cache and cookies periodically.
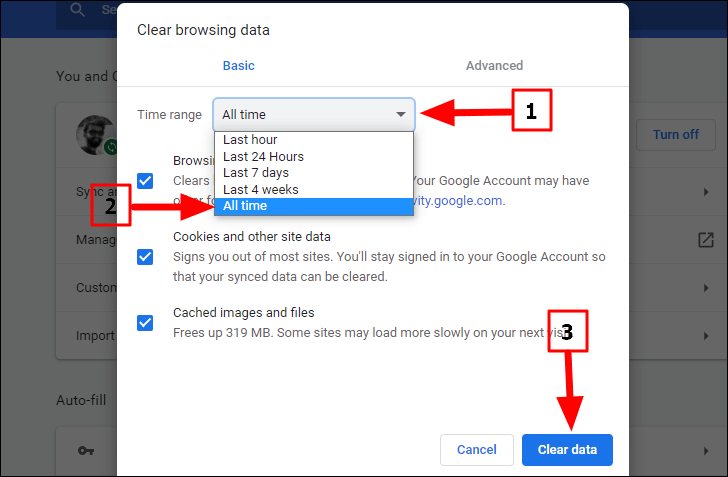
To clear Chrome cache and cookies, launch the Chrome browser, press CTRL + H to open the ‘History’, and then click on the ‘Clear browsing data’ tab on the left.
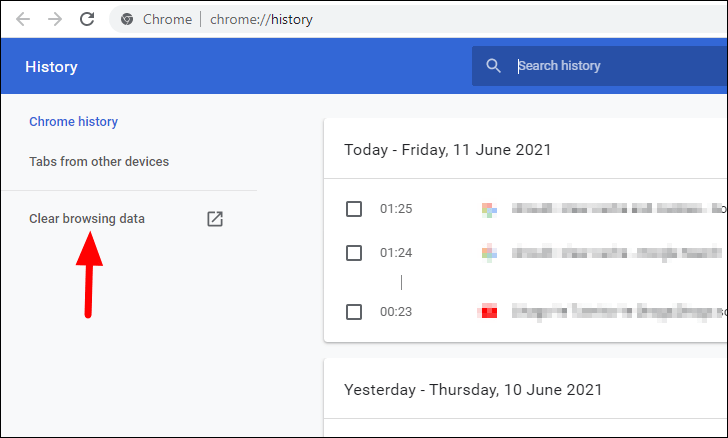
In the ‘Clear browsing data’ window, click on the drop-down menu next to ‘Time range’ and select the ‘All time’ option. Now, ensure that you have selected all the three options, ‘Browsing history’, ‘Cookies and other site data’, and ‘Cached images and files’. Finally, click on ‘Clear data’ at the bottom.
After you have cleared the data, relaunch the browser, and check if you are still encountering issues with sounds on Chrome.
8. Disable Chrome Extension
Many a time, you may unknowingly install extensions that conflict with the sound output of Chrome, thus leading to the error. Although they are meant to enhance the functionality of the browser, in this case, it’s quite the opposite.
If you have installed any extensions in the recent past after which you started encountering the error, it’s time you disable them or remove them altogether.
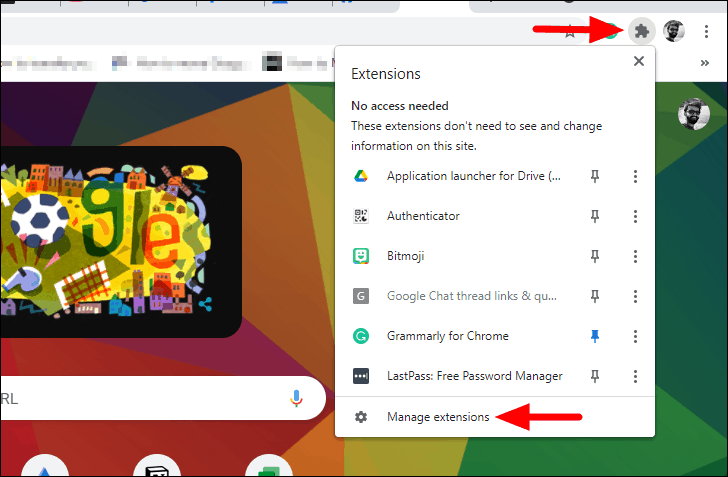
To disable an extension on Chrome, click on the ‘Extensions’ icon next to the address bar near the top-right corner, and select ‘Manage Extensions’ from the drop-down menu.
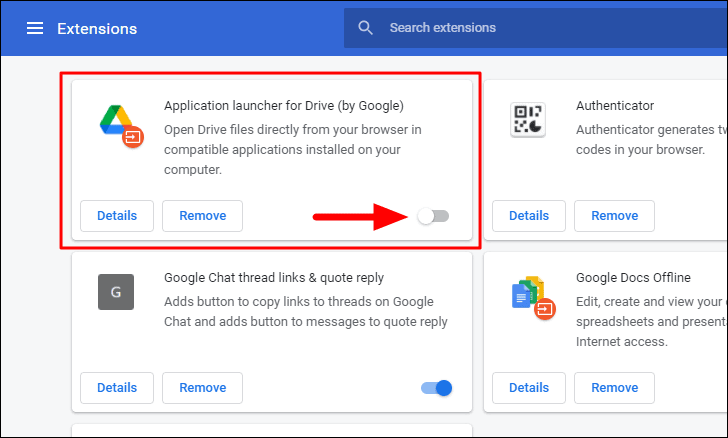
In the ‘Extensions’ window, identify the conflicting extension, and click on the toggle under it to disable the extension. If you are unable to pinpoint a single extension, disable them one at a time and check if the error is fixed. Once you have identified the extension that’s conflicting with the functioning of the browser, it’s time you remove it altogether.
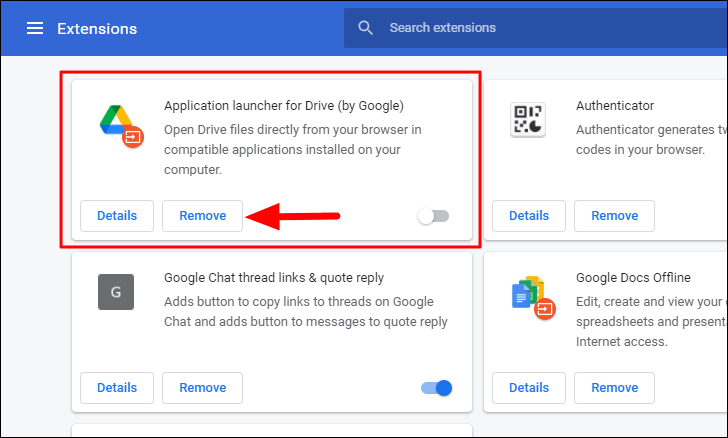
To remove a specific extension, click on the ‘Remove’ option under it.
If disabling the extensions didn’t work, then they are not causing the error. In this case, try the next fix.
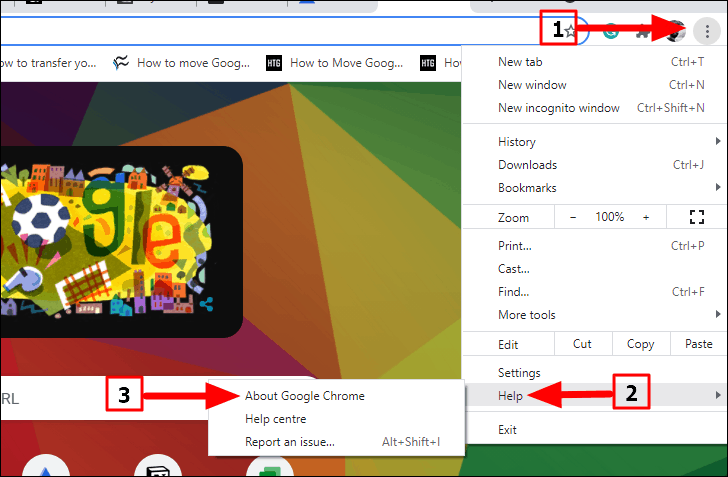
9. Check for Google Chrome Updates
If you are running an older version of Chrome, it’s likely to cause the audio output error. Although Chrome is set to update automatically, you must look for updates in case of such errors.
To update Chrome, click on the ellipsis near the top-right corner, select ‘Help’ from the drop-down menu, and then click on ‘About Google Chrome.
In case you are on the latest version of the browser, the same will be displayed. If an update is available, there would be an option to install the update.
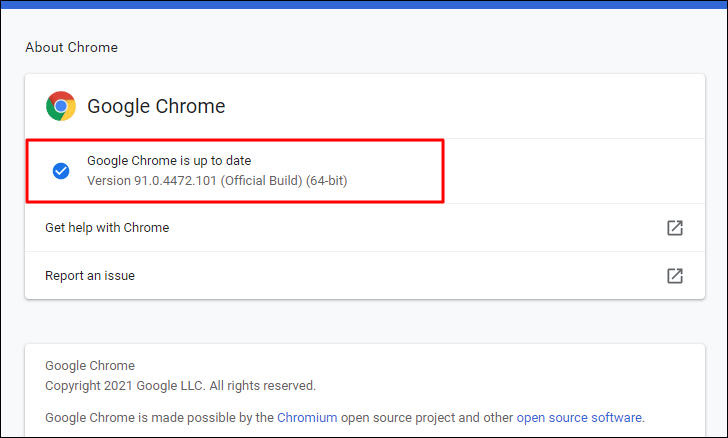
After you have updated Chrome, check if the audio error is fixed. If not, move to the next fix.
10. Perform System Restore
If none of the fixes above have fixed the error, you can go for ‘System Restore’. With ‘System Restore’, any recent changes would be removed and the Windows would move back in time to a point where the error did not exist. However, ‘System Restore’ should be your last resort since you might lose certain apps and settings, although, it wouldn’t affect the files on the computer.
After you have run ‘System Restore‘, the audio error on Google Chrome will be fixed.
Now that the sound issue on Chrome is resolved, you can play audio and videos without any hitch whatsoever.