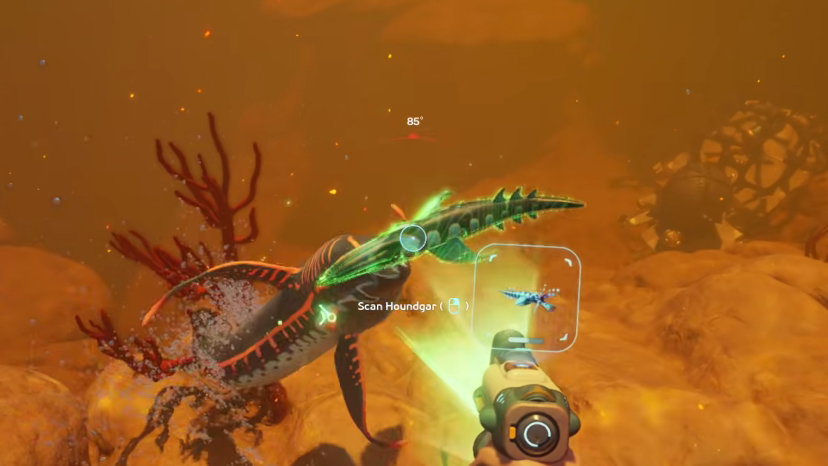
The Houndgar is a small, aggressive squid-like predator in Subnautica 2, and scanning one is half of what you need to unlock the Chum Cloud Active Biomod at the Biolab. The other half is a Toxic Sponge scan. Both require the upgraded Bioscanner, not the basic Scanner.
Why the regular Scanner won’t work
Biomod unlocks only register with the Bioscanner, which is an Axum-tech upgrade to your starting Scanner. Any creature data you collected with the base Scanner does not count toward Biomod requirements at the Biolab, so a Houndgar scan done with the wrong tool will not progress Chum Cloud.
Before you head out hunting one, you need the Bioscanner built and equipped.
Get the Bioscanner first
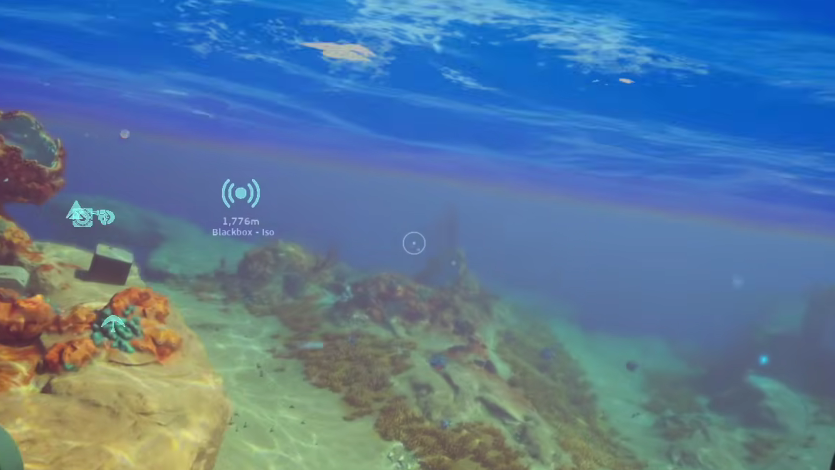
The degraded Bioscanner blueprint sits inside the Cicada Wreck (also referred to as the Blackbox Iso Signal wreck), perched on a plateau in the alien-structure region east of the Lifepod. Rough bearings are about 1,800 meters east of the Lifepod, or roughly 600 meters southeast of the Alien Ruins Signal, near the large alien turbine at the Karakorum Power Plant area.
Where to find a Houndgar
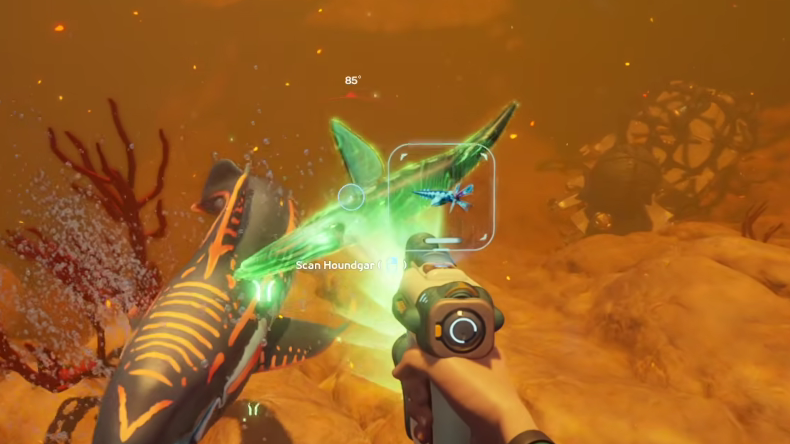
Houndgars live in the deeper, murky yellow-tinged biome past the Alien Ruins, the same general area where bubbles vent up from the seafloor. They swim in groups alongside a larger predator called the Marrowbreach. If you spot a Marrowbreach, smaller squid-like creatures circling it are Houndgars.
Visually, a Houndgar has a dark blue body with bright blue banding, a beaked head, eight arms joined by membranes, and a pair of large fins behind the head. When it flashes a bright pattern across its arm membranes, it is signaling a Marrowbreach attack, not just posturing — that is your cue to back off, not to push in for the scan.
Reaching the biome reliably means taking a submersible vehicle and descending until the water turns from open blue into the yellower, low-visibility layer. Surface near the bubble vents and the Houndgars will be in open water nearby.
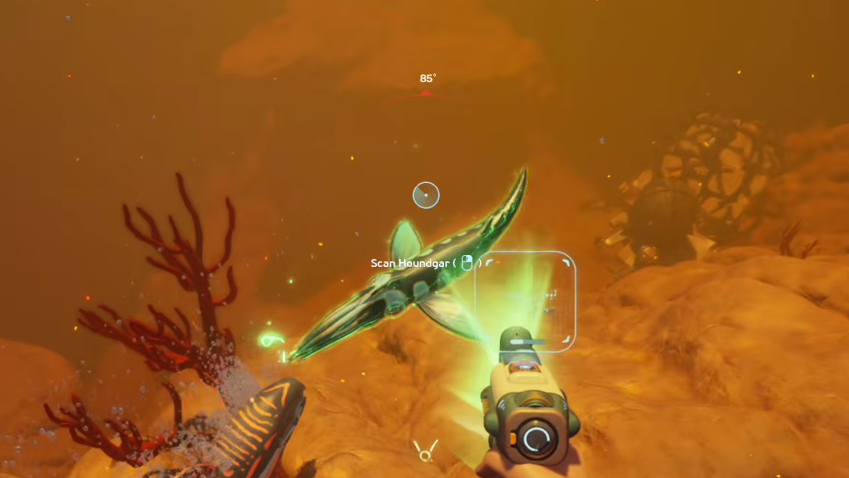
Performing the Houndgar scan
Finishing the Chum Cloud unlock
Chum Cloud requires two scans, not one. The Houndgar scan handles half of it; the Toxic Sponge scan is the other half. Toxic Sponges are stationary, glowing green organisms tucked inside small caves near rocky surface structures close to the starting area, which makes them the easier of the two targets.
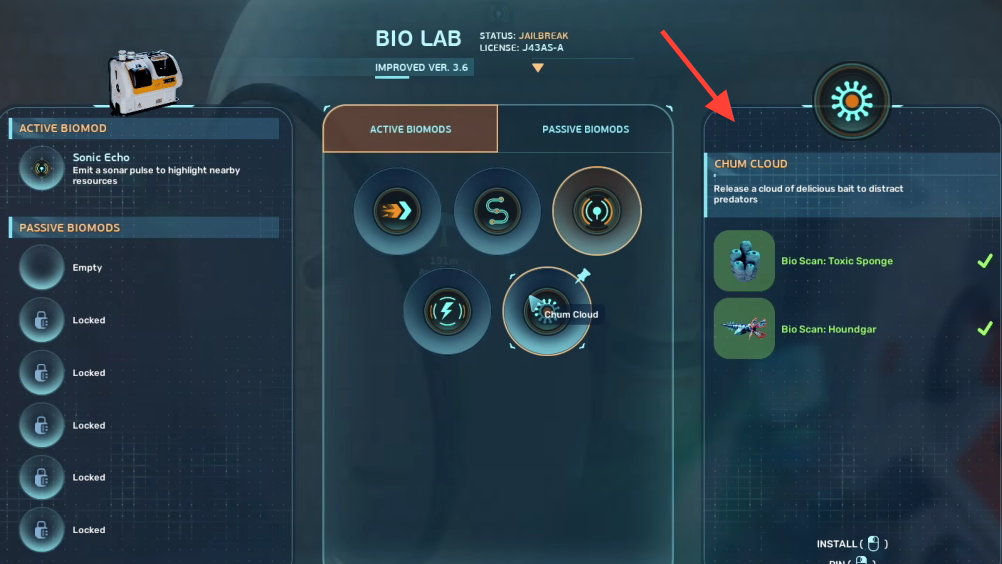
Once both scans are logged, head back to the Biolab. The previously unknown Biomod slot will resolve into Chum Cloud, with green checkmarks next to both Bio Scan: Toxic Sponge and Bio Scan: Houndgar requirements. Equip it from the Active Biomod list to release a bait cloud that distracts predators.
Houndgar scan quick reference
| Detail | Value |
|---|---|
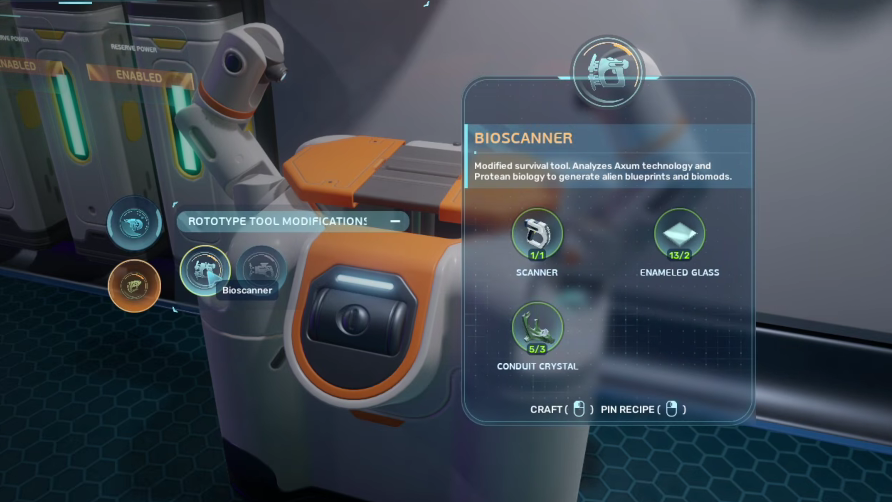
| Required tool | Bioscanner (crafted at Modification Station) |
| Bioscanner recipe | 1x Scanner, 2x Enameled Glass, 3x Conduit Crystal |
| Houndgar biome | Murky yellow deep biome past the Alien Ruins, near bubble vents |
| Companion creature | Marrowbreach (larger predator, hunts with Houndgars) |
| Threat indicator | Bright flashing arm-membrane display |
| Confirmation | “NEW DATABANK ENTRY: HOUNDGAR” notification |
| Biomod unlocked | Chum Cloud (also requires Toxic Sponge scan) |
| Chum Cloud effect | Releases a bait cloud that distracts predators |
Houndgars are tagged as possibly intelligent and even potentially trainable in their databank entry, but for the Chum Cloud unlock all you need is a clean scan and a quick exit. Get the Toxic Sponge logged on the way back to base, and the Biomod slot will resolve the moment you reopen the Biolab.