
Sending a large document to print by accident, or realizing you need to stop a print job before it finishes, can quickly waste paper, ink, and time. Canceling a print job on Brother, Epson, HP, and other popular printers requires prompt action and a clear understanding of your device’s controls and your computer’s print queue. Following the right steps prevents unnecessary printing and helps your printer recover quickly for your next job.
Canceling a Print Job Directly from the Printer
Many printers, including models from Brother, Epson, and HP, feature a dedicated cancel button on the control panel. This button typically has a red X or a stop symbol. Pressing it immediately after starting a print job attempts to halt printing mid-process. If you act quickly, the printer may stop before completing the current page, especially on newer models.
On some Brother printers, for example, pressing the cancel button will display a message like "Cancel Printing, Job Cancelling" until the job is halted. On HP printers, the cancel button works similarly, but response times can vary based on the printer’s memory and current workload. If the print job has already moved to the printer’s internal memory, you may need to wait for the current page to finish before the job fully stops.
Canceling Print Jobs from Your Computer (Windows)
When the cancel button on the printer does not work or is unavailable, managing print jobs through your computer’s operating system provides more control. The steps differ slightly depending on your version of Windows, but the core process remains consistent.
Step 1: Open the print queue. On Windows 10 or 11, select Start, then search for Control Panel. Navigate to Hardware and Sound > Devices and Printers. Alternatively, in Windows 11, go to Settings > Bluetooth & devices > Printers & scanners.
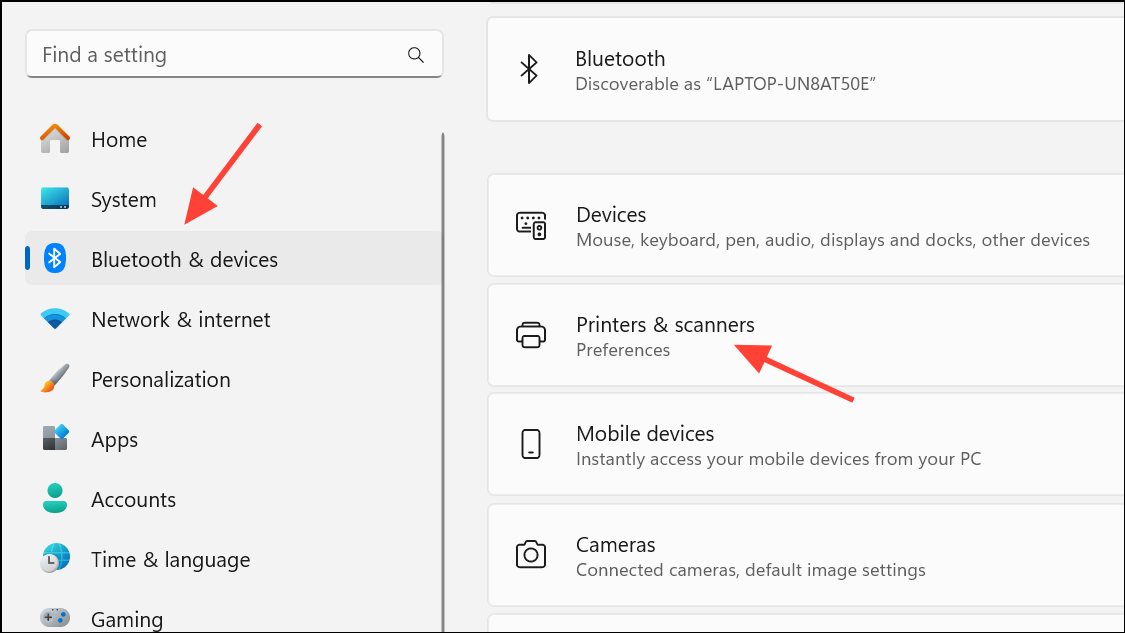
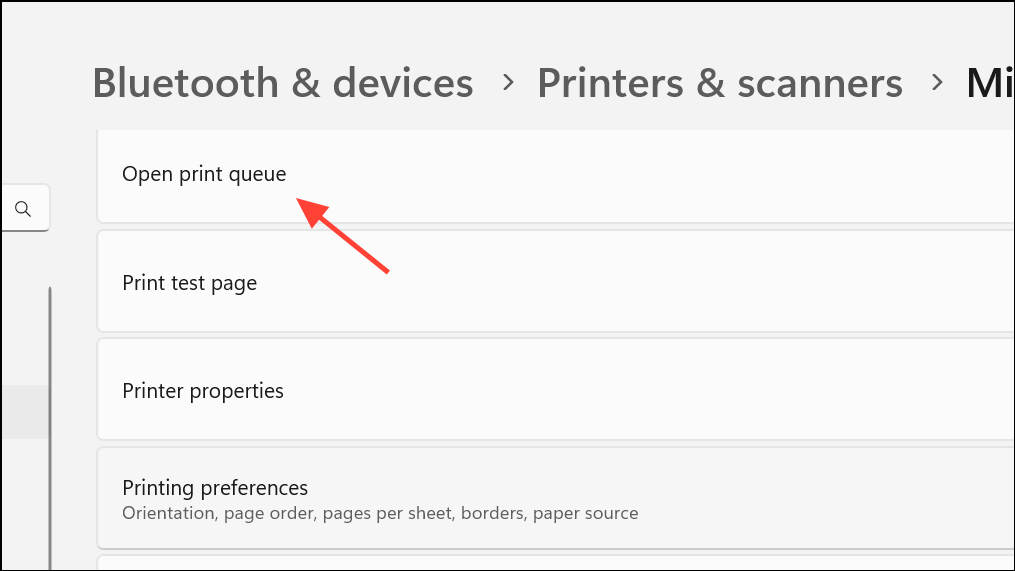
Step 2: Locate your printer in the list, right-click its icon, and select See what's printing or Open print queue. This brings up the list of current and pending print jobs.
Step 3: To cancel all documents, click the Printer menu and select Cancel All Documents (sometimes labeled Purge Print Documents). To cancel only a specific job, click on the job to highlight it, then go to the Document menu and choose Cancel.
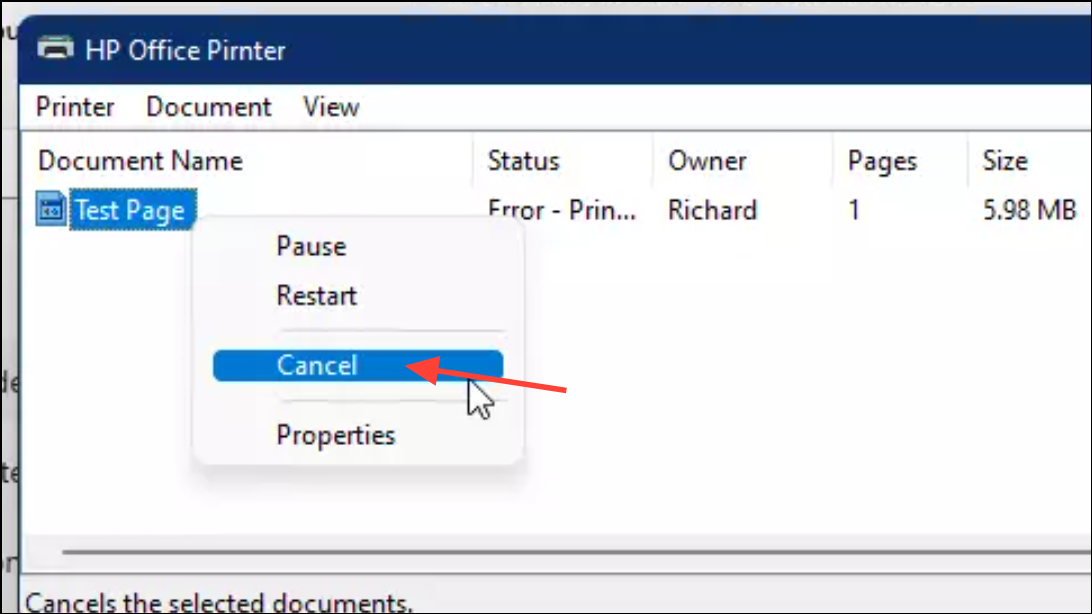
Step 4: Confirm the cancellation if prompted. The print queue should clear the selected jobs. If the queue does not empty after several attempts, restart your computer to force the print spooler to refresh.
For older versions of Windows (such as XP or Vista), the process is similar: access the Printers and Faxes folder from the Start menu, double-click your printer, and manage jobs from the print queue window.
Canceling Print Jobs on macOS
Apple computers provide a straightforward way to manage print jobs through the system settings.
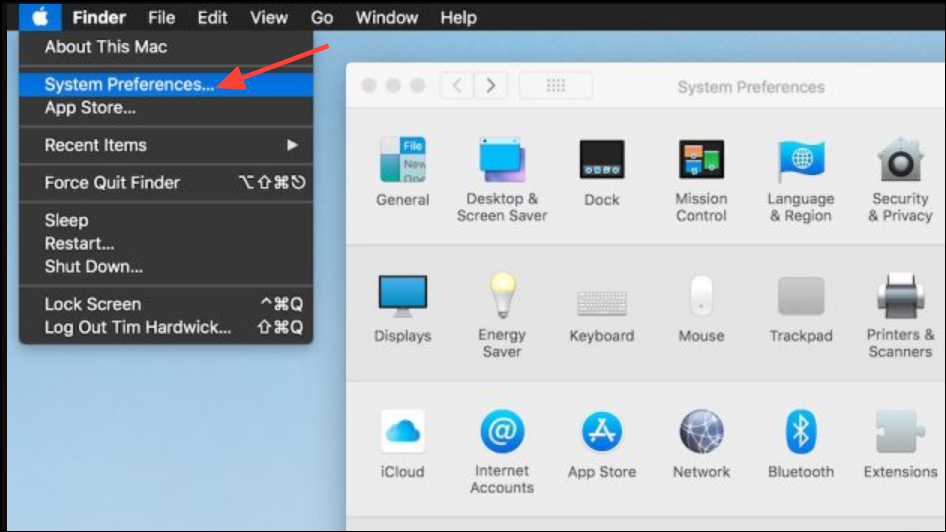
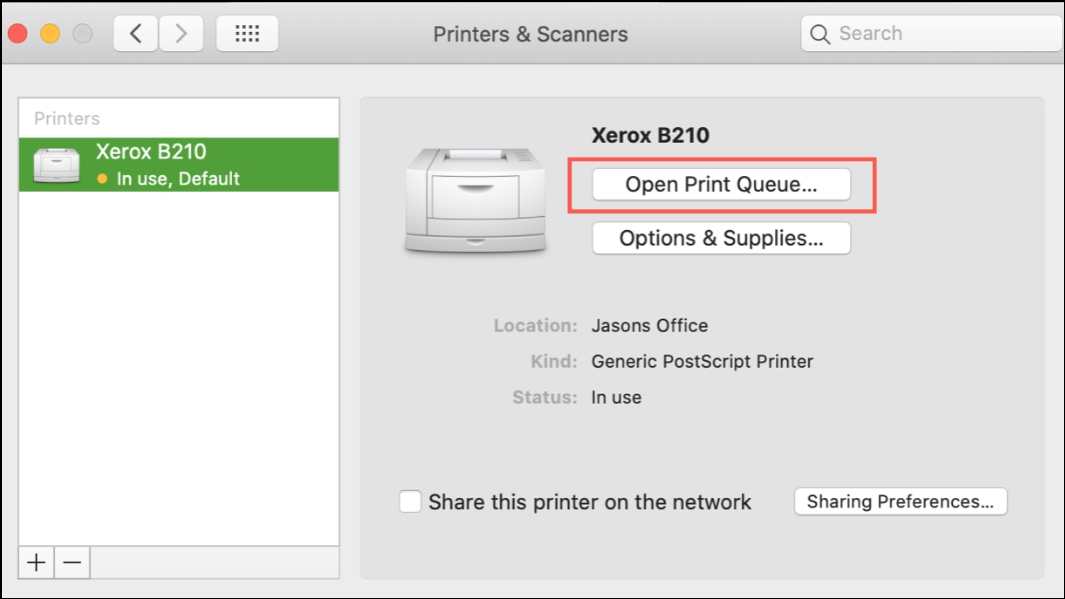
Step 1: Open the Apple menu and select System Settings (macOS 13 or later) or System Preferences (macOS 12 or earlier).
Step 2: Click Printers & Scanners. Select your printer from the list, then click Print Queue... or Open print queue....
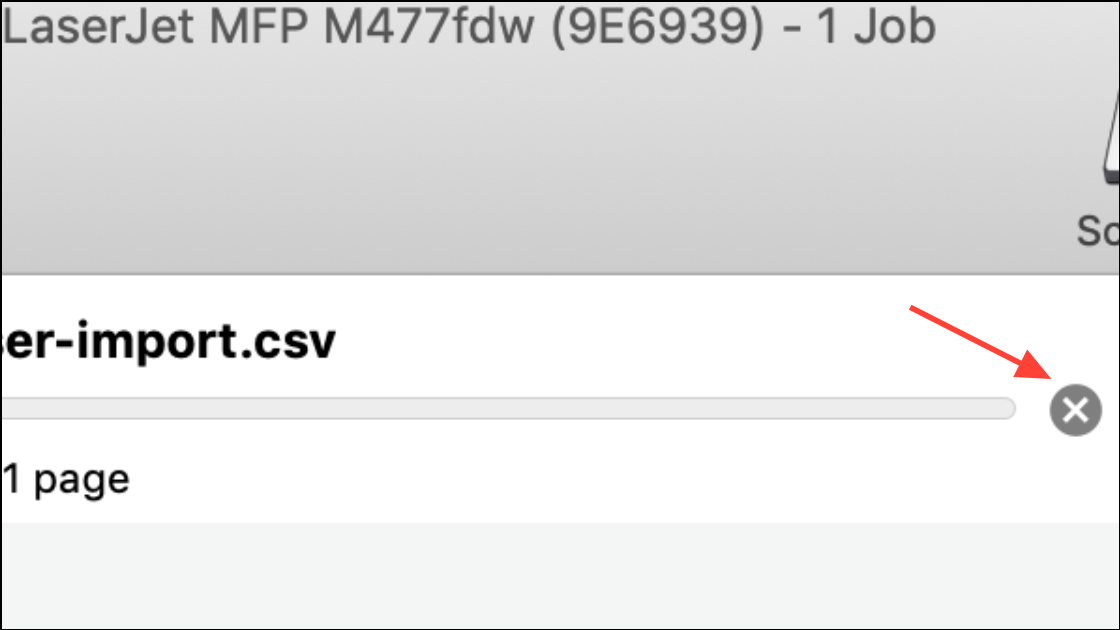
Step 3: In the print queue window, select the print job(s) you want to stop. Click the X or Delete icon next to each job to remove it from the queue. If you are using a Brother printer and printing via the iPrint&Scan app, use the cancel button within the application.
On older versions of macOS (10.8–10.4), access Print & Fax or Print & Scan within System Preferences, then follow the same process to open the print queue and delete jobs.
Force-Clearing Stuck Print Jobs Using the Print Spooler (Windows)
Sometimes, print jobs remain stuck in the queue and resist standard cancellation attempts. This often happens when the print spooler service hangs or the job is already in the printer’s memory. Clearing the spooler manually can resolve stubborn issues and allow new print jobs to process.
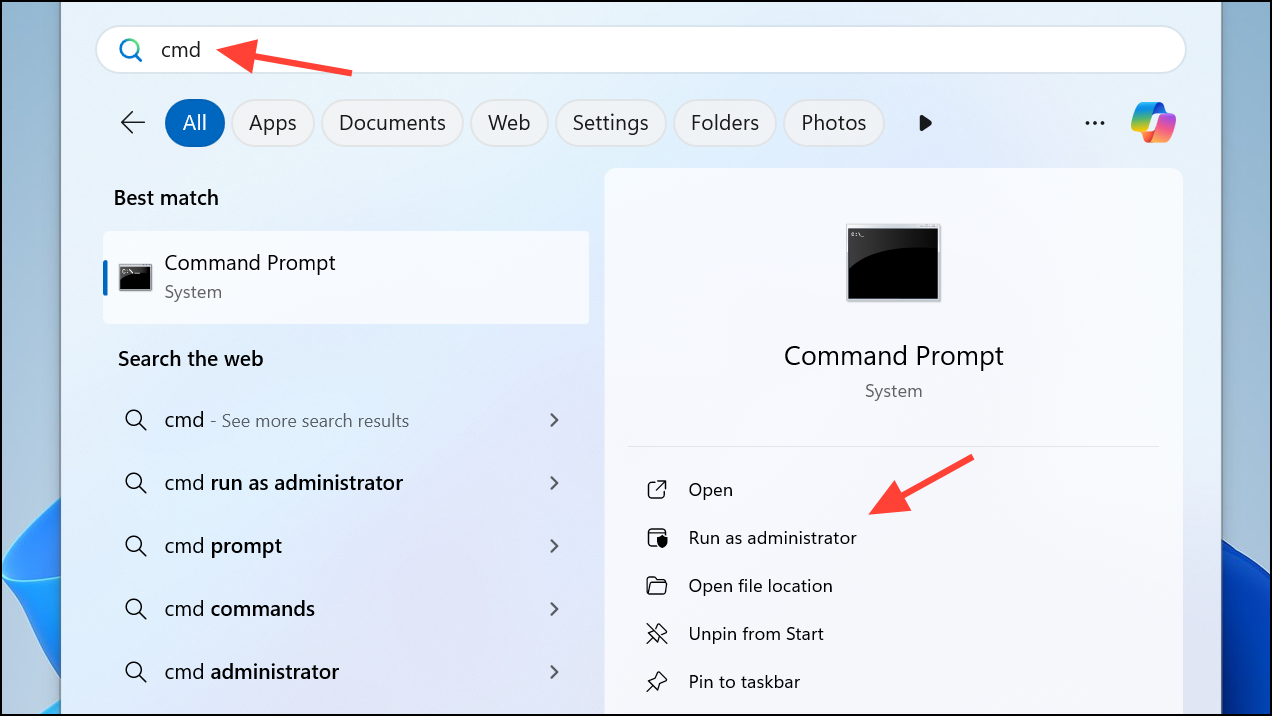
Step 1: Open an elevated Command Prompt. Search for cmd in the Start menu, right-click it, and choose Run as administrator.
Step 2: Stop the print spooler service by entering the following command:
net stop spooler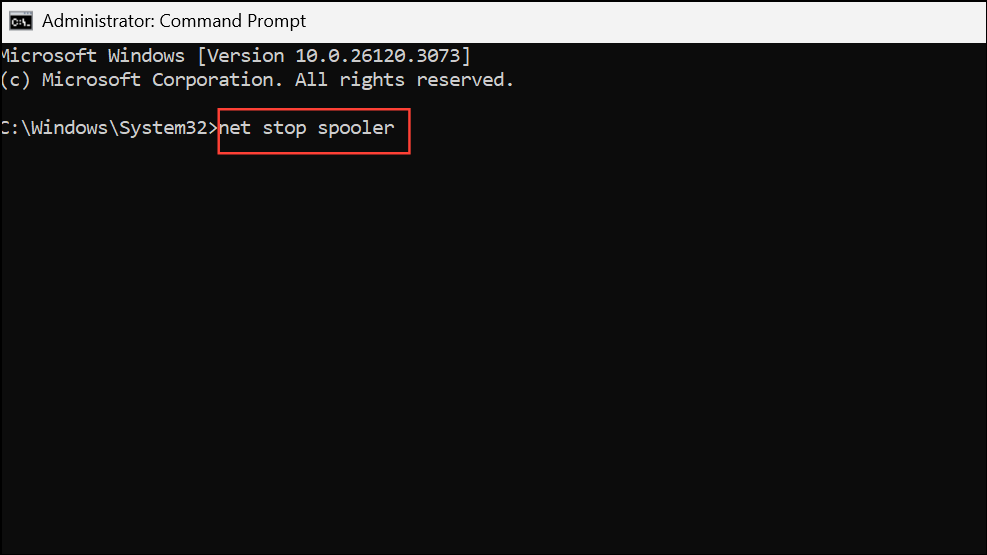
This halts the Windows service responsible for managing print jobs.
Step 3: Delete all files in the spooler directory. Run:
del /q %systemroot%\system32\spool\PRINTERS\*.*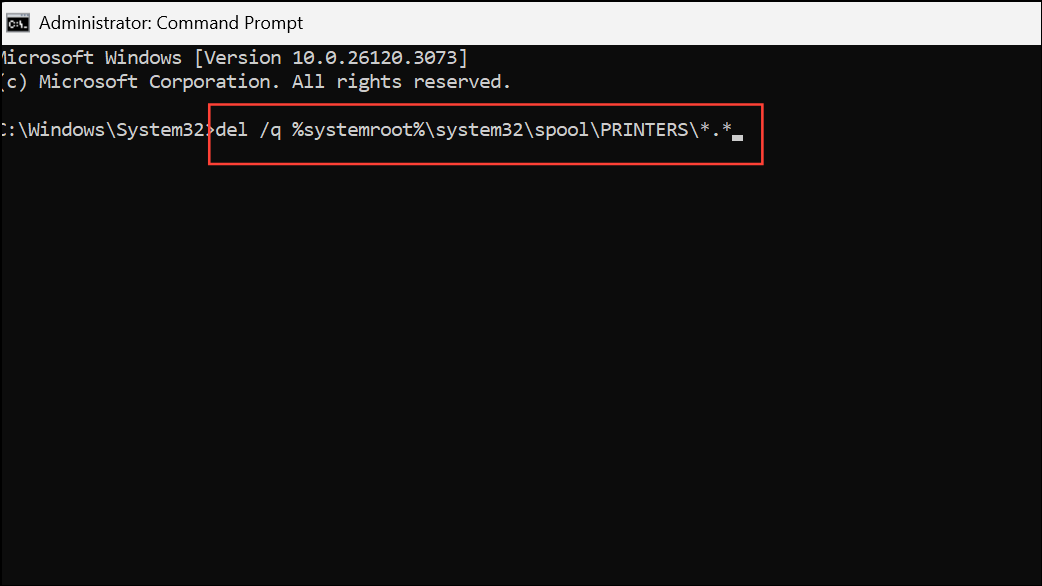
This command removes any lingering print job files that are blocking the queue.
Step 4: Restart the print spooler service with:
net start spooler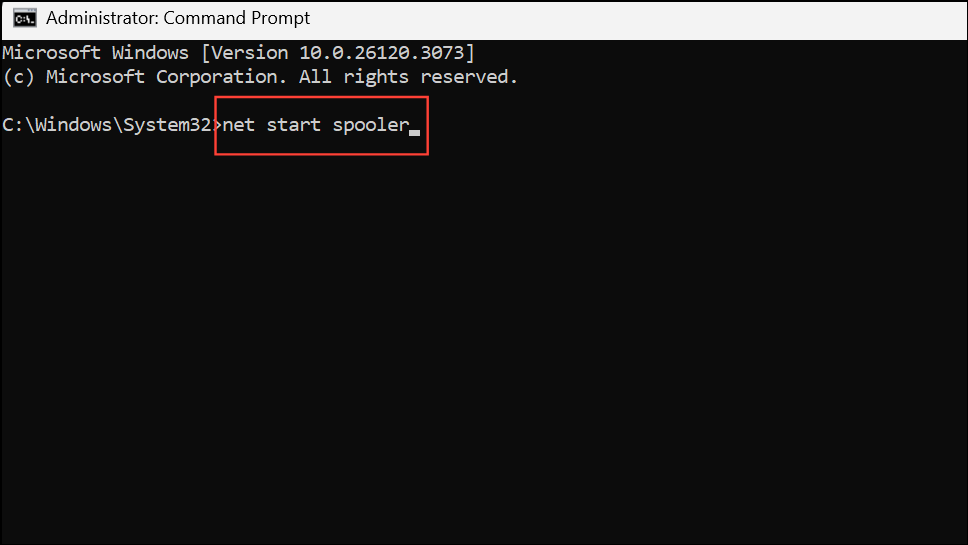
After these steps, check the print queue again. It should now be empty, and you can send new print jobs without delay. If you frequently encounter stuck jobs, consider saving these commands in a batch file for quicker access in the future.
Alternative Approaches and Additional Tips
If a print job refuses to clear after using both the printer’s cancel button and the computer’s print queue, power cycling the printer can help. Turn off the printer, wait a few seconds, and turn it back on. This action can clear jobs stored in the printer’s memory.
For network printers or those managed through print servers, you may need administrative privileges to clear stuck jobs. On some systems, right-clicking the print queue and selecting Open as Administrator allows for more forceful cancellation.
On Linux systems using CUPS (Common Unix Printing System), open a web browser and navigate to http://localhost:631/jobs/ to manage and cancel print jobs directly.
As a last resort, unplugging the printer or removing paper from the tray can physically stop printing, but this may cause paper jams or require resetting the printer afterward. Use these methods only if software-based cancellation fails.
Canceling print jobs efficiently prevents wasted resources and frustration. Following these steps for your operating system and printer brand will help you regain control when an unwanted print job starts. If problems persist, checking for updated drivers or contacting manufacturer support may offer long-term solutions.