
If you’re a regular Twitter user, it is important to understand the privacy and safety settings that are available to you. Whether you don’t want to see the ‘Potential sensitive content’ warning when visiting a page or a post or you want to tweak who can see your profile and/or tweets. Or maybe, you simply want to block/unblock some contacts or manage your topics of interest on Twitter.
These settings are an important aspect of your Twitter experience as they help you control who sees your tweets, and to protect yourself from unwanted interactions. So, it’s important to get a handle on them.
Fortunately, it’s very easy to manage as everything is accessible using the ‘Privacy & Safety’ settings menu. In this guide, we are going to show you exactly what and how can you tweak so you can set up your experience according to your preferences.
Managing Privacy and Safety Settings
To showcase the method, we are using the website; however, the steps are the same for mobile devices as well.
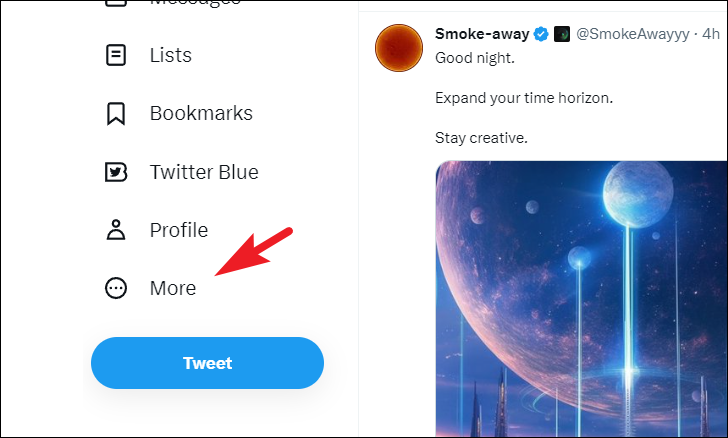
First, head to twitter.com and sign in using your credentials. Once you are at the Home Page, click on the ‘More’ tab from the left sidebar.
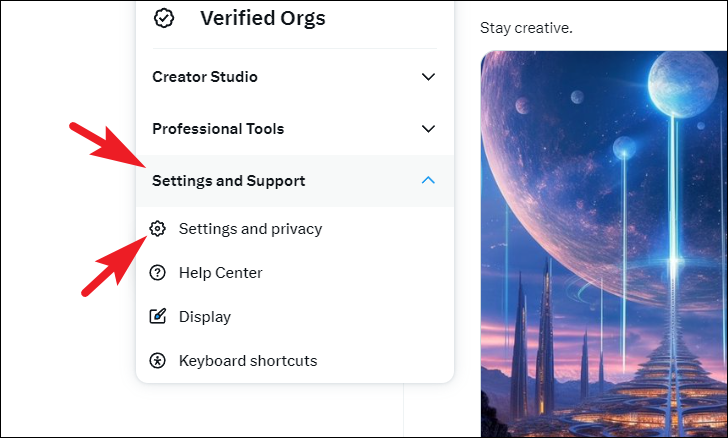
Then, expand the ‘Settings and Support’ option. Next, click on ‘Settings and privacy’ from the list.
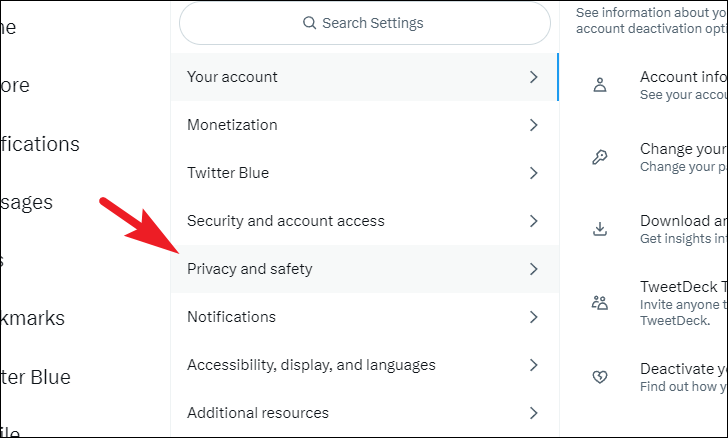
After that, choose the ‘Privacy and safety’ option. You should see all the settings falling under the category expanded to the right section of the screen.
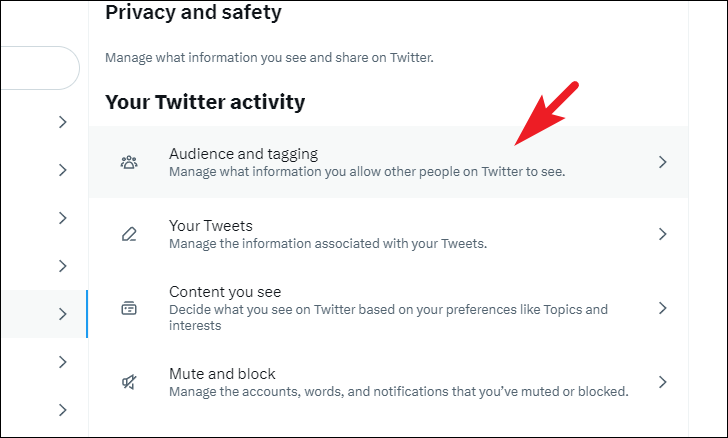
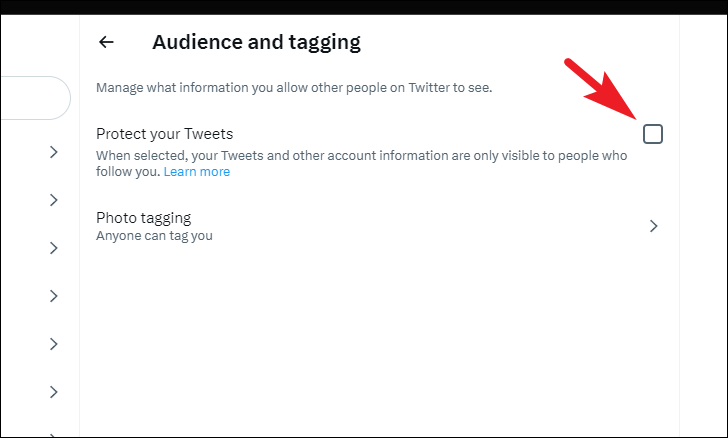
To make sure your tweets and account information is only visible to people that follow you, click on the ‘Audience and tagging’ option.
On the next screen, click on the checkbox following the ‘Protect your tweets’ option. This will bring an overlay alert to your screen.
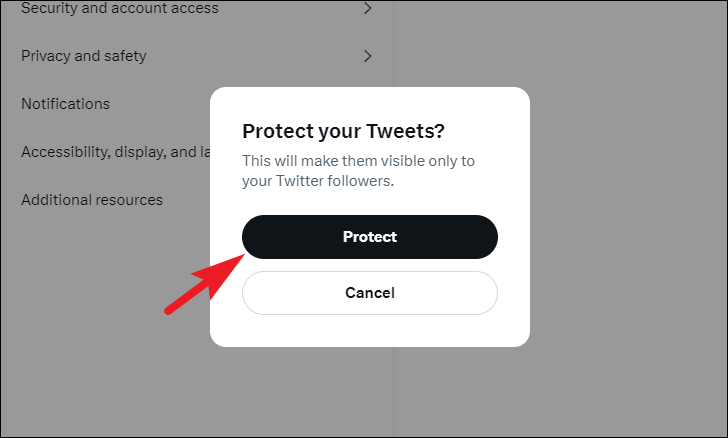
From the overlay alert, click on the ‘Protect’ button to turn on the setting.
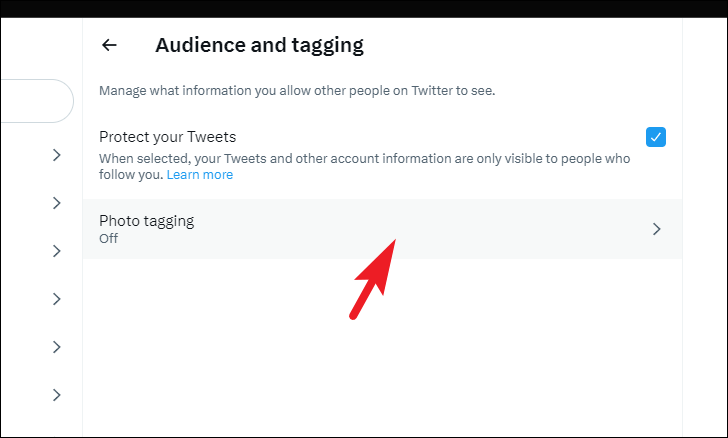
If don’t want people whom you do not follow to be able to tag you in a picture, select ‘Photo tagging’ to continue.
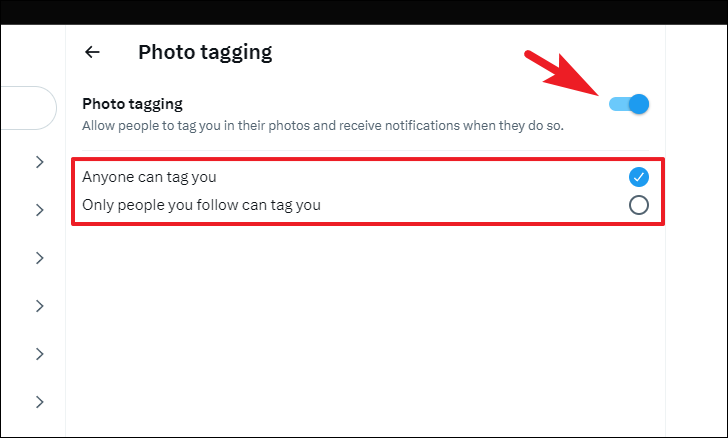
Then, select the ‘Only people you follow can tag you’ option. In case you do not wish to allow photo tagging at all, turn off the toggle following the ‘Photo tagging’ field.
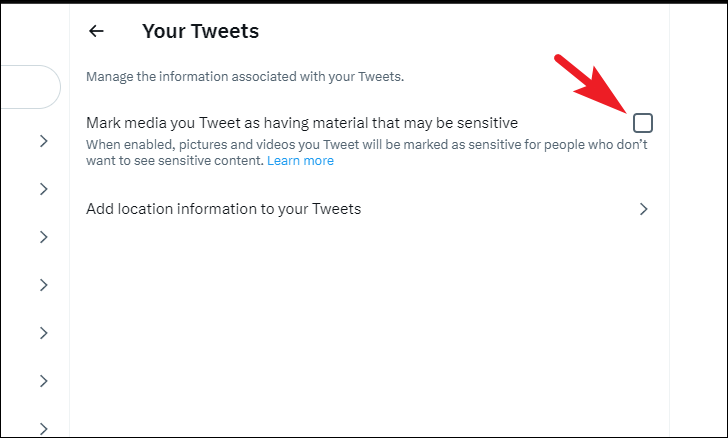
Next, if you wish to mark your tweets and photos as sensitive, click on the ‘Your Tweets’ tile.

Then, select the ‘Mark media you Tweet as having material that may be sensitive’ option.
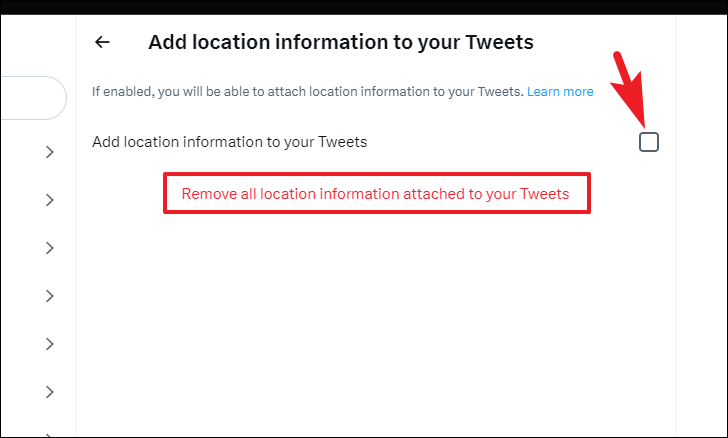
If you wish to add location information to your tweets or remove it from existing tweets, click on the ‘add location information to your Tweets’ to continue.

Then, to add it, click on the checkbox following the ‘Add location information to your Tweets’. To remove the location information from all existing tweets, click on the ‘Remove all location information attached to your tweets’ option.
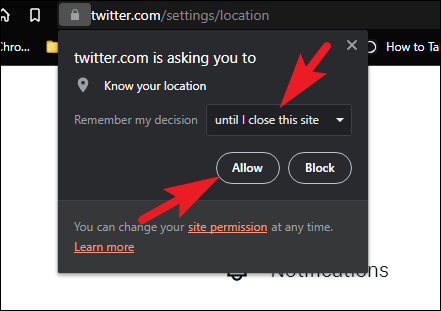
If you are on a browser, you might receive a pop-up to allow location access to the website. Choose the duration using the dropdown menu and click on the ‘Allow’ button. If you are on a mobile device you might receive a pop-up for the same.
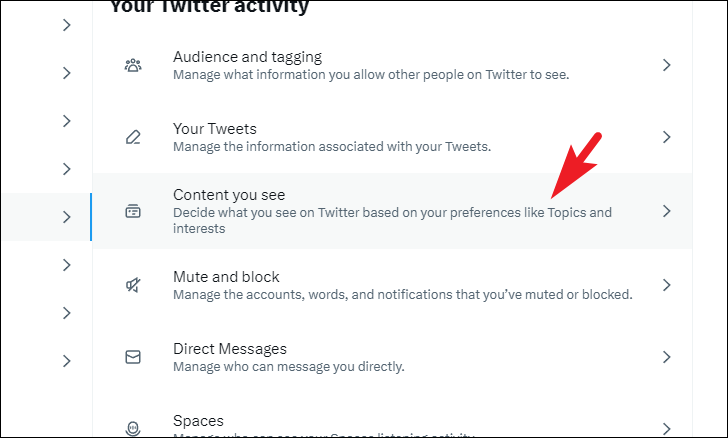
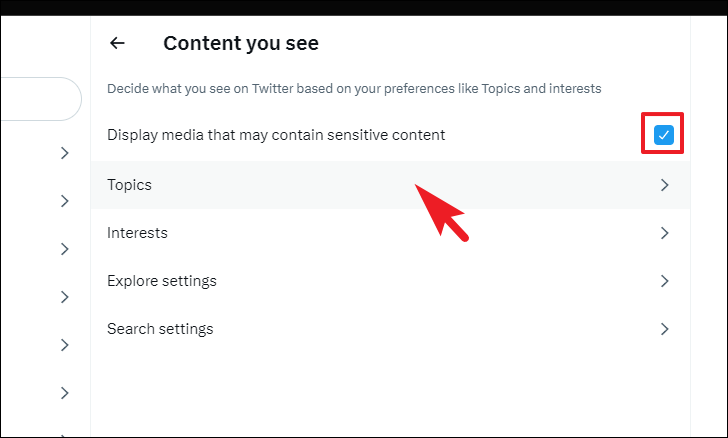
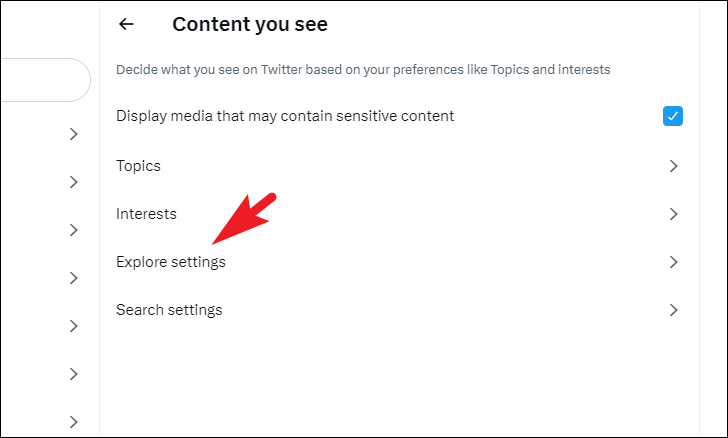
To change topics, interests, and search settings, click on the ‘Content you see’ tile.
On the next screen, if you wish to see sensitive content without being notified of it first in your feed, click on the checkbox following the ‘Display media that may contain sensitive media’ option. To manage topics, click on the ‘Topics’ tile to continue.
After that, you will be able to see your currently followed topics. You can select more topics by clicking on the individual tile. If you wish to find more topics, click on the ‘More topics’ button.
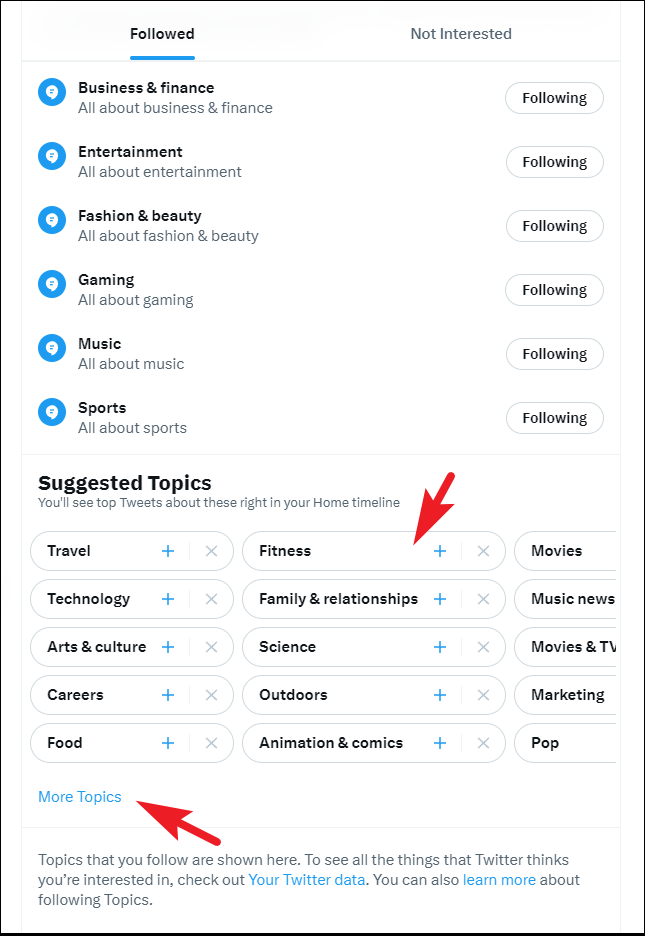
To unfollow a topic, click on the individual ‘Following’ button for each topic. It will change to ‘Unfollow’ as you hover over it; click on it to unfollow. You can also head to the ‘Not Interested’ section to see the list of topics you have marked as not interested.

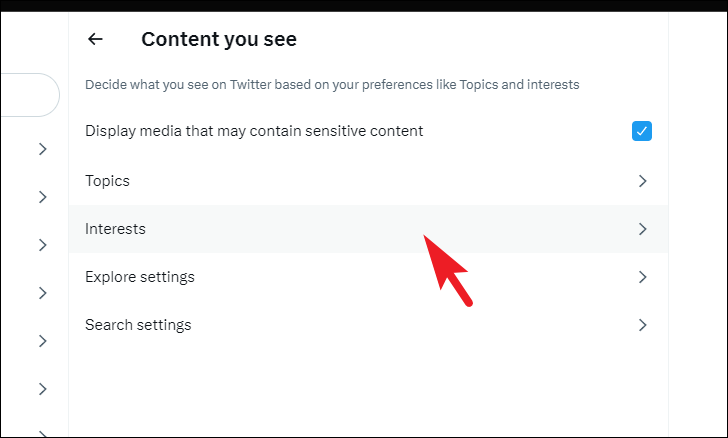
To adjust your account interests, click on the ‘Interests’ tile from the ‘Content you see’ screen.
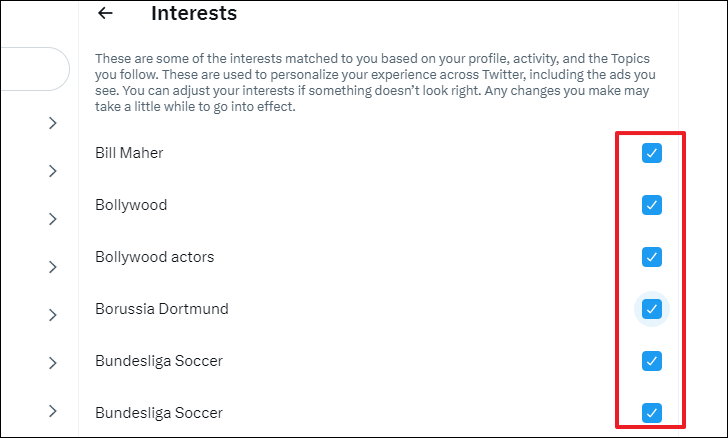
After that, you will be able to see all the interests you had manually selected at the time of account creation along with the topics Twitter automatically added based on your profile and activity. The interests shown on the page also impact the adverts delivered to you across the website.
To deselect, click on the checkbox following the individual option. You can deselect as many as you wish to. However, do note as per Twitter, it may take a while to reflect the changes on your account/feed.
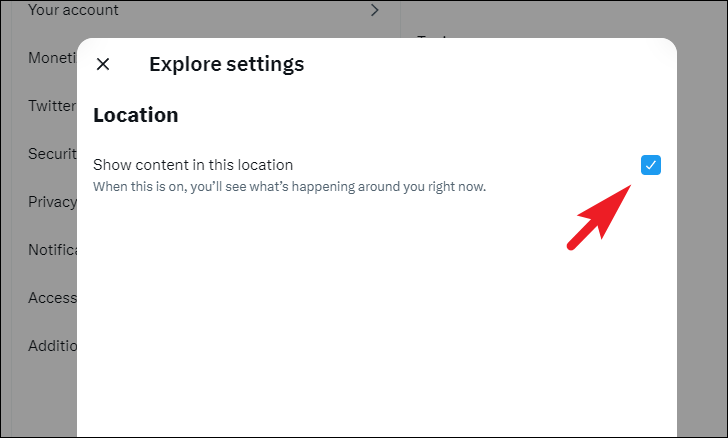
Twitter also displays content depending on your location. If you wish to turn off this setting, click on the ‘Explore settings’ tile. This will bring an overlay window to your screen.
From the overlay window, uncheck the ‘Show content in this location’ option.
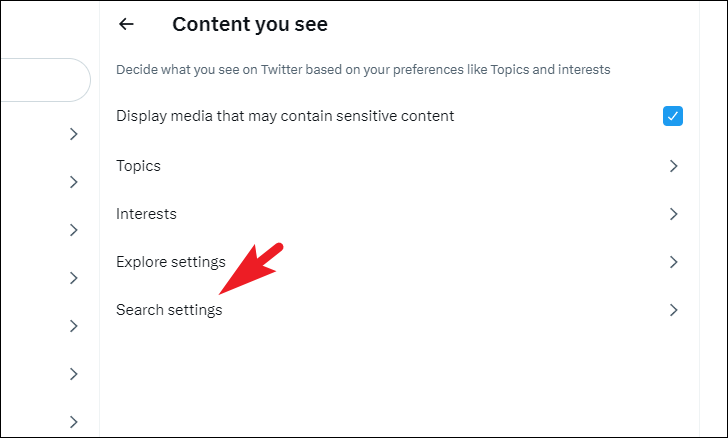
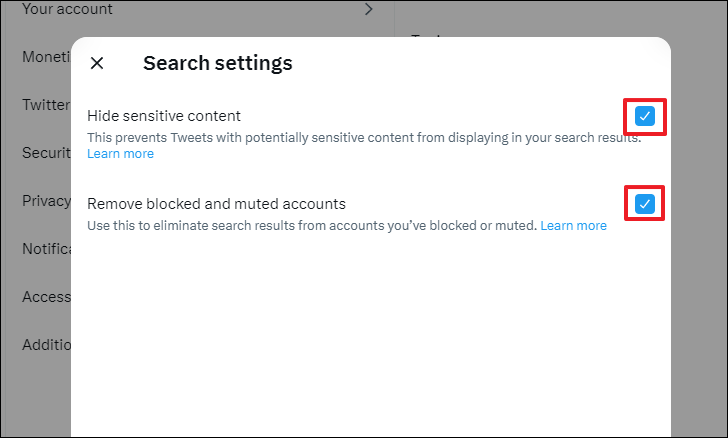
To include sensitive content and/or content from the blocked/muted account(s) in the search, click on the ‘Search settings’ tile. This will bring an overlay window to your screen.
On the overlay window, uncheck the ‘Hide sensitive content’ option. Next, to see search results from blocked/muted account(s), uncheck the ‘Remove blocked and muted accounts’ option.
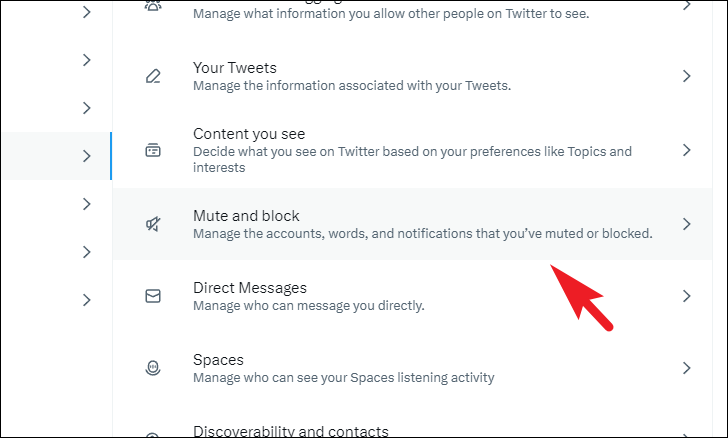
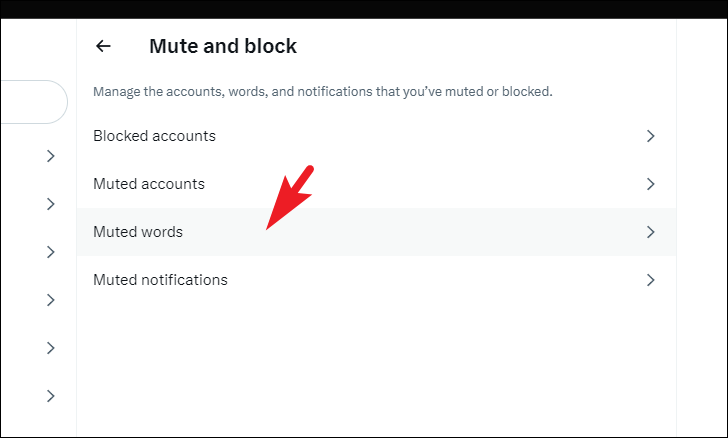
To manage the accounts you have muted and blocked, click on the ‘Mute and block’ tile.
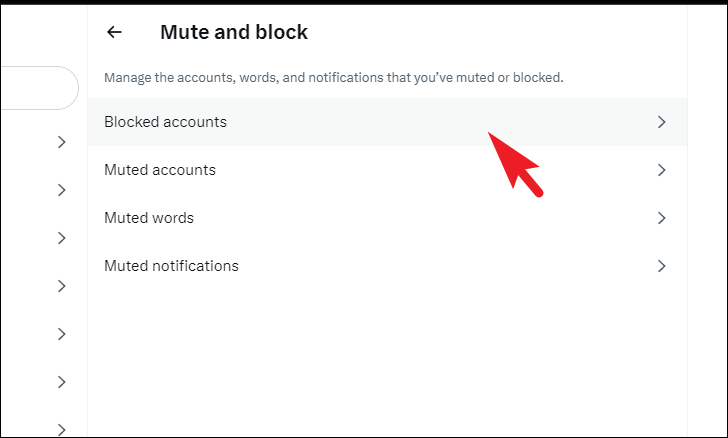
To unblock any account, click on the ‘Blocked accounts’ tile to proceed.
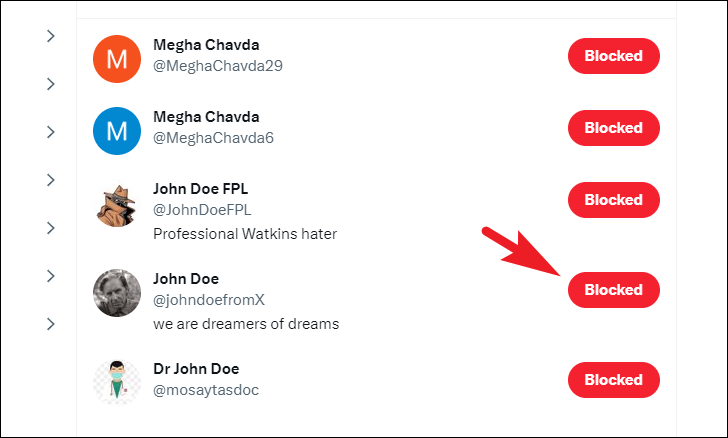
Then, click on the ‘Blocked’ button following the account you wish to unblock. Once unlocked, you will receive a toast notification at the bottom of the screen saying the account has been successfully unblocked.
You can also head to the ‘Imported’ section to see all the blocked accounts that you may have imported from your previous Twitter account.
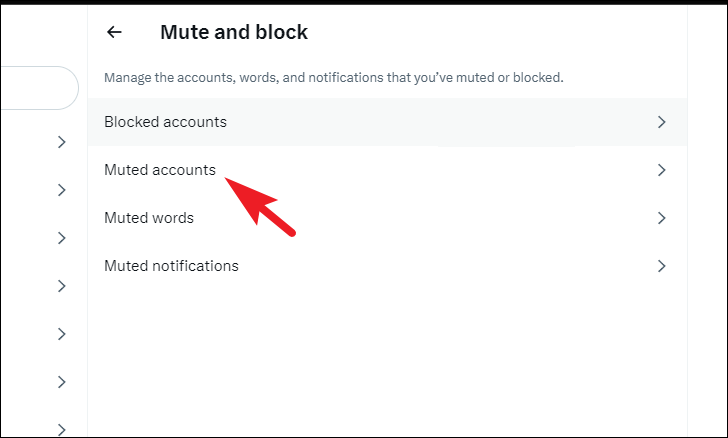
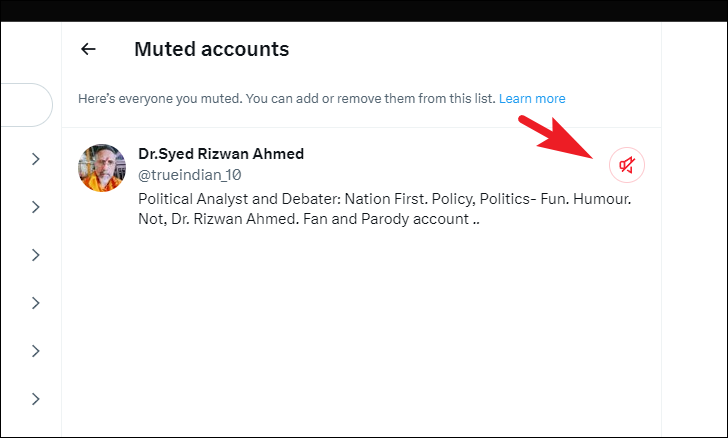
To unmute accounts, click on the ‘Muted accounts’ section.
On the next page, click on the ‘unmute’ button following every account listing. Once unmuted, you will be able to see their posts and activity in the feed once again.
Twitter also allows you to mute words. Once you add a word to your mute list, you will not receive notifications, tweets, or see them in your feed that includes the word(s).
To mute a word, click on the ‘Muted words’ tile to proceed.
After that, click on the ‘+’ icon in the top right corner. This will bring an overlay window to your screen.

Next, enter the word or phrase that you wish to mute. Please note the word/phrase you enter will also mute its hashtag. Next, choose if you only wish to disable the notification or if you do not wish to see it on your timeline as well. Uncheck the ‘Home timeline’ option if you only wish to disable notifications for it.
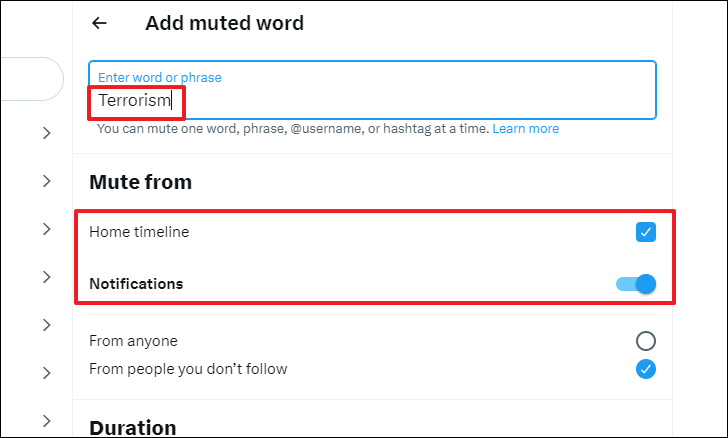
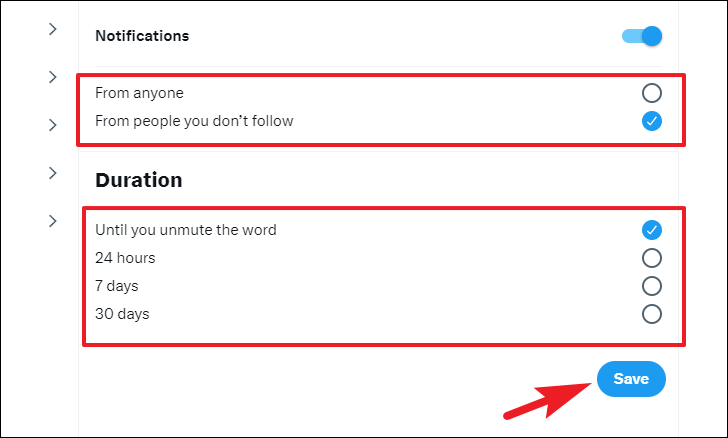
After that, choose the audience. The options are pretty self-explanatory; you can either choose to mute tweets/notifications from everyone or only from people you do not follow on Twitter. To choose, click on the option you deem fit. Also, select a duration for the muted words, you can either choose to disable the muted words automatically or you can do so manually. Choose the option suitable for you and then finally click on the ‘Save’ button.
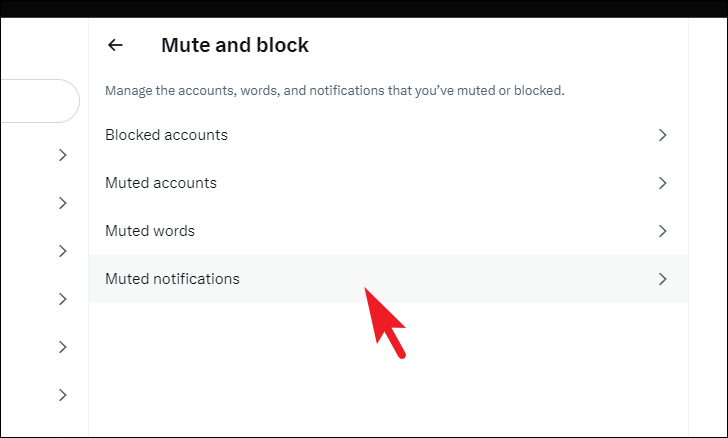
Just like words you can also mute notifications. Moreover, Twitter allows you granular control over whose notifications you can mute.
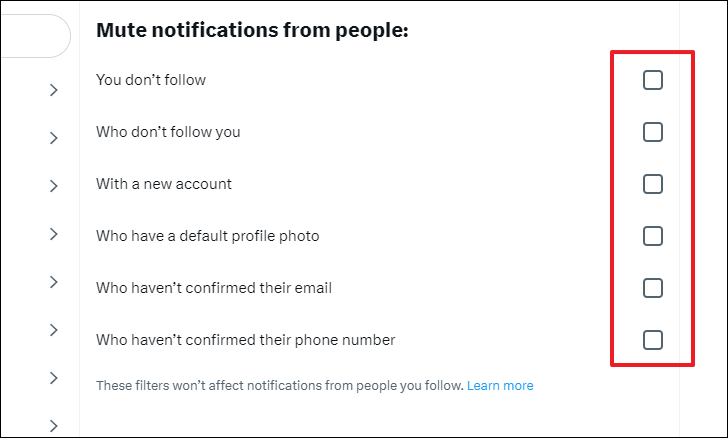
To mute notifications, click on the ‘Muted notifications’ tile to proceed.
After that, click on the individual checkbox following the option to select it. You can select multiple options. Also, do note that these filters will not impact notifications from people that you already follow.
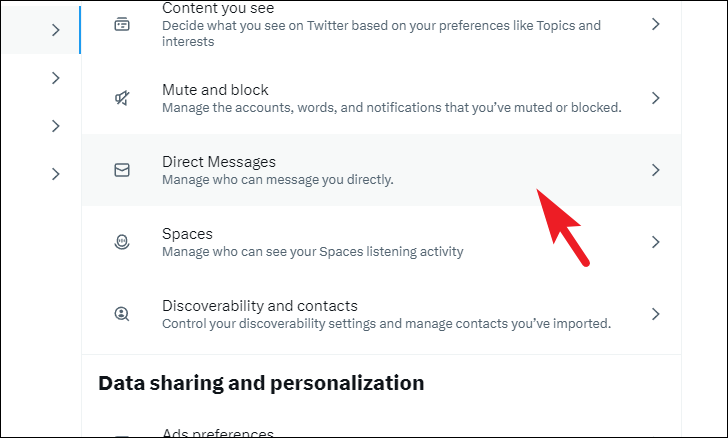
To manage settings regarding Direct Messages, click on the ‘Direct Messages’ tile from the ‘Privacy and safety’ screen.
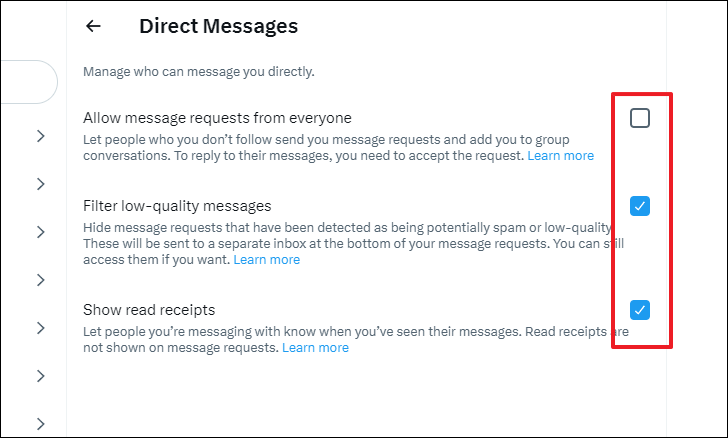
If you wish to allow message requests from everyone, click on the checkbox following the respective option. By default, Twitter filters low-quality messages that are likely to be spam. If you wish to disable the filter, uncheck the ‘Filter low-quality messages. Similarly, read receipts are turned on by default. To disable them, uncheck the ‘Show read receipts’ option.
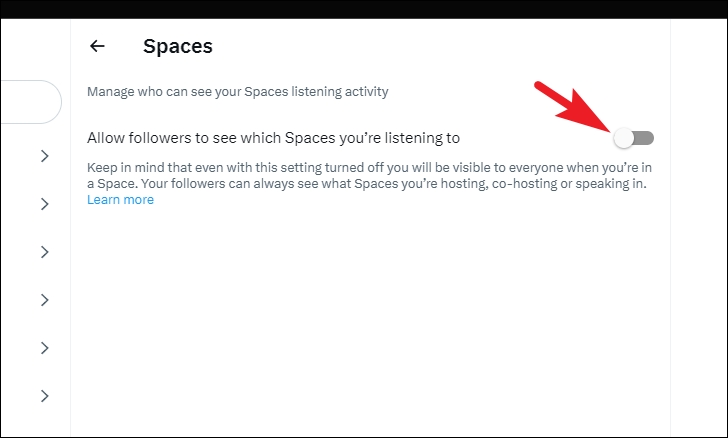
Twitter allows your followers to know what spaces are you listening to. However, you can disable it if you wish to.
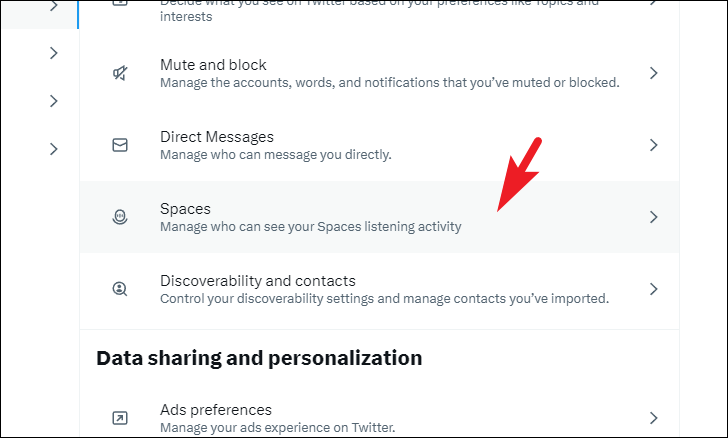
To disallow followers to see which spaces you are listening to, click on the ‘Spaces’ tile to proceed.
After that, toggle the switch off following the ‘Allow followers to see which Space you are listening to’ option. Please note, even when this is turned off, followers will be able to see when you are in Space, hosting, co-hosting, or speaking in one.
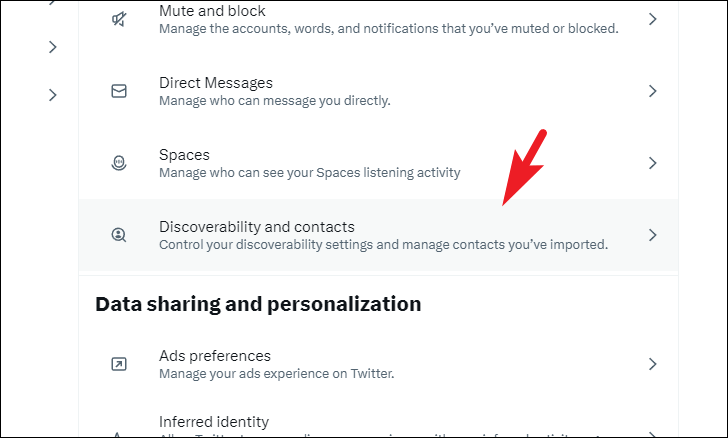
To manage your discoverability on Twitter, click on the ‘Discoverability and contacts’ tile to proceed.
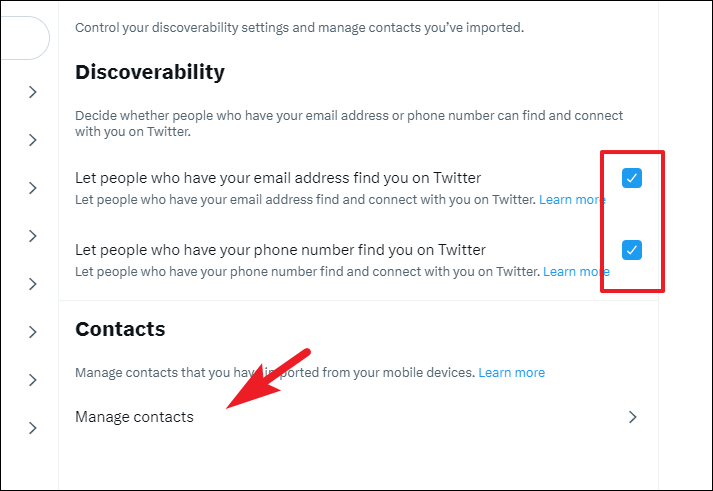
If you do not want to allow people who have your email address and phone number to let you find on Twitter, uncheck both options individually. You can also remove or deselect contacts by clicking on the ‘Manage contacts’ tile.
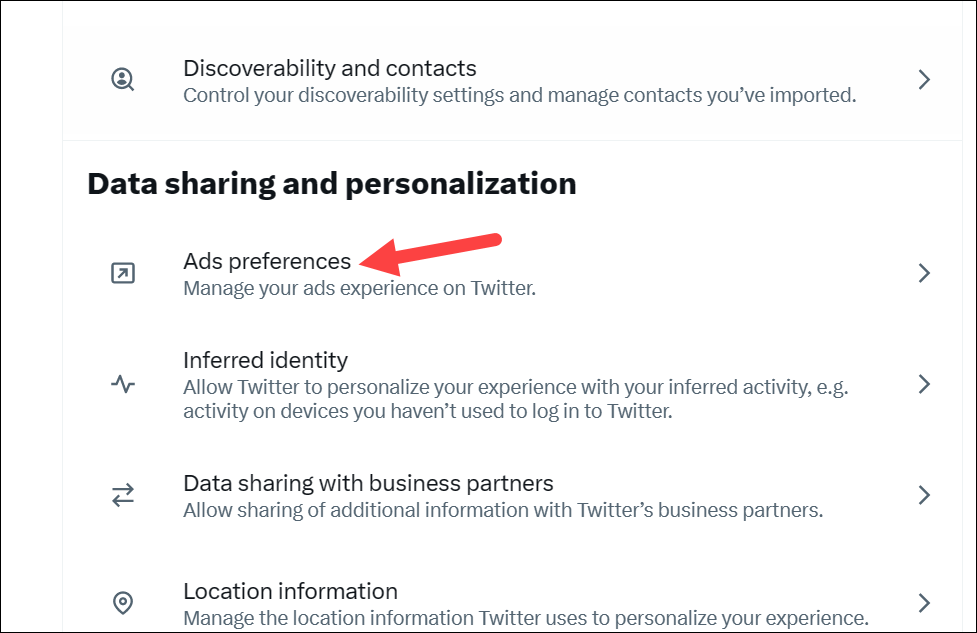
Data Sharing and Personalization Settings
By default, Twitter displays personalized adverts to you; however, you can further personalize ads by sharing your online activity, on and off Twitter, with advertisers. Please note this will track your activity on other websites as well. Hence, only toggle it on if you are not heavy on privacy.
To share your complete online activity with Twitter advertisers, click on the ‘Ads preferences’ tile in the Privacy and Settings menu to proceed.
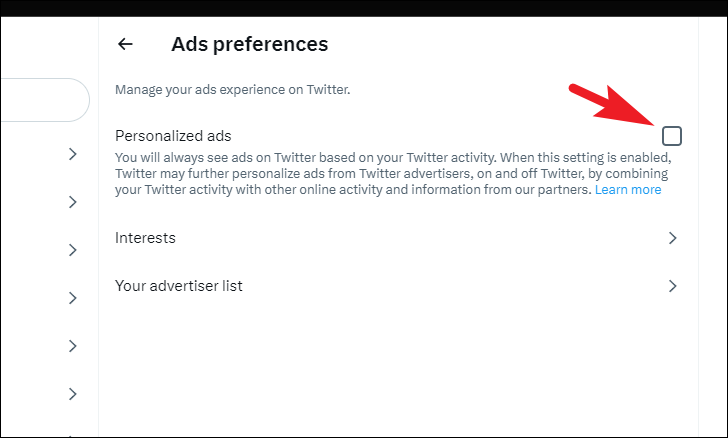
Then, check the option for ‘Personalized ads’.
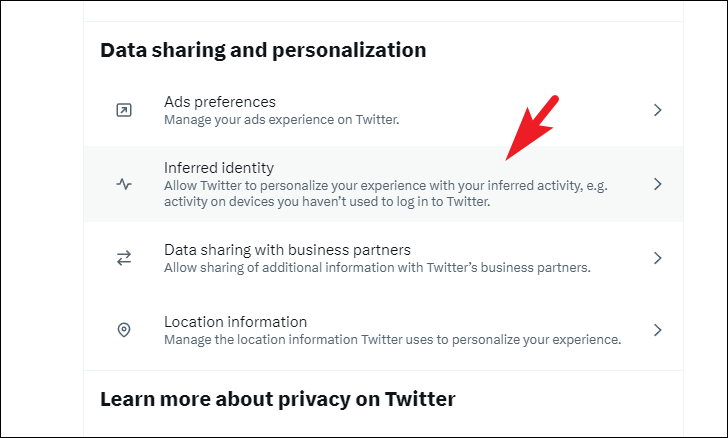
Twitter always uses the information and devices you use to log in to personalize your experience. However, when ‘Inferred identity’ setting is enabled, Twitter will use inferences like devices similar to yours (which you haven’t used to log in), contact information similar to yours, and browsers other than what you use to further personalize your experience.
To toggle on Inferred identity setting, click on the ‘Inferred identity’ tile to proceed.
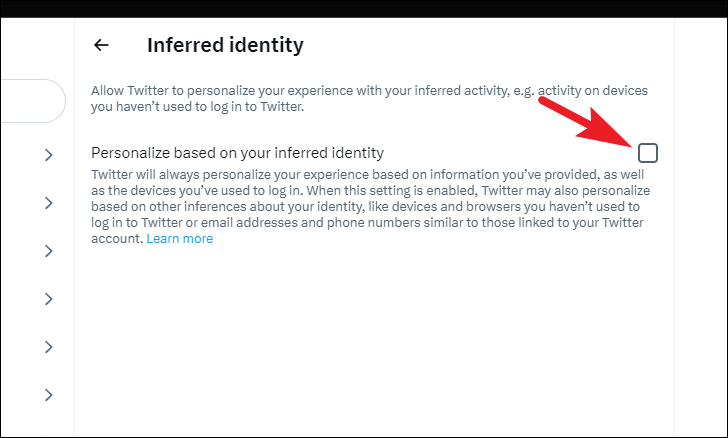
Next, click on the checkbox to turn the setting on.
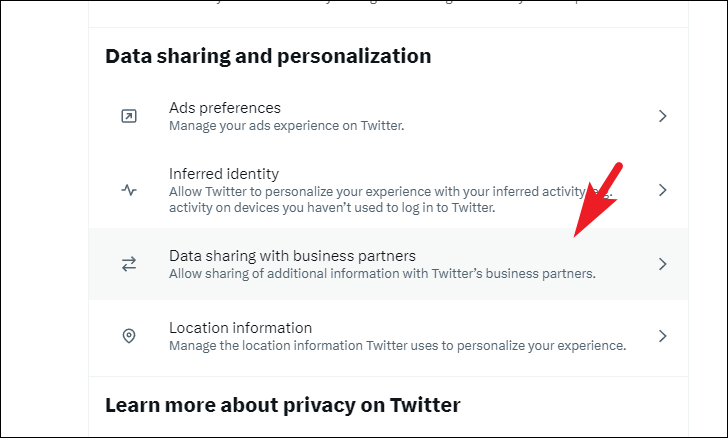
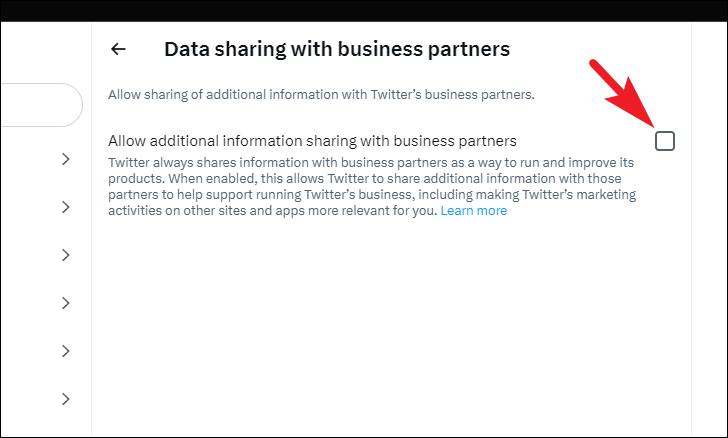
By default, Twitter also shares information with its business partners to better the experience for you. However, you can also opt-in for sharing additional data about your account to better the usability of the website. This may include your usage statistics, your activity on the Internet, your browser information, and much more.
If you wish to turn on additional data sharing, click on the ‘Data Sharing with business partners’ tile.
On the next screen, click on the checkbox to enable the setting.
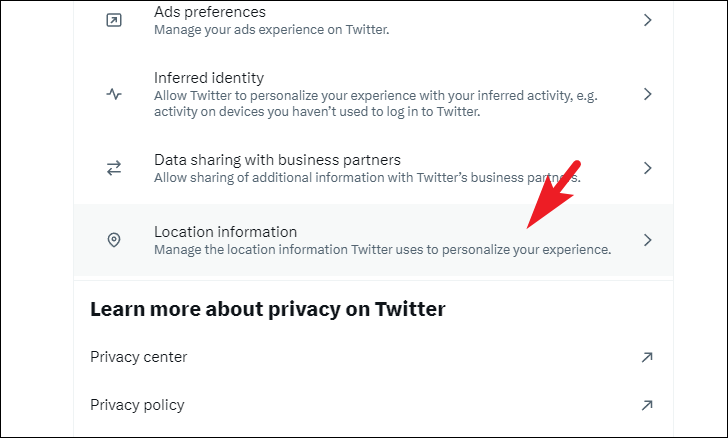
To show you more relevant content on your feed, Twitter always uses location information. By default, it will capture all the locations of devices that you use to sign in or access the app/website and show you local content that is relevant to you. That being said, if you do not wish to see content based on your location, you can turn this setting off.
To turn off location-based content, click on the ‘Location information’ tile to proceed.
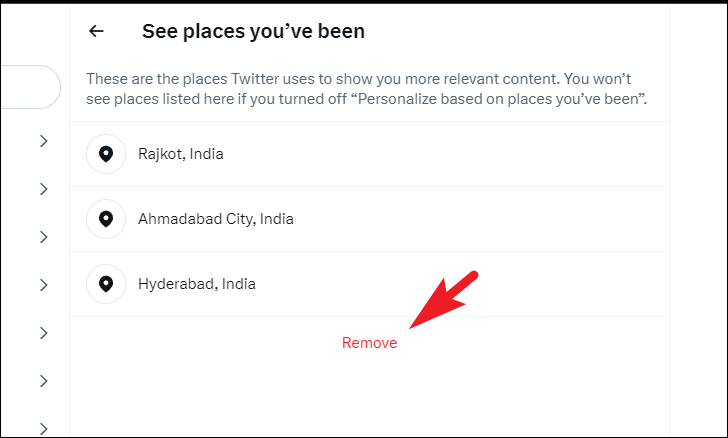
Then, click on the checkbox following the ‘Personalize based on the places you’ve been’ option. In case you want to manage your location history on Twitter, click on the ‘See places you have been’ tile.
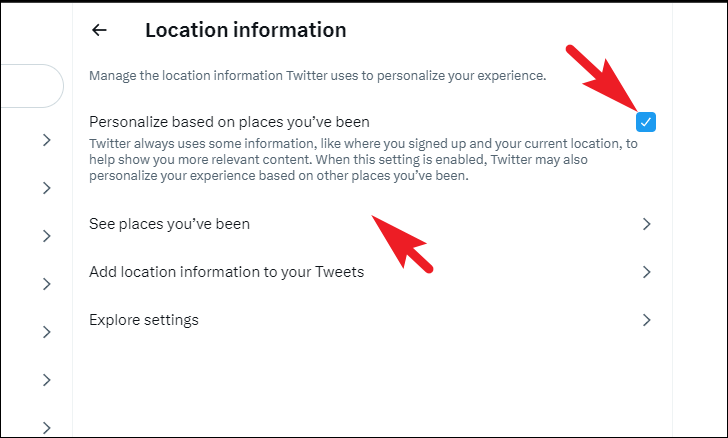
After that, you will see the list of all places you have used Twitter from. To delete the history, click on the ‘Remove’ button.
There you go, people. Using this guide, you will be a pro at managing your privacy and safety settings on Twitter.


