
Twitch is a streaming service that has live video game streaming as its cornerstone function, but anyone can stream anything on Twitch. Users can broadcast content on crafts, sketching, comedy, music, talks, educational lessons, and just about anything in a person’s professional or leisure routine. Everything is streamable in real-time on Twitch.
Apart from just streaming, Twitch also allows viewers to create clips of the streams they’re watching. This is a great feature, especially for live gaming streams. Viewers can cut a part of the entire stream, publish it, and help gain viewers for the streamer or simply share a link to the clip.
In this guide, we’ll cover how you can create clips of your favorite streams on the desktop and mobile Twitch applications. Read on!
About Twitch Clips
When you hit the ‘Clip’ button to create a clip on Twitch, you’re essentially recording the last few seconds of the live stream in real-time. The duration of this clip differs on the mobile and desktop app. On the mobile app, the default duration of the recorded clip is 30 seconds. Whereas, on the desktop application, it is 90 seconds.
The ‘Clip’ button and the function to clip a stream are visible and available only when the stream is playing. You cannot see the button when you pause a stream.
On desktop. The 90-second clip can be clipped to a minimum of 30 seconds and a maximum of 60 seconds. You cannot exceed a minute of the clip or use the entire 90-second clip while publishing. Trimming is mandatory here.
On mobile. You can directly publish the 30-second clip or share a link to the same without trimming the clip. However, you can trim the clip and then publish/share it too. Trimming is not mandatory.
Creating Clips on Twitch Mobile App
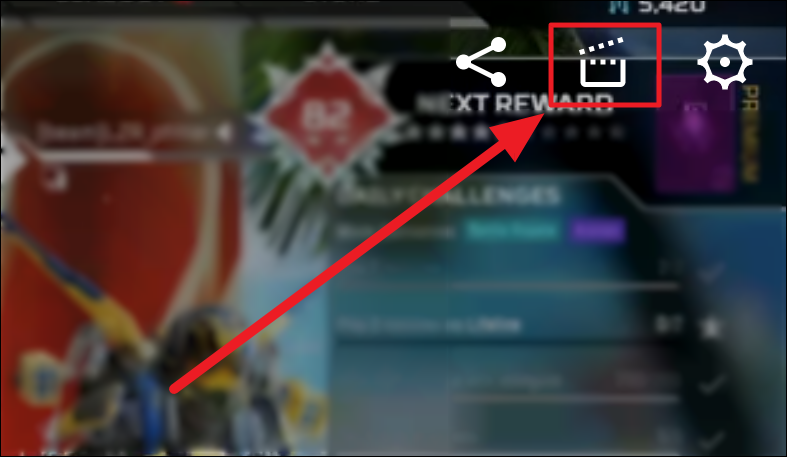
Open a stream on Twitch and tap the video so you can see the ‘Pause’ button. You can see the streamer’s details as well if you’re using in the landscape mode. Now, tap the ‘Clip’ button shown with a clapper board icon to the top right of the live stream.
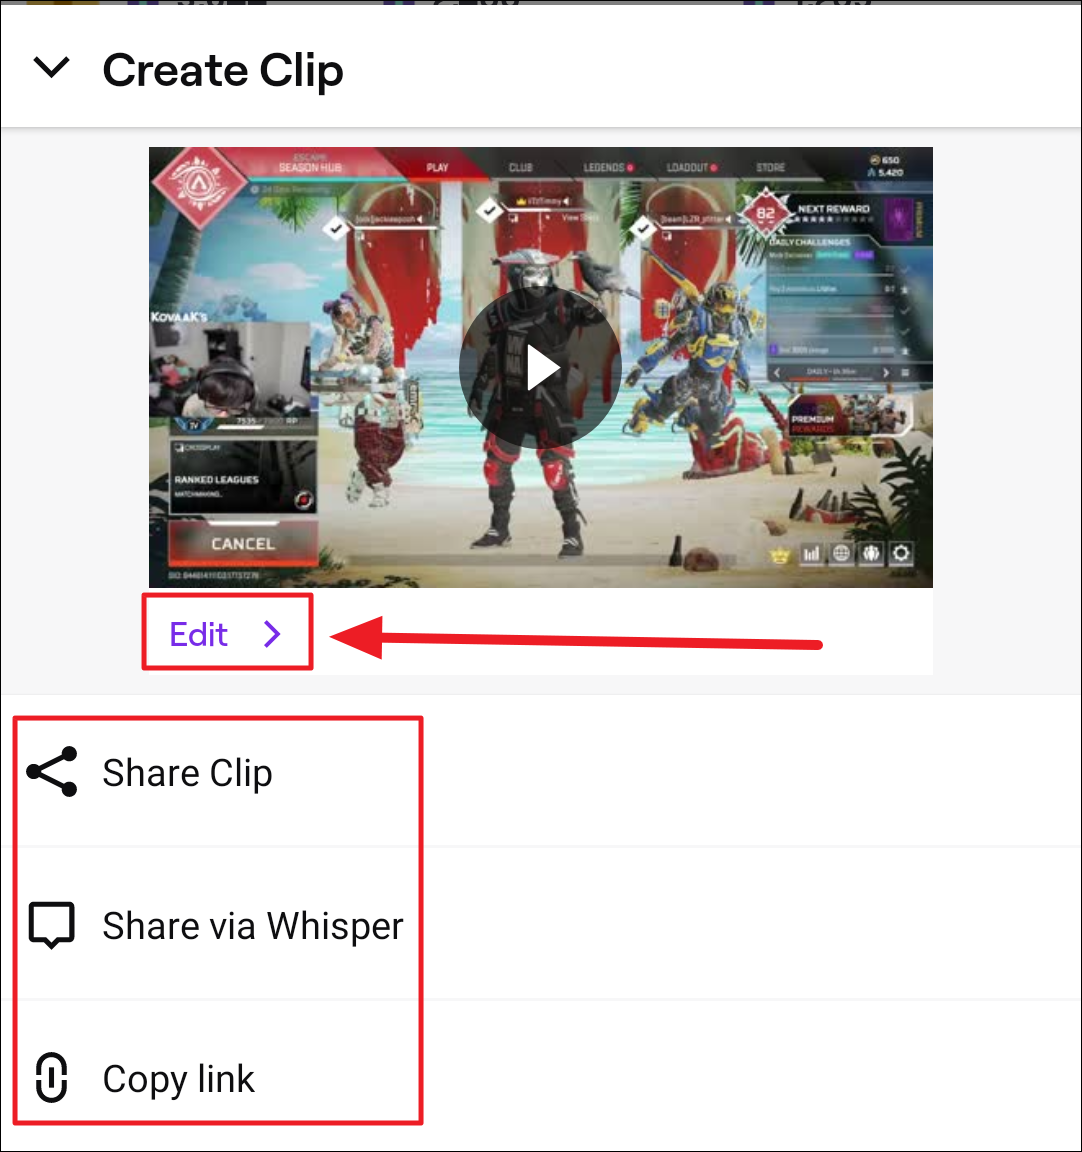
You will see a ‘Create Clip’ dialog box. The clip will take a few seconds to generate. Click the ‘Edit’ option below the clip to edit it. If your clip needs no trimming or edits, you can directly share it by tapping the ‘Share clip’ option. This will open your sharing options along with a ‘Copy’ button to copy the link to the clip.
However, you can also directly copy the link to your clip by tapping the ‘Copy link’ option from the ‘Create Clip’ menu. If you want to send the clip as a private message, tap the ‘Share via Whisper’ option. ‘Whispers’ are essentially direct messages (DMs) on Twitch.
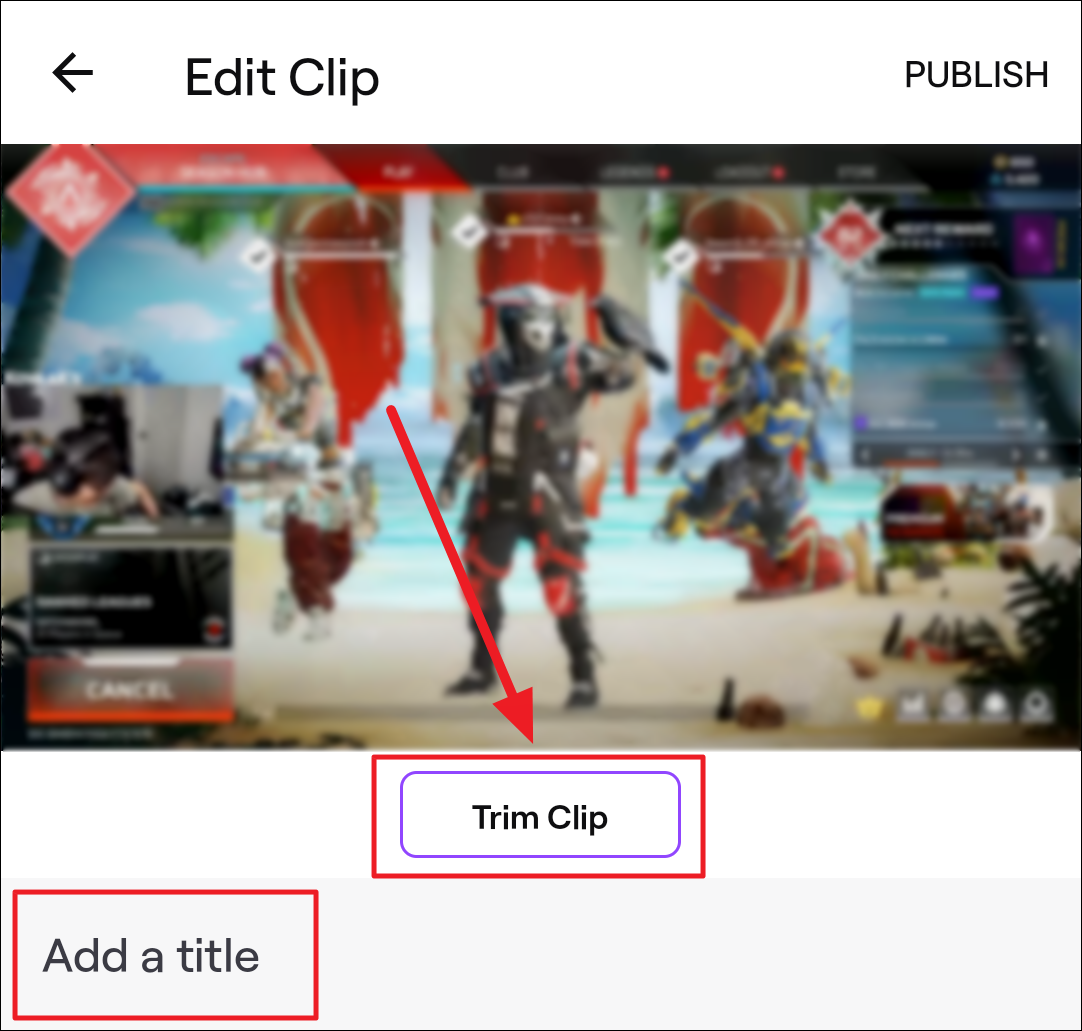
If you chose ‘Edit’, tap ‘Trim’ on the next screen to trim your clip. Tap the ‘Add a title’ text field and to add a title for your clip. Titles are compulsory for all clips.
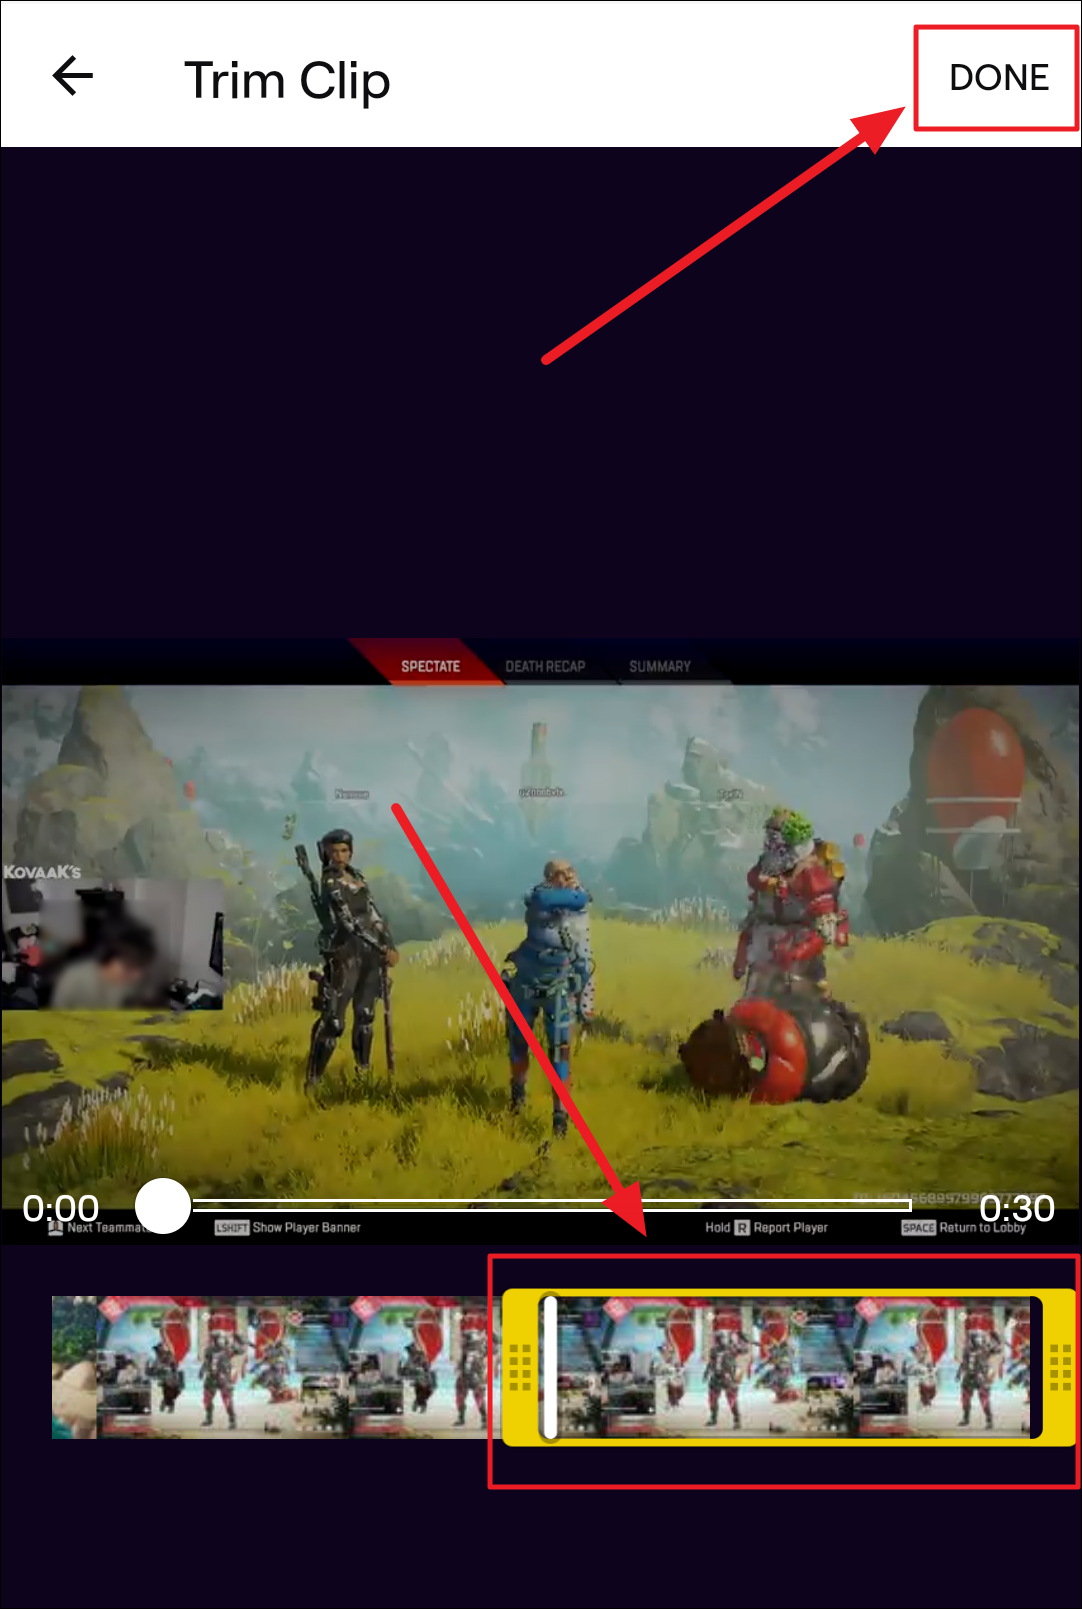
Tap and move the vertical yellow slider below the clip to position it to contain the clip you want. You can also tap the dotted sides of the slider to increase or decrease the width of the slider — which reflects on the duration of the trimmed clip.
If you cannot move the slider to a particular part in the video, move the video stream to position the clipping portion into the slider’s width. Once you’re done, hit the ‘DONE’ button to the top right corner of the screen.
You’ll return to the same ‘Edit Clip’ screen. Add a title if you haven’t already. You can also edit the title now. Tap the ‘Publish’ button to the top right corner of the screen to publish your clip.

Your clip is now published.
Creating Clips on the Twitch Desktop App
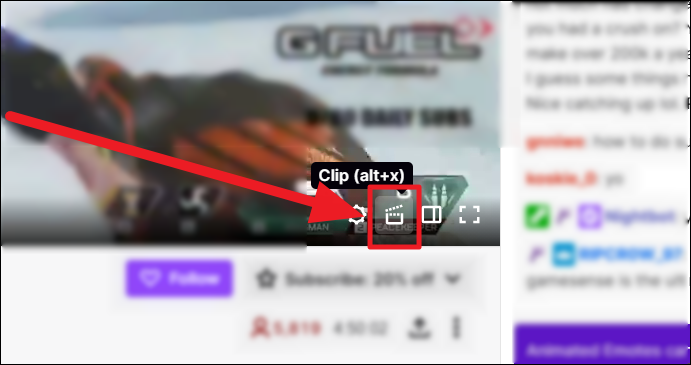
Launch Twitch on your computer and open the live stream you’d like to clip. Now, click the same clapper board icon — the ‘Clip’ button to the bottom right corner of the stream.
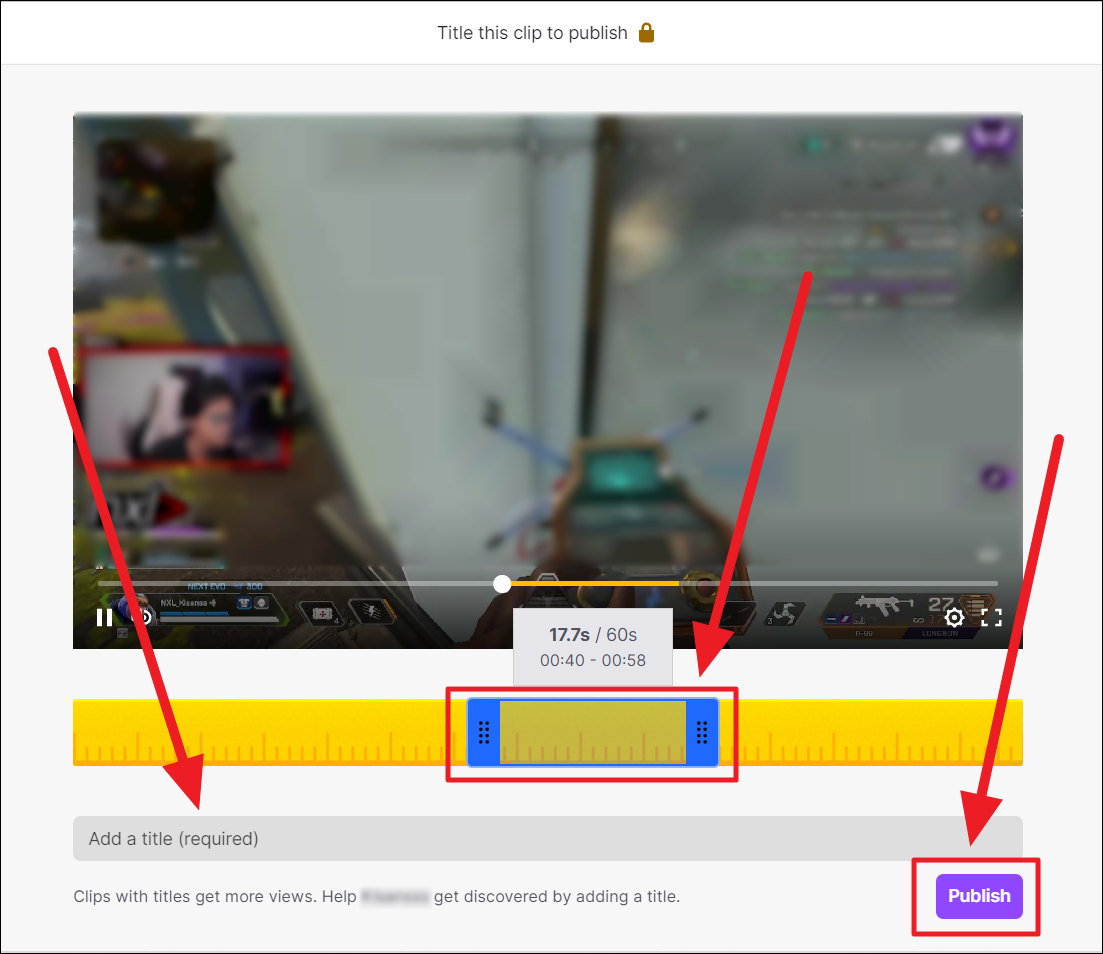
You will redirect to your browser. On the clips.twitch.tv/create page, trim your clip by moving the blue vertical slider through the yellow scale. Place the slider on the part that contains the live stream you want to clip. Drag the dotted section on the sides of the blue slider to increase/decrease the length (duration) of the clip.
Once that’s in place, title your clip. Twitch makes clip titling mandatory – this helps the original streamer gain views. Plus, clips with relevant titles naturally get more views than clips with random titles. When you’re done, hit the ‘Publish’ button to publish your clip.
Your clip will now process to publish. Give it a couple of seconds. Once your clip is published, you will see details of your live stream clip with the name of the streamer, your Twitch username, and a ‘Follow’ button in case you want to follow the streamer whose live stream you clipped.
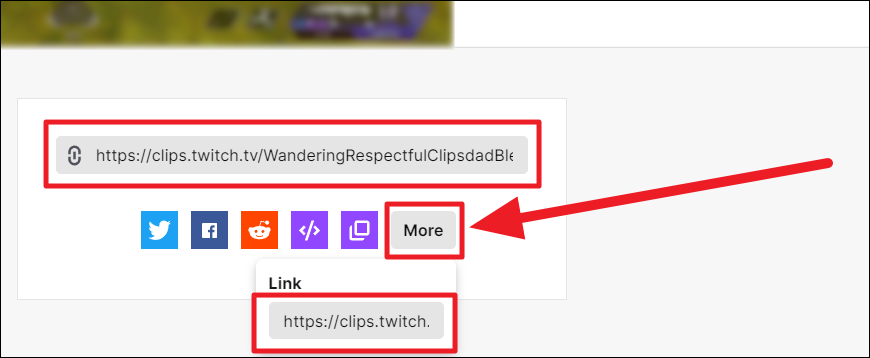
There are a couple of ways you can directly share the clip from this screen. Click the clip’s link with the ‘Link’ icon below the clipped video or hit the ‘Copy’ button with a two-slide icon to instantly copy the clip’s link to your clipboard. You can also click the ‘More button and then manually copy the link. Either way, the resulting link directs to the clip.
You can also share the link on social media platforms like Twitter, Facebook, and Reddit simply by clicking the respective icon(s). Click the ‘Embed’ icon to receive an embedding code that you can further integrate into any platform.
Where to Find Your Twitch Clips?
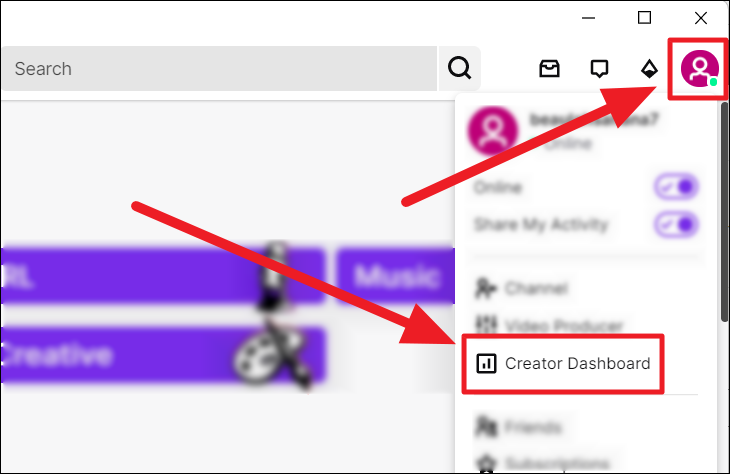
You can access your Twitch clips only on the desktop app. The mobile Twitch app shows the clips made of your live streams and not your clips of other streams — made by you. To find your clips, head onto the Twitch desktop app. Ensure the account on both devices match so you can see your mobile clips on the desktop app as well.
Click your user account button to the top right corner of the screen. Select the ‘Creator Dashboard’ option from the drop-down menu.
You will redirect to dashboard.twitch.tv on your browser. Here, click the hamburger icon (three vertical lines) to the top left corner of the screen. Then, click the ‘Content’ drop-down box.
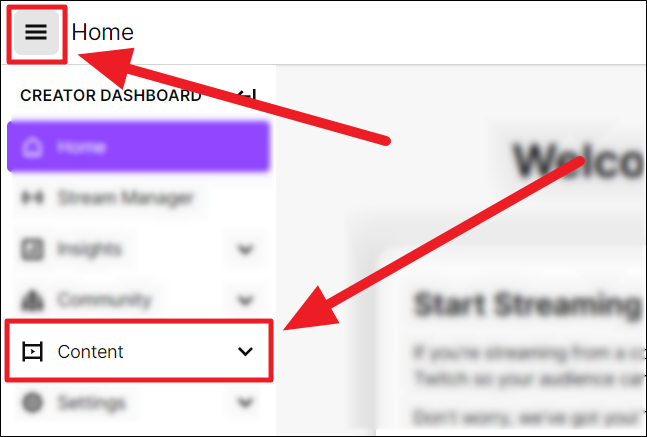
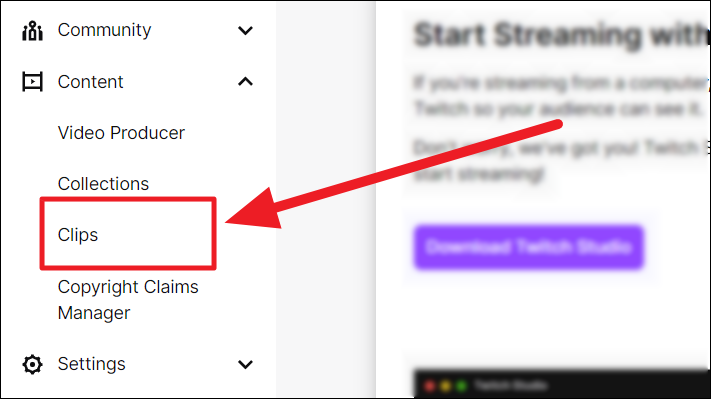
Select the ‘Clips’ option in the ‘Content’ drop-down.
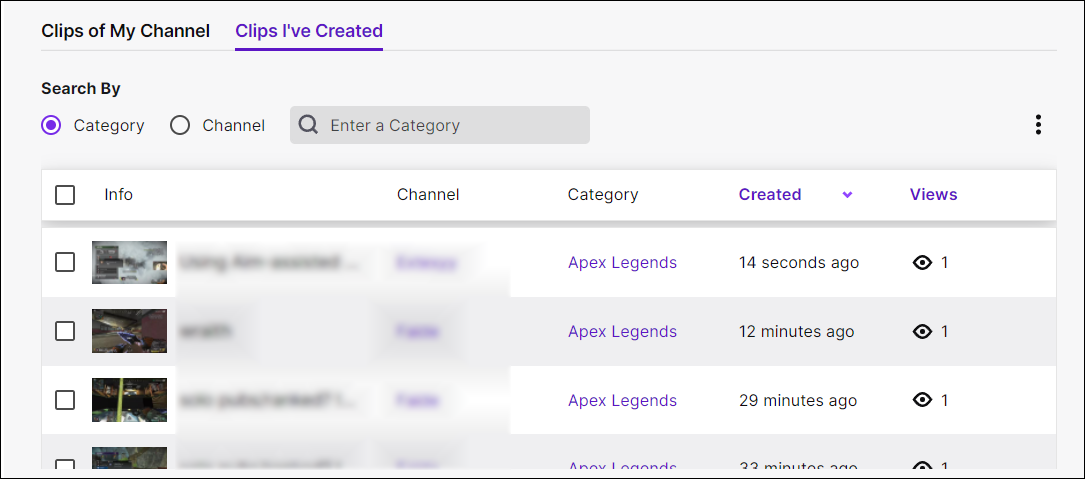
You will now see all your clips, strictly created by you. Most times you would land on the ‘Clips I’ve Created’ tab directly. In case you don’t, simply click this tab to view all the clips you have created.
A thumbnail image of the clip, the original channel and category of the clip, the data of clip creation, and the total views since the time of creation are this tab’s details.
Clips are recorded the moment you click/tap the ‘Clip’ button on any Twitch device. You needn’t publish a clip to see it in your Creator Dashboard.
Deleting Your Clips
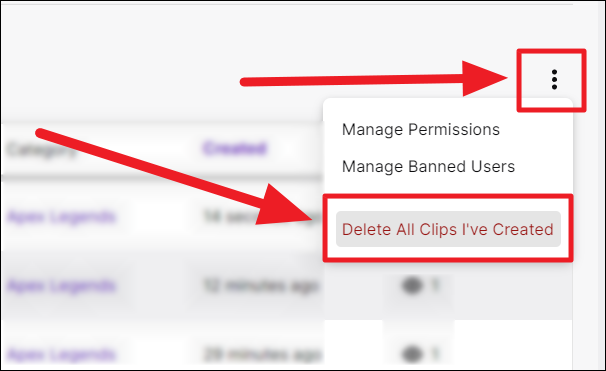
To delete all your clips at once, click the ellipsis icon (three vertical icons) to the top right corner of the list of clips. Select ‘Delete all clips I’ve created’ in the menu.
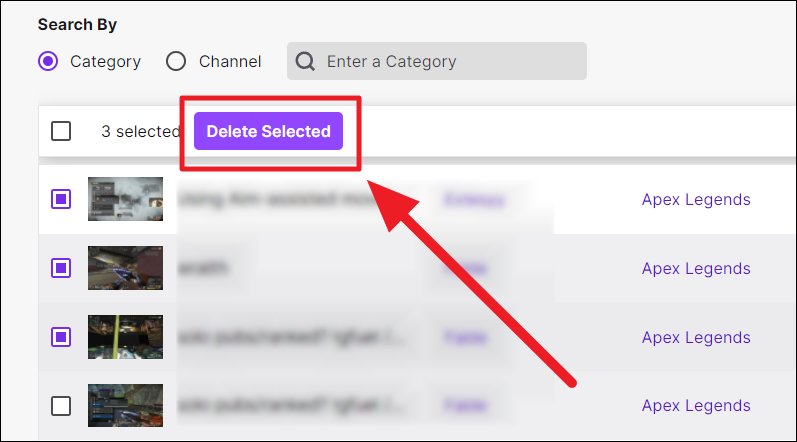
To individually delete clips, click the square radio button in front of the clip you want to delete and then click the ‘Delete Selected’ button that appears above the list.
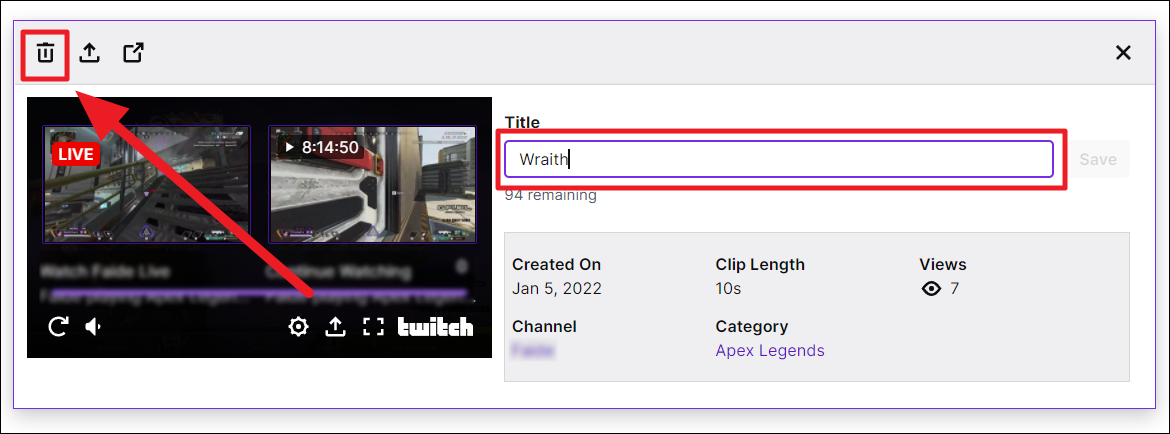
You can also click an individual clip to view its details and delete the clip from here as well. Click the ‘Delete’ button (trashcan icon) to the top left corner of the clip’s details to delete the individual clip. You can also change/edit the clip’s title here.
The button with an outward arrow icon next to the trashcan icon is the ‘Share’ button. Click this button to open your sharing options and further share the clip likewise. The next button with a pop-out icon allows you to watch the clip on the ‘Clips Page’.
It’s a breeze to create clips on Twitch once you get the hang of it. You can create clips on both the mobile and desktop apps but can view them only on the latter.
Just by clicking/tapping the ‘Clip’ button on either device, you’ll be recording the clip on your creator dashboard. However, these clips will hardly gain any views as they aren’t titled or published. Hope you found our guide useful!


