
Let’s assume you are working on a really long document that is dozen or even a hundred pages long like software documentation, project reports, contracts, or even your personal journal. And navigating through that document to edit or read can be extremely difficult.
So creating a table of contents in your document can make it easier for you to navigate and organize your document as well as get an overview of the document’s content. It is similar to the list of chapters at the beginning of a book.
A table of content is usually created at the head of the document that includes headings and subheadings in the document along with the page numbers of where they are located. In Microsoft Word, the table of content is a list of hyperlinks to section titles which allows you to go directly to a specific section of the document without having to scroll through the endless pages.
Let us learn how to insert a table of contents section in Microsoft Word as well as how to update and customize it.
Format Your Document for Table of Content
Before you insert a table of content (TOC) into your document, first, you need to prepare the document so that Word can recognize the section tiles and automatically generate the TOC and keep it updated after making changes to the document.
To be able to insert a table of contents, first, you need to format your headings and subheading with sequential heading styles, such as Heading 1, Heading 2, Heading 3, and so on. Navigate to each page of your document and apply heading levels that give context to your content.
For instance, the main headings in the document should be formatted with the Heading 1 (H1) style, the subheading under the main heading should be formatted with the Heading 2 (H2) style, and so on.
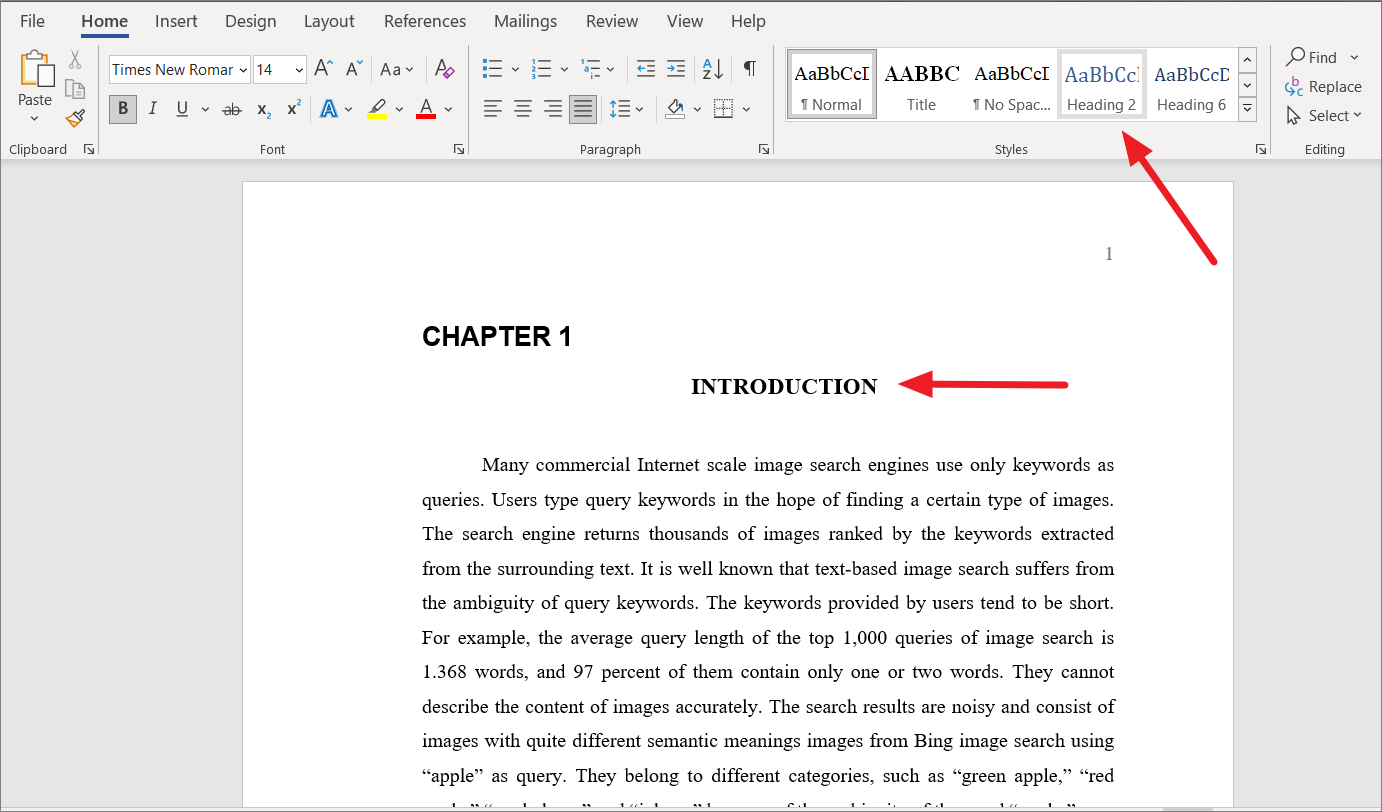
To apply a heading level to a heading or a title, place your cursor on the text of your headings. Then, go to the ‘Home’ tab and select the heading style you want to use from the box in the Styles section. Here, we are selecting the ‘Heading 1’ style for Chapter titles because they are the main section titles.

Then, apply the ‘Heading 2’ for secondary heading or titles. Here we are applying ‘Heading 2’ (H2) for the Introduction section below chapter 1. Keep applying heading styles in a similar fashion to all the headings you want to include in the contents.
You can also use the below shortcuts to apply the heading styles:
- Heading Style 1: Alt+Shift+1
- Heading Style 2: Alt+Shift+2
- Heading Style 3: Alt+Shift+3 and so on.
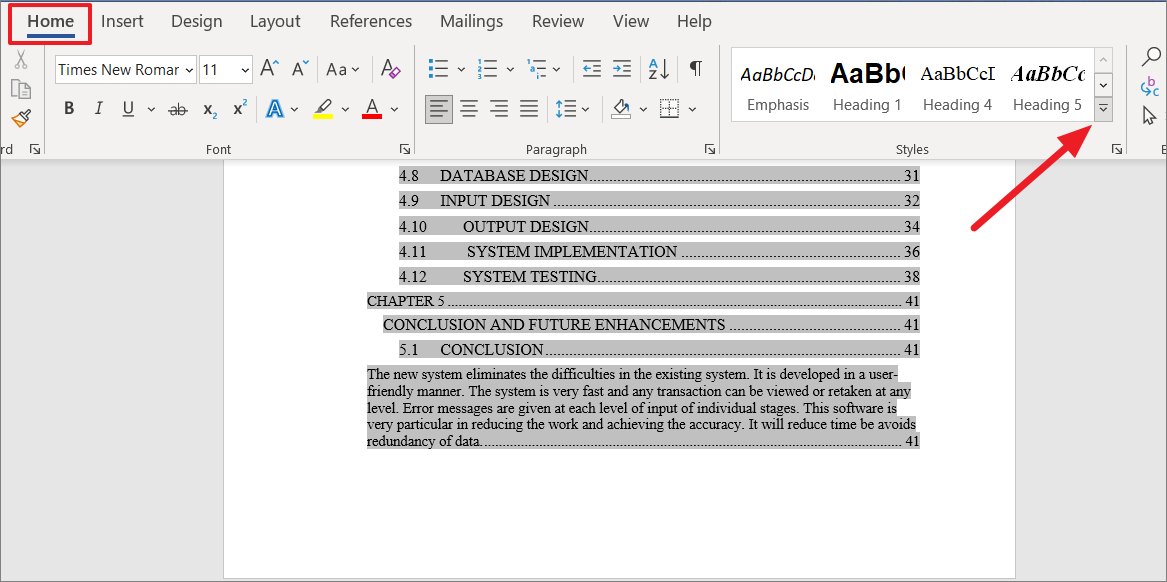
If you don’t like any of the built-in heading styles, you can create your own custom style. To create a new style for the heading, go to the ‘Home’ tab, and click the ‘More’ button on the bottom right corner of the box that contains styles options.
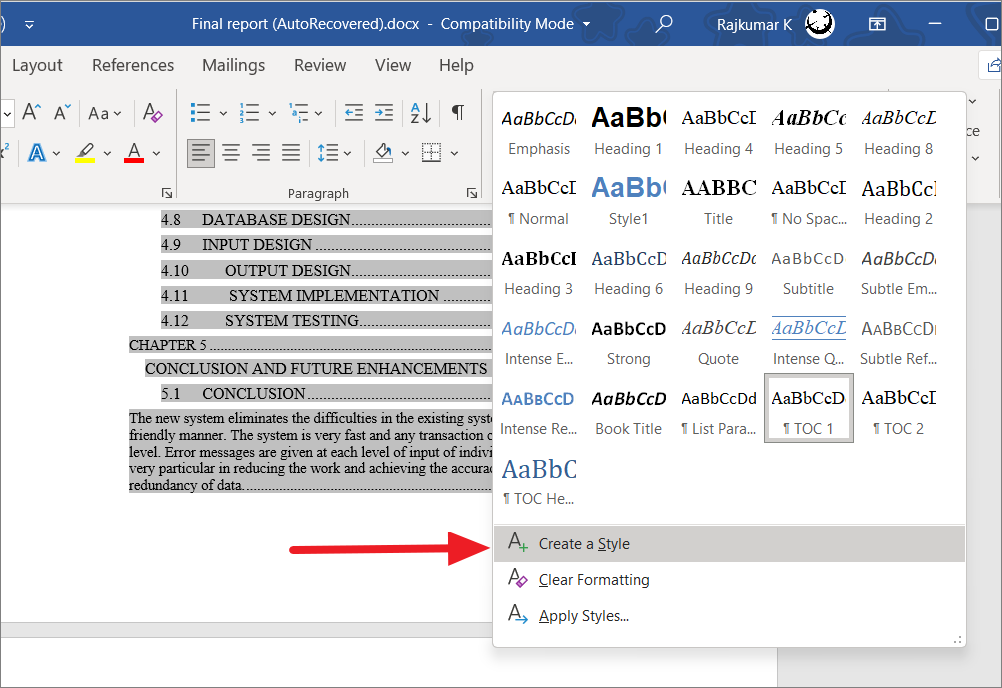
At the bottom of the Styles box, select the ‘Create a Style’ option.
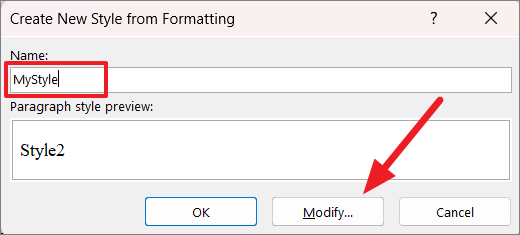
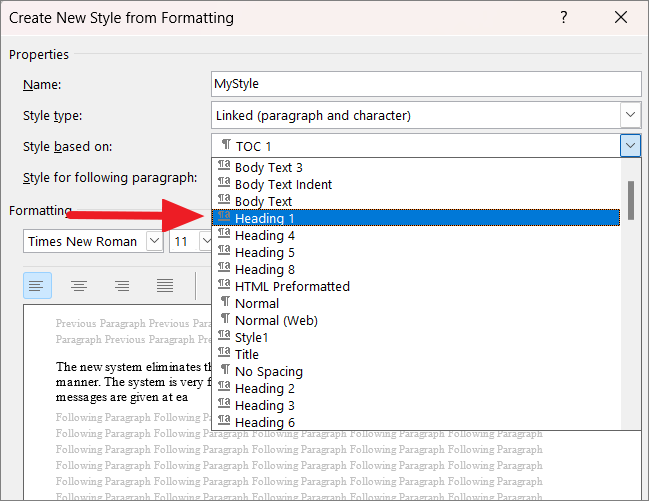
Give a name to the new style and click ‘Modify’ to change its formatting.
From the ‘Style based on’ drop-down menu, choose the heading level (e.g. Heading 1).
Then, you can change a few formatting options (font, font color, size, etc) to modify the text appearance. If you wish to add additional formatting to the style, click the ‘Format’ button.
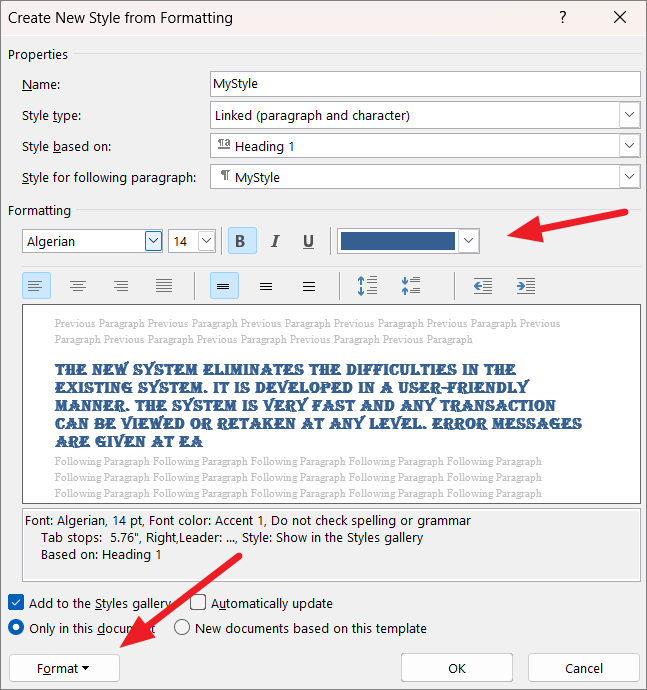
From the Format menu, you can change the format of the font, paragraph, tabs, borders, etc. After applying the formatting, click ‘OK’.
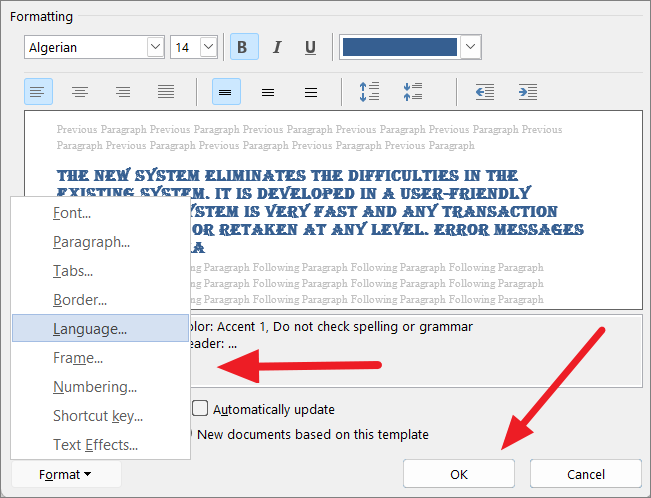
Then, click ‘OK’ in the Create New Style from Formatting dialog window to save the style.

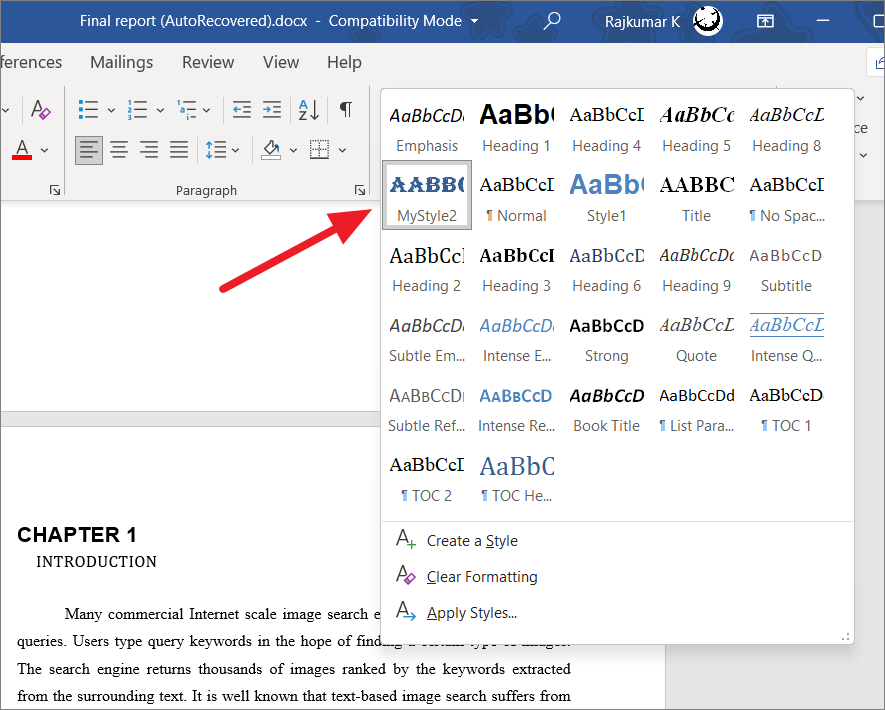
After saving the style, select the heading and choose your custom style from the ‘Styles’ options.
Creating the Table of Contents in Word
After formatting your document, now, it’s time to create the table of content. There are three ways you create a table of content:
- Automatic Table of Contents – Create it automatically using preset styles.
- Manual Table of Contents – Create it manually by typing the heading in the template of lists.
- Custom Table of Contents – Customize your own table of content by editing fonts, colors, structure, and level of headings.
A table of contents is usually created on a separate page at the beginning of the document. If page 1 of your document already has content, position the cursor in the first position of the document and press Ctr+Enter or Command+Enter (page break) to allocate an entire page of TOC.
To create a table of content, place your cursor where you want the table of contents to appear. Then, go to the ‘Reference’ tab, click the ‘Table of Contents’ button in the Table of Contents group. From the ‘Table of Contents’ menu, select one of the available built-in styles to insert TOC using that style.
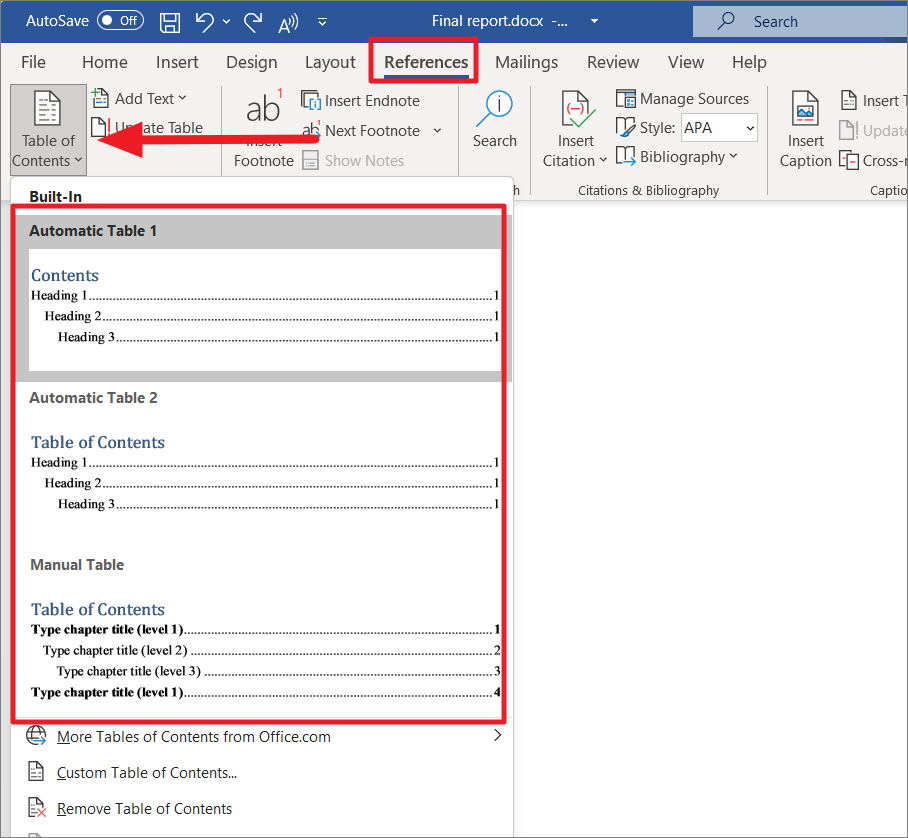
Insert Automatic Table of Contents
From the Table of Contents drop-down menu, select either of the ‘Automatic Table 1’ or ‘Automatic Table 2’ built-in styles. Both Tables of Contents styles are nearly the same with all text formatted as Heading 1, Heading 2, or Heading 3. The only real difference between both of them is the title of the list (Contents or Table of Contents).
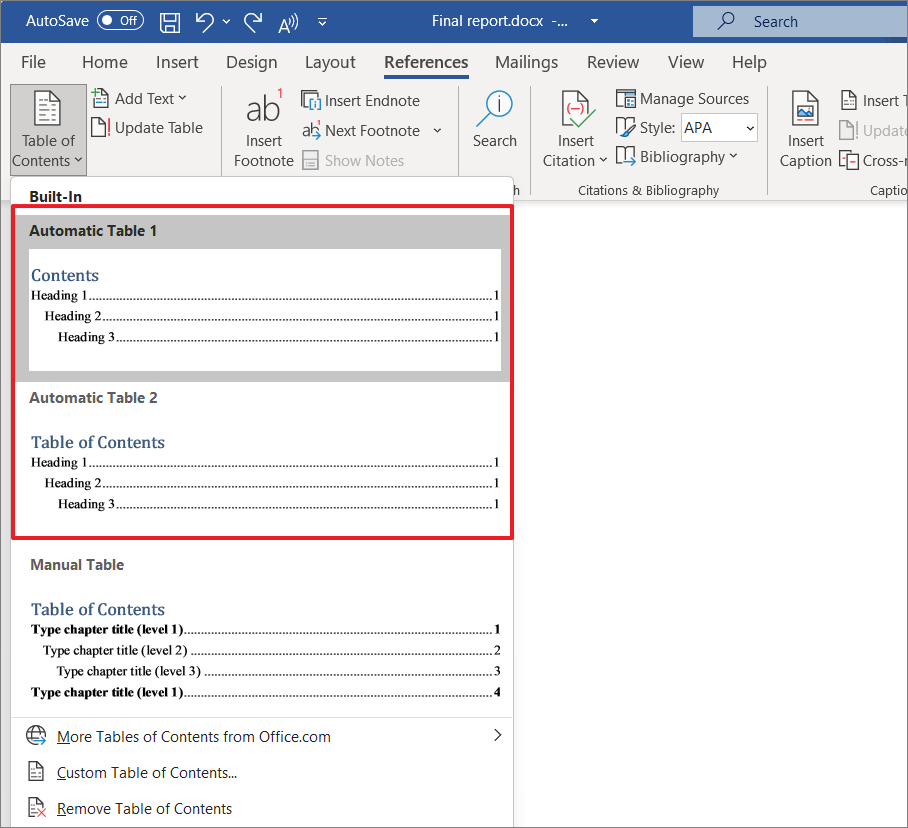
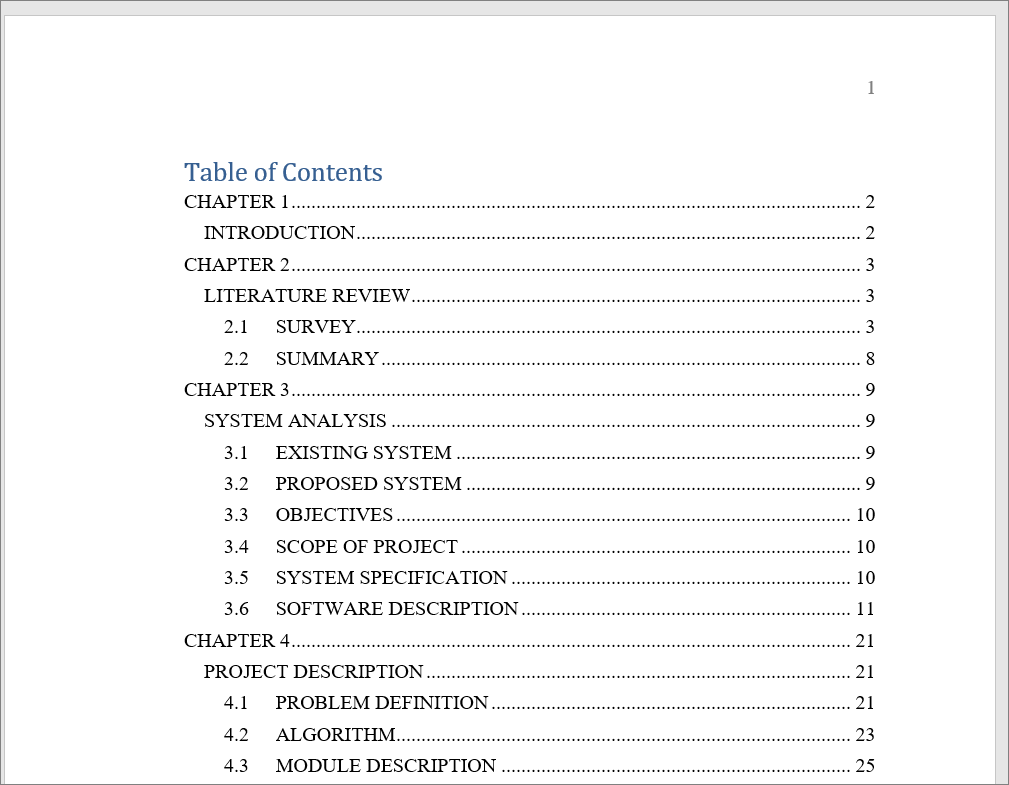
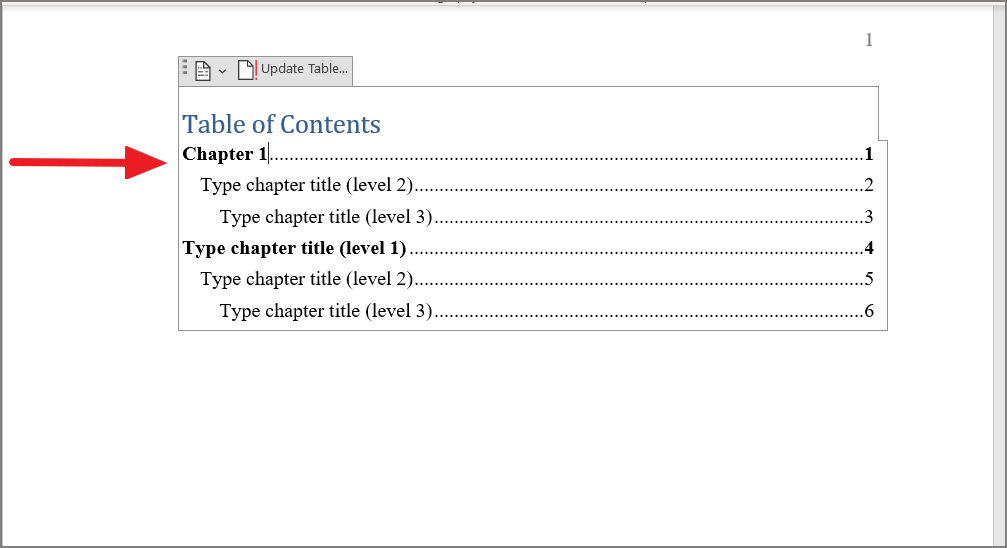
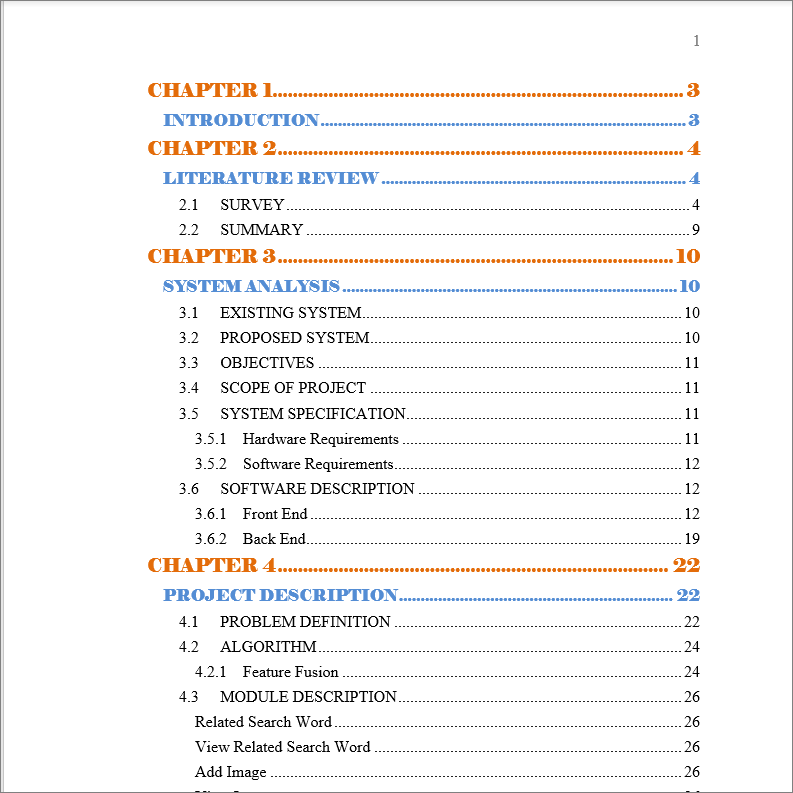
If you select the Automatic table option, Word will automatically recognize the section headings (that you formatted as Heading 1, 2, and 3) and add them to the appropriate list as shown below.
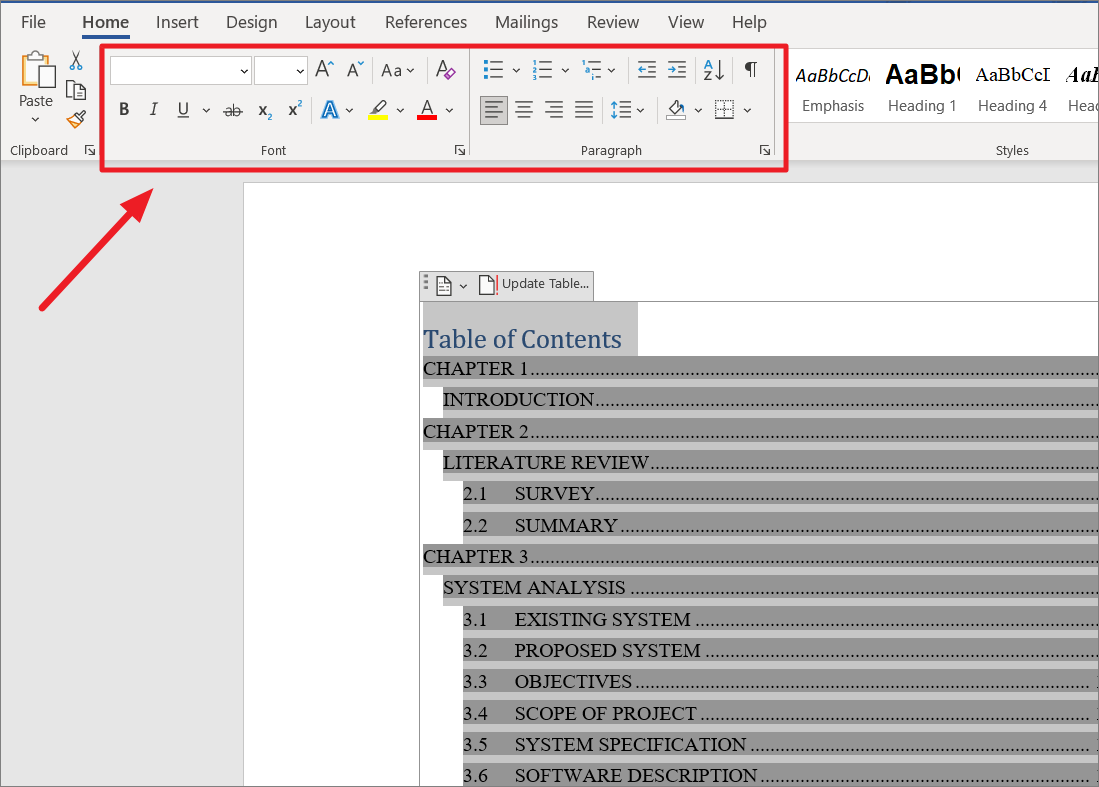
After creating the table of content, you can still format the list by selecting the contents and using the Formatting options in the ‘Home’ tab.
Sometimes, you would the below error message after selecting the Automatic table option – “No table of contents entries found”. It means the Word couldn’t find any text with the style Heading 1, Heading 2, or Heading 3 in the document.
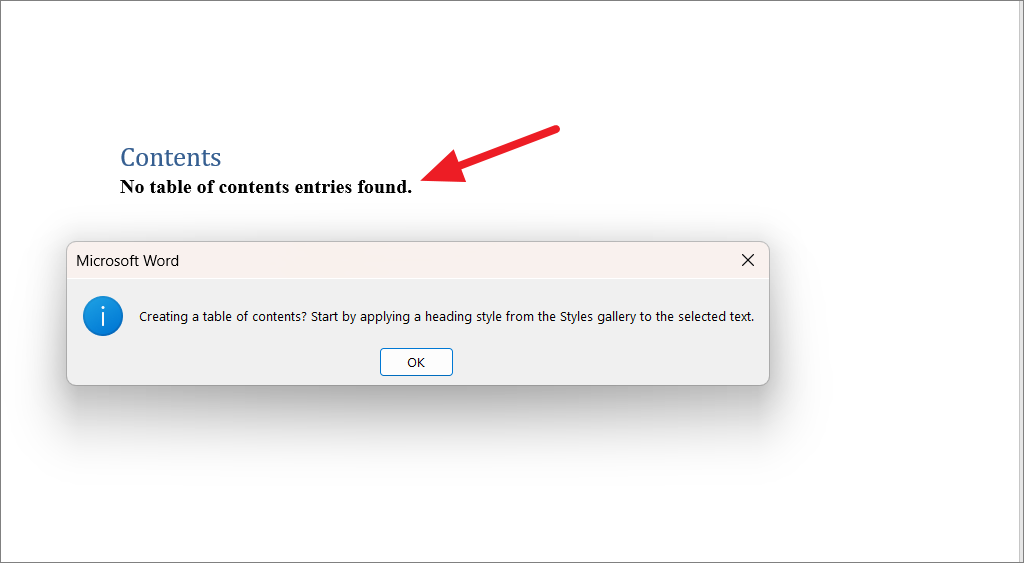
If you see this message, then delete the error message or press Undo (Ctrl+Z) and format the headings and subheadings with proper Heading Styles. Then, try inserting the table of contents again.
Create a Manual Table of Contents
Automatic Table 1 or 2 will automatically generate the table of contents based on the names of the titles. However, sometimes, Word can do a bad job of recognizing and listing the names of headings in the table. With the Manual table option, you have to manually make all the necessary changes such as typing the list of titles and adding page numbers.
If you want to insert a manual table of contents, you can use the ‘Manual Table’ option from the Table of Contents menu.
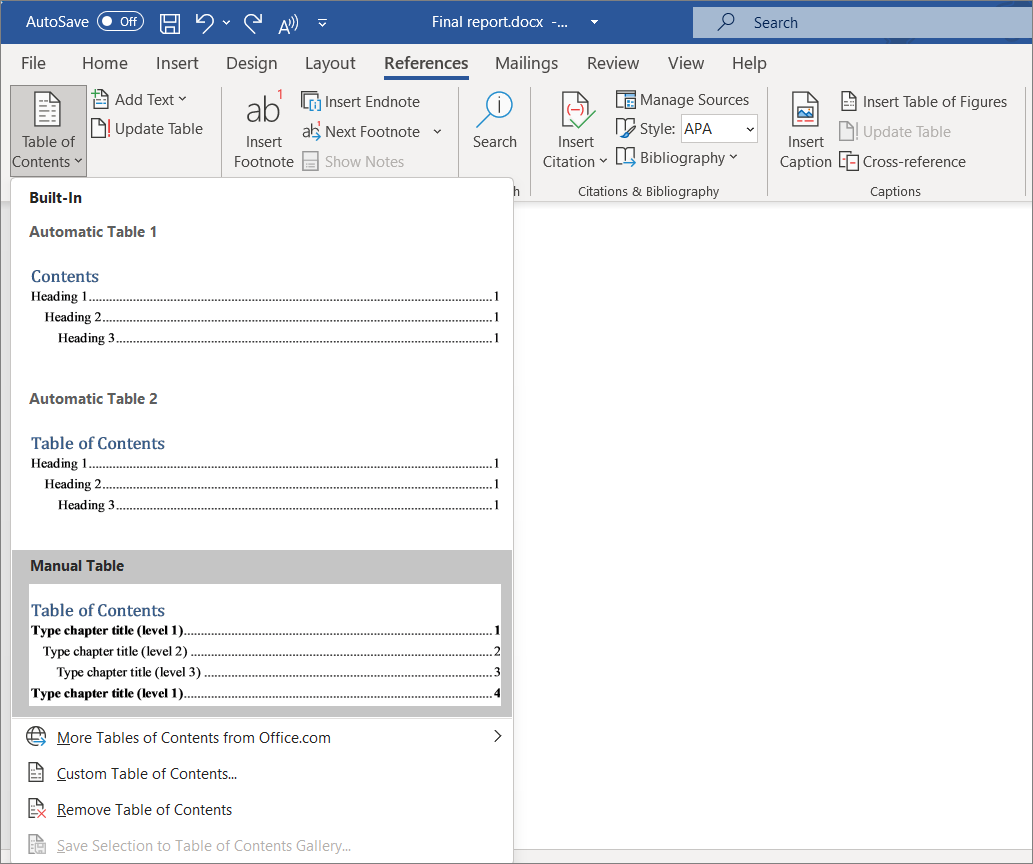
This option gives you a template for a table of contents where you can manually type your topics and subtopics that you want to appear in the list.
Create a Custom Table of Contents
If you don’t like the built-in styles for the table of contents, you can customize the various elements of the TOC such as text format, alignments, page numbers, number levels to show, etc. By default automatic table only shows three levels of headings, but if you want to go deeper than the top three heading styles, you have to customize the table of contents.
You can either customize the existing TOC created by built-in styles or create a new customized table of contents.
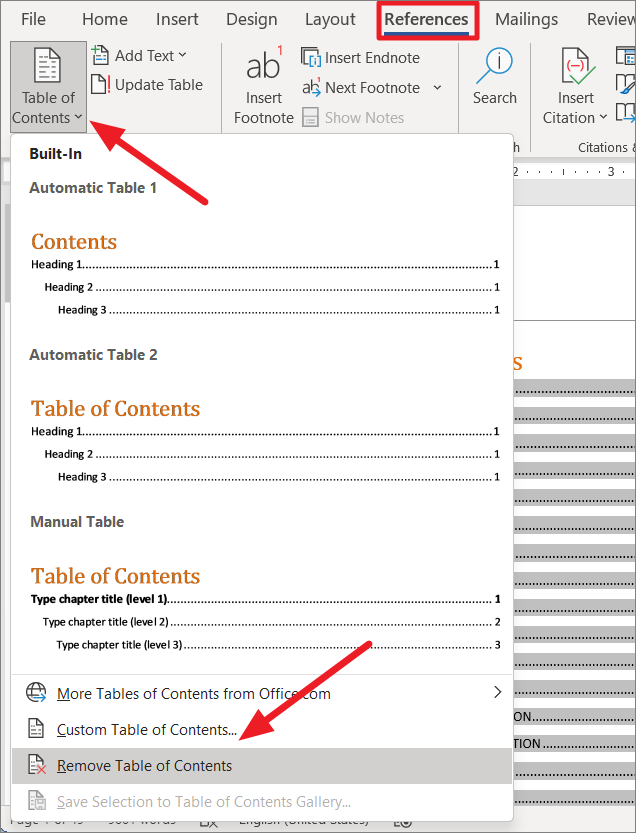
To create a custom table of contents, go to the ‘References’ tab and select the ‘Table of Contents’ drop-down menu from the Ribbon. From the drop-down menu, click the ‘Custom Table of Contents…’ option.
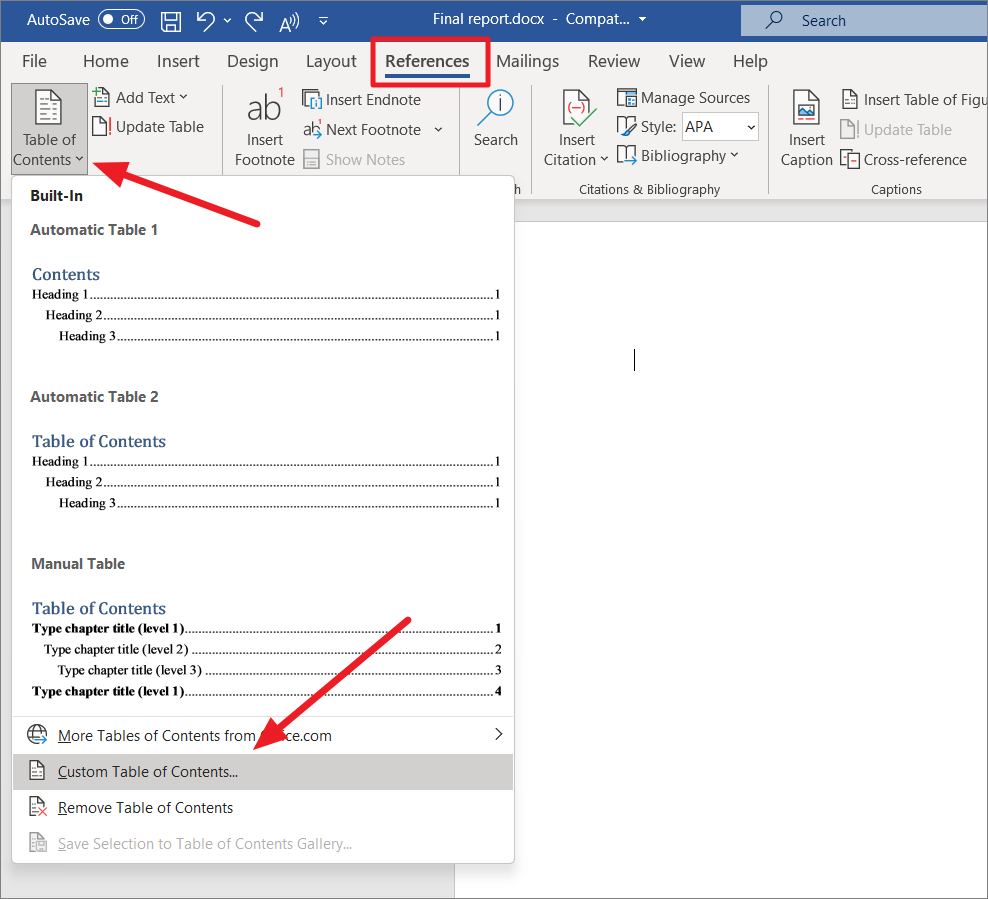
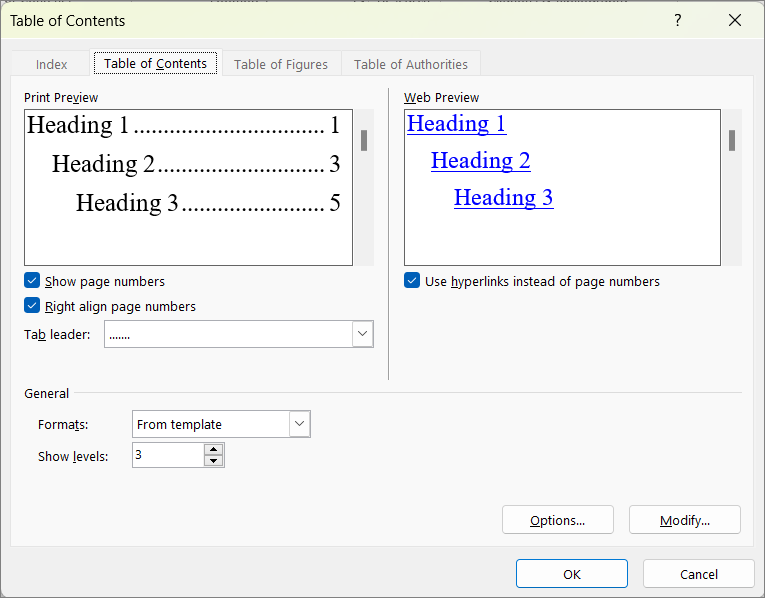
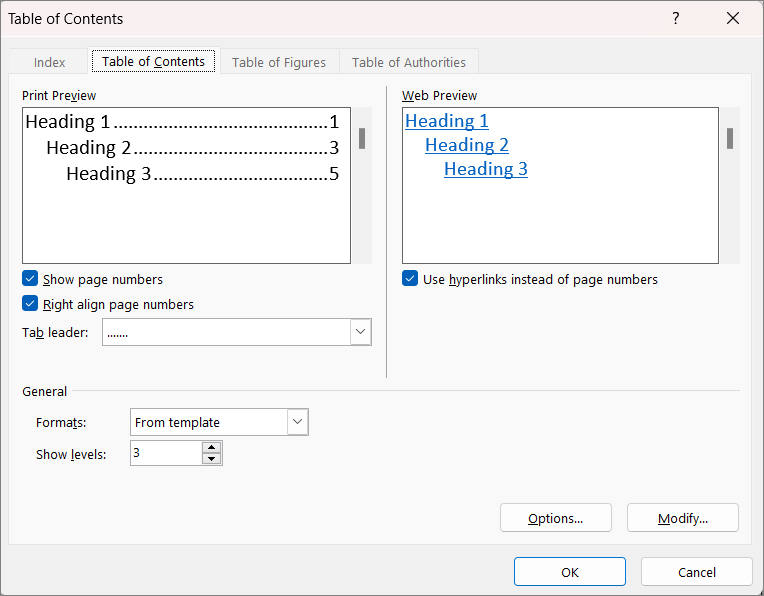
This will open up the Table of Contents dialog box where you have various options for customizing your table.
Change Format for the Table of Contents
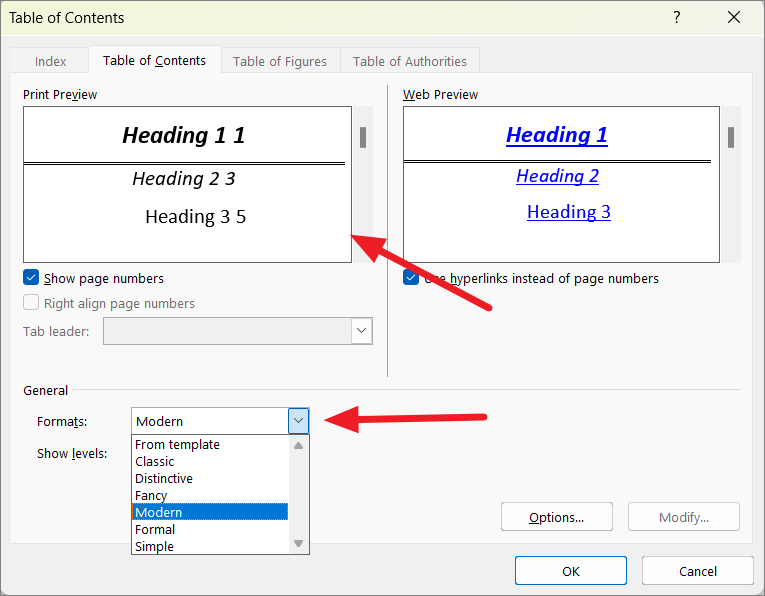
You can change the way the entire table looks (the font, font size, alignment, etc.) by choosing a different format. Under the General section, click the ‘Formats:’ drop-down menu and choose one of the 6 templates or styles. If you select a different format, you can see how the new style will look in the ‘Print Preview’ and ‘Web Preview’ boxes.
And if you don’t like any of the six formats, you can apply advanced formatting (the font, font size, color, etc.) to the current template. To do that, select ‘From template’ (default style) in the Format drop-down and click the ‘Modify’ button.
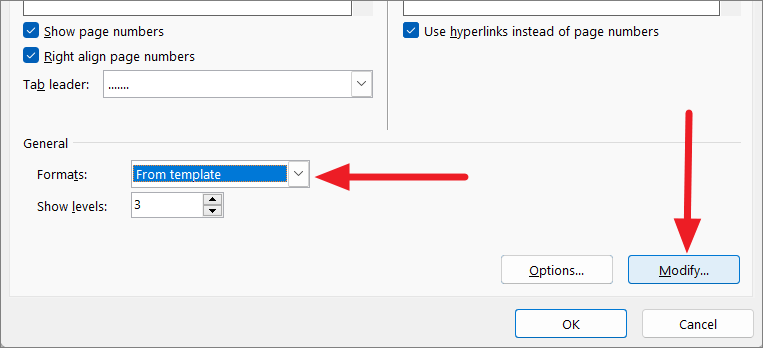
The Modify option will only be available if your select the ‘From template’ option from the Formats.
In the Styles dialog window, select the level that you want to format or change and then click ‘Modify’ again.
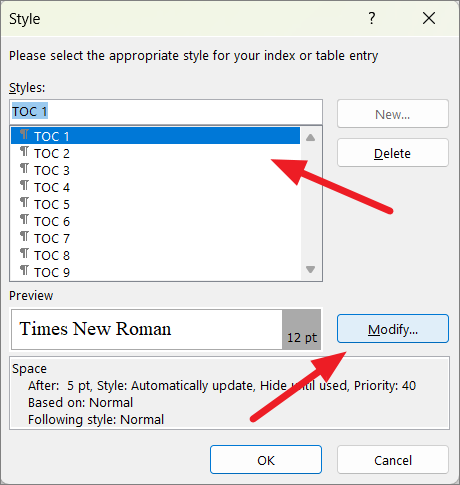
This will open Modify Style window where you can change the font, font size, choose the text color, add indents, and make a variety of other edits. As you format the TOC, you will see the preview of the changes you made in the box below.
As you can see below, here we are changing the font to ‘Elephant’, font size to ’14’, and text color to ‘Orange’. After making all the changes, click ‘OK’ to save the formatting.
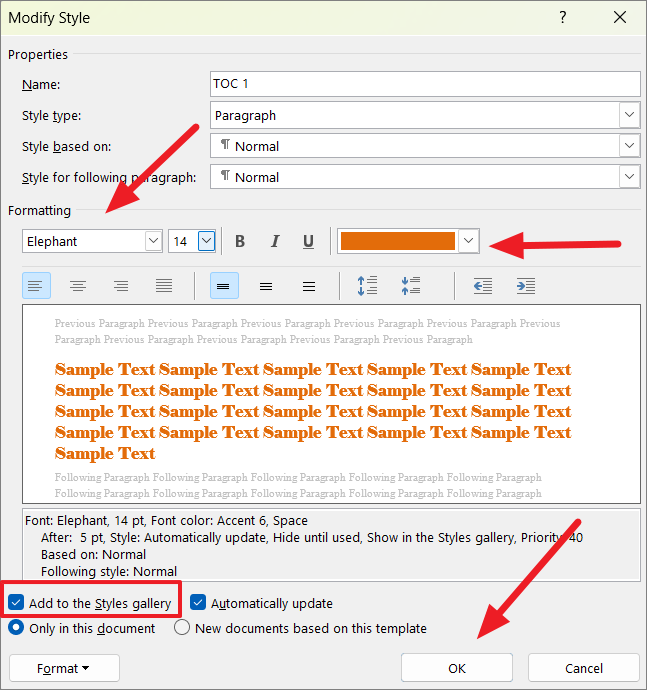
You can also choose whether this custom style applies to the current document or to all future documents. If you want to use this heading style in future documents, check the ‘Add to the Styles gallery’ option.
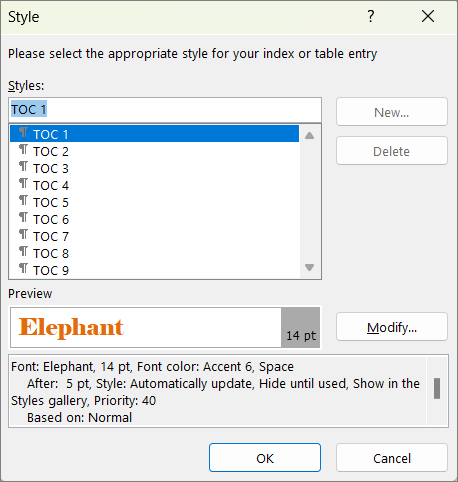
Back in the Style dialog, you can see the preview of the format in the Preview box.
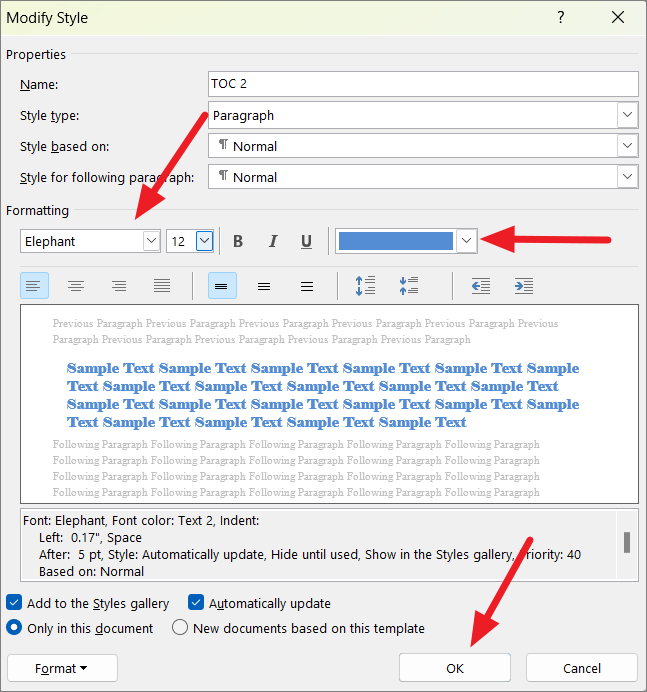
Now, repeat the process for other TOC styles (TOC 1, TOC 2, etc). Here, we are setting ‘Elephant’ for font, ’12’ for size, and ‘Blue’ for color.
Change the Number of levels Shown
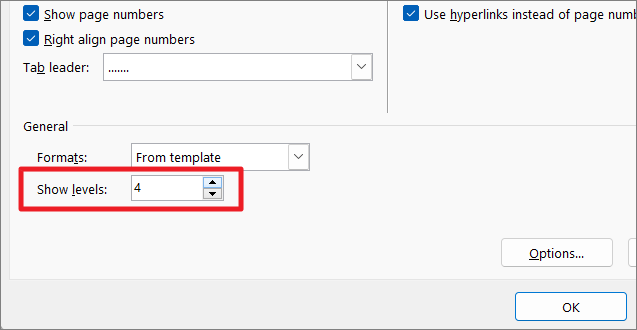
In the Table of Contents window, you can also change the number of heading levels you want to include in the table of contents. By default, the TOC only shows 3 levels of headings.
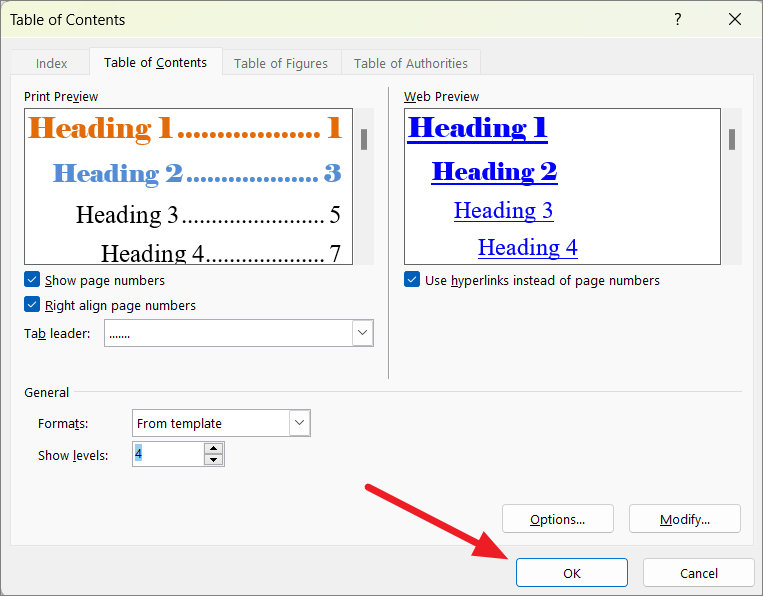
To show more levels or fewer levels, increase or decrease the number in the ‘Show levels’ box accordingly. Here, we want to show ‘4’ levels of headings starting from Heading 1 to Heading 4.
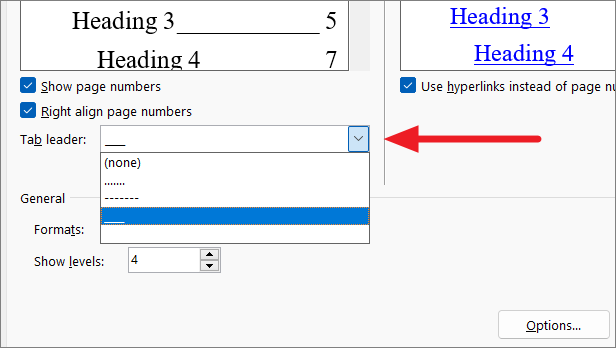
Change Tab Leader
Tab Leader is the line or dots that connect the name of the heading and page number in the contents. You can use the ‘Tab leader’ dropdown menu to choose the type of tab leader you want to appear between the index entry and page number. There are four options, dots (…), small dash, long dash, and none. If you don’t want to see any leader between the list and page number, select the ‘(none)’ option from the drop-down.
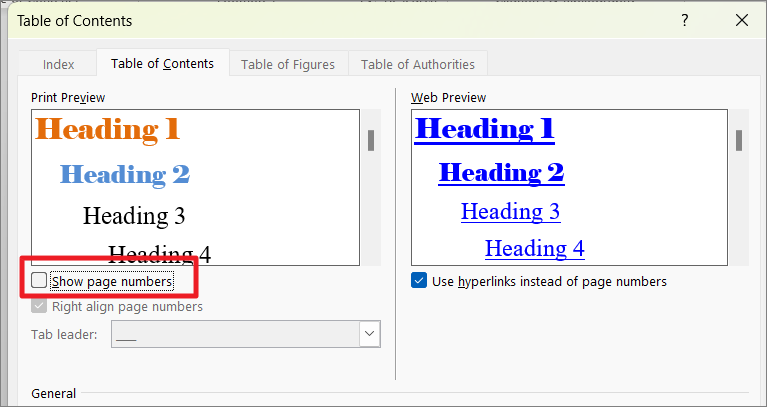
Display or Hide Page Numbers
If you don’t want to see the page number next to the items in the contents, uncheck the ‘Show page numbers’ checkbox.
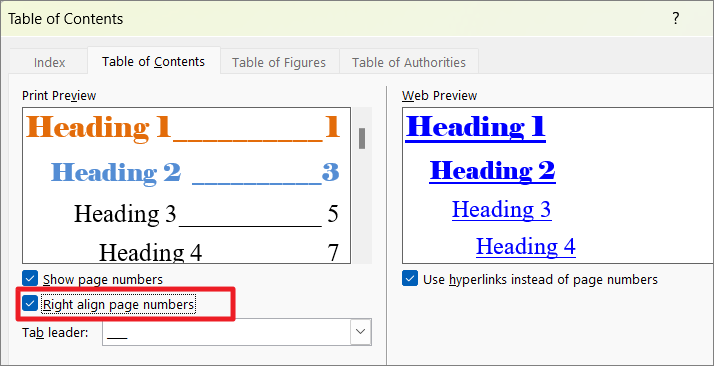
To keeps the pages numbers aligned to the right side of the table of contents, make sure that the ‘Right align page numbers’ option is checked.
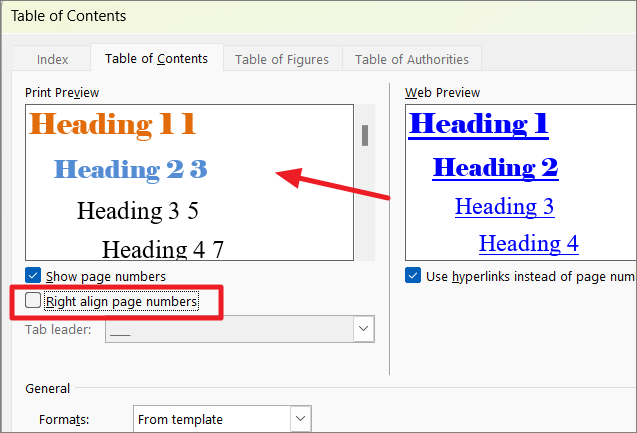
If this option is unchecked, the page numbers will appear right next to the list of items in the table of contents.
Change Table of Contents Options
To further customize the layout and outline levels of the table of contents, click the ‘Options’ button in the dialog window.
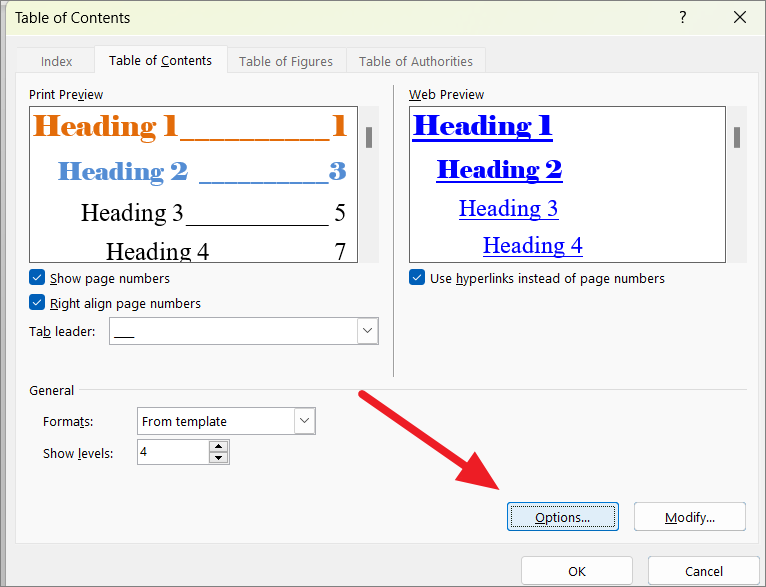
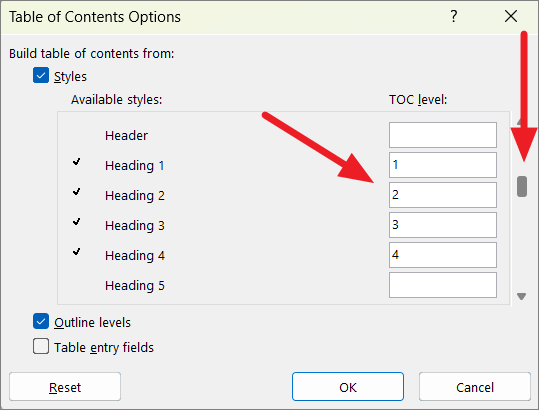
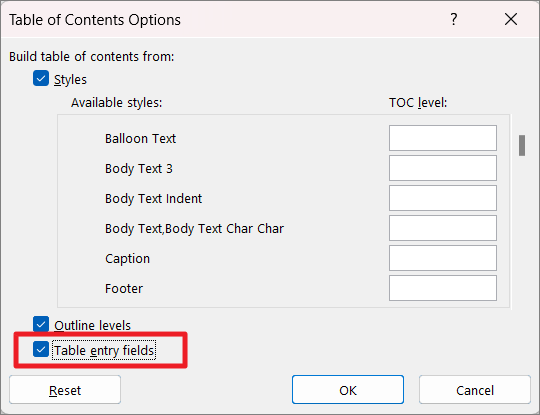
This window gives control over the items or styles that can be included in the TOC. It maps the styles that are in use in the table and their TOC levels. Here, you can set which style match each TOC level.
Scroll down the list of Styles until you see Heading 1, Heading 2, etc. As you can see above, Heading 1, Heading 2, Heading 3, and Heading 4 are already set as levels 1, 2, 3, and 4 respectively. Since we have set the number of levels to 4, only four entries are mapped.
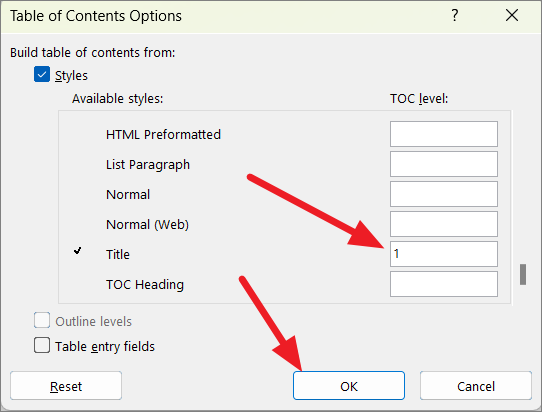
Suppose you want to add the main title of the document to be listed in the table of contents (at the top of the content) rather than the Heading 1 title.
To do this, delete the TOC level number 1 from Heading 1 and scroll down to the Title style and specify ‘1’ in the corresponding box. Then, enter ‘2’ for Heading 1, ‘3’ for Heading 2, and so on. After making the changes, click ‘OK’ to save.
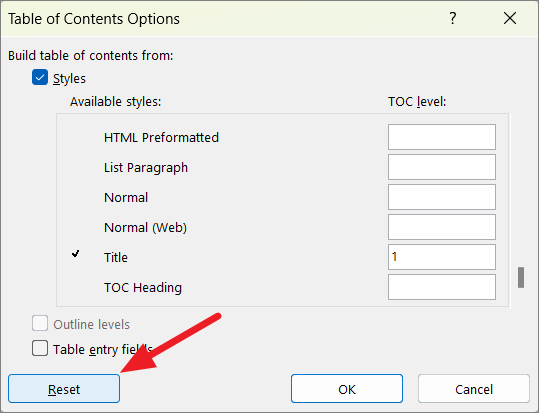
If you don’t like the changes, click the ‘Reset’ button to reset all the TOC level changes.
In case you are using Table of Contents field codes in your document along with or instead of header styles, you will need to check the box next to ‘Table entry fields’ at the lower right corner of Table of Contents Options.
Create a Clickable Table of Contents
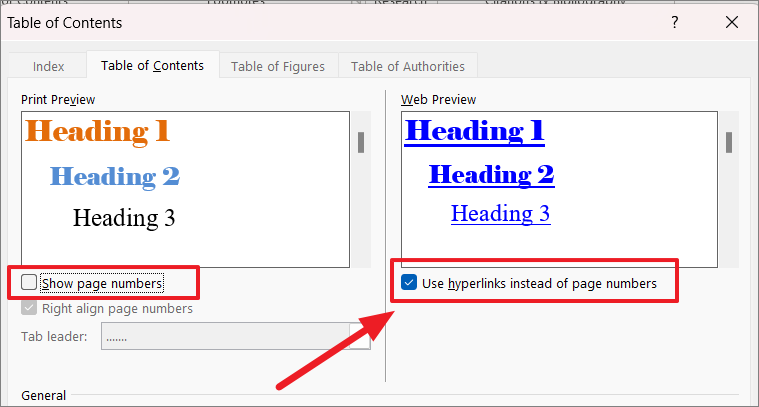
In the Web Preview box of the Table of Contents dialog box, you can see what your TOC will look like if you were to convert your document to a web page. By default, TOC creates a list of headings in your document and if you want to go to a specific title, you have to manually navigate to the page number or press Ctrl and click the heading to jump to that topic.
However, you can also use hyperlinks for the table of contents for navigating the document.
To create a clickable TOC, first, uncheck the ‘Show page numbers’ option, and then check the ‘Use hyperlinks instead of page numbers’ box.
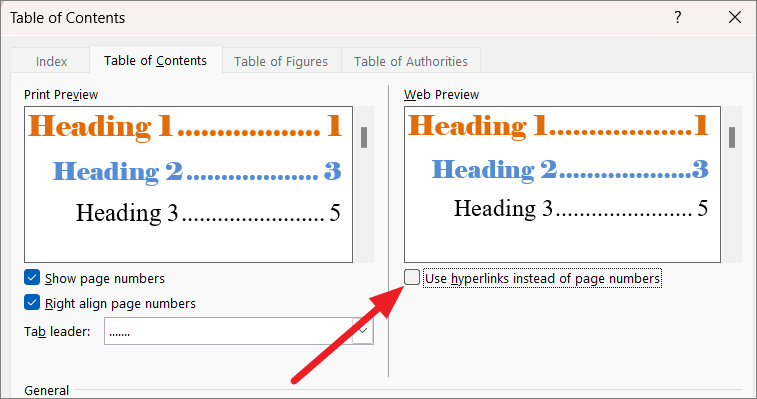
And if you want to see the same view as in ‘Print Preview’, uncheck the ‘Use hyperlinks instead of page numbers’ check box.
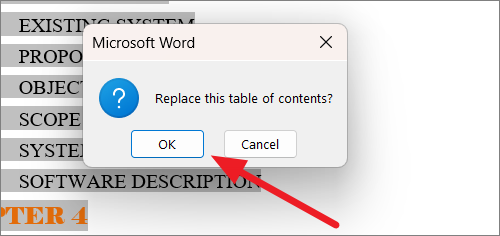
After making all the formatting changes, click ‘OK’ in the Table of Contents box to apply the customizations.
When you do, Word will ask you if you want to replace the current table with the customized table, choose ‘Yes’.
Now, we got a custom table of contents based on the formatting we applied.
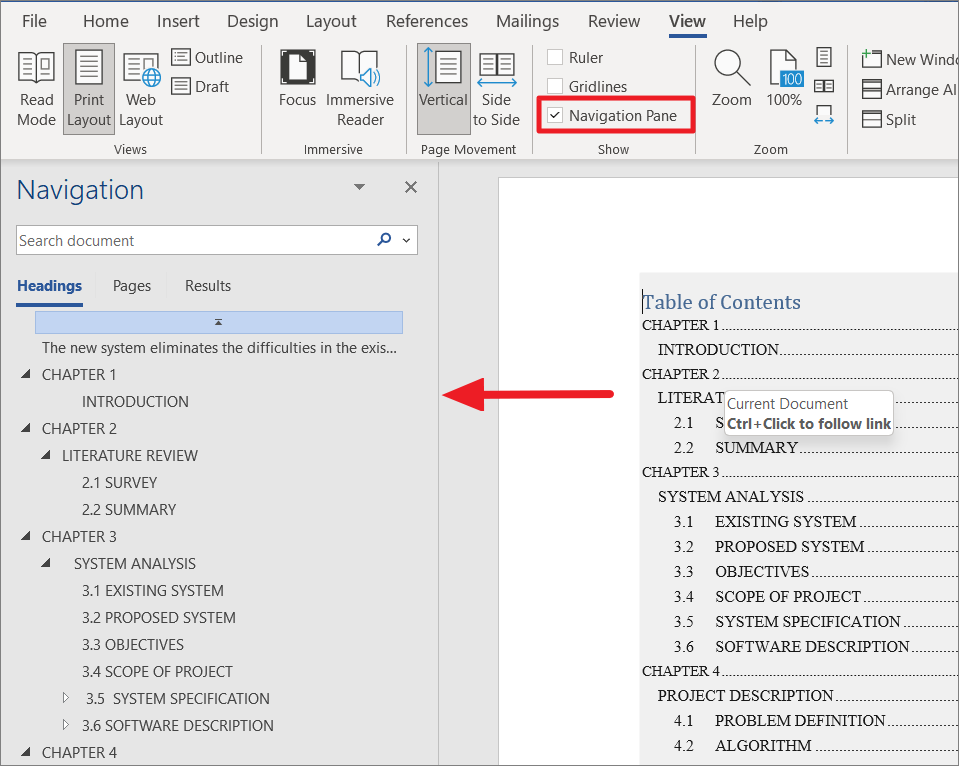
For easy navigation of both headings and pages, you can enable the navigation panel from the ribbon. To do that, go to the ‘View’ tab on the ribbon and select the checkbox next to the ‘Navigation Pane’ option in the Show group.
Change Table of Contents Appearance
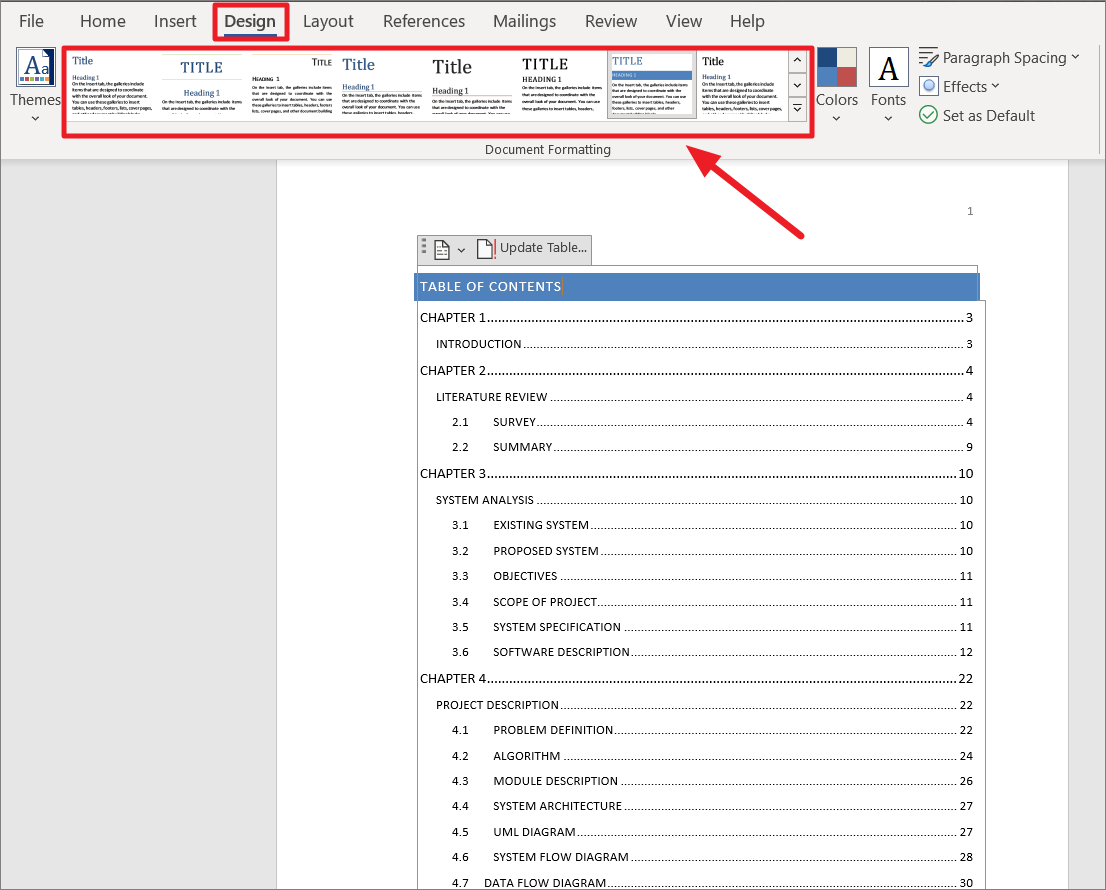
You can also change the table of contents appearance from the Design tab in the ribbon.
To change TOC formatting, select the table of content, then go to the ‘Design’ tab and select one of the options from the Document Formatting section.
Edit/Customize the Table of Contents
If you wish to make changes (changing level, formatting styles, changing the format, changing tab leader, hide or show page numbers, etc.) to the table of contents after creating the TOC, follow these steps:
Right-click anywhere in the Table of Content and select ‘Edit Field’ from the context menu.
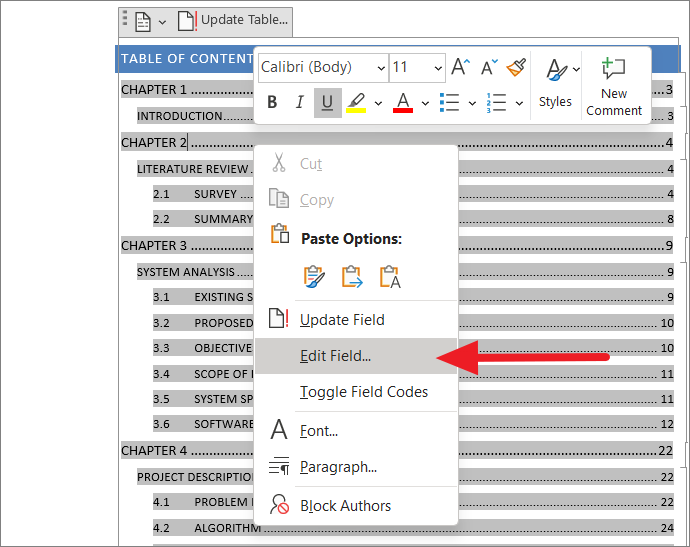
It will open the Field dialog box. In the ‘Field names’ box, locate ‘TOC’ and select it. Then, click the ‘Table of Contents’ button under the Field Properties section to open the Table of Contents dialog.
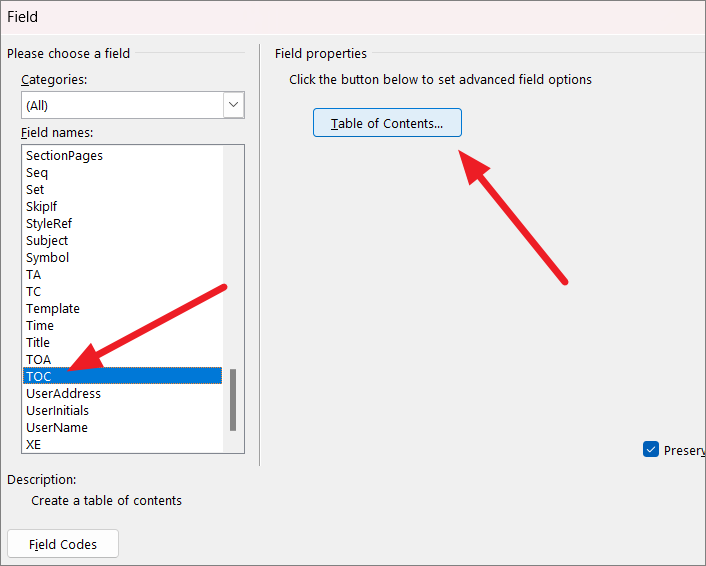
Then, use the Table of Contents window to customize your TOC however you like.
Update the Table of Contents in Word
The Table of Contents in Word does not automatically update itself after adding or deleting contents, changing heading styles, rearranging text, or changing headings and pages. Once you make any changes to your document, you need to manually click the Update Table button to reflect those changes in the table of contents. To update your table of contents, do the following:
First, click on the table of contents and go to the ‘References’ tab, click the ‘Update Table’ button in the Table of Contents group.
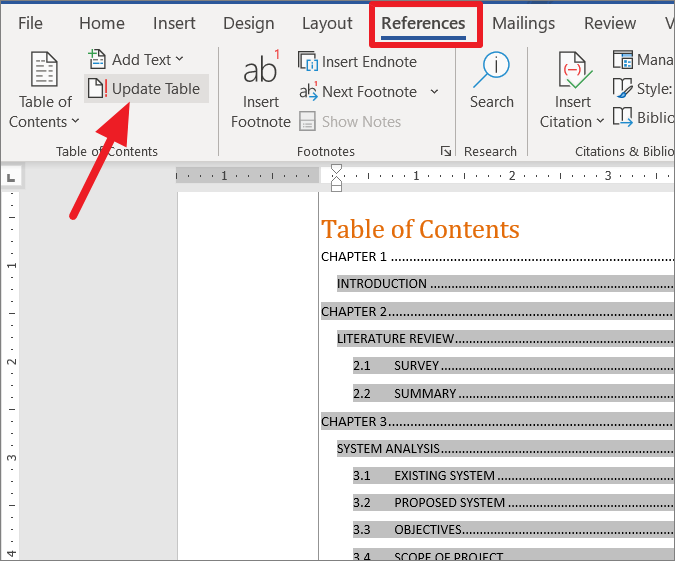
Alternatively, you can select the TOC, and click the ‘Update Table’ button.

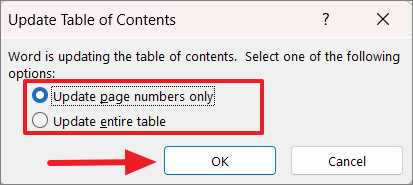
Either way, it will show you the below prompt box with two options:
- Update page numbers only – Choose this option, if you want to update the page number only. If you added or removed content under already existing heading sections, then this option would be enough.
- Update entire table – This will update the entire table including page numbers, headings added, removed, and modified.
Select either of the options and click ‘OK’.
As soon as you do this, the table of contents will be updated to reflect the changes you made.
You can only update the table of contents that has been automatically inserted using the built-in automatic table format. However, if you inserted the table of content manually, you have to click inside the table and make any edits yourself.
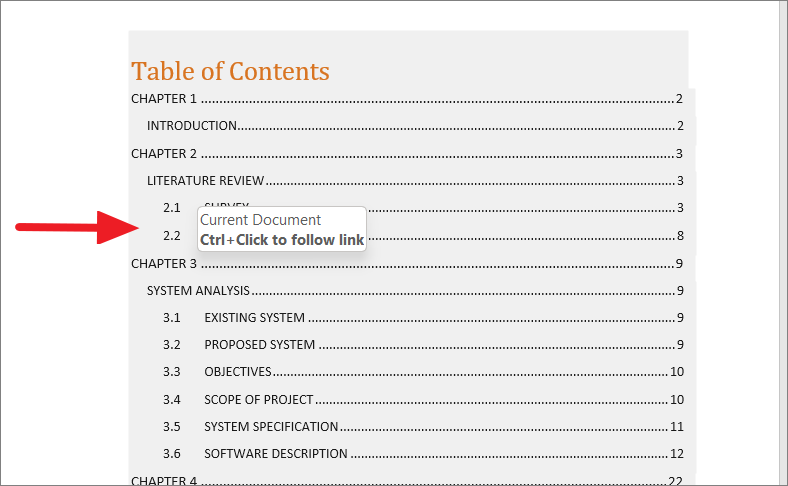
Use Table of Contents to Navigate the Document
Each entry in the table of content has a link built into it that lets you go directly to the corresponding section in the document. When you hover the mouse over an index in the table, you will see how to use it – ‘Ctrl+Click to follow’.
To jump to a specific section in the document, just hold the Ctrl key on your keyboard and click on the appropriate entry in the table.
Remove a Table of Contents
If you no longer require the table of contents, you can easily delete it any time with two steps.
First, select the table of contents by clicking on it. Switch to the ‘References’ tab in the Ribbon and click ‘Table of Contents’ in the Table of Contents group. Then, click the ‘Remove Table of Contents’ option from the drop-down.
Alternatively, open the Table of Contents drop-down menu at the top of the table, and select ‘Remove Table of Contents’.
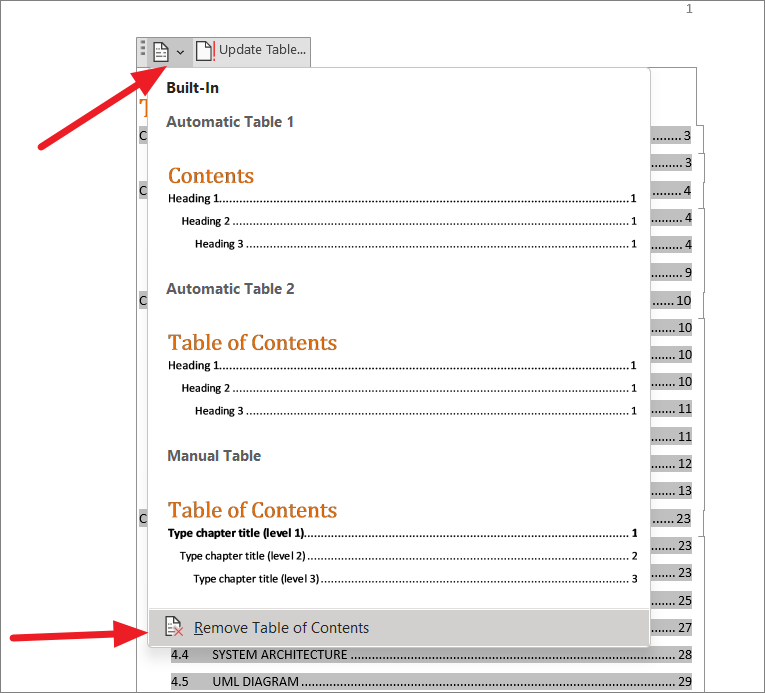
The table of contents will be removed from the document.
That’s it.