
Location History keeps a track of your movement and saves every place you visit. The feature is available on all three, mobile phone, tablet and laptop, given that ‘Location History’ is enabled. Before we move to the steps for disabling the feature, you must know what it’s all about and why does Google track your movement, or the movement of the device, to be precise.
What’s Location History and Do I Need It?
We have already discussed earlier what Location History is all about. The locations that you visit or your current location is used for various purposes that are beneficial to you. You will be shown targeted ads and helps saves your preferences for routes. Also, the next time you do a Google search, you will be shown curated results based on the places you have visited in the past.
Other than that, it will help you find out where you were at a certain time and day, in case you can’t recall, a feature that often comes in handy. If you lose your phone, Google will help you locate it, given that it’s turned on.
Now, coming to the second part of the question. Enabling or disabling ‘Location History’ is more of a personal choice. If you are someone who likes to keep a track of their movements and like curated search results, it would be a great option owing to the accuracy and comprehensiveness of the stored data. However, there are many who have a contrary belief and don’t want their movements to be tracked.
Therefore, it’s really up to you whether you want Google to store the ‘Location History’.
Is the Location History Secure?
Although, it’s claimed that ‘Location History’ is secure and not shared for advertising and other purposes. But, anything that’s online can never be completely secure and there’s always the risk of being exposed.
Can I Clear Past Location History?
Yes, you can clear the past Location History. Google offers many options when it comes to clearing location history, either to delete a specific stop, a day, location history for a selected period, or the complete Location History stored to date.
Is Location History Enabled for all the Devices?
No, the location history is enabled only for the devices that you have selected, given that Google has been allowed to access the location. So, even if you are signed in with the same account on multiple devices, you can also choose the ones for which the location and movement are to be tracked.
Now that you have a fair understanding of the concept of ‘Location History’, it’s time we walk you through the process of disabling it.
How to Disable Location History in Google Maps
You can disable location history, both on the web and the Google Maps mobile app. This certainly makes the process a lot more convenient. Also, as discussed earlier, you can disable ‘Location History’ for a particular device or the account altogether.
Remotely Disable Location History from Desktop
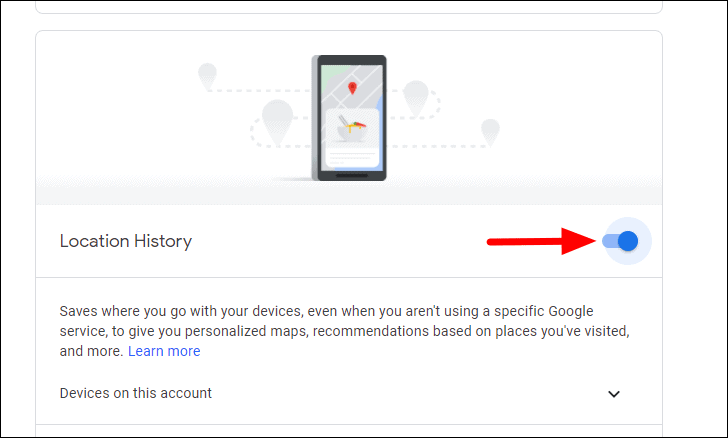
First, go to myactivity.google.com and login to the platform.
To disable Location History for the account and all linked devices, click on the toggle next to ‘Location History’.
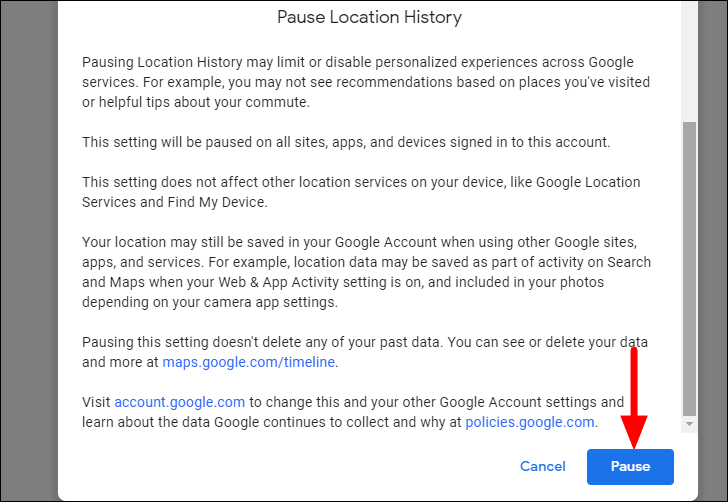
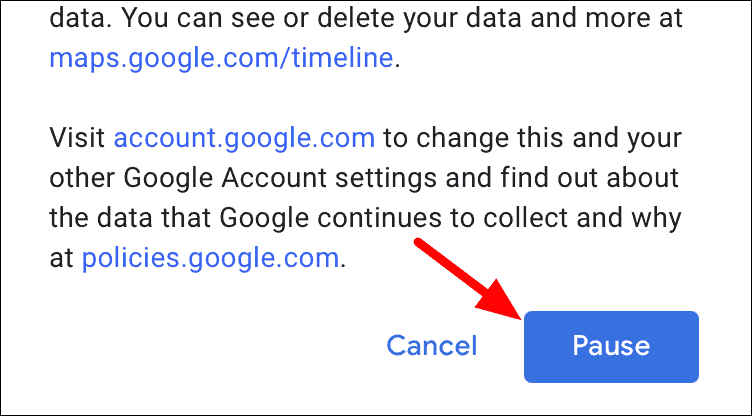
Next, a window will launch detailing how disabling the Location History will affect the Google service. Scroll down to the bottom of it and then click on the ‘Pause’ option.
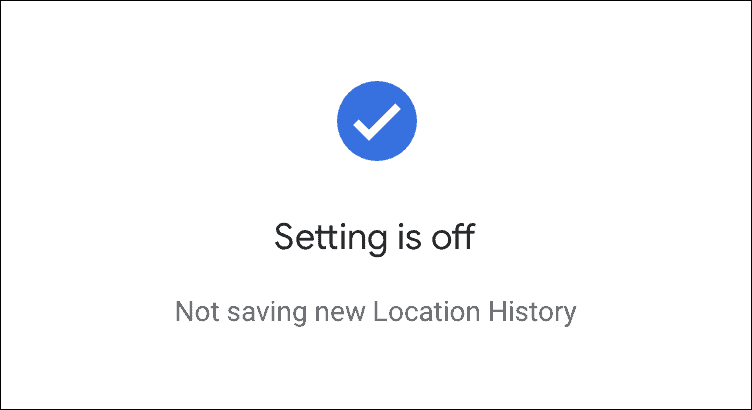
You will now receive a confirmation box that the setting is turned off. Finally, click on ‘Got it’ at the bottom.
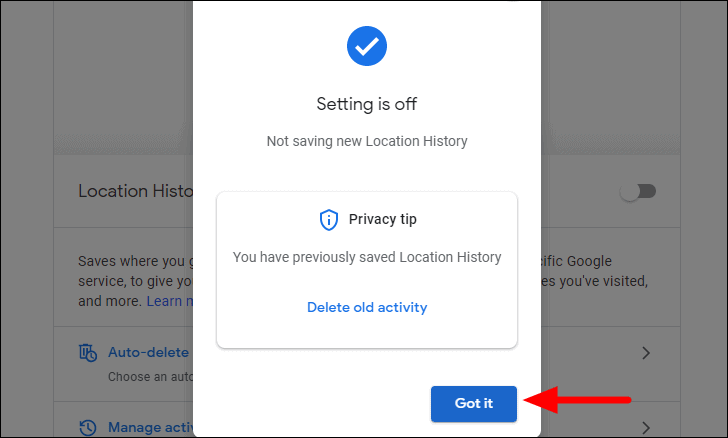
You have now disabled Location History for the account, thereby disabling it for all devices signed in with this account.
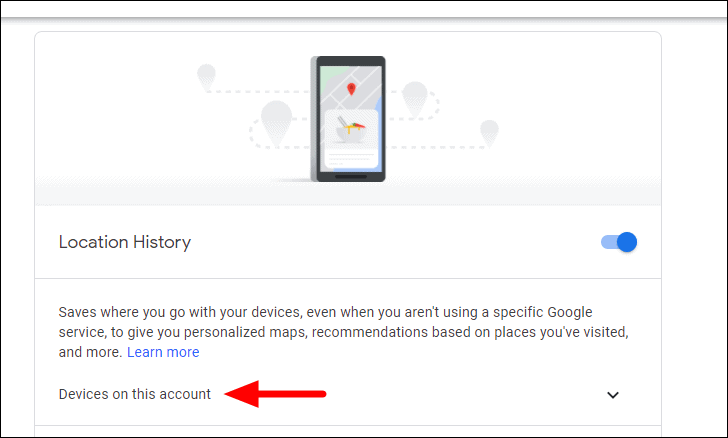
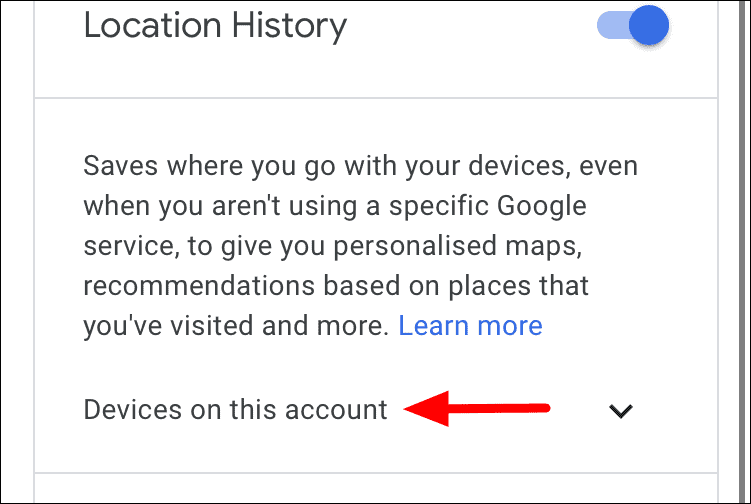
To disable Location History for a particular device, click on the ‘Devices for this account’ option.
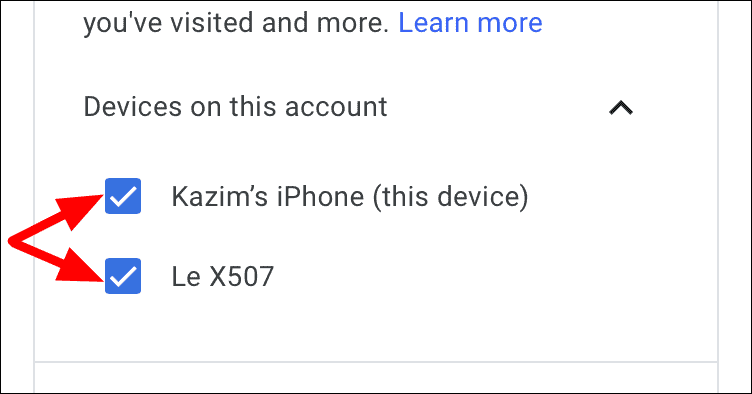
Next, untick the checkbox before the device for which you want to disable Location History.
Note: For some devices, you will have to disable Location History from the device itself. We have discussed disabling Location History on mobile phone in the next section.
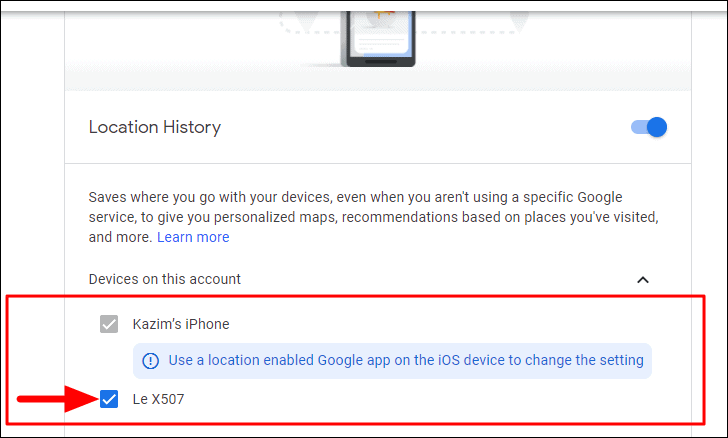
After you untick the checkbox, the Location History for that particular device will be turned off.
Disable Location History from Maps App
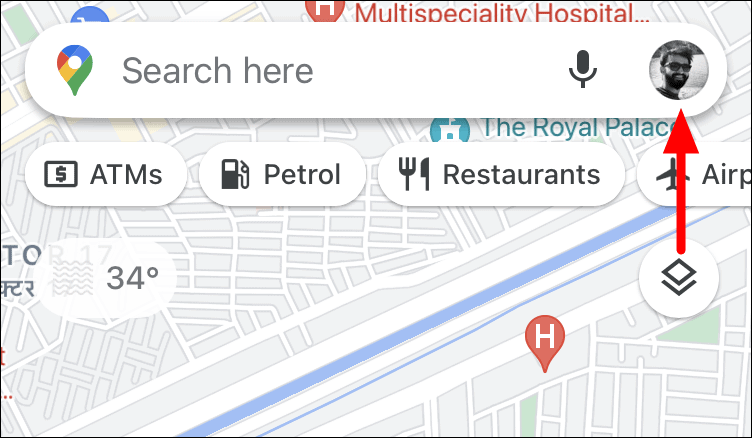
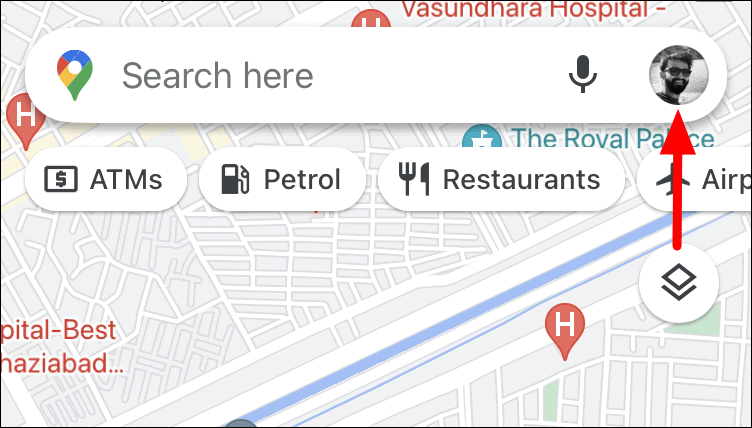
To disable Location History on your mobile phone, launch the ‘Google Maps’ app on your phone, and tap on your picture at the top-right corner.
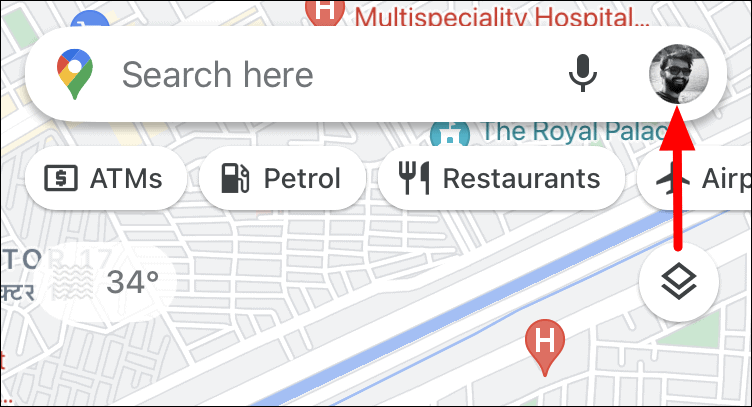
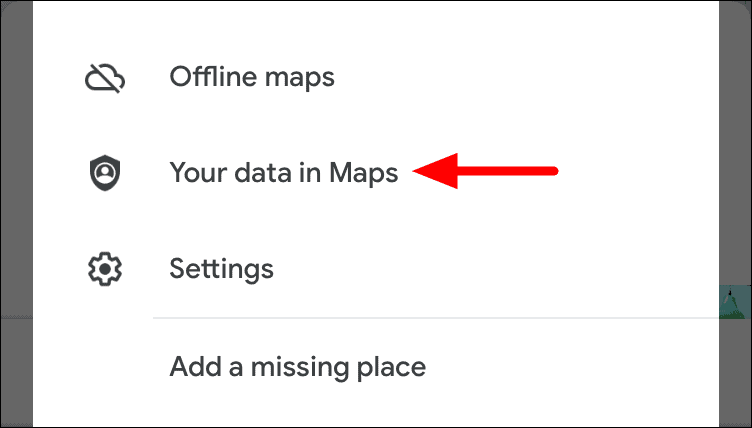
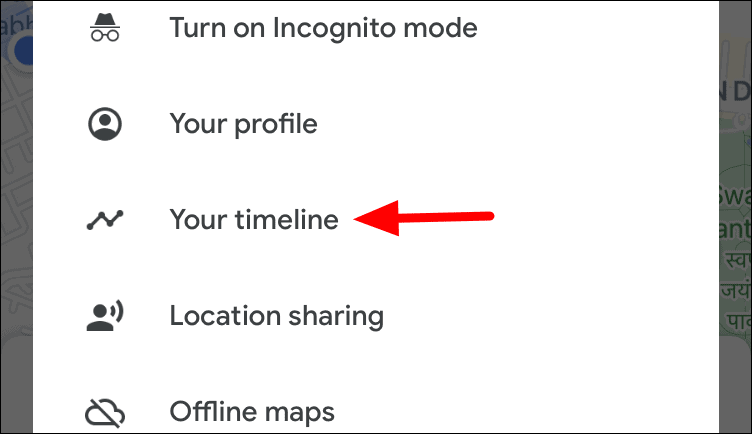
A menu with multiple options will appear, tap on ‘Your data in Maps’.
To disable Location History for the account and all linked devices, scroll down, locate ‘Location History’, and then tap on the ‘On’ option under it.

Next, tap on the toggle next to ‘Location History’.
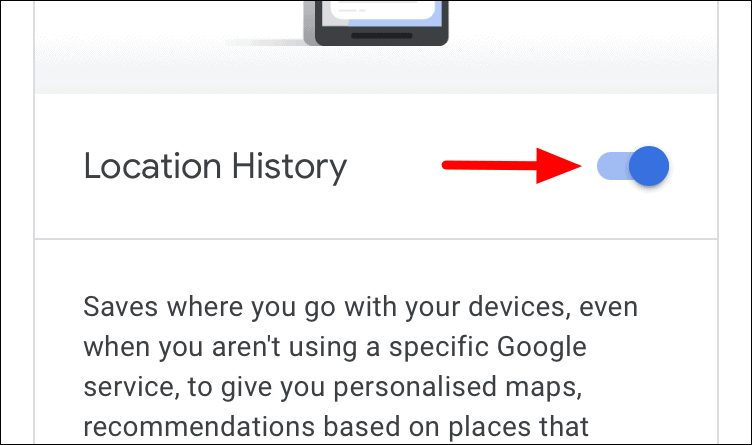
The ‘Pause Location History’ will now open explaining how pausing/disabling it will limit the personalized experience and other changes. Scroll down to the bottom and then tap on ‘Pause’.
The ‘Location History’ is now turned off and the same will be displayed on the app.
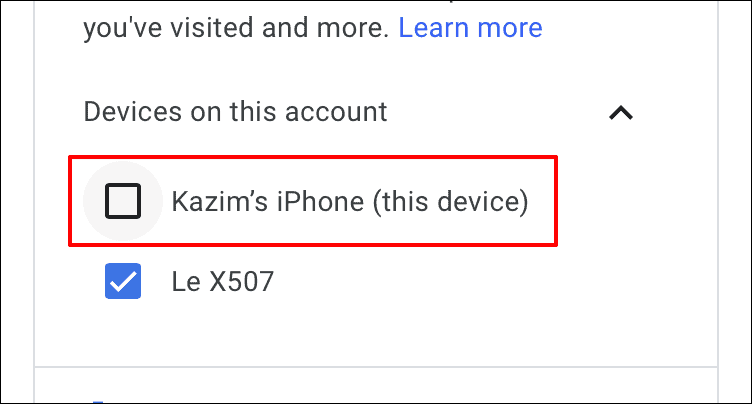
To disable Location History for a particular device, tap on ‘Devices on this account’ instead of tapping the toggle next to ‘Location History’.
You will now find a list of devices linked to this account. Next, tap on the checkbox for the device for which you want to disable ‘Location History’.
After you tap on the checkbox and it’s no more selected, the ‘Location History’ for that particular device is disabled. Also, we weren’t able to disable ‘Location History’ for the first device (Kazim’s iPhone) earlier on the web since it showed that it can only be disabled on the mobile app. It has been disabled now.
That’s all there’s to disabling ‘Location History’.
How to Delete Location History in Google Maps
You can delete the ‘Location History’ any time you want, both from the web portal and the Google Maps mobile app. However, ‘Location History’ once deleted cannot be retrieved. Hence, it’s recommended that you only delete it after thorough consideration.
Note: The Google Maps mobile app offers the option to delete ‘Location History’ for a particular time range, an option that’s missing on the web. If you want to go with that, head over to the Google Maps app and follow the steps mentioned here.
Remotely Delete Location History from Desktop
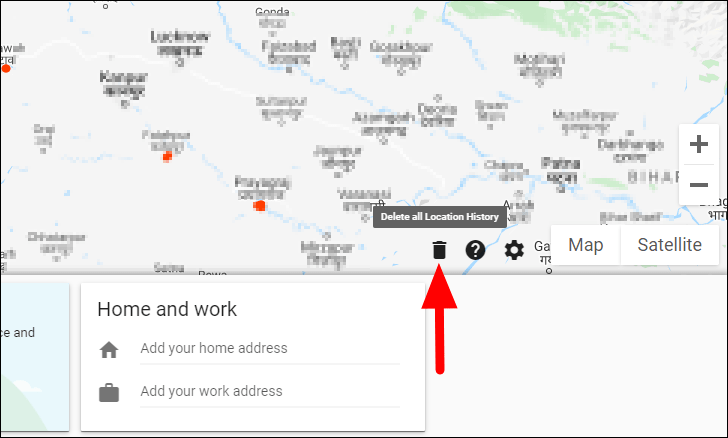
You can delete either a particular stop from the ‘Location History, a day of it, or the whole of it stored eversince the start. To delete either of three, go to timeline.google.com and sign in with the concerned account.
Delete Complete Location History
To delete the complete location history for the account, click on the ‘Delete’ icon on the Google Timelines window that you opened earlier.
A confirmation box will now pop up. Tick the checkbox for ‘I understand and want to delete all Location History’, and then click on the ‘DELETE LOCATION HISTORY’ option at the bottom.
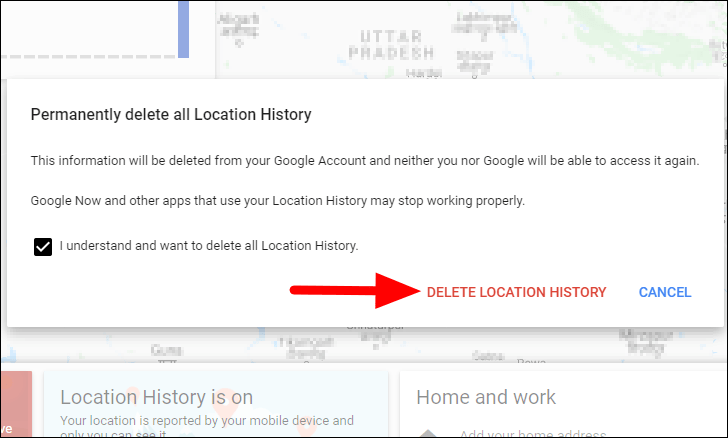
If any further dialog boxes pop-up, select the appropriate response to complete the process.
Delete a Single Day from Location History
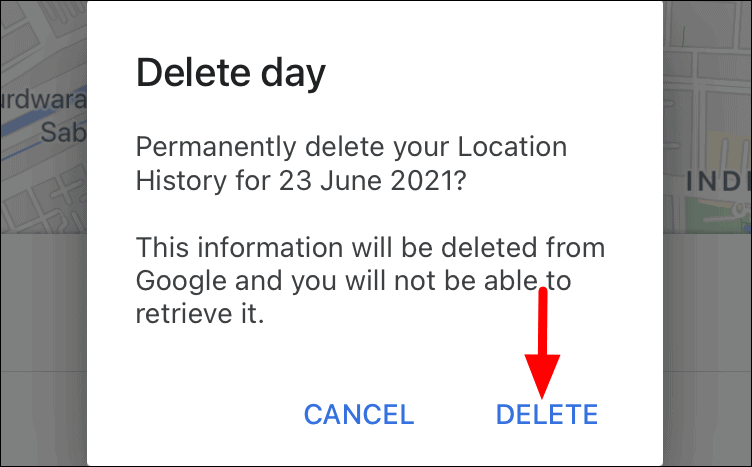
To delete a single day from Location History, first select the date from the drop-down menus at the top-right corner. The first is the year, the second is for the month and the third is the day. After you have set a filter, the Location History for that particular day will be displayed on the screen. Now, click on the ‘Delete’ icon.

A confirmation box now pops up, click on ‘DELETE DAY’ to confirm the changes and delete the location history for that particular day.
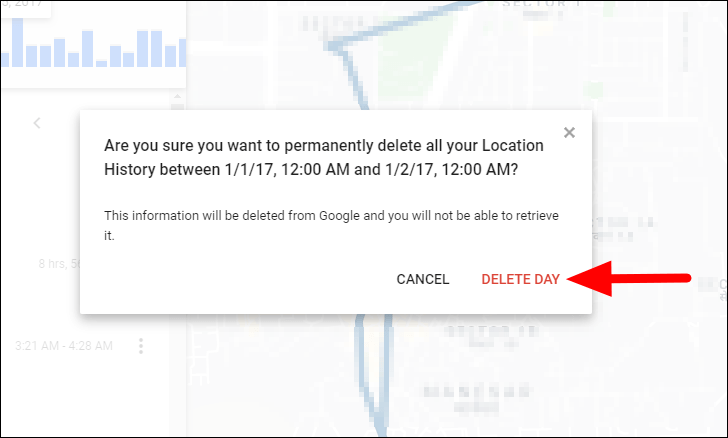
The location history for the selected date has now been deleted.
Delete a Stop from Location History
To delete a stop from Location History, select a date, as you did earlier. Now, the Location History for the selected date will be displayed. Next, locate the stop that you want to delete and click on the ellispsis next to it.
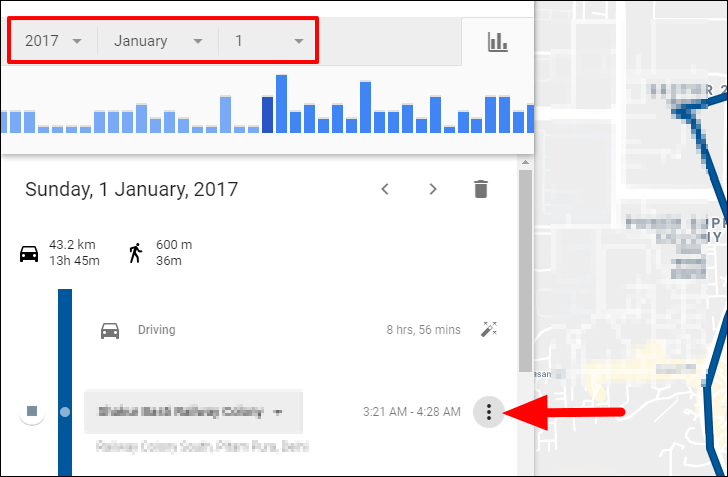
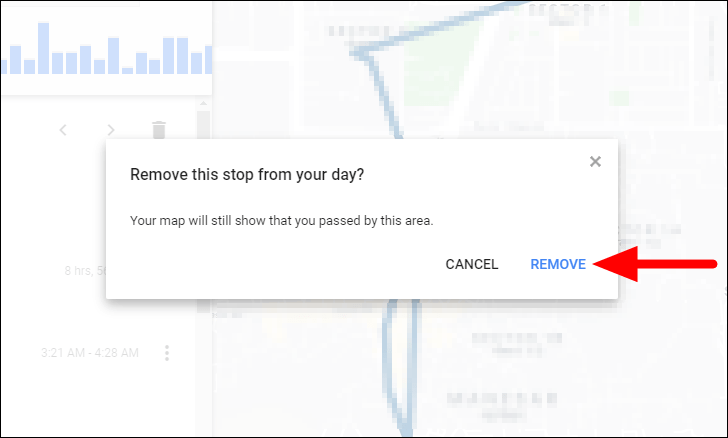
Now, select ‘Remove stop from day’ from the menu that pops up.

Finally, click on ‘Remove’ to delete that stop. Although the stop is deleted from the Location History and is no more listed as a separate entry, it will continue to show on the map.
These are all the ways you can delete Location History on the web portal.
Delete Location History from Maps App
This is a rather convenient option for many, since most have ‘Location History’ enabled on the phones only. Also, accessing the mobile app is easier than the web portal for many. Another factor that makes users lean towards the Google Maps app to delete Location History is the additional option for choosing a time range.
Let’s see all the ways you can delete Location History on Google Maps mobile app.
To delete location history the first two steps remains the same for all. Tap on the profile picture at the top-right corner.
Next, select ‘Your timeline’ from the list of options in the menu.
Delete Complete Location History
To delete complete Location History, tap on the ellipsis at the top-right corner.
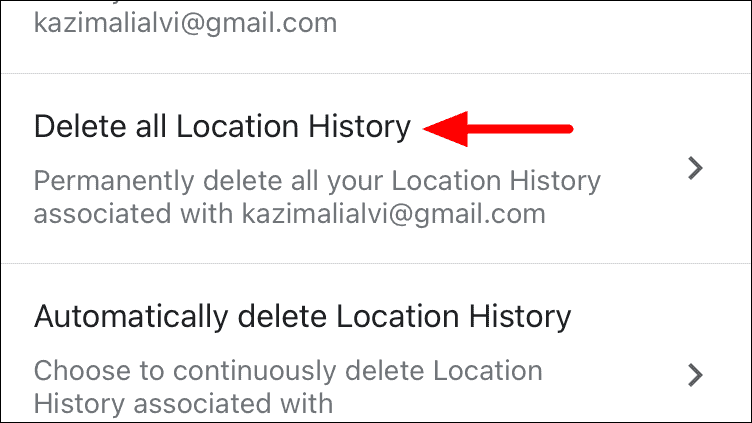
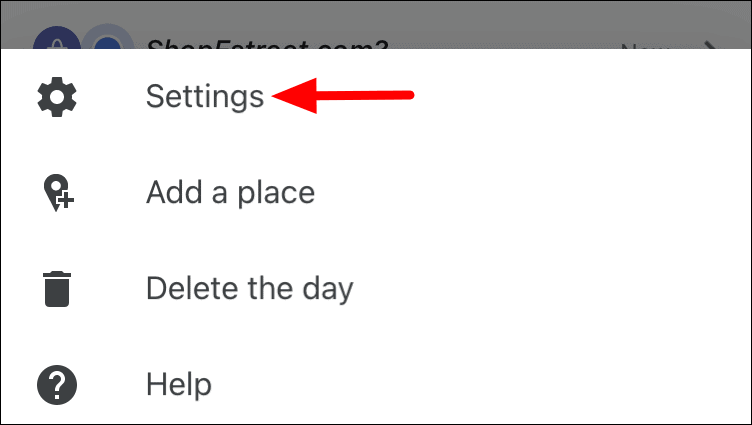
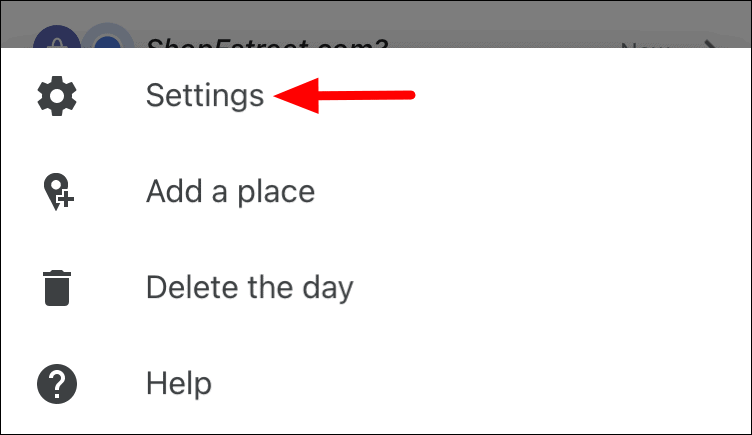
Next, select ‘Settings’ in the menu that appears at the bottom of the screen.
Now, scroll down and locate ‘Delete all Location History’, and tap on it.
A confirmation window will launch, tick the checkbox for ‘I understand and want to delete’, and then click on ‘Delete’ under it.
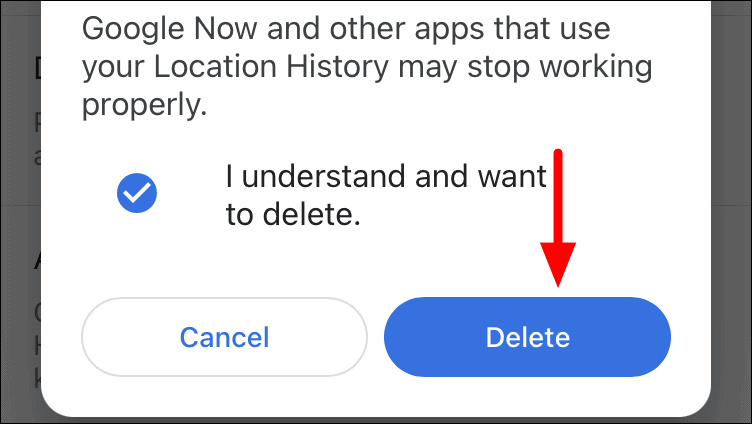
All the ‘Location History’ saved for your account will now be deleted.
Delete Location History for a Particular Period
To delete Location History for a particular time range, tap on the ellipsis at the top-right corner of the ‘Timeline’ screen.
A menu will now appear at the bottom, select ‘Settings’.
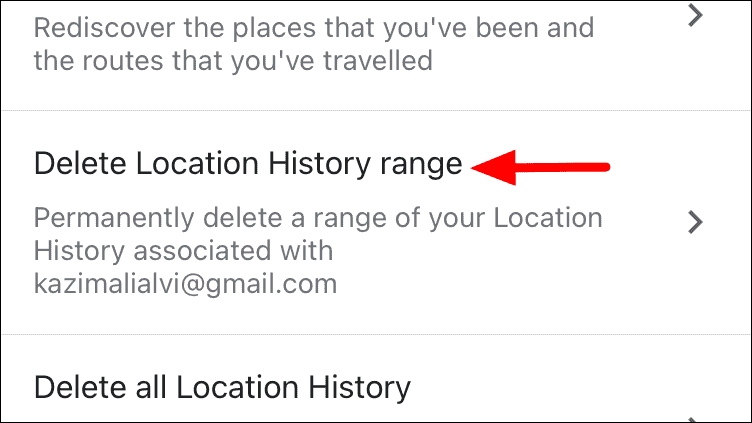
Next, locate and tap on the ‘Delete Location History range’ option in the list.
Now, choose a time range by first tapping on the ‘Start’ option, selecting the starting date, then tap on ‘End’ and select the end date. Once you have set a time range, tap on ‘Delete’ at the top-right corner.
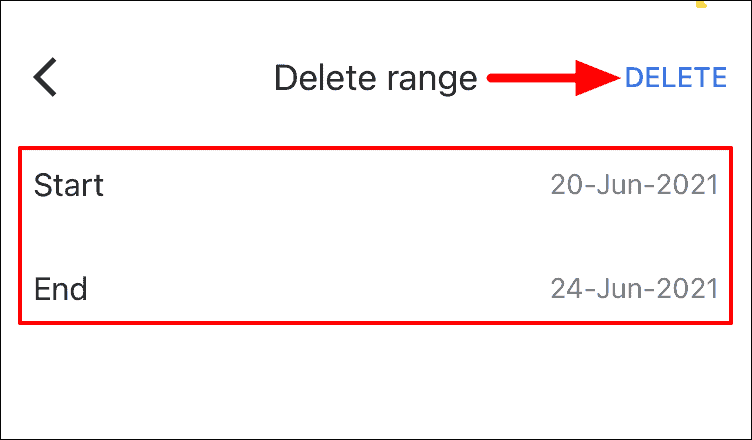
Next, a confirmation box will show up on the screen. Select the checkbox that says ‘I understand and want to delete’ and then tap on ‘Delete’ at the bottom.
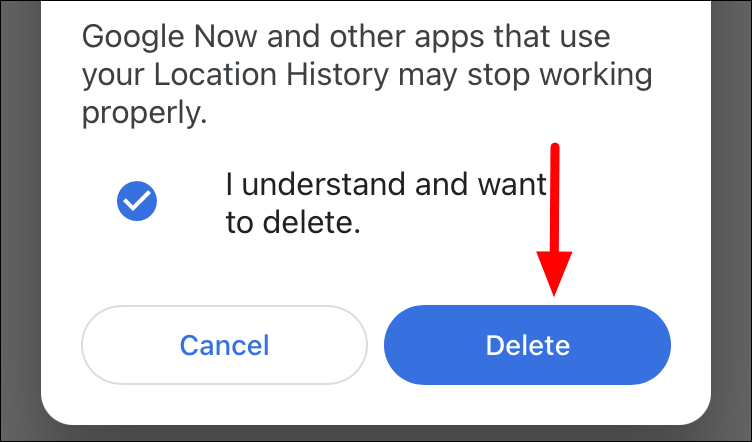
The Location History for the selected time range has now been deleted.
Delete a Single Day from Location History
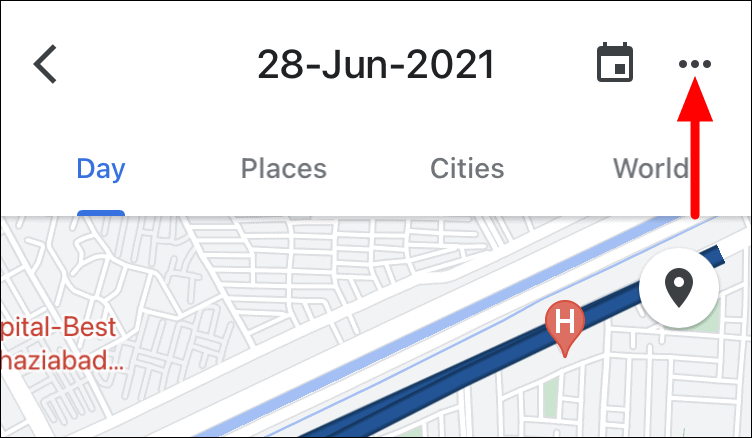
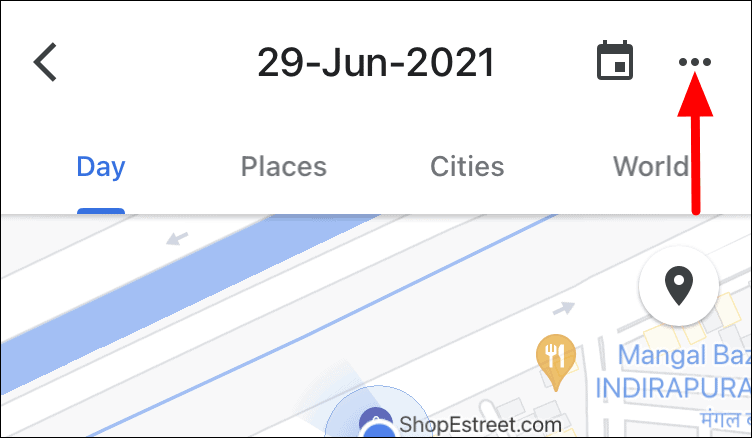
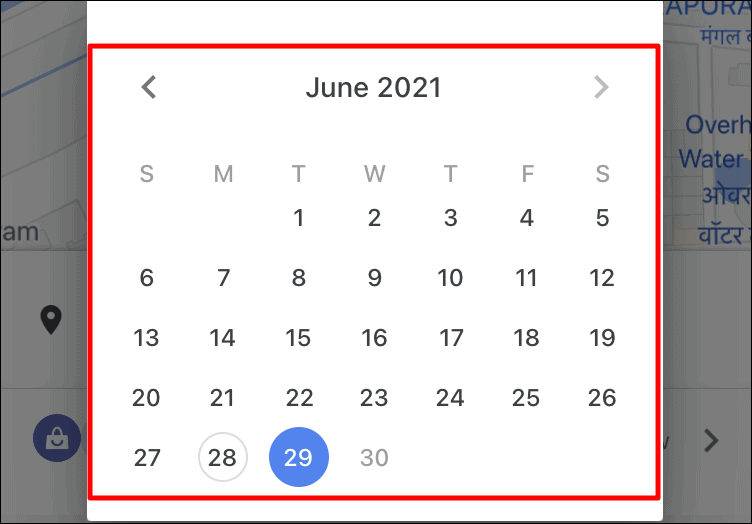
To delete the Location History for a specific date, tap on the ‘Calendar’ icon near the top-right corner.
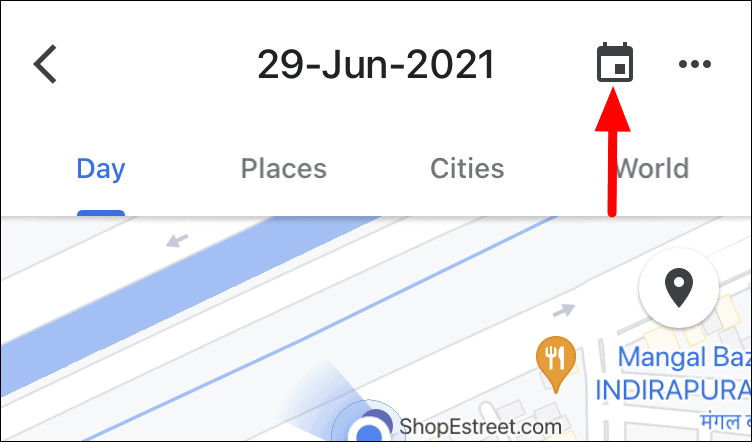
Next, a calendar will launch, select the date for which you want to delete the Location History. The present date will be selected by default.

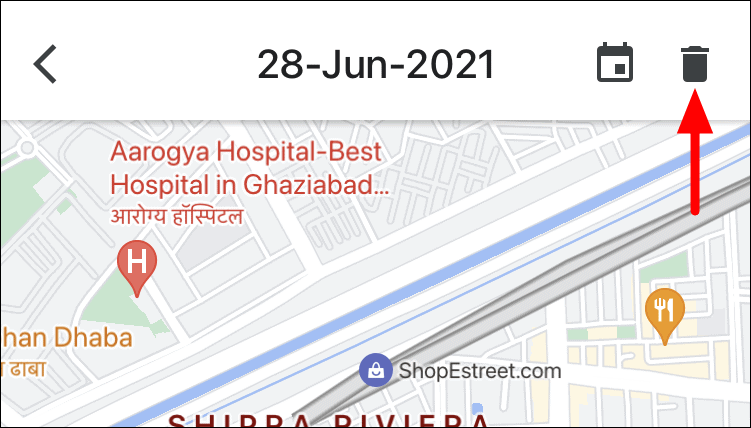
Once you have selected a date, tap on the ellipsis at the top-right corner.
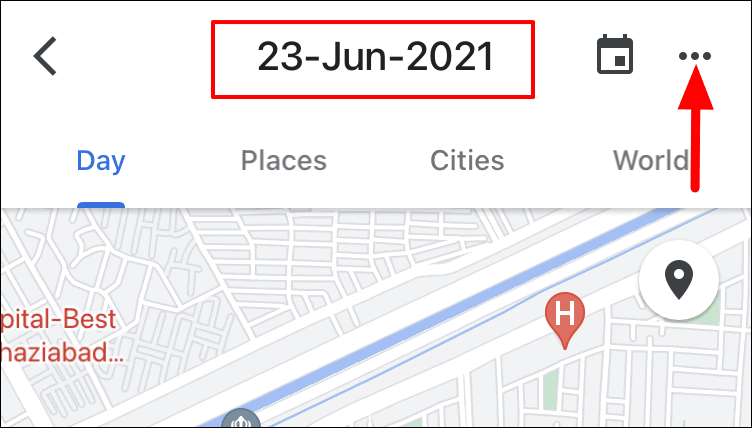
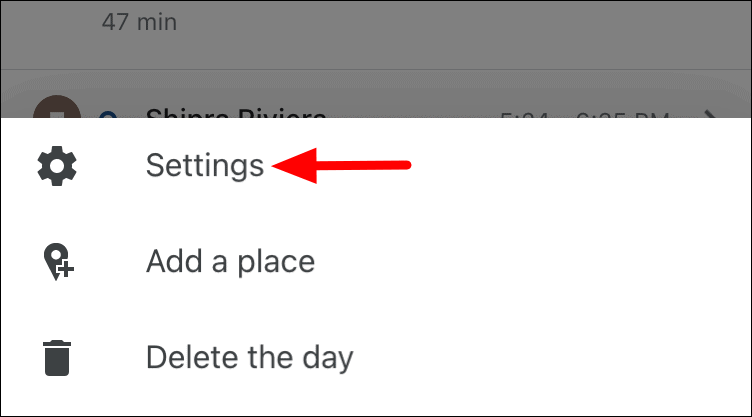
Now, select the ‘Delete the day’ option in the menu that appears at the bottom of the screen.
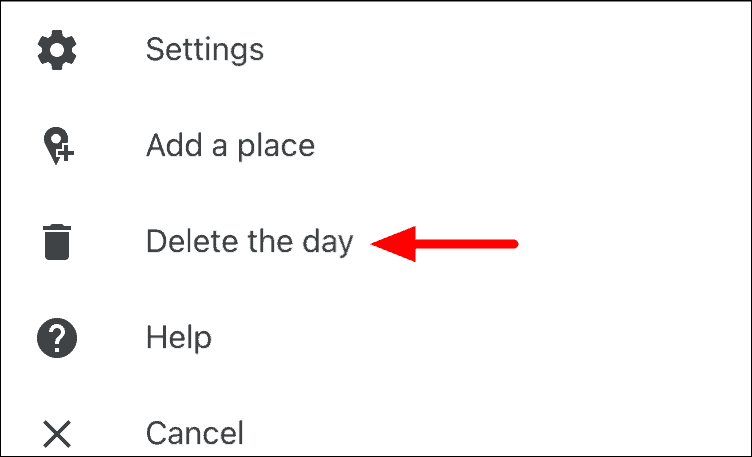
Finally, click on ‘Delete’ in the confirmation box that pops up.
The Location History for the selected date will now be deleted.
Delete a Stop from Location History
To delete a Stop from the Location History, tap on the ‘Calendar’ icon at the top-right corner of the ‘Your Timeline’ section of Google Maps.

Now, select a date on which you visited the stop that you want to delete from the Location History.
After you have selected a date, the various spots that you visited will be displayed at the bottom. Tap on the stop that you want to remove.
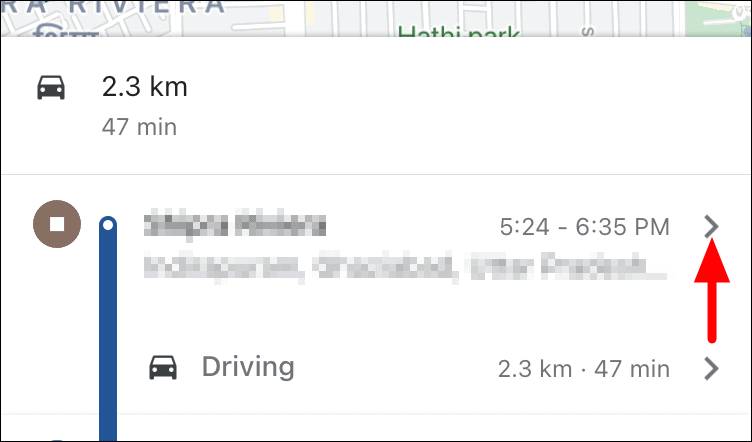
After you have selected a stop, tap on the ‘Delete’ icon at the top-right corner.
Finally, click on ‘Remove’ to delete the stop from the Location History.
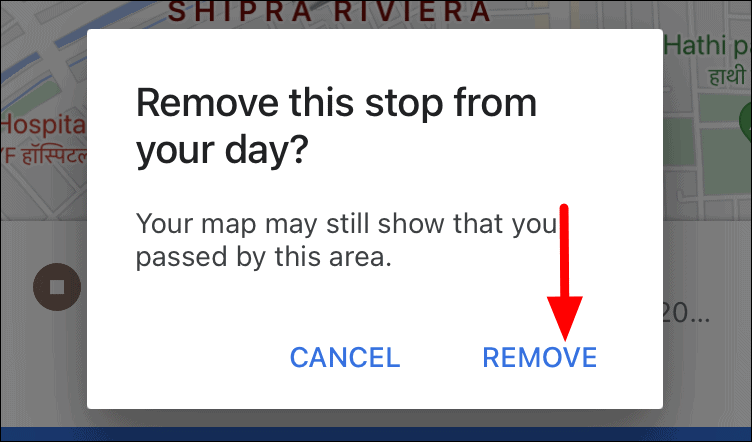
The selected stop will now be removed from the Location History, however, it will continue to show on the map as a location that you passed by.
That’s all there’s to deleting Location History.
Automatically Delete Location History in Google Maps
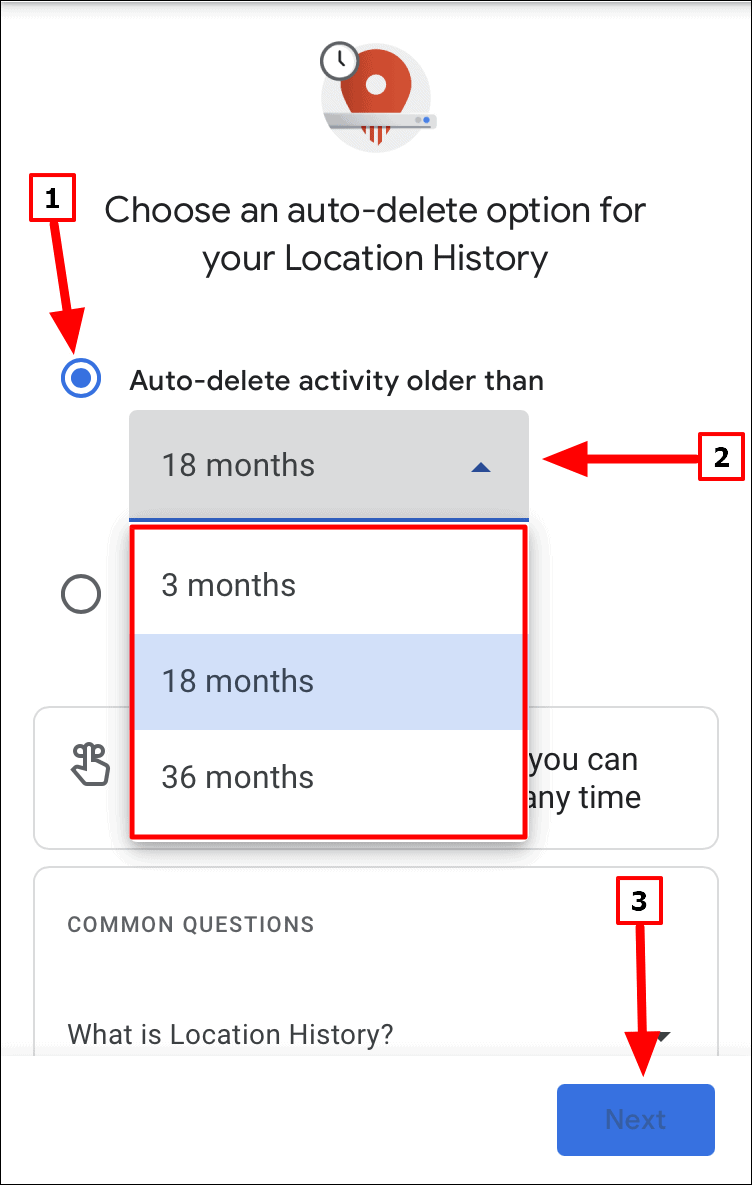
Apart from deleting Location History manually, you also have the option to set it to auto-delete. However, in the ‘Automatically Delete Location History’ setting, you have only three options, i.e., 3, 18, and 36 months, which means that Location History older than the selected period will be automatically deleted.
Just like we saw with disabling and deleting Location History, you can enable the ‘Automatically Delete Location History’ setting both from the desktop (web) and Google Maps mobile app.
On the Desktop
To enable Automatically Delete Location History on the desktop, go to timeline.google.com, and sign in with the email id that’s linked to the device. In Timeline, click on the ‘Settings’ icon near the bottom-right corner.
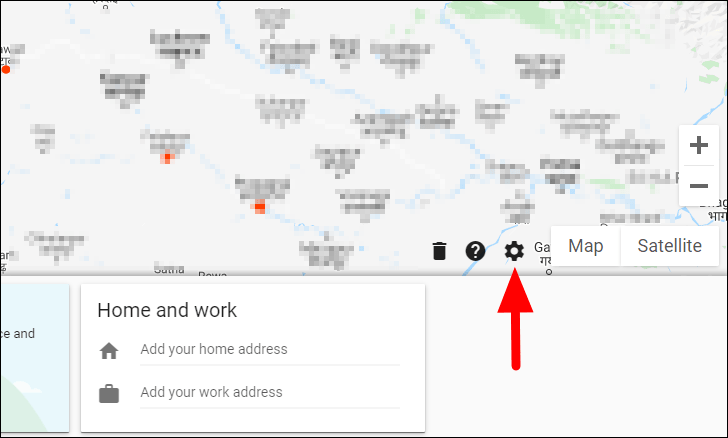
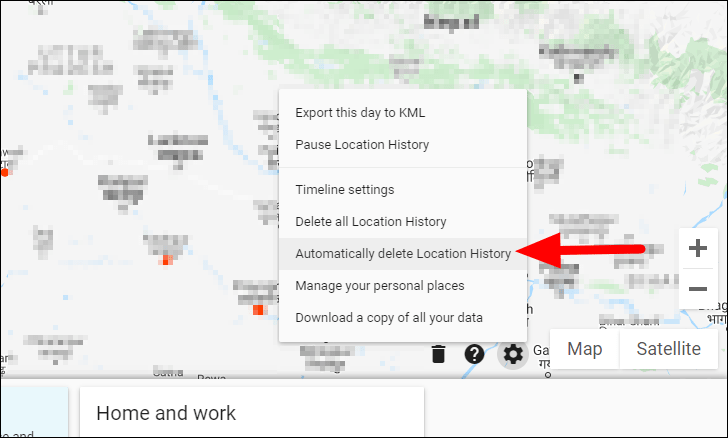
Next, select ‘Automatically delete Location History’ from the menu that appears.
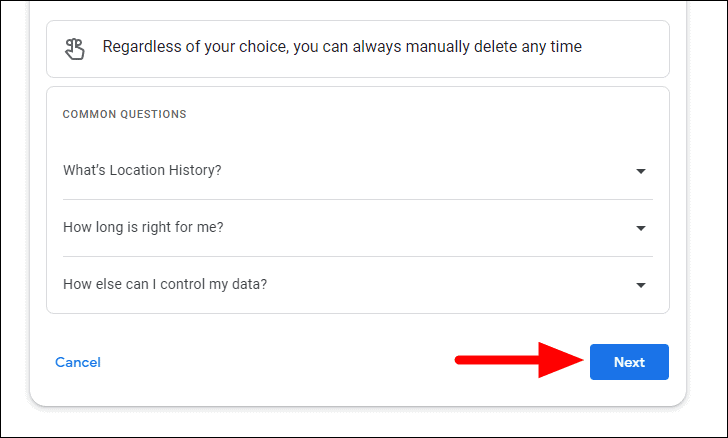
On the next screen, select the checkbox for ‘Auto-delete activity older than’, click on the drop-down menu under it, and then select either of the three options.
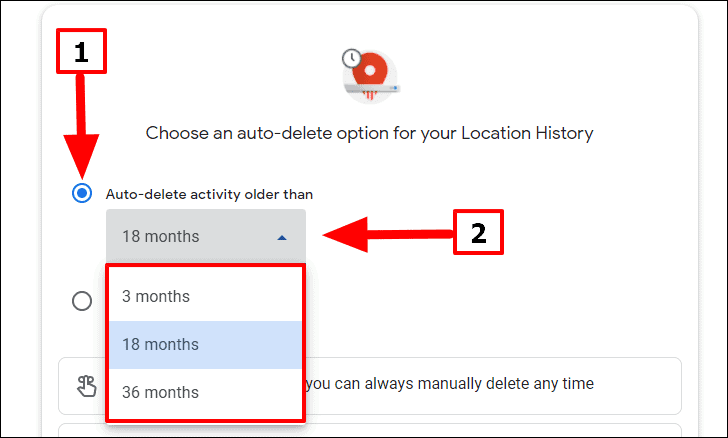
Now, scroll down to the bottom and click on ‘Next’.
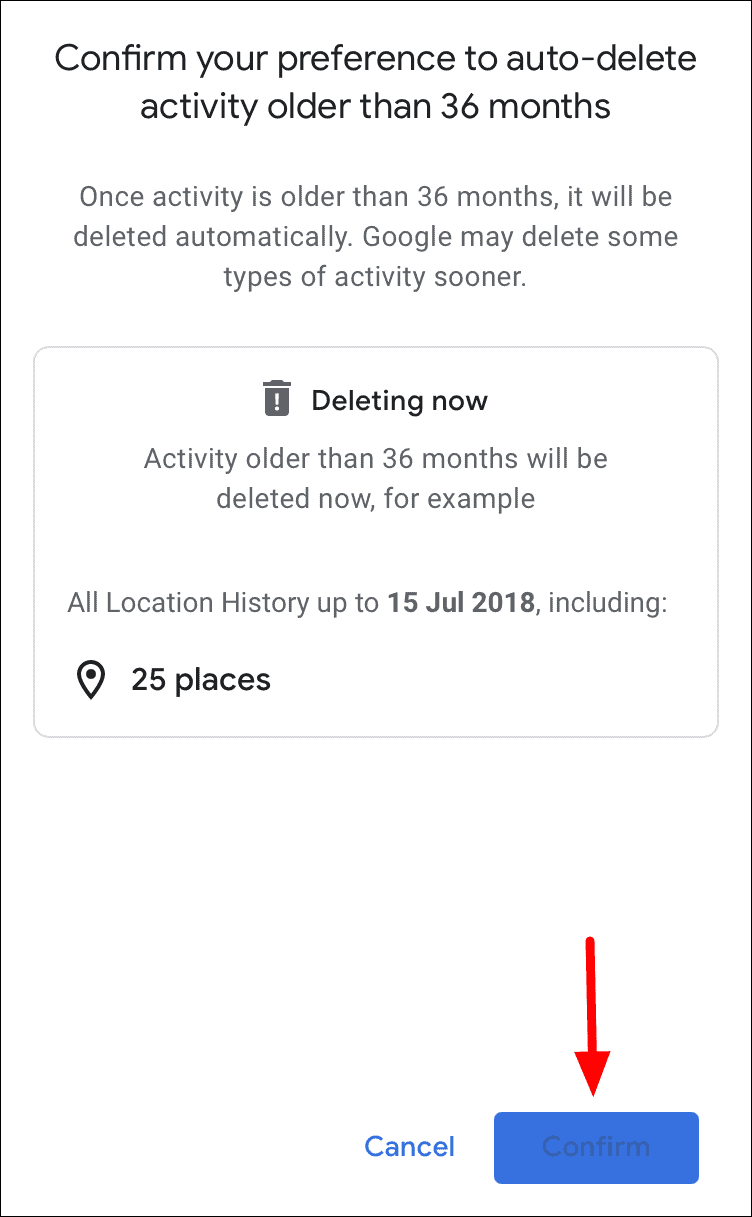
A confirmation box will now launch displaying the selected settings and the data that will be deleted. Click on ‘Confirm’ at the bottom to proceed.
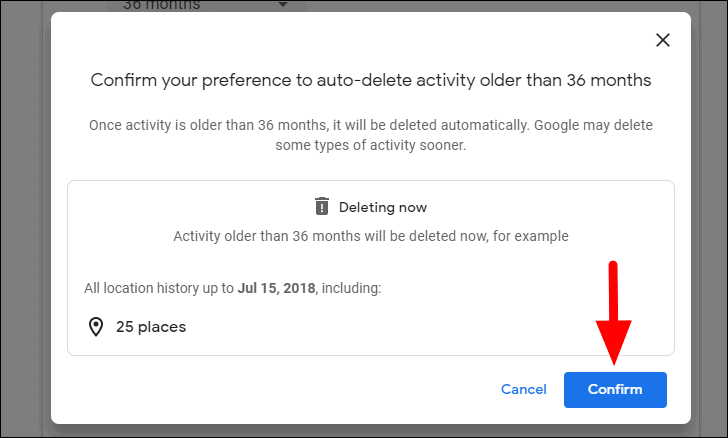
The Location History older than the selected period will now automatically be deleted from now. Also, the history that’s older than the selected period from the current date will be deleted as well.
With Google Maps Mobile App
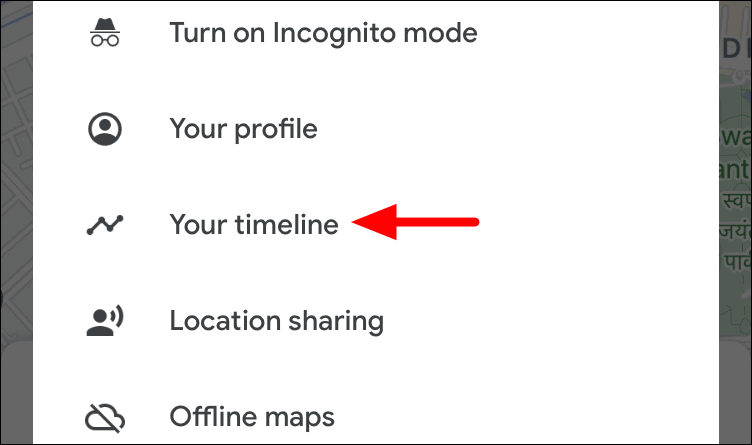
To automatically delete Location History, launch the ‘Google Maps’ app on your phone and tap on the profile picture at the top-right corner.
Next, select ‘Your timeline’ from the list of options in the menu.
In the Timeline, tap on the ellipsis at the top-right corner.
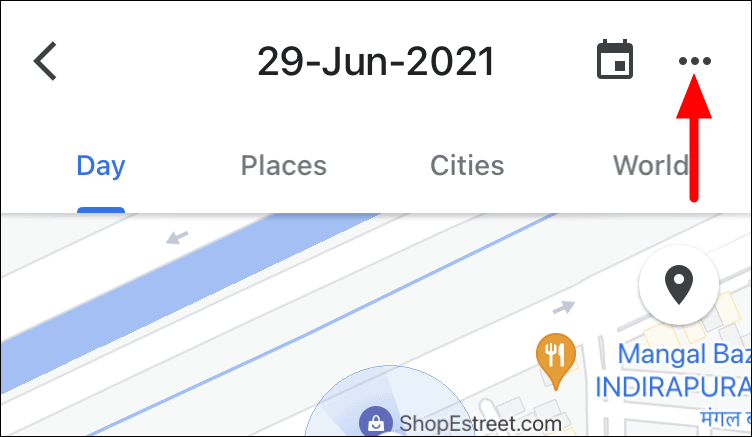
A small menu will appear at the bottom, select ‘Settings’.
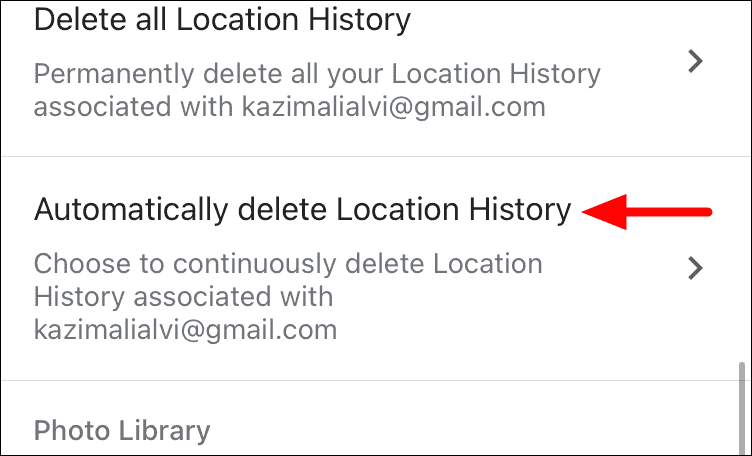
Next, locate and tap on the ‘Automatically delete Location History’ option from the list.
Now, select the checkbox for ‘Auto-delete activity older than’, tap on the drop-down menu below it, select an option, and then tap on ‘Next’ at the bottom.
On the next screen, your current auto-delete setting will be displayed. Tap on ‘Confirm’ at the bottom-right to validate the change.
The new settings are now in place.
The choice of disabling or deleting Location History depends on individual preferences and cannot be generalised. Therefore, before you proceed, do understand the changes that will come into affect and how they affect you.


