Sometimes, you may get the 0x800706b5 error code while trying to update Windows when the update fails to install. This error can also cause your system to hang and the error code may sometimes even appear after you've installed the update. There are various reasons why it happens, such as your Windows Update cache files may have become corrupted, system files might be damaged, glitches and bugs with the update, etc. Fortunately, there are a few fixes that can help you sort out the problem.
Solution 1: Run the Windows Update Troubleshooter
Windows has a built-in troubleshooter to detect and fix problems with Windows Update that can help get rid of the 0x800706b5 error.
- Open the Settings app using the
Win + Ishortcut and typetroubleshootin the search box on the left.
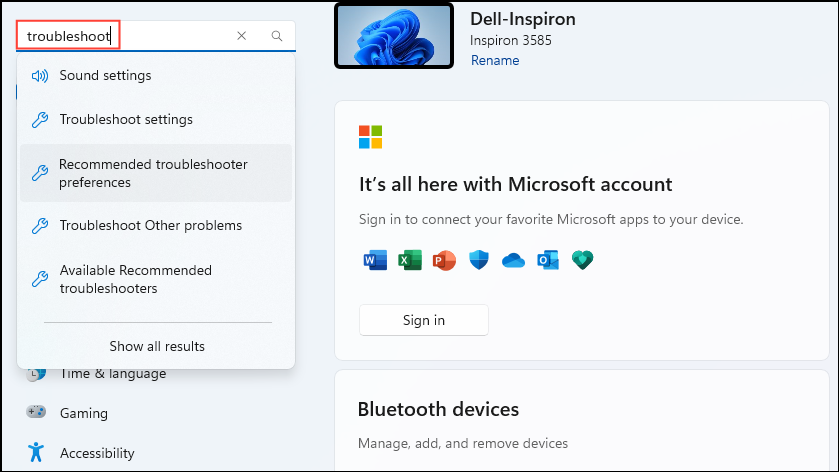
- Click on 'Troubleshoot Other problems' in the list of options that appear.
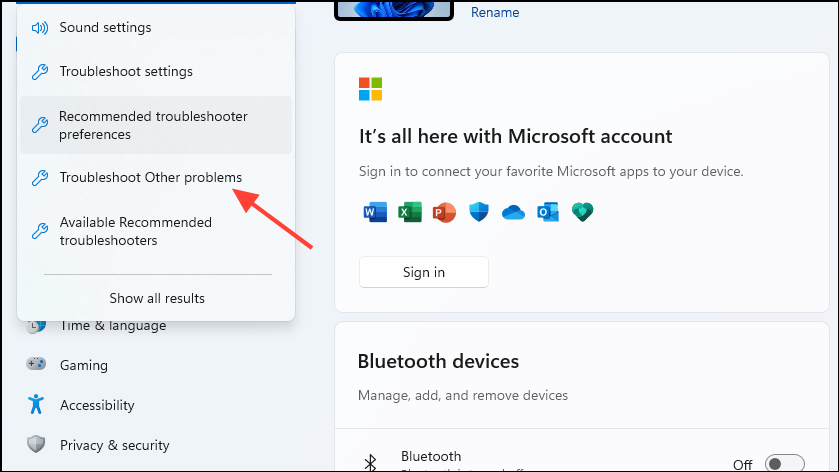
- On the next page, you will see troubleshooters for different components, such as audio, network, and printer. Click on the 'Run' button on the right of the Windows Update option.
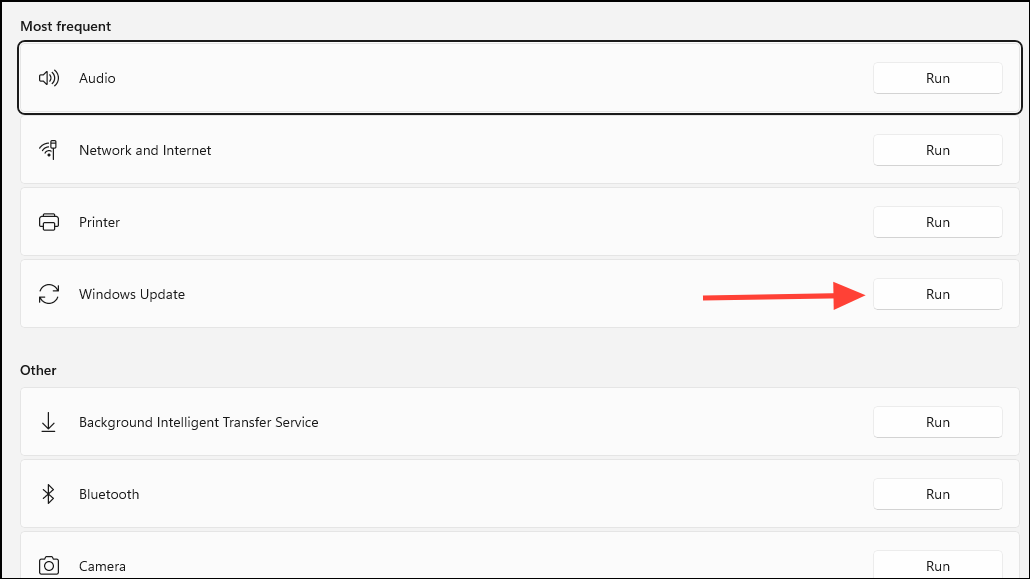
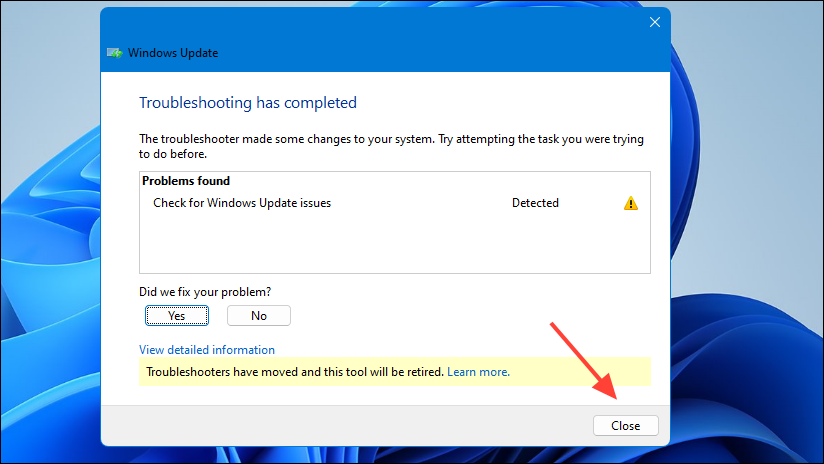
- Let the troubleshooter run and then follow the steps that appear on your screen. You can then close the troubleshooter, but you may have to reboot your PC for changes to take effect.
Solution 2: Select the Update and Restart option
If there are pending updates that need to be installed, you will see an 'Update and Restart' option when you click on the power button. If you cannot install the pending updates from the Updates page in the Settings app, this can help you out.
- Open the Start button and click on the Power button.
- Click on 'Update and Restart' to allow your system to install the updates.
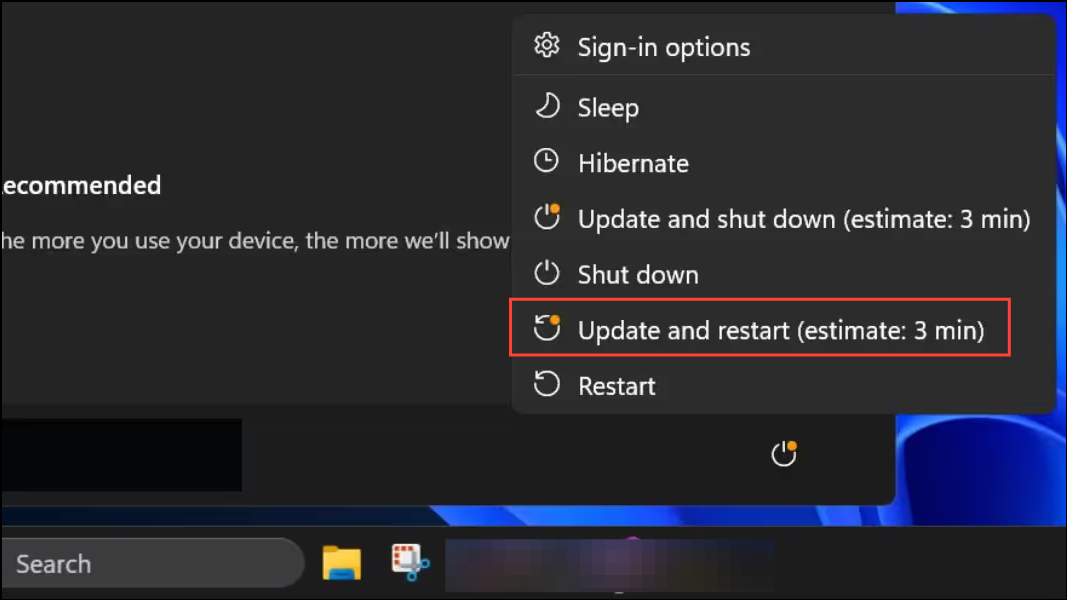
- Wait for your computer to restart and the error should no longer be present.
Solution 3: Restart the Windows Update service
The Windows Update service may sometimes get corrupted or experience glitches, which can result in the 0x800706b5 error. In such a case, you can restart the service to try and fix the issue.
- Open the Start menu, type
services.msc, and click on 'Run as administrator'.
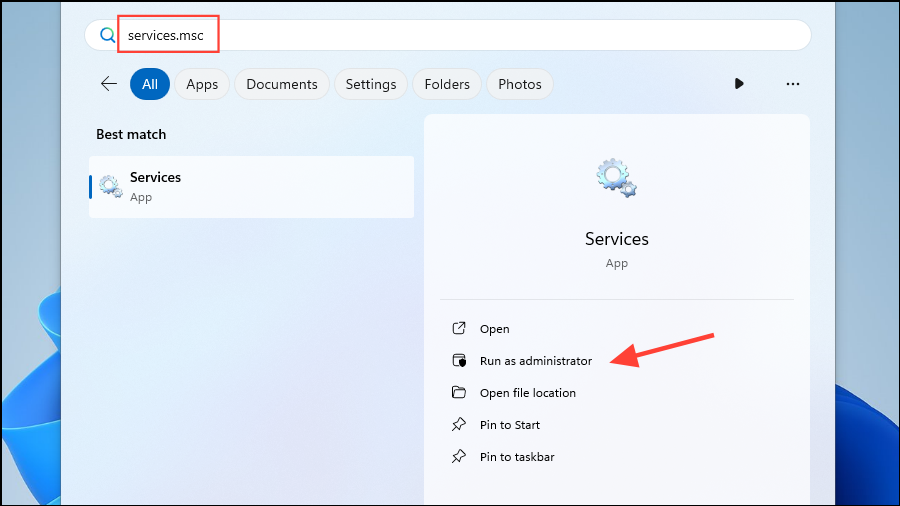
- When the Services utility opens, scroll through the list of services and find 'Windows Update'. Right-click on it and select 'Properties'.
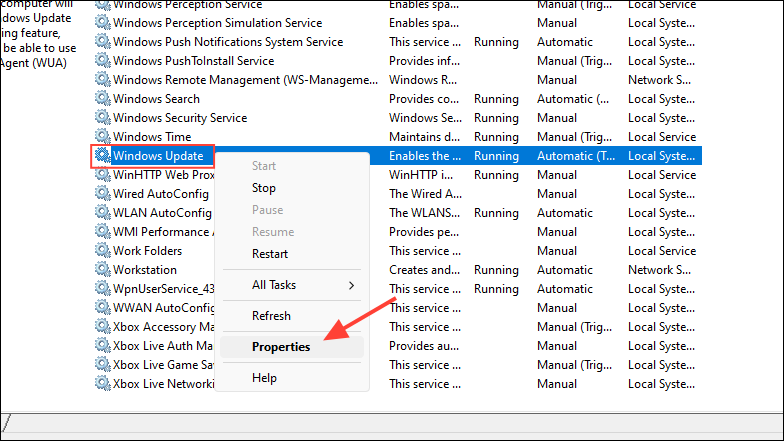
- In the dialog box that opens, click on the 'Stop' button where the Service status is visible.
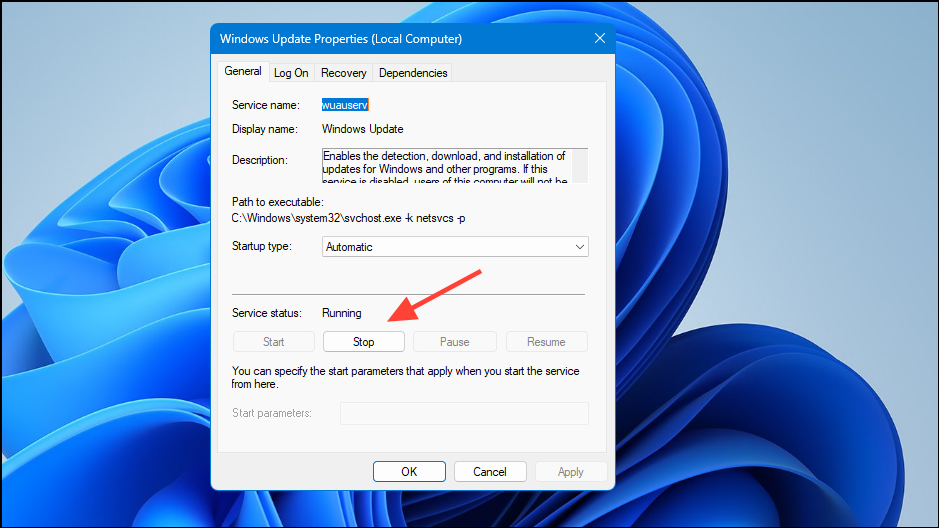
- Now, open the Run dialog box again and paste
%windir%\SoftwareDistribution\DataStorein it before pressing Enter.
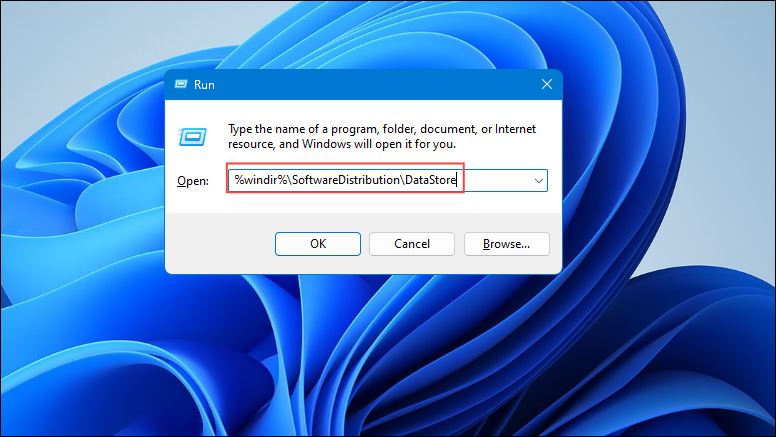
- A new window will open up. Select all the folders and files inside and delete them.
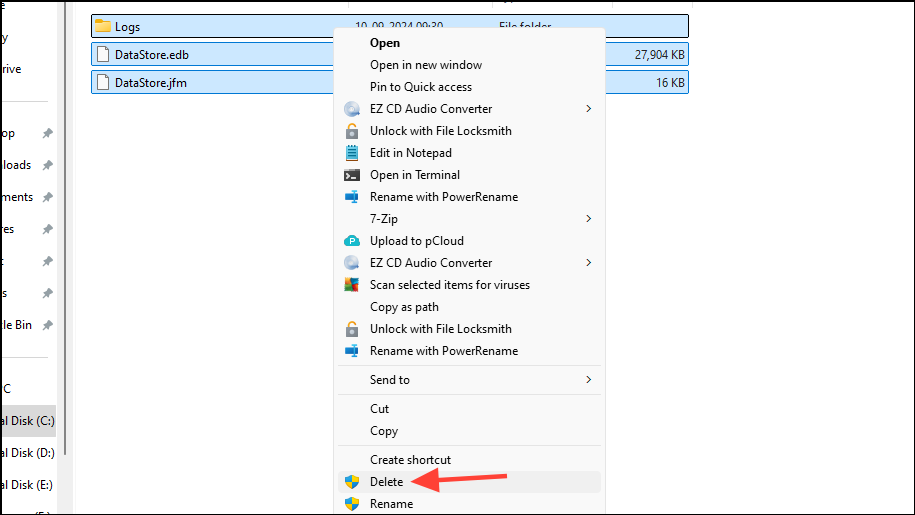
- After you've deleted the folder contents, close the folder and open the Services utility again. Right-click on Windows Update and then click on the 'Start' button this time.
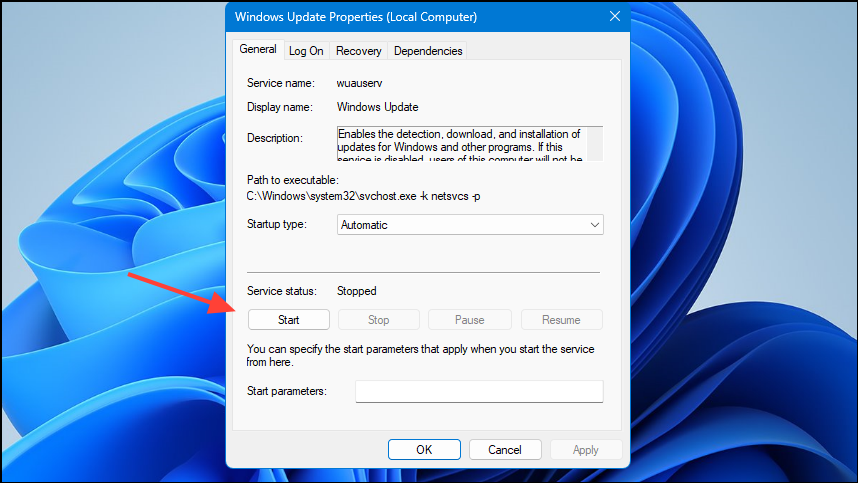
- Finally, click on the 'OK' button and close the utility. The error should no longer appear on your system.
Solution 4: Start the Windows Installer service
Another solution for the 0x800706b5 error is to start the Windows Installer service.
- Open the Services utility as explained above and search for the 'Windows Installer' services in the list of services.
- Right-click on it and click on 'Start' before closing the utility.
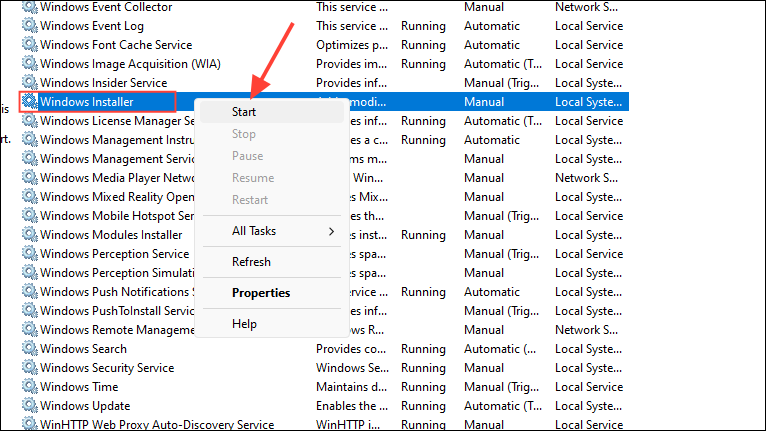
- Try running Windows Update again and check whether the error has been resolved.
Solution 5: Reset Windows Update components
If Windows Update components have become corrupted, you will need to reset them to their default state to get rid of the problem causing the 0x800706b5 error.
- Open the Start menu, type
cmd, and click on 'Run as administrator'.
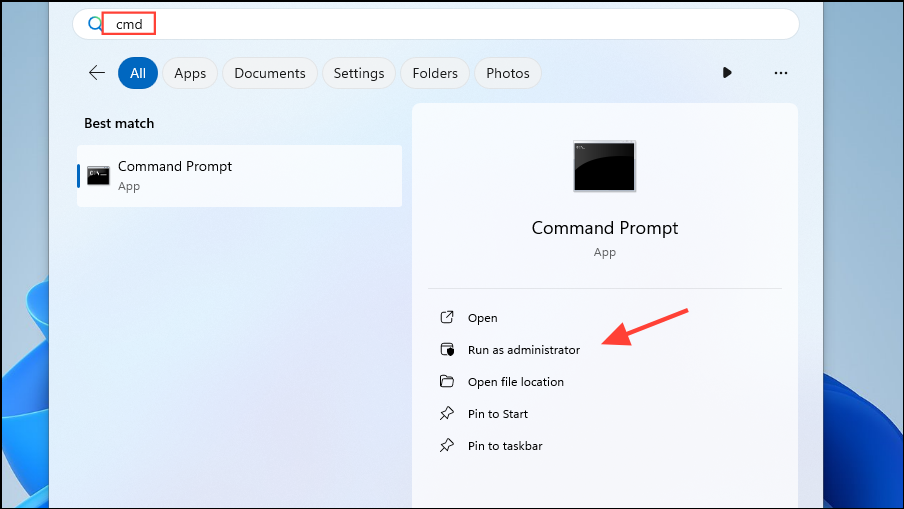
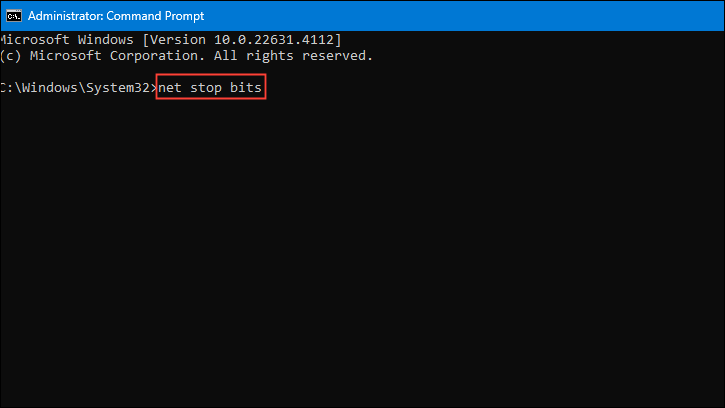
- Once the command prompt window opens, type the following commands one by one, pressing Enter after each one.
net stop bits
net stop wuauserv
net stop appidsvc
net stop cryptsvc
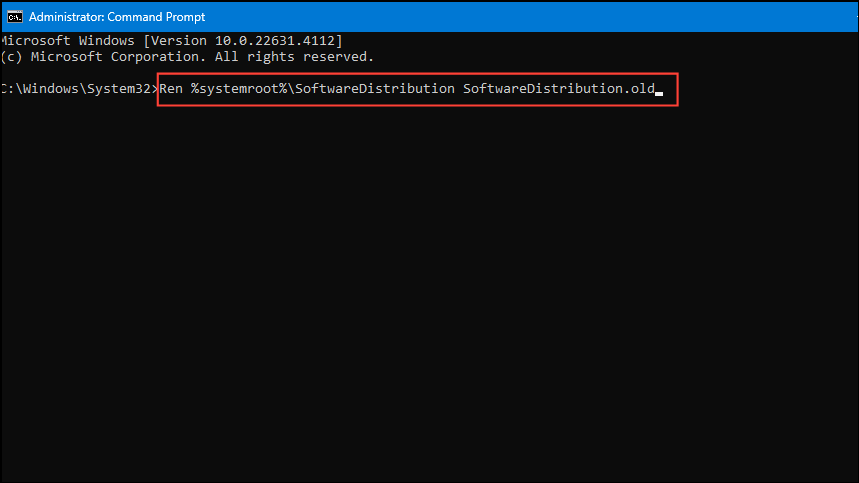
- After entering the above commands, paste
Ren %systemroot%\SoftwareDistribution SoftwareDistribution.oldin the command prompt window and press Enter.
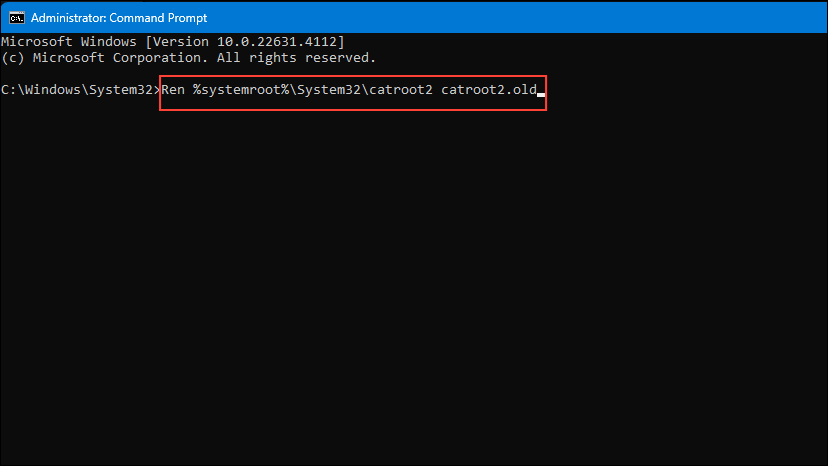
- Follow this with the following command:
Ren %systemroot%\System32\catroot2 catroot2.oldand press Enter again.
- Finally, you can restart the services by entering the following commands one by one and pressing Enter after each one.
net start bits
net start wuauserv
net start appidsvc
net start cryptsvc
- Once you finish entering the commands, Windows will create new catroot2 and SoftwareDistribution folders and restart the update services. You can reboot your computer and then try installing the updates again.
Solution 6: Remove recently installed programs
Sometimes, the 0x800706b5 error starts showing up after you install a program, which means that the software is causing issues preventing updates from being installed. To check this, you can remove the application and then try updating Windows again.
- Open the Settings app and click on 'Apps' on the left.
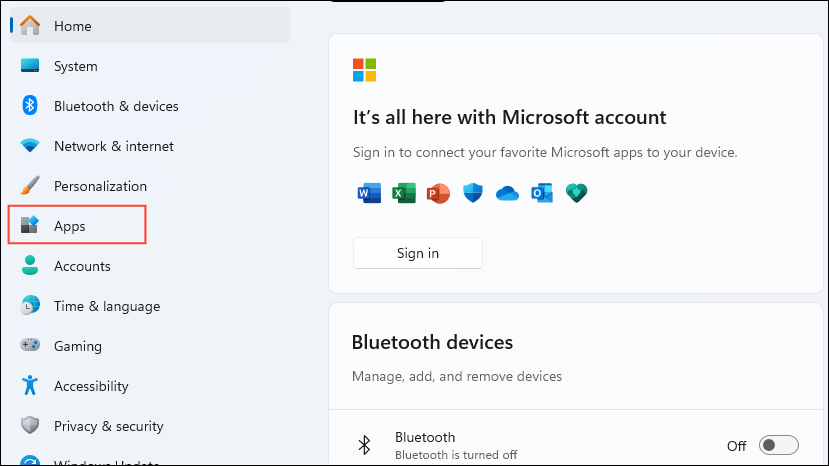
- Next, click on 'Installed Apps' at the top of the Apps page.
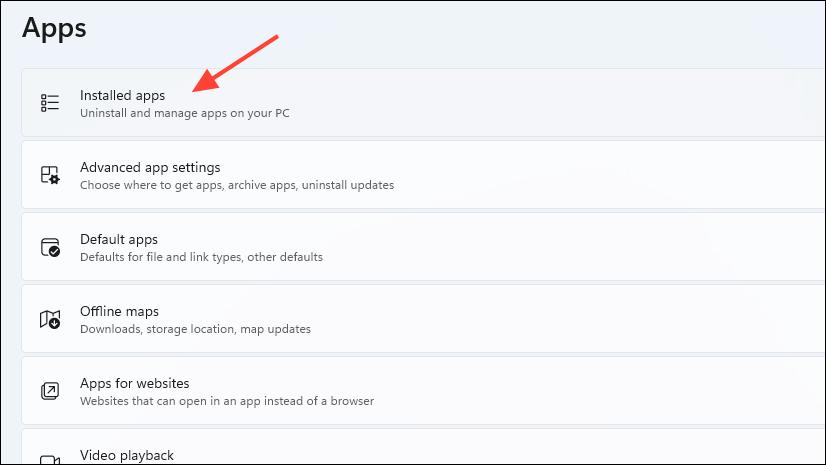
- Now you will see all the applications installed on your computer. Click on the three dots on the right of the program you want to remove and then on 'Uninstall'.
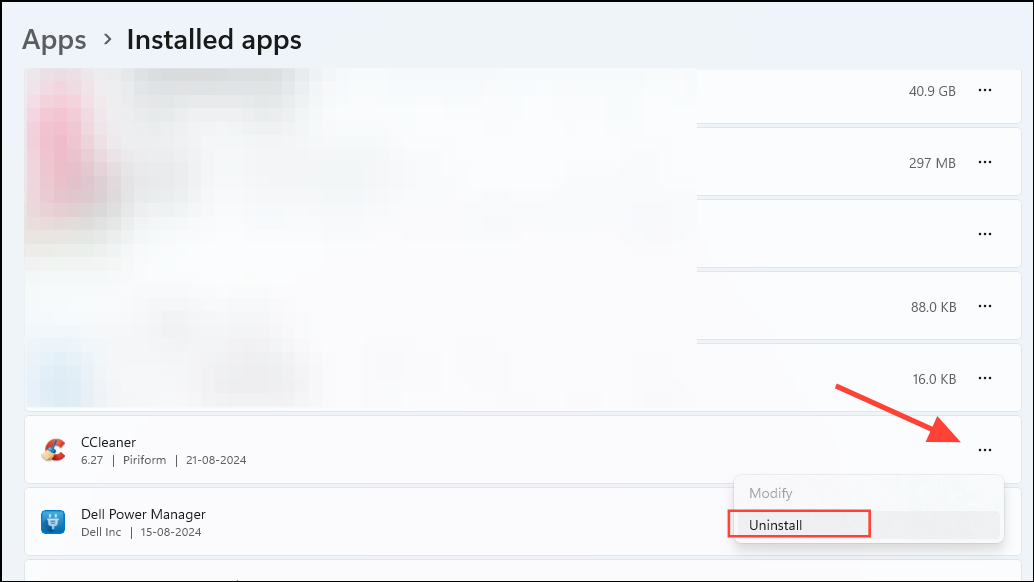
- Wait for the program to be removed from your PC and then try to install the updates again.
Solution 7: Install the update manually
You can install Windows Updates manually from the Microsoft Update Catalog if you are getting the 0x800706b5 error when updating from Windows Settings.
- Go to the Microsoft Update Catalog website and type the KB code of the update you want to install.
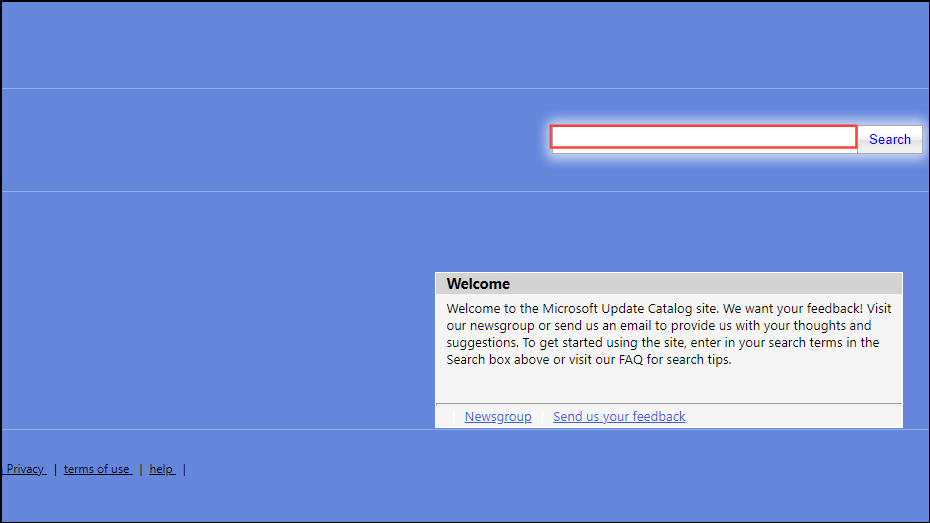
- You will see a list of the available updates. Click on the 'Download' button for the update you want to install.
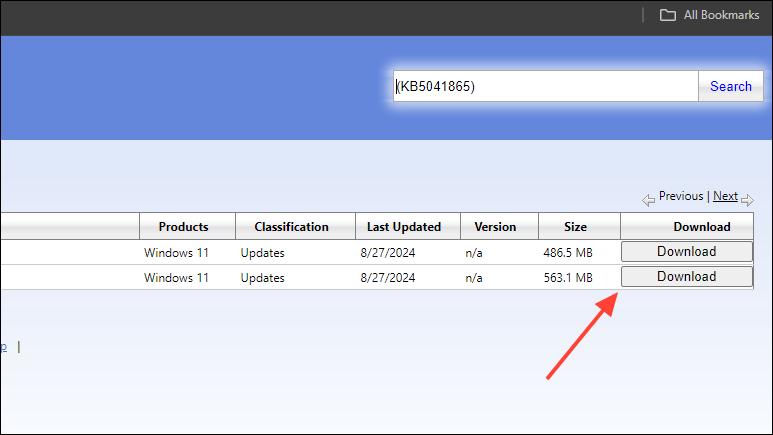
- A dialog box will appear containing a link on which you can right-click and then click on 'Save link as..' to save it to your PC.
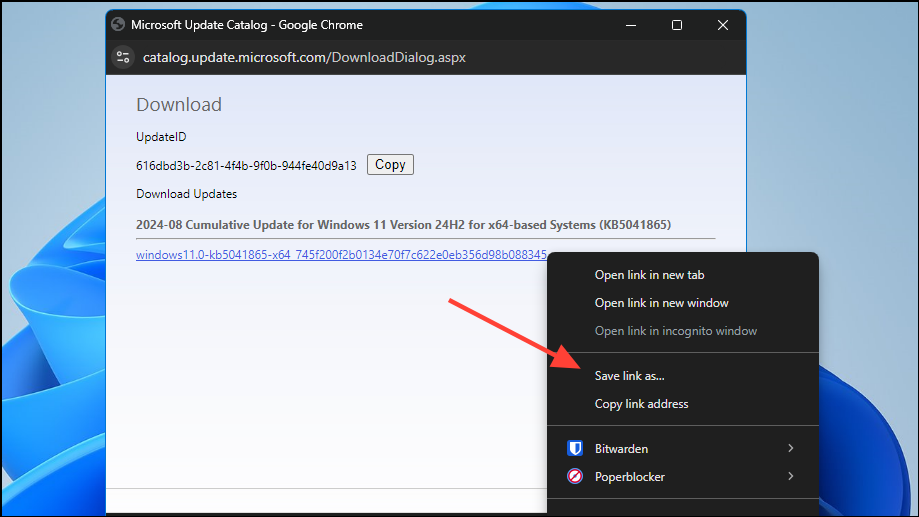
- Once the update file is downloaded, double-click on it to install it.
Solution 8: Run Windows System File Checker
Windows can run into problems if the Windows Resource Protection (WRP) file is corrupted or missing. To fix this, you will need to run the System File Checker utility.
- Open Command Prompt with Admin privileges and then type
sfc /scannowbefore pressing Enter.
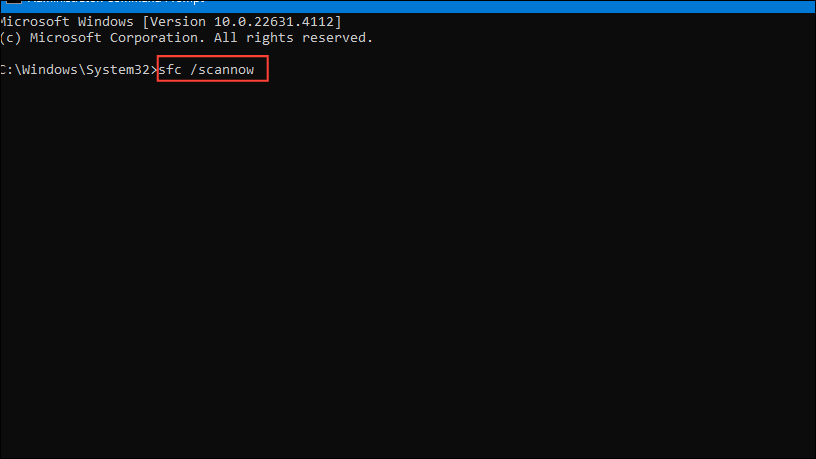
- Wait until the scan is complete and then reboot your computer before trying to install the updates again.
- If SFC shows an error, type the following commands one by one into the command prompt window, pressing Enter after each one.
DISM /Online /Cleanup-Image /CheckHealth
DISM /Online /Cleanup-Image /ScanHealth
DISM /Online /Cleanup-Image /RestoreHealth
Solution 9: Perform a clean boot
A clean boot helps you check whether any third-party programs are causing problems and preventing Windows from updating. You can then remove the problematic application, which should allow the update to install successfully.
- Open the Start menu, type
msconfig, and click on 'Run as administrator'.
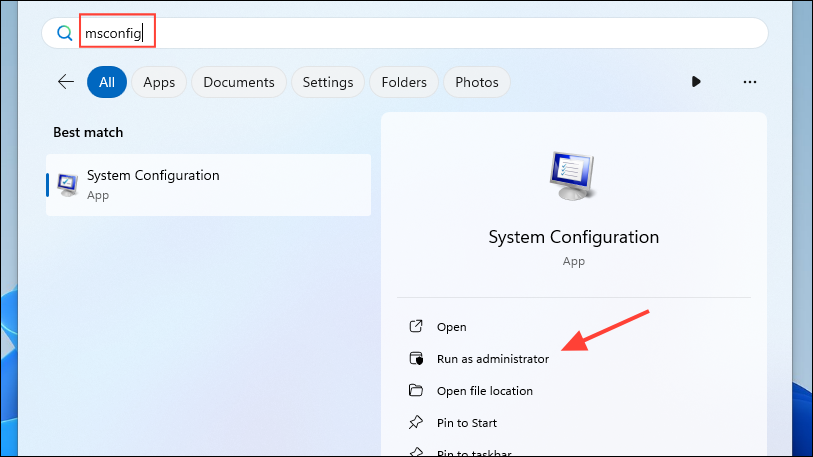
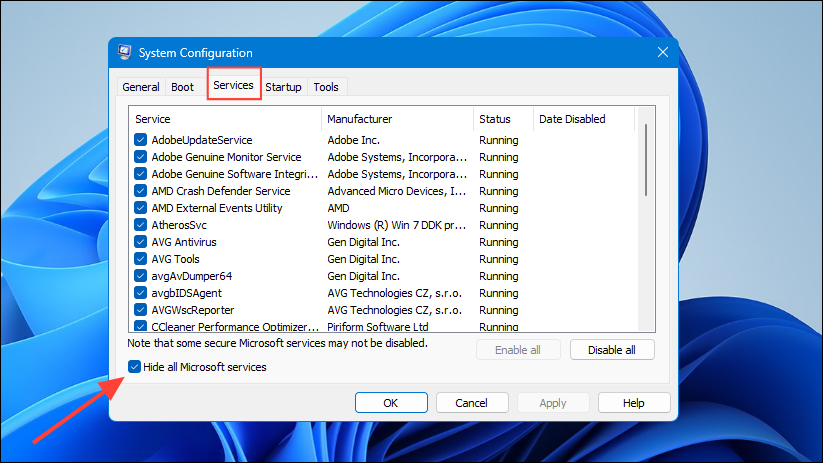
- When the System Configuration utility opens, switch to the 'Services' tab at the top and then click on the checkbox next to the 'Hide all Microsoft services' at the bottom to enable it.
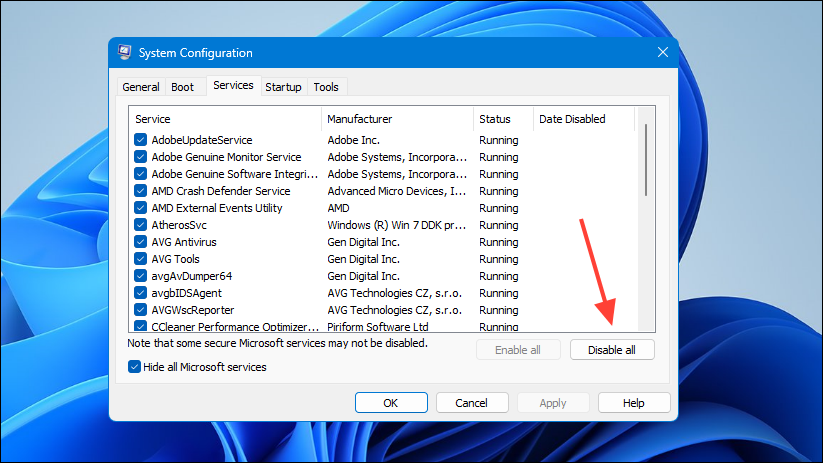
- Now, click on the 'Disable all' button to turn off all third-party services.
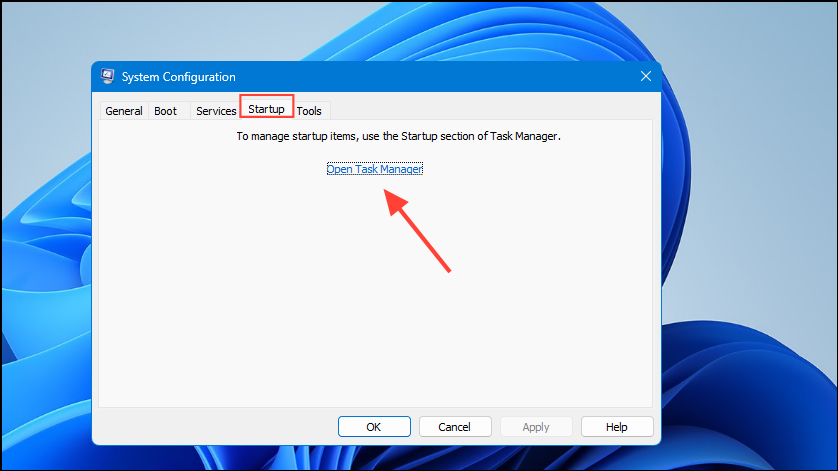
- Next, click on the 'Startup' tab at the top and then on 'Open Task Manager'.
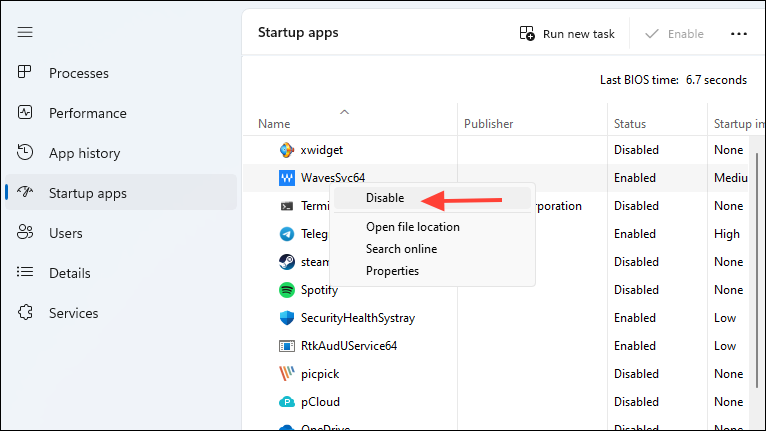
- When the Task Manager opens, right-click on the applications on the right side and click on 'Disable' for each application.
- Close the Task Manager and then click on the 'OK' button to close the System Configuration utility. Then restart your computer and it will boot into Safe Mode. If the error does not appear, start enabling the applications one by one from the Task Manager until it appears to determine which program is causing it.
Things to know
- Windows Updates can also cause problems at times, so you can try uninstalling recent updates from the Windows Update page.
- If you had created a restore point earlier, you can try restoring your PC using System Restore if nothing else works.
- Similarly, there is an option in the Settings app that lets you reset your PC, but keep in mind that this will remove all your applications, settings, and customizations.
- If you're not sure about installing an update, first, create a backup of your system and then install the update. In case problems occur, you can use the backup to undo the changes made by the update.


