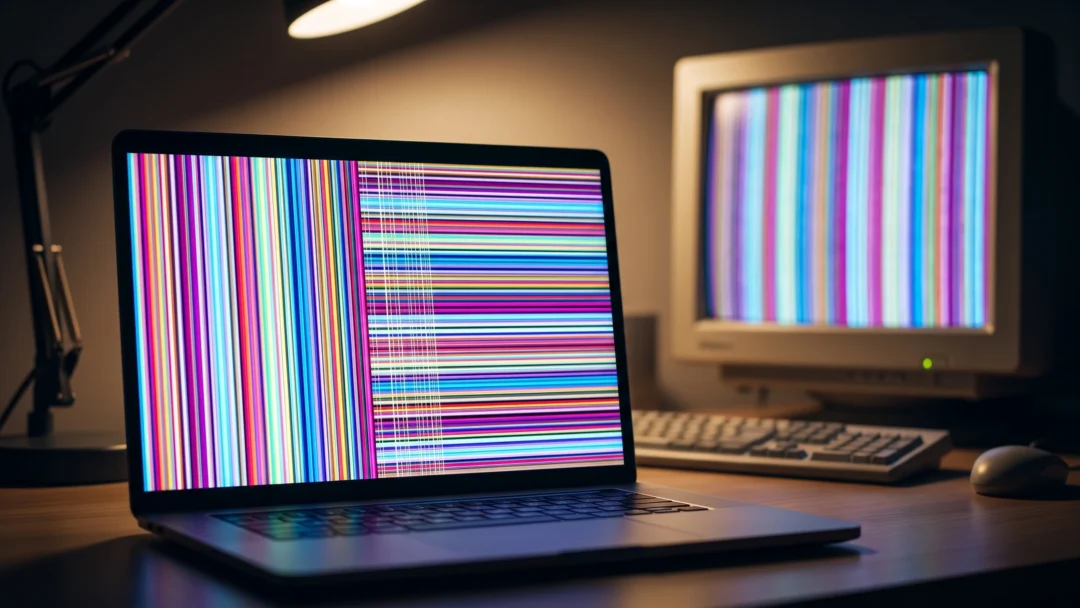
A black screen appearing after booting Windows 11 can be alarming and may prevent you from accessing your system. This issue can arise due to various reasons, including power supply problems, display settings misconfigurations, or driver issues. Fortunately, there are several methods you can try to resolve this problem and get your PC back to normal.
Restart your PC
Step 1: Press and hold the power button on your computer for about 10 to 15 seconds until it completely shuts down. This ensures that all components are turned off properly.
Step 2: Wait for at least 30 seconds to allow your system to reset.
Step 3: Press the power button again to turn on your PC. Check if the black screen issue persists or if you can log into your account.
If you're unable to restart your PC using the power button, you can try using the shortcut Ctrl + Alt + Delete
. This should bring up a screen with several options, including a power button at the bottom right. Click on it and select 'Shut down' to turn off your computer.
Reset Windows Explorer
If your screen is black but you can still see and move the mouse cursor, the issue might be with the File Explorer not loading correctly. Restarting Windows Explorer can help fix this problem.
Step 1: Press Ctrl + Shift + Esc
to open the Task Manager.
Step 2: In the Task Manager, under the 'Processes' tab, locate 'Windows Explorer'. If you have trouble finding it, you can use the search bar at the top.
Step 3: Right-click on 'Windows Explorer' and select 'Restart'. Your desktop may flicker briefly as the explorer restarts.
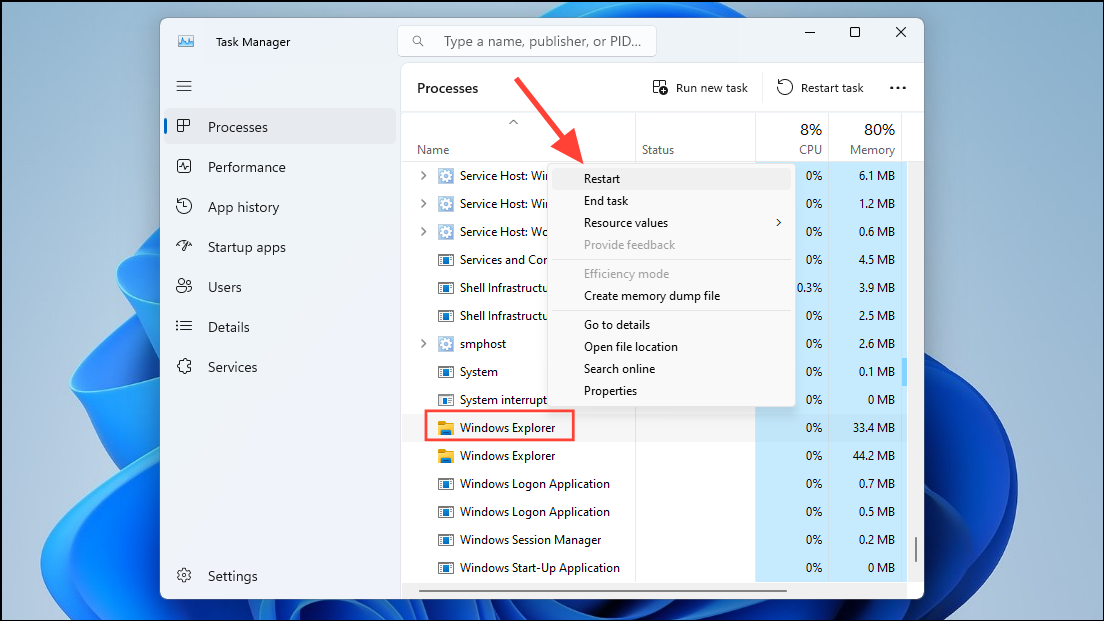
This should refresh the File Explorer and potentially resolve the black screen issue.
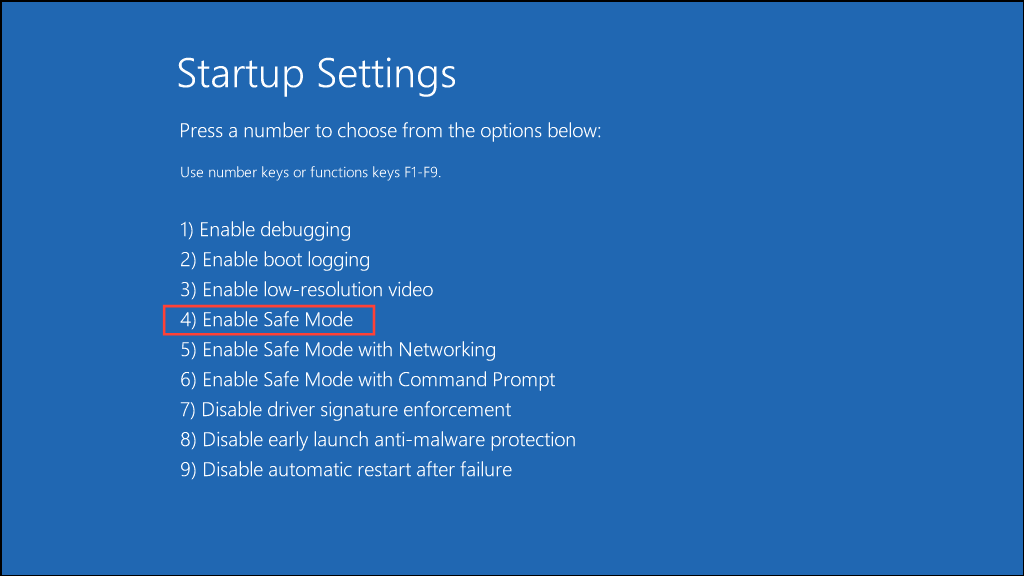
Boot into Safe Mode
Safe Mode starts Windows with only the essential files and drivers, which can help you troubleshoot issues caused by faulty drivers or software. Booting into Safe Mode might help you identify and fix the black screen problem.
Step 1: With your PC powered on, press and hold the Shift
key and then click on the 'Restart' option from the Start menu or login screen.
Step 2: Your PC will reboot and display the 'Advanced Options' screen. Select 'Startup Settings' from the list.
Step 3: On the 'Startup Settings' page, click on 'Restart' to reboot your PC again.
Step 4: After restarting, you'll see a list of options. Press 4
on your keyboard to enter Safe Mode.
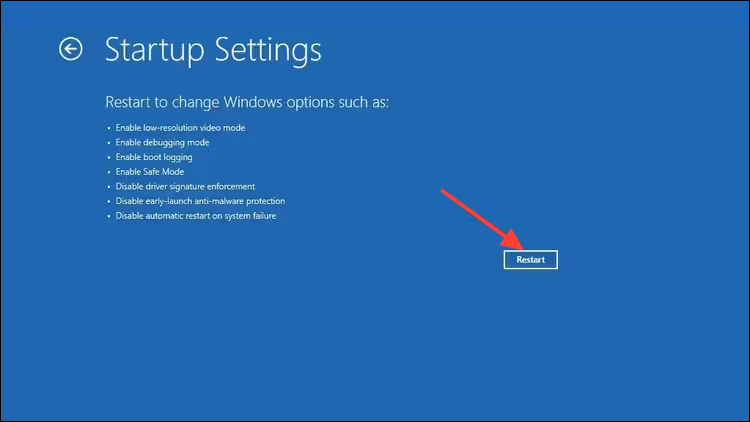
Once in Safe Mode, you can try various troubleshooting steps, such as updating or rolling back drivers, uninstalling recent software, or running system scans.
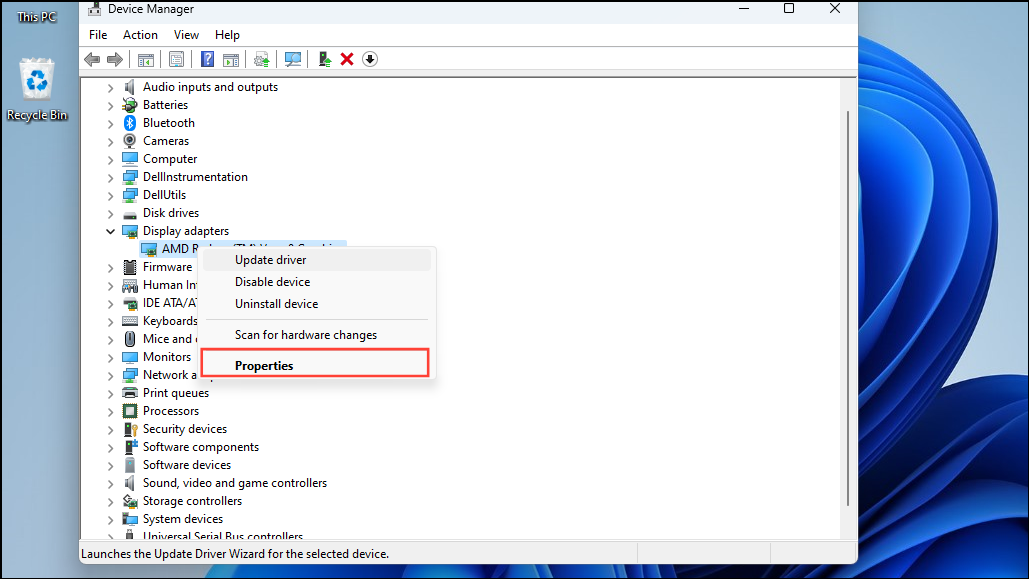
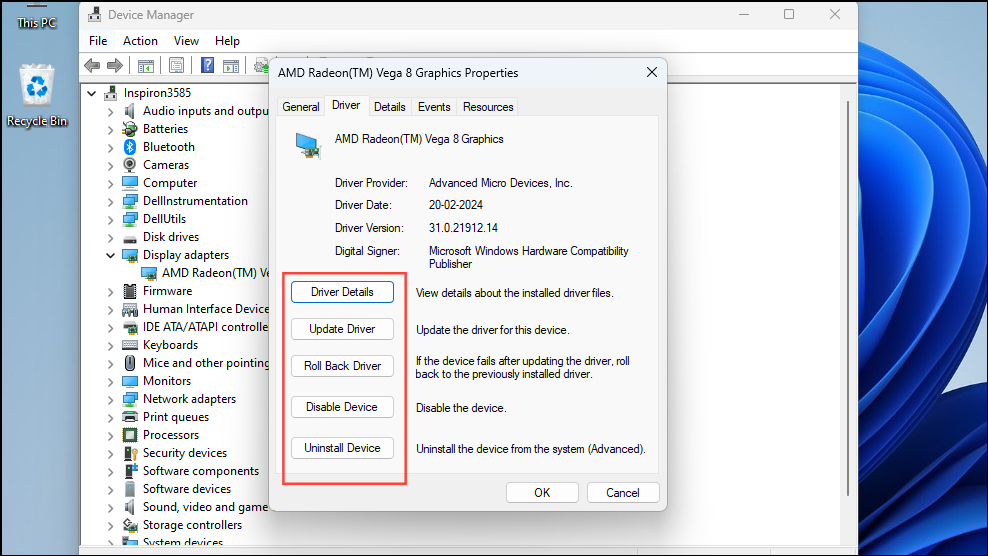
Update or Roll Back Drivers in Safe Mode
Corrupted or incompatible graphics drivers can cause the black screen issue. Updating or rolling back these drivers while in Safe Mode might resolve the problem.
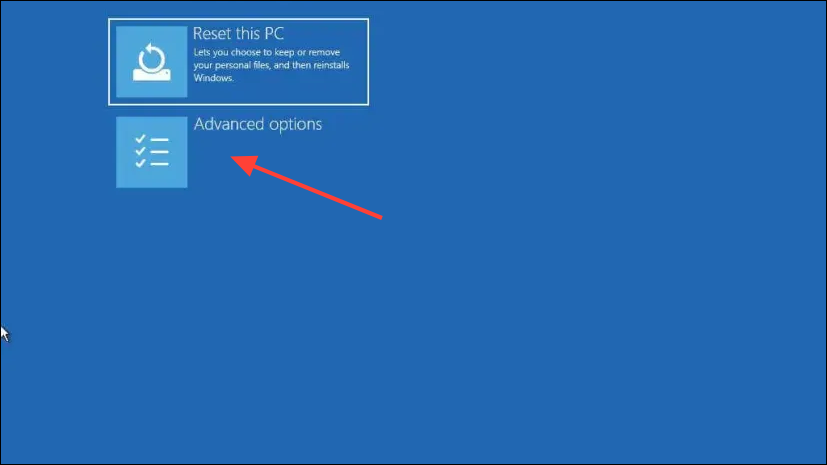
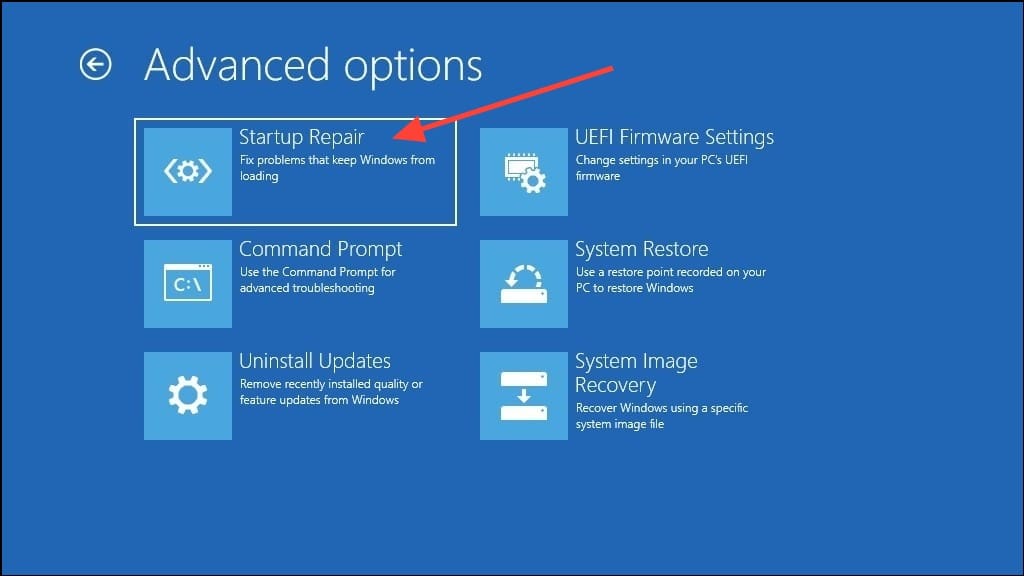
Step 1: While in Safe Mode, press Win + X
and select 'Device Manager' from the menu.
Step 2: In Device Manager, expand the 'Display adapters' section. Right-click on your graphics driver and select 'Properties'.
Step 3: In the properties window, go to the 'Driver' tab. Here, you can choose to 'Update Driver' or 'Roll Back Driver' if the option is available.
Step 4: After updating or rolling back the driver, restart your PC normally to see if the issue is resolved.
Run Startup Repair
If the black screen persists, you can use Windows' built-in Startup Repair tool to fix issues preventing your system from booting correctly.
Step 1: Turn off your PC completely. Press the power button to turn it on, and immediately press the F11
key repeatedly (or the key specific to your system) to enter the Windows Recovery Environment.
F11
, F12
, Esc
, or another key.Step 2: On the 'Choose an option' screen, select 'Troubleshoot'.
Step 3: Click on 'Advanced options', then select 'Startup Repair'.
Step 4: Follow the on-screen instructions. Windows will attempt to diagnose and fix issues that are preventing your system from booting properly.
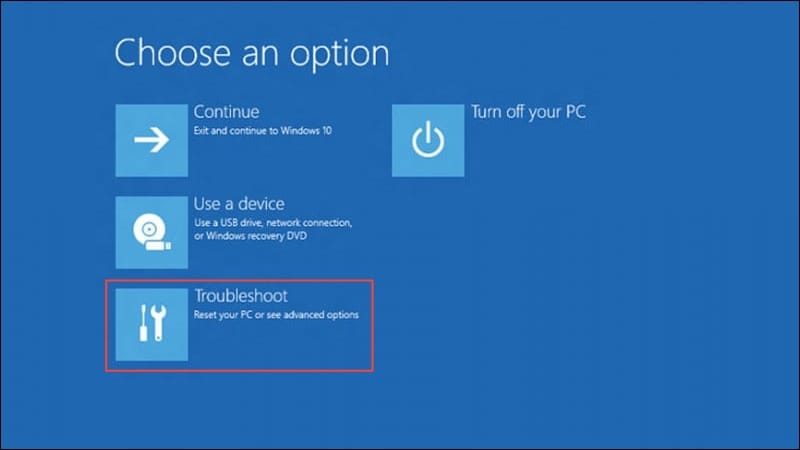
Once the process is complete, restart your PC to see if the black screen issue has been resolved.
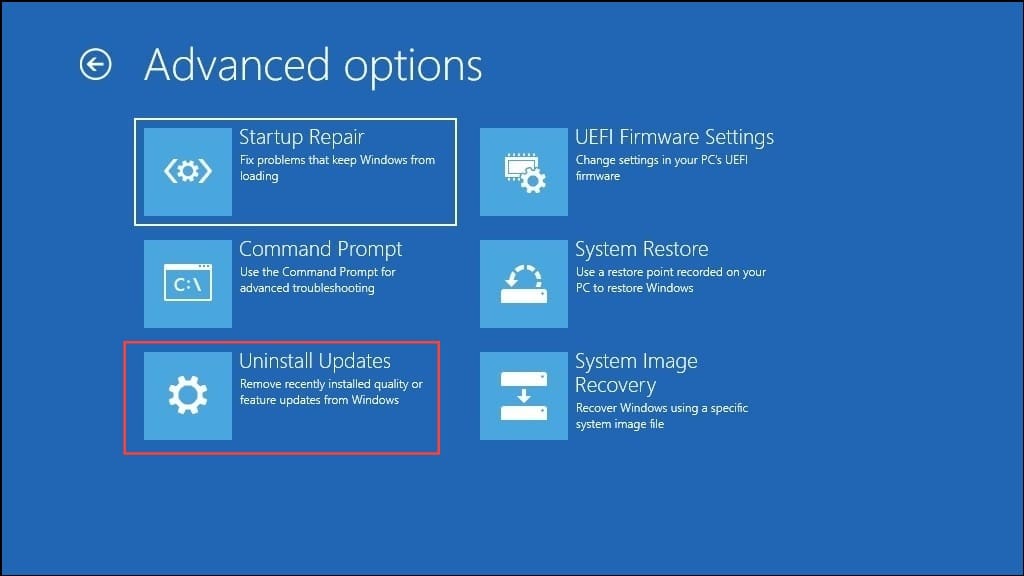
Uninstall Windows Updates
Sometimes, recent Windows updates can cause unexpected issues. Uninstalling the most recent updates may fix the black screen problem.
Step 1: Access the Advanced Options in the Windows Recovery Environment as described earlier.
Step 2: Select 'Uninstall Updates' from the list of options.
Step 3: Choose 'Uninstall latest quality update' to remove recent patches that might be causing the issue.
Step 4: Confirm the uninstallation and allow the process to complete. Restart your PC afterward.
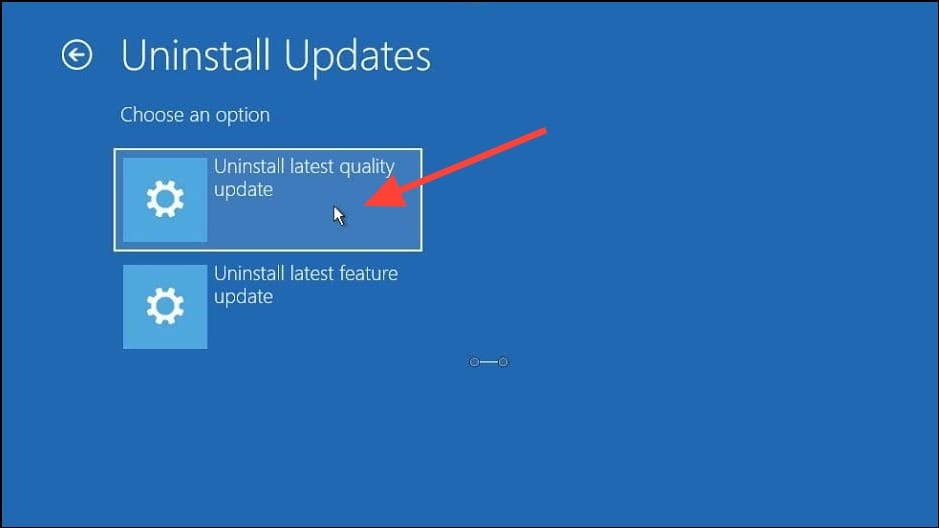
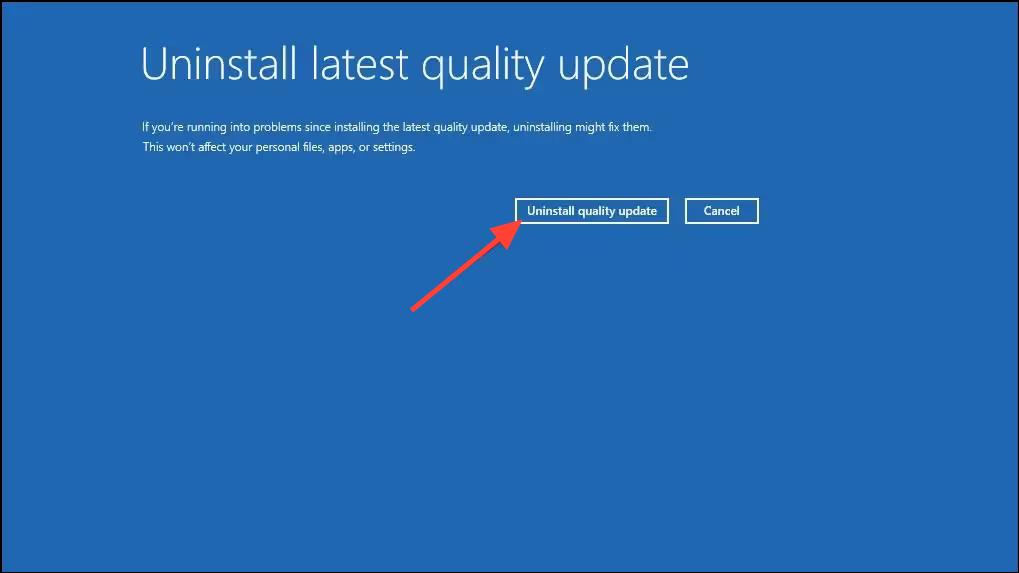
If uninstalling the quality updates doesn't help, you can repeat the steps to uninstall the latest feature update.
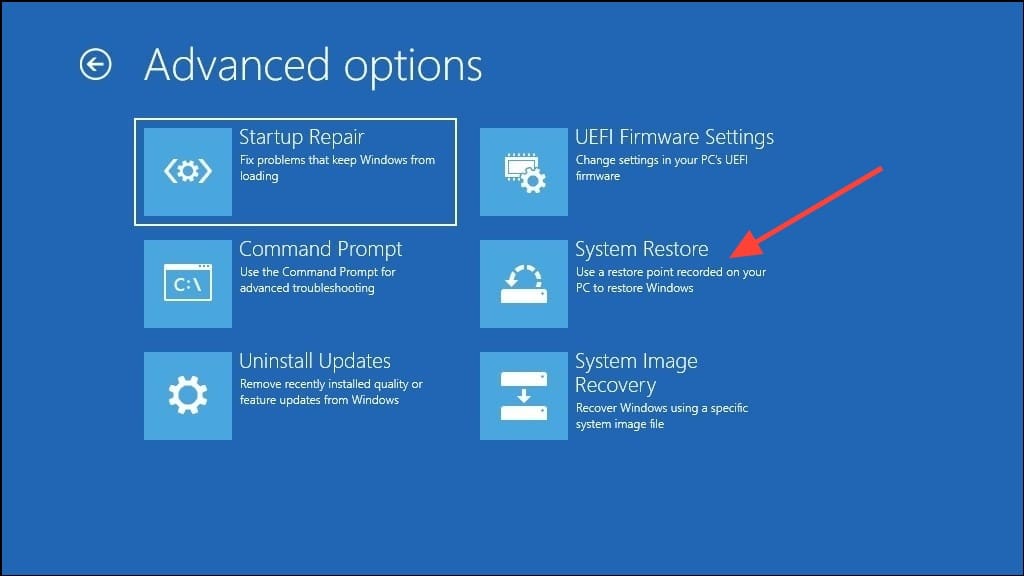
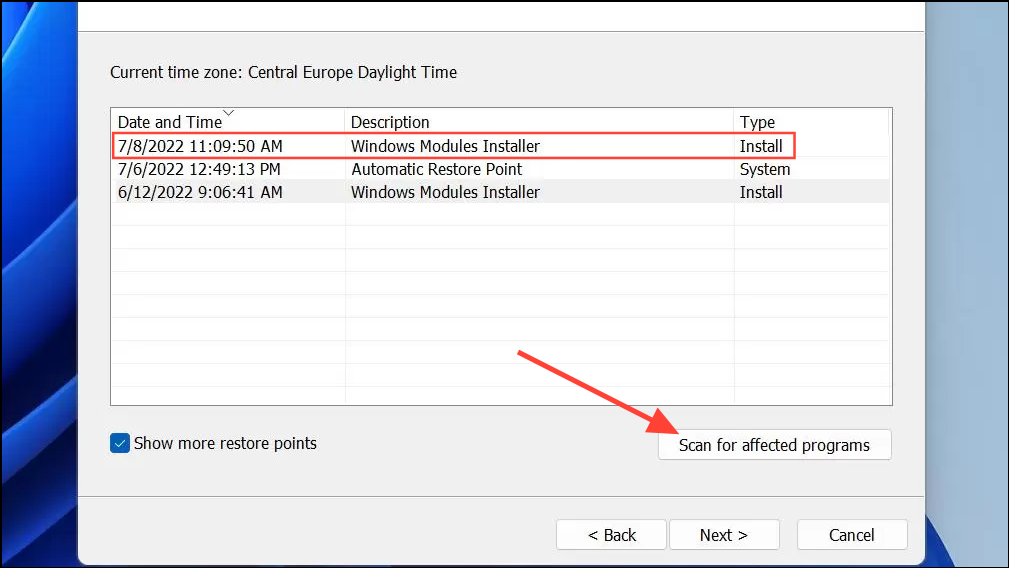
Perform a System Restore
Restoring your system to an earlier point in time can undo recent changes that may have caused the black screen issue.
Step 1: In the Advanced Options menu, select 'System Restore'.
Step 2: Click 'Next' in the System Restore dialog.
Step 3: Select a restore point created before the black screen issue began. You can click on 'Scan for affected programs' to see which applications will be affected.
Step 4: Click 'Finish' to start the restoration process. Your PC will restart and restore the system to the selected point.
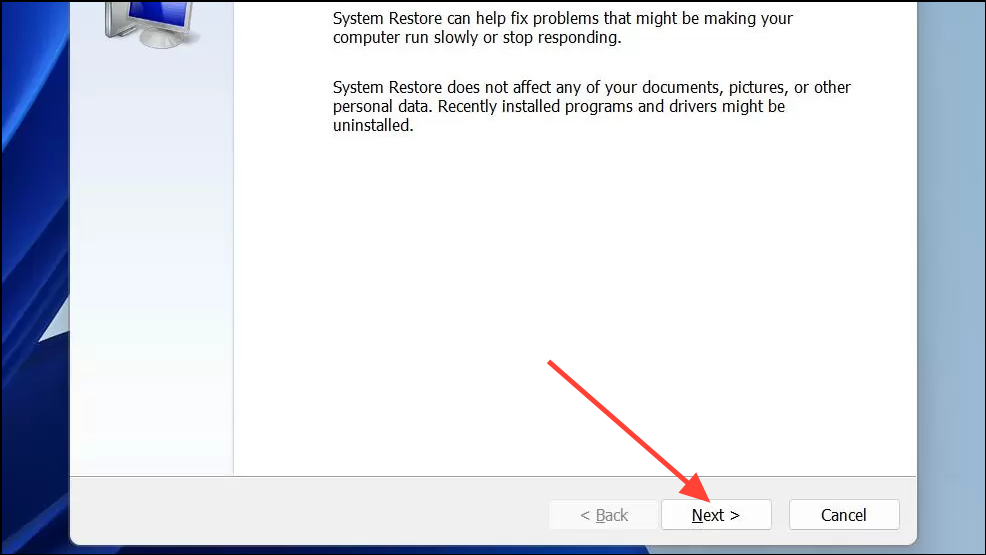
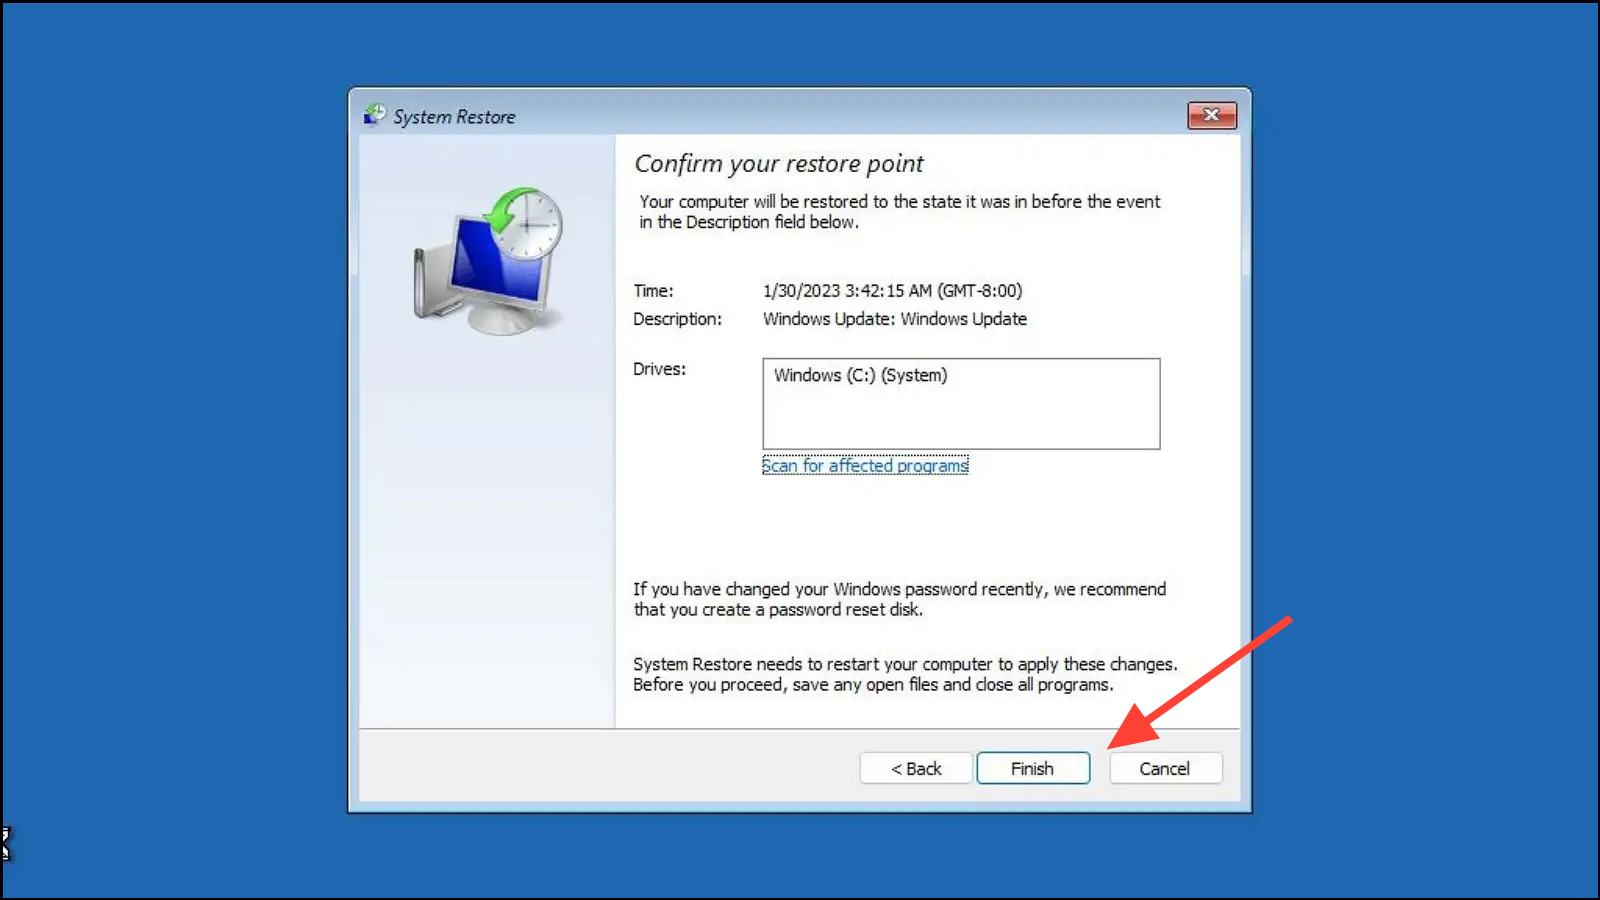
After the restoration is complete, check if the black screen issue is resolved.
Check Your Device's Power Supply
It's possible that power issues are causing the black screen. Ensure that all power cables are securely connected and that the outlet is functioning correctly.
Step 1: Verify that your PC's power cable is properly plugged into a working outlet.
Step 2: Check for any loose connections or damaged cables that might be preventing power from reaching the monitor or system components.
Step 3: If you're using an external display, make sure it's turned on and connected correctly to your PC. Try using a different cable or port if available.
Dust and debris can also interfere with connections, so consider cleaning the ports and connectors with compressed air.
Disconnect External Devices
External peripherals can sometimes cause conflicts leading to a black screen. Removing these devices can help identify the culprit.
Step 1: Power off your PC completely.
Step 2: Unplug all external devices such as printers, cameras, USB drives, and additional monitors.
Step 3: Turn on your PC and see if it boots normally.
Step 4: If the black screen issue is resolved, reconnect each device one at a time, restarting the PC each time, to identify which device causes the problem.
Reset the UEFI/BIOS and Check the Boot Order
Incorrect BIOS settings or boot order can prevent your system from loading correctly. Resetting the BIOS to default settings may help.
Step 1: Restart your PC and immediately press the F2
or Delete
key repeatedly to enter the BIOS setup. The specific key may vary depending on your motherboard manufacturer.
Step 2: Inside the BIOS, look for an option like 'Load Setup Defaults', 'Load Default Settings', or 'Restore Defaults'. Use the arrow keys to navigate and press Enter
to select.
Step 3: Navigate to the 'Boot' tab to check the boot order. Ensure that the hard drive with Windows 11 installed is set as the primary boot device.
Step 4: Save the changes and exit the BIOS. Your PC will restart with the default settings.
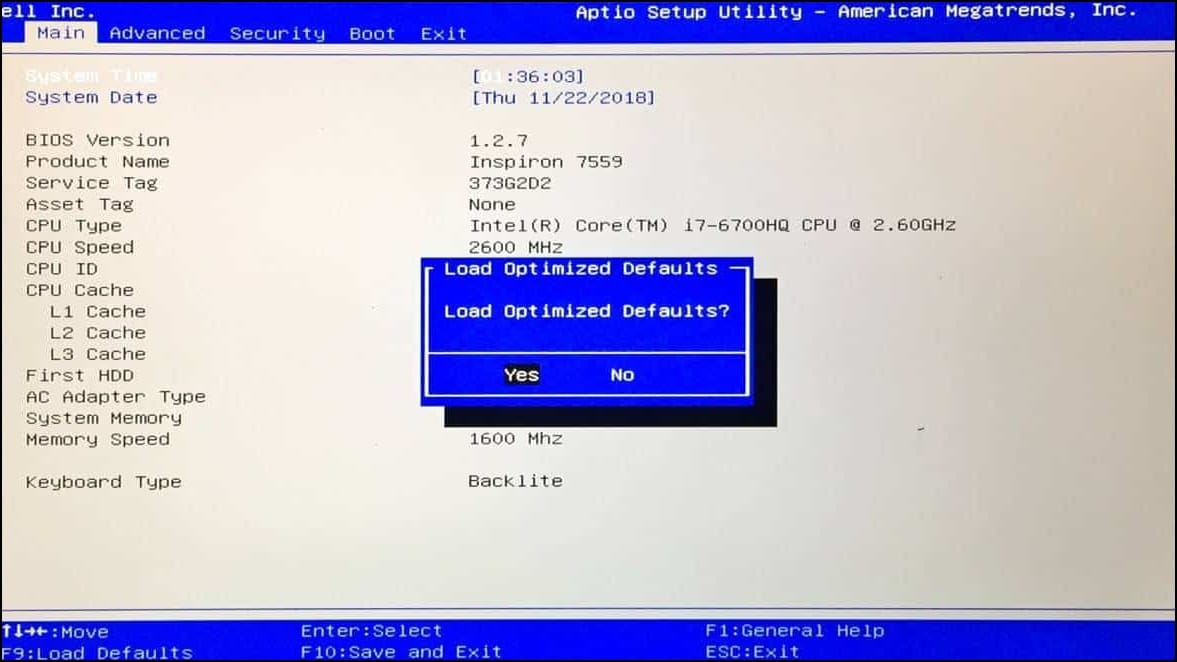
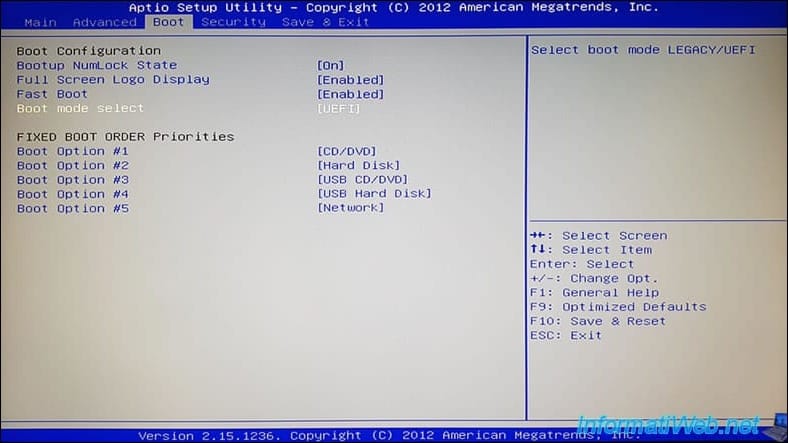
After resetting the BIOS, check if the black screen issue has been resolved during boot.
By following these methods, you should be able to resolve the black screen issue after booting Windows 11. If the problem persists, it may indicate a hardware malfunction, and you might need to consult a professional technician.
Member discussion