Google Chrome Extension is a small software module that allows users to enhance their productivity, change browser functionality, alter the content of webpages, add features, and more. It allows users to customize their browsing experience to their needs. It can make your browsing experience easy, flexible, safe, and effective.
The best thing about Google Chrome extensions is that you can sync the extensions that you have on one device with other devices that use the same account. So, you don’t have to install every extension all over again whenever sign in to a new device. However, sometimes the Chrome extensions may not sync properly between devices. In this article, we will see how to fix it when chrome extensions are not syncing between devices.
Check the Sync Settings
When you have a problem with Google Chrome extension syncing, you should check the Chrome Sync Settings first.
In Google Chrome, you can decide whether or not you want to sync extensions and other settings on a specific device. If this sync option is turned off or only specific data is synced except Extensions, then you will probably experience this issue. To check the Sync settings on Chrome, follow these steps:
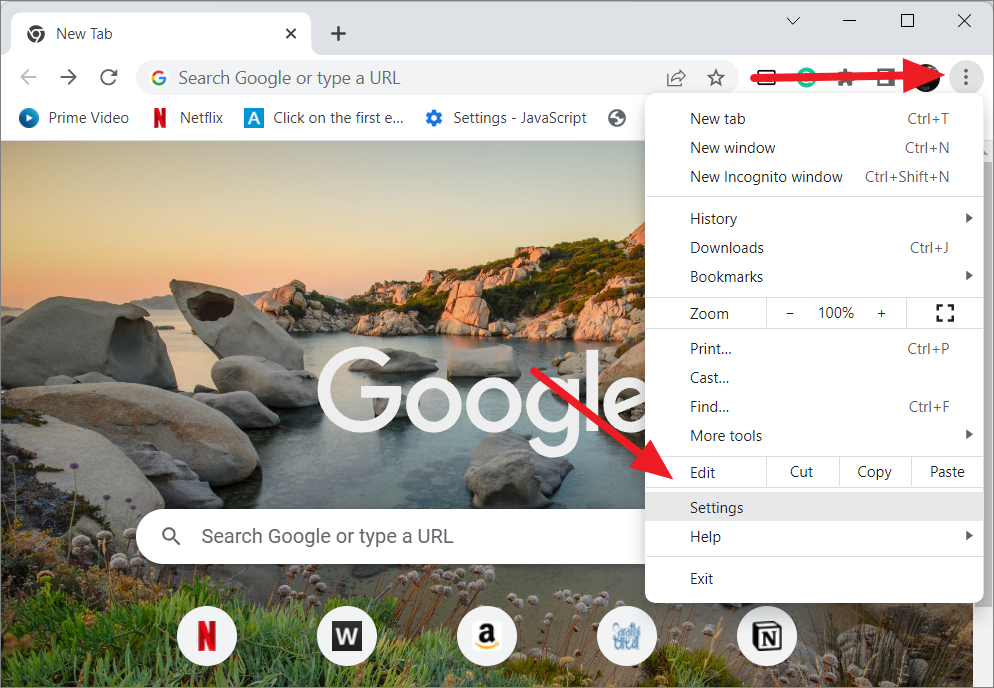
In the Google Chrome browser, click the three-dots menu button at the top right corner and select the ‘Settings’ from the menu.
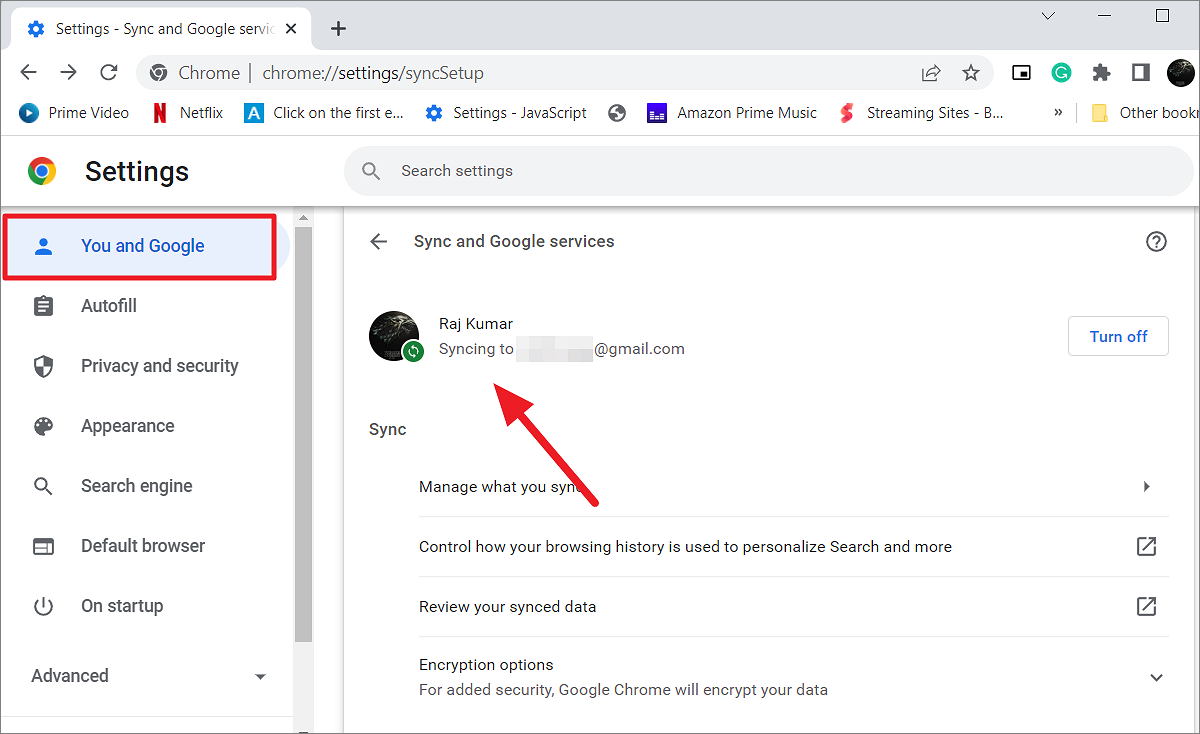
In the You and Google section, make sure it says ‘Syncing to ….@gmail.com’ right under your profile picture.
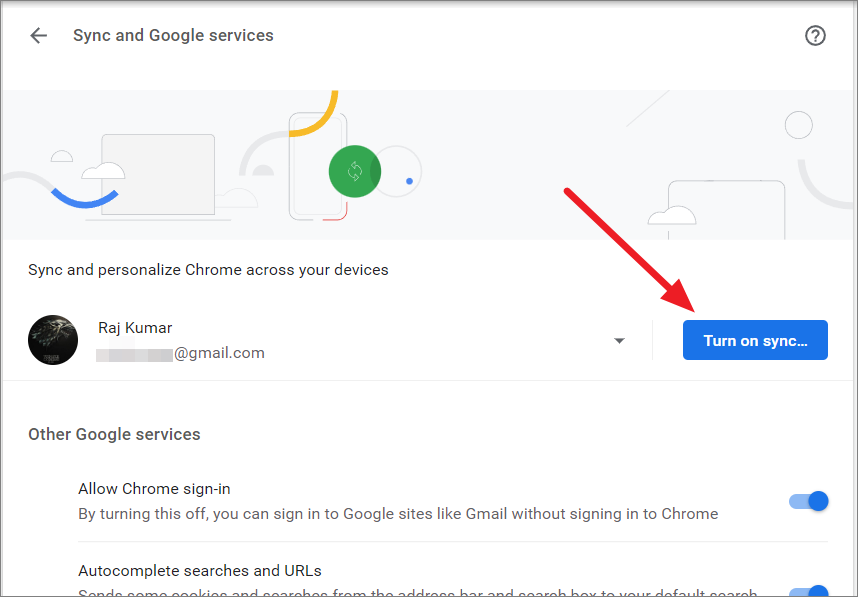
If the sync is turned off, click on the ‘Turn on sync…’ button next to your profile picture.
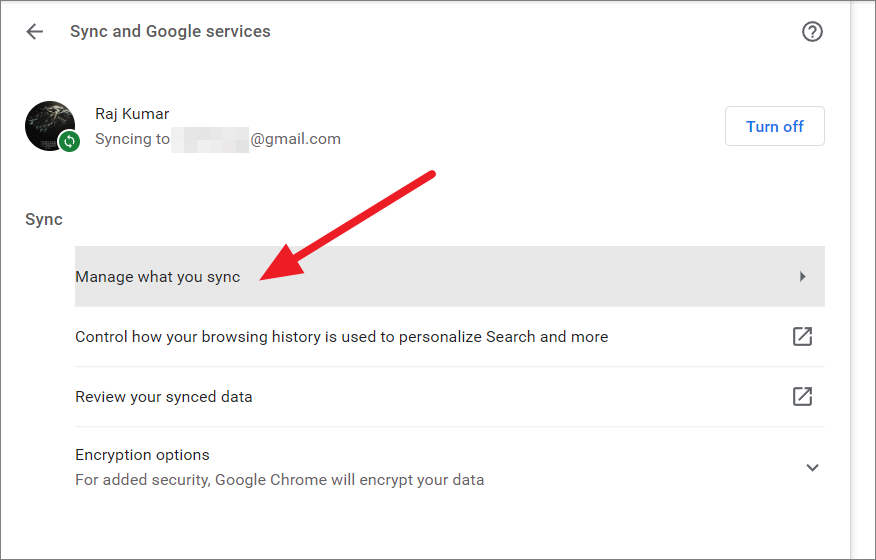
If your account is syncing, then click the ‘Manage what you sync’ option under the Sync section.
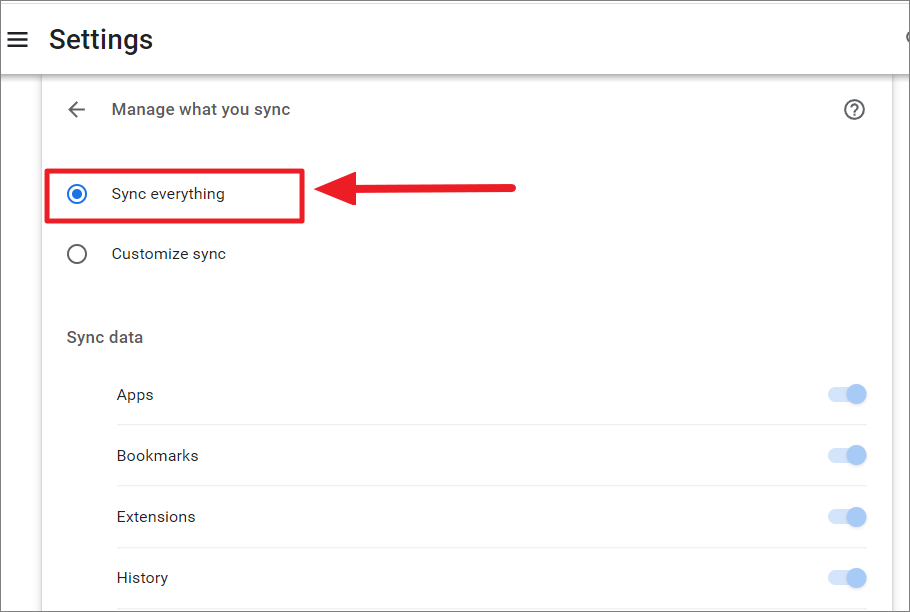
Here, you can manage sync settings for various items, like Apps, Bookmarks, Extensions, and more. Now, if the ‘Sync everything’ option is selected every item in the list will be synced.
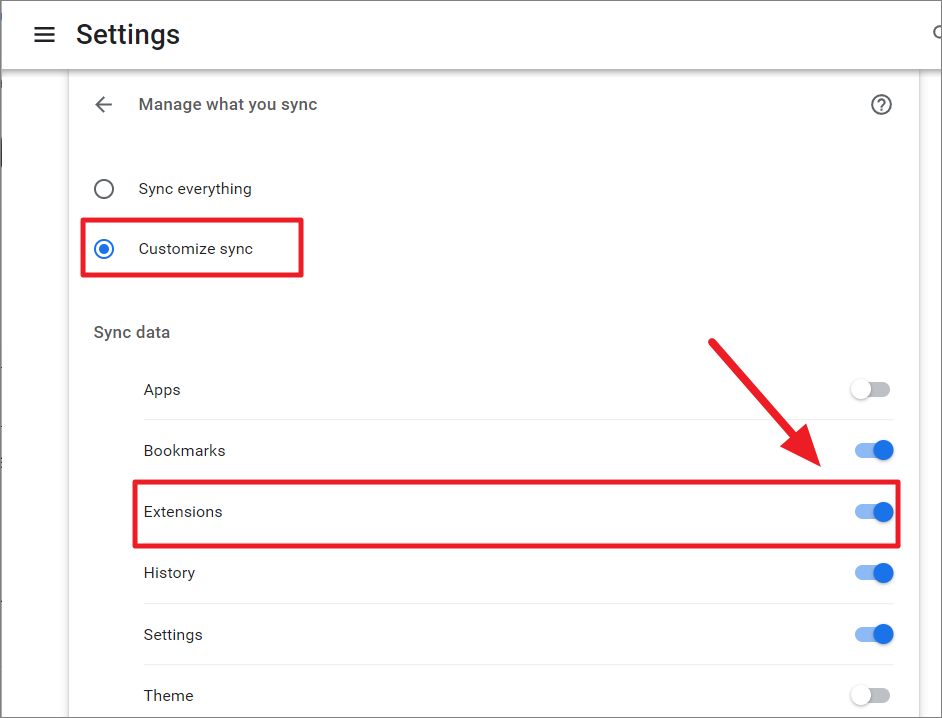
However, if you only want to sync specific items, select the ‘Customize sync’ option above and make sure the toggle next to ‘Extensions’ is turned On.
Install Google Chrome Updates
In most cases, all the issues with the Chrome browser will be fixed with software updates. Some Chrome extensions may not be compatible with old or a specific build of the Chrome browser, which can disrupt the sync operation of extension between the devices. Hence, keeping your Chrome browser up to date can fix or remove bugs and security issues.
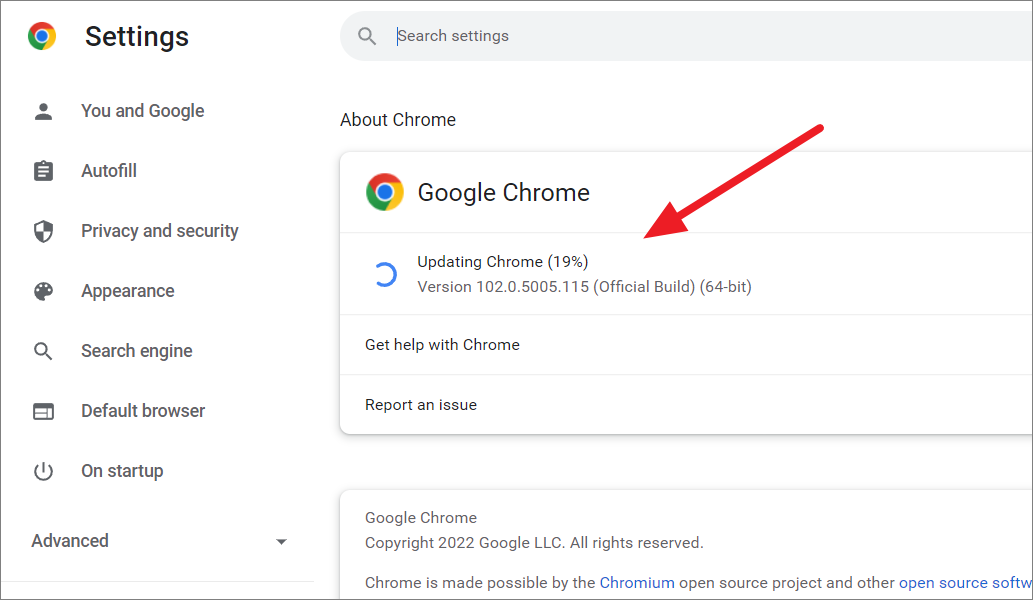
To update the Google Chrome browser, click the vertical ellipses at the top right corner and select ‘Settings’.
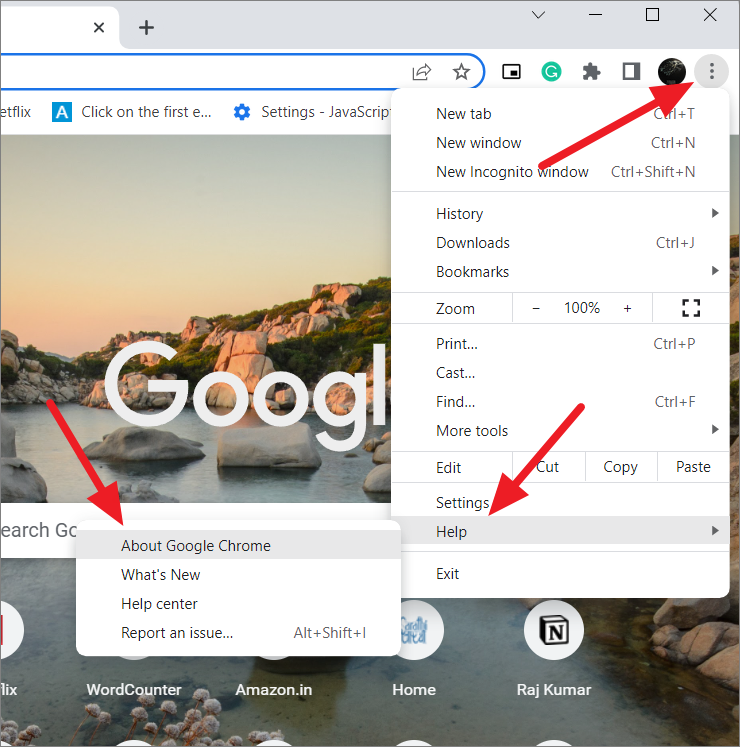
Once you open the About Chrome page, it will automatically check for updates and update your browser to the latest build.
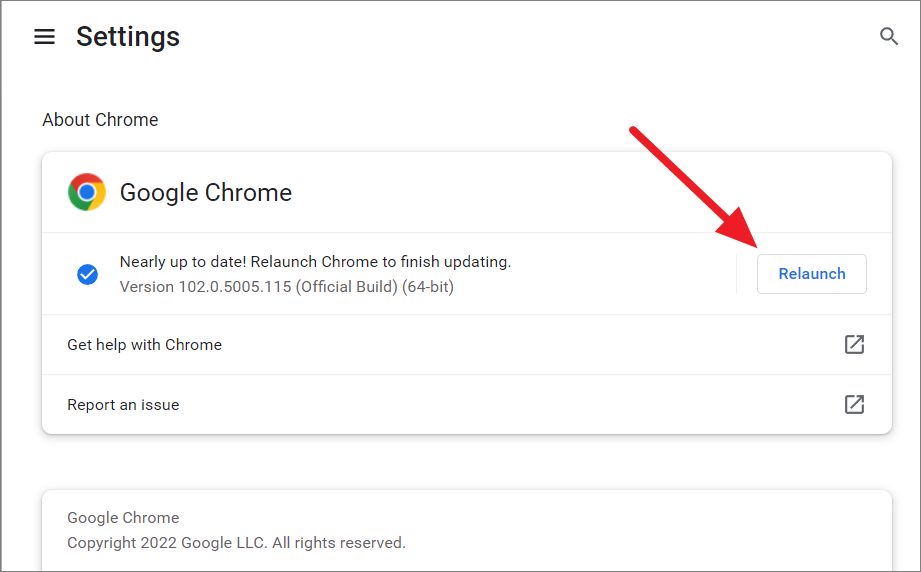
Once the update is done, click the ‘Relaunch’ button to restart the browser.
Re-Enable Extension Sync
Now, if the Extensions are not syncing even when the Extension sync is turned on, you can try disabling and re-enabling the option. Navigate to the Sync settings as shown in the above section. Then, select the ‘Sync everything’ option.
After that, select the ‘Customize sync’ option and then toggle the ‘Extensions’ option off and on again.
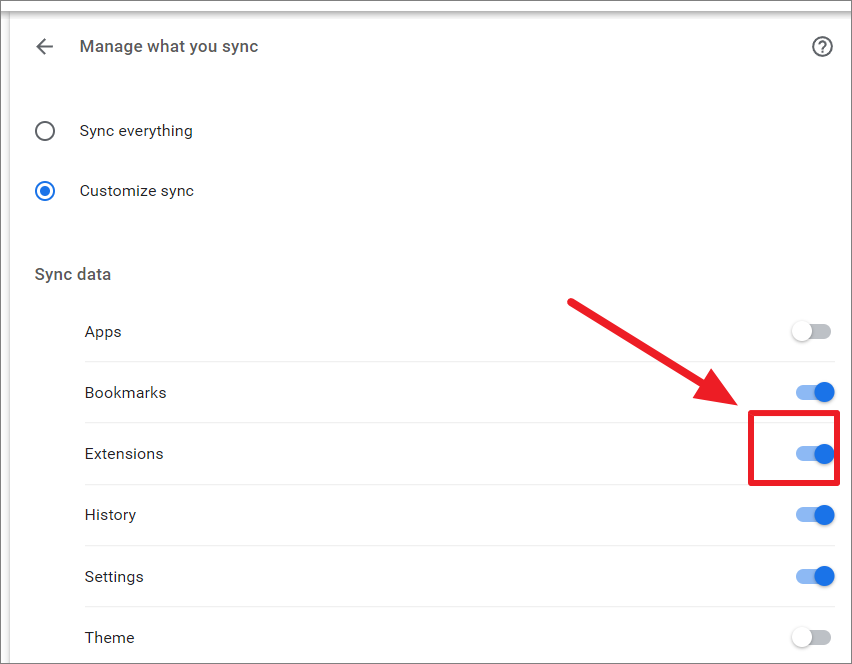
You can also choose the ‘Sync everything’ option again.
Disconnect and Reconnect your Google Account
Another simple way to solve chrome’s extension sync problems is to disconnect and reconnect your Google account on a particular device.
Open Google Chrome and go to the Google Chrome settings by clicking the vertical ellipsis button and selecting ‘Settings’.
Under the You and Google section of the Settings, click the ‘Manage your Google Account’ option.
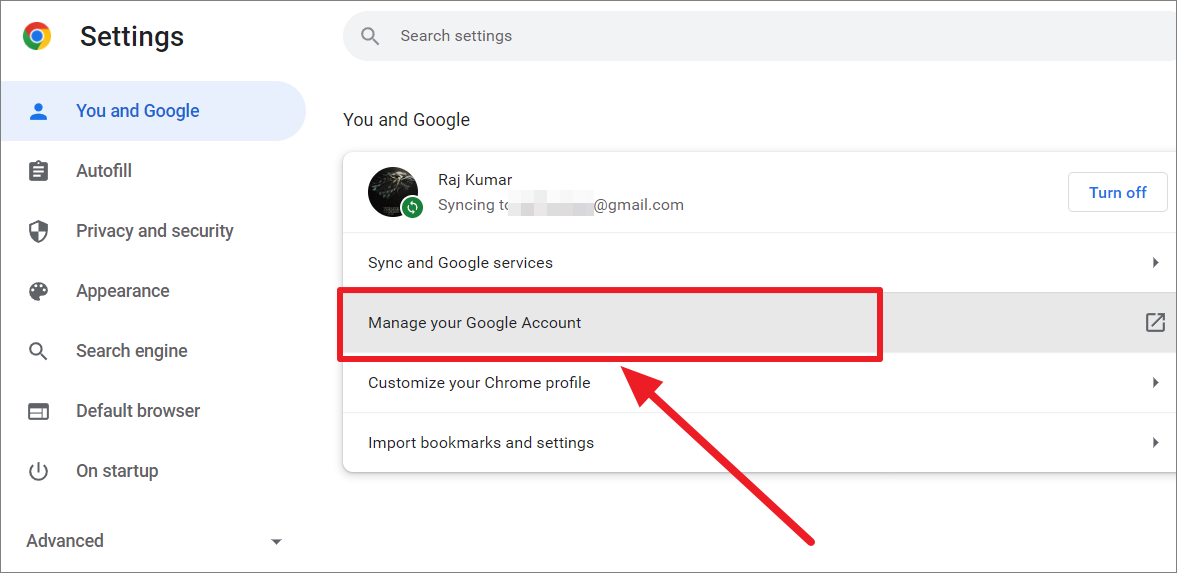
This will open the Google Account page on a separate tab. Now, click your profile picture on the top right corner and select the ‘Sign out’ option.
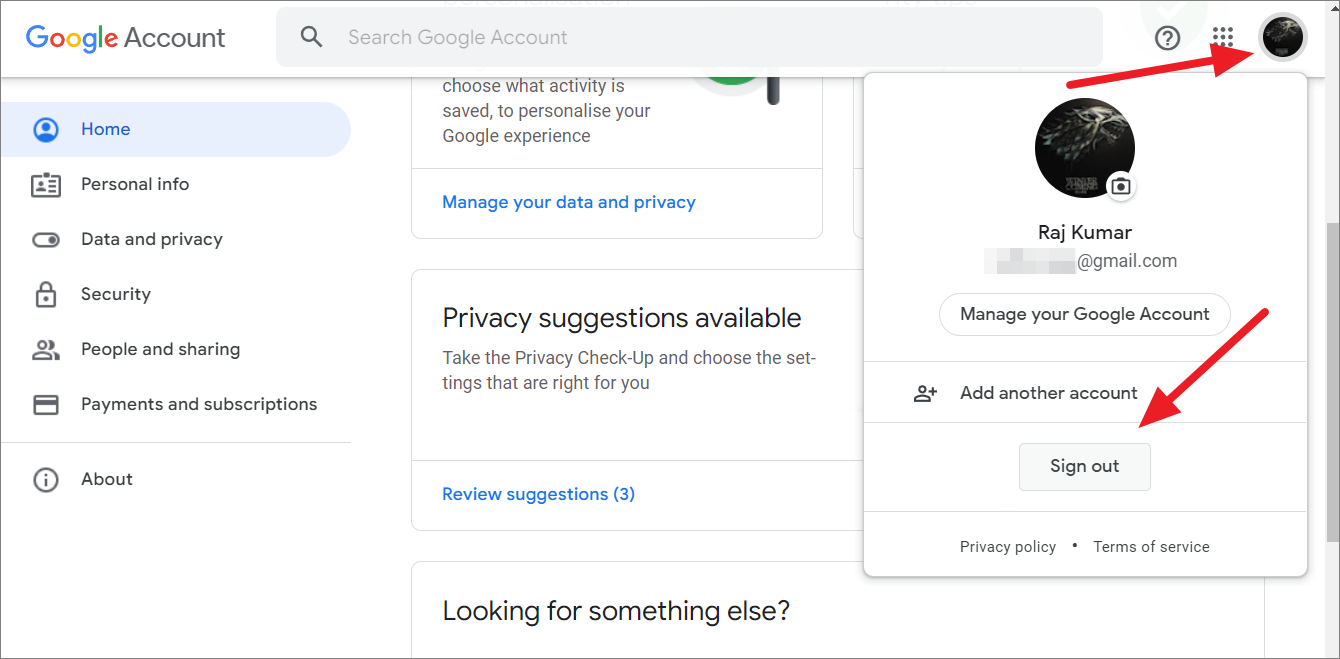
After that, completely close the browser and launch it again and then sign in to your Google account.
Repair or Uninstall Extensions
If the above method doesn’t fix the issue, you can try this method. An unexpected crash or shutdown can cause Chrome extensions to corrupt which may disrupt the extension synching on a particular device. But if extensions are corrupted on one device, it will not affect other devices. Here’s how you can repair or uninstall problematic extensions:
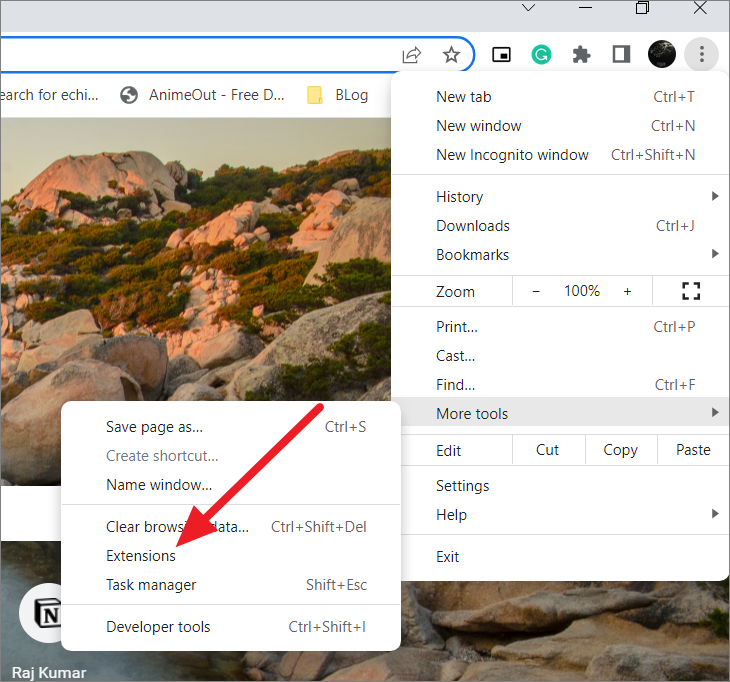
Click the vertical ellipse button (Menu) on the Chrome browser, go to ‘More tools’ and select ‘Extensions’ from the sub-menu.
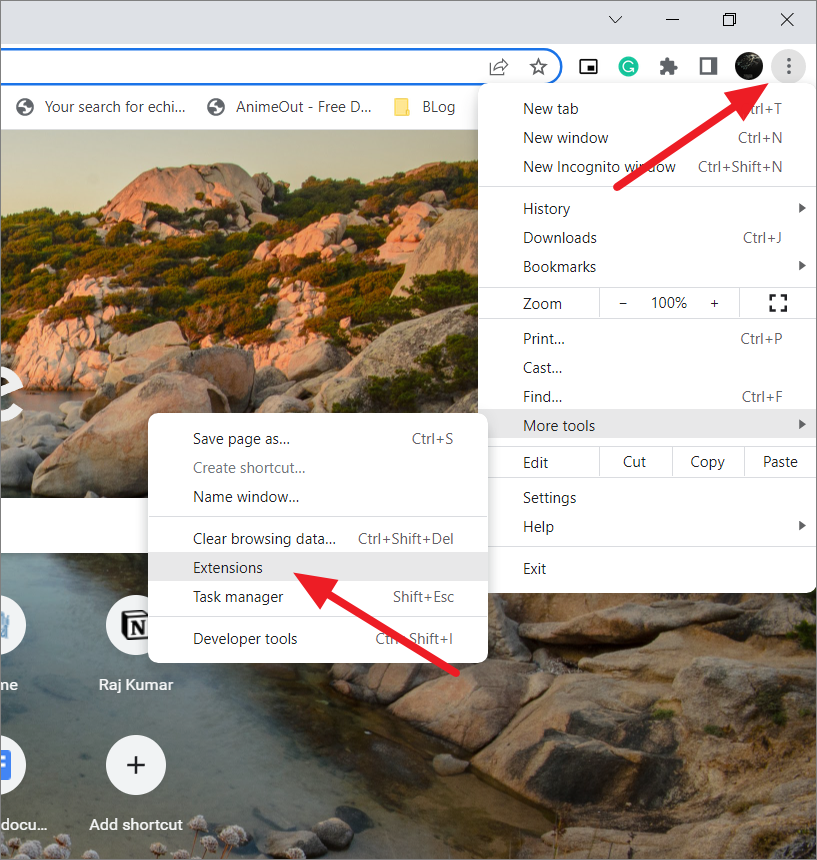
Alternatively, you can open Settings and select ‘Extensions’ on the left panel.
Now, you will see a list of extensions installed on your device. If an extension is corrupted or broken, you will see an option to repair it. Click the ‘Repair’ button to repair the extension.
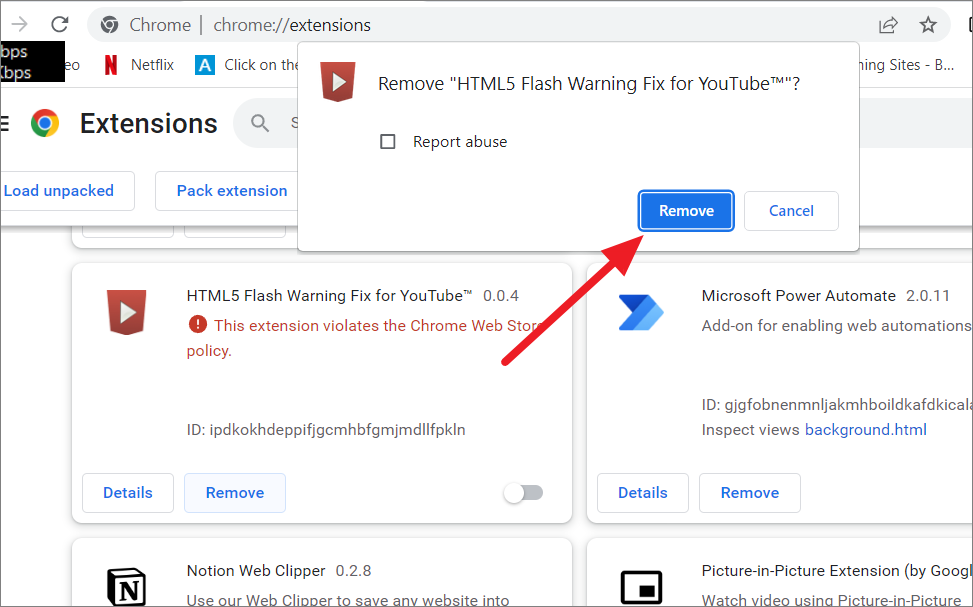
If repairing the extension doesn’t fix the issue, you can try uninstalling corrupted, expired, and unnecessary extensions from the device. To uninstall an extension, click the ‘Remove’ button on it.
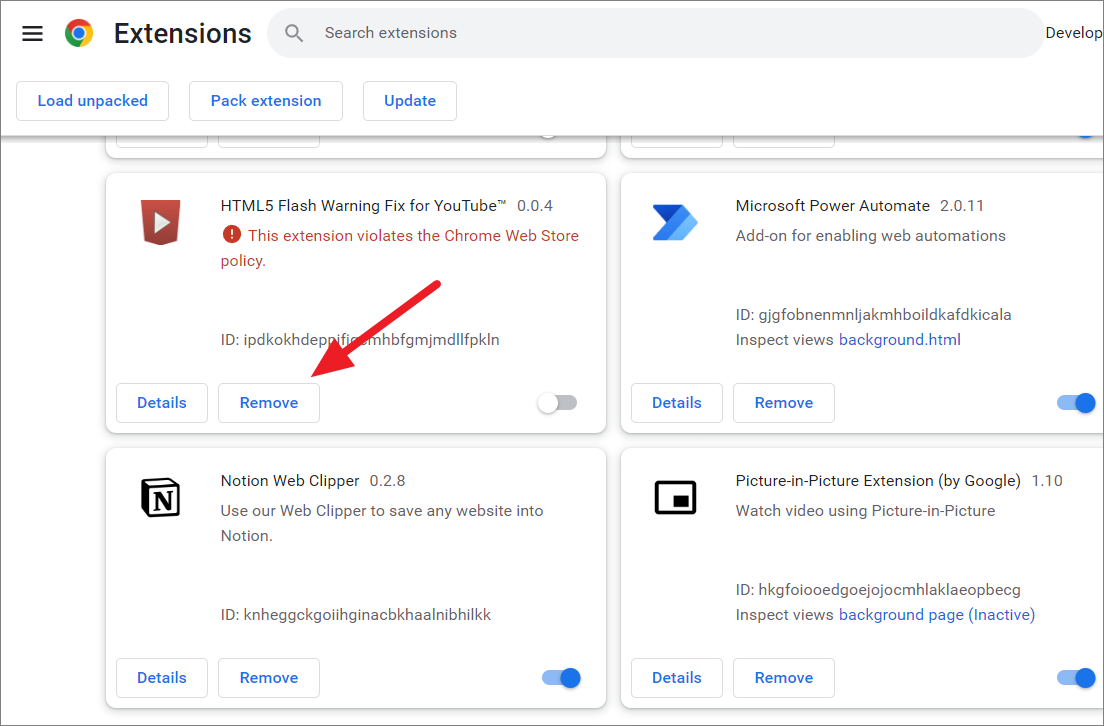
Click the ‘Remove’ button again on the confirmation box at the top to remove the extension.
Activate Developer Mode
Google Chrome automatically updates the extensions your device whenever there’s an update is available. However, sometimes, Google may fail to update your extensions. To manually update the extension, you need to enable the Developer mode.
First, open the Extensions by clicking the Menu button and selecting ‘Extensions’ under More tools.
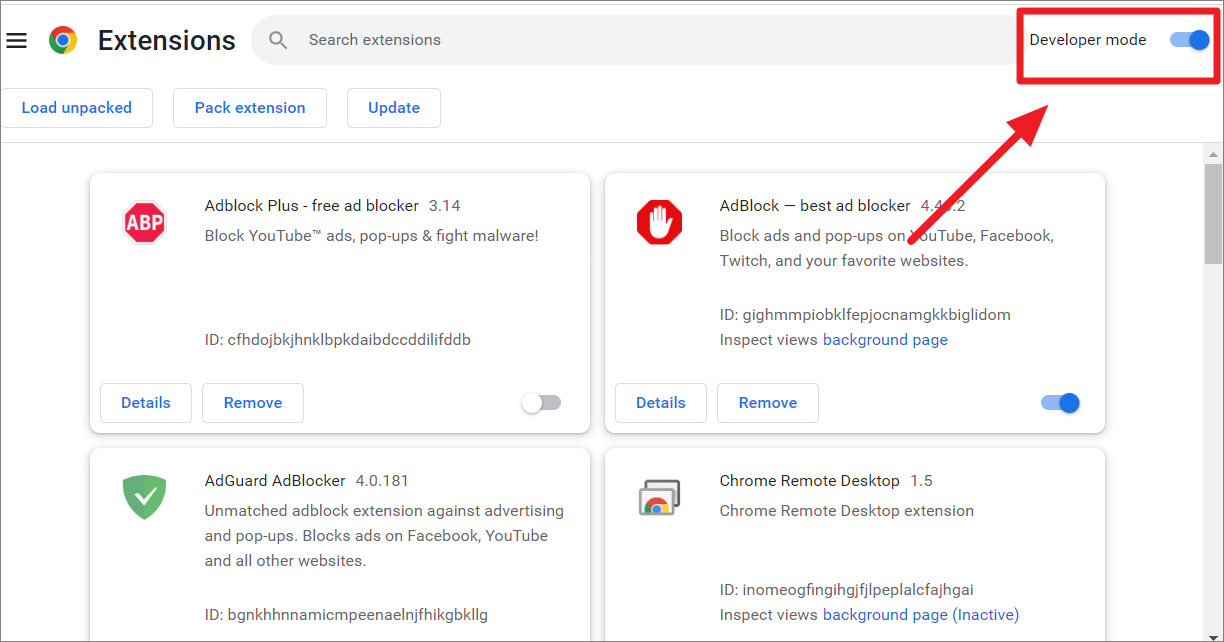
At the top right corner of the Extensions page, click the ‘Developer mode’ toggle to switch to developer mode.
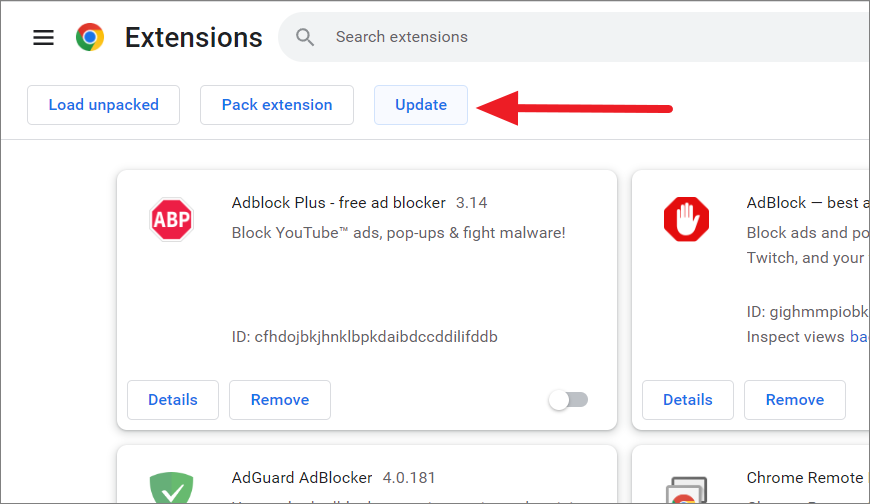
Once the Developer mode is activated, you will notice the ‘Update’ button at the top. Click on it to update the extensions.
Clear Synced Data
In case, Chrome extensions not syncing you can clear the Chrome data to reset sync in your browser. Here’s how you can reset sync on Google Chrome.
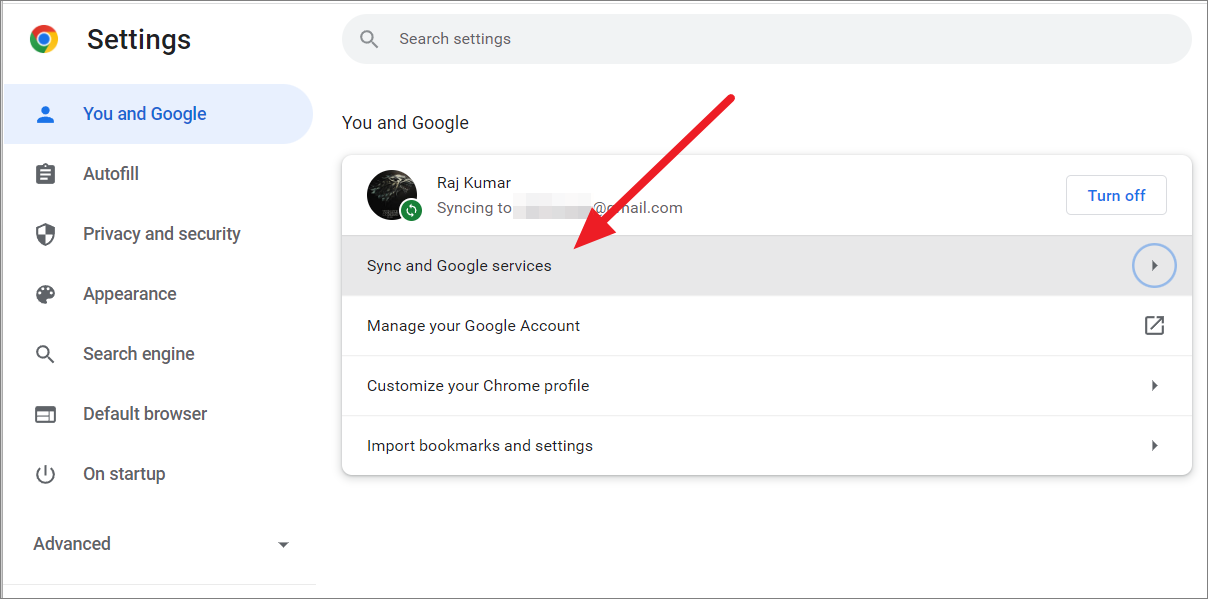
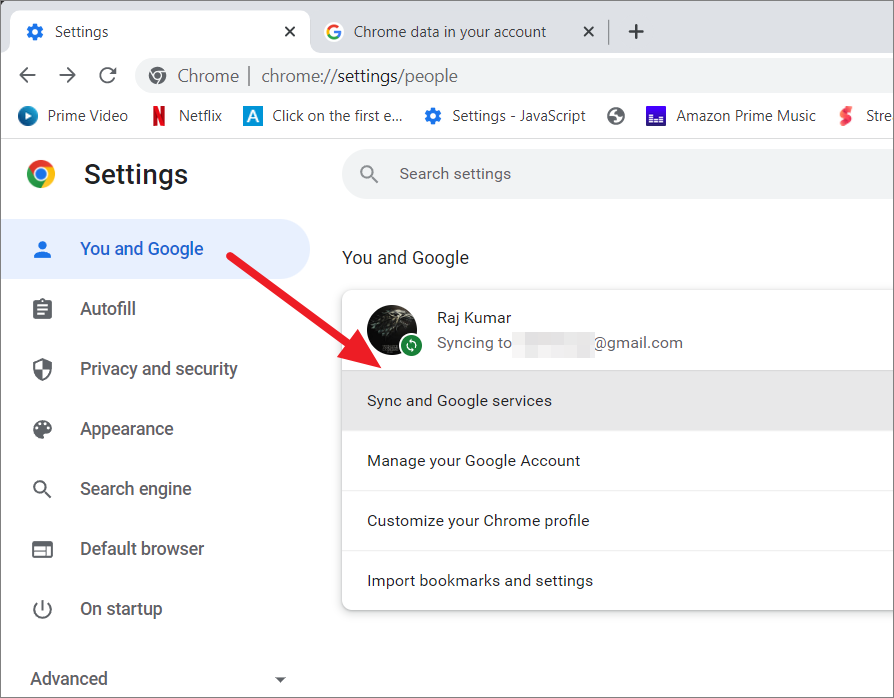
First, open Google Chrome Settings and click on the ‘Sync and Google services’ option under the You and Google section.
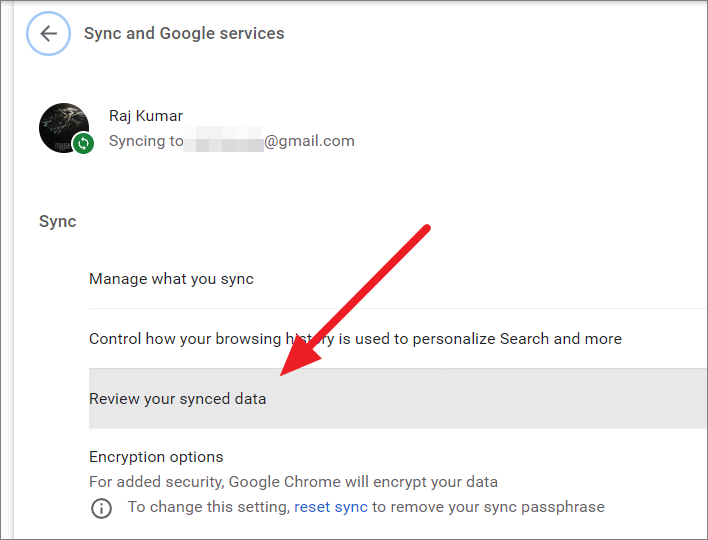
On the next page, click the ‘Review your synced data’ option under Sync.
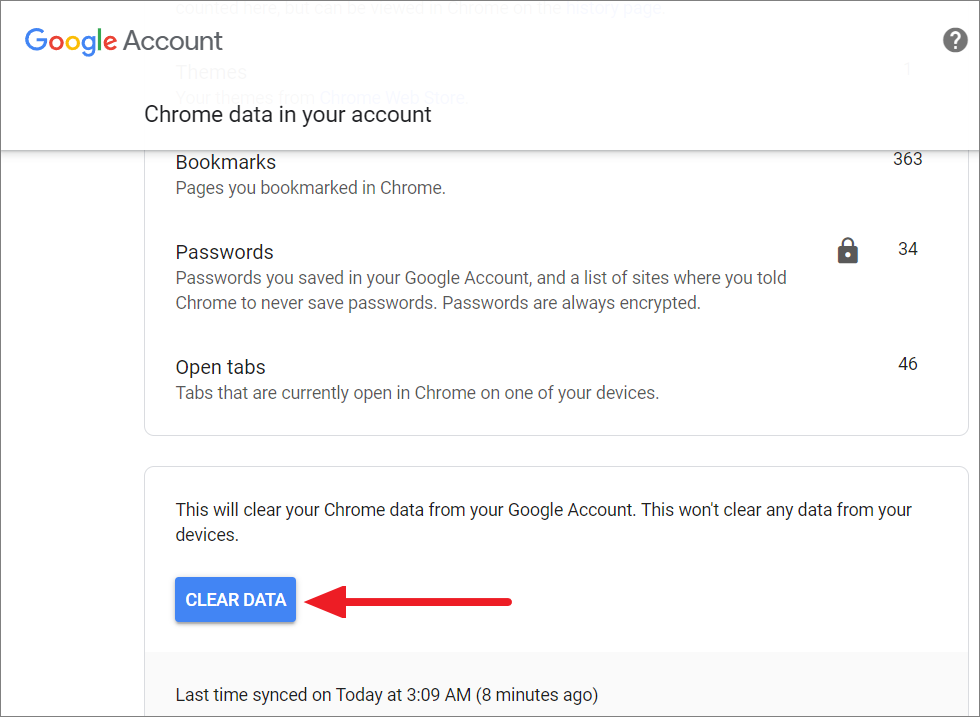
The page will show you a list of everything that Chrome is syncing from your computers like bookmarks, history, passwords, extensions, and other settings. Now, click the ‘CLEAR DATA’ button.
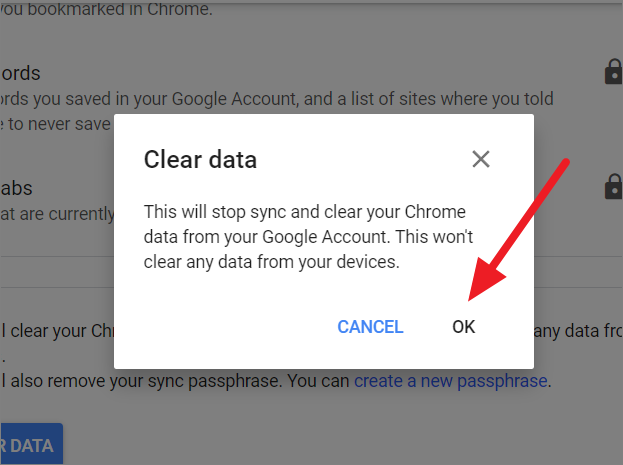
If you see a confirmation prompt, click the ‘Ok’ button. This will delete all your Chrome data from your Google Account but not from your device.
Once you clear the Chrome data, sign out of Google Chrome on all devices that are using the same Google account. Then, click the profile icon on the browser or go to any Google service, like YouTube, Gmail, or Google Drive to sign in to the account again.
Resetting the Sync will probably fix most sync-related issues, if the problem is still not fixed, try the next method.
Create Sync Passphrase for Chrome Extensions
Google Sync Passphrase is a security feature in Google Chrome that allows you to encrypt your data with advanced encryption. Sync Passphrase adds an additional layer of security by encrypting your Chrome data and storing it in the cloud without letting Google read it.
So, settings up and using Sync Passphrase will make Google Chrome syncing between all your devices effortless. Here’s how you can create Sync Passphrase for Chrome Extensions:
Open Google Chrome Settings and select ‘Sync and Google services’ under the You and Google section.
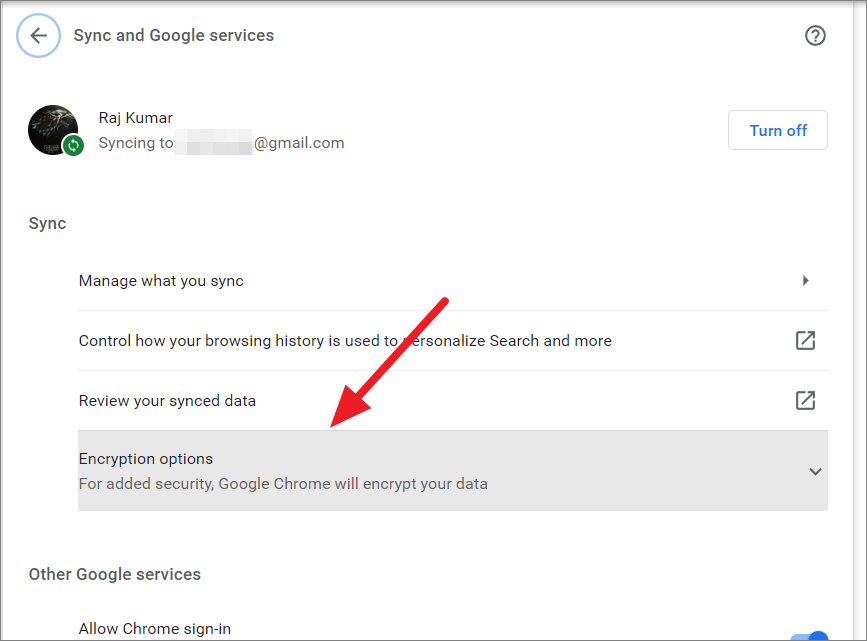
On the next page, expand ‘Encryption Options’ by clicking the option or the down arrow under the Sync section.
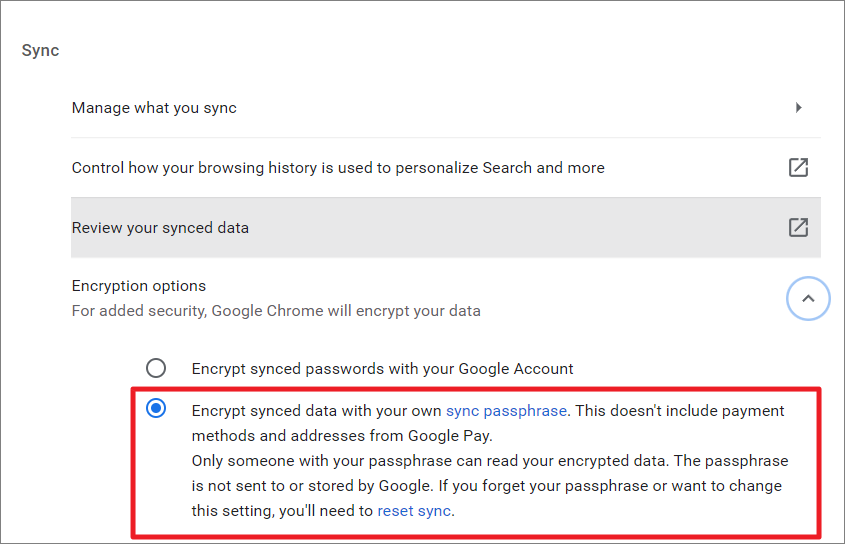
Under the Encryption options, you will notice two encryption methods. Now, choose the ‘Encrypt synced data with your own sync passphrase’ option.
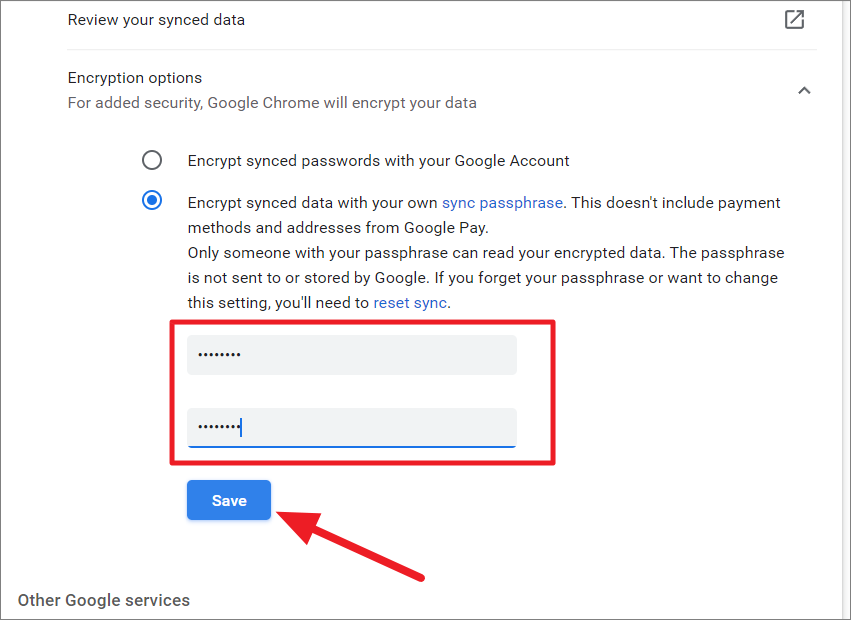
Once you select the second option, you will see two text fields. Enter your passphrase in the first field and confirm it in the second field. Then, click ‘Save’.
After setting up the sync passphrase, you cannot change it and you will need the passphrase whenever you sign in to a new chrome browser and try to sync the data. In case, you forget the sync passphrase or want to turn off the passphrase, you can reset the Chrome Sync which will remove the passphrase.
If you have already set up a sync passphrase on another device, you will see the ‘Data was encrypted with your sync passphrase on ….’. in the Sync settings of Chrome. This means you will need to enter the passphrase whenever you sign in to a new browser.
Create a New Browser Profile
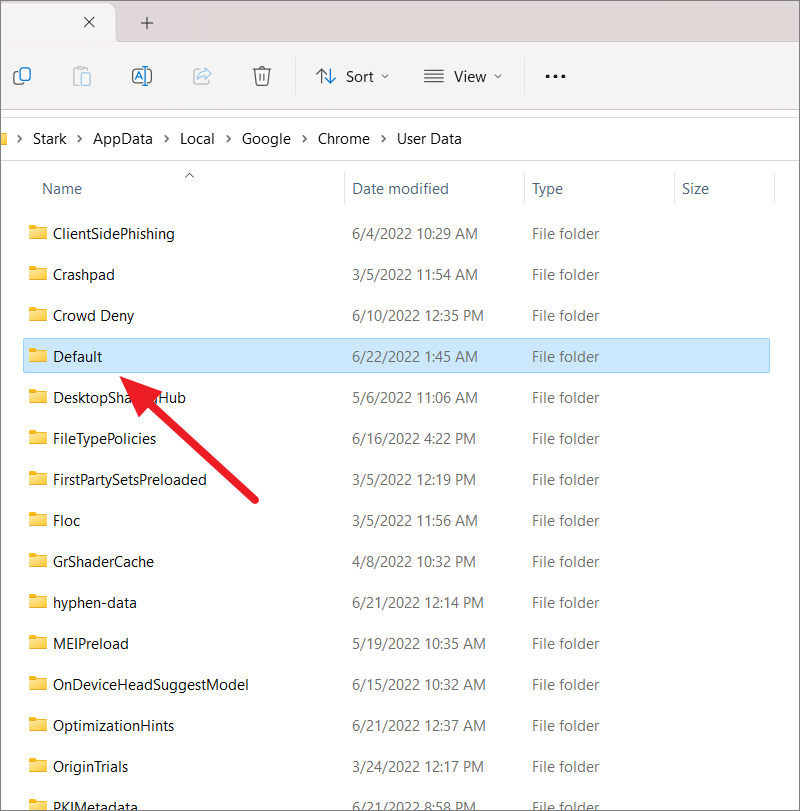
Creating a new browser profile for Google Chrome on your device can also fix most of the issues including extensions not synching. All your Extensions and other Google Chrome data are stored in the Default folder. Renaming this folder will force Chrome to create a new profile.
To locate the Default folder, open File Explorer by pressing Win+E and type or copy-paste the following in the address bar:
%LOCALAPPDATA% GoogleChromeUser DataAfter that, completely close the Google Chrome browser. Now rename the Default folder to anything you want (like Default old) in the above location. Then, relaunch the chrome browser and it will force the browser to create a new Default folder in the same location.
Then, sign in to the Google account and check to see if extensions sync again.
Clear Browsing Data
If creating a new browser profile doesn’t fix the problem, you can try clearing the browser data or cache.
Open Chrome Settings by clicking the ‘Menu’ icon in the top right corner, and choose ‘Settings’ from the menu. In the Chrome Settings, switch to the ‘Privacy and Security’ tab and click the ‘Clear browsing data’ option on the right.
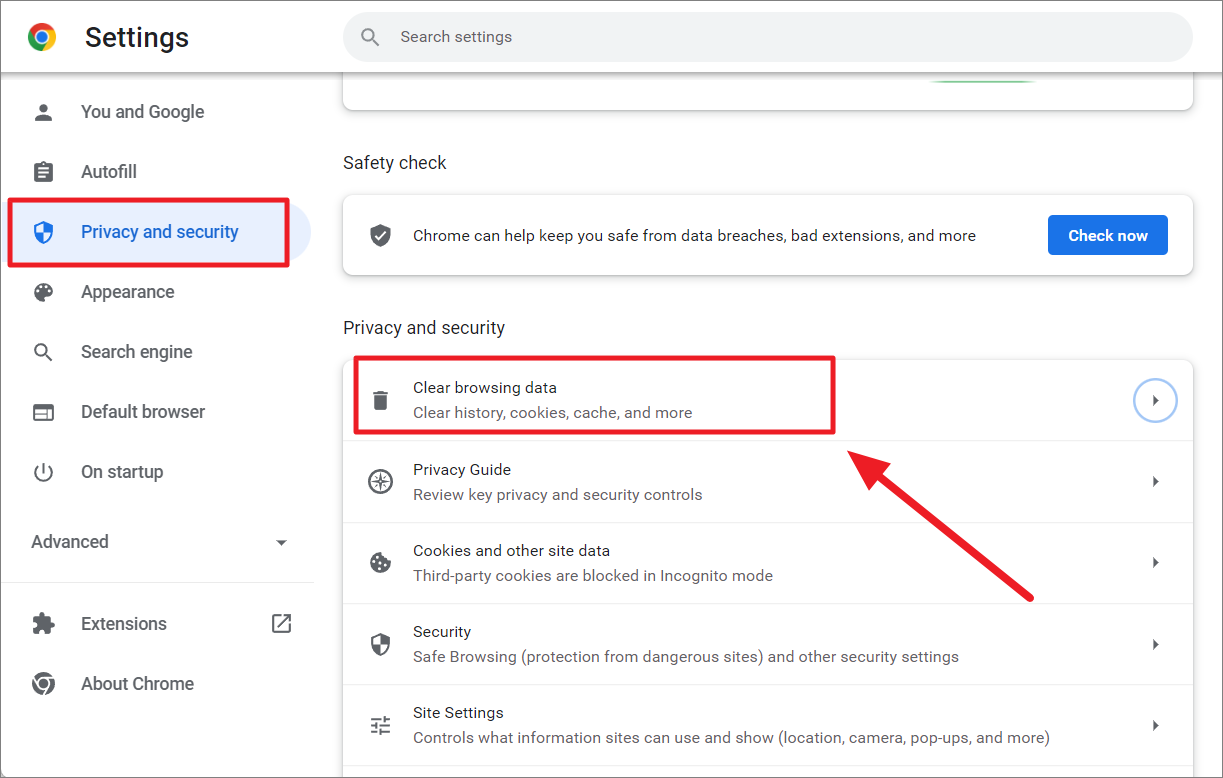
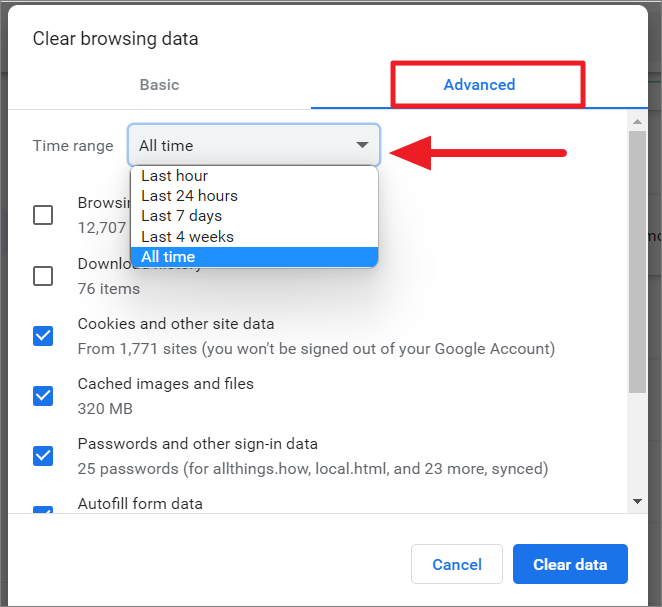
Then, switch to the ‘Advanced’ tab and choose ‘All time’ from the Time range drop-down list.
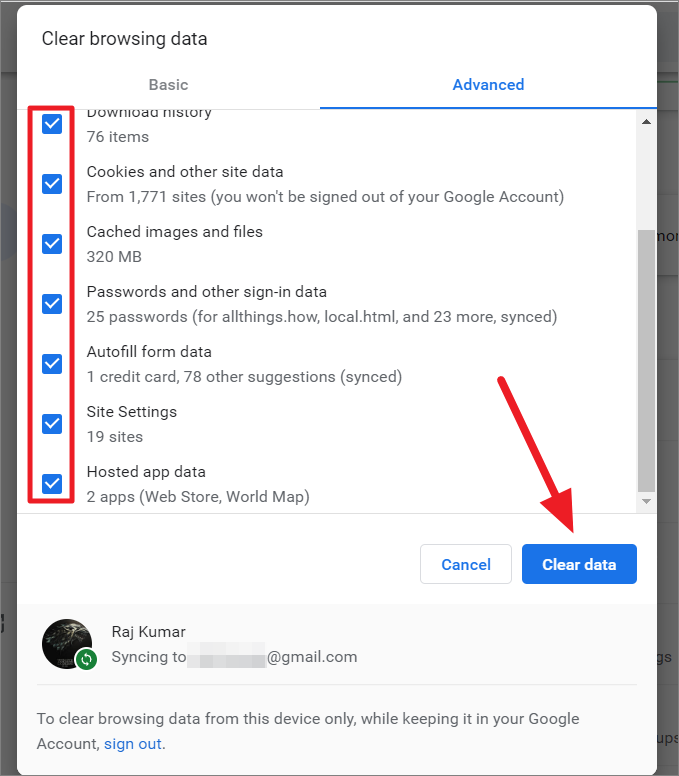
Now, select every item in the list and click the ‘Clear data’ button. This will delete all the browsing data including, history, site passwords, autofill data, and site settings.
After that restart your browser and check if the extensions are syncing between devices properly.
Reinstall Chrome Browser
If none of the above methods were able to resolve your sync issue, you have no choice but to reinstall the Chrome Browser on your device.
To reinstall the browser, open Windows settings (Win+I), go to the ‘Apps’ section on the right and select the ‘Installed apps’ tile on the right.
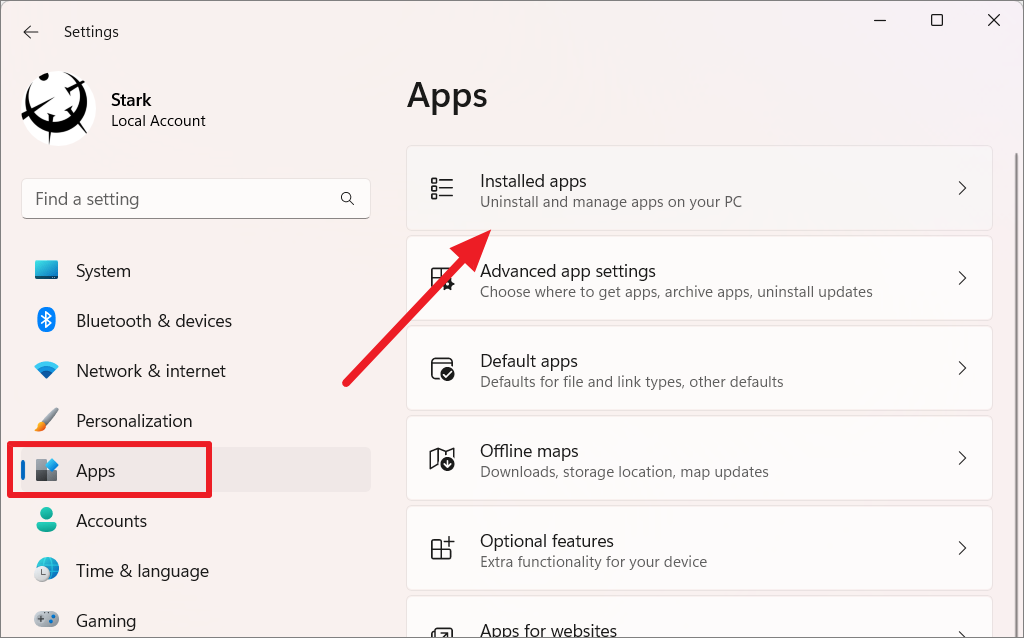
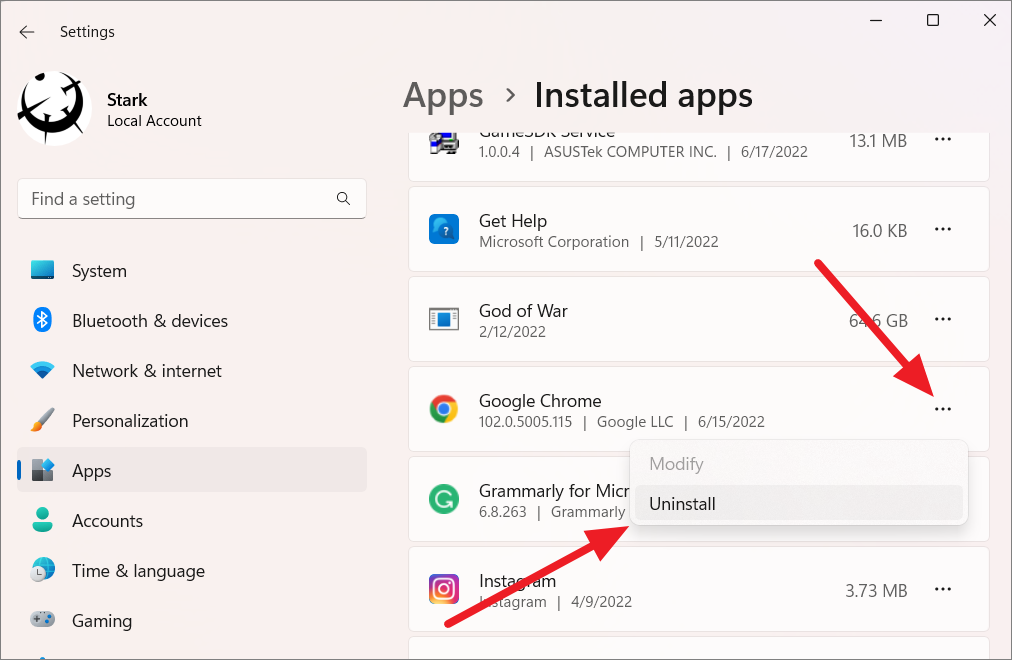
On the Installed apps page, click the three dots (horizontal ellipses) button next to Google Chrome and select ‘Uninstall’.
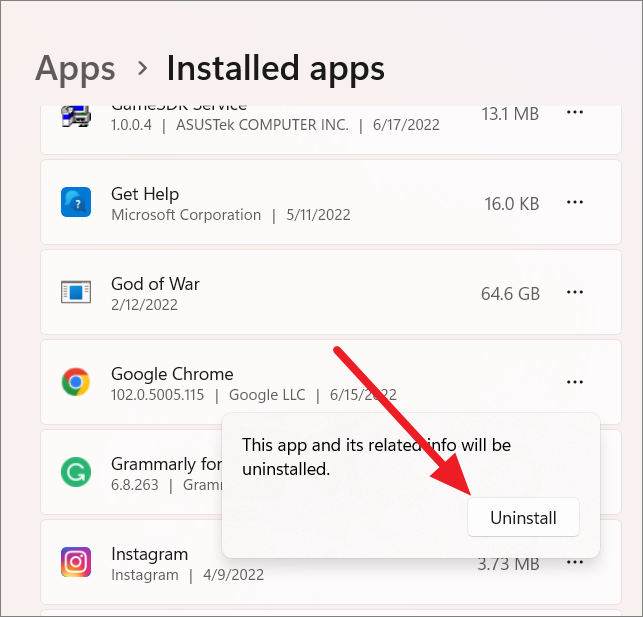
Then, click the ‘Uninstall’ button again.
Alternatively, you can open Windows search (press the Windows key) and type ‘Chrome’. Then, right-click on the top result and select ‘Uninstall’.
After that, download and install the chrome browser using this link.
That’s it.

