
Issues are something you almost never face on an iPhone, however, many users have reported facing the “Swipe up” gesture not behaving as expected on their iPhones out of the blue.
Since there are two distinct types of iPhones out there in the wild, (one which supports Touch ID and one that supports Face ID), the functionality of the “Swipe Up” gesture also tends to differ a bit on both of these.
Where the one with Touch ID mainly utilizes the “Swipe Up” gesture to bring up the “Control Centre”. The latter one uses the gesture for unlocking, navigating, as well as bringing up the app switcher on the device.
Being a similar entity and yet providing a different functionality also translates to having different reasons for a feature to not behave as expected. Hence, before you tackle this issue head-on, understanding what may have caused it on your type of iPhone could potentially save you from the hassle of facing this error again.
What can Render the Swipe Up Dysfunctional on your iPhone?
Due to the nature of the error and its sudden onset, it seems to be a software-related issue, that can present itself by an outdated app running into issues due to incompatibility or after a major software upgrade that went wrong. And since Apple makes absolutely sure that no software upgrade has a detrimental impact on the user experience, it is most likely an outdated app on your device or a rogue app that was running in the background when a major upgrade was initiated and could not adjust to the new platform.
That being said, iPhones (one with the Touch ID) also have a setting that disables the “Swipe Up” gesture on the lock screen and when an app is running in the foreground which can be easily solved by tweaking the settings on the device.
Along with that, many third-party apps allow you to customize the Control Centre and add a shortcut for your ease of use that you can simply access with a tap. Many a time, incompatibility or improper integration of the functionality by the third-party app can also be the culprit behind the issue.
Fortunately, whatever may be the reason for this issue, it is relatively easy to tackle and resolve by yourself. Now, that you have a grasp of the “why” of the issue, let’s head on to the fixes that can resolve the problem.
Method 1: Force Restart your iPhone
A forced restart kills all the running processes and helps them to start afresh. If the issue on your device is being caused by an incompatible app, the issue wouldn’t present itself until you restart the particular app. Which can definitely help you narrow down the issue and take appropriate actions.
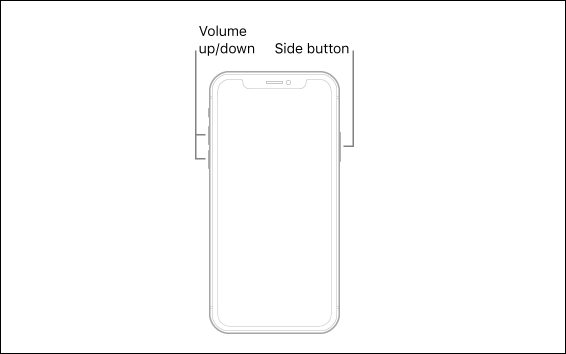
Force Restart iPhones with Face ID, iPhone 8, and SE (2nd Gen)
The newer iPhones have a different process of force restarting them when compared to the earlier released models from Apple.
To force restart the aforementioned iPhones, first, quickly press and release the ‘Volume up’ button located on the left side of your iPhone. Then, similarly, quickly press and release the ‘Volume down’ button. After that, press and hold the ‘Lock/Side’ button until the Apple logo appears on your screen. Once the logo appears, release the side button.
Once your iPhone has been restarted, punch your passcode in and check if the issue has been resolved.
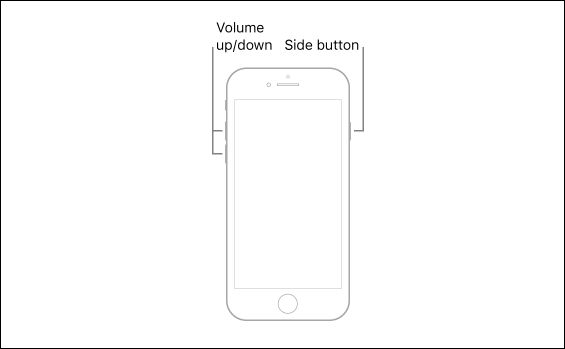
Force Restart iPhone 7
This generation of iPhone receives special treatment by being the only one not sharing the process of force restarting the phone with any other generation of iPhones. However, it is as simple to force restart an iPhone 7 as it is to restart any other model of an iPhone.
To force restart an iPhone 7, press and hold the ‘Lock/Side’ button and ‘Volume down’ button together until the Apple logo appears on your screen. Once the logo appears, release both the buttons.
After that restart, check if this has resolved the issue on your iPhone.
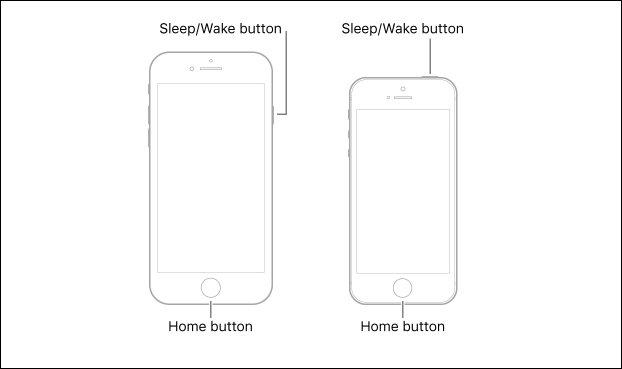
Force Restart iPhone 6, 6s, and SE (1st Gen)
The aforementioned iPhones are the last of the ones that need the ‘Home’ button to force restart them. That being said, using the ‘Home’ button to force restart the iPhone only makes the matter much simpler relatively.
To do so, press and hold the ‘Lock/Side’ button and the ‘Home’ button together on your iPhone until the Apple logo appears. Once you see the logo on your screen, release both the buttons.
Method 2: Tweak Control Centre Settings
Note: This method is only applicable to iPhones with Touch ID. If you own an iPhone with a Face ID, please head to the next method.
There could be a probability that settings for Control Centre were changed that disable its access on the lock screen and when an app is running in the foreground. Since the setting has the potential to fix an issue this big, it cannot hurt to spare your two minutes to make sure the settings are not the culprit behind it.
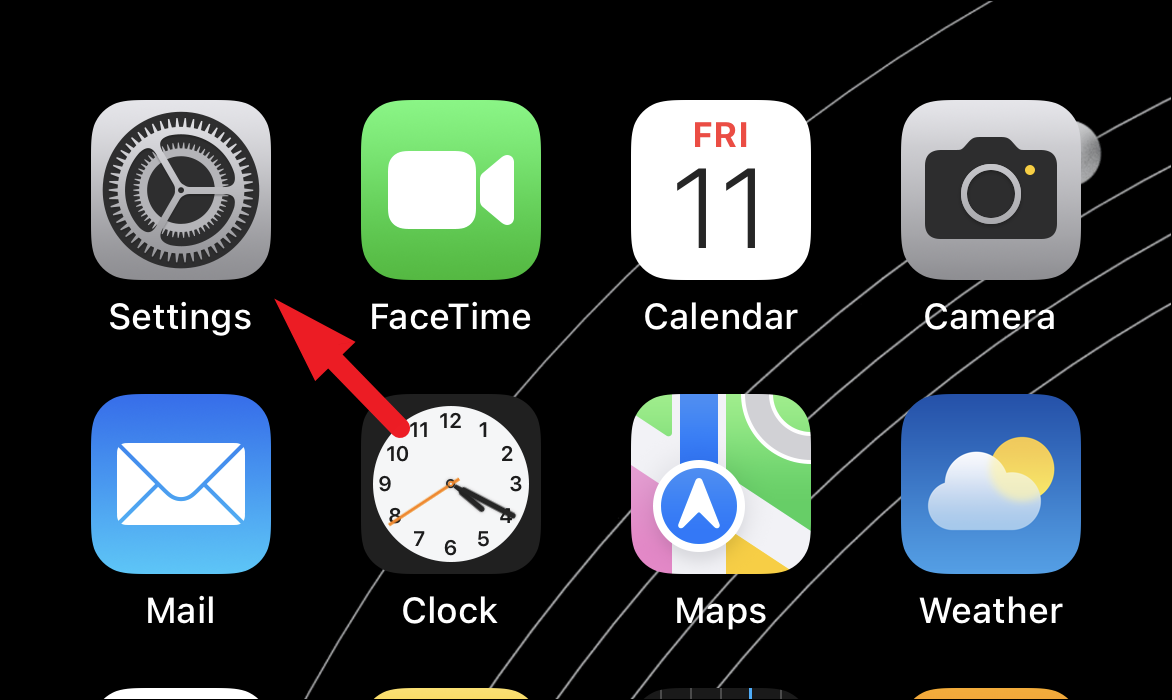
First, open the Settings app either from the home screen or from the app library of your iPhone.

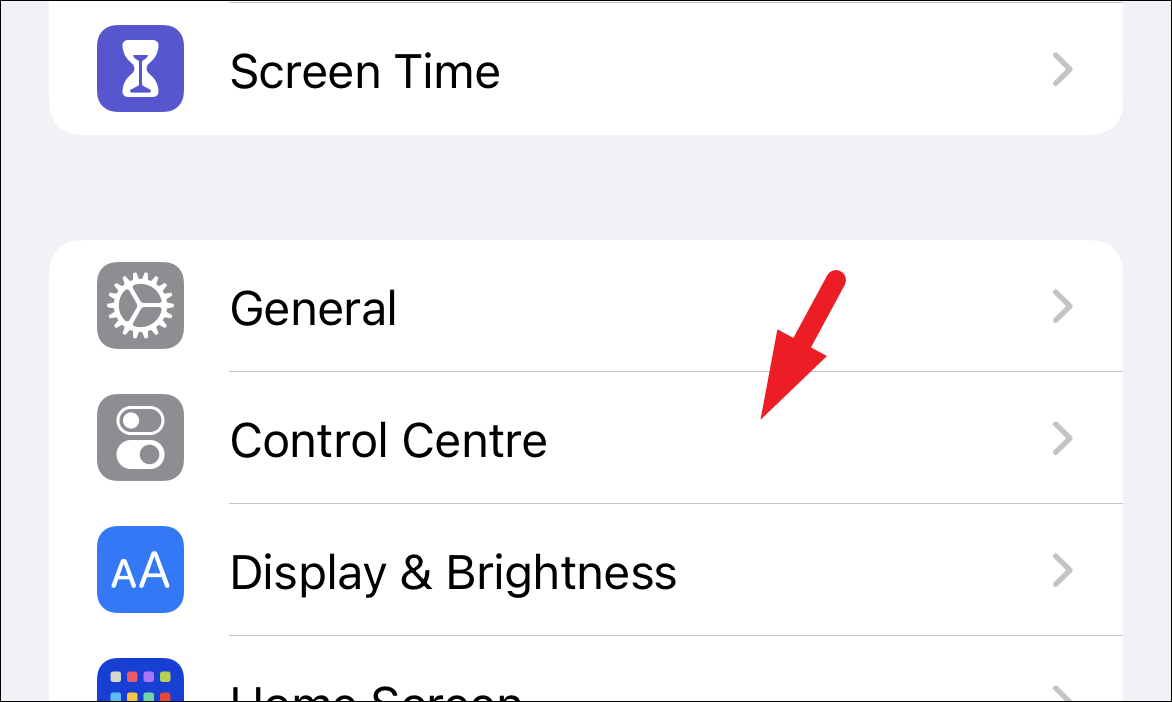
Then, from the Settings screen, locate and tap on the ‘Control Centre’ option to continue.
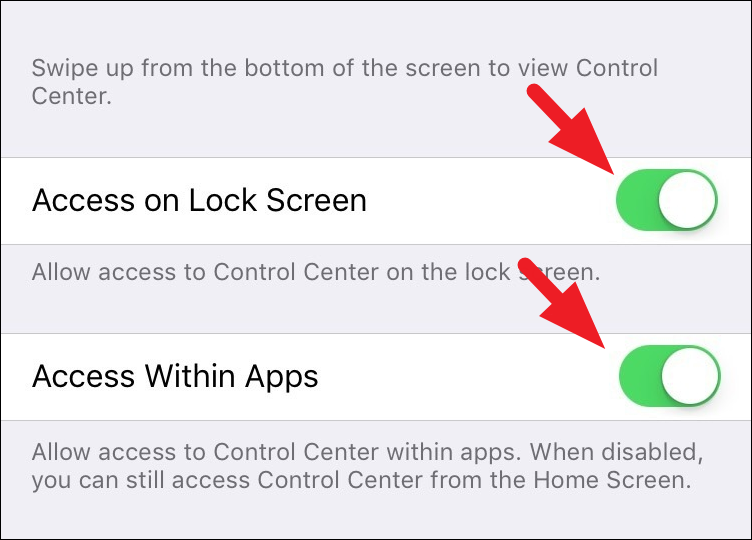
After that, locate the ‘Access on Lock Screen’ option on the screen and tap on the following toggle switch to bring it to the ‘On’ position. Next, locate the ‘Access Within apps’ option, present right beneath the ‘Access on Lock Screen’ option and make sure the toggle switch present on the far right edge is in the ‘On’ position.
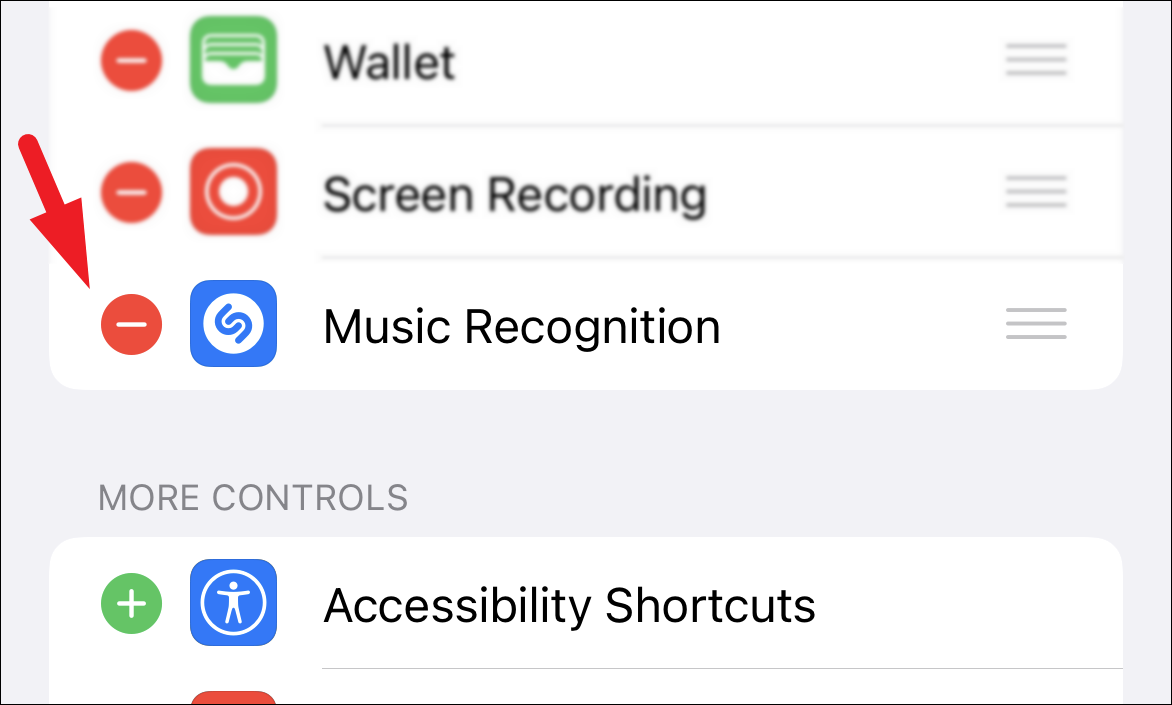
Now, head to the ‘Included Controls’ section on the ‘Control Centre’ screen. Then, tap on the ‘red dot’ preceding any third-party app control present in the list to reveal a ‘Remove’ button.
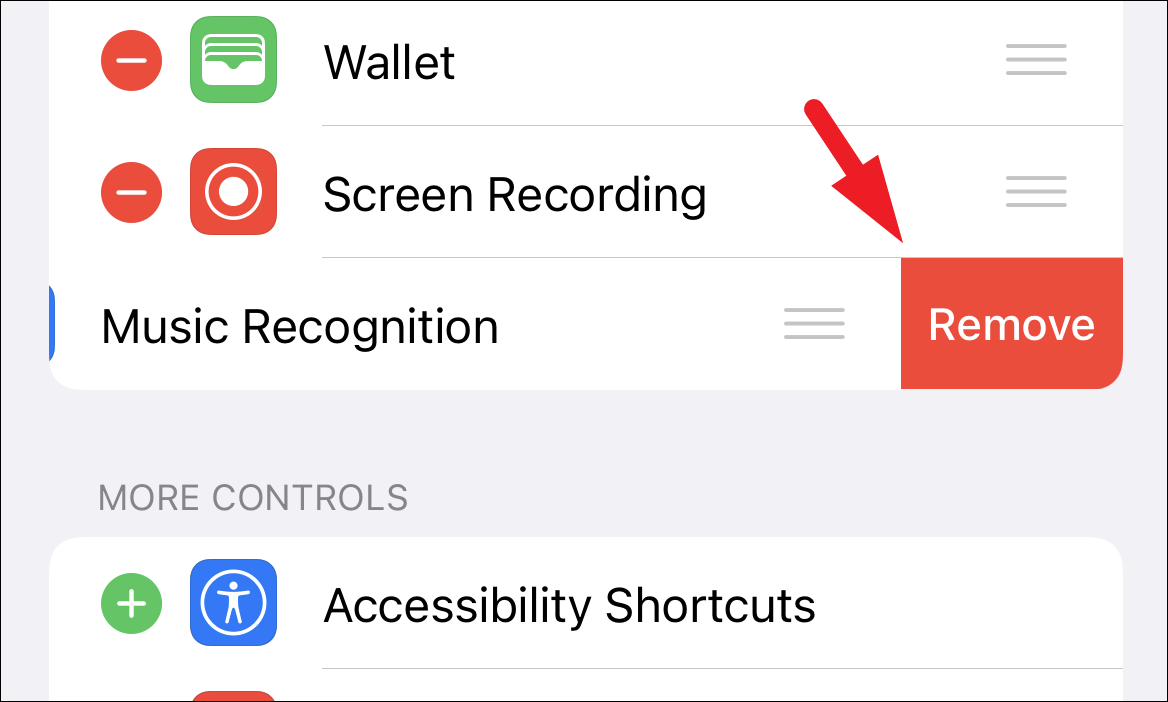
Then, tap on the ‘Remove’ button revealed on the right edge of the option to remove the app control from the ‘Control Centre’. Repeat the process for every third-party app present in the list.
Then, restart your iPhone as you would normally do and check if the issue still persists. If the issue was caused by a third party app control present in the Control Centre, it should be resolved. You can now, add the apps again in the Control Centre one by one and pinpoint the problematic app causing the issue on your device.
Method 3: Make Sure the VoiceOver Feature is Turned Off on your iPhone
The VoiceOver feature on iPhones changes the gestures completely that you use to interact with your iPhone. Since it hardly takes a minute to make sure the feature is turned off, it definitely cannot hurt to check.
To head to the VoiceOver settings, first, launch the ‘Settings’ app on your iPhone either from the home screen or from the app library.

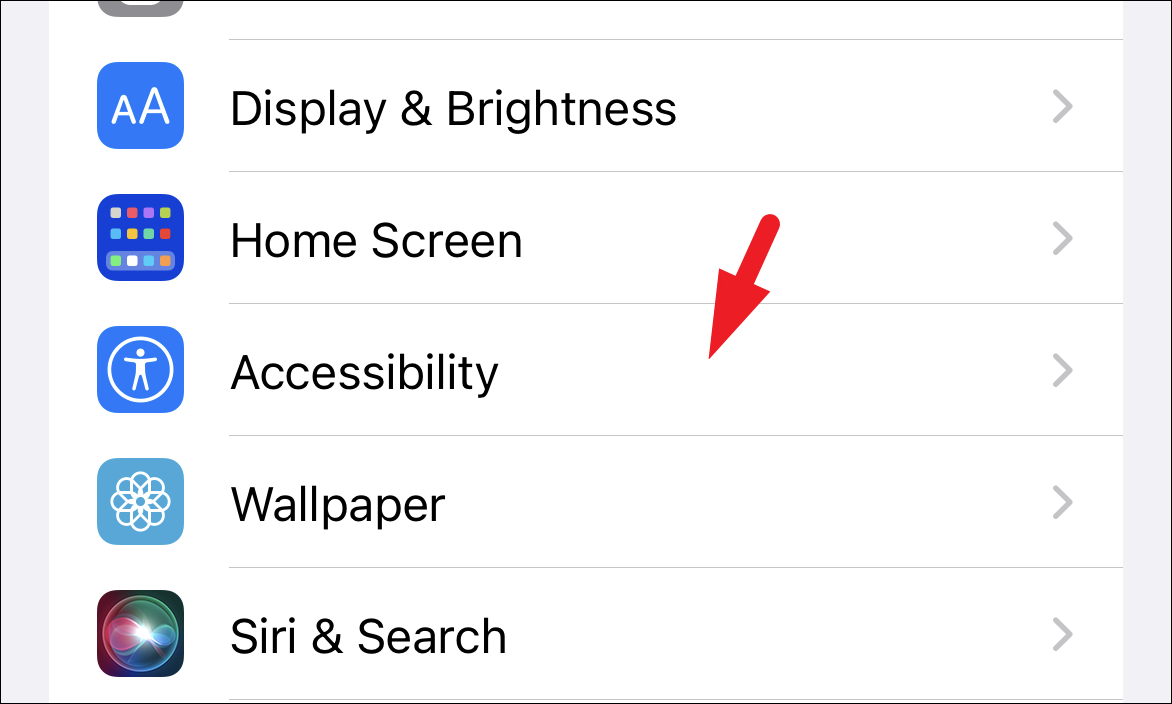
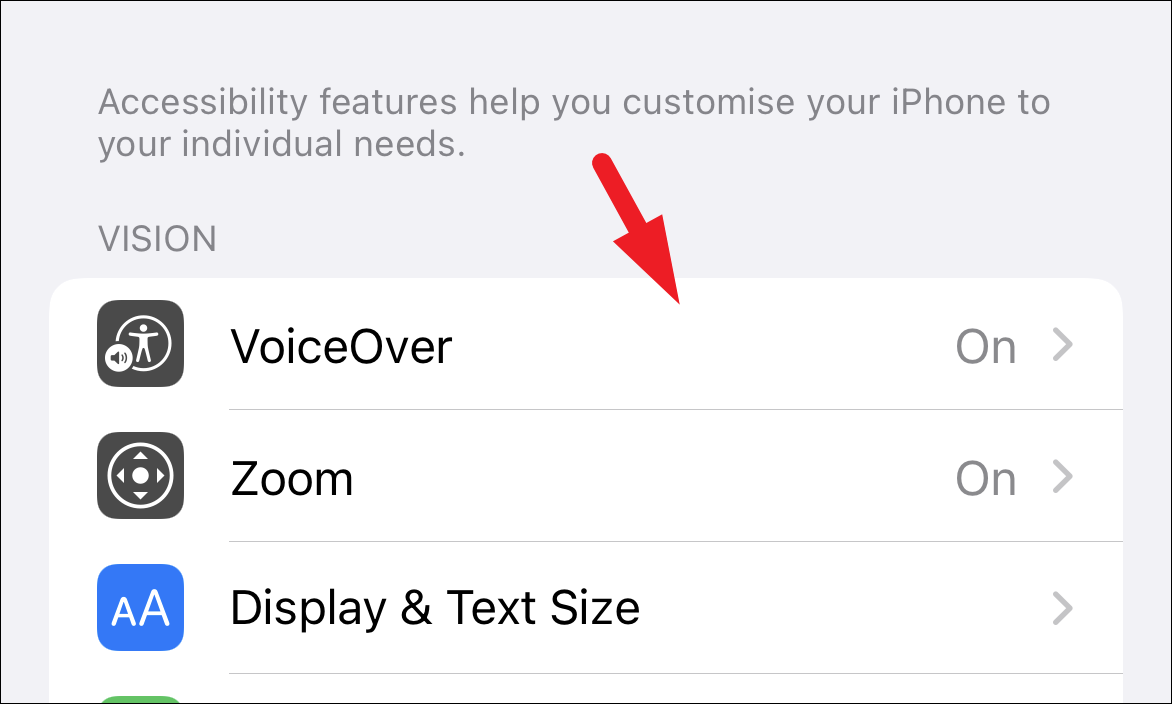
Next, on the Settings screen, scroll down to locate and tap on the ‘Accessibility’ option from the list to proceed.
After that, under the ‘Vision’ section, locate and tap on the ‘VoiceOver’ option to continue.
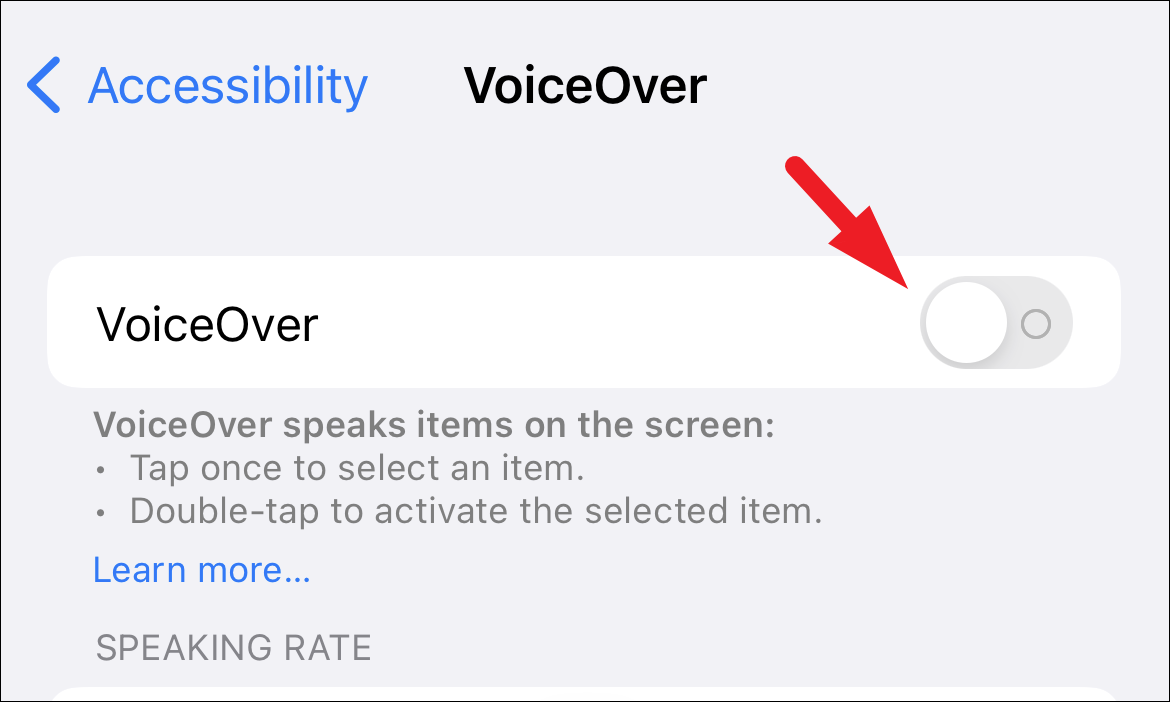
Then, locate the ‘VoieOver’ tile on the screen and if the following toggle switch on the tile is in the ‘On’ position, tap on it to bring it to the ‘Off’ position.
If your VoiceOver was already turned off, do not sulk, just hop onto the next section.
Method 4: Restore your iPhone from a Recent Backup Using iTunes
If you have a habit of periodically backing up your iPhone to a computer or iCloud, you may be able to resolve the issue by restoring your iPhone to the old image. Given, you were not facing this issue on your iPhone when the backup image was created.
Before you connect your iPhone to your computer and start the restore process. You will need to turn off the ‘Find My’ services on your iPhone.
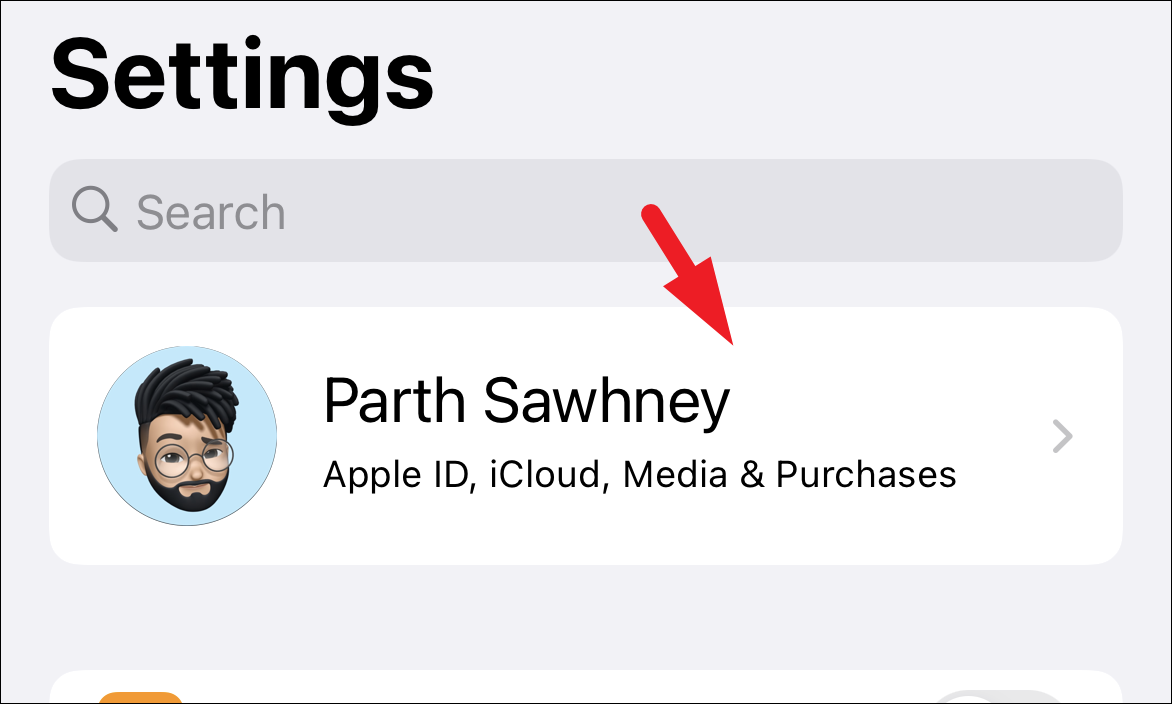
To do so, head to the ‘Settings’ app either from the home screen or from the app library of your iPhone.

Next, on the Settings screen, tap on the Apple ID card to continue.
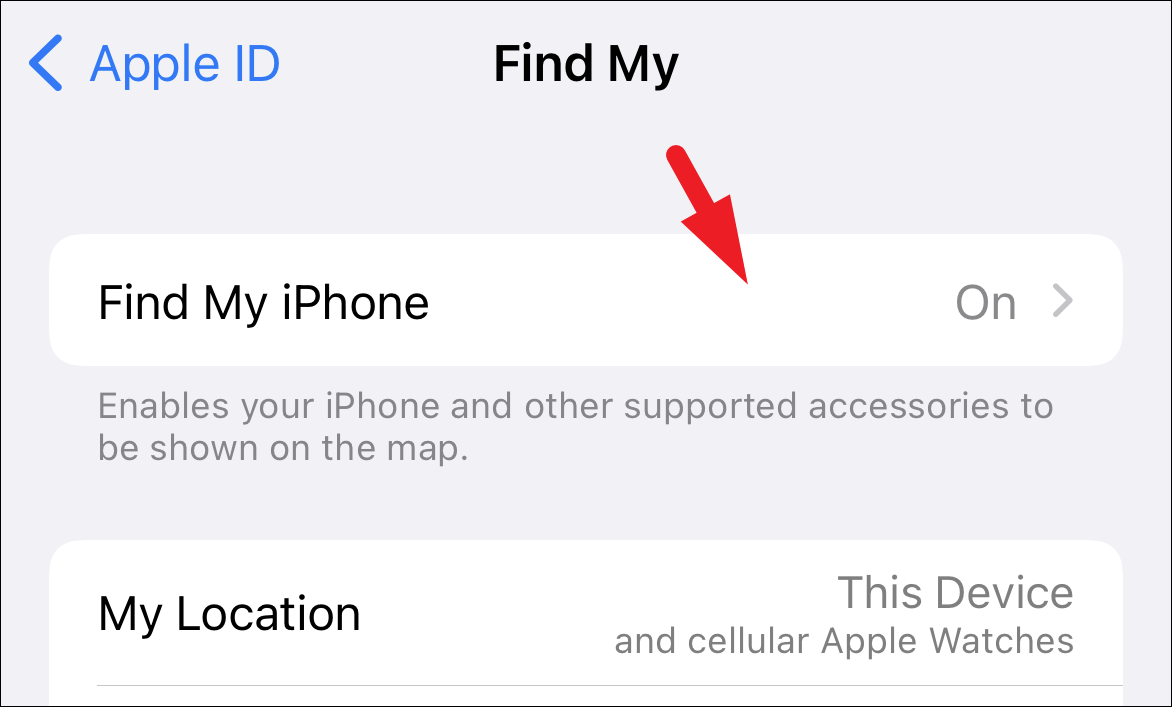
After that, on the next screen, tap and locate the ‘Find My’ tile from the list to proceed.
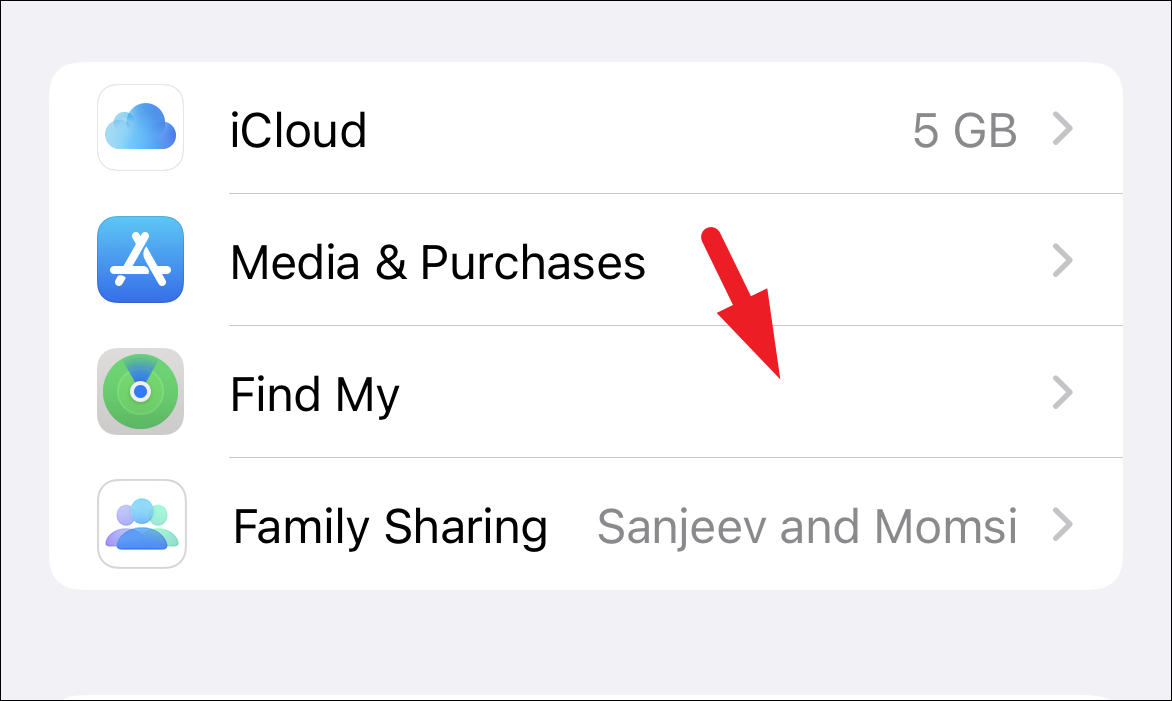
Then, on the ‘Next’ screen, tap on the ‘Find My iPhone’ tile.
Now, locate the ‘Find My iPhone’ option and tap on the following toggle switch to bring it to the ‘Off’ position. This will bring an overlay window to your screen.
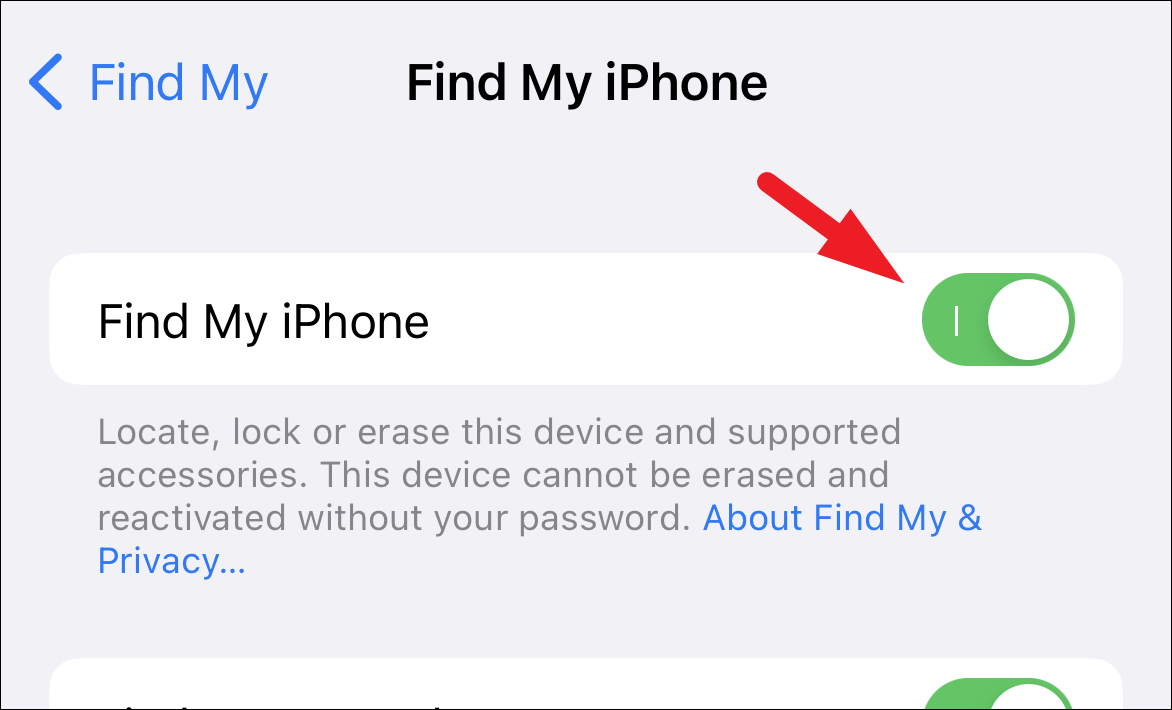
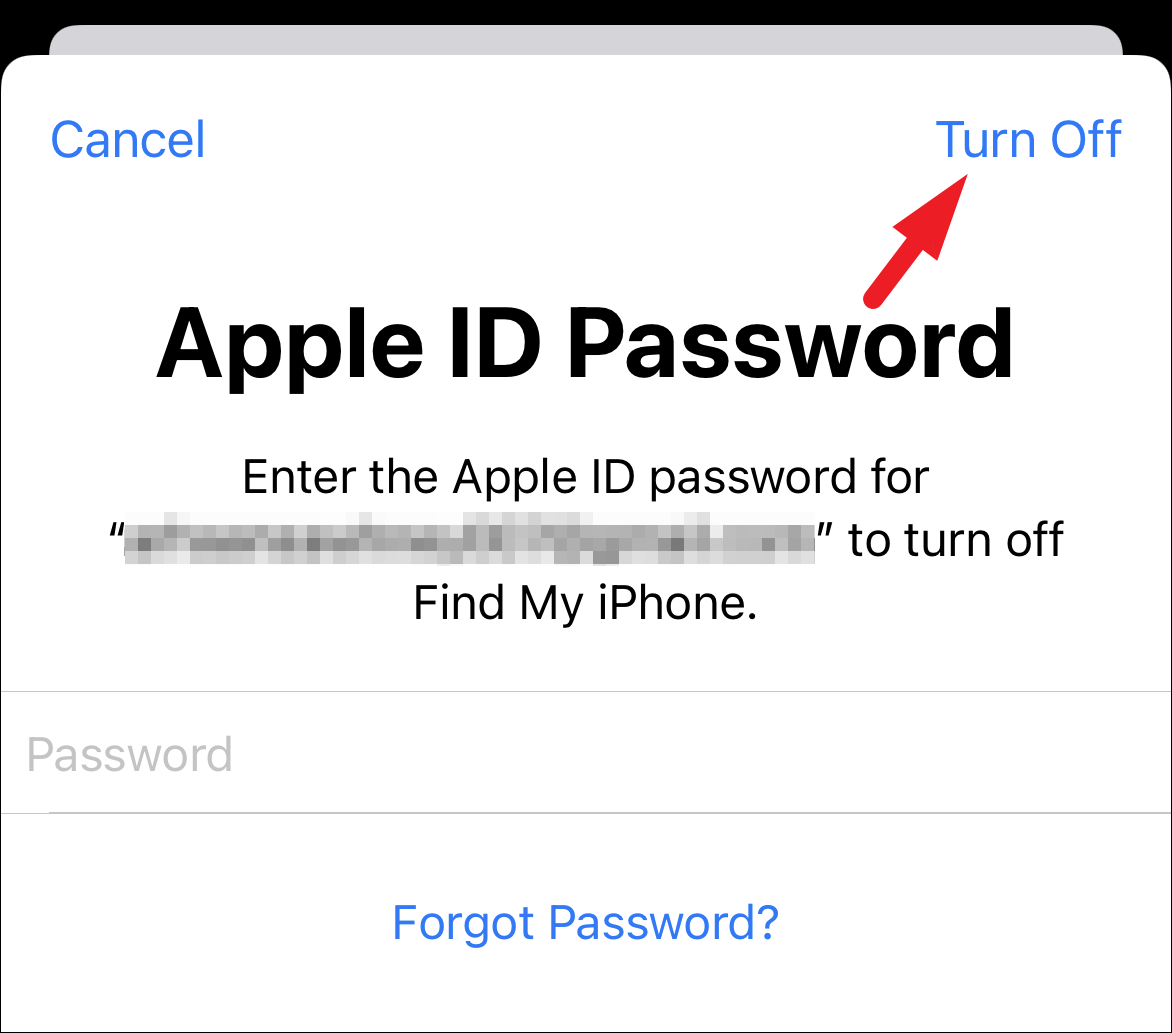
Next, enter the password for your Apple ID and tap on the ‘Turn Off’ option present on the top right corner of your screen to turn off the ‘Find My’ services for your iPhone.
Once you have turned off the ‘Find My’ services on your iPhone, connect the device to your Windows or macOS machine via a cable.
Next, launch the iTunes app either from the desktop, taskbar, Start Menu, Dock, or launchpad of your respective device.

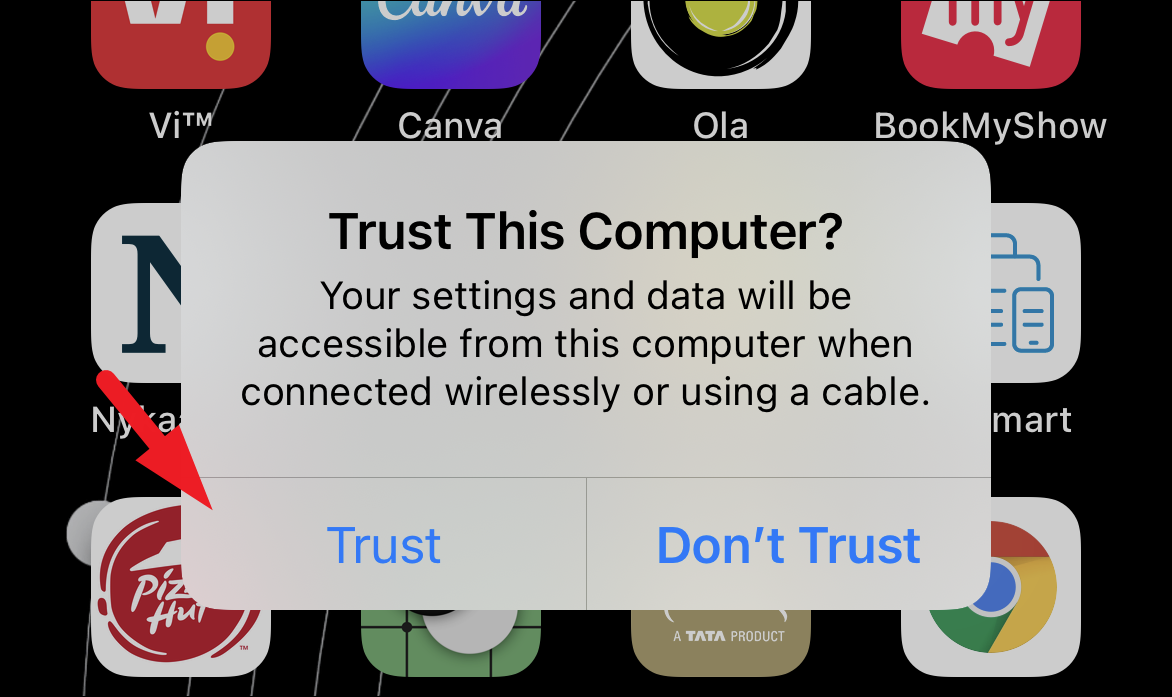
Once the iTunes window opens and detects your iPhone, it will request to access it.
Now, on your iPhone screen, an overlay prompt will be displayed, tap on the ‘Trust’ button to let iTunes access the iPhone.
Then, on the iTunes window on your computer, locate and click on your iPhone tile present on the left sidebar to continue.

Now, on your iPhone details page, locate the ‘Backups’ section and click on the ‘Restore Backup..’ option to proceed. This will open an overlay window on your screen.

Now, on the overlay window, click on the drop-down menu following the ‘Backup’ option and click to select the most recent backup from the list. After that, click on the ‘Restore’ button present in the window. If the backup you wish to restore your iPhone from is encrypted, you may also need to provide the password for it as well.

The restoration process will now commence on your iPhone, keep the device connected even after it has been restored to allow the sync process to be completed. Once the sync process has been completed, disconnect your device and check if the issue has been resolved.
Method 5: Reset All Settings on your iPhone
Resetting all settings has a very high potential to solve any issues you are facing on your device. As the name suggests, resetting all settings will completely restore the network settings, keyboard dictionary, Home Screen layout, privacy settings, location settings, and Apple Pay Card settings to their factory default state. However, no media or app will be deleted from your iPhone.
To reset all settings on your iPhone, first, open the ‘Settings’ app either from the home screen or from the app library of your device.
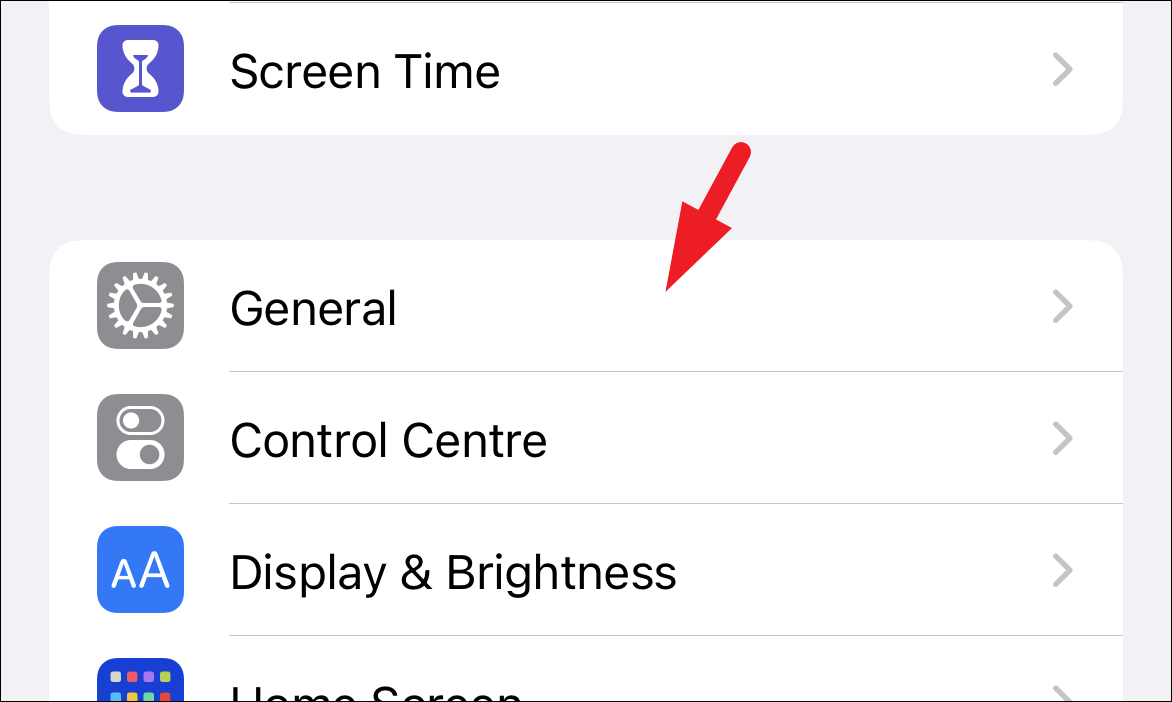
Then, on the ‘Settings’ screen locate and tap on the ‘General’ option from the list to continue.

Now on the next screen, scroll down till the end of the page and tap on the ‘Transfer or Reset iPhone’ tile to proceed.

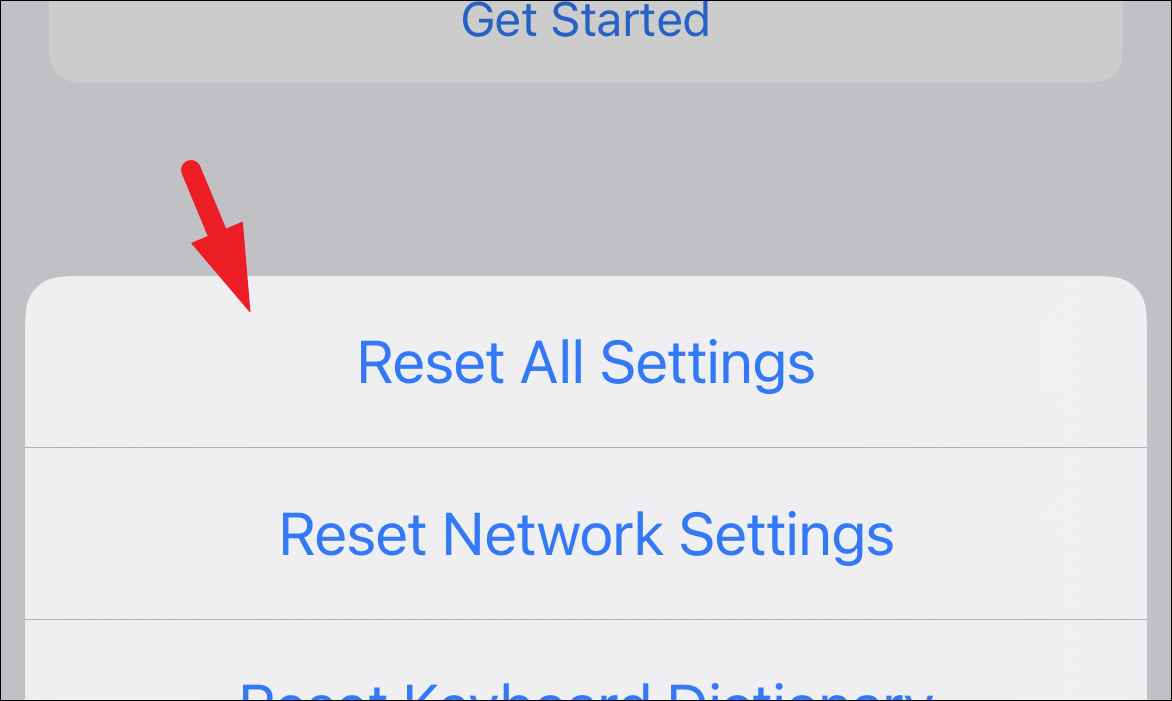
After that, on the ‘Transfer or Reset iPhone’ screen, tap on the ‘Reset’ tile present at the bottom section of your screen. This will bring up an overlay menu on your screen.

Now, from the overlay menu, tap on the ‘Reset All Settings’ option. This action will require you to punch in your passcode next.
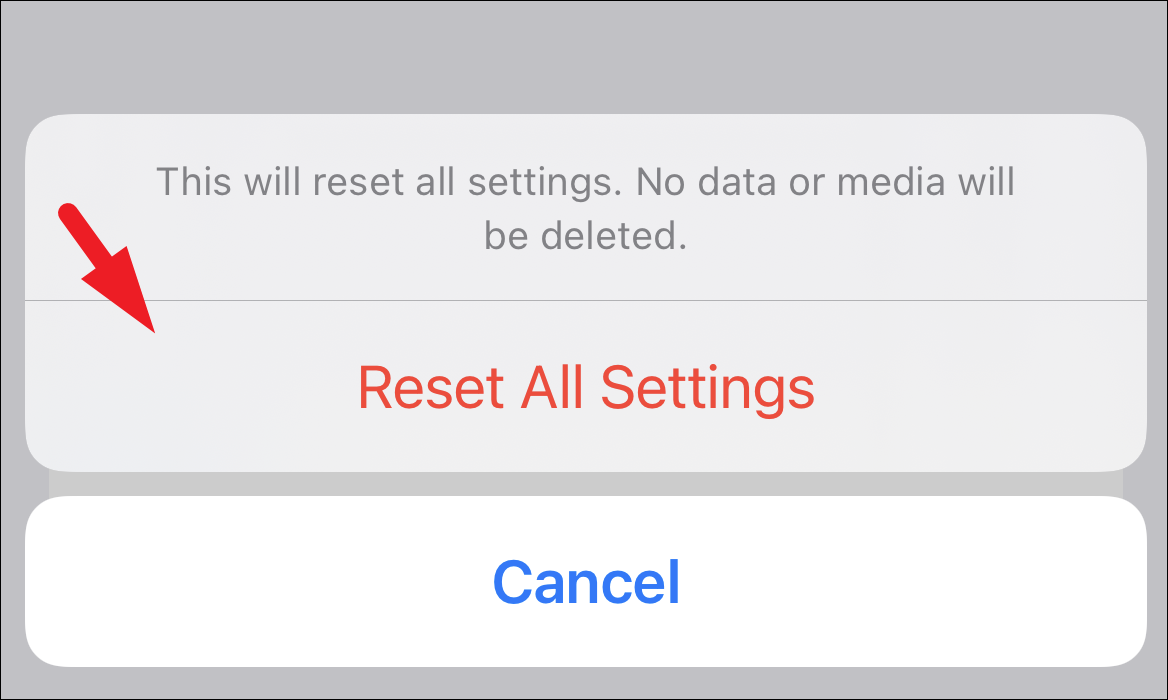
After you successfully enter your iPhone passcode, an overlay prompt will appear on your screen. Tap on the ‘Reset All Settings’ option once again to confirm.
Your iPhone may take several minutes during the restart or may even restart more than once, do not worry, it is normal behavior. Once restarted, check if the issue still persists.
Method 6: Reset your iPhone to Factory Defaults
If non of the solutions listed until now have been able to resolve your issue, you may have to take the drastic step of erasing all content and settings on your iPhone and bringing it to a factory default state. Though erasing all your content is a very major step, you can be absolutely sure that it will cent percent resolve the issue if it software-based.
Note: Before you proceed ahead, make sure you have a backup of your iPhone on iCloud or on iTunes as that will help you restore back all your data.
To erase all content and settings on your iPhone, head to the ‘Settings’ app either from the home screen or from the app library of your device.

Then, from the ‘Settings’ screen, locate and tap on the ‘General’ option from the list.
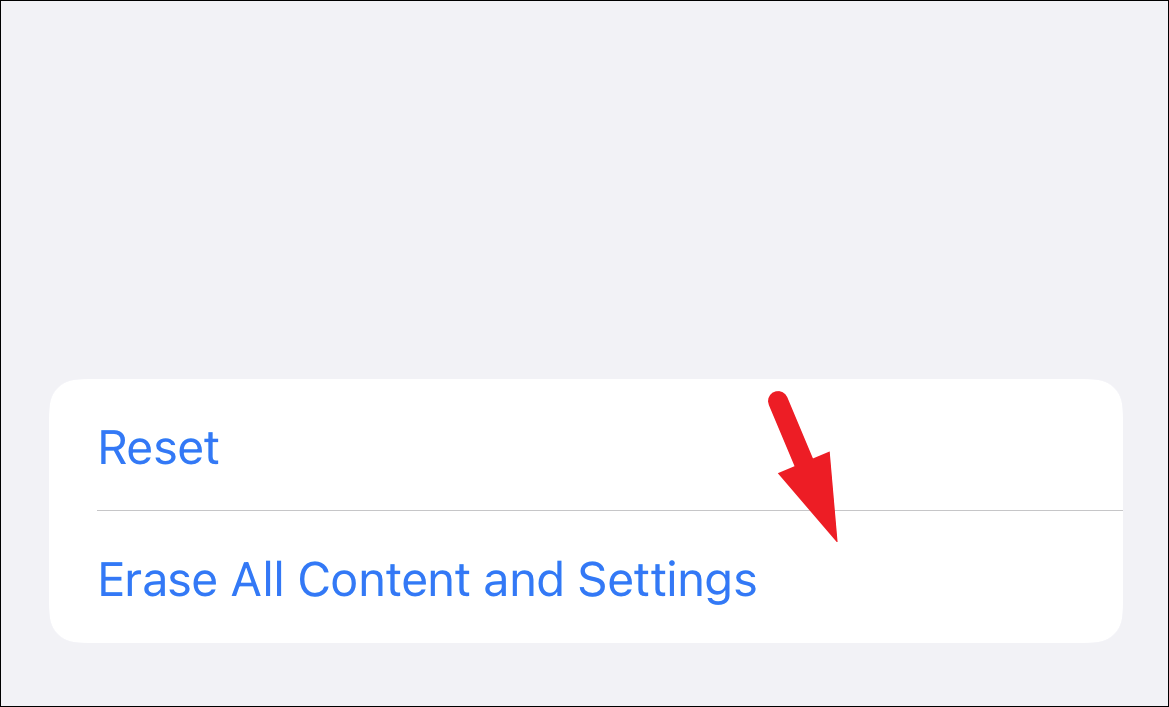
After that, scroll down to the end of the page and tap on the ‘Transfer or Reset iPhone’ option.

Now, on the next screen, tap on the ‘Erase all Content and Settings’ option to continue.
On the next screen, tap on the ‘Continue’ button present at the bottom section of the screen to proceed. You will be next asked to enter the passcode for your iPhone.
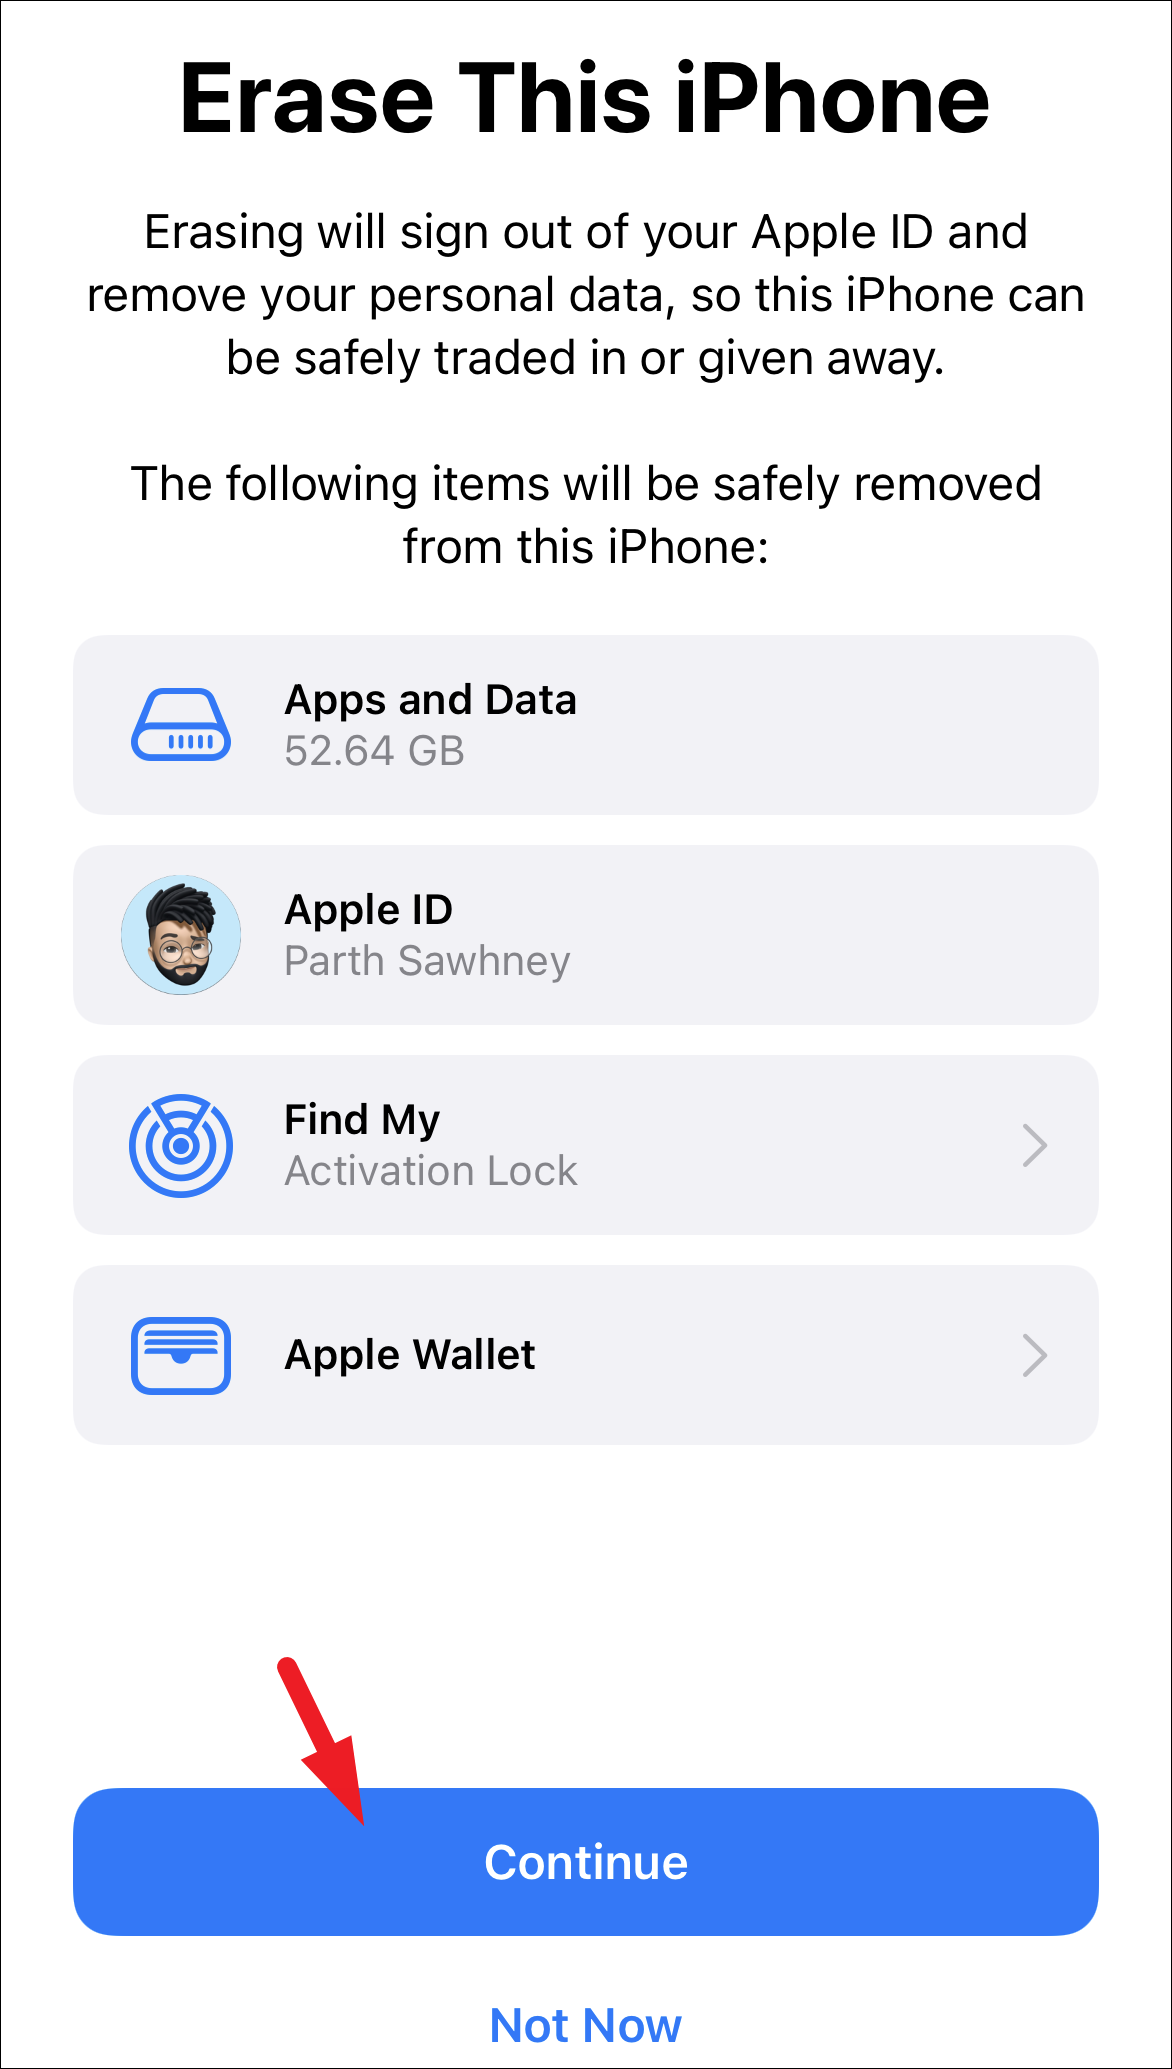
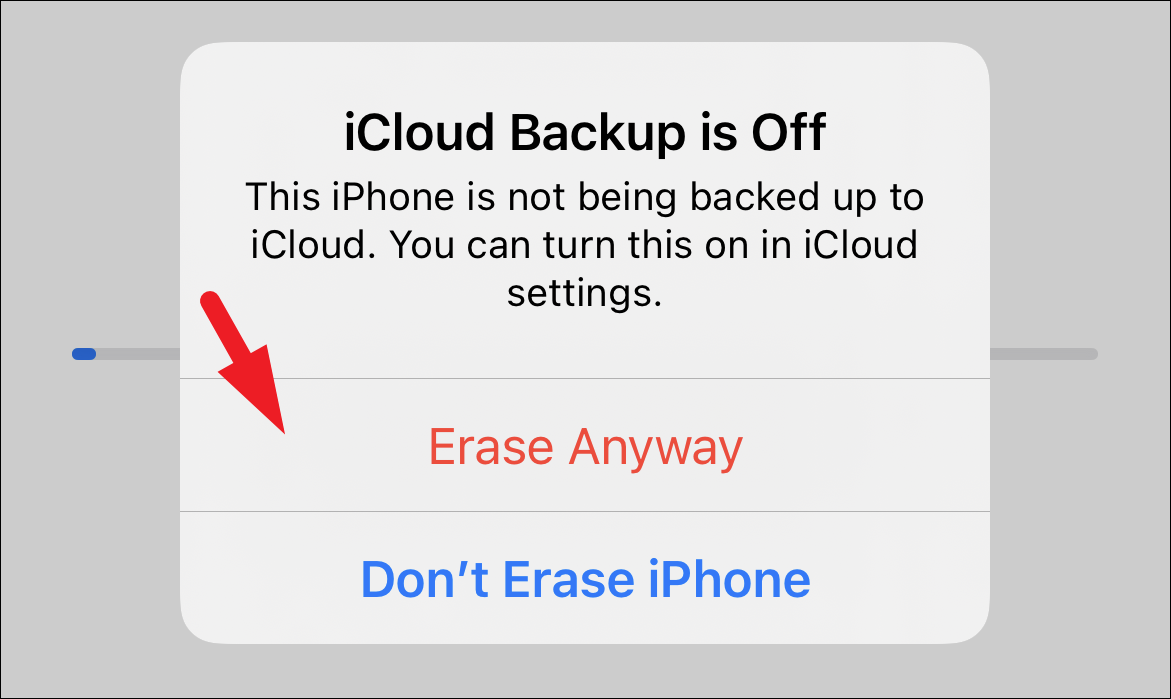
Once you have entered your passcode, your iPhone will be now backed up to iCloud. In case your iCloud backup is off, tap on the ‘Erase Anyway’ button to erase all data currently present on your iPhone and bring it to a factory default state.
If your iCloud backup is turned on, your iPhone will be backed up to the iCloud. Then, you will receive an overlay prompt from the bottom section of your screen. From the overlay prompt, tap on the ‘Erase’ button to provide your confirmation to restore your iPhone to the factory default state.
Your iPhone will now shut down and may take several minutes to restart. It may also restart more than once in-between the process and that is perfectly normal behavior. Once restarted, set up your iPhone either using a previously backed up image or set up as new. Your issue should now be resolved.


