
Windows 11 sometimes prevents users from removing their Windows Hello PIN by disabling (greying out) the "Remove" button in Sign-in Options. This restriction can block you from switching to password sign-in or other authentication methods, especially if you're managing device access or troubleshooting login issues. Several system policies, account settings, or device configurations can cause this limitation, but you can resolve it by adjusting the right settings or using advanced tools.
Method 1: Disable "Only Allow Windows Hello Sign-In" Setting
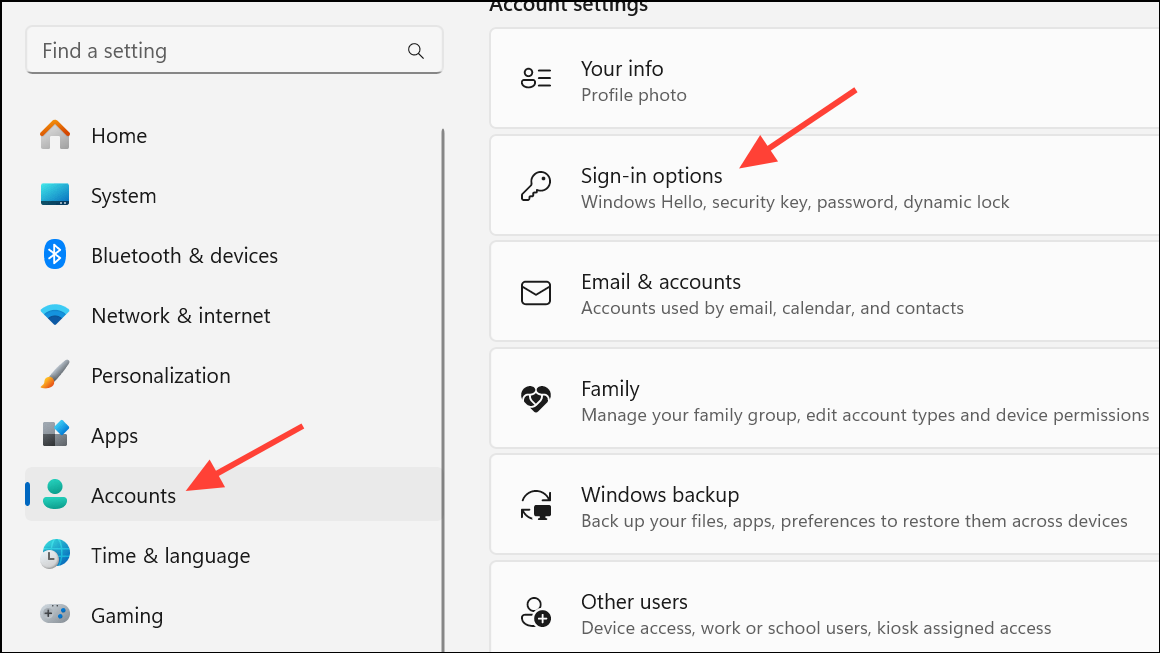
Step 1: Open the Windows Settings app by pressing Windows + I.
Step 2: Navigate to Accounts in the sidebar, then select Sign-in options.
Step 3: Scroll down to the Additional settings section. Locate the option labeled For improved security, only allow Windows Hello sign-in for Microsoft accounts on this device.
Step 4: Switch this setting to Off. Turning it off allows password sign-in and re-enables the option to remove your PIN.

Step 5: Close and reopen the Settings app to refresh the page. Return to Sign-in options, select PIN (Windows Hello), and the Remove button should now be clickable.
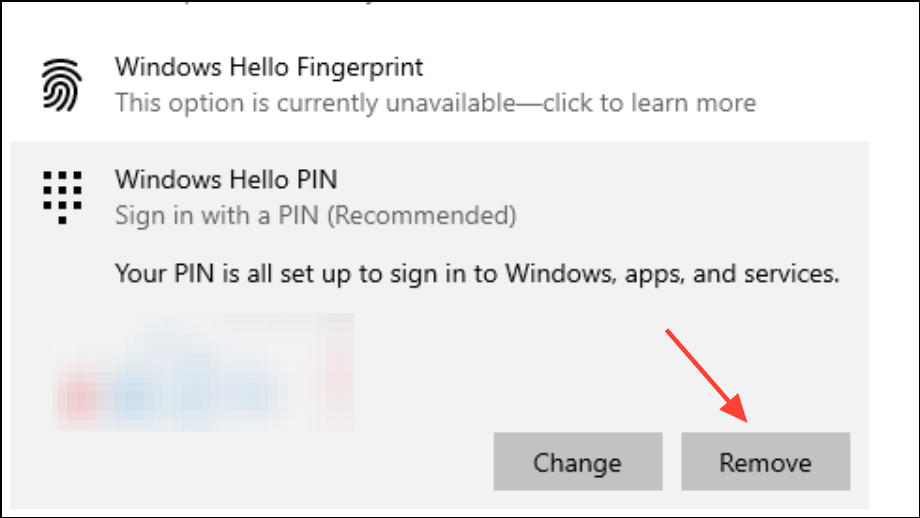
Step 6: Click Remove and confirm by entering your account password when prompted.
Method 2: Re-enable Password Sign-In for Local Accounts
Windows Hello PIN removal requires a password to be set on your account. If password sign-in is disabled or missing, you must enable it or set a password first.
Step 1: In Settings > Accounts, select Sign-in options.
Step 2: Ensure the option to use a password to sign in is enabled. If it’s missing or greyed out, follow a tutorial to enable password sign-in for local accounts, such as using the Local Group Policy Editor or Registry Editor.
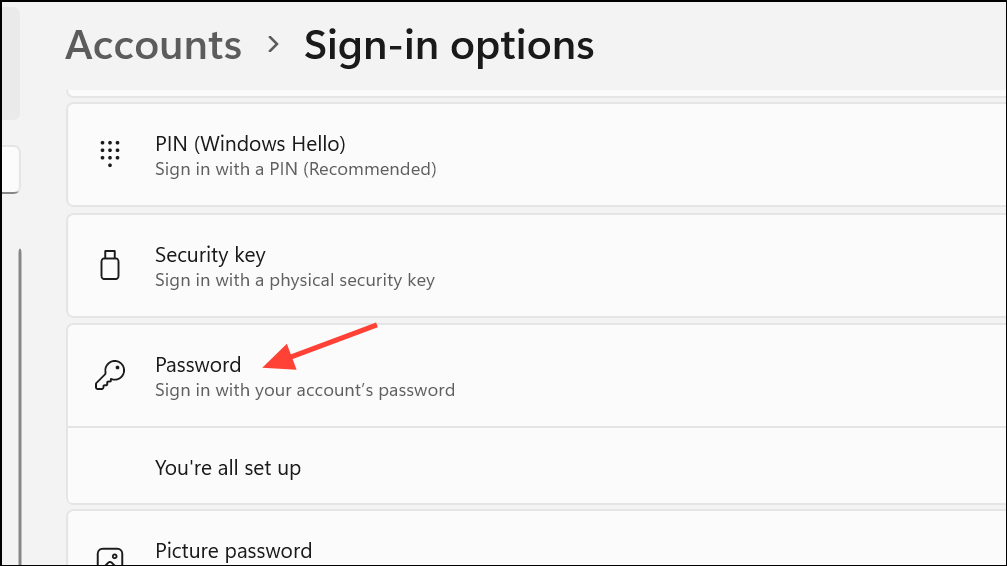
Step 3: If your account does not have a password, set one by clicking Password under Sign-in options and following the prompts.
Step 4: Once a password is set and password sign-in is available, try to remove the PIN again as described in Method 1.
Method 3: Turn Off Passwordless Microsoft Account
Microsoft accounts with passwordless sign-in enabled can also prevent PIN removal. You’ll need to disable this feature through your Microsoft account's security settings.
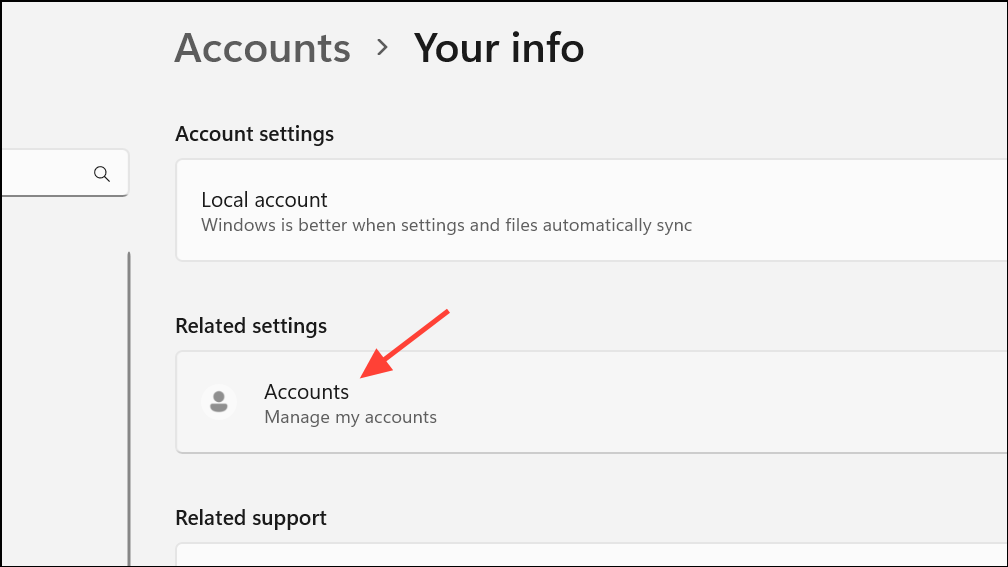
Step 1: Open Settings > Accounts > Your info and click the Accounts link under "Related settings" to open account.microsoft.com in your browser.
Step 2: Go to the Security tab, then select Advanced security options.
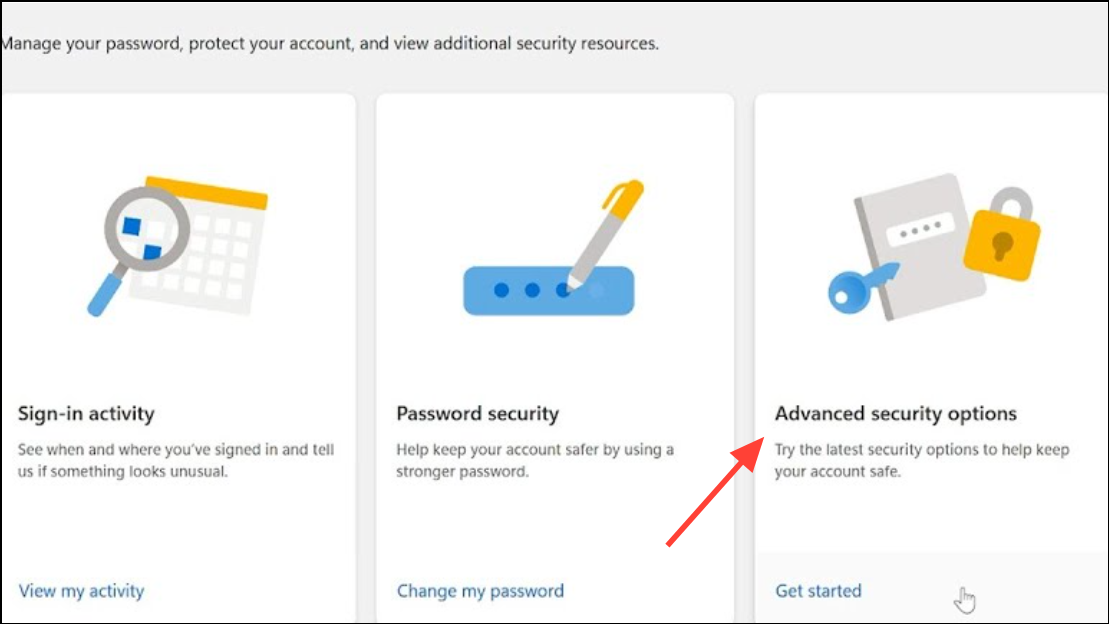
Step 3: In the Additional security section, turn off the Passwordless account option. Follow the on-screen instructions to confirm this change.
Step 4: Restart your computer. After rebooting, revisit the Sign-in options page in Settings and check if the PIN Remove button is now enabled.
Method 4: Use "I Forgot My PIN" to Remove PIN
If the Remove button stays greyed out, use the "I forgot my PIN" feature as a workaround. This method can reset or clear the PIN requirement.
Step 1: Go to Settings > Accounts > Sign-in options. Expand the PIN (Windows Hello) section.
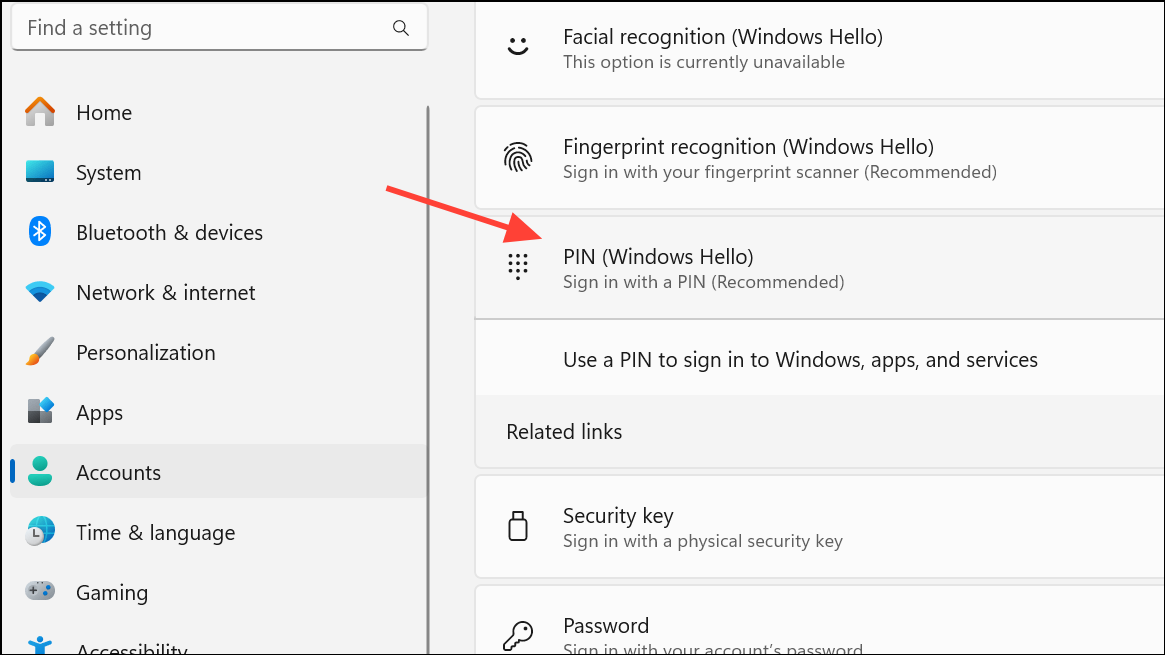
Step 2: Click I forgot my PIN. When prompted, authenticate with your Microsoft account credentials.
Step 3: At the PIN creation dialog, leave the fields empty and click Cancel instead of setting a new PIN.
Step 4: This process should remove the PIN from your account, allowing you to use password sign-in only.
Method 5: Remove PIN via Command Prompt (Advanced)
For persistent issues, especially on business or domain-joined devices, you can delete Windows Hello for Business registrations using the command line. This removes all local Hello credentials, including PIN, Face, and Fingerprint sign-in.
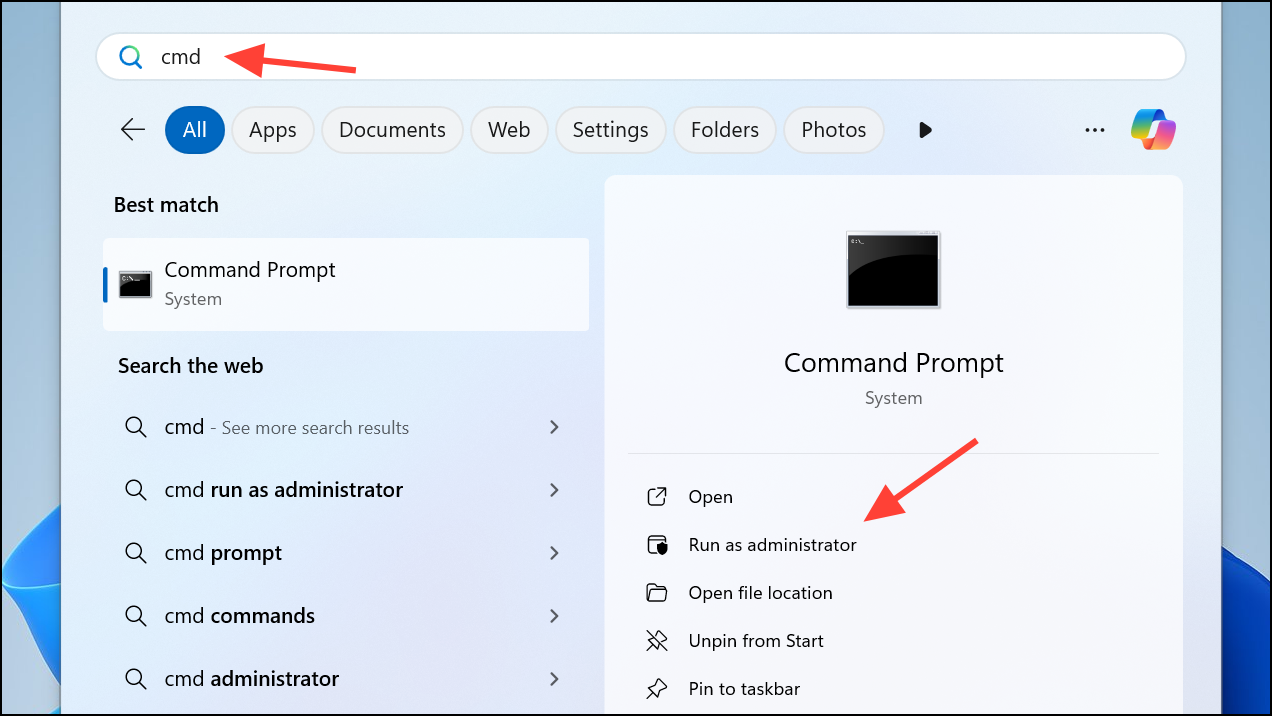
Step 1: Open Command Prompt (cmd.exe) as the affected user (not as administrator unless required).
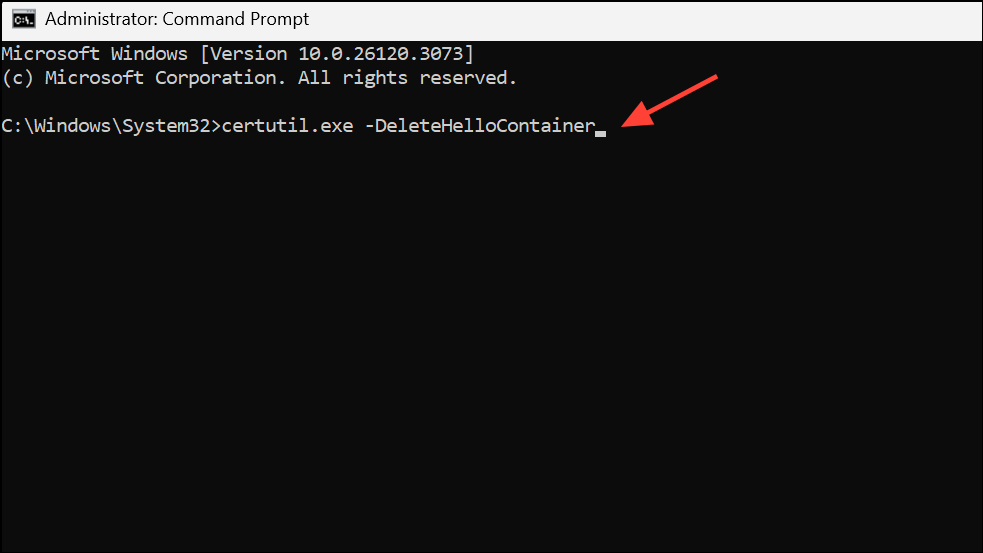
Step 2: Run the following command to delete Hello credentials:
certutil.exe -DeleteHelloContainer
Step 3: Sign out of the user account by running:
logoff.exe
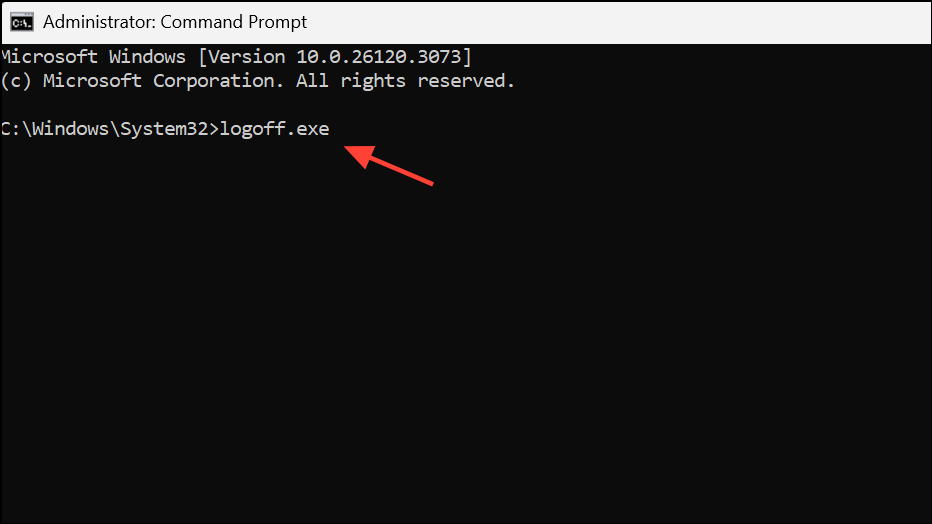
Step 4: After signing back in, the PIN and other Hello sign-in options should be cleared. You can set up new sign-in methods as needed.
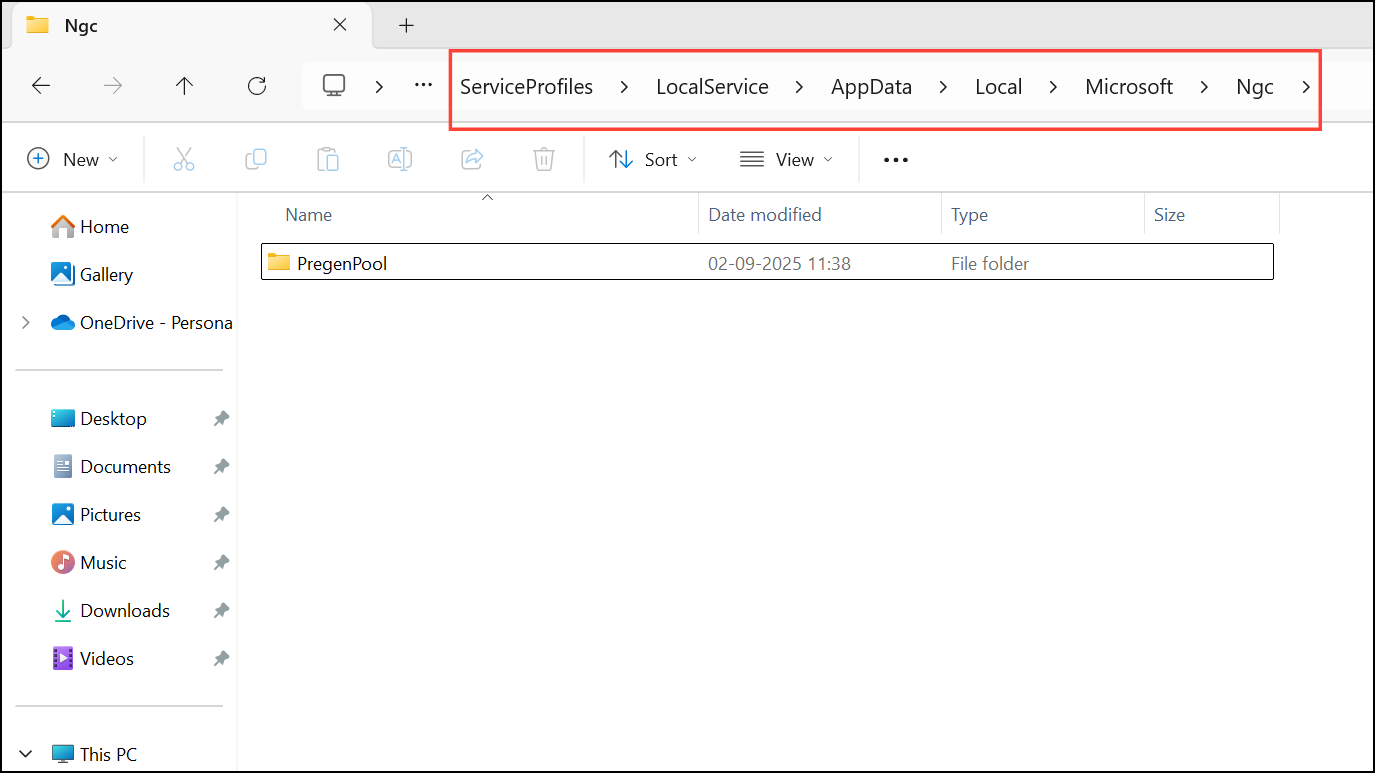
Method 6: Delete the Ngc Folder (PIN Storage)
The Ngc folder stores PIN configuration data. Removing it can reset the PIN requirement, but may force you to set up a new PIN before removal is possible.
Step 1: Navigate to C:\Windows\ServiceProfiles\LocalService\AppData\Local\Microsoft\NGC. If you can't access this folder, you may need to take ownership and grant permissions.
Step 2: To take ownership and delete the folder, open PowerShell as administrator and run:
powershell -windowstyle hidden -command "Start-Process cmd -ArgumentList '/s,/c,takeown /f C:\Windows\ServiceProfiles\LocalService\AppData\Local\Microsoft\NGC /r /d y & icacls C:\Windows\ServiceProfiles\LocalService\AppData\Local\Microsoft\NGC /grant administrators:F /t & RD /S /Q C:\Windows\ServiceProfiles\LocalService\AppData\Local\Microsoft\Ngc & MD C:\Windows\ServiceProfiles\LocalService\AppData\Local\Microsoft\Ngc & icacls C:\Windows\ServiceProfiles\LocalService\AppData\Local\Microsoft\Ngc /T /Q /C /RESET' -Verb runAs"
Step 3: Restart your computer. The PIN will be reset, and you may now be able to remove it from Sign-in options or use password sign-in only.
Additional Tips and Troubleshooting
- On managed or domain-joined devices, group policy or Intune settings may enforce Windows Hello PIN. Contact your IT administrator if you cannot change sign-in settings.
- Switching from a Microsoft account to a local account can sometimes restore the Remove button, but may affect access to Microsoft services.
- If you see messages like "This setting is managed by your administrator," local policy or registry edits may be required.
- Always ensure you have a password set before attempting to remove your PIN, as Windows requires at least one sign-in method.
Resolving a greyed-out Remove PIN option in Windows 11 usually involves adjusting security settings or account configurations. With the right approach, you can regain control over your sign-in preferences and streamline your login process.