
The SETUP_FAILURE blue screen error with stop code 0x00000085 occurs when Windows 11 encounters a critical problem during setup, often halting installation and leaving users unable to proceed. This issue frequently points to disk driver faults, memory problems, or corrupted installation media. Addressing the root cause is essential to successfully installing or updating Windows 11 and restoring full system functionality.
Check System Requirements and Hardware Compatibility
Windows 11 setup can fail with a blue screen if the system does not meet minimum requirements, especially for RAM and compatible processors. Insufficient memory or unsupported hardware will prevent installation from proceeding. Verifying system compatibility before troubleshooting further can save significant time.
Step 1: Compare your PC’s specifications against the official Windows 11 requirements. These include a 1 GHz or faster processor with two or more cores, 4 GB RAM, 64 GB storage, UEFI firmware with Secure Boot, TPM 2.0, and DirectX 12 compatible graphics.
Step 2: If your system falls short—particularly with RAM or storage—upgrade the necessary components before attempting installation again. Check your motherboard’s support documentation for any additional compatibility notes.
Recreate or Replace the Installation Media
Damaged or corrupted installation media, such as a faulty USB drive or DVD, is a common cause of 0x00000085 errors. Even a minor file corruption can lead to a setup failure blue screen.
Step 1: If using a USB drive, reformat it using the official Windows Media Creation Tool. Download the latest Windows 11 ISO directly from Microsoft’s website to avoid any file corruption.
Step 2: Create a new bootable USB drive. Use a different USB port and, if possible, a different USB drive to rule out hardware defects.
Step 3: For DVD installations, burn a new disc at the slowest possible speed and verify the integrity of the ISO before burning.
Step 4: Attempt installation again with the new media. If the error persists, move to the next troubleshooting steps.
Update BIOS and Storage Controller Drivers
Outdated BIOS firmware or storage controller drivers can result in hardware conflicts or prevent Windows setup from communicating correctly with your drives. Updating these components can resolve setup failures, especially on newer hardware platforms.
Step 1: Visit your motherboard or system manufacturer’s support page and download the latest BIOS firmware for your model. Follow the manufacturer’s precise instructions for updating the BIOS—incorrect updates can render the system unbootable.
Step 2: After updating the BIOS, download the latest chipset and storage controller drivers. Install these from within your current operating system if possible, or use the “Load driver” option during Windows setup if required.
Step 3: Reboot and retry the Windows 11 installation. BIOS and driver updates often resolve compatibility issues that cause blue screen errors during setup.
Test Memory and Storage for Hardware Faults
Faulty RAM or hard drives are a frequent root cause of setup failures. Even if hardware appears functional during normal use, installation processes stress memory and storage in ways that can reveal hidden defects.
Step 1: Run the Windows Memory Diagnostic tool. Open the Run dialog (Windows + R), type mdsched, and press Enter. Choose to restart and check for memory problems. The system will reboot and test RAM for errors.

Step 2: If errors are detected, test each RAM stick individually by removing all but one and repeating the diagnostic. Replace any faulty module before proceeding.
Step 3: Check your hard drive for errors. Boot into Windows Recovery Environment or use a live USB, open Command Prompt, and run:
chkdsk C: /f /r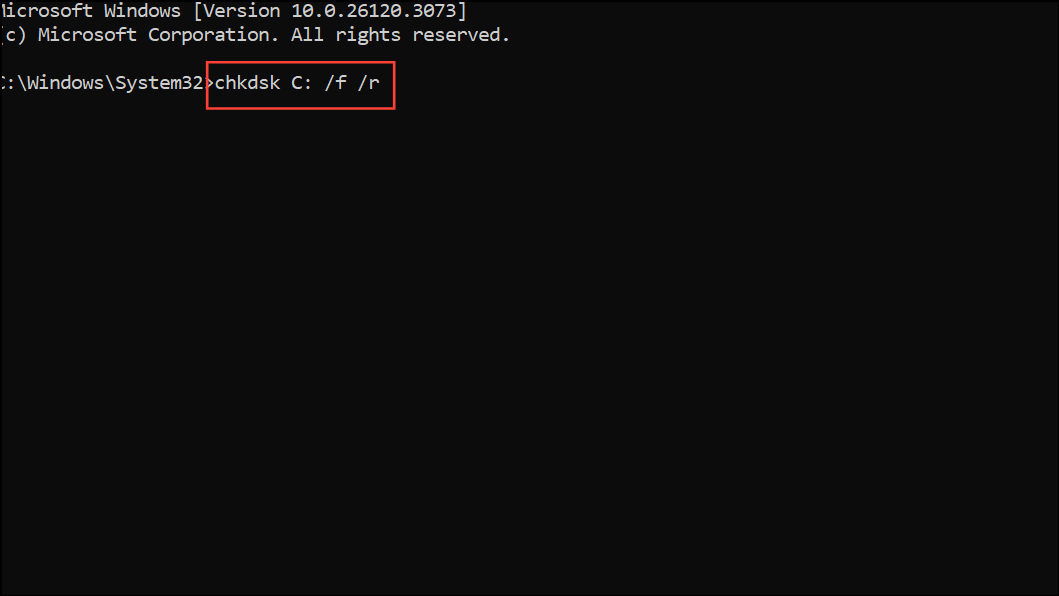
This scans and repairs file system errors and bad sectors. If errors are found, consider replacing the drive.
Step 4: Disconnect all unnecessary external devices, including secondary drives, printers, and USB accessories, to eliminate the chance of hardware conflicts during setup.
Perform a Clean Boot Installation
Residual files, partitions, or third-party drivers from previous installations can interfere with a new Windows setup. A clean boot installation wipes out these potential issues by starting from scratch.
Step 1: Boot from your newly created Windows 11 installation USB or DVD.
Step 2: When prompted, select “Custom: Install Windows only (advanced)” to access the partition screen.
Step 3: Delete all existing partitions on the target drive. This removes any lingering data or boot records that may cause conflicts. Warning: This step erases all data from the drive—back up important files first.
Step 4: Select the resulting unallocated space and click “Next.” Windows setup will create the required partitions and proceed with installation.
Step 5: Follow the on-screen instructions to complete setup. If the process completes without the blue screen error, the clean install has resolved the issue.
Scan for Viruses or Malware
Malware infections can corrupt system files and interfere with the installation process. Running a full scan helps to rule out this possibility.
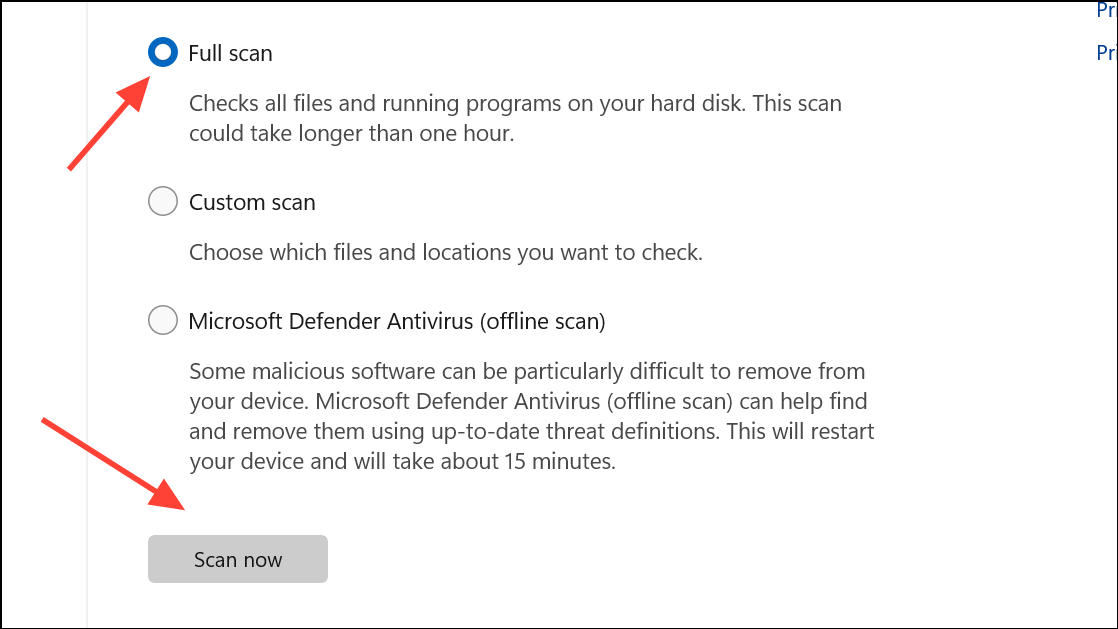
Step 1: Boot into your existing Windows installation or use Windows Defender Offline if the system won’t boot.
Step 2: Open Windows Security, navigate to Virus & threat protection, and select “Full scan.” Remove any threats detected before attempting installation again.
Advanced Troubleshooting: BIOS Settings and Hardware Swaps
On high-end hardware, especially with certain Intel 13th/14th generation CPUs and Z790 motherboards, users have reported persistent setup failures even after replacing RAM, storage, and CPUs. In these cases, specific BIOS settings or hardware swaps may be necessary.
- Disable CPU overclocking features, such as Turbo Boost or set the CPU Core Ratio lower in BIOS. Some users have resolved setup failures by manually lowering CPU multipliers.
- Reset BIOS to default or fail-safe settings. Delete and reload factory trusted keys and re-enable Secure Boot to rule out firmware corruption.
- If repeated failures occur across multiple hardware swaps, consider switching to a different platform (e.g., AMD motherboard and CPU) if possible, as some hardware combinations may be incompatible with current Windows 11 builds.
- Unplug Ethernet cables or PCIe network cards during installation—Windows may attempt to load incompatible drivers for some network hardware, causing blue screens.
Resolving the SETUP_FAILURE blue screen error in Windows 11 requires a methodical approach—start by verifying hardware compatibility, then recreate installation media, update firmware and drivers, check for hardware faults, and finally perform a clean installation. If the issue persists, advanced BIOS tweaks or hardware replacement may be necessary. With careful troubleshooting, most users can get Windows 11 installed and running smoothly.