
Unexpected power loss during gaming sessions on Windows 11 can abruptly interrupt gameplay and risk data loss or hardware damage. This issue most frequently arises when the system is under heavy load, such as during graphically demanding games, and is rarely caused by software alone. Addressing these shutdowns requires a careful approach that prioritizes hardware checks, power delivery, and system configuration.
Check Power Supply Unit (PSU) and Power Delivery
Step 1: Inspect the PSU for signs of failure. A faulty or insufficient PSU is the leading cause of sudden shutdowns during gaming. Even if your PSU is rated well above your system’s requirements, manufacturing defects or wear can cause voltage drops or trigger overcurrent protection circuits. If the system powers back on only after toggling the PSU switch, this strongly indicates the PSU is tripping its protection mechanisms.
Step 2: Examine all power cables and connections. Ensure every power cable—especially the 24-pin motherboard, CPU 8-pin, and GPU PCIe connectors—are fully seated and undamaged. Avoid using daisy-chained (piggybacked) PCIe cables for high-power GPUs; instead, use separate cables from the PSU for each power connector on your graphics card. Faulty or loose cables can interrupt power flow under load.
Step 3: Test a different power outlet or circuit. Plug your PC directly into a wall outlet rather than an extension cord or surge protector, which may not handle the required power draw. If possible, use a different circuit in your home to rule out electrical issues or overloaded breakers.
Step 4: If you have access to a known-good PSU (with sufficient wattage and proper connectors), temporarily install it to see if the issue persists. This is the most direct way to confirm or rule out PSU failure.
Monitor System Temperatures and Cooling
Step 1: Use hardware monitoring tools (such as HWMonitor, MSI Afterburner, or your motherboard’s software) to track CPU and GPU temperatures during gaming. Modern CPUs and GPUs will initiate thermal shutdown if temperatures exceed safe limits—typically above 95°C for CPUs and 105°C for GPUs. However, most users report shutdowns with temperatures well below these thresholds, indicating other causes.
Step 2: Check that all cooling fans are operational and free from dust buildup. Clean your PC’s interior, focusing on heatsinks, filters, and the PSU intake to improve airflow and cooling efficiency.
Step 3: Reapply thermal paste to the CPU if it has not been changed in several years, or if you recently removed the heatsink. Poor thermal contact can cause hotspots and rapid overheating under load.
Test and Configure Memory (RAM)
Step 1: Reseat RAM modules by removing them from their slots and reinstalling them. Heat cycles and vibration can loosen RAM over time, causing intermittent contact and potential crashes.
Step 2: Run a memory diagnostic tool, such as Windows Memory Diagnostic or MemTest86, to check for faulty RAM. Unstable or defective memory can cause shutdowns; however, this typically results in blue screens rather than complete power loss.
Step 3: Review memory overclock settings in the BIOS. If you are using XMP (Intel) or EXPO (AMD) profiles for higher RAM speeds, try disabling these profiles or manually increasing DRAM voltage to the manufacturer’s recommended value (often 1.35V for DDR4/DDR5). Incompatible or unstable memory settings can cause system instability, especially under load.
Step 4: Test with one RAM stick at a time to isolate faulty modules. If the system remains stable with one stick but not another, the unstable stick may need replacement.
Check Motherboard, GPU, and Other Hardware
Step 1: Inspect the motherboard for visible damage, such as burnt components or scratches near CPU socket pins. Physical damage can disrupt power delivery or cause short circuits under load.
Step 2: Reseat the graphics card and check its PCIe power connectors. Ensure the GPU is firmly installed and all power connectors are secure. Faulty PCIe risers or extension cables can also cause power issues—use direct connections whenever possible.
Step 3: If you have recently upgraded hardware (such as GPU or RAM), confirm compatibility with your motherboard and PSU. Some motherboards may require BIOS updates to support newer CPUs or memory modules.
Step 4: Remove and reconnect all internal cables, including SATA, USB, and front panel connectors, to rule out accidental shorts or loose connections.
Review Software, Drivers, and Windows Settings
Step 1: Update all drivers, especially for the GPU and chipset, using the manufacturer’s official support pages. Outdated or incompatible drivers can cause instability under load.
Step 2: Perform a clean installation of GPU drivers using Display Driver Uninstaller (DDU) to remove remnants of old drivers that may conflict with new versions.
Step 3: Check Windows Event Viewer for critical errors. Look for event IDs 41, 6008, or 1074 under Windows Logs > System. While these typically indicate an unexpected shutdown, they rarely specify the hardware cause. If you see "Kernel-Power" errors, this confirms an abrupt power loss.

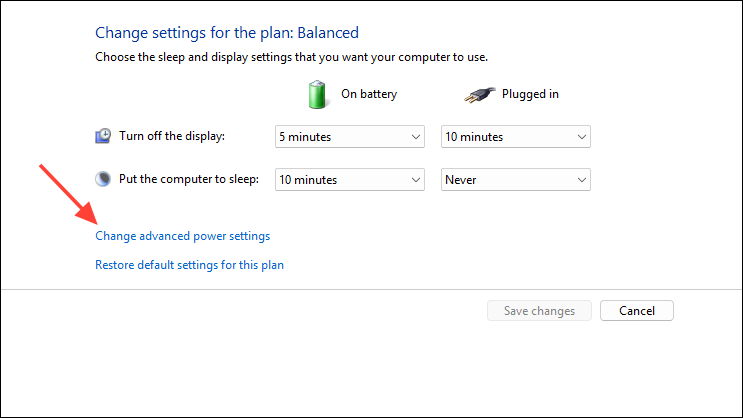
Step 4: Adjust advanced power settings. Open Control Panel > Power Options > Change plan settings > Change advanced power settings. Set "Minimum processor state" to 0% and "Turn off hard disk after" to "Never." Disable "Fast Startup" under "Choose what the power button does" to prevent potential conflicts during boot.
Step 5: Scan for malware using Windows Security or a reputable third-party antivirus tool. Malware can cause instability, though this is a rare cause of shutdowns limited to gaming scenarios.
Test System Stability and Isolate the Issue
Step 1: Run stress tests for individual components. Use FurMark for GPU, Prime95 or Cinebench for CPU, and TestMem5 or MemTest86 for memory. If the system only shuts down under combined CPU and GPU load, this further points to power delivery issues.
Step 2: Monitor system behavior during stress tests. If the shutdown occurs during a specific test, the associated component is likely at fault. If the system remains stable during synthetic loads but shuts down during games, check for spikes in power draw or rare software conflicts.
Step 3: If all hardware passes individual stress tests, but the issue persists during gaming, consider potential motherboard or rare CPU faults. Swapping components with known-good parts is the most reliable way to isolate the defective hardware.
Additional Troubleshooting Tips
- Ensure your system is running on the latest BIOS firmware, as updates can improve hardware compatibility and stability.
- Disable CPU C-states or set them to the lowest setting in BIOS, especially if using memory overclock profiles, as some systems experience instability when C-states and XMP/EXPO are enabled together.
- Check for electrical issues in your environment, such as faulty outlets, overloaded circuits, or old/faulty surge protectors.
- If using a UPS (uninterruptible power supply), ensure it can handle the peak load of your gaming PC.
- Remove any recently added hardware or peripherals to rule out conflicts or defective devices.
Systematic troubleshooting—starting with the PSU and power delivery, then moving through cooling, memory, and hardware checks—will resolve most cases of Windows 11 PCs shutting down during gaming. Swapping suspect components and monitoring system behavior under load are the most effective ways to pinpoint and resolve the root cause.