
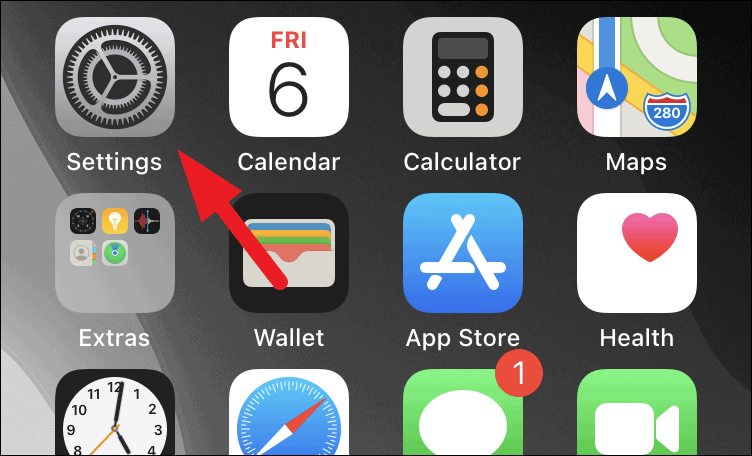
While we have an app for almost everything, browsers are the one single app providing us access to the whole internet and thus need to be one of the safest in terms of privacy.
While many of us love to use Chrome and enjoy the seamless experience across all devices, we often tend to forget that ease of convenience almost always comes at the cost of privacy.
Hence, if you have been finding a way to protect your digital privacy and at the same time not hamper your browsing experience at the same time, you have landed on the right page.
Get a Chrome Incognito Icon on your Android Device’s Homescreen
Often, you either need quick access to the Chrome incognito window or are required to access the incognito mode more frequently than the regular one. If that’s the case with you, you can create a separate incognito mode icon and place it on the home screen of your Android device for immediate access.
To do so, tap and hold on the Chrome icon from the home screen or your device’s app drawer. This will open an overlay menu, then, tap and hold the ‘New Incognito tab’ tile and drag it across your screen.
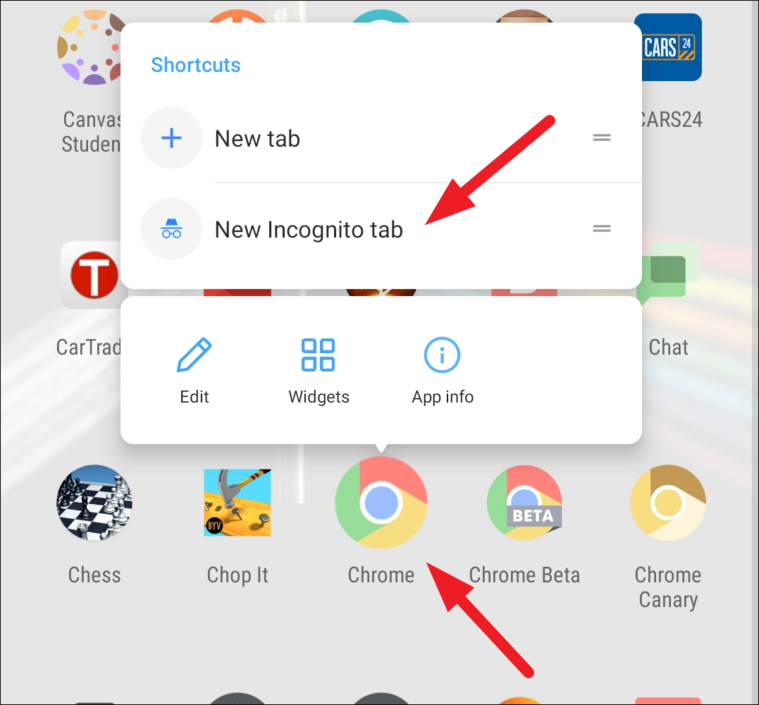
As soon as you start dragging the tile it will transform into an icon and you will be able to place it on your home screen.
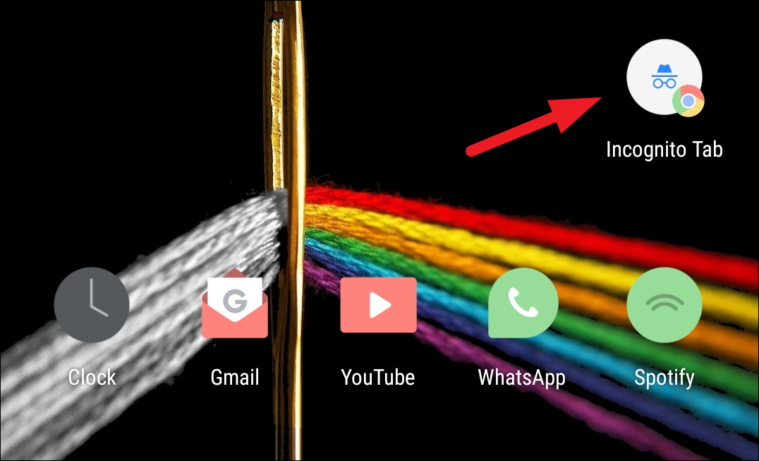
And that’s it, you have the Chrome Incognito icon alongside the regular Chrome icon on your Android device. You can open an ‘Incognito’ window straight away by tapping on the ‘Incognito Tab’ icon on your Android device.
Make Chrome more Privacy Focused on Android
Unlike iOS, Andriod is not really known for its privacy or security. Hence, the responsibility usually falls on the shoulder of the user to safeguard themselves; and since the browser is the first line of defense, it is a necessity that you control and share your information with only selective and trustworthy websites.
Set up Chrome without Signing in to your Google Account
Since you would have entered your email address to set up your Android device, most probably you will already be logged in to Chrome as well. However, you can choose to sign out and not sync your data and settings across devices.
Sign out of Chrome and Delete all Cookies, Browsing Data, and Site Data
Signing out of Chrome is fairly simple and doesn’t involve diving too much into the Chrome settings.
To do so, launch the Chrome browser from the home screen or the app library of your Android device.

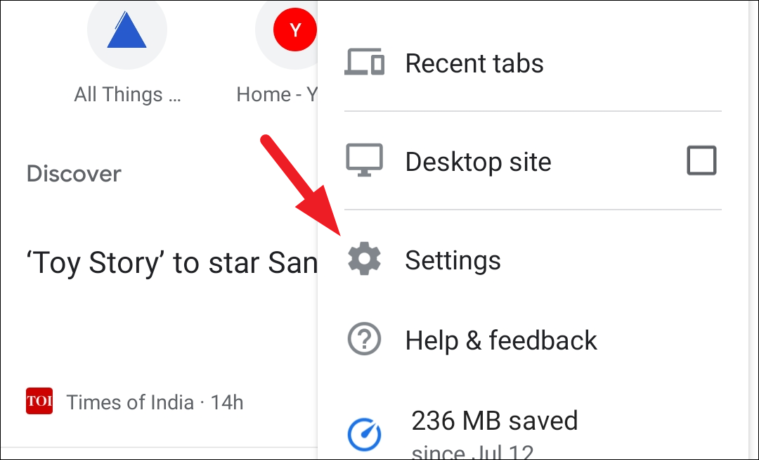
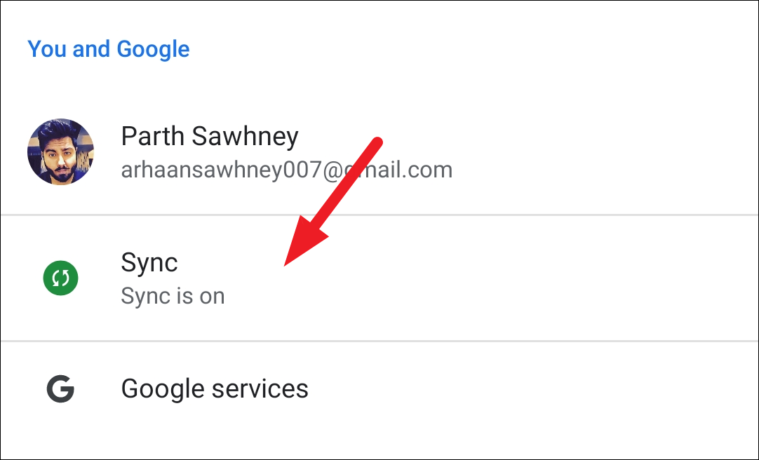
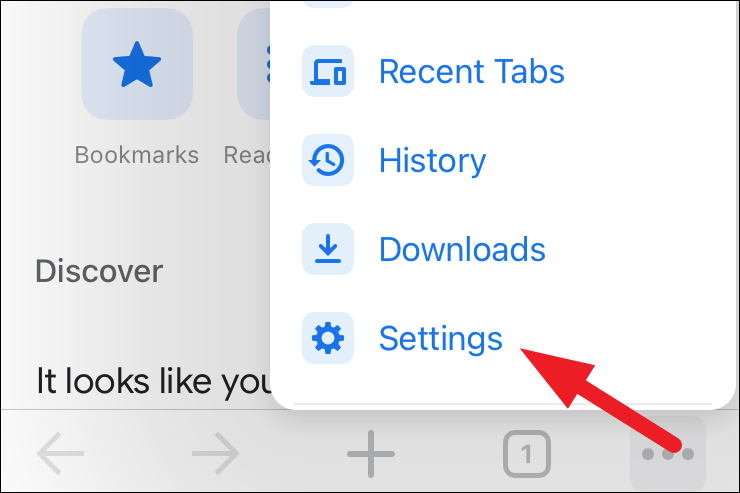
Next, click on the kebab menu (three vertical dots) from the top right corner of the browser window.
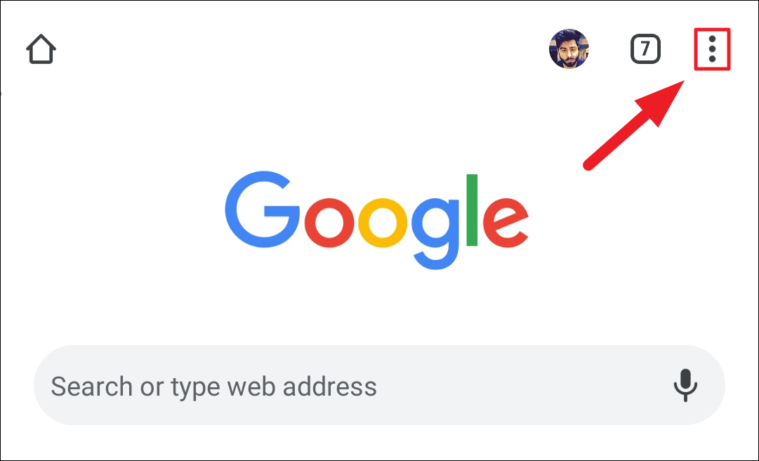
Then, choose the ‘Settings’ option from the overlay menu.
After that, click on the ‘Sync’ option present under the ‘You and Google’ section on the ‘Settings’ screen.
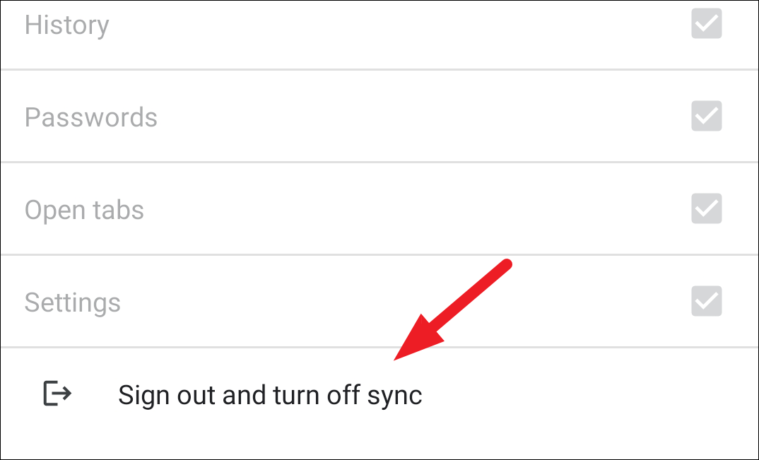
Now, scroll down and tap on the ‘Sign out and turn off sync’ option situated under the ‘Sync everything’ section. This will open an overlay window on your screen.
From the overlay window, tap on the ‘Also clear your Chrome data from this device’ and then tap on the ‘Continue’ button present on the bottom right corner of the overlay window.
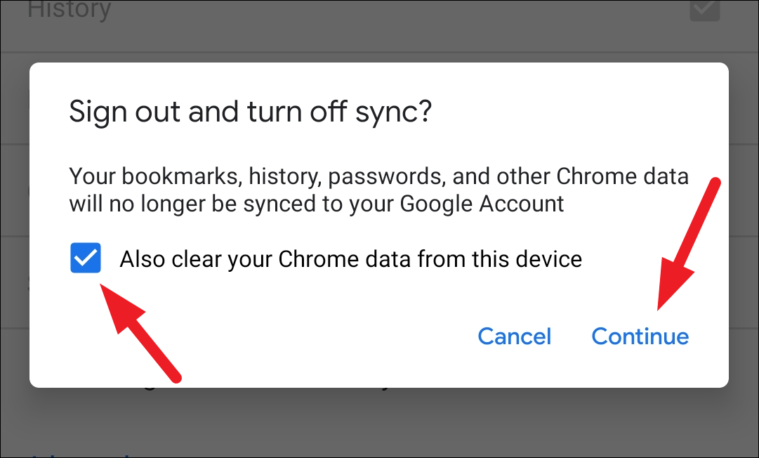
You will be logged out of your email address on Chrome and all your cookies, browsing data, and site data will be cleared.
Disable All Built-in Google Services on Chrome
The Chrome browser has many built-in functionalities to make your browsing experience much more enjoyable and hassle-free. However, to do so, it needs to gather your information and send them to Google servers or at times to a third party.
While many might not mind this trade-off much; for some, it can be strictly a no-no from a privacy point of view. Thankfully, you can easily turn these options off if that’s what you prefer.
Access Google Services on Chrome
Before you can jump in toggle built-in services on or off, you need to first learn how to access them.
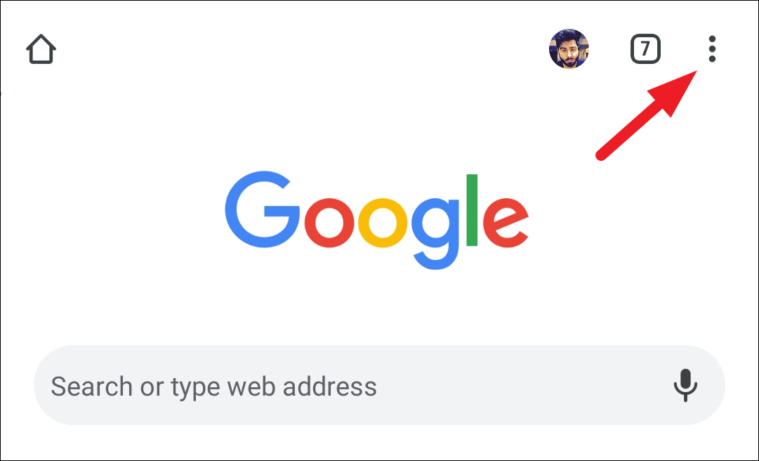
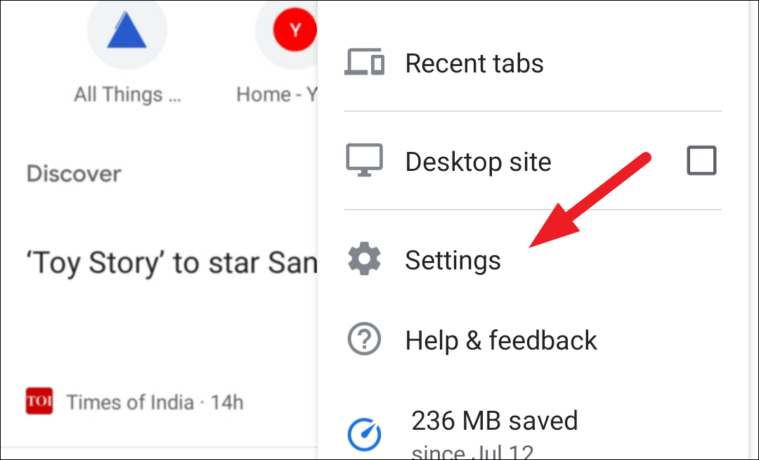
First, launch Chrome from the app library or the home screen of your Android device.

Next, click on the kebab menu (three vertical dots) present on the top right corner of the Chrome window.

Then, tap to choose the ‘Settings’ options from the overlay menu.

After that, tap on the ‘Google services’ option present under the ‘You and Google’ section.
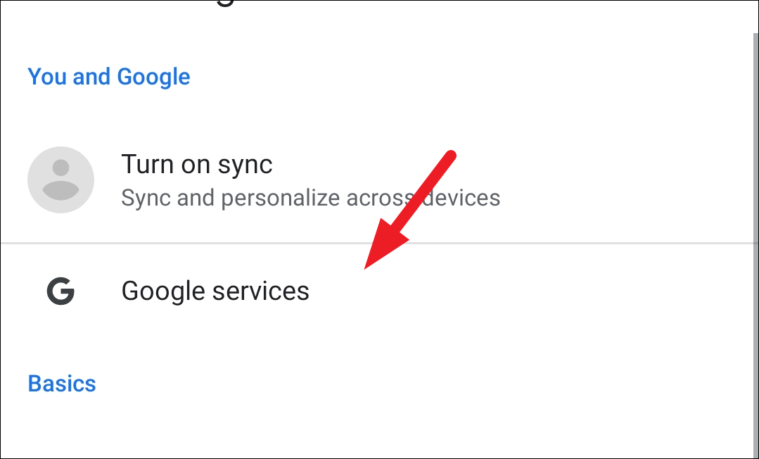
You will now be able to see all the enabled services for you in Google Chrome.
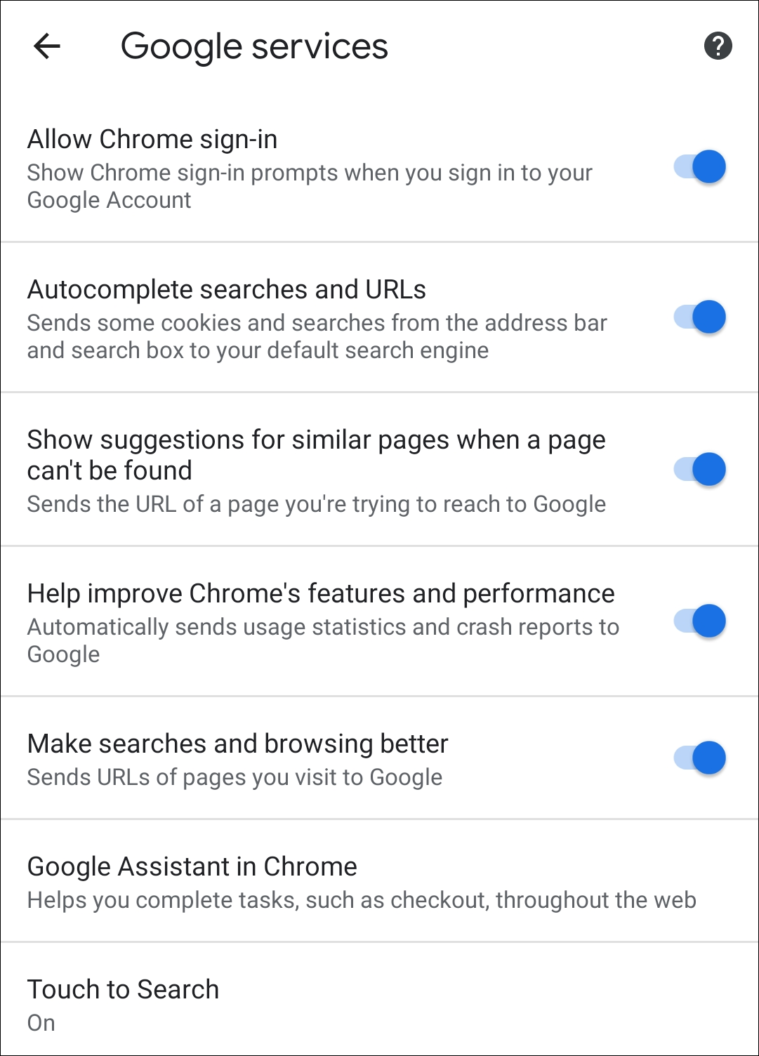
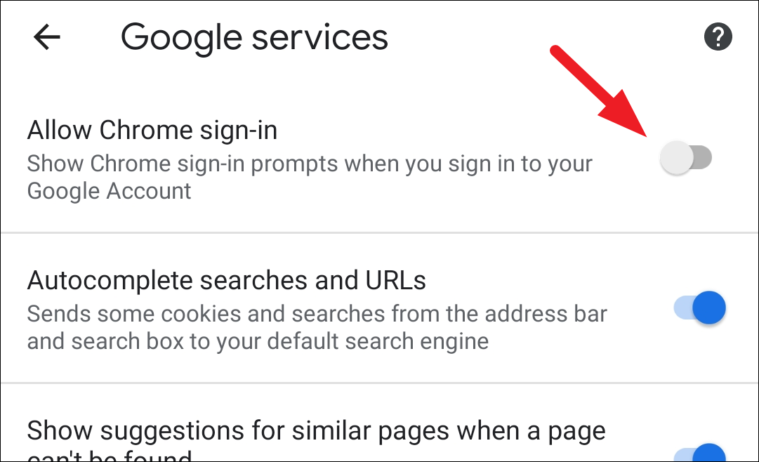
Disable Chrome Sign-in
If you have turned off the ‘Sync’ functionality on Chrome, turning this off becomes imperative to turn off pesky prompts to sign back into Chrome whenever you enter your Google account credentials on any website.
To disable the Chrome sign-in, from the ‘Google services’ screen, locate the ‘Allow Chrome sign-in’ option and toggle the following switch to the ‘Off’ position.
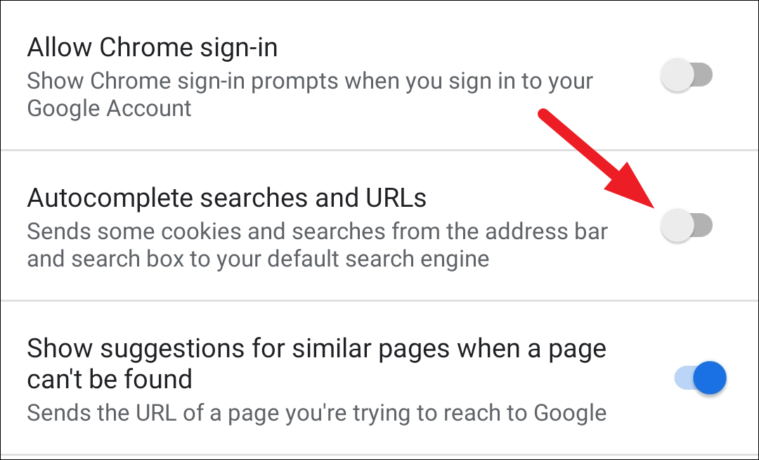
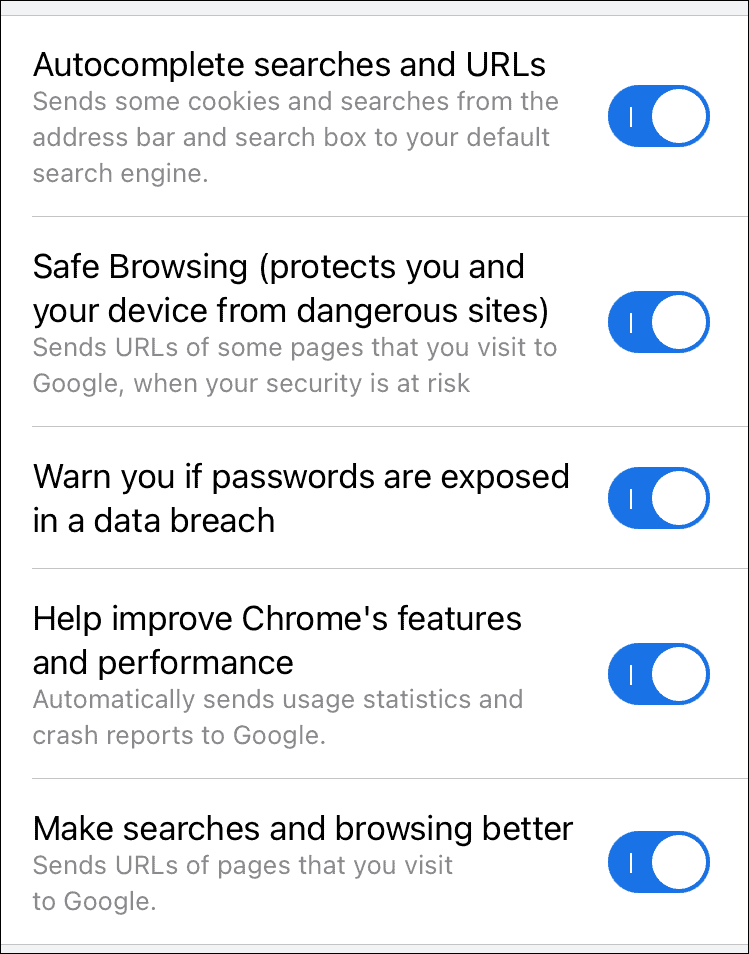
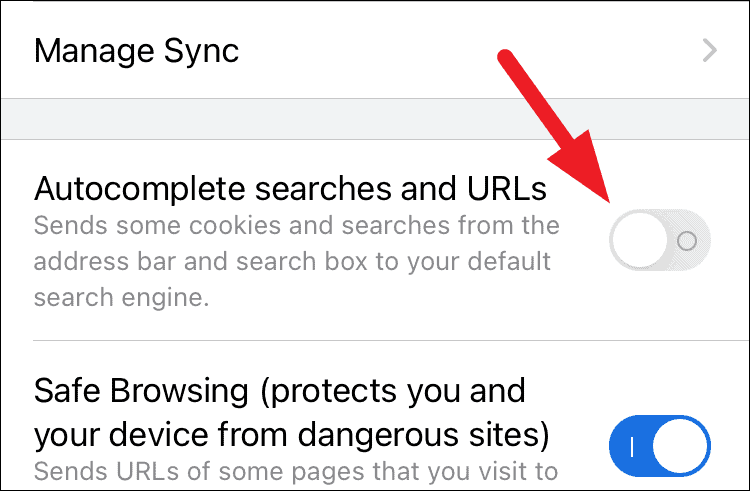
Disable Autocomplete Searches and URLs
To help you search faster, Chrome sends out cookies and search data to your default search engine, which in turn provides you suggestions for searches and your previously visited websites. Though a very handy feature, it definitely poses a degree of concern to users who take data sharing pretty seriously.
To turn it off, head to the ‘Google services’ screen as shown in the guide above. Then, locate the ‘Autocomplete searches and URLs’ option and toggle the following switch to the ‘Off’ position.
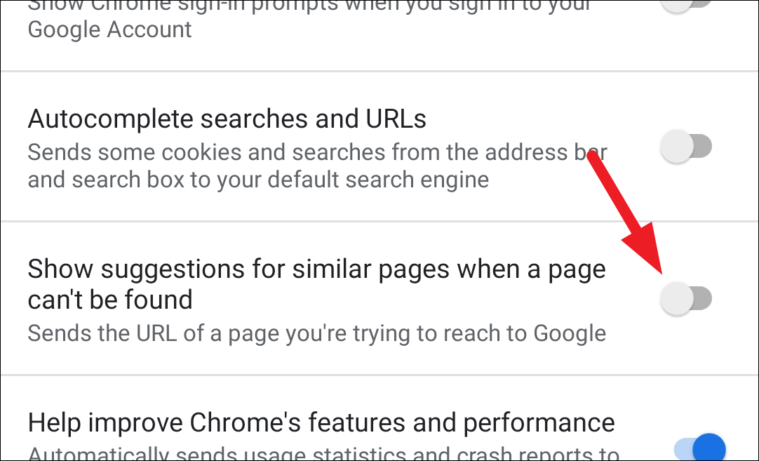
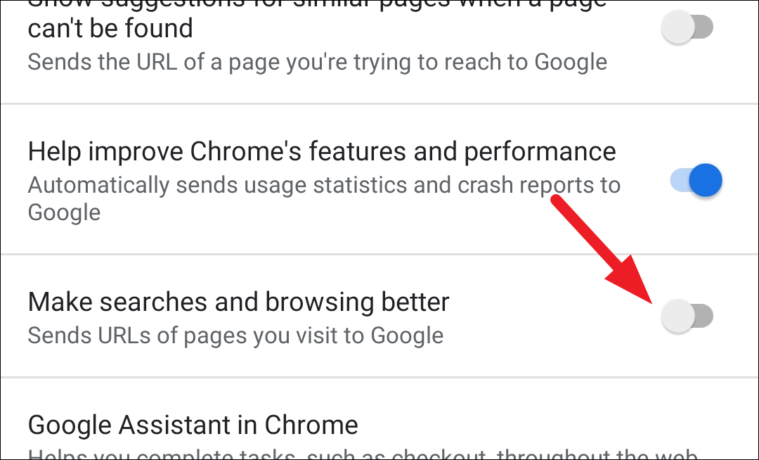
Next, scroll down to the ‘Show suggestions for similar pages when a page can’t be found’ and toggle the adjacent switch on the tile to the ‘Off’ position. This will stop Chrome from showing you similar website suggestions when the entered URL is not reachable.
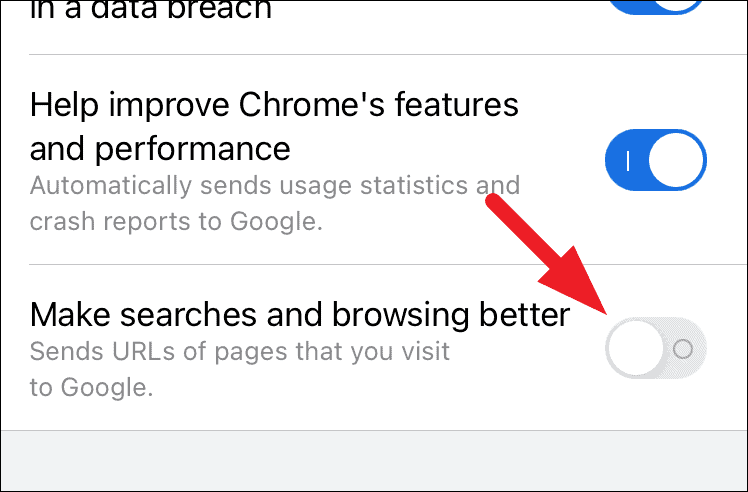
Now to completely disable the sending of URLs, toggle the switch to the ‘Off’ position present right next to the ‘Make searches and browsing better’ option on the screen.
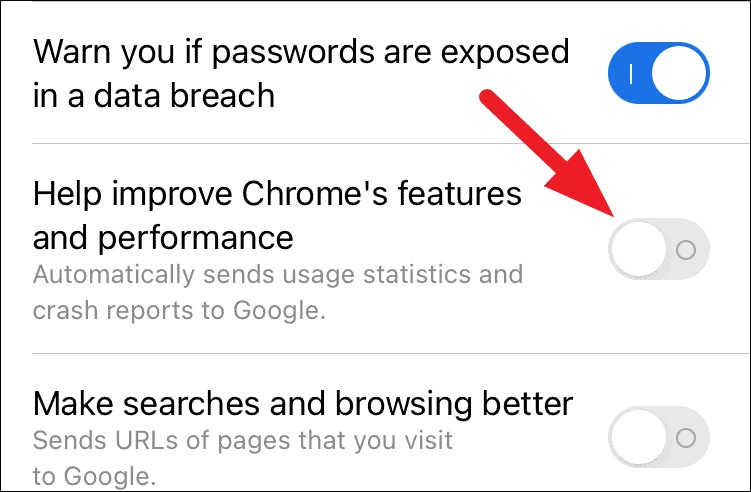
Disable Statistics and Crash Report Sent to Google
Statistics and crash report data are usually sent anonymously to Google for product improvement and identifying any minor/major bugs present in the browser. To make sense, these crash reports or statistics might include the list of open apps, approximate location, and many such metrics.
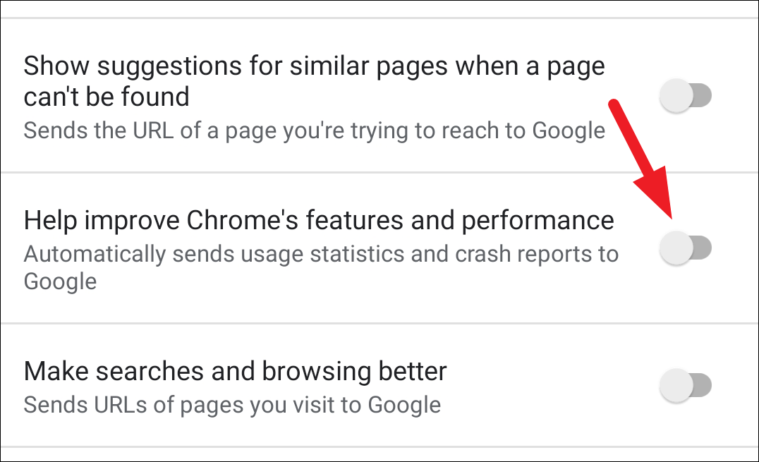
If you are not comfortable sharing these reports with Google, head to the ‘Google services’ screen and locate the ‘Help improve Chrome’s features and performance’ option. Then, toggle the switch following the option to the ‘Off’ position.
Disable Google Assistant on Chrome
On Android devices, Google assistant tracks the websites you visit using the Chrome browser and comes in with tips and suggestions on supported websites to help you use them better. If you do not wish to use Google Assistant’s help on Chrome you can disable it.
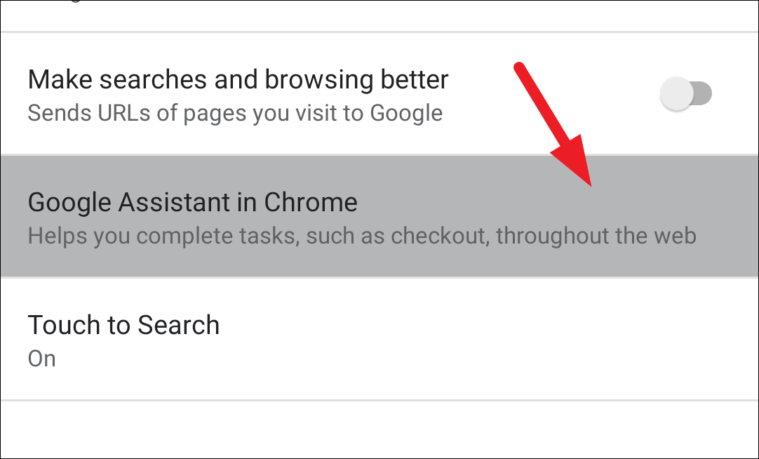
To do so, head to the ‘Google services’ screen as shown previously in this guide. Next, locate and tap on the ‘Google Assistant in Chrome’ option present on the screen.
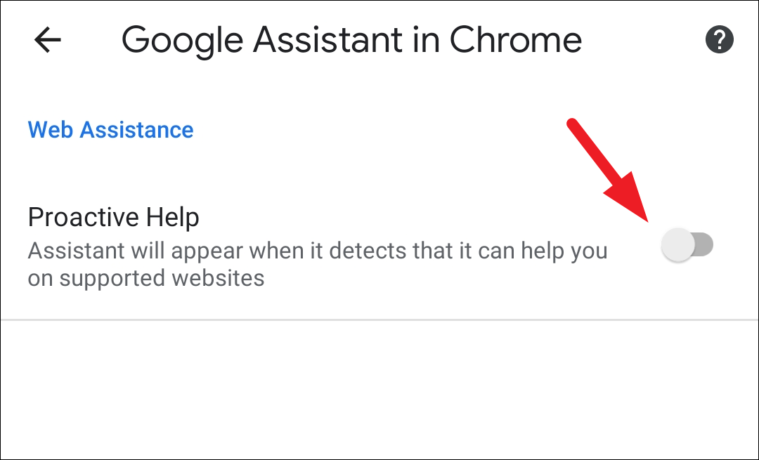
After that, toggle the switch to the ‘Off’ position present adjacent to the ‘Proactive Help’ option on the Google Assistant settings screen.
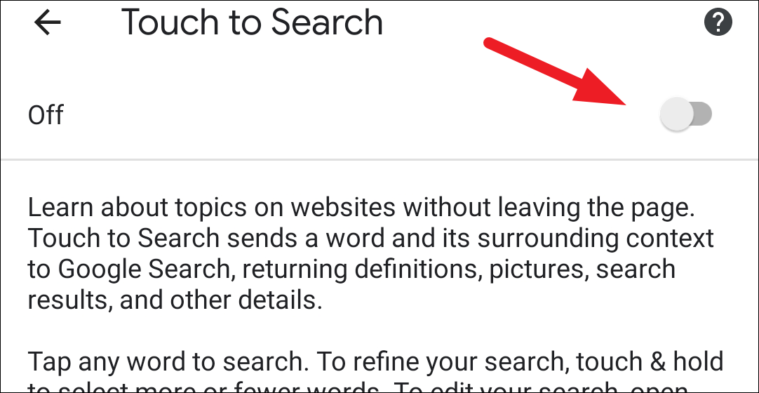
Disable Touch to Search Feature
‘Touch to Search’ feature allows you to search about a topic or see definitions for a word by simply performing a tap and hold gesture which brings up a retractable pane on the same webpage itself.
It is a very handy feature when you come across a new word or some specific terminology you might not know about. That being said, it can make some users really uncomfortable as this all your selected data to Google servers to provide you information regarding the same.
To turn off the feature, head to the ‘Google services’ screen on Chrome. Then, locate and tap on the ‘Touch to Search’ option from the list of options.
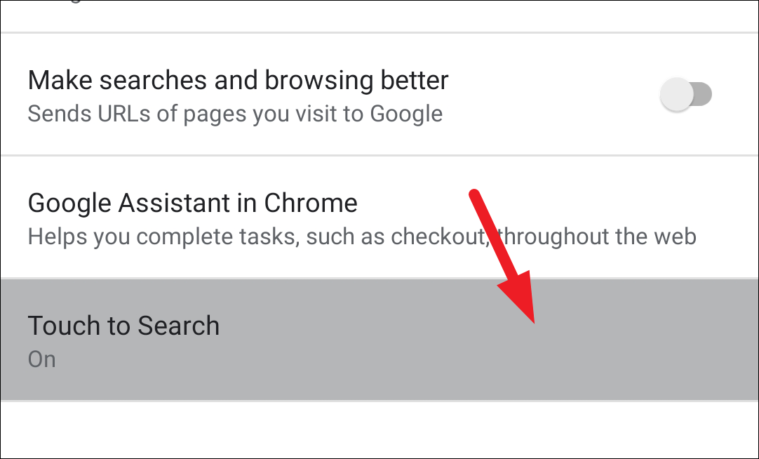
Next, toggle the switch to the ‘Off’ position present on the top right section of your device’s screen.
Disable All Autofill Features in Chrome
Chrome allows users to auto-populate passwords, addresses, and payment fields using information they have either entered previously on a website or manually saved by users. Since many users might not feel very comfortable sharing such sensitive information, there is an option to disable the feature.
Since autofill features do not have a separate category in the mobile browser contrary to the desktop counterpart, you will need to navigate to individual sections to turn them off.
Access Chrome Settings on Android
To do so, launch the Chrome browser from the home screen of the app library of your android device.

Then, click on the kebab menu (three vertical dots) present on the top right corner of the screen.
Now, choose the ‘Settings’ option present in the overlay menu.
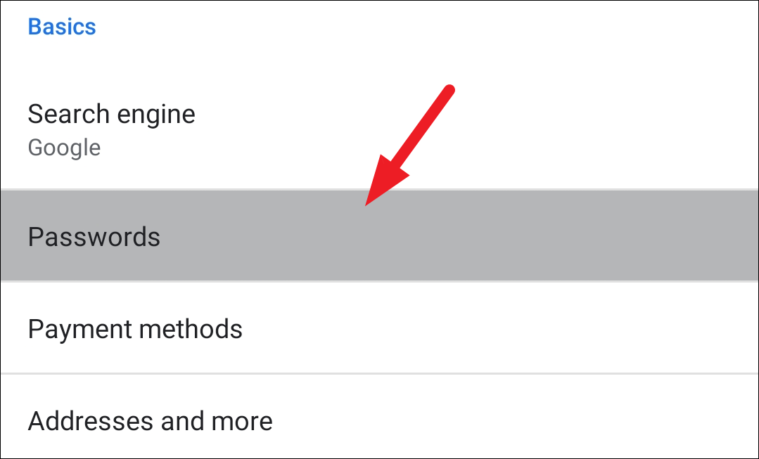
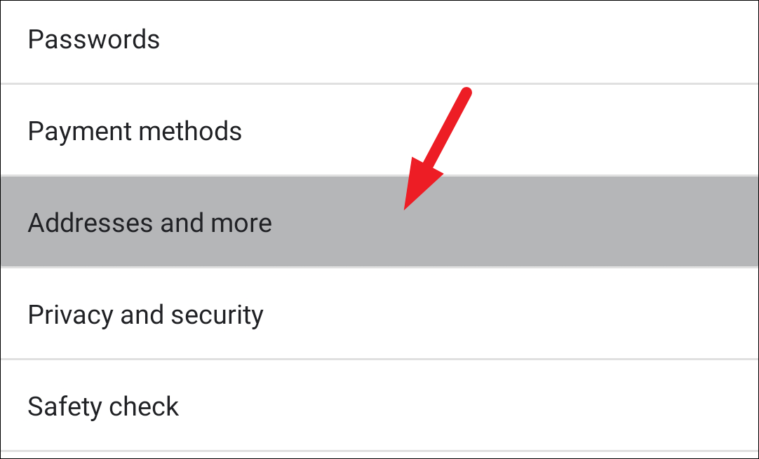
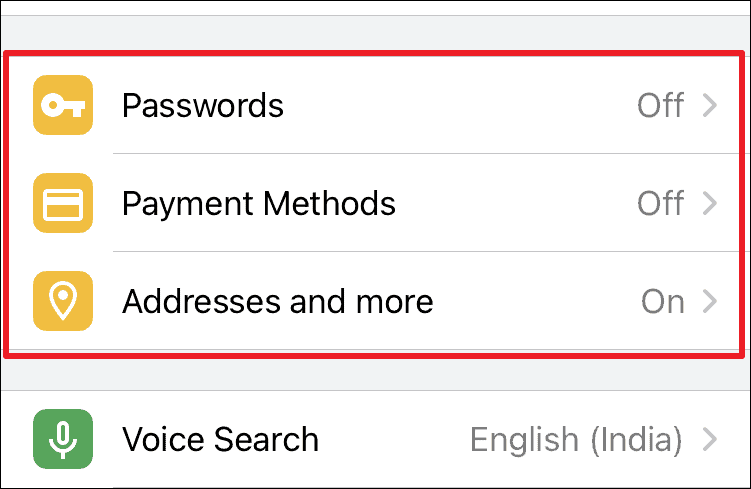
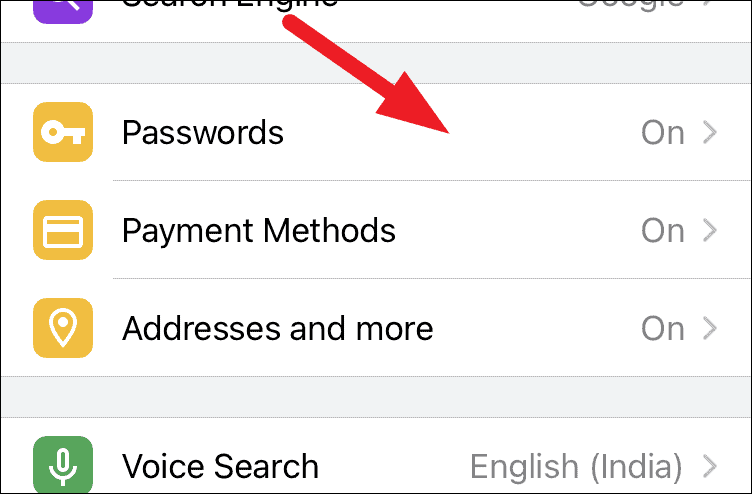
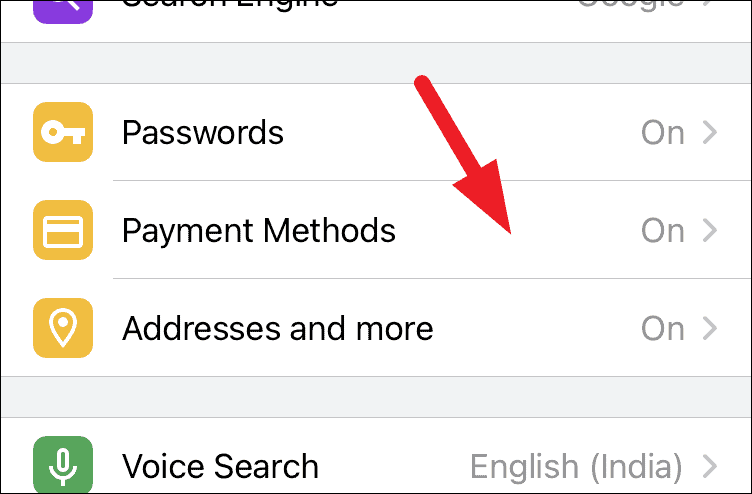
You will now be able to see individual tabs for ‘Passwords’, ‘Payment Methods’, and ‘Addresses and more’ which comprises the settings related to the autofill feature of Chrome.
Disable Password Saving and Auto Sign-in
Since Chrome saves passwords for the websites you log in to, it also offers to automatically sign you in whenever you visit the website using the browser. And if you are not comfortable with saving passwords and Chrome automatically signing you in, you can choose to turn these options off.
To do so, head to the Chrome ‘Settings’ screen as shown in the previous section. Then locate and tap on the ‘Passwords’ tab present on the Chrome ‘Settings’ screen.
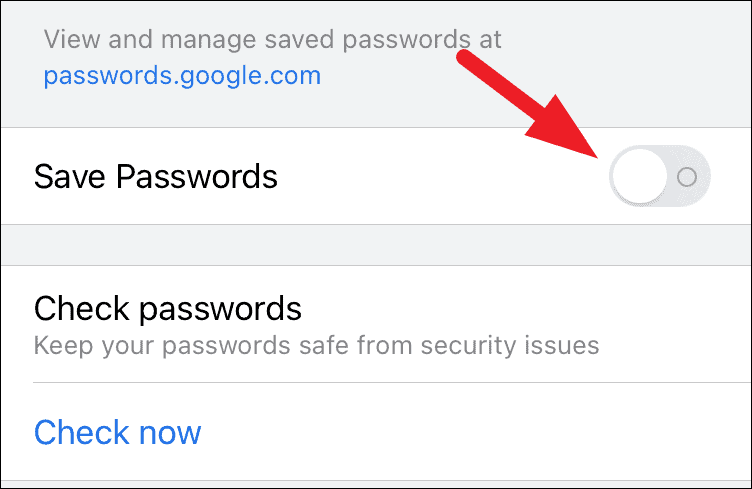
Next, locate the ‘Save passwords’ option and toggle the following switch to the ‘Off’ position to disable the saving of passwords on Chrome.
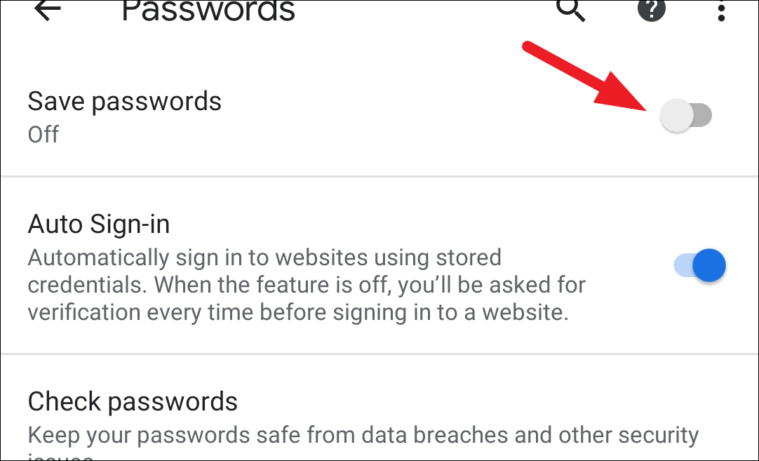
After that head to the ‘Auto Sign-in’ option located right under the ‘Save passwords’ option and toggle the following switch to the ‘Off’ position by tapping on it.
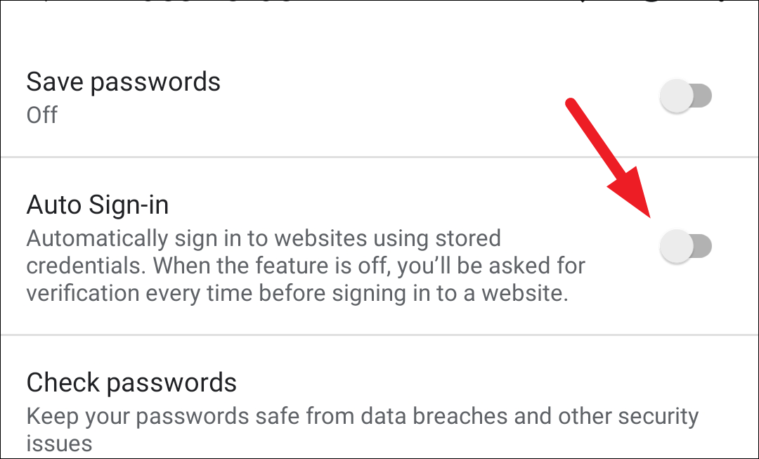
Now your Android’s Chrome will not save passwords or automatically sign you in on the website.
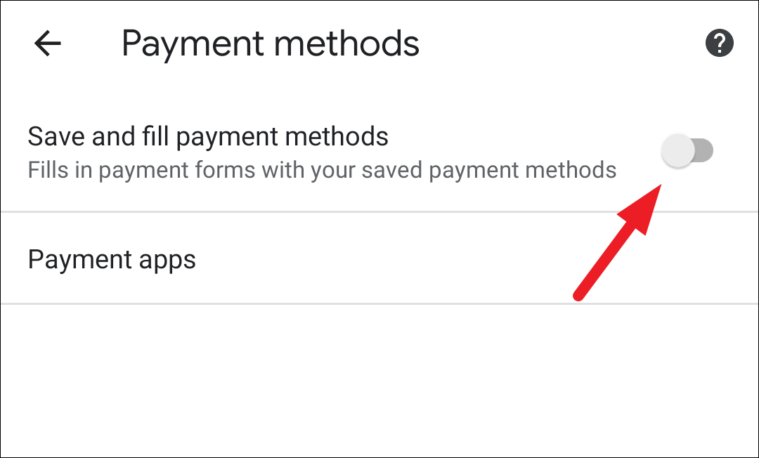
Disable Payment Method Features
Since there might be occasions when somebody else could also be using the browser on your phone, saving a payment method is not a very wise decision.
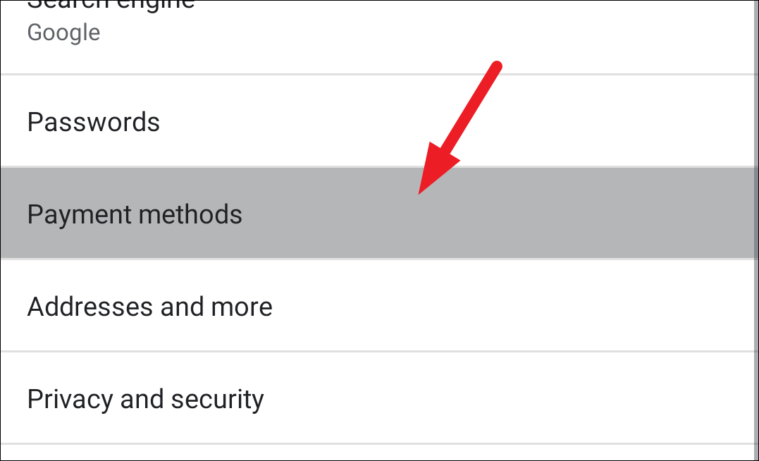
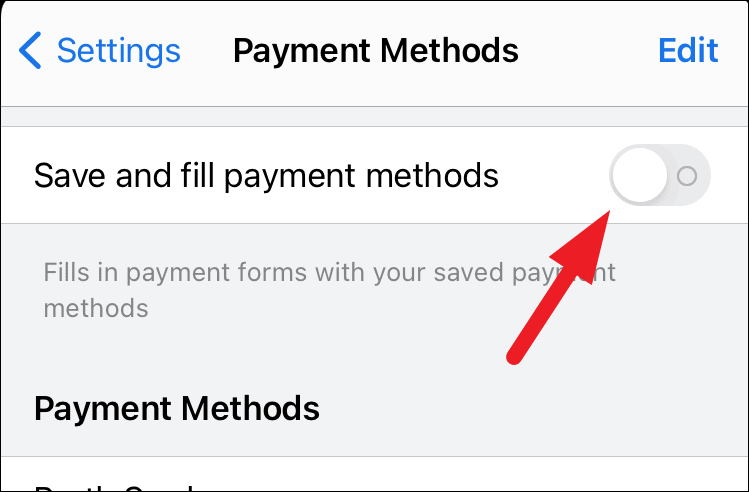
Thus to turn it off, go to the Chrome ‘Settings’ screen as shown in one of the previous sections. Then, tap on the ‘Payment methods’ tab located just under the ‘Passwords’ tab.
Next, locate the ‘Save and fill payment methods’ field and tap on the following switch to toggle it ‘Off’.
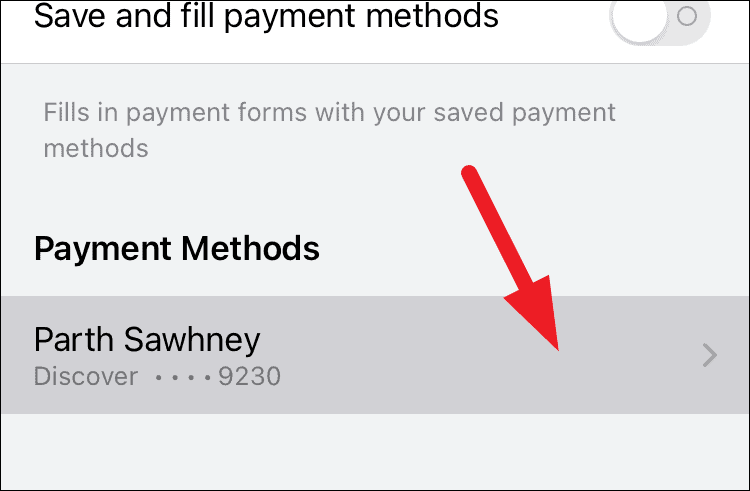
Then, in case you already have a saved payment method on your browser; locate the payment method on the screen and tap on it.
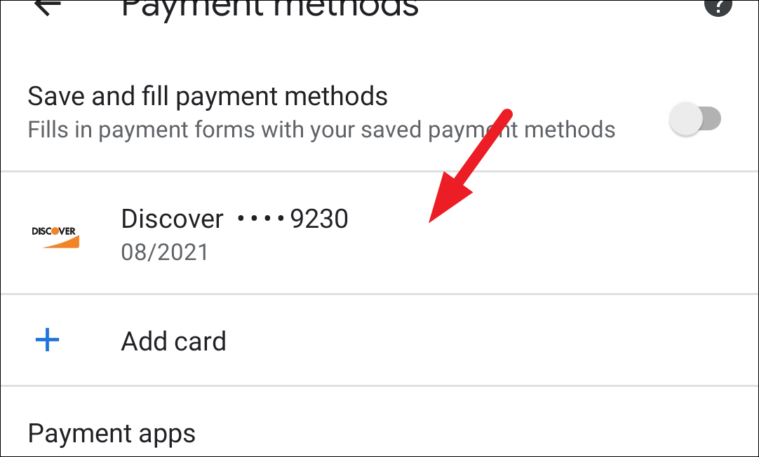
After that, click on the ‘Trash Bin’ icon present at the top right section of the screen.
Note: Chrome doesn’t allow screenshots on the ‘Payment methods’ screen. Hence, no screenshot is added.
That’s it, Chrome will never ask you to save payment method is now.
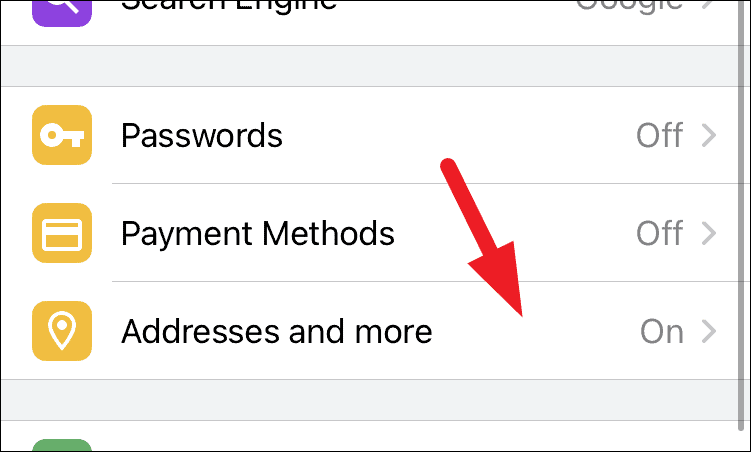
Disable Address, Email, Phone number Filling Features
The trifecta of address, email, and phone number is one the most important pieces of information if not the most important for you to share very carefully. And if saving all of this information on a browser makes you uncomfortable, you can completely erase it.
To do so, head to the Chrome ‘Settings’ as shown previously in the guide. Then, tap on the ‘Addresses and more’ option present on your screen.
After that, toggle the switch to the ‘Off’ position that is following the ‘Save and fill addresses’ option on the ‘Addresses and more’ settings screen.
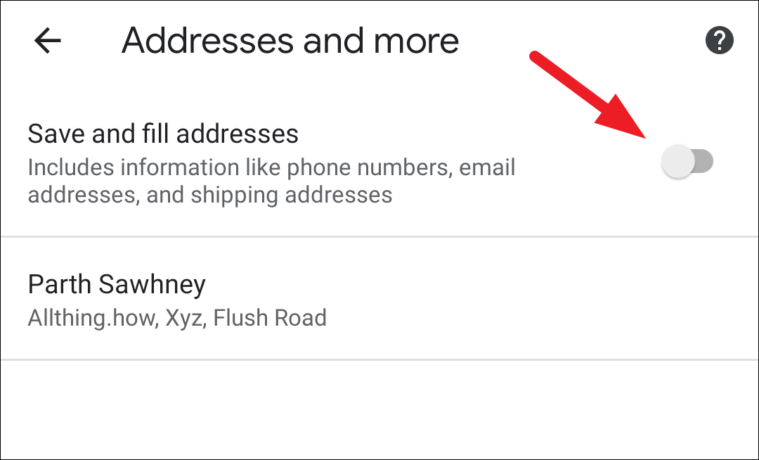
Then, if you already have addresses saved on Chrome, you will be able to see it under the ‘Save and fill addresses’ option. To delete the saved address, tap on it to view it first.
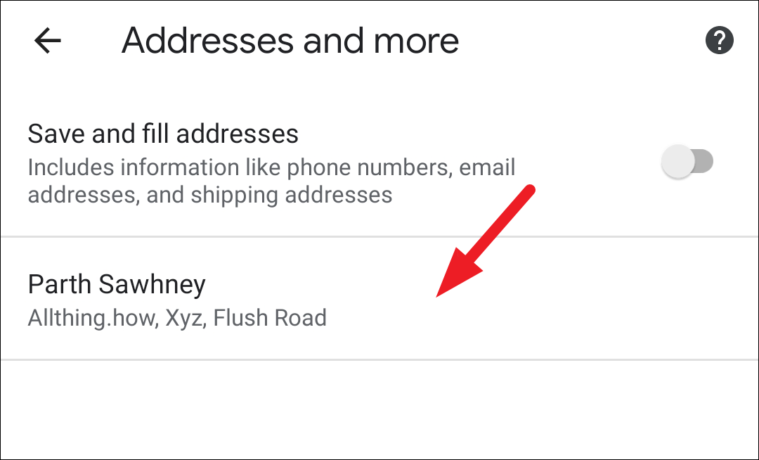
Next, tap on the ‘trash bin’ icon present at the top right section of your screen to delete the saved address permanently.

Disable Site Data and Cookies Entirely in Chrome
Along with information like passwords, payment methods, addresses, and more Chrome also keep site data and cookies of almost all websites you visit. For the uninitiated, Cookies are used to save some information about you like your account credentials to keep you logged in, or just some basic preferences.
Along with cookie storing, Chrome also monitors your browsing and preloads some websites to deliver you fast performance. Thankfully, you can turn off all these options from Chrome settings.
Access Chrome Settings
Before you lean onto disabling site data and cookies, you need to know how to get to the Chrome ‘Settings’ page since that is the central point for accessing every sub-setting.
To do so, first launch the Chrome browser from the home screen or the app drawer of your Android device.

Next, tap on the kebab menu (three vertical dots) located on the top right corner of the Chrome window.

Now, tap on the ‘Settings’ option from the overlay menu.

After that, you will be able to see the Chrome ‘Settings’ page on your device screen.
Disable Preload Pages Feature and Send Do Not Track Requests to Websites
To protect your privacy further, you can also send websites you visit a ‘Do Not Track’ request. Although it is completely up to the website you are visiting to honor this request as some sites do need to collect some data for statistics and surveys.
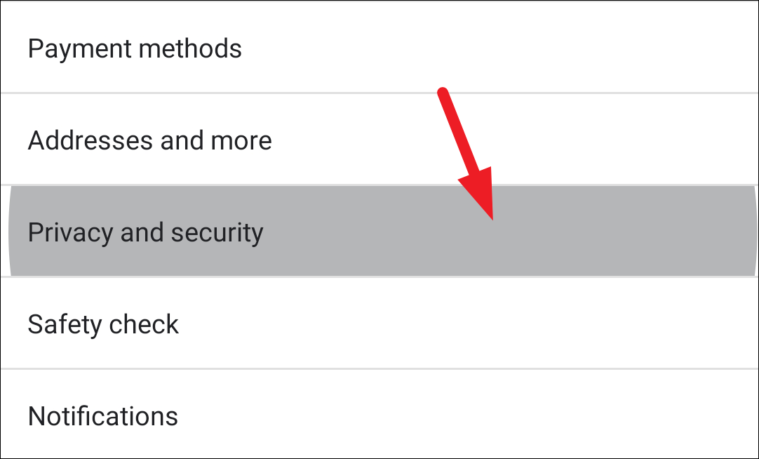
To disable the Preload pages feature, head to the Chrome ‘Settings’ screen as shown earlier. Then, scroll to locate and tap on the ‘Privacy and security’ option present under the ‘Basics’ section.
Now, locate the ‘Preload pages for faster browsing and searching’ option from the list of options. Then, tap to toggle the following switch to the ‘Off’ position.
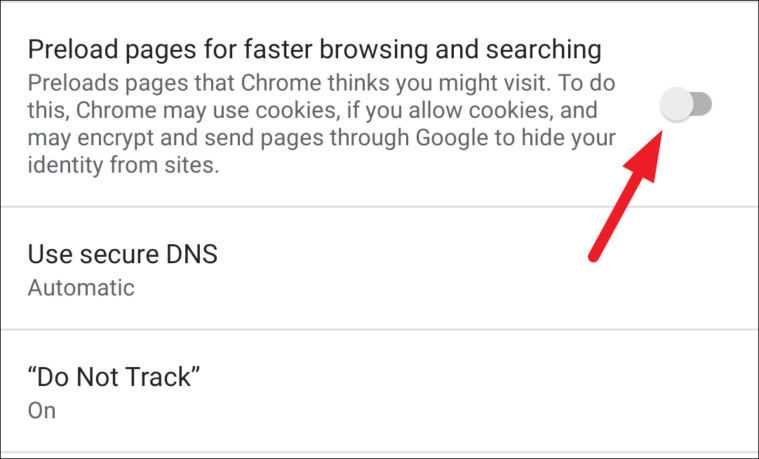
Once turned off, Chrome will no longer preload webpages it thinks you might visit while browsing on the internet.
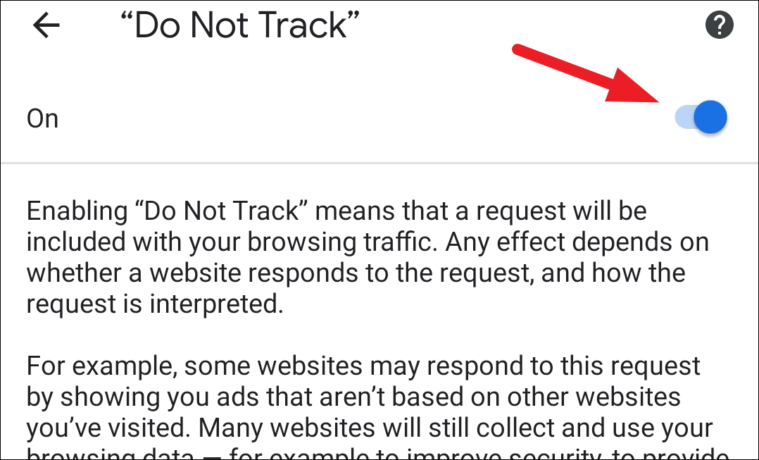
Then, to send a ‘Do Not Track’ request to websites you visit, locate and tap on the “Do Not Track” option present on the ‘Privacy and security’ settings screen.
After that, toggle the switch to the ‘On’ position that is present on the top right section of the screen.
Block Cookies for All Websites
Since most of the websites use cookies to save your preferences and at times your account information to keep you logged in on that website; turning them off can seriously hamper your user experience across all of the websites you visit.
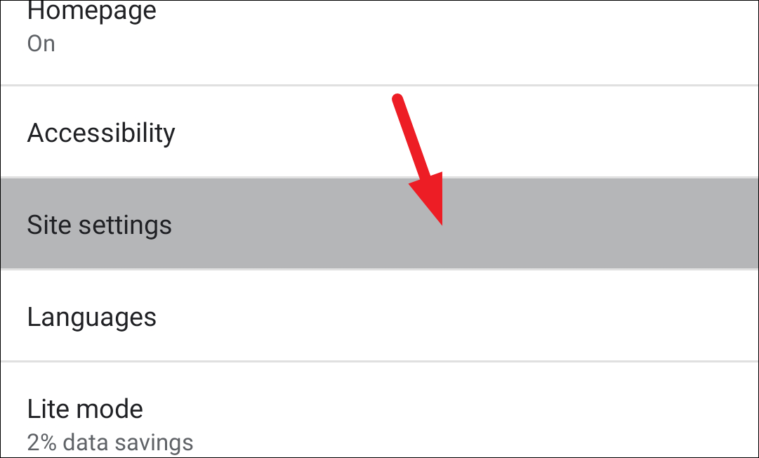
In case privacy wins the tug of war against user experience for you, head to the Chrome ‘Settings’ page as shown in one of the previous sections.
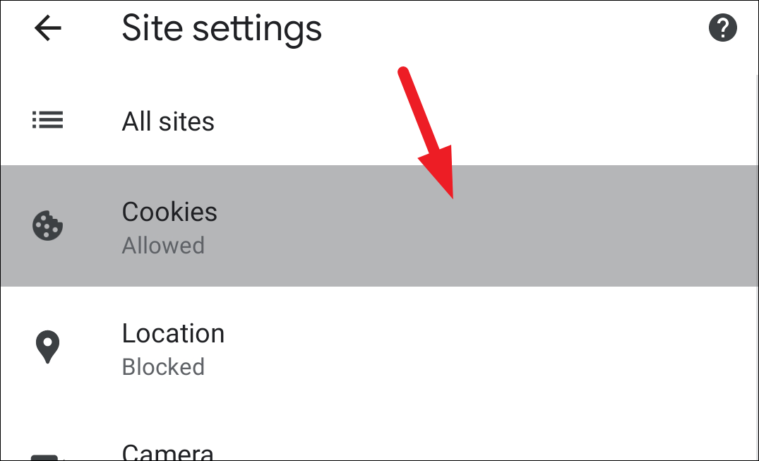
Now, scroll to locate the ‘Site settings’ tab which would be situated under the ‘Advanced’ section on the ‘Settings’ screen. Then tap on it to enter the ‘Site settings’.

After that, tap on the ‘Cookies’ option from the ‘Site settings’ screen.
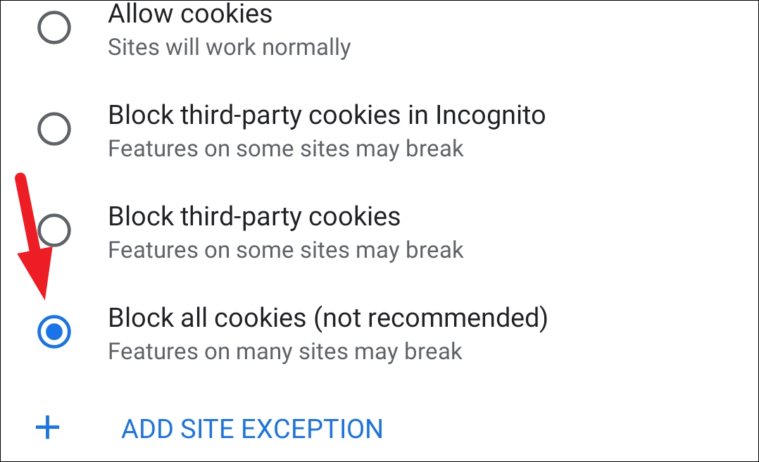
Now, tap on the radio button preceding the ‘Block all cookies’ option from the list of options.
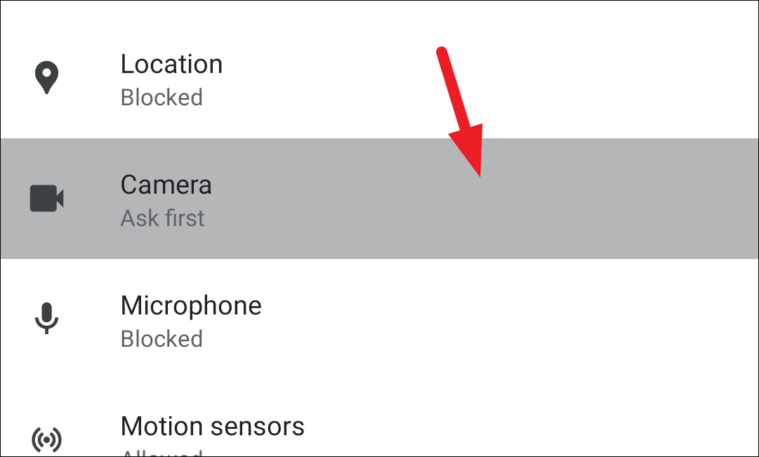
Disable Location, Camera, and Microphone Access for All Websites in Chrome
Since on a mobile phone, you usually have respective apps to help you navigate or video calls your friends and loved ones, giving access to these peripherals makes very less sense barring exceptional scenarios.
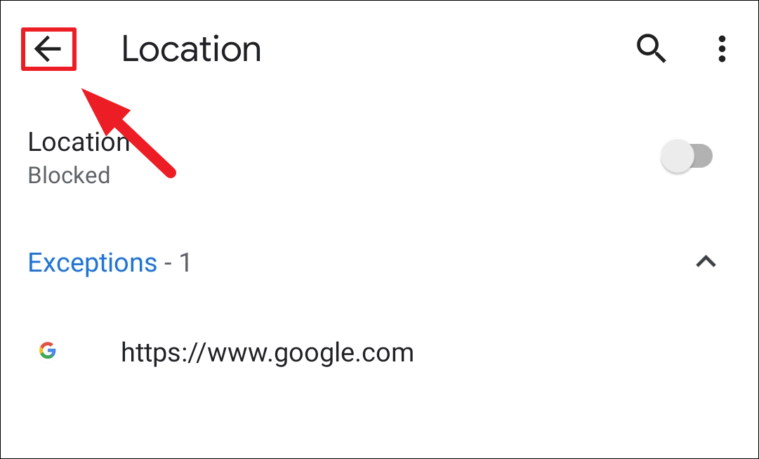
To do so, head to the ‘Site settings’ screen as shown in the previous section. Then locate and tap on the ‘Location’ option present on the screen.
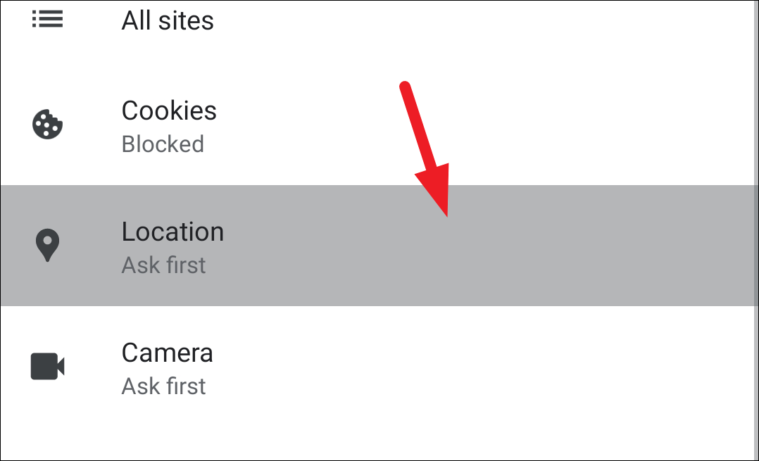
After that, toggle the switch to the ‘Off’ position that is present on the top right section of the screen.

Then, in case you already have allowed any website(s) to access the location, you will be able to see it/them under the ‘Exceptions’ section.
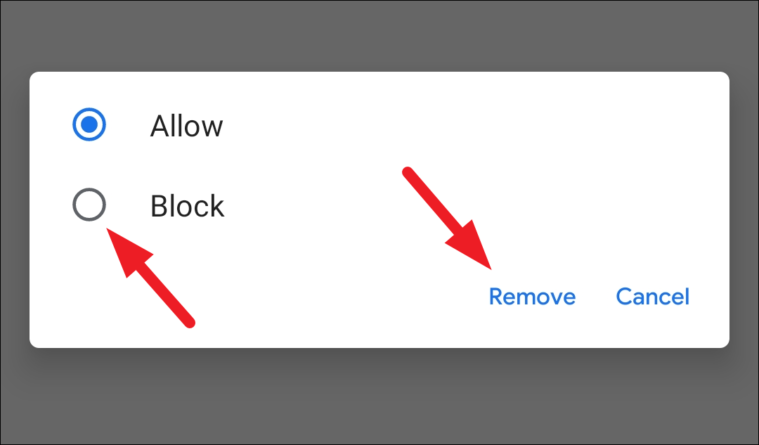
Now, to remove any website from the list, tap on the individual website name. This will open an overlay window on your screen.

Then, from the overlay window, tap on the radio button preceding the ‘Block’ option to permanently block the website until you unblock it manually. Otherwise, tap on the ‘Remove’ button present on the bottom right corner of the overlay window.
In case you have more than one website present under the ‘Exceptions’ section you will have to delete all the websites individually.
Once you have disabled the location access, tap on the ‘back arrow’ present on the top left corner of the screen.
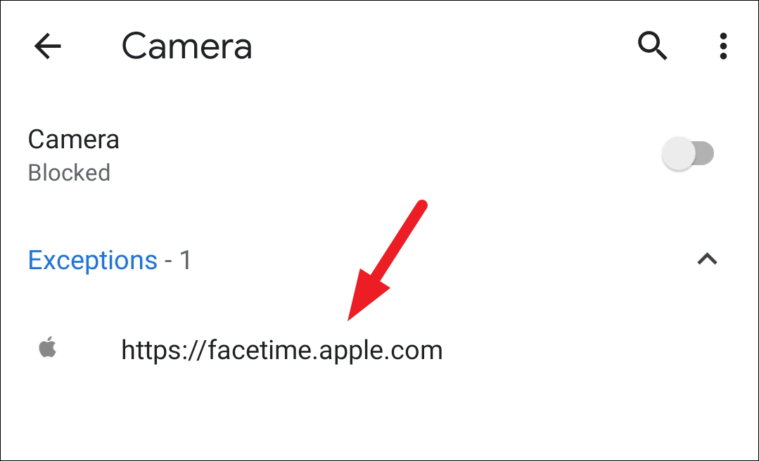
After that, tap on the ‘Camera’ option situated right under the ‘Location’ option.
Next, toggle the switch to the ‘Off’ position following the ‘Camera’ field on the screen.
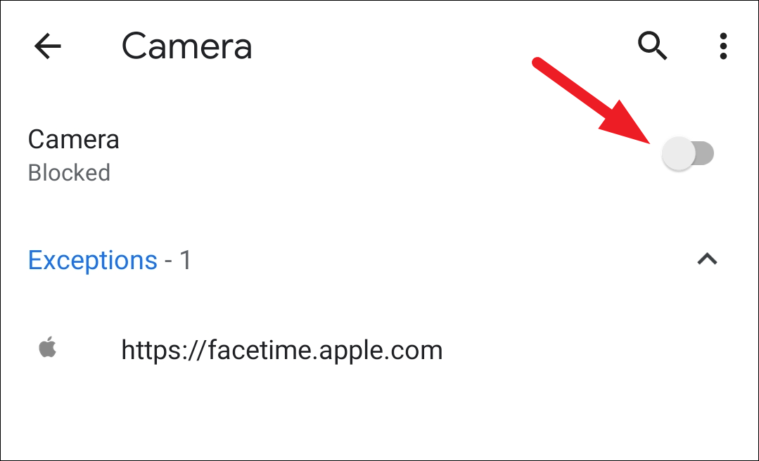
Now, in case you already have websites having access to your camera, they will be listed under the ‘Exceptions’ section.
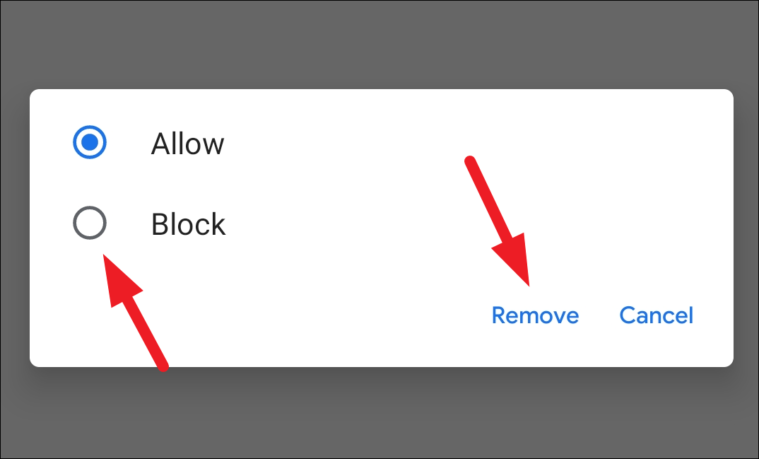
To remove a website from the exceptions list, tap on the individual site listing. This will bring up an overlay window on your screen.
Next, tap on the radio button preceding the ‘Block’ option to permanently block the website from accessing your camera until you unblock it manually. Otherwise, to simply remove it from the ‘Exceptions’ list tap on the ‘Remove’ button present on the bottom left corner of the overlay window.
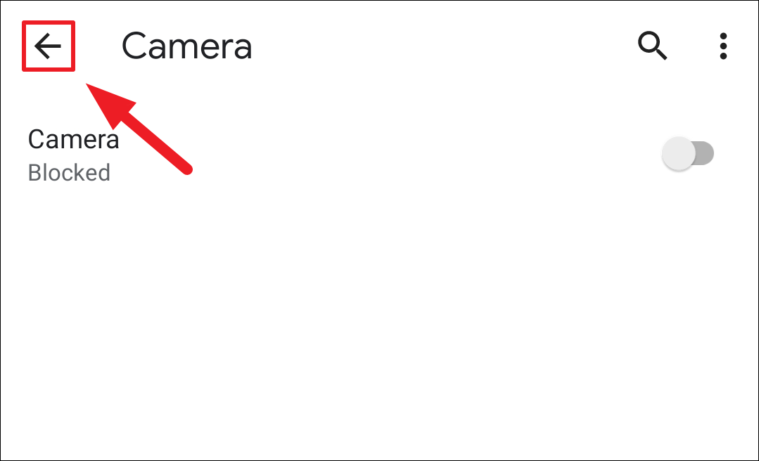
Once done, tap on the ‘back arrow’ icon present on the top left corner of the window.
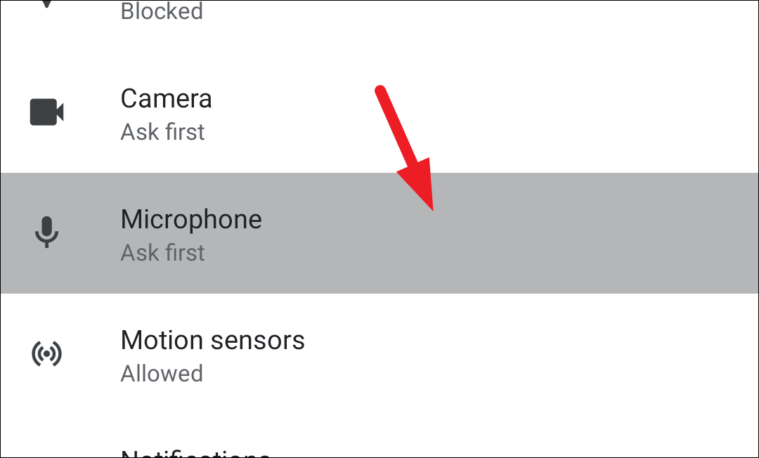
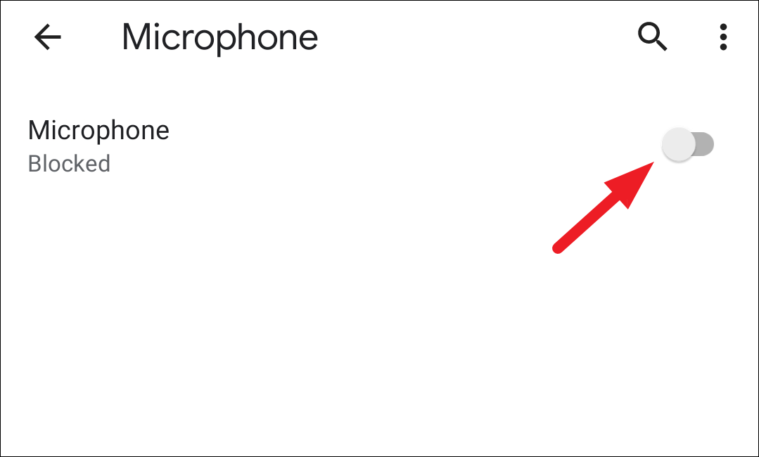
Now, right under the ‘Camera’ option, you will find ‘Microphone’ listed; tap on the option to move to the microphone settings screen.
After that, tap to toggle the switch to the ‘Off’ position that is following the ‘Microphone’ field.
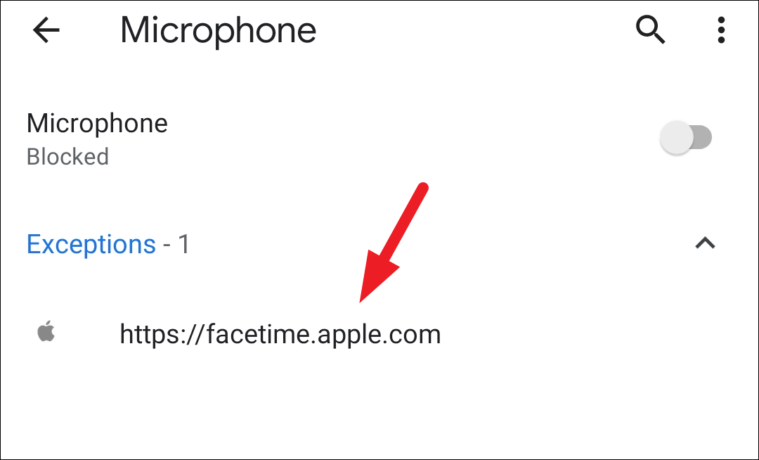
In case there are websites already having access to your microphone, they will be listed under the ‘Exceptions’ section on your screen.
Now, to remove a website from the exceptions list, tap on the individual website name from the list. This will open an overlay window on your screen.
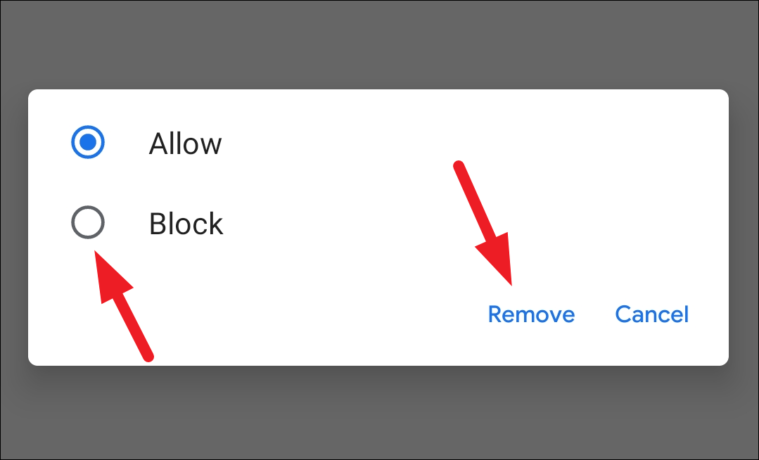
Next, tap on the radio button preceding the ‘Block’ option to permanently block the website from accessing your microphone until you unblock it manually. Otherwise, tap on the ‘Remove’ button present on the bottom left corner of the overlay window.
Disable Websites From Sending You Notifications
Most of us are already receiving a bazillion notifications on our phones throughout the day, what we do not need is notifications coming in from some websites as well. Thankfully, Chrome provides a way to disable these pesky notifications.
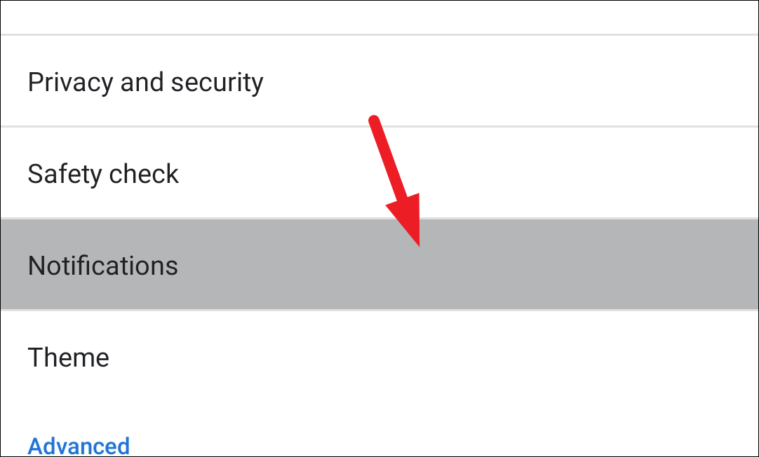
To do so, head to the Chrome ‘Settings’ screen as shown in one of the sections previously. Then, scroll to locate and tap on the ‘Notifications’ tab present under the ‘Basics’ section. This will redirect you to your phone’s ‘Settings’ app.
Now, in case you do not want any notifications from Chrome, toggle the switch present on the ribbon to the ‘Off’ position.
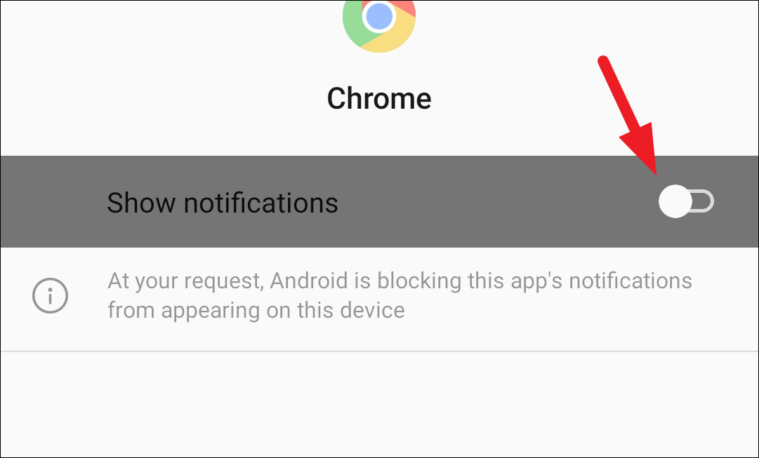
Otherwise, to only block website notifications, scroll down and locate the ‘Show notification’ option present under the ‘Sites’ section. Then, tap on the following switch to toggle it ‘Off’.
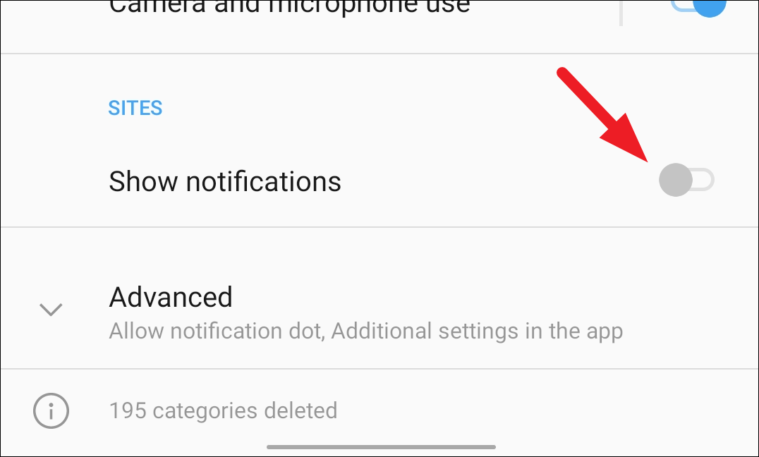
Now, if your mobile device supports notification dots, you can turn them off too if you wish to do so.
To do that, tap on the ‘Advanced’ tab present on the ‘Notifications’ settings screen.
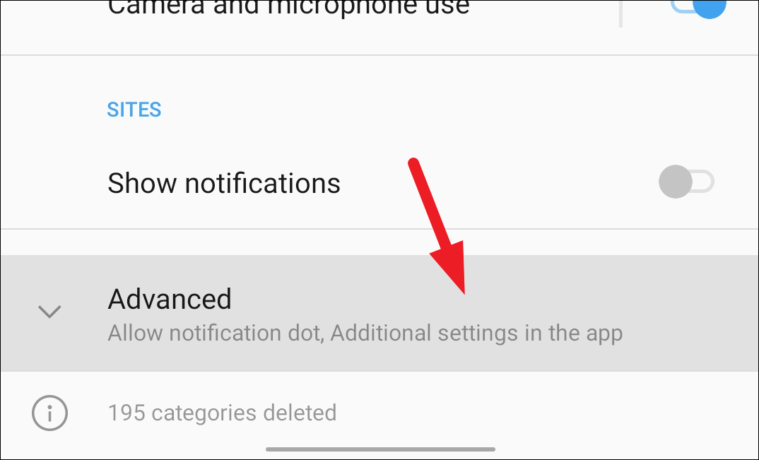
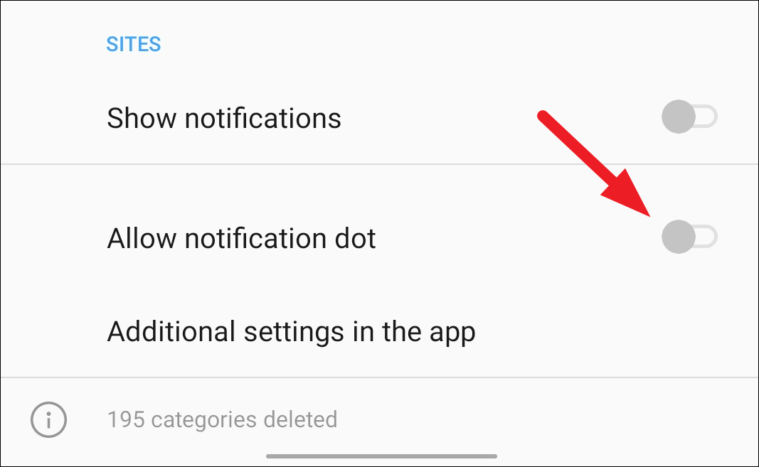
Then, toggle the switch to the ‘Off’ position following the ‘Allow notification dot’ field.
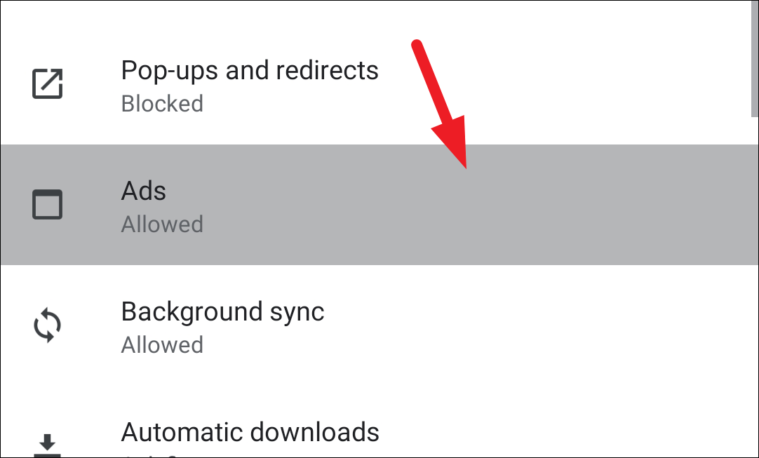
Disable Ads, Pop-ups, and Redirects on Websites
Major elements hampering your browsing experience are Pop-ups and automatic redirects. And amazingly, Chrome provides you native support to disable them on every website.
To do so, head to the ‘Settings’ screen on Chrome; then, tap on the ‘Site settings’ option present on the ‘Settings’ screen.

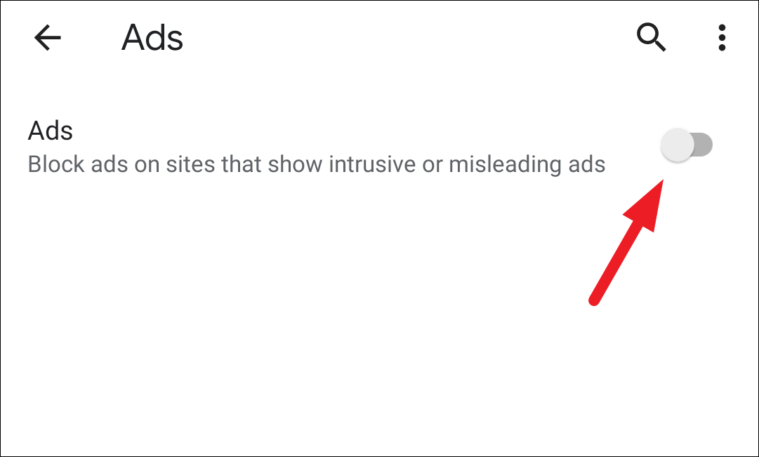
Now, locate and tap on the ‘Ads’ option present on the ‘Site settings’ screen.
After that, toggle the switch to the ‘Off’ position following the ‘Ads’ field on the screen.
Now, tap on the ‘back arrow’ icon present on the top left corner of the Chrome window.
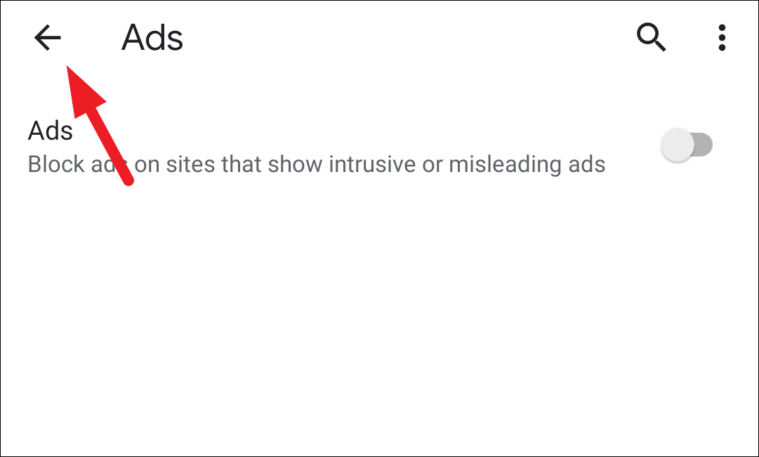
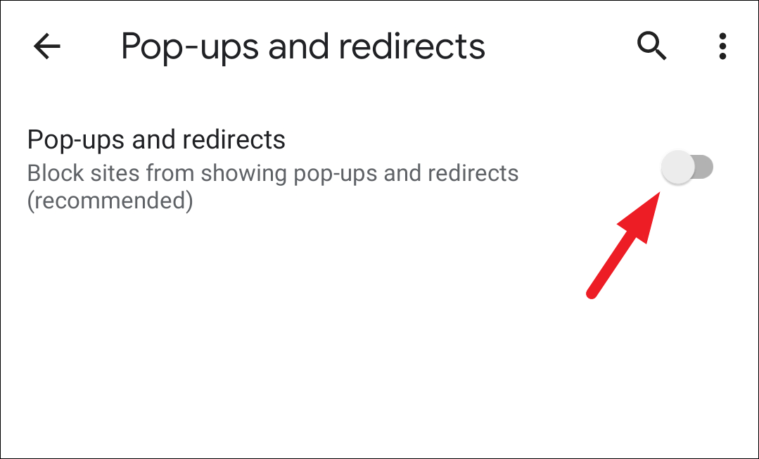
Next, locate and tap on the ‘Pop-ups and redirects’ option from the list.
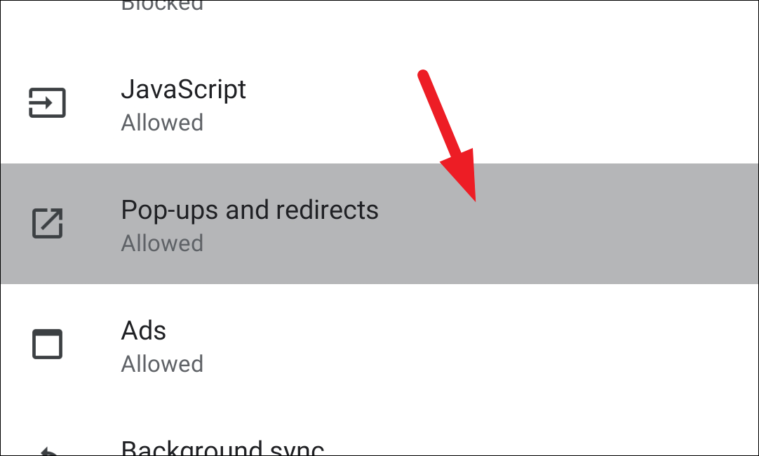
After that, toggle the switch to the ‘Off’ position following the ‘Pop-ups and redirects’ field on the screen.
Disable Background Sync For Closed Tabs
Background Sync basically allows Chrome tabs to complete an ongoing task such as sending a message or finish uploading any user data such as files on the cloud or a picture on social media even after you have closed the tab.
Though designed for the user’s ease of convenience, this can also at times translate into unsolicited actions or downloads from malicious websites.
To do so, head to the Chrome ‘Settings’ page as shown in one of the previous sections of this guide. Then, tap on the ‘Site settings’ option from the list.

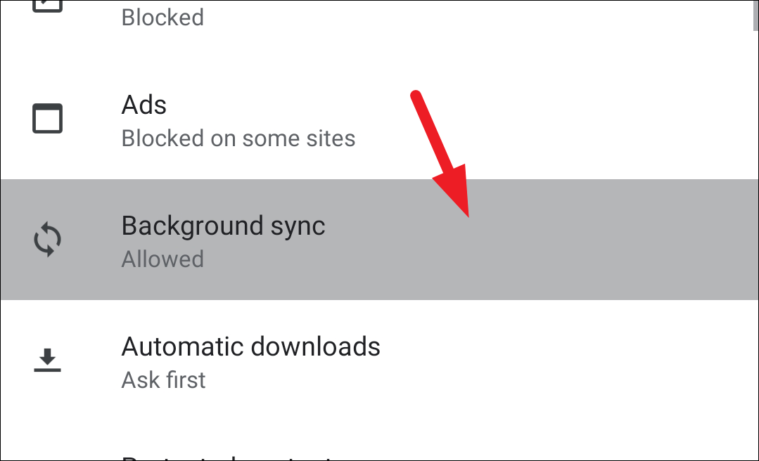
After that, scroll down to locate the ‘Background sync’ option and tap on it to navigate to the ‘background sync’ settings page.
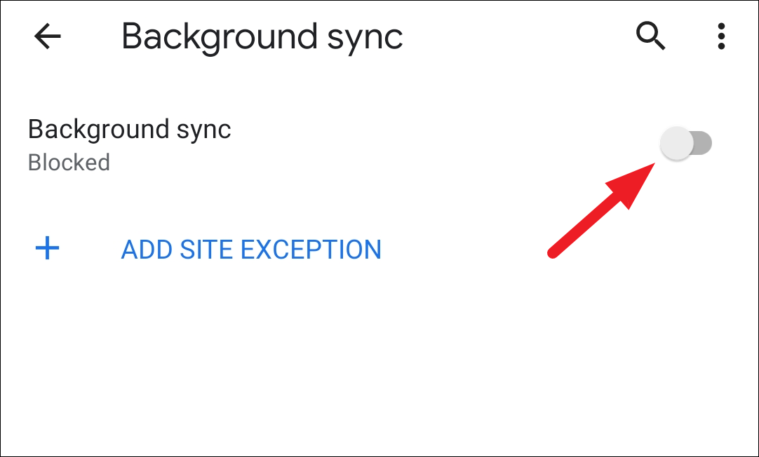
Next, tap to toggle the switch to the ‘Off’ that is following the ‘Background sync’ field on your screen.
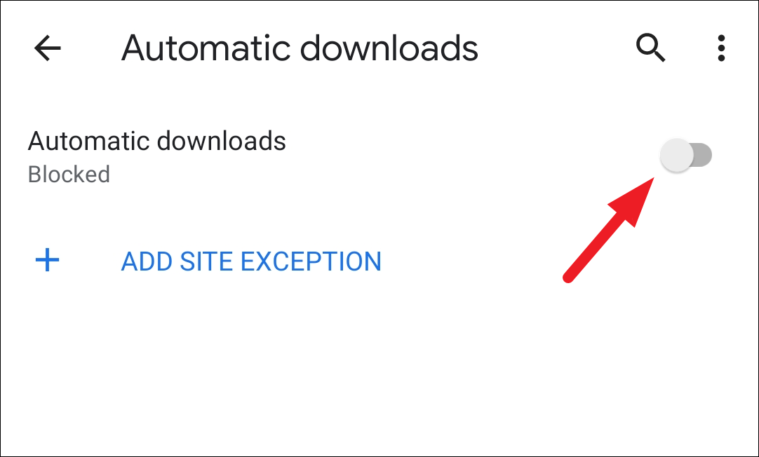
Block Automatic Downloads
If you do not want websites to start automatic downloads on Chrome or even request you for the same, you can completely block automatic downloads on Chrome. However, you still be able to download files or media by initiating the download manually.
To do so, head to the Chrome ‘Settings’ screen as shown in one of the previous sections. Then, tap on the ‘Site settings’ option present on the screen.

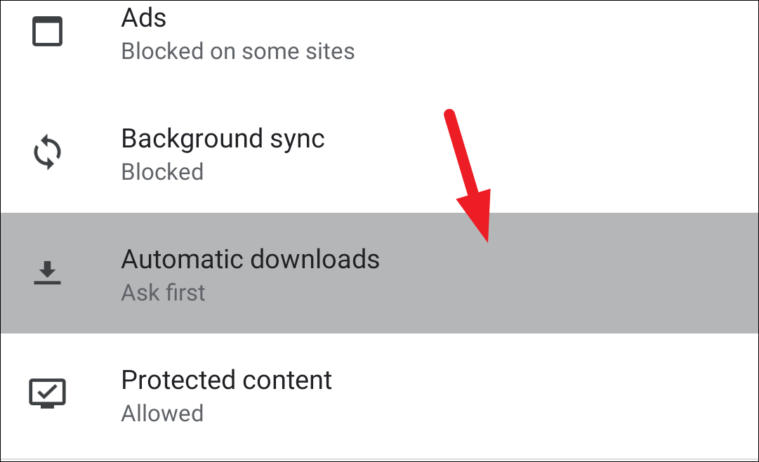
Now, locate and tap on the ‘Automatic downloads’ option present on the ‘Site settings’ screen.
After that, toggle the switch to the ‘Off’ position following the ‘Automatic downloads’ field on the screen.
In case you want to add an exception for automatic downloads from a specific website, tap on the ‘Add Site Exception’ button. This action will open an overlay window on your screen.
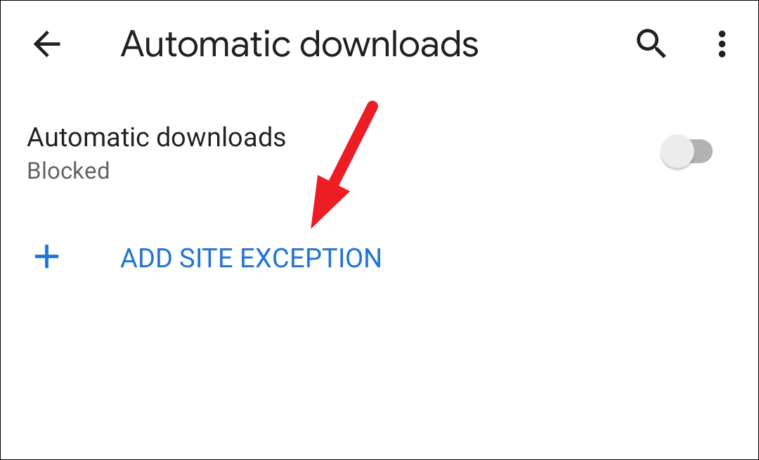
Now, type your preferred website’s URL in the space provided and then tap on the ‘Add’ button present on the lower right corner of the overlay window.

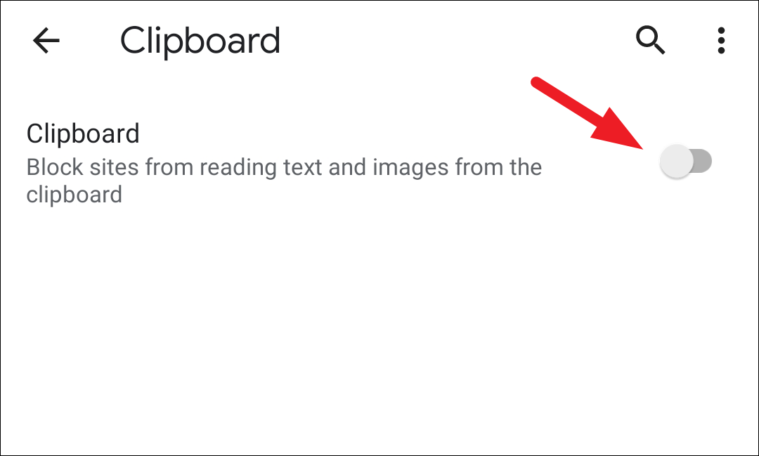
Disable Clipboard Access
Websites can also request access to your information available on your clipboard. Though information on your clipboard might not always be confidential nature; if you feel uncomfortable sharing your copied information with the website.
To do so, head to the Chrome ‘Settings’ screen as shown previously in this guide. Then, tap on the ‘Site settings’ option present under the ‘Advanced’ section.
Then scroll down to locate and tap on the ‘Clipboard’ option from the ‘Site settings’ screen.
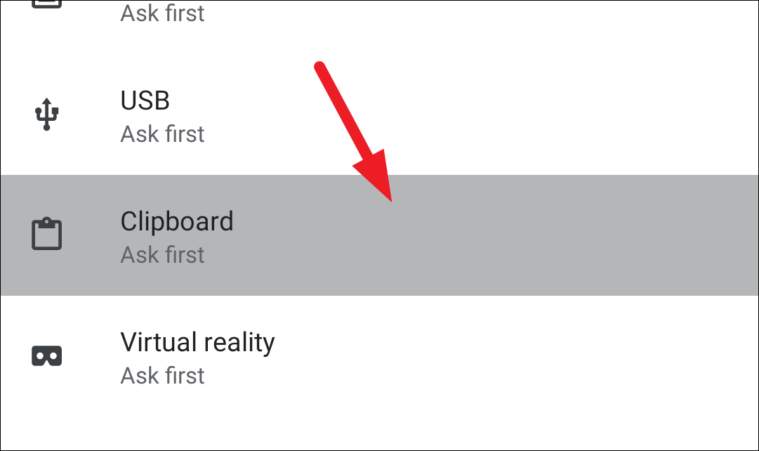
After that, toggle the switch to the ‘Off’ position following the ‘Clipboard’ field.
Use Chrome With Complete Privacy on iOS
Chrome is already optimized for privacy on iOS relative to its Android counterpart. However, as they say, there’s always room for improvement, and when that improvement is in line with protecting privacy it should definitely be welcomed.
Set up a Chrome without Signing in to your Google Account
If you are installing Google Chrome on your iOS device for the first time, you get. the option to not sign in and sync Chrome with your email account. It is just a single-step procedure.
First, launch Chrome from the home screen of your iOS device.
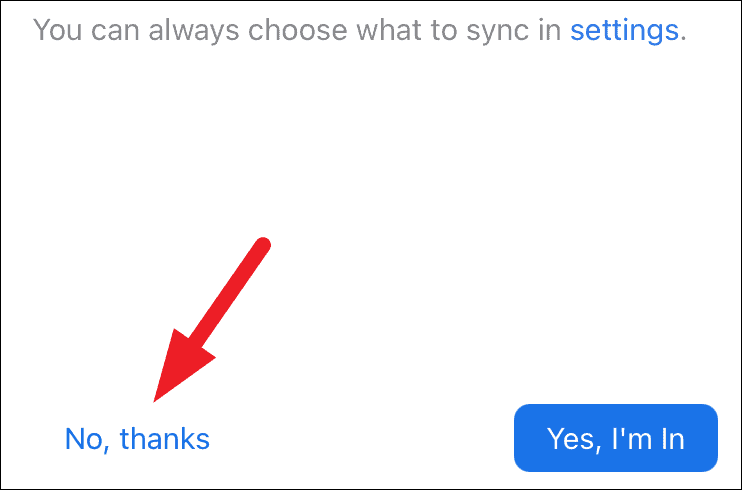
Now, since it is your first launch tap on the ‘Accept & Continue’ button to accept the terms and conditions of using the Chrome app.

After that, Chrome will ask you to turn on sync for your email address; tap on the ‘No, thanks’ button from the bottom left corner of your device screen to set up Chrome without signing into your Google account.
Now if you already have Chrome on your iOS device you can also remove the app, reinstall it and follow the above procedure to set up Chrome without a Google account.
Sign out of Chrome and Delete all Cookies, Browsing Data, and Site Data
If you don’t want to take up that hassle of reinstalling Chrome onto your device, you can also simply log out of your account, turn off sync, and delete all the information Chrome has stored related to the websites you have visited.
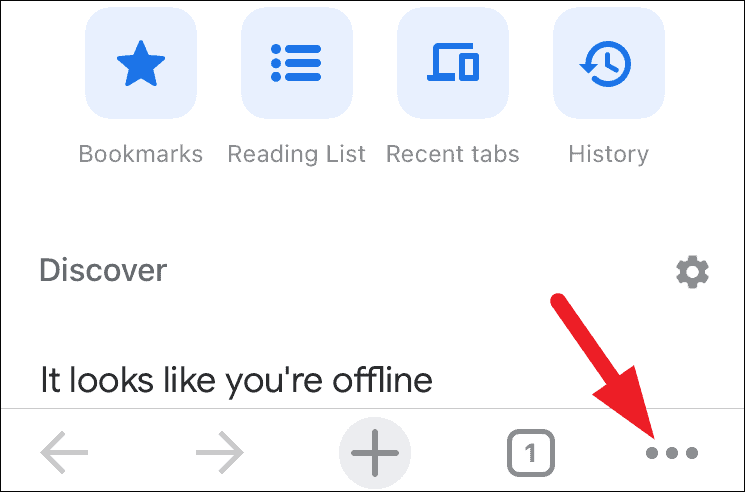
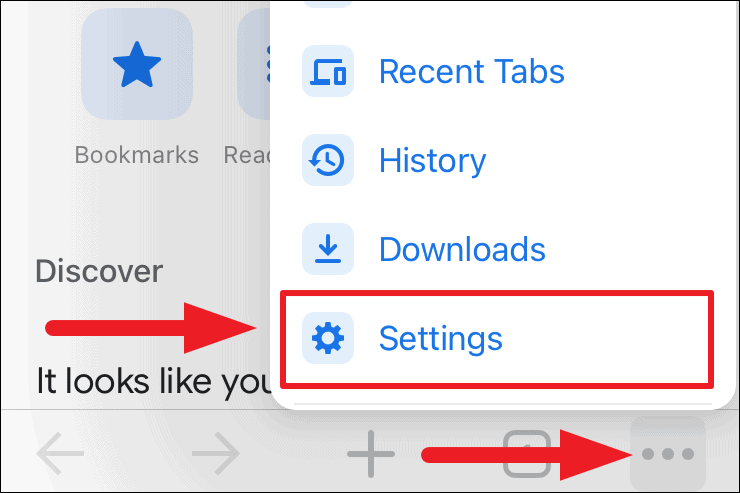
To do so, launch Chrome from the home screen of your iOS device. Then, tap on the ellipsis (three horizontal dots) present at the bottom right corner of the Chrome screen.
Next, tap on the ‘Settings’ option from the overlay menu.
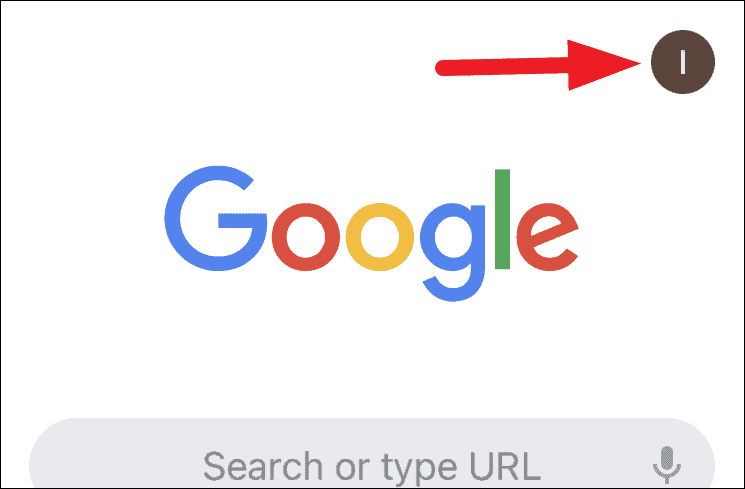
After that, tap on your account information tab present on the ‘Settings’ screen.

Alternatively, you can also tap on your account picture or initials situated on the top right corner of the Chrome home page. This will open an overlay window on your screen.
Then, tap on your account information tab present on the ‘Google Services’ window.
Now, tap on the ‘Sign out and clear data from this device’ option present on the screen. This will bring up an alert from the bottom of the screen.
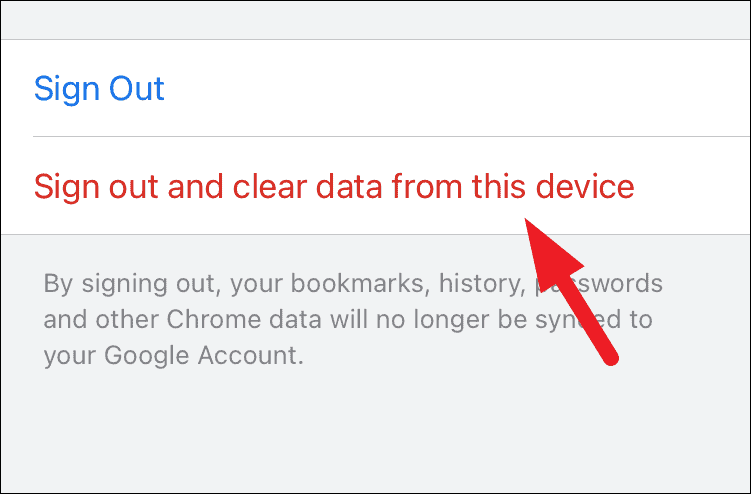
Then, read the alert carefully and tap on the ‘Sign out and clear data from this device’ option.
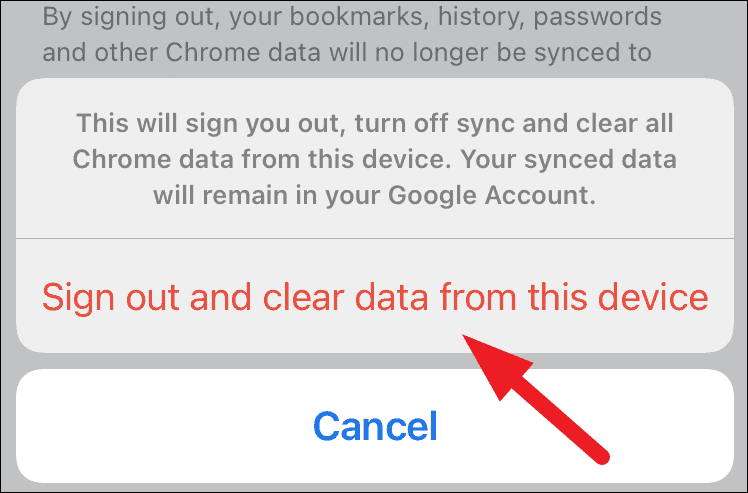
And that’s it you will be signed out of Chrome and all your bookmarks, passwords, history, and other site data will be deleted.
Disable All Built-in Google Services
Though Chrome has been pretty much restricted on iOS when it comes to sharing of data, there are still some built-in services that to provide a better overall experience share some data with Google servers. Thankfully, they all can be disabled if that suits you better.
Access Google Services on Chrome
To access Google services, launch the Chrome browser from the home screen or the app library of your iOS device.
Then, tap on the ellipsis (three horizontal dots) icon from the bottom right corner of the Chrome window. Next, select the ‘Settings’ option from the overlay menu.
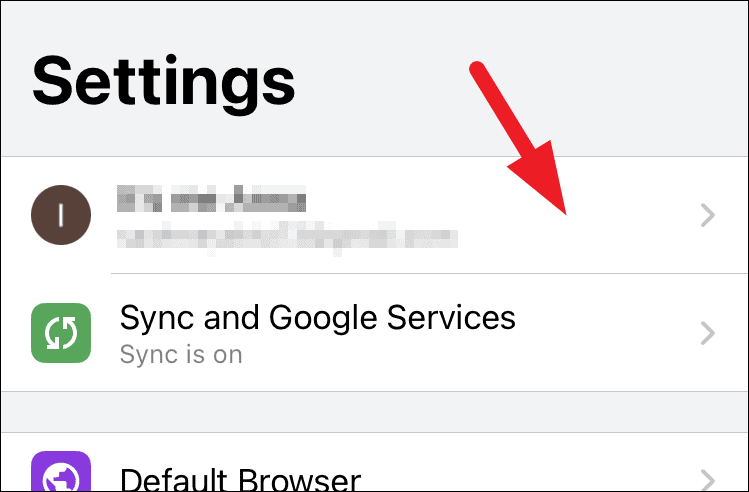
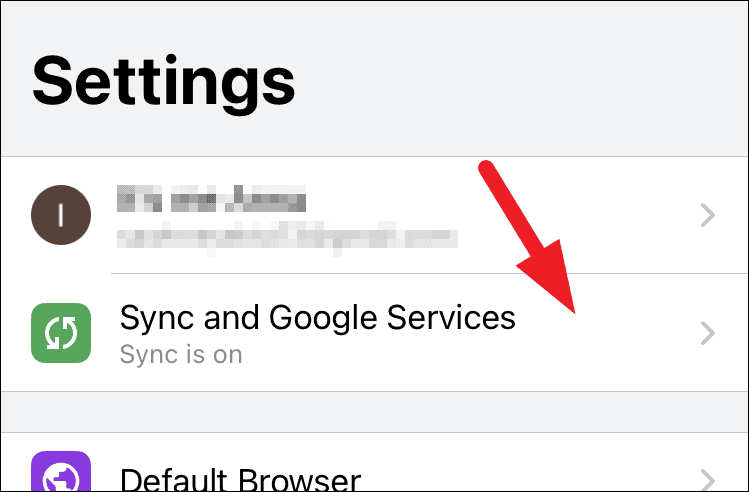
After that, tap on the ‘Sync and Google Services’ option from the ‘Settings’ screen.
Alternatively, if you have not signed out from Chrome, you can tap on the account picture or initials present at the top right corner of the Chrome homepage.

Now, you will be able to see all the built-in services in your Chrome.
Disable Autocomplete Searches and URLs
To make your life easier, Chrome sends some cookies and search data to Google to autocomplete a search query or website address you type in the address bar. Though it is a nifty little feature, one cannot ignore that this feature collects all the information you type into Chrome.
To turn it off, head to the ‘Google services’ screen as shown in the previous section. Then, locate the ‘Autocomplete searches and URLs’ and tap the following switch to toggle it ‘Off’.
Now, to completely disable the sending of URLs to Google servers, locate the ‘Make searches and browsing better’ option on the ‘Google services’ screen. Then, toggle the following switch to the ‘Off’ position.
Disable Statistics and Crash Reports Sent to Google
Statistics and Crash reports are usually used for product improvement and finding any specific bugs in the code to serve the users better. However, more often than not these reports might include a timestamp, location, device make, and model which might make some of the users uncomfortable.
Hence, to turn it off head to the ‘Google Services’ screen. Then, locate the ‘Help improve Chrome’s features and performance’ option and toggle the following switch to the ‘Off’ position.
Disable All Autofill Features in Chrome on iOS
Like every other browser, Chrome also supports an autofill feature where it would auto-populate fields using the information already saved to it. Chrome can save passwords, payment methods, addresses, phone numbers, and more
No doubt the feature is really helpful however, sharing sensitive information such as payment methods and personal addresses might be something a pool of people do not feel comfortable with. Fortunately, all these options can be turned off from Chrome settings.
Access Chrome Settings on iOS
To access Chrome settings, launch the Chrome app from the home screen of your device. Then, tap on the ellipsis icon (three horizontal dots) and tap on the ‘Settings’ option from the overlay menu.

Then, tap on the ellipsis (three vertical dots) icon from the bottom right corner of the window. Next, tap on the ‘Settings’ option from the overlay menu.

Since the autofill features are not placed under a separate category, you will be able to see all the individual options on the Chrome ‘Settings’ screen.
Disable Password Saving
Unlike Android or Desktop counterpart, Chrome does not offer an ‘Auto Sign-in’ functionality on iOS. However, saved passwords are still auto-populated in the respective fields on the websites.
To turn password saving off, head to the Chrome ‘Settings’ page as shown in the previous section. Then, tap on the ‘Passwords’ option present on the screen.
After that, locate the ‘Save Passwords’ field and toggle the following switch to the ‘Off’ position.
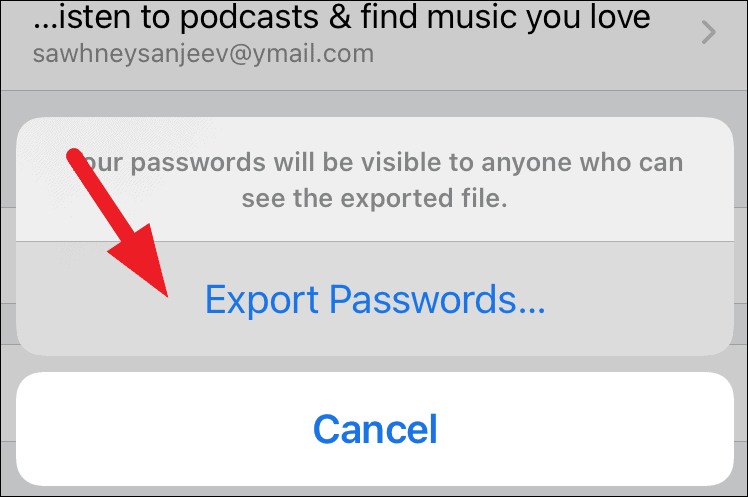
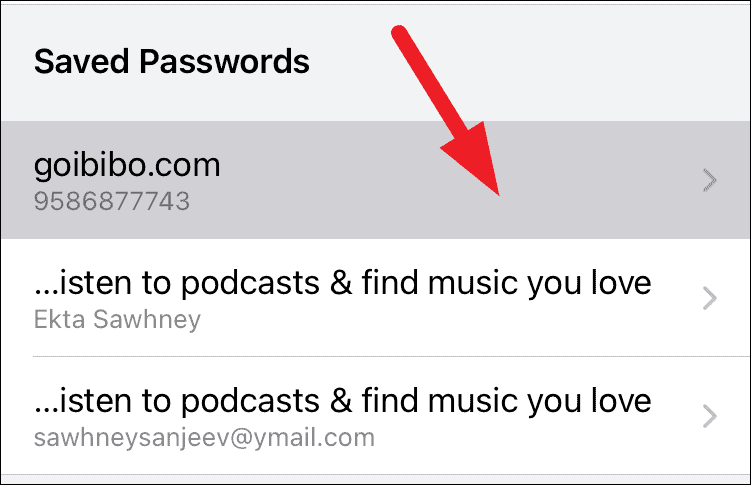
In case, you already have saved passwords for websites, you will be able to find them under the ‘Saved Passwords’ section.
Now, if you wish to export your saved passwords before you remove them from Chrome, you can do so by locating the ‘Export Passwords’ option and tapping on it from the ‘passwords’ settings screen. This will bring up an overlay pane on your screen.

After that, tap on the ‘Export Passwords’ option from the overlay pane. However, do remember that all your passwords will be exported in a text file.
Next, you need to provide Face ID, Touch ID, or enter your phone passcode to export the file. Then an overlay window will open on your screen, tap on your preferred app present on the window to send or save the file.
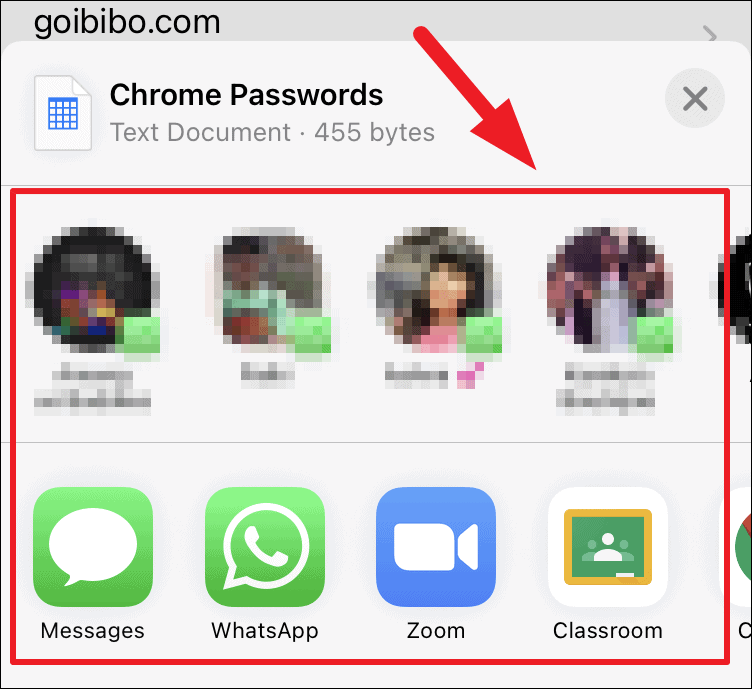
Then, to delete your existing passwords tap on the individual website name from the list of options.
After that, tap on the ‘Edit’ option present at the window’s top right corner.
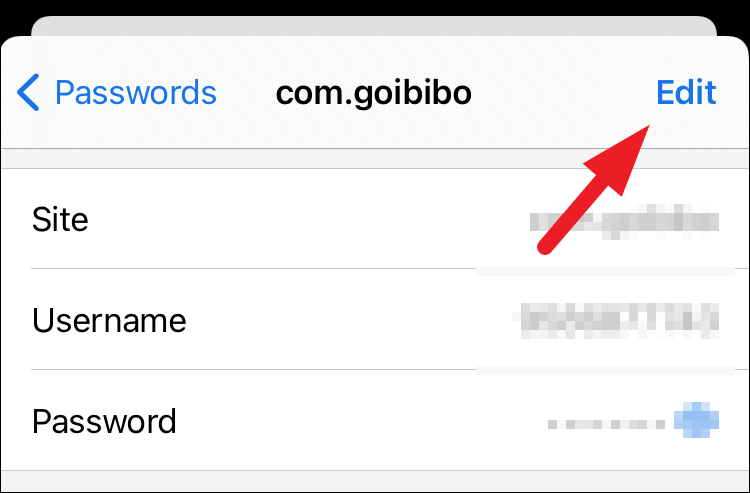
Then, after providing authentication using Face ID, Touch ID, or your account passcode tap on the ‘Delete’ button present at the bottom of the screen to remove the saved credentials.
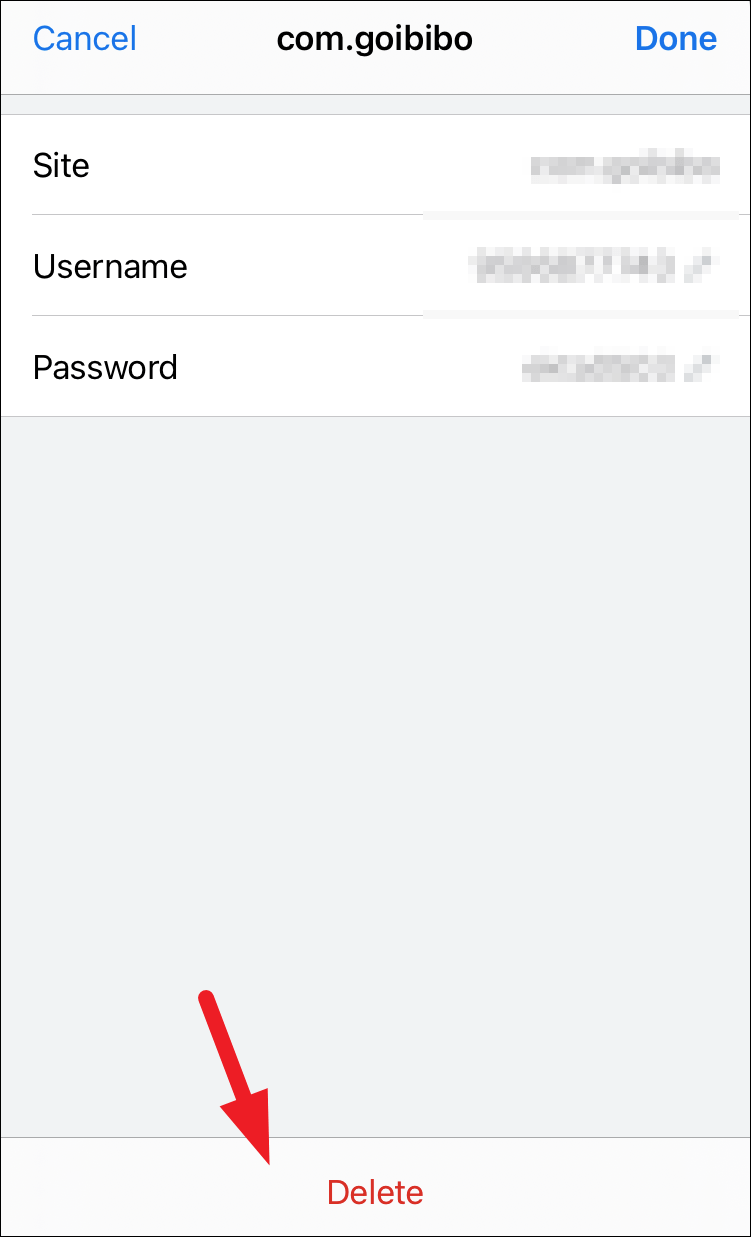
If you have more than one credential saved on your Chrome browser you will need to delete each of them individually.
Disable Payment Method Features
With so many much more secure ways to process a payment nowadays, it really doesn’t make sense to keep your payment methods saved on a browser as far as privacy is concerned.
To turn the payment methods off on Chrome, head to the ‘Settings’ screen as shown in one other previous section. Then, tap on the ‘Payment Methods’ option present on your screen.
Then, locate the ‘Save and fill payment methods’ options and toggle the following switch to the ‘Off’ position.
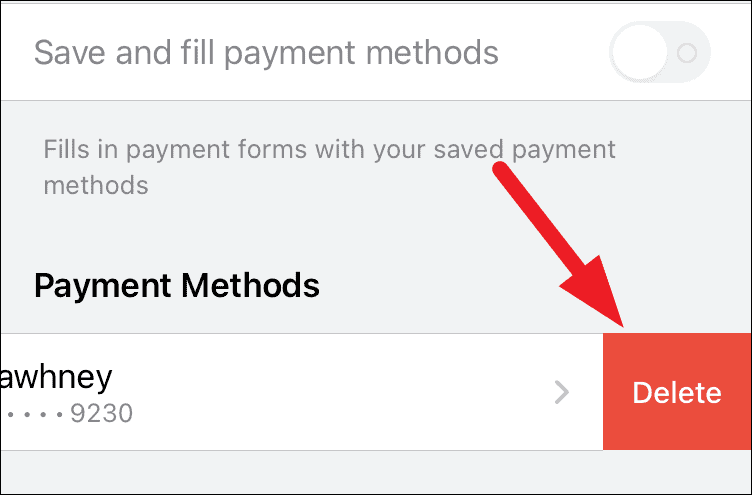
In case you already have a payment method saved, you will be able to locate it under the ‘Payment Methods’ screen.
To delete the saved payment method, swipe right to left on the individual option present on your screen. This action will reveal the ‘Delete’ button on the far right edge of the screen. Now, tap on the ‘Delete’ button to remove the payment method.
Disable Address, Email, Phone number Filling Features
Along with the payment methods and passwords, Chrome allows saving information such as addresses, Emails, and phone numbers. However, saving all this sensitive information on a browser might make some people uncomfortable.
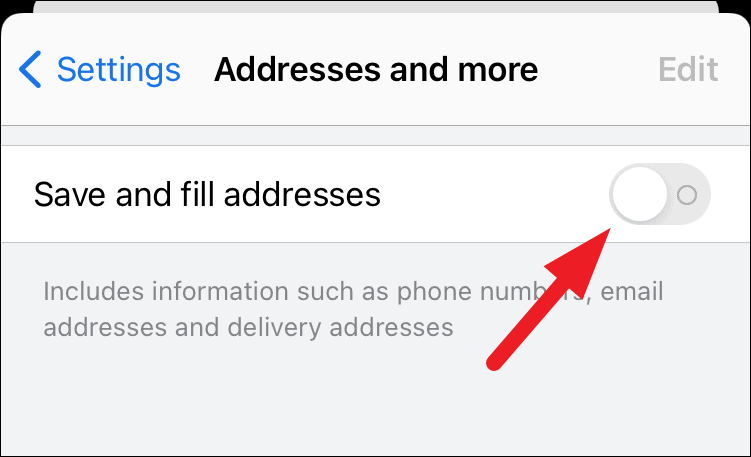
To turn off this feature, head to the Chrome ‘Settings’ page as shown in one of the previous sections above. Then tap on the ‘Addresses and more’ option present on your screen.
Then, tap to toggle the switch to the ‘Off’ position to turn off the saving of the ‘Addresses, phone number, and email address’ on Chrome browser.
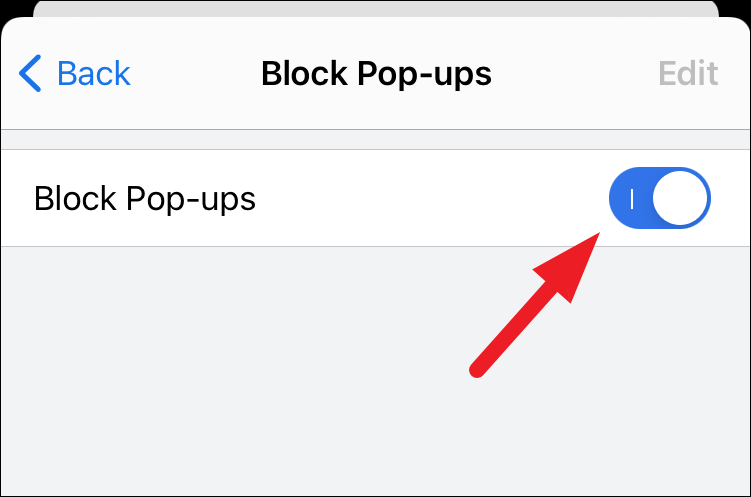
Block All Pop-ups on Chrome Natively
Random pop-ups on websites are very annoying and completely disrupt the user experience. Hence, Chrome provides native support to block them.
To do so, head to the Chrome ‘Settings’ screen as shown in one of the sections previously. Then, scroll down to locate and tap on the ‘Content Settings’ option.
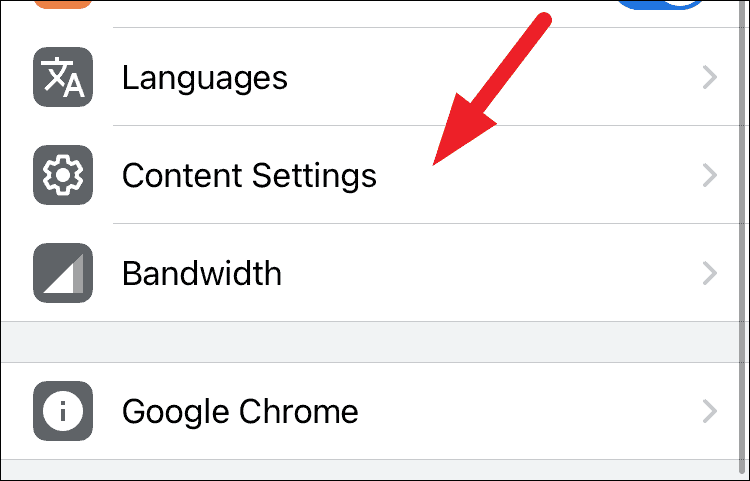
Next, tap on the ‘Block Pop-ups’ option from the ‘Content Settings’ screen.
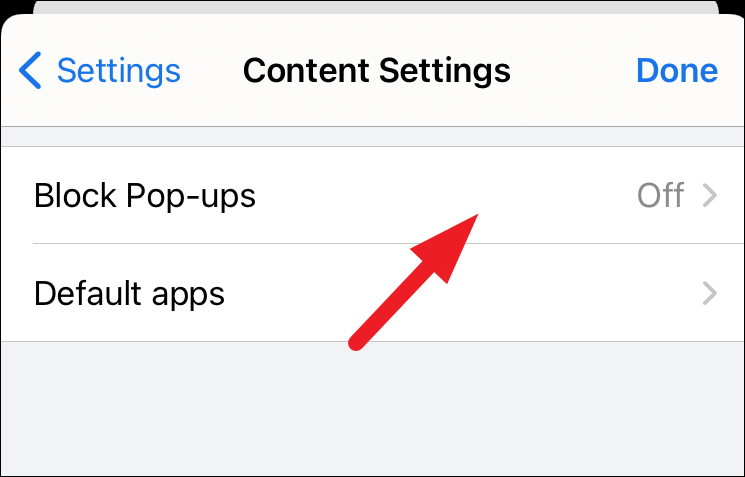
After that, tap on the switch to toggle it to the ‘On’ position that is following the ‘Block Pop-ups’ field.
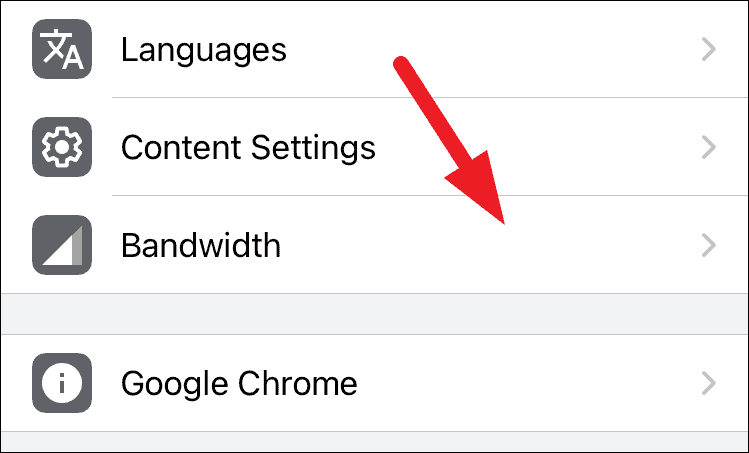
Disable Pre-load Web Pages Feature
Chrome also preloads some web pages it presumes you might visit. This feature is definitely useful, however, to provide this functionality to users Chrome reads user behavior and also uses a tad bit of extra bandwidth.
Hence, to turn it off, head to the Chrome ‘Settings’ screen as shown previously in this guide. Then, locate and tap on the ‘Bandwidth’ option present on the screen.
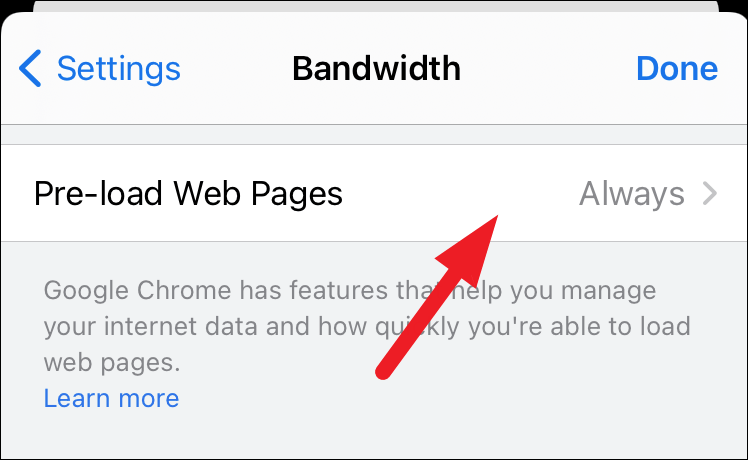
Now, tap on the ‘Pre-load Web Pages’ option present on the ‘Bandwidth’ settings screen.
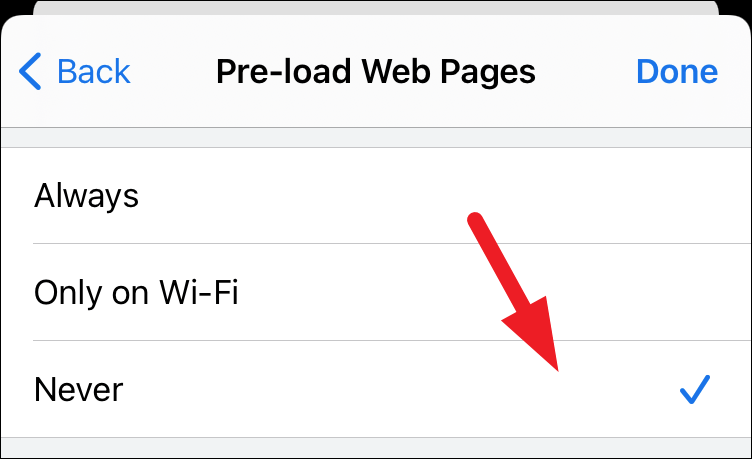
After that, tap to choose the ‘Never’ option to disable the pre-load webpages feature on Chrome.
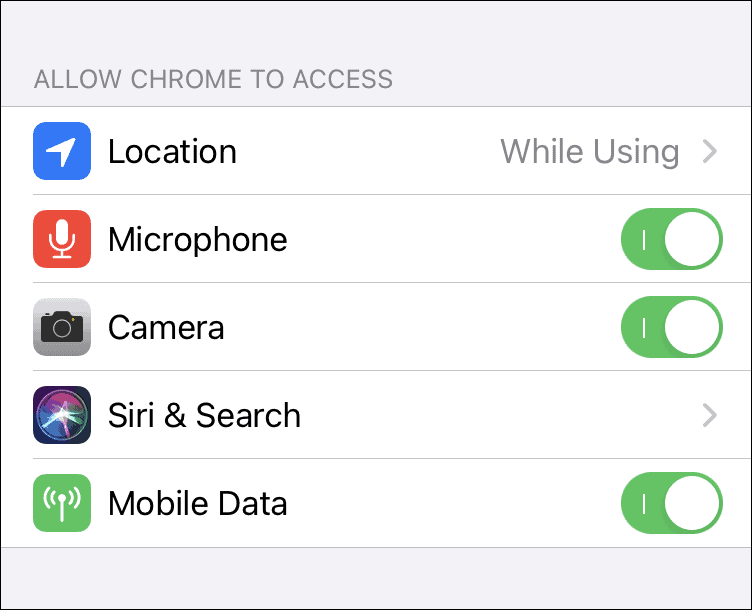
Disable Location, Camera, and Microphone Access for All Websites in Chrome
Disabling location, camera, and microphone are not disabled the same way as the Android or Desktop counterpart of the Chrome browser. Disabling Chrome’s access to all of these peripherals will require you to jump into your phone settings.
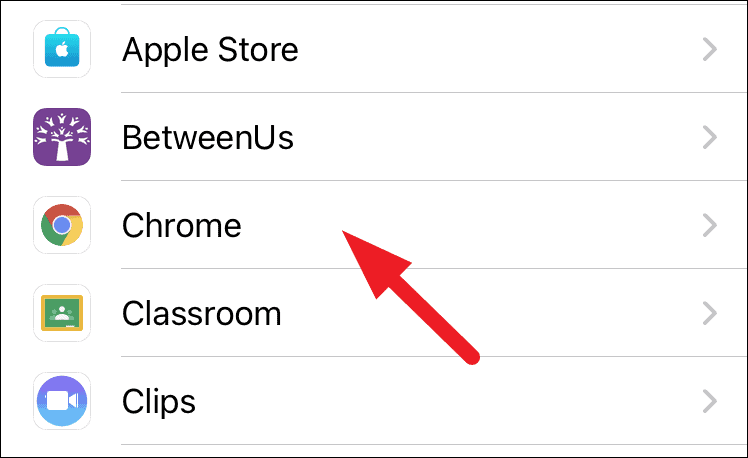
Hence, launch. the ‘Settings’ app from the home screen of your iOS device.
Then, scroll down to locate and tap on the ‘Chrome’ option from the ‘Settings’ screen.

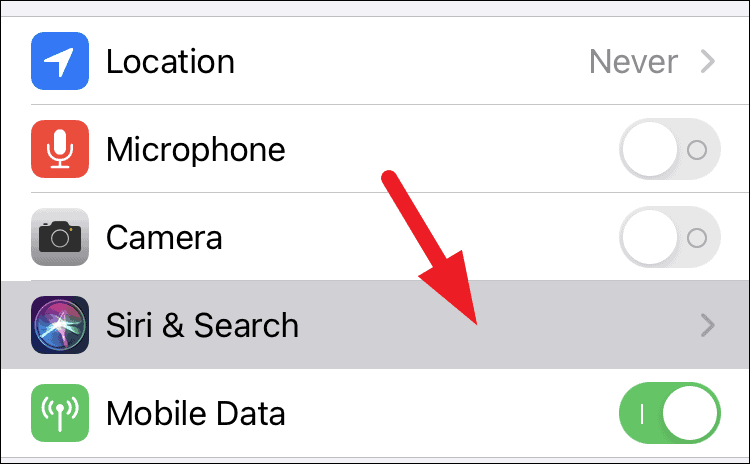
Now you will be able to see access options for microphone, camera, and location on your screen.
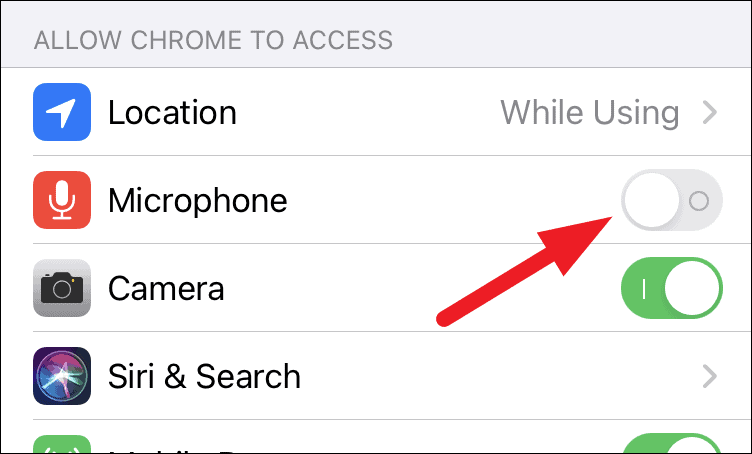
To disable access to your microphone, locate the ‘Microphone’ option on the ‘Chrome Settings’ screen and then toggle the following switch to the ‘Off’ position.
Similarly, to disable the camera, toggle the switch to the ‘Off position that is following the ‘camera’ option on the screen.
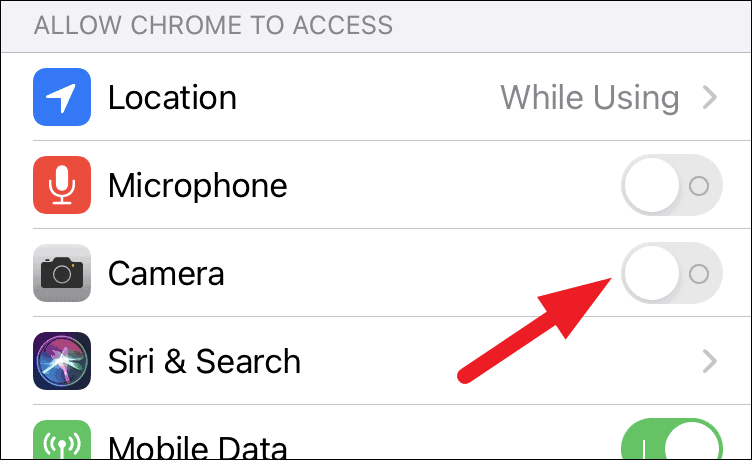
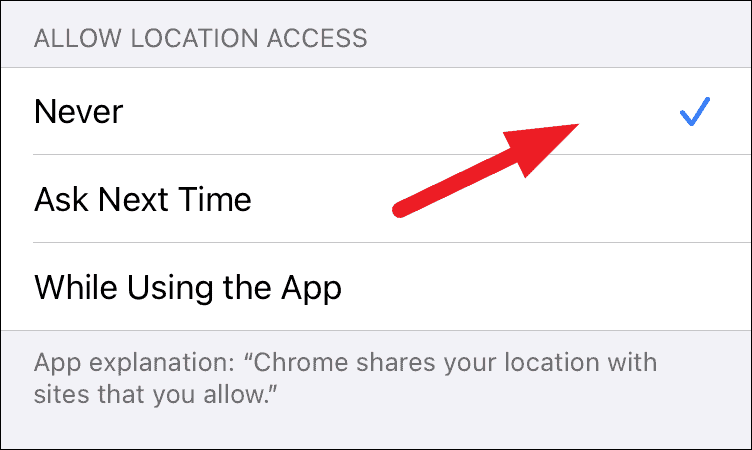
After that, tap on the ‘Location’ option present on your screen.
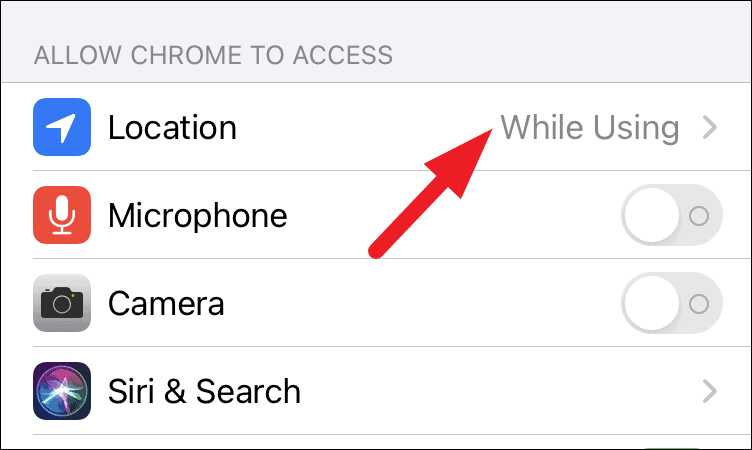
Then, finally to disable the location, toggle the switch to the ‘Off’ position following the ‘Location’ option.
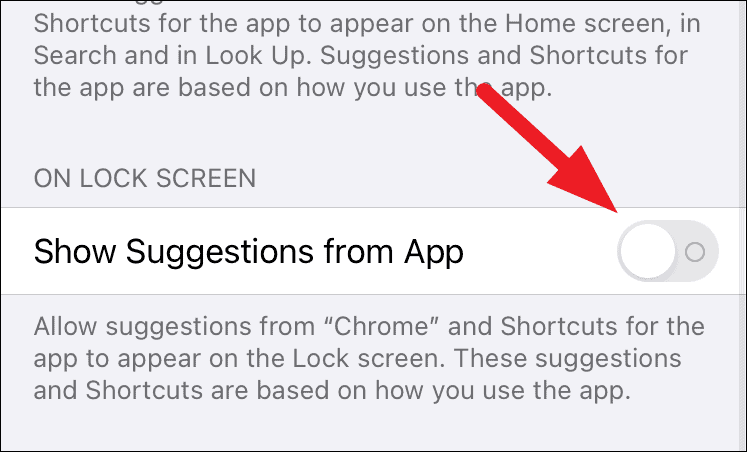
Disable Chrome to learn your App Usage
Over time Chrome learns how you use the app and send you suggestions on its basis to let you use it more efficiently. While it can be useful for users switching to Chrome browser and learn about it; on the flip side, many might not be comfortable with the trade of privacy for tips and tricks.
To turn it off, head to the ‘Settings’ app on your iOS device. Then, scroll down and locate the ‘Chrome’ option from the ‘Settings’ screen.
After that, tap on the ‘Siri & Search’ option present on the screen.
Now, locate the ‘Show Suggestion From App’ option and toggle the following switch to the ‘Off’ position.
And that’s it, Google Chrome is now configured to completely safeguard your private data unless you explicitly choose to share it.