Windows Update components are vital for downloading and installing the latest features, drivers, and security patches on your Windows 11 system. However, these components can sometimes become corrupted or encounter errors, leading to issues with updates. Resetting the Windows Update components can help resolve these problems and restore normal update functionality. In this guide, we'll explore several effective methods to reset these components.
Reset Windows Update Components via Command Prompt
Resetting the Windows Update components through the Command Prompt involves executing a series of commands. While this method is comprehensive and highly effective, it is also time-consuming. Follow the steps below to perform a manual reset.
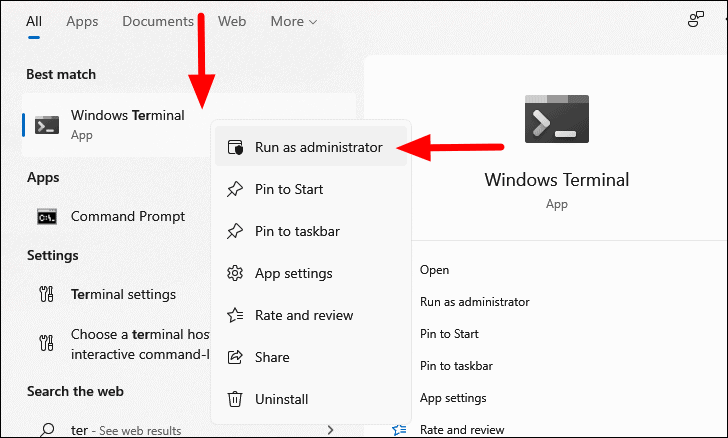
- Open the Search menu and type Windows Terminal. Right-click the Windows Terminal app in the search results and select Run as administrator. Confirm any prompts that appear.
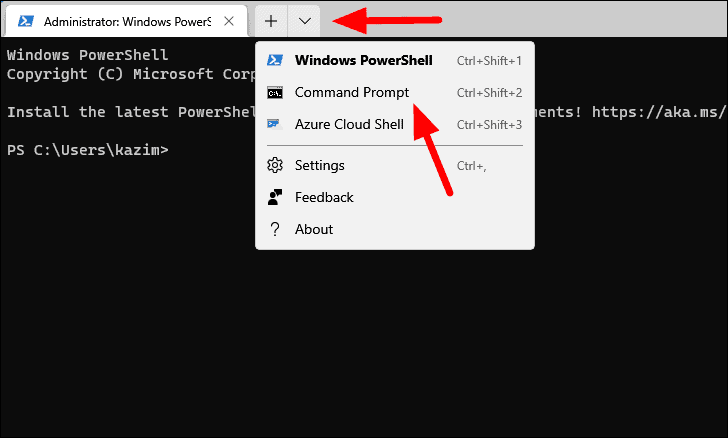
- By default, Windows Terminal opens with PowerShell. To switch to Command Prompt, click the down-arrow icon at the top and select Command Prompt from the list. Alternatively, press
CTRL + SHIFT + 2to open Command Prompt directly.
- In the Command Prompt window, stop the following services by entering each command and pressing
ENTERafter each:
net stop bitsnet stop wuauservnet stop cryptsvc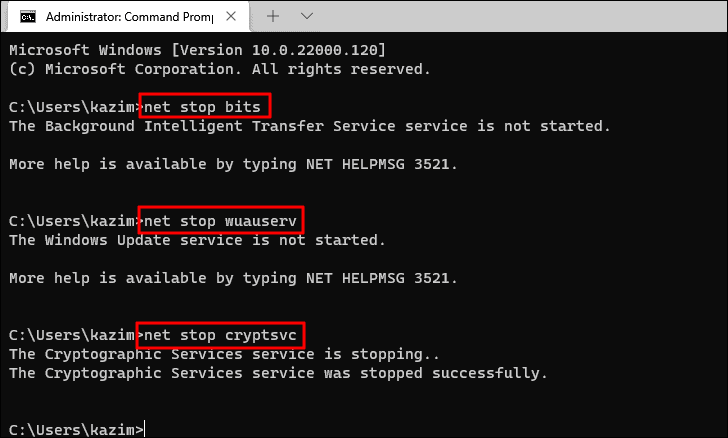
- Delete the
qmgr*.datfiles by running the following command:
Del "%ALLUSERSPROFILE%\Application Data\Microsoft\Network\Downloader\qmgr*.dat"Note: You can skip this step if this is your first attempt at resetting the Windows Update components. If problems persist after completing all steps, include this step in your next attempt.
- Rename the following folders by executing each command:
Ren %Systemroot%\SoftwareDistribution\DataStore DataStore.bakRen %Systemroot%\SoftwareDistribution\Download Download.bakRen %Systemroot%\System32\catroot2 catroot2.bakNote: You can skip this step if this is your first attempt at resetting the components. If issues continue, include this step the next time.
- Reset the Windows Update service and BITS by entering these commands:
sc.exe sdset bits D:(A;;CCLCSWRPWPDTLOCRRC;;;SY)
(A;;CCDCLCSWRPWPDTLOCRSDRCWDWO;;;BA)
(A;;CCLCSWLOCRRC;;;AU)
(A;;CCLCSWRPWPDTLOCRRC;;;PU)
sc.exe sdset wuauserv D:(A;;CCLCSWRPWPDTLOCRRC;;;SY)
(A;;CCDCLCSWRPWPDTLOCRSDRCWDWO;;;BA)
(A;;CCLCSWLOCRRC;;;AU)
(A;;CCLCSWRPWPDTLOCRRC;;;PU)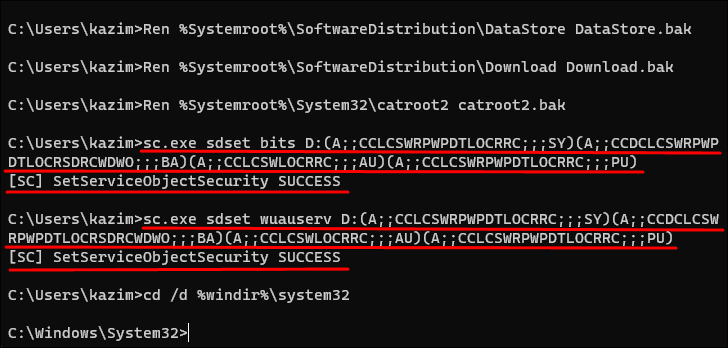
- Navigate to the
system32directory by running:
cd /d %windir%\system32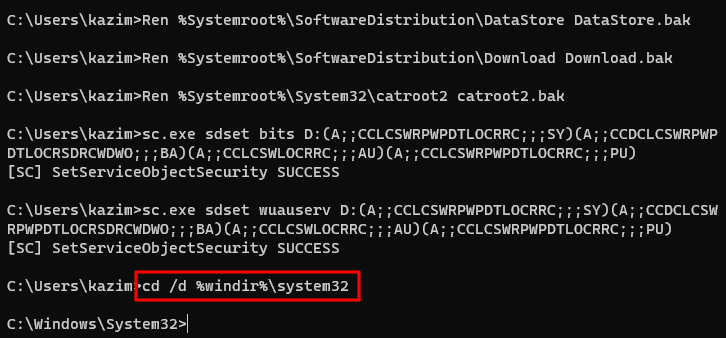
- Re-register the Windows Update and BITS files by entering the following commands. Press
ENTERafter each command, and click OK on any prompts:
regsvr32.exe atl.dll
regsvr32.exe urlmon.dll
regsvr32.exe mshtml.dll
regsvr32.exe shdocvw.dll
regsvr32.exe browseui.dll
regsvr32.exe jscript.dll
regsvr32.exe vbscript.dll
regsvr32.exe scrrun.dll
regsvr32.exe msxml.dll
regsvr32.exe msxml3.dll
regsvr32.exe msxml6.dll
regsvr32.exe actxprxy.dll
regsvr32.exe softpub.dll
regsvr32.exe wintrust.dll
regsvr32.exe dssenh.dll
regsvr32.exe rsaenh.dll
regsvr32.exe gpkcsp.dll
regsvr32.exe sccbase.dll
regsvr32.exe slbcsp.dll
regsvr32.exe cryptdlg.dll
regsvr32.exe oleaut32.dll
regsvr32.exe ole32.dll
regsvr32.exe shell32.dll
regsvr32.exe initpki.dll
regsvr32.exe wuapi.dll
regsvr32.exe wuaueng.dll
regsvr32.exe wuaueng1.dll
regsvr32.exe wucltui.dll
regsvr32.exe wups.dll
regsvr32.exe wups2.dll
regsvr32.exe wuweb.dll
regsvr32.exe qmgr.dll
regsvr32.exe qmgrprxy.dll
regsvr32.exe wucltux.dll
regsvr32.exe muweb.dll
regsvr32.exe wuwebv.dll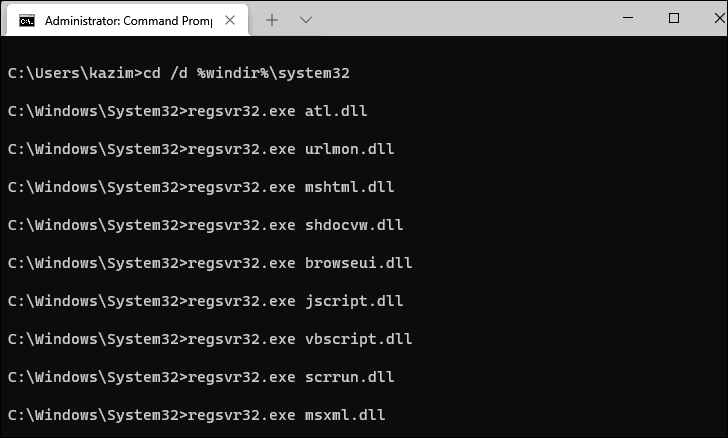
- Reset the Windows Sockets by running:
netsh winsock reset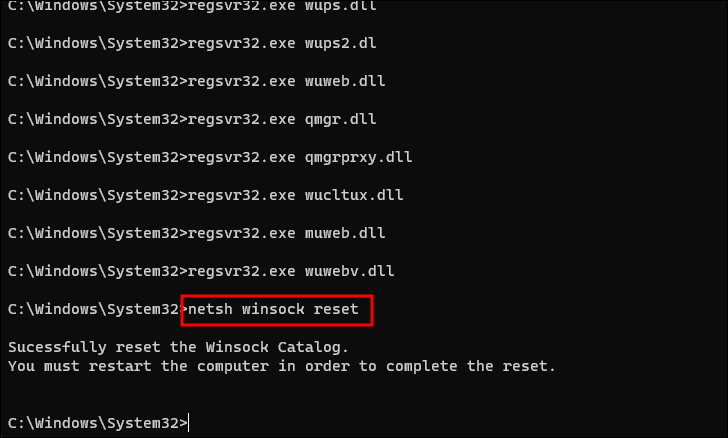
- Restart the services that were stopped earlier by executing these commands:
net start bitsnet start wuauservnet start cryptsvc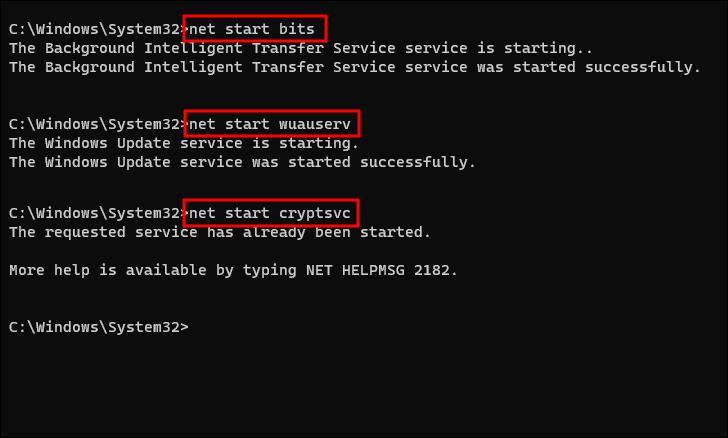
- Restart your computer to apply the changes. The Windows Update components should now be reset.
Reset Windows Update Components with the Reset Windows Update Tool
The 'Reset Windows Update Tool' is a free, open-source utility that automates the process of resetting Windows Update components. This method can save time and reduce manual effort compared to the Command Prompt method.
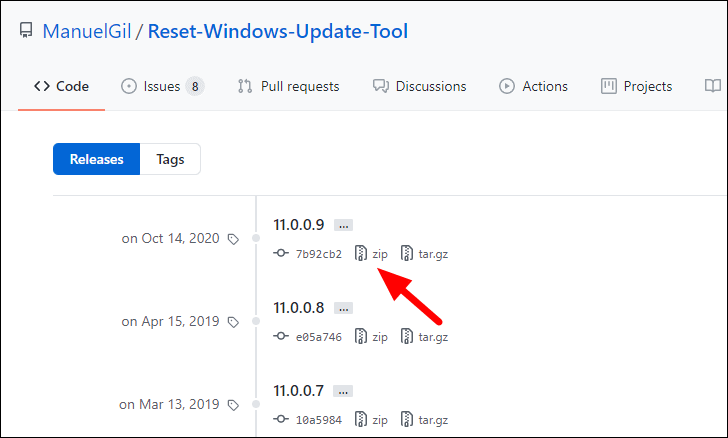
- Download the 'Reset Windows Update Tool' from its official repository. Go to github.com/ManuelGil and click on the zip option under the latest version.
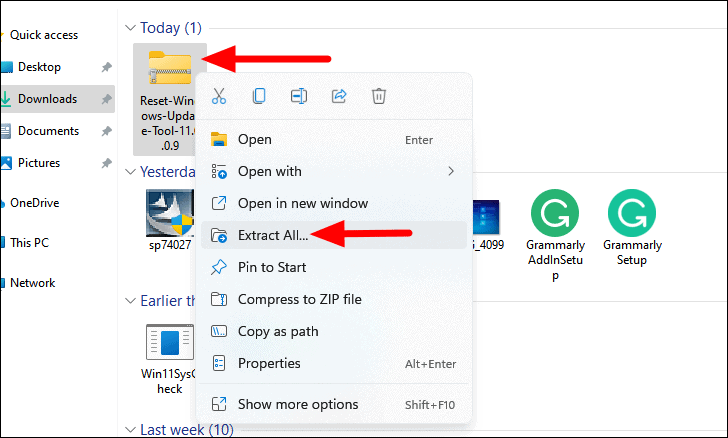
- After downloading, navigate to your Downloads folder, right-click the ZIP file, and select Extract All.
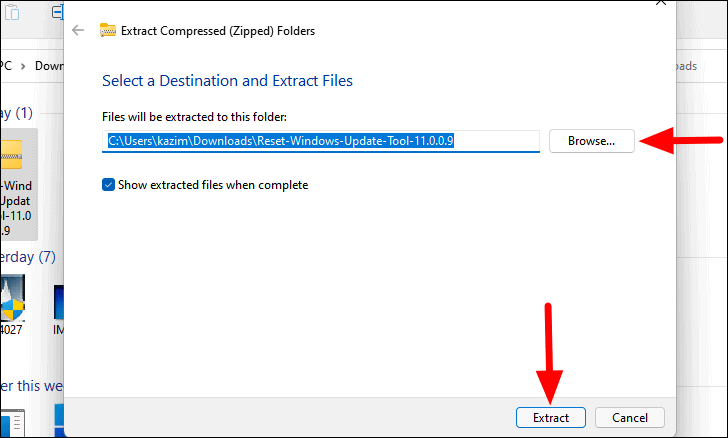
- Choose a destination for the extracted files by clicking Browse, then click Extract.
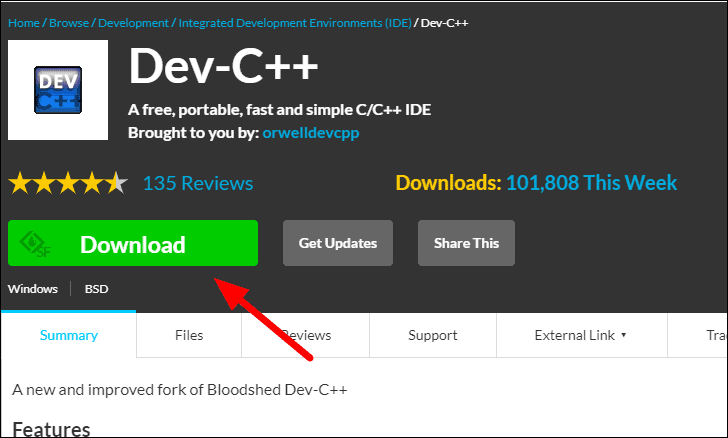
- Download and install Dev-C++, which is required to compile the tool. Go to sourceforge.net/projects and click on Download.
- Once downloaded, run the Dev-C++ installer and follow the on-screen instructions to complete the installation.
- Right-click the Dev-C++ shortcut or executable and select Run as administrator to launch it with administrative privileges.

- In Dev-C++, click on the File menu and select Open.
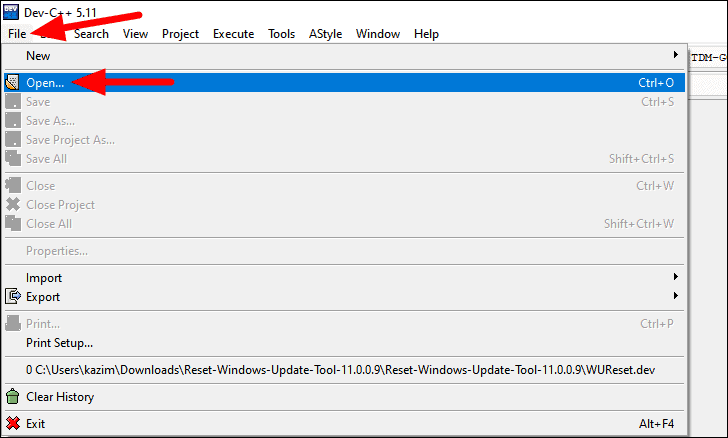
- Navigate to the location where you extracted the 'Reset Windows Update Tool' files, select the WUReset.dev file, and click Open.

- Once the file is loaded, click on the Execute menu and select Compile or press
F9to compile the tool.

- After compilation, click on the Execute menu again and select Run or press
F10to run the tool.

- In the tool's command window, read the terms and conditions. Type
Yand pressENTERto accept.

- Press
2and thenENTERto select the option to reset the Windows Update components.

- Wait for the tool to complete the reset process. Once finished, it will display a confirmation message. Close the window and restart your computer.

Reset Windows Update Components via Windows Update Troubleshooter
Windows 11 includes built-in troubleshooters that can automatically detect and fix various issues. The Windows Update Troubleshooter can reset components if it detects problems related to updates.
- Open the Settings app by right-clicking the Start button and selecting Settings from the menu, or by pressing
WINDOWS + I.
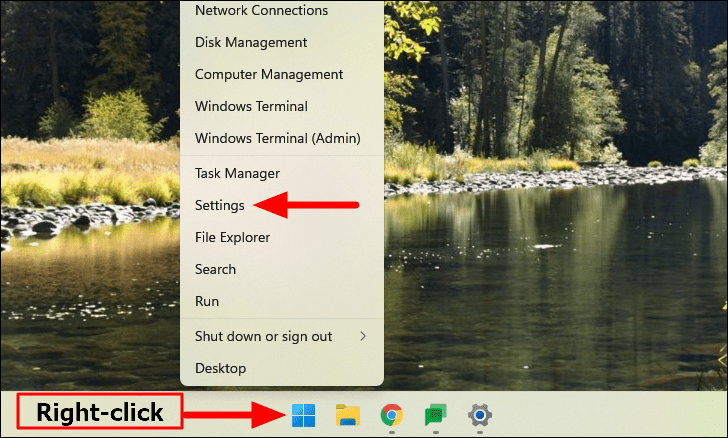
- In the System tab, select Troubleshoot on the right pane.

- Click on Other troubleshooters.

- Find Windows Update in the list and click on Run next to it.

- The troubleshooter will scan for issues and attempt to fix them. Follow any on-screen instructions and allow the process to complete.
The methods above should help you reset the Windows Update components on your Windows 11 system and resolve update-related issues. If problems persist, consider checking for other underlying causes or seeking additional support.






Member discussion