
When you have to select a block of adjacent/continuous cells in Excel, all you have to do is select a cell, then with the left mouse button pressed, drag over the other cells that you want to select. Or you can hold the Shift key and use arrow keys to select the range.
Occasionally you may require to select multiple cells that are not next to each other (non-adjacent/continuous cells). But selecting non-adjacent cells is a bit complicated than selecting continuous cells, but it’s still quite easy.
At times, you may want to format, copy, or delete the contents of non-adjacent cells in Excel, which requires you to select all these cells at once. Fortunately, there are several simple ways to select non-adjacent cells in Excel, including using only a keyboard, keyboard & mouse, Name box, Find and replace tool, and Go To tool.
Selecting Non-Adjacent Cells with Keyboard and Mouse
Most people know that you can select non-adjacent cells by using the keyboard and mouse together. It is the easiest way to select multiple non-adjacent cells and ranges of cells.
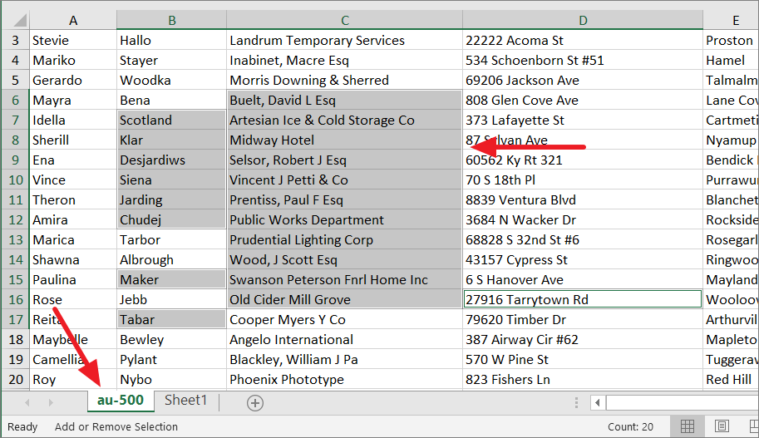
If you want to select cells that are not next to each other, press and hold the Ctrl key and then select each cell with the ‘Left mouse click’ (you can also drag and select a range of cells at once). Don’t release the Ctrl key until you finish selecting the cells or else you will lose all your selection and you have to re-do it again.
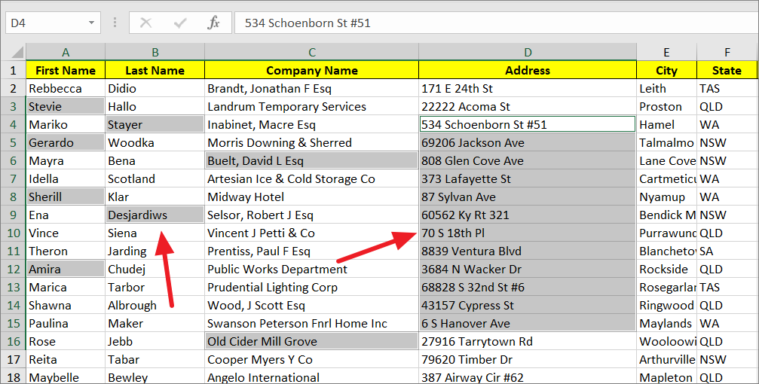
If you want to select non-adjacent columns or rows, press and hold the Ctrl key and then click the column letters (B, D) or row numbers (5, 7, 10, 12) to select the entire rows or columns.
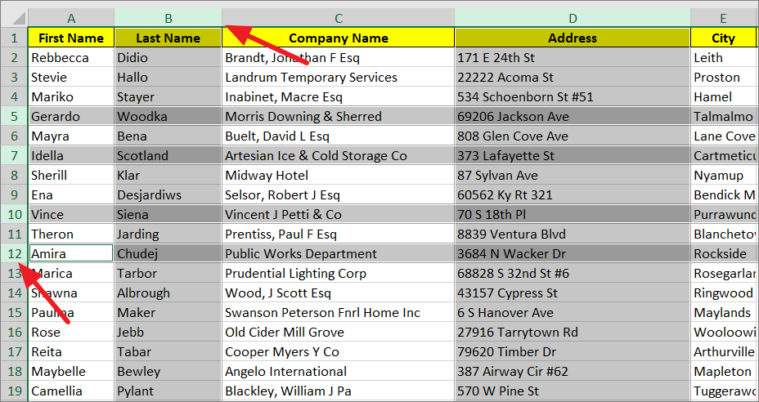
You can also select a combination of random cells and entire rows or columns together. While selecting cells, if you selected any wrong cells, you can always unselect them by pressing and holding the Ctrl key and clicking on the selected cells to unselect them.
Selecting Non-Adjacent Cells Using the Keyboard Only
If you’re a keyboard person, there’s also a way you can use to select non-continues cells with keyboard only. It can be done by using the Extended Selection mode. Follow these steps do that:
First, place the cursor on the first cell that you want to select and press F8 to enable ‘Extended Selection mode’ which also selects the first cell. You can see that in the status bar in the bottom left-hand corner of the Excel screen.
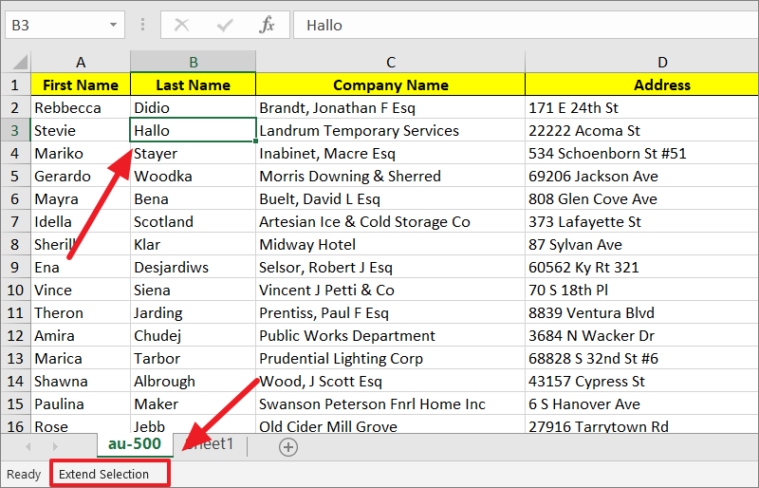
If you want to select the adjacent cells, use the arrow keys to make the selection. Since the Extend Selection mode is activated, this will only make the selection of adjacent cells.
Now, press and release the Shift + F8 keys to disable ‘Extended Selection mode’ and start the ‘Add or Remove Selection’ mode. ‘Add or Remove Selection’ mode preserves your current selections and allows you to highlight non-adjacent cells with your mouse or arrow keys. Use the arrow keys to go to the next cell that you wish to select.
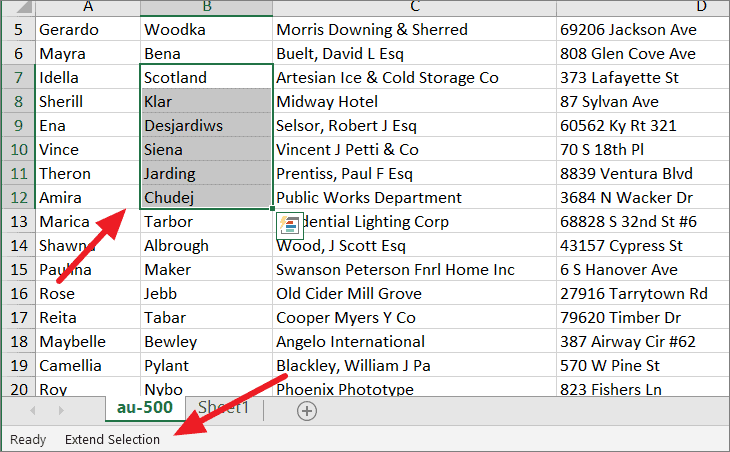
Next, press the F8 key again and use the arrow keys to make the selection. Then, press Shift + F8 to toggle off the Extended Selection mode and to move to the next cell you want to add to your selection. Continue doing this same process to select more non-continues cells.
In simple terms, F8 toggles the Selection mode and enables you to make a selection, next, Shift + F8 lets you move to the next cell(s) you want to select, and again, F8 lets you make the next selection.
When the ‘Add or Remove Selection’ mode is activated, you can also use the mouse to make the non-adjacent cell selections.
Selecting Non-Adjacent Cells Using the Name Box
The Name box is located to the left side of the formula bar which normally displays the address of the active cell or group of cells in the worksheet. You can also use the Name box to select non-continues cells.
When you select a cell, the Name box will display that cell address. Also, when you type a cell address/reference in the Name box, it will select that cell.
For instance, let’s assume you want to highlight the following non-adjacent cells and ranges – A5, B2:B10, D5, D7, E2, E10. Here, how you do it:
First, click on the Name Box, and type the cell references or range references that you want to select in the Name Box, separated by comma(,). Then, press Enter.
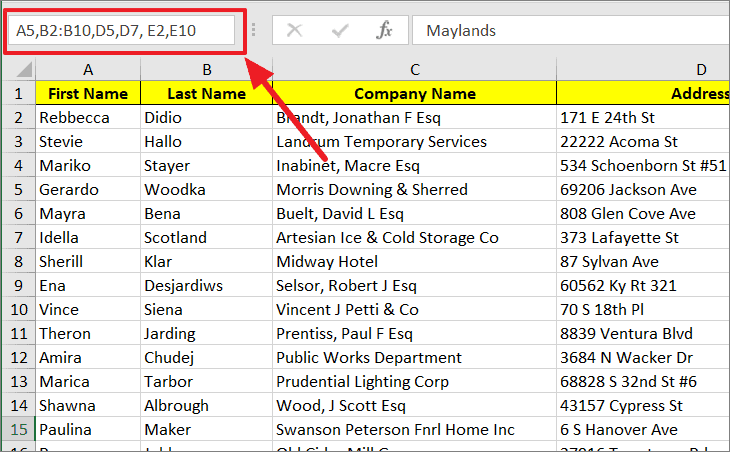
And all your specified cells will be selected, instantly. Also, the Name Box will now show the last specified cell address.
You can type your cell addresses in any order you want in the Name Box.
Selecting Non-Adjacent Cells Using Find and Replace Tool
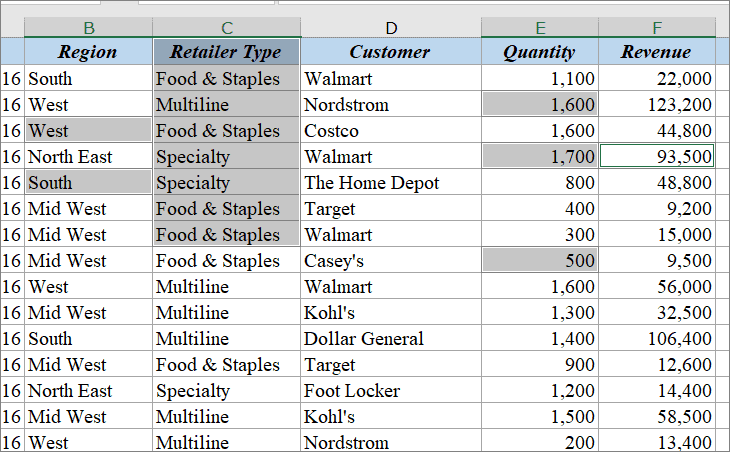
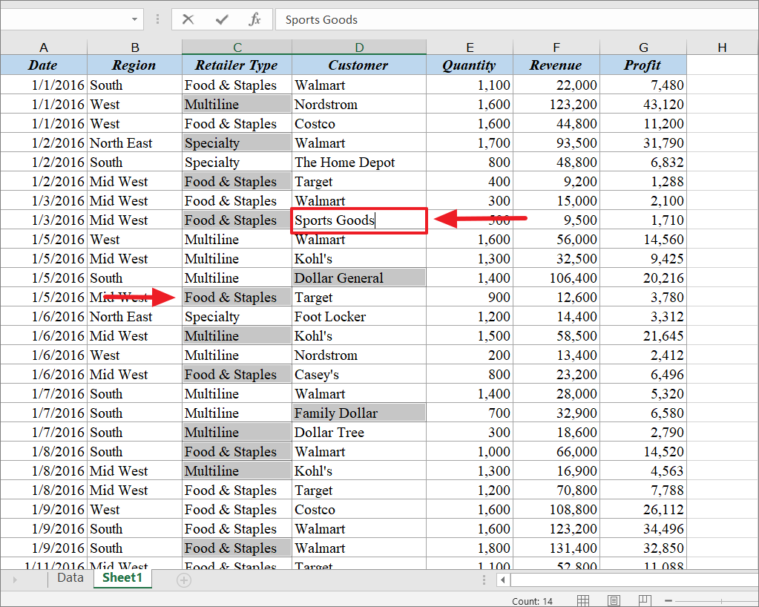
At times, you may need to highlight cells (non-contiguous cells) based on a specific value in them.
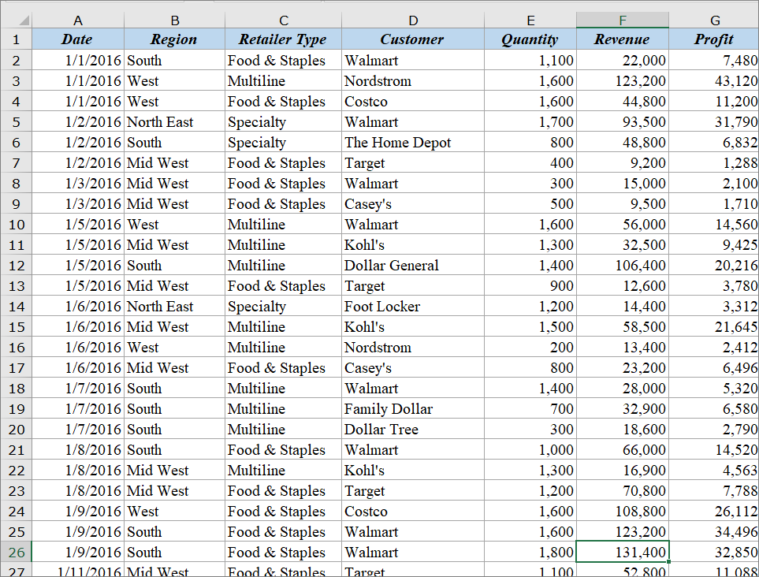
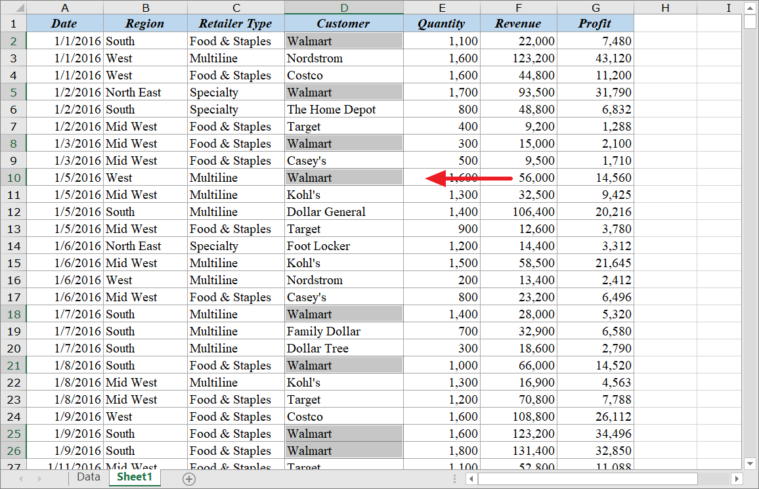
For example, in the below table you have multiple retailer types and you may want to select all the cells that have the retailer type ‘Walmart’. Then, follow these steps:
Select the entire data range or the range in which you want to highlight cells, and then press Ctrl + F. Alternatively, you can also click the ‘Find & Select’ option from the ‘Home’ tab and select ‘Find’.
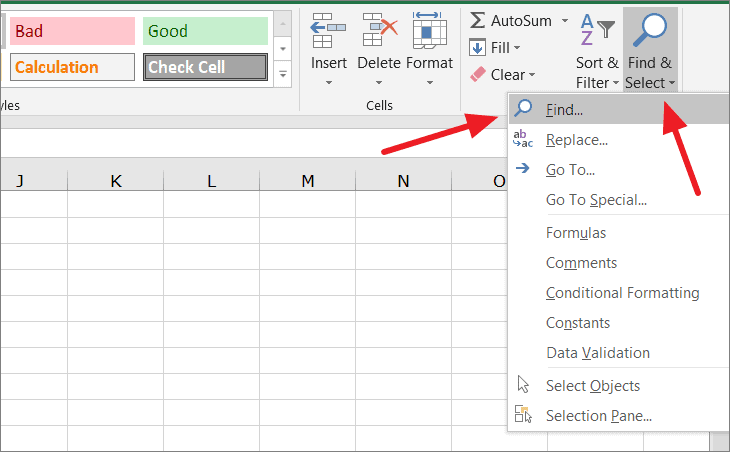
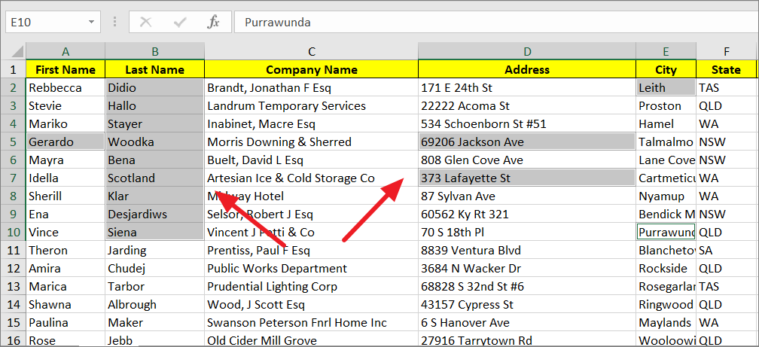
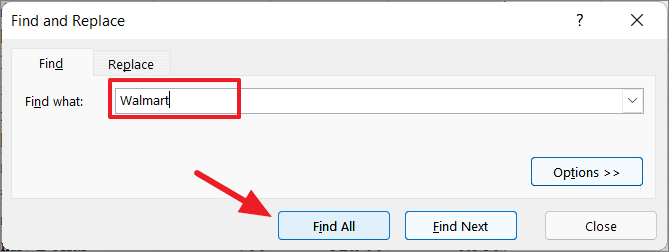
In the Find and Replace dialog, type the value you want to highlight in the ‘Find what’ field. Here, we’re typing “Walmart”. Then, click the ‘Find All’ button.
The box below the Find and Replace dialog will list all the findings that match the keyword (Walmart). Now, simply press Ctrl + A to select all the cells that were found.
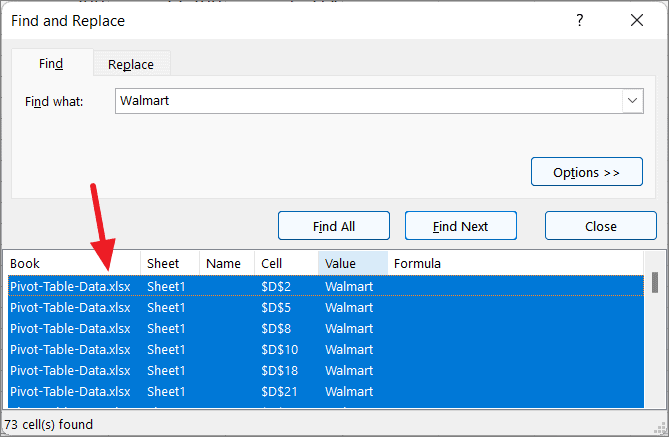
Then, click the ‘Close’ button to close the Find and Replace dialog. Now, you will see all the cells containing that specific word have been selected.
Selecting Non-Adjacent Cells or Columns Using Go To
Another way you can select non-adjacent cells or columns is by using the ‘Go To’ feature.
On the Home tab of the Ribbon, click the ‘Find & Select’ option and select ‘Go To’ or simply press the F5 function key.
Now, you will see the Go To dialog box. In the ‘Reference’ box, type the cell references or range of cells that you want to select, separated by a comma. Then, click ‘OK’ or just hit Enter.
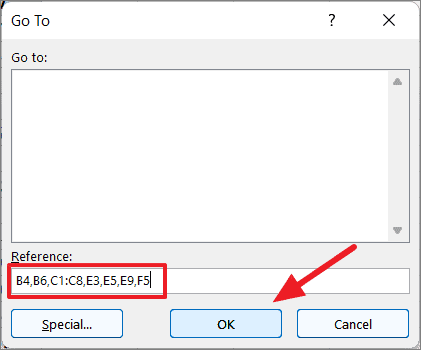
This will highlight the specified cells.
Just like in the Name Box method, you can type the addresses in any order you want. You can also select separate cells, ranges, rows, and columns together.
After selecting the cells, you can change, edit, or format these cells.
Entering Data in Non-Adjacent Cells Simultaneously
Most of the time, you select multiple non-contiguous cells to enter a value or replace a value in them. This way you can enter the same value in multiple cells simultaneously. You can do this with a simple keyboard shortcut. Here’s, how:
First, select the non-adjacent cells you want to populate with the same data using any of the above methods.
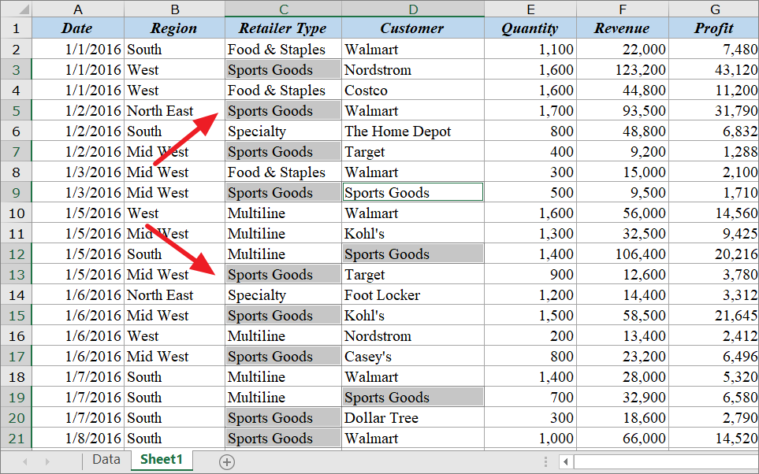
Once the cells are selected, start typing the value (e.g. Sports Goods) into any of the selected cells.
After the entering value, press Ctrl + Enter, instead of just Enter, and all the selected cells will be entered with the same data, simultaneously.
This method can be used to enter text, numbers, values, and formulas.


