The camera on iPhones has always been great, despite what the dissenters say. But the camera on the Pro series has taken it up several notches. However, figuring it out can be overwhelming, especially if you’re upgrading from an older model that had a simpler camera system to the Pro series or if you’re entirely new to an iPhone.
So, to enable you to utilize your iPhone 14 Pro or Pro Max’s camera to its full potential and take the best shots possible, we’ve compiled this guide.
iPhone 14 Pro Camera at a glance
Before we get on to the business of using the camera, let’s have a look at everything it has to offer.
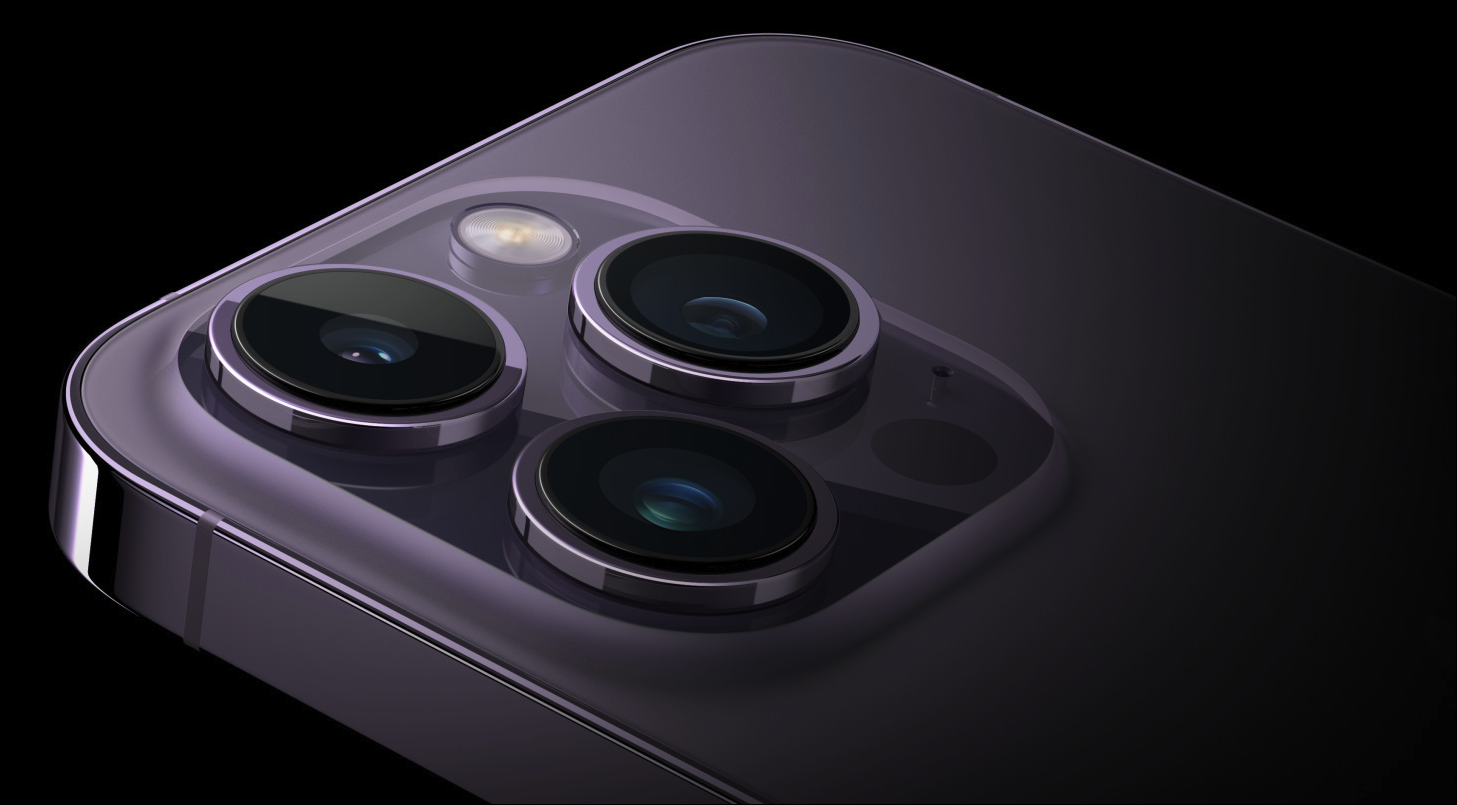
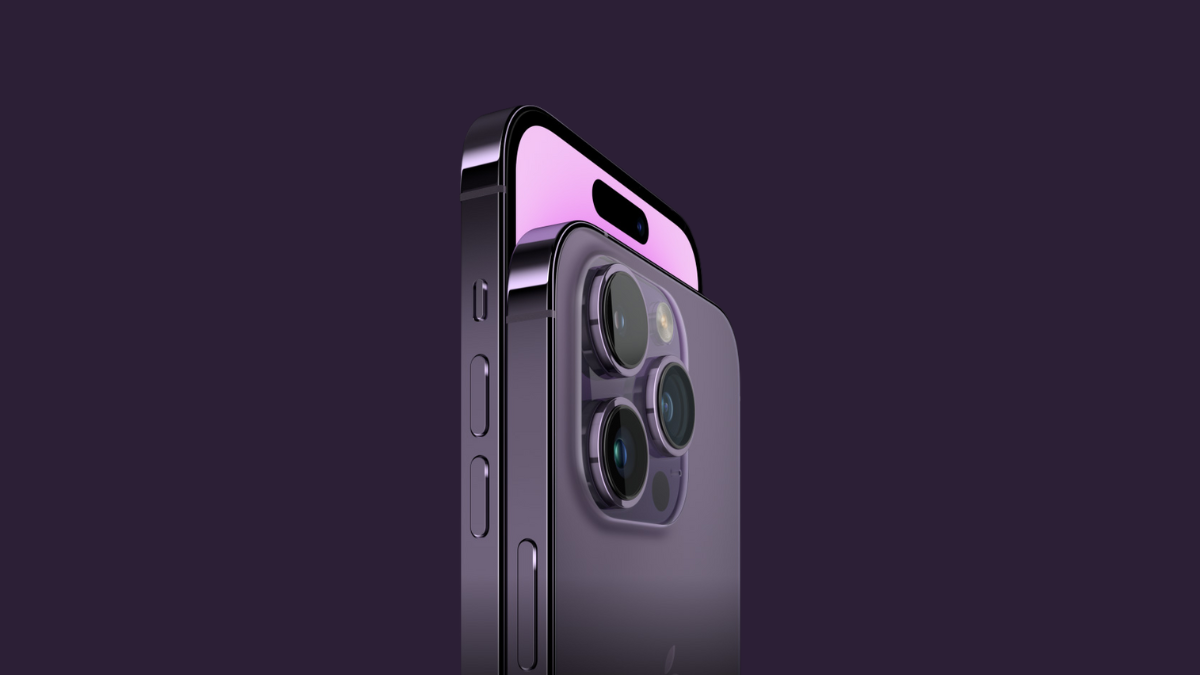
The iPhones 14 Pro and Pro Max have three main cameras at the back:
- The 48 MP Main Camera
- The 12 MP Ultra Wide Camera, and
- The 12 MP Telephoto Camera
With the Phone 14 Pro series, Apple has made considerable changes to the camera system and introduced a 48 MP camera with an advanced quad-pixel sensor for the first time. Notably, iPhone 13 Pro had a 12 MP main camera, as did its predecessors.
With up to 4x more resolution, iPhone 14 Pro can deliver mind-blowing details when you crop the photo. It’s not just a phone for hobbyists but also for serious photographers with ProRAW.
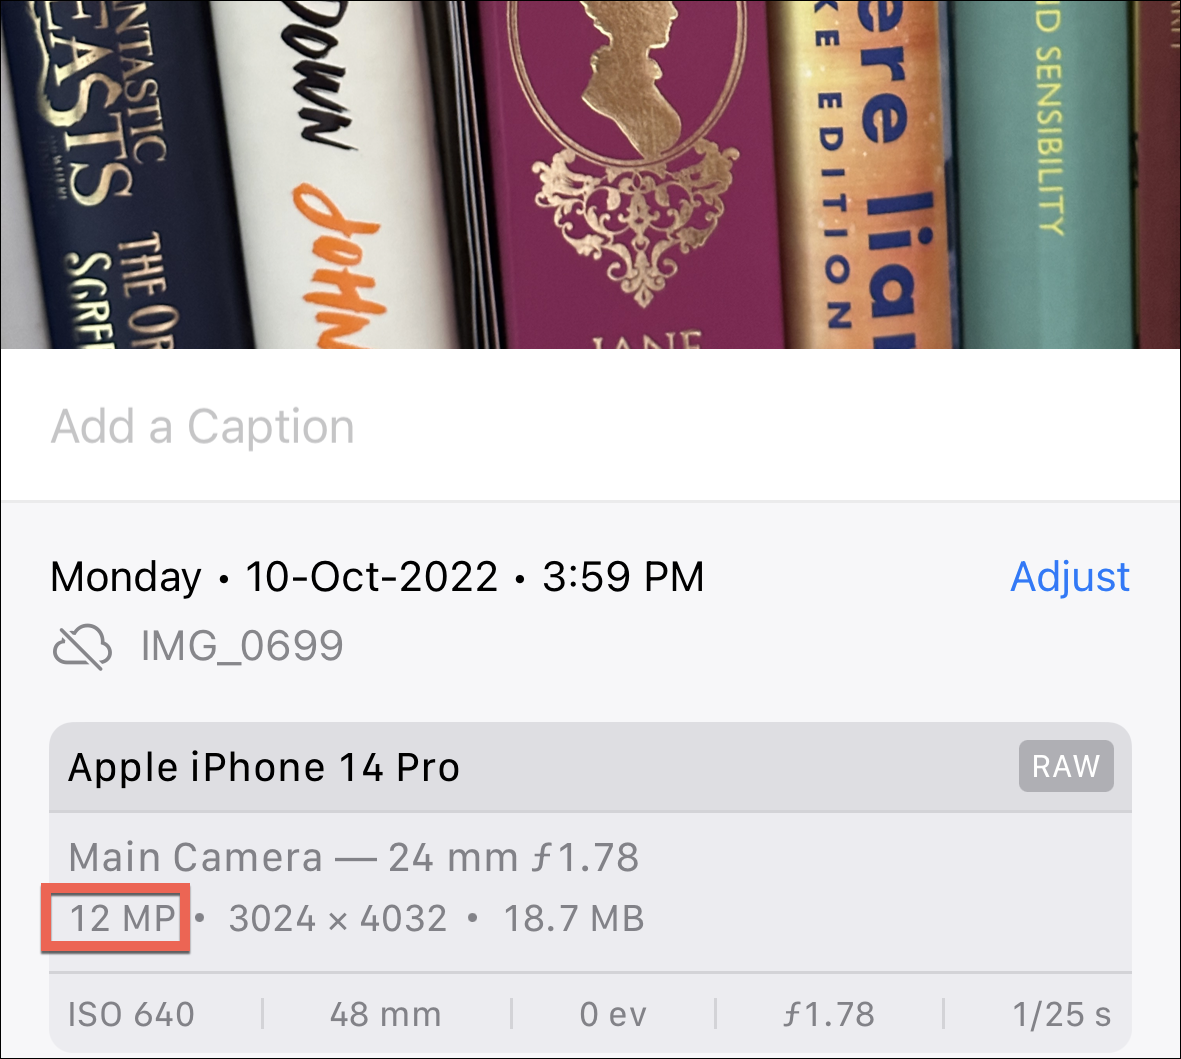
Now, for most users, the phone will shoot at the practical 12 MP size, by grouping 4 pixels together into one large quad pixel – a process called pixel binning. But with the increased sensor size, it can capture 4x more light than the 12 MP photos shot on earlier phones. For comparison, the sensor on 14 Pro is 65% larger than the one on 13 Pro.
Now, while it optimizes most photos for light capture, you can optimize for detail whenever you want by shooting in ProRAW at 48 MP. In this case, instead of pixel binning, the sensor uses each individual pixel.
There’s also the addition of the 2x Telephoto optical zoom to the camera this year. Apple had dropped the 2x zoom for Portrait mode and other stuff in the 13 Pro lineup which only offered 3x zoom for other modes. But that’s changed with 14 Pro. And it’s again because of the quad-pixel sensor that you can have full-resolution photos and 4K videos without digital zoom at 2x. The quad-pixel sensor uses the middle 12 megapixels to create the 2x Telephoto, in addition to the three fixed lenses of the camera system.
So, that gives users the zoom optical zoom options of 0.5x, 1x, 2x, and 3x. The 2x telephoto works in Portrait mode, Time-Lapse, and Pano, in addition to normal photo and video modes.
Other than the optical zoom, you also have a digital zoom of up to 15x on the iPhone 14 Pro.
Apple has also considerably improved low-light photography with the new camera system. And the improvements aren’t limited to the Main camera only. iPhone 14 Pro can now take 3x better low-light photos with the Ultra-Wide Camera, and 2x better on the Main and Telephoto camera.
While it’s largely in part because of the larger sensors that can capture more light, there are other factors at play here as well. We’re talking about the all-new Photonic Engine. You would have heard these words everywhere. Exactly what is it? It’s the newest image pipeline process that leverages both the hardware on 14 Pro models and the software in iOS 16.
Photonic Engine allows Deep Fusion to happen earlier in the imaging process while the images are still uncompressed, hence delivering extraordinary details, like images with brighter and better colors, even in low light.
14 Pro also sports an improved and adaptive True Tone flash. The pattern and intensity of the nine LEDs are adjusted in a manner so that the subject always appears in the best light.
There are also improved video capabilities than last year. The cinematic mode can now shoot in 4K HDR at 24 fps on your 14 Pro models. On the 13 Pro series, where Cinematic mode was introduced for the first time, the resolution was capped at 1080p at 30fps.
It also has the new Action mode, which you can find on the entire iPhone 14 series. Action Mode stabilizes the shots when you’re filming while moving – whether it’s from a moving car or running after your subject.
And let’s not forget the TrueDepth front camera which can also take 2x better low-light photos than before.
Now that we’re all caught up, let’s get going!
Using the iPhone 14 Pro Camera
Taking photos has become a part of most people’s day-to-day activities. Whether you’re on vacation or simply snapping photos of your coffee for the gram, you’ll take out the phone in your pocket. Here’s a simple guide that’ll let you master that device to take your best shots.
Getting the Basics Down
While you might already know how to use the basic functions of the iPhone 14 Pro Camera, we’ll do a quick refresher, just in case. If you already know your way around iPhone’s camera, feel free to skip to the next section.
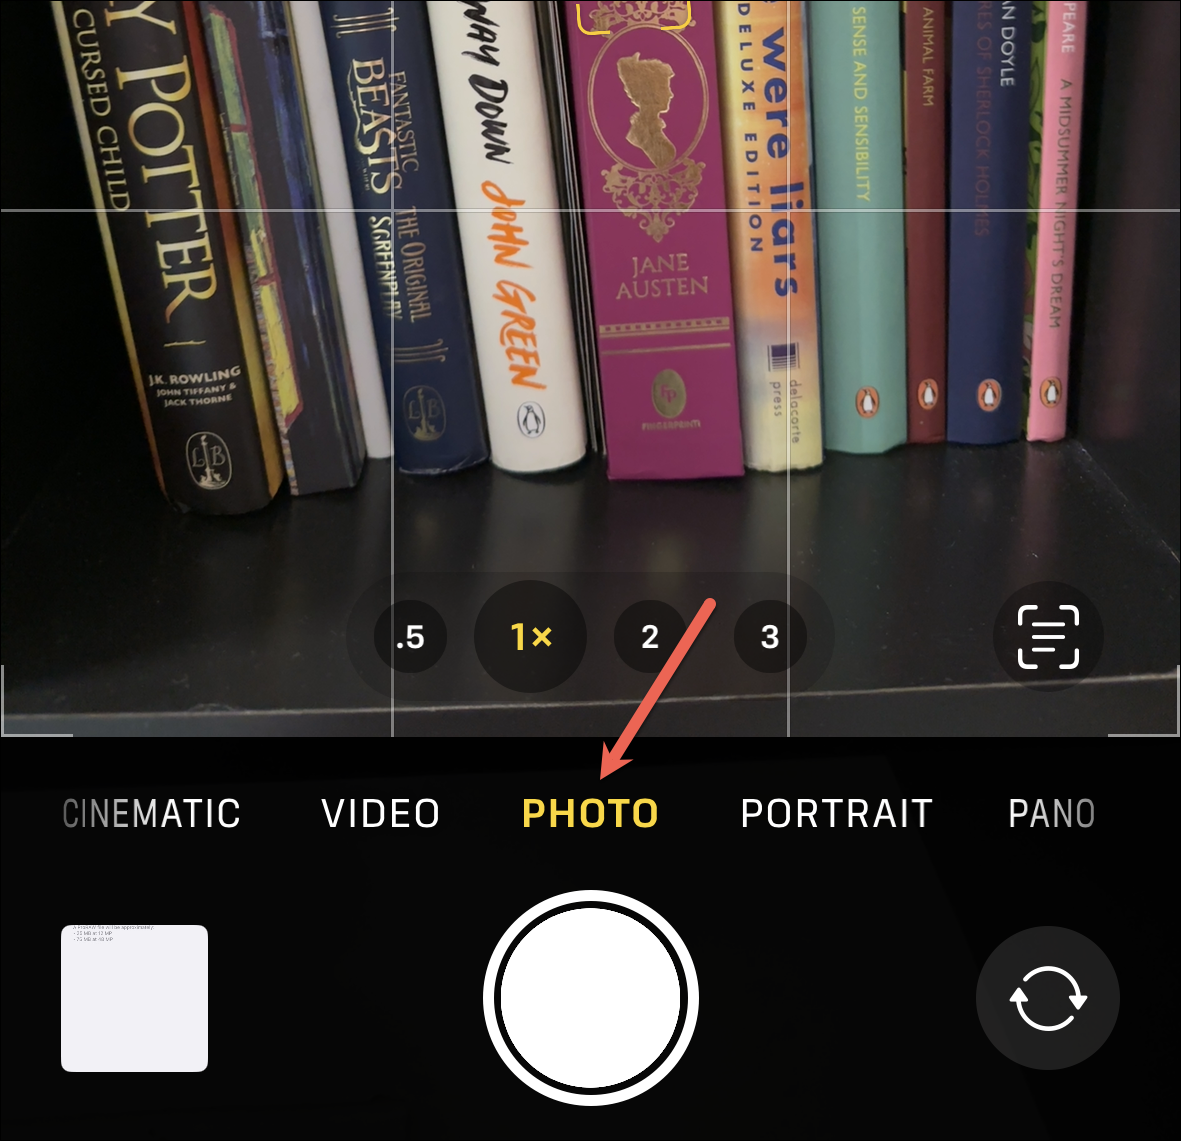
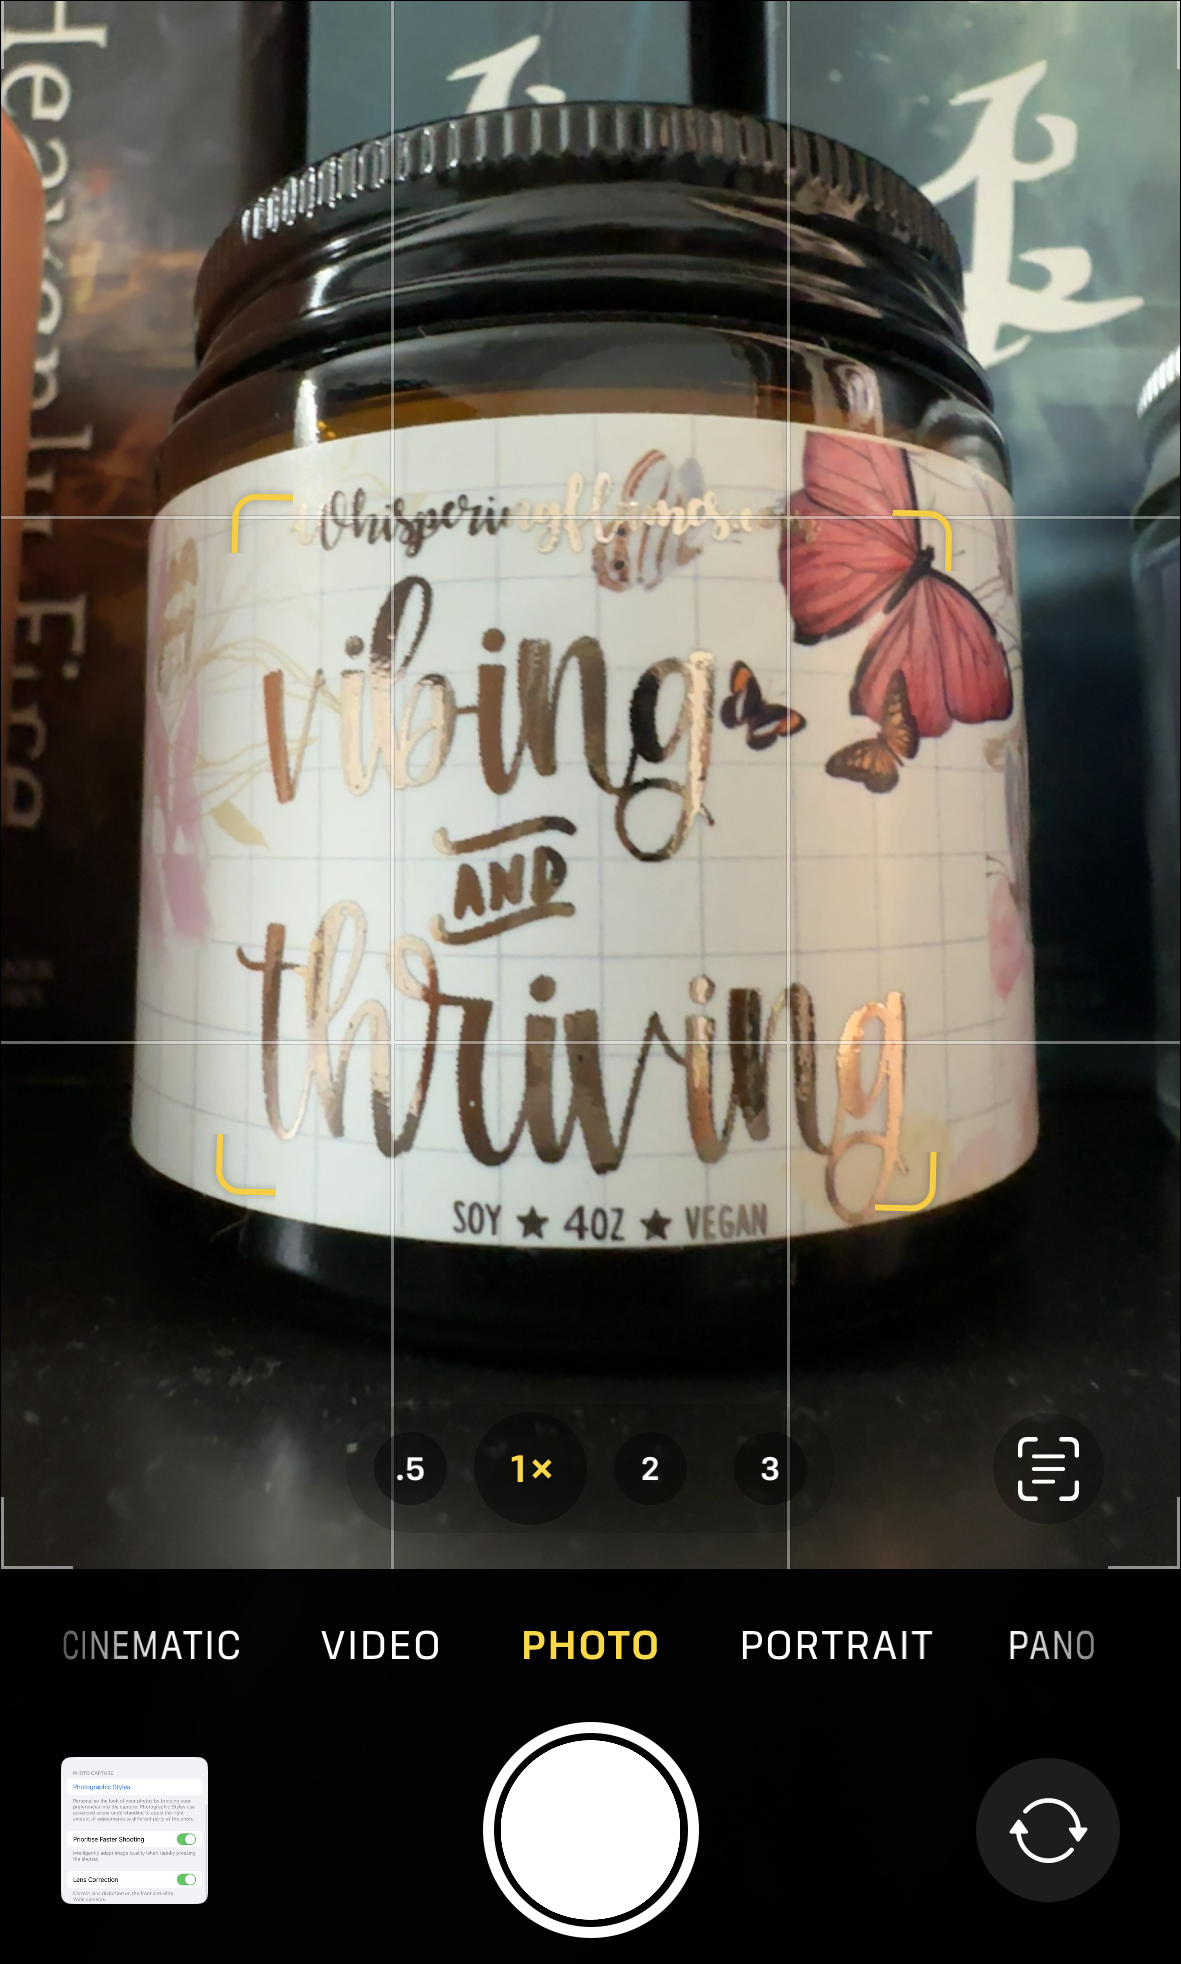
Open the native Camera app on your iPhone. If you haven’t preserved the settings, it’ll always open in the ‘Photo’ mode in the rear-camera view.
You can tap the Shutter to take a photo. You can also use either of the Volume buttons to take a photo. Using the volume buttons to take the photo can save it from being blurry when reaching the shutter is hard, like when you’re taking a selfie sometimes.

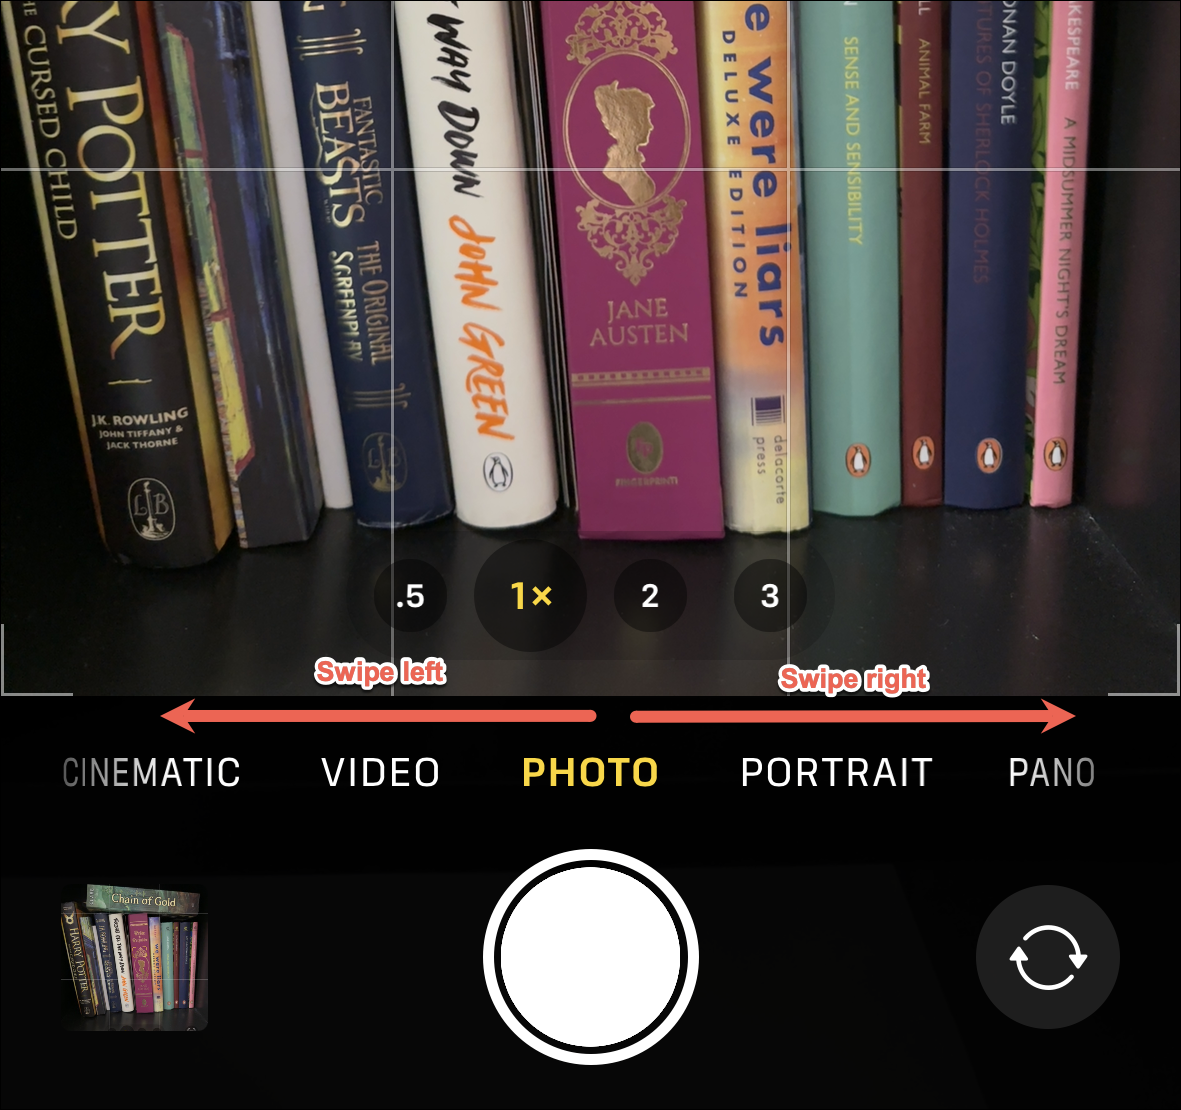
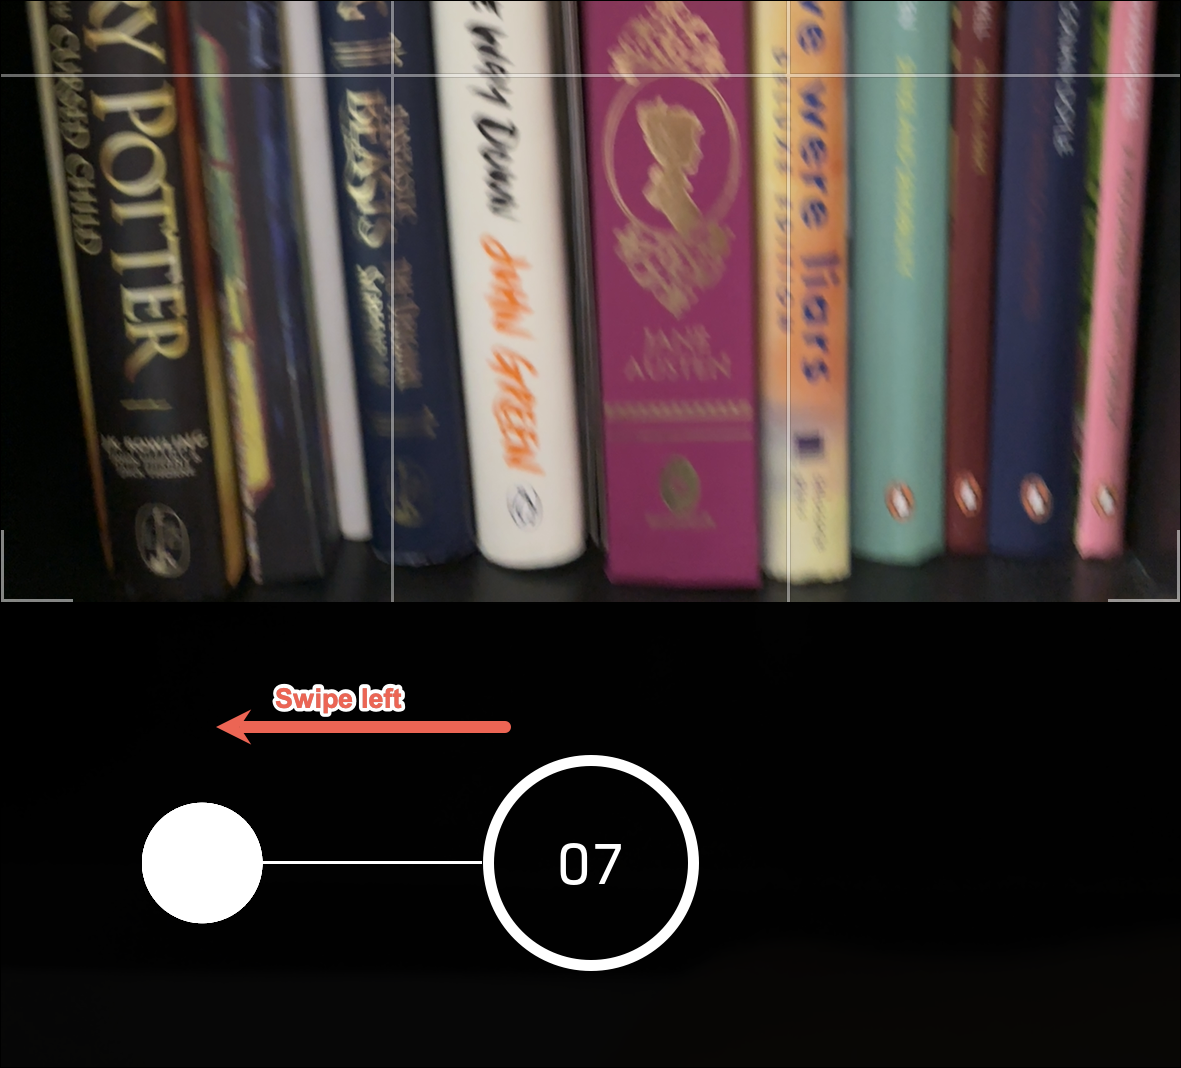
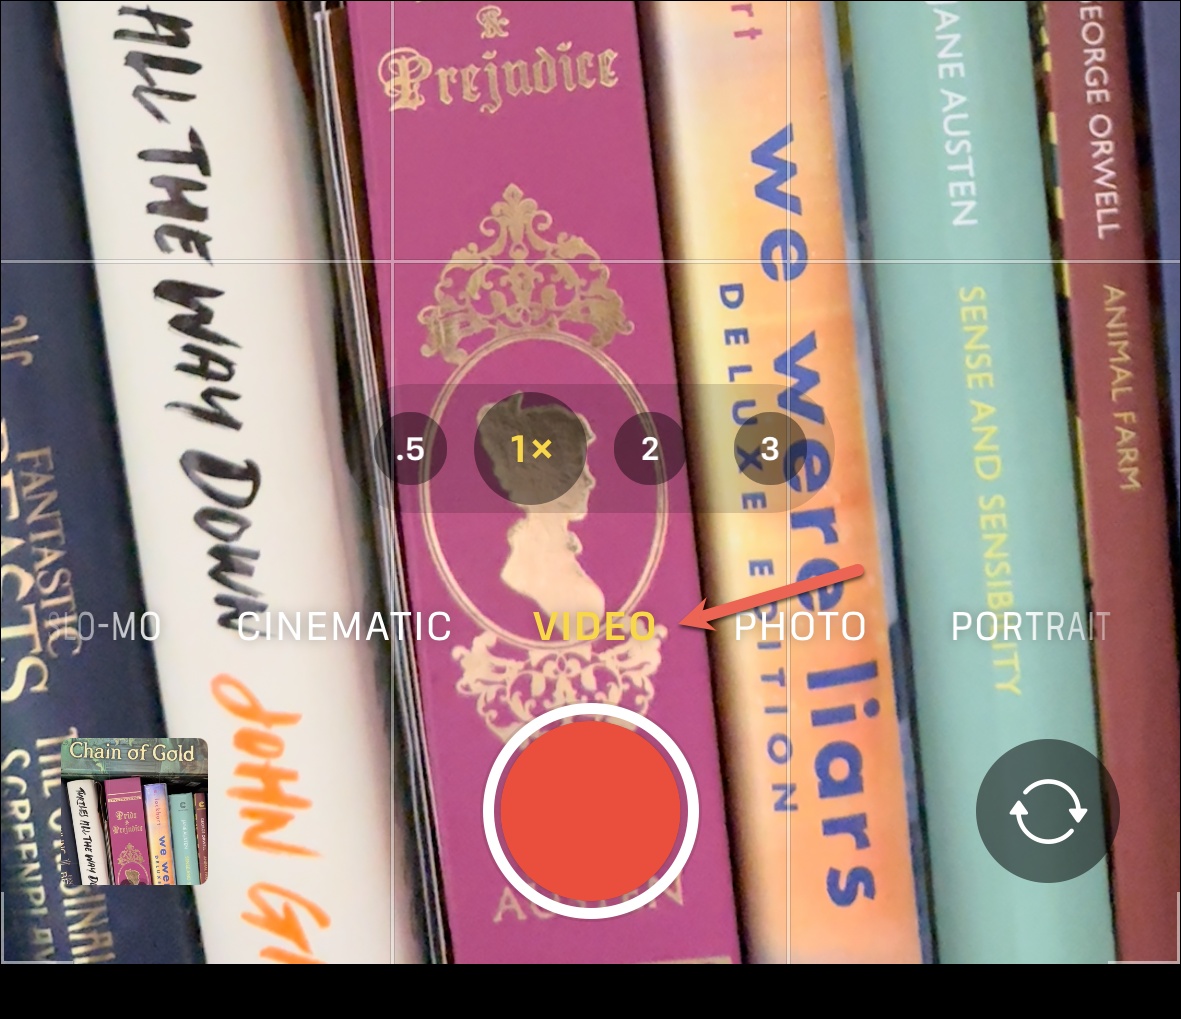
To switch between different modes like Video, Portrait, Pano, Slo-mo, Time-lapse, or Cinematic, swipe left or right. Swipe right to access video recording modes and left to access photo modes like Portrait and Pano.
You can also take a video by holding down the shutter in the Photo mode. Releasing the shutter will stop the recording. If it’s a longer video, swipe to the right so you can go hands-free.
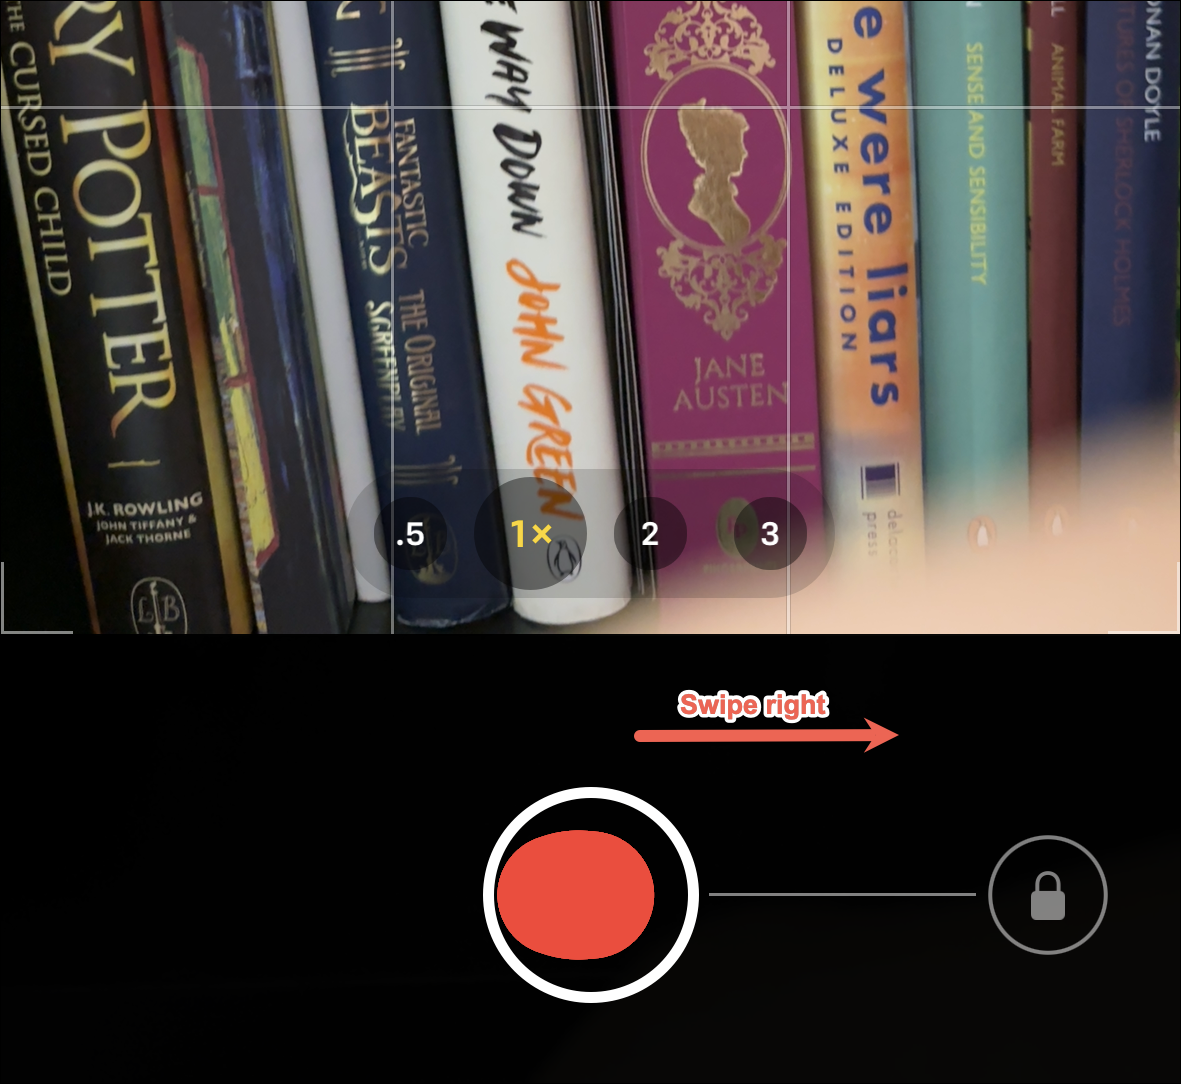
Here’s a tip for you. Recording a video by using this method won’t stop any music playing on your iPhone. You can also hold down either of the volume buttons to record a video, but you have to keep pressing it.
If you want to take burst photos, swipe the camera shutter to the left.
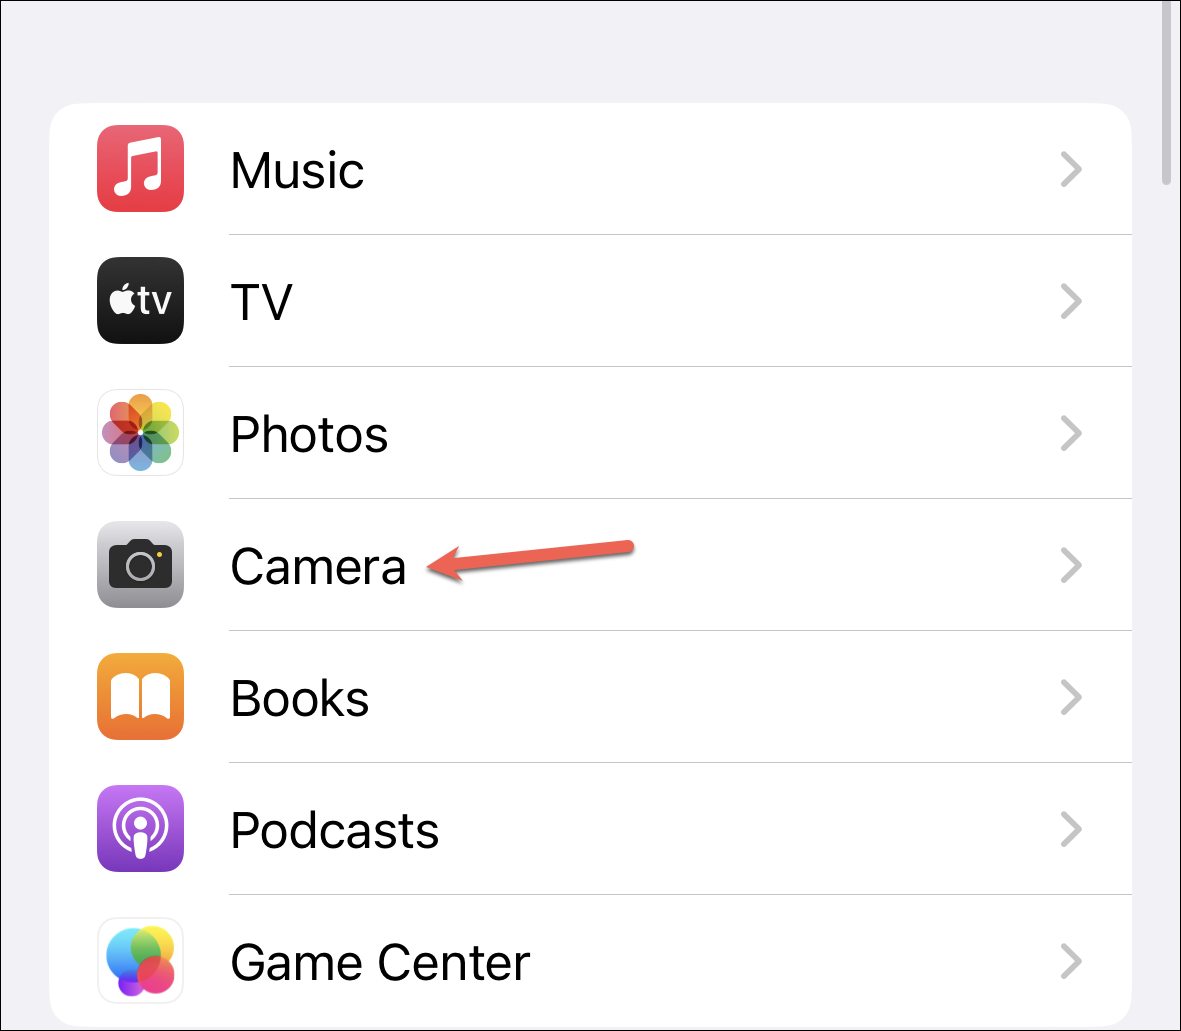
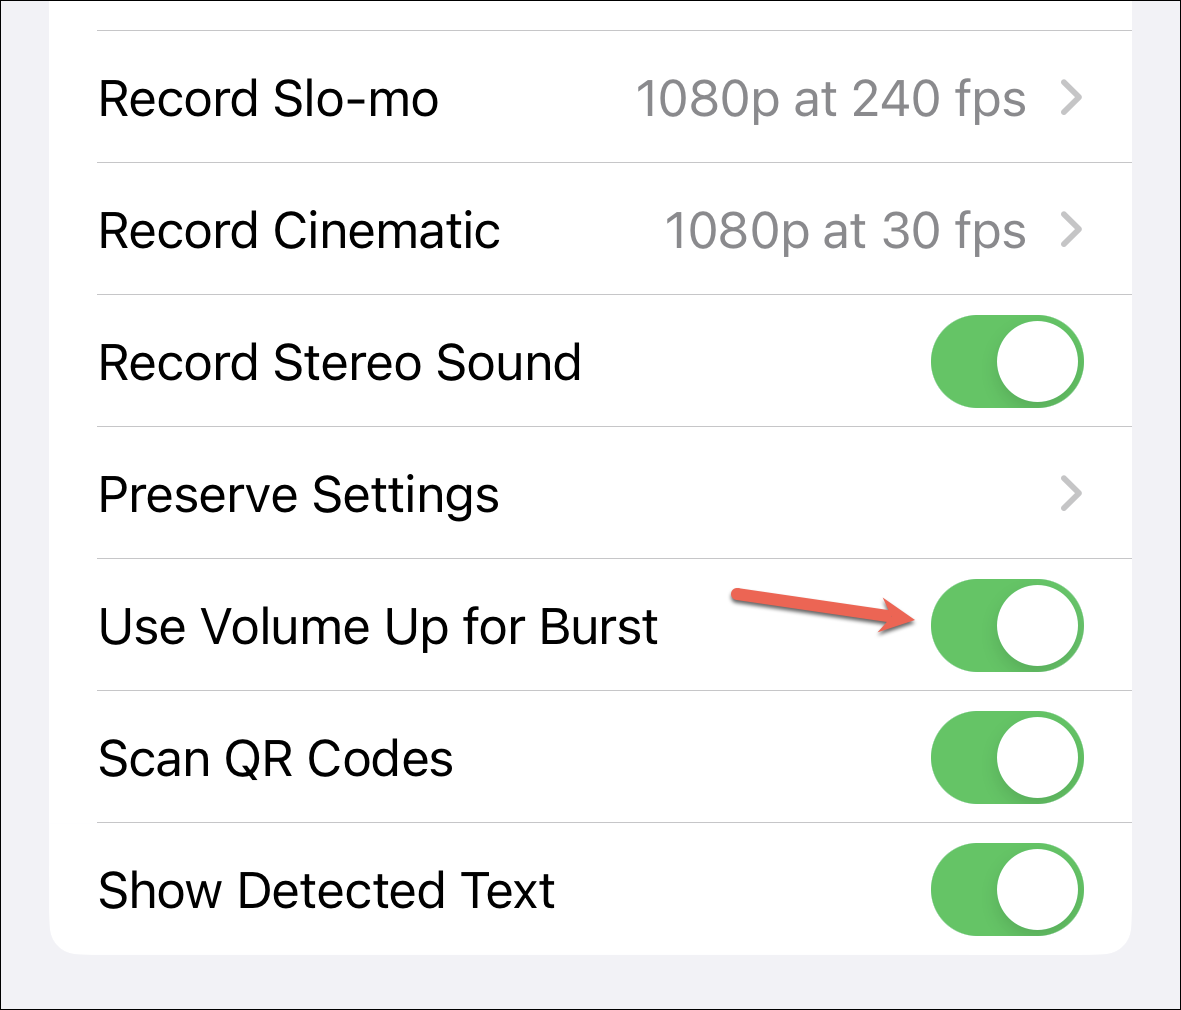
You can also use the volume button for taking bursts by configuring it in settings. Open the Settings app and go to ‘Camera’.
Then, enable the toggle for ‘Use Volume Up for Burst’.
You can access the other controls like Flash, Night Mode, Live Photo, Photographic styles, aspect ratio, exposure, timer, and filters, by tapping the ‘caret’ icon on the top. Options for Live Photo, Flash, and Night Mode are also available on the top of the screen, but all others can only be accessed from the caret menu.
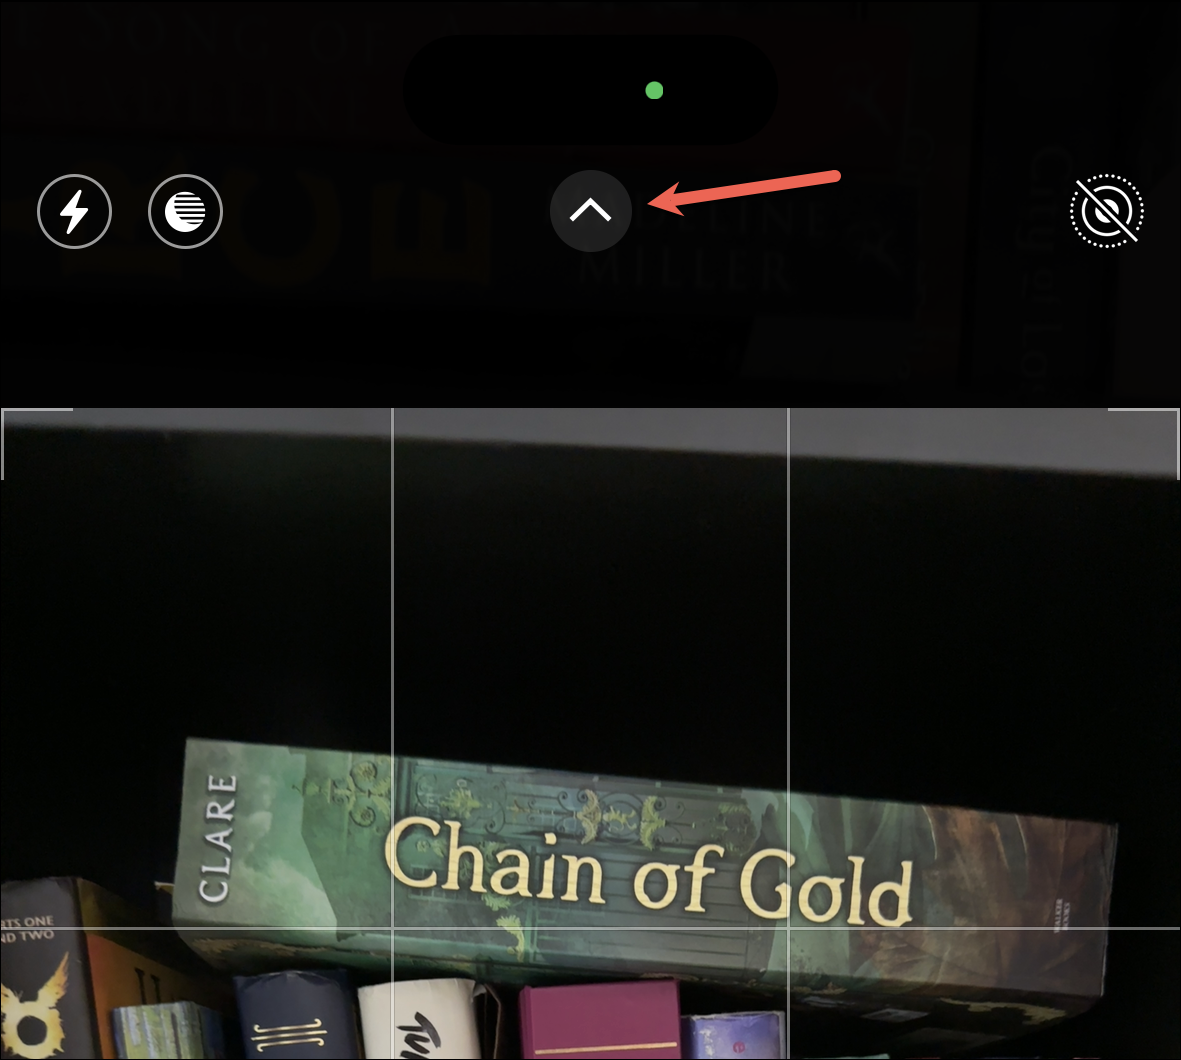
These controls will appear above the camera shutter. Swipe right on them to access all camera controls.
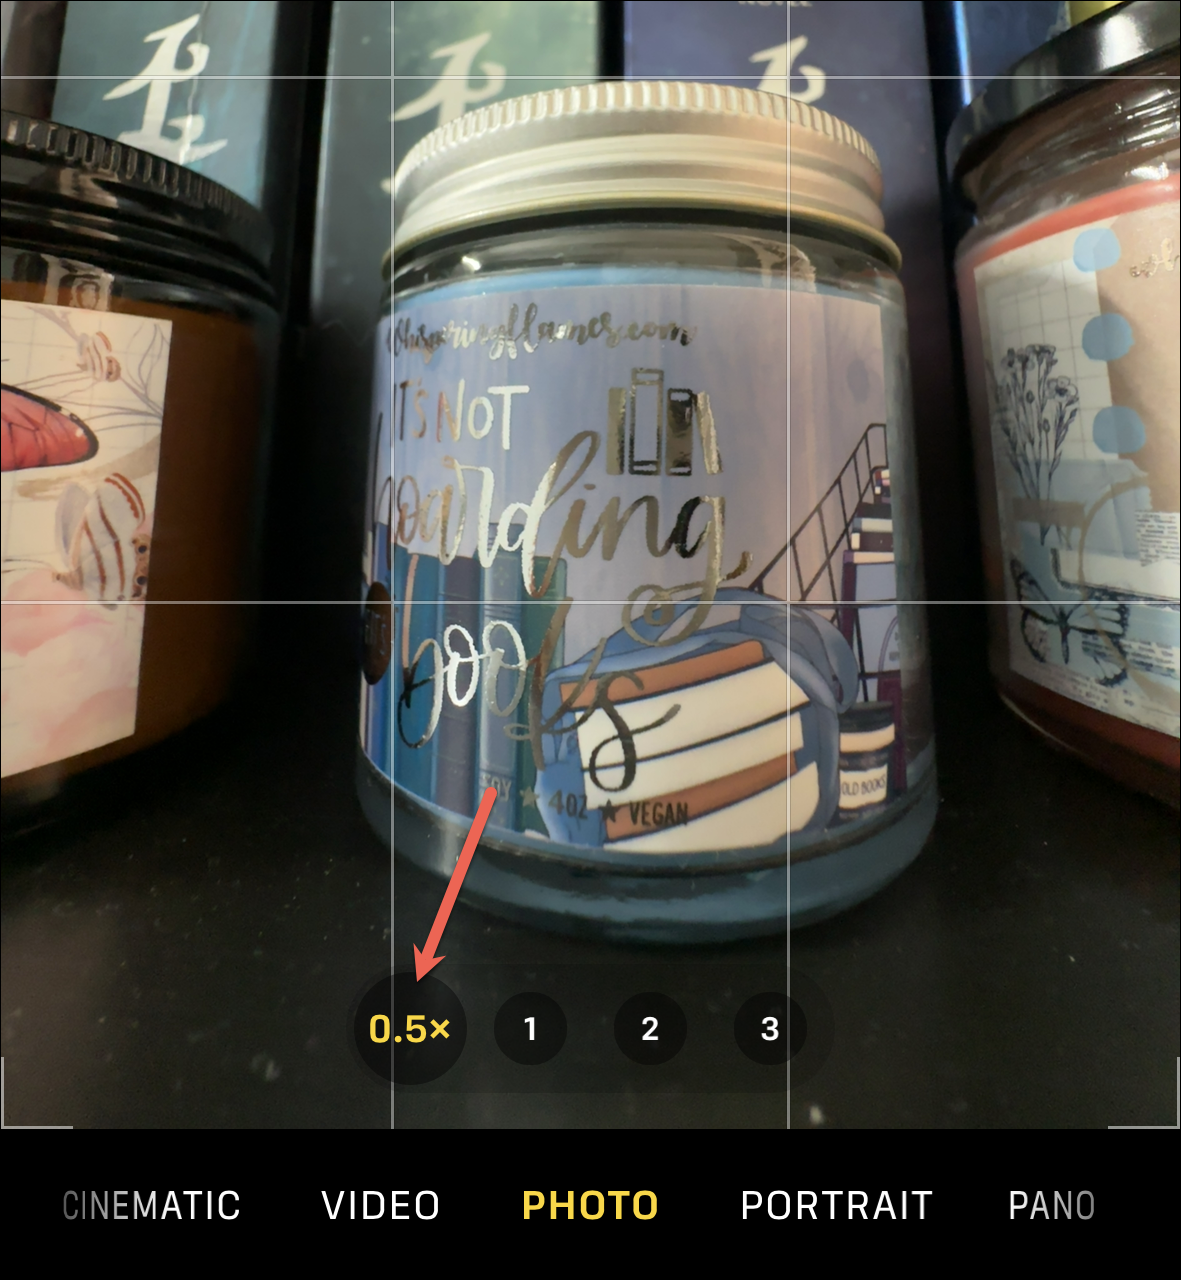
Using the Zoom
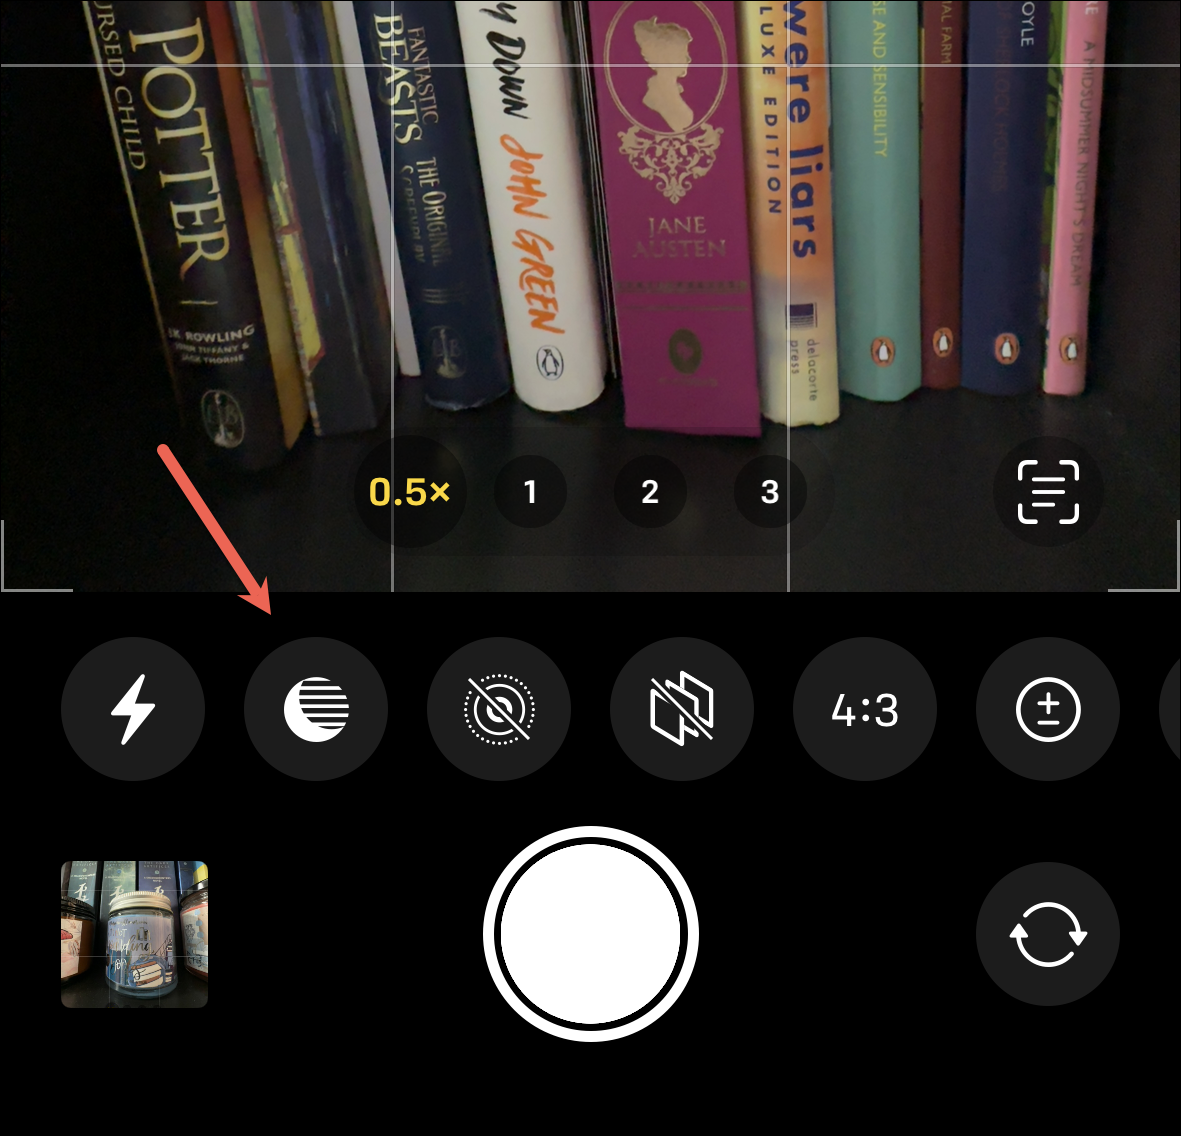
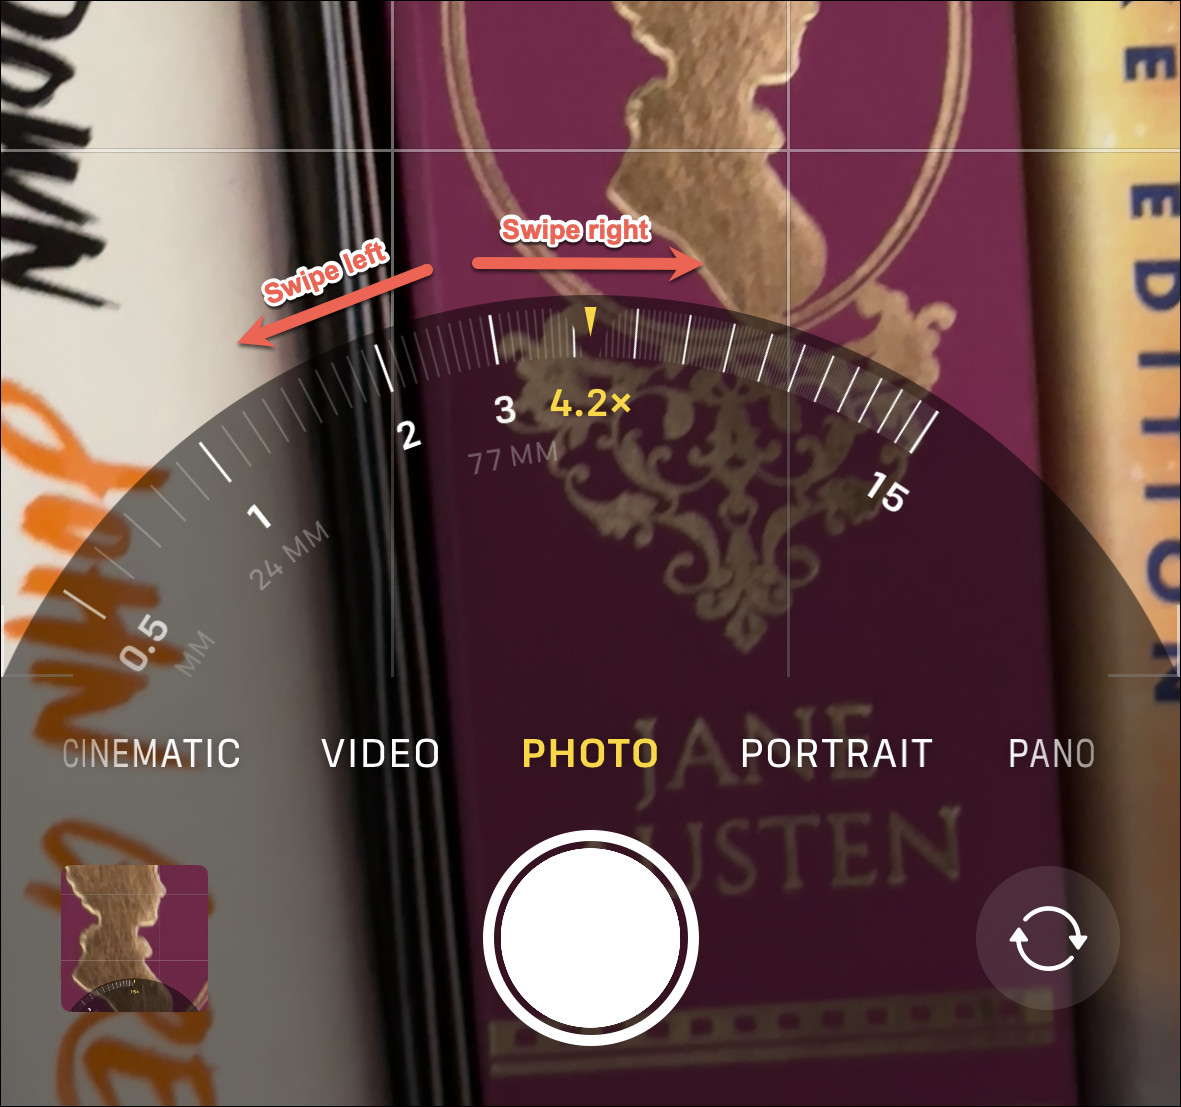
As explained above, you can use up to 4 optical zoom options on the iPhone 14 Pro camera: 0.5x zoom that uses the Ultra Wide camera, 1x zoom and 2x Telephoto zoom that use the Main camera with the quad-pixel sensors, and 3x zoom that uses the fixed Telephoto lens.
To switch between these optical zoom levels, tap the circular indicators above the shutter button.
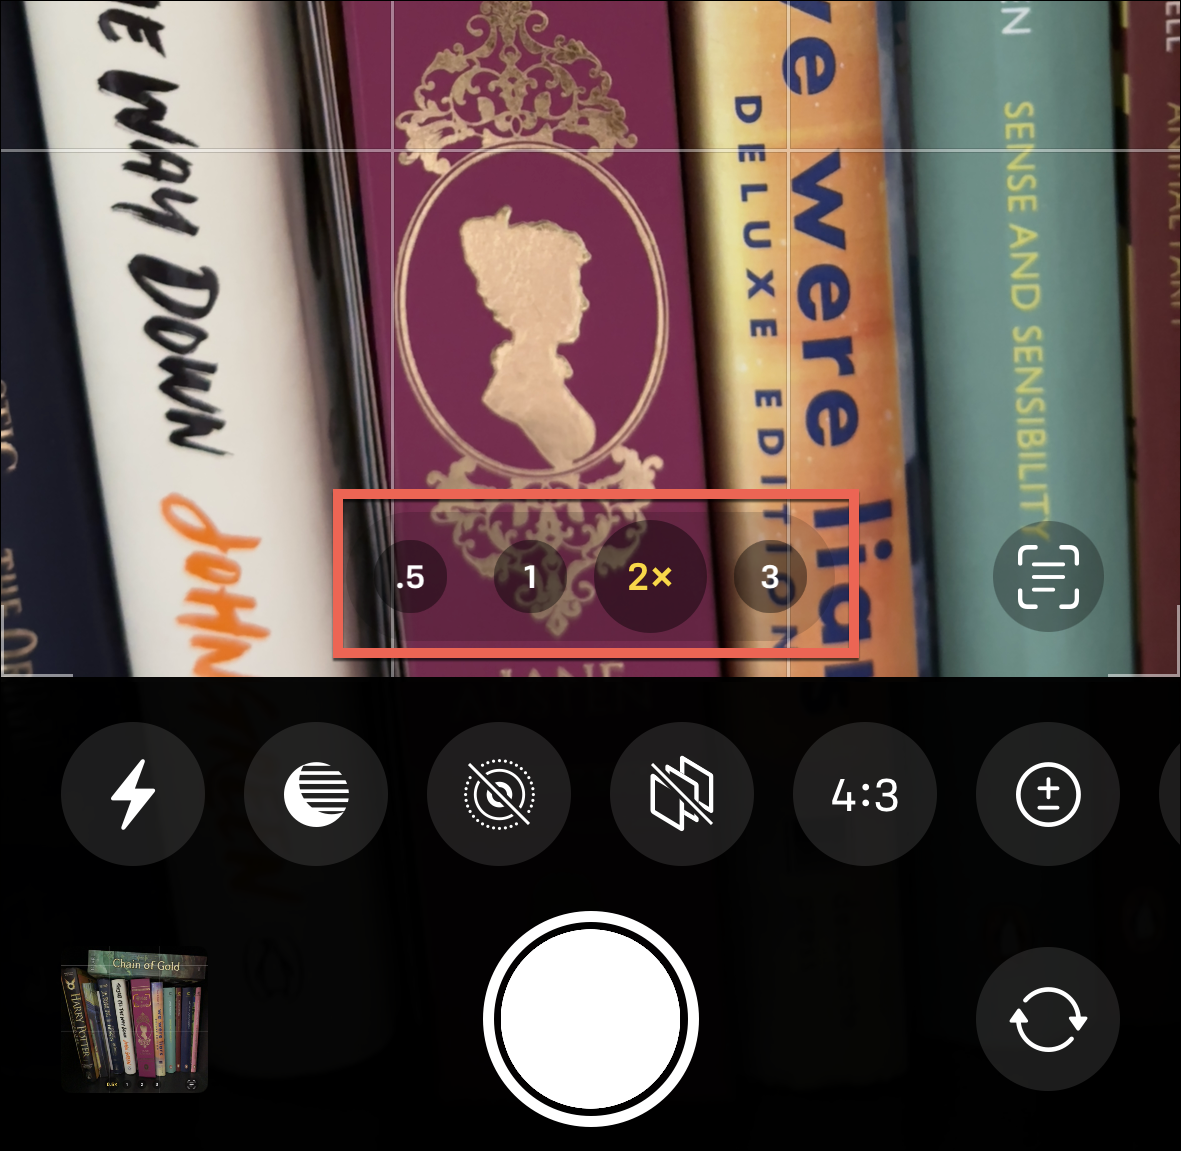
You can also zoom digitally up to 15x. Digital zoom crops the photo instead of adjusting the optics, hence yielding lower-resolution photos than optical zoom. But since options for optical zoom are fixed and limited, they offer additional flexibility. Hold any of the circular zoom indicators at the bottom and slide your fingers left or right on the zoom slider.
Taking a Macro Shot
You can also indulge in some macro photography on your iPhone 14 Pro. The feature was introduced with iPhone 13 Pro, and you can take some stunning photos using it. Whether you’re into nature photography or need to capture jewelry, candles, or other product closeups for your business, it can produce incredible photos.
Taking a Macro shot is easy. All you have to do is move closer to the subject and the view automatically switches from the main camera to the ultra-wide.
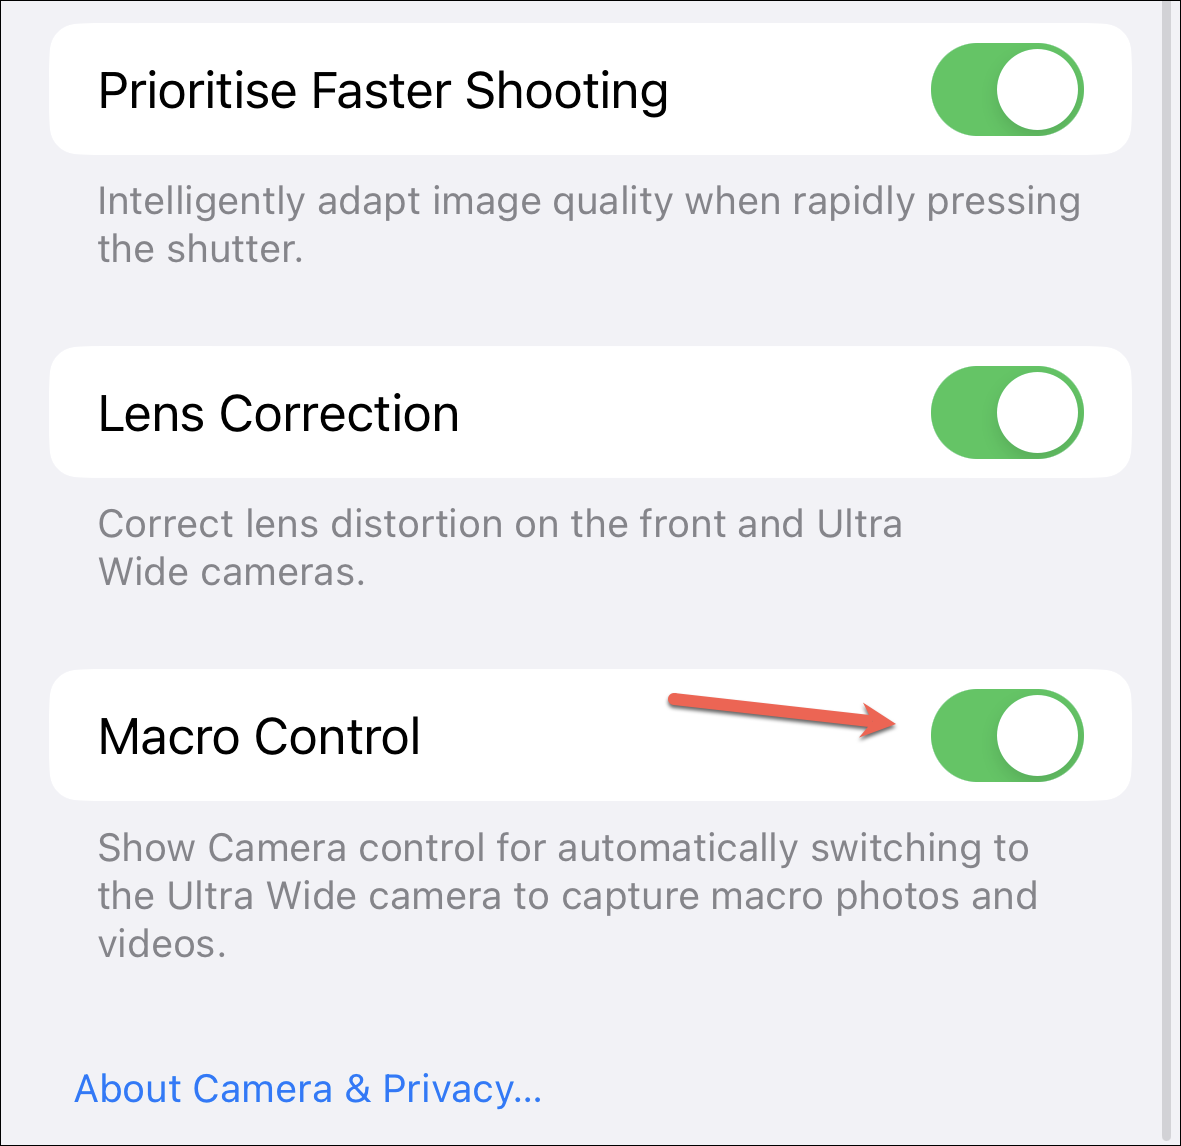
You can also enable Macro Controls so whenever you’re switching to the Macro camera, you’ll know and even turn it off.
Go to ‘Camera’ from the settings app. Then, turn on the toggle for ‘Macro Control’.
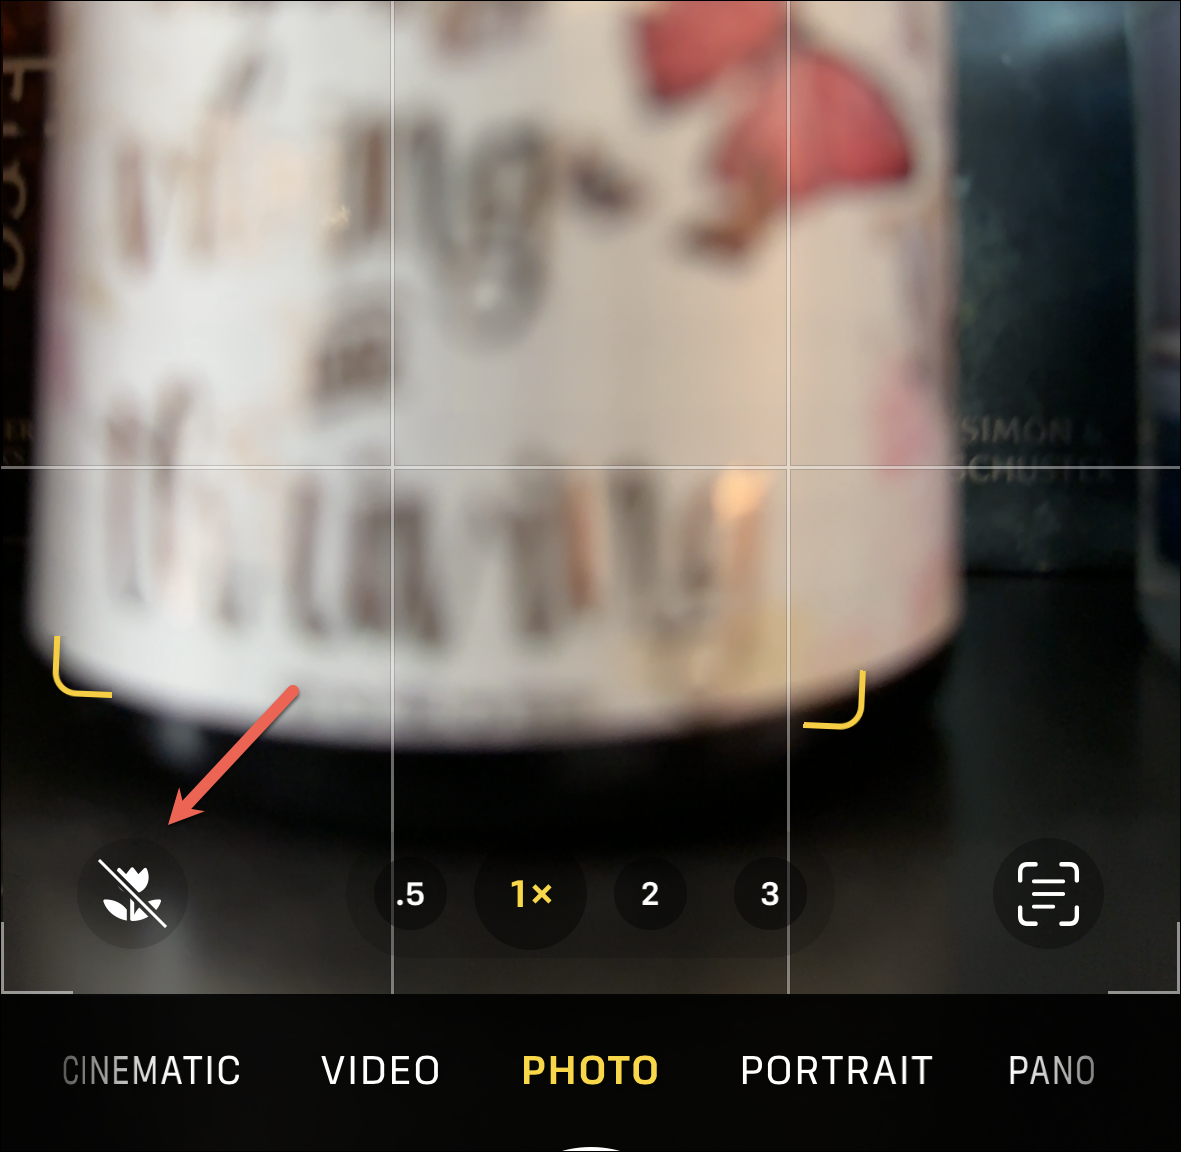
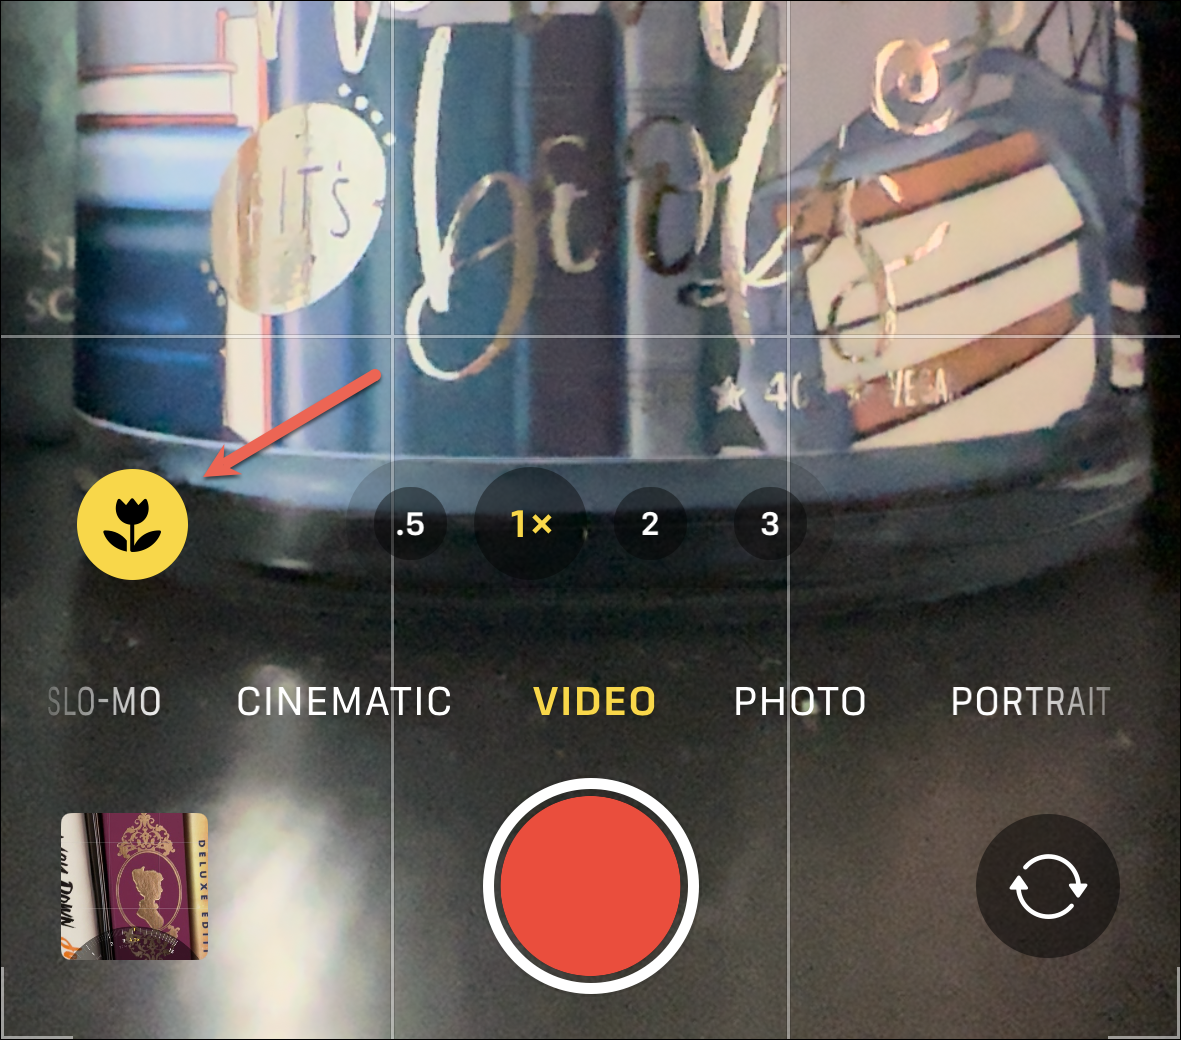
Now, when you’re switching to a Macro Shot, a Macro indicator button in form of a tulip will appear in the bottom left.

You can even tap it to turn off macro and return to the standard camera, which won’t be able to focus at such close angles, though!
You can also shoot videos in Macro in a similar manner.
Forcing Ultra-Wide View with Macro:
When you’re taking a macro shot, your iPhone automatically switches to the Ultra-wide camera, but it still uses the same view as the main camera by cropping the view. But if you want, you can use the ultra-wide view while getting a close-up. Tap the 0.5x zoom option above the shutter.
Using the 48 MP Camera with Apple ProRAW
One of the most exciting features of the iPhone 14 Pro camera system is the inclusion of the 48 MP sensor. But as we explained above, iPhone 14 Pro uses pixel binning to convert 48 MP photos to 12 MP photos. But if you want, you can take 48 MP photos using the Apple ProRAW format.
Apple introduced ProRAW a couple of years back with the iPhone 12 Pro series. Apple ProRAW combines the information of the RAW format with iPhone image processing. This gives you photos where you can exercise greater creative control when editing the exposure, color, and white balance of the photo.
But by default, ProRAW is disabled and you have to first enable it from the camera settings to use it. It makes sense since ProRAW photos are 10 to 12 times larger than normal HEIF or JPEG files and an average user doesn’t need to shoot in this mode.
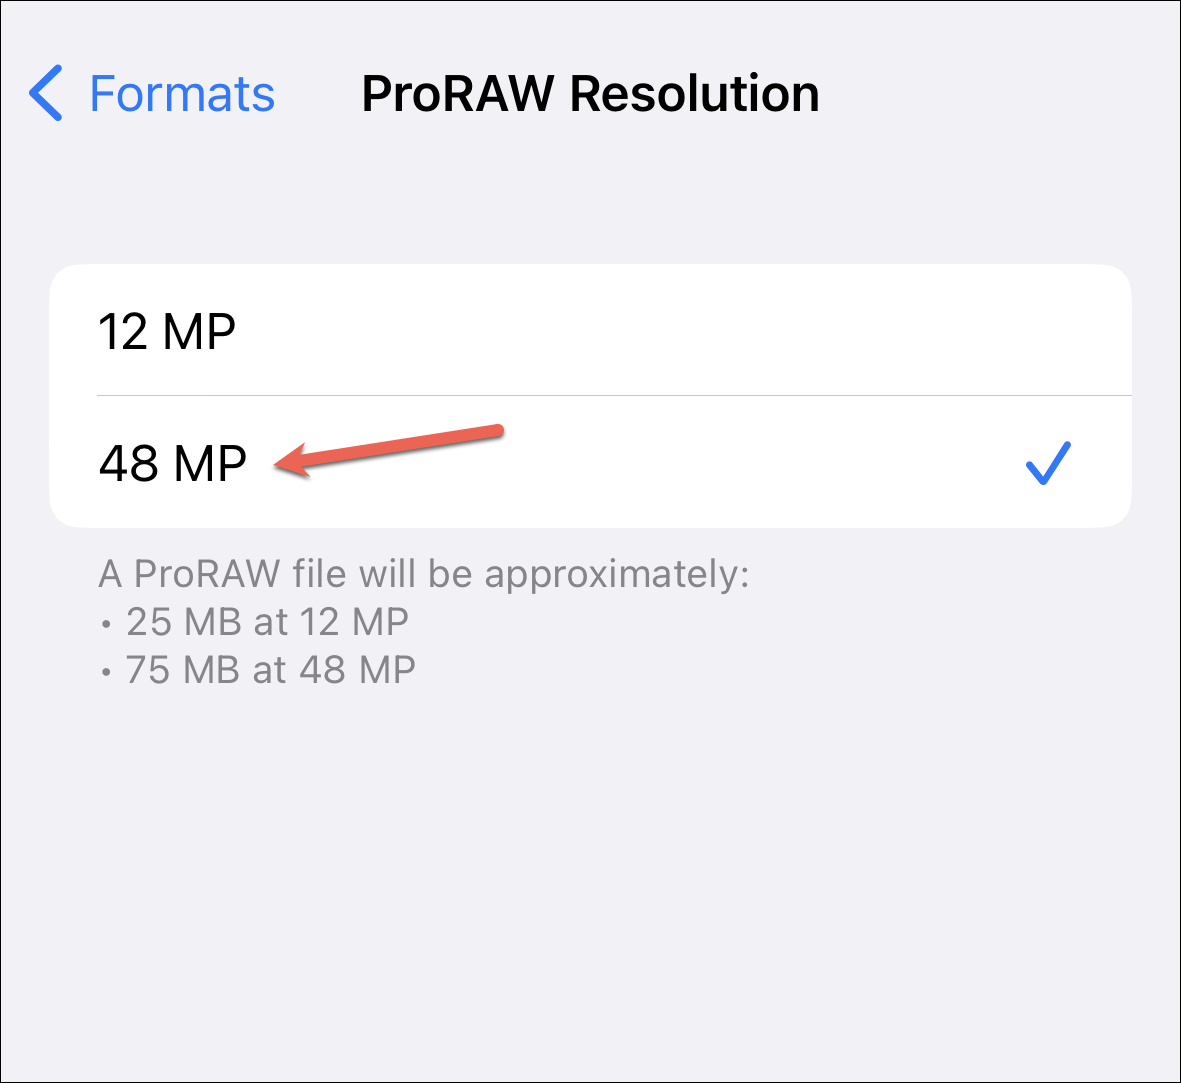
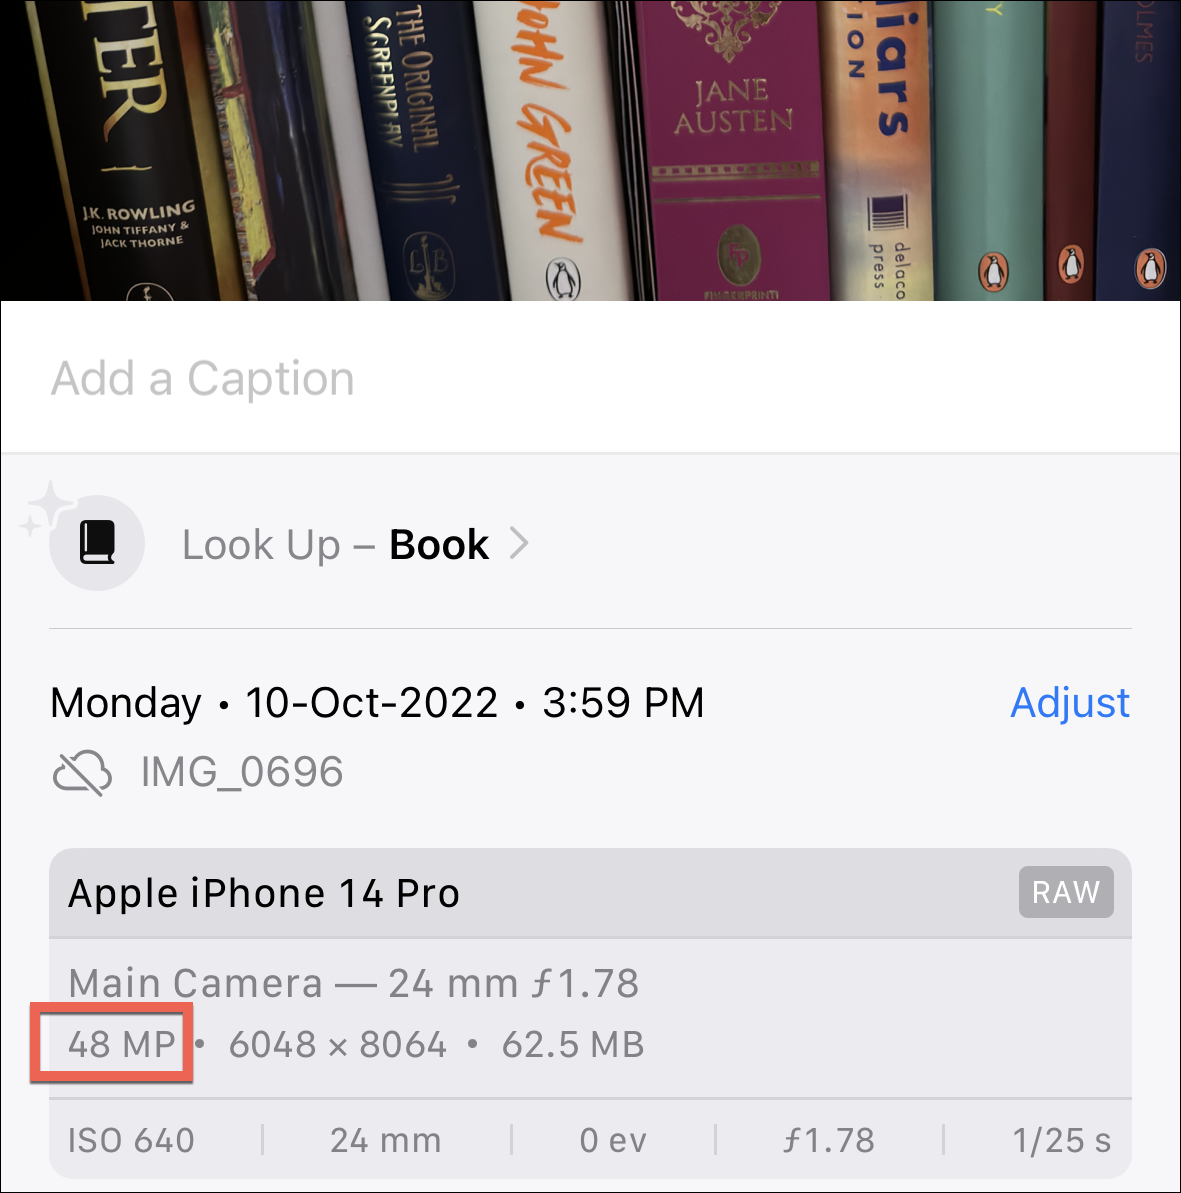
Even when you enable ProRAW, it’ll be set to take photos in 12 MP by default. But you can change the resolution to 48 MP. Capturing photos in 48 MP allows you to retain more detail in your images. This comes in handy when zooming in or cropping photos. But shooting in 48 MP also results in photos that are huge in size – approximately 75 MB.
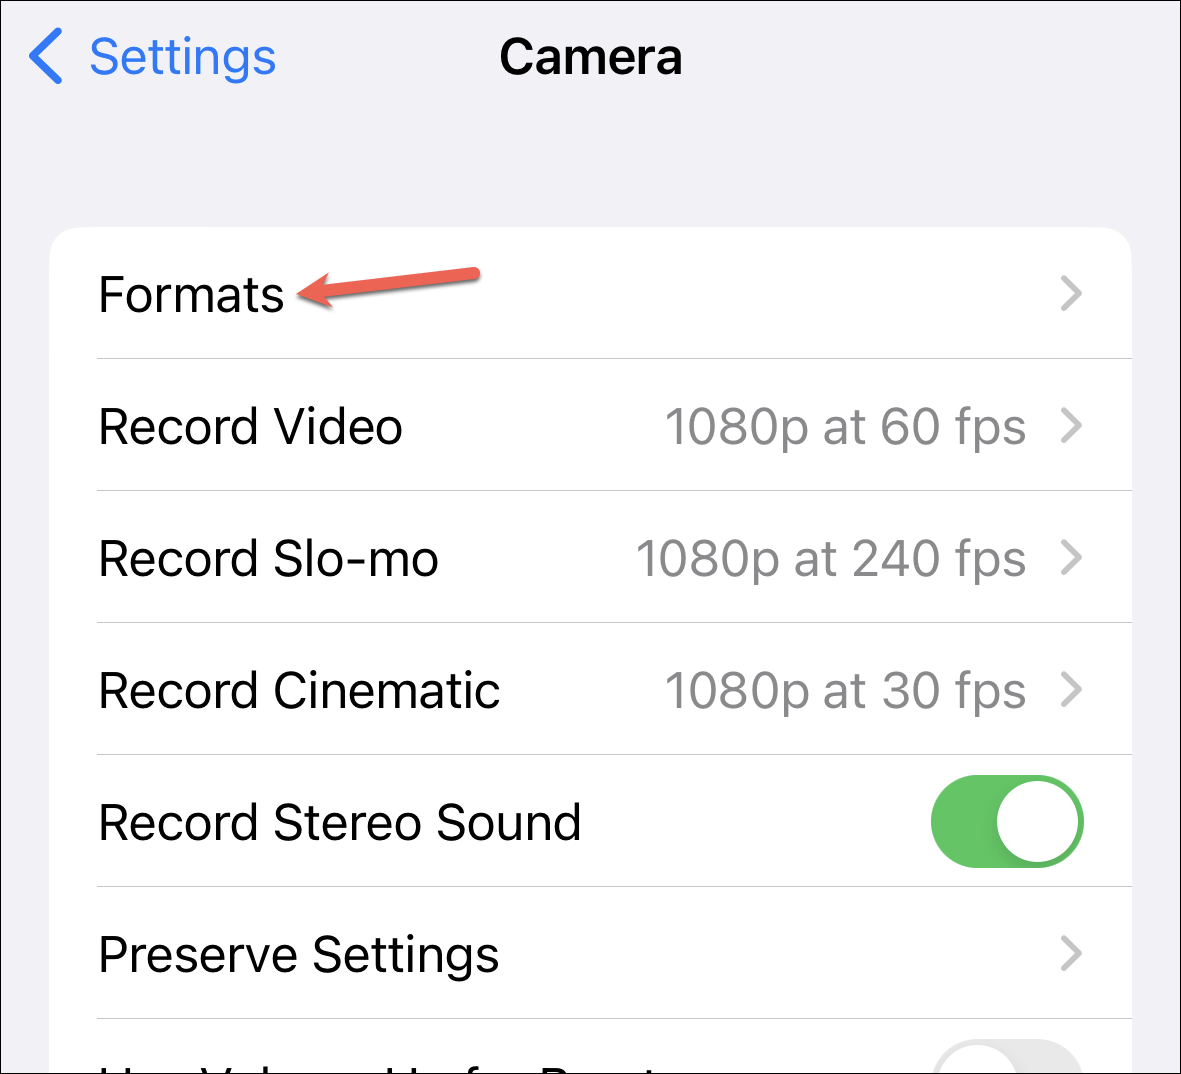
To enable ProRAW, open the Settings app and go to ‘Camera’.

Then, tap the option for ‘Formats’.
Here, enable the toggle for ‘Apple ProRAW’.
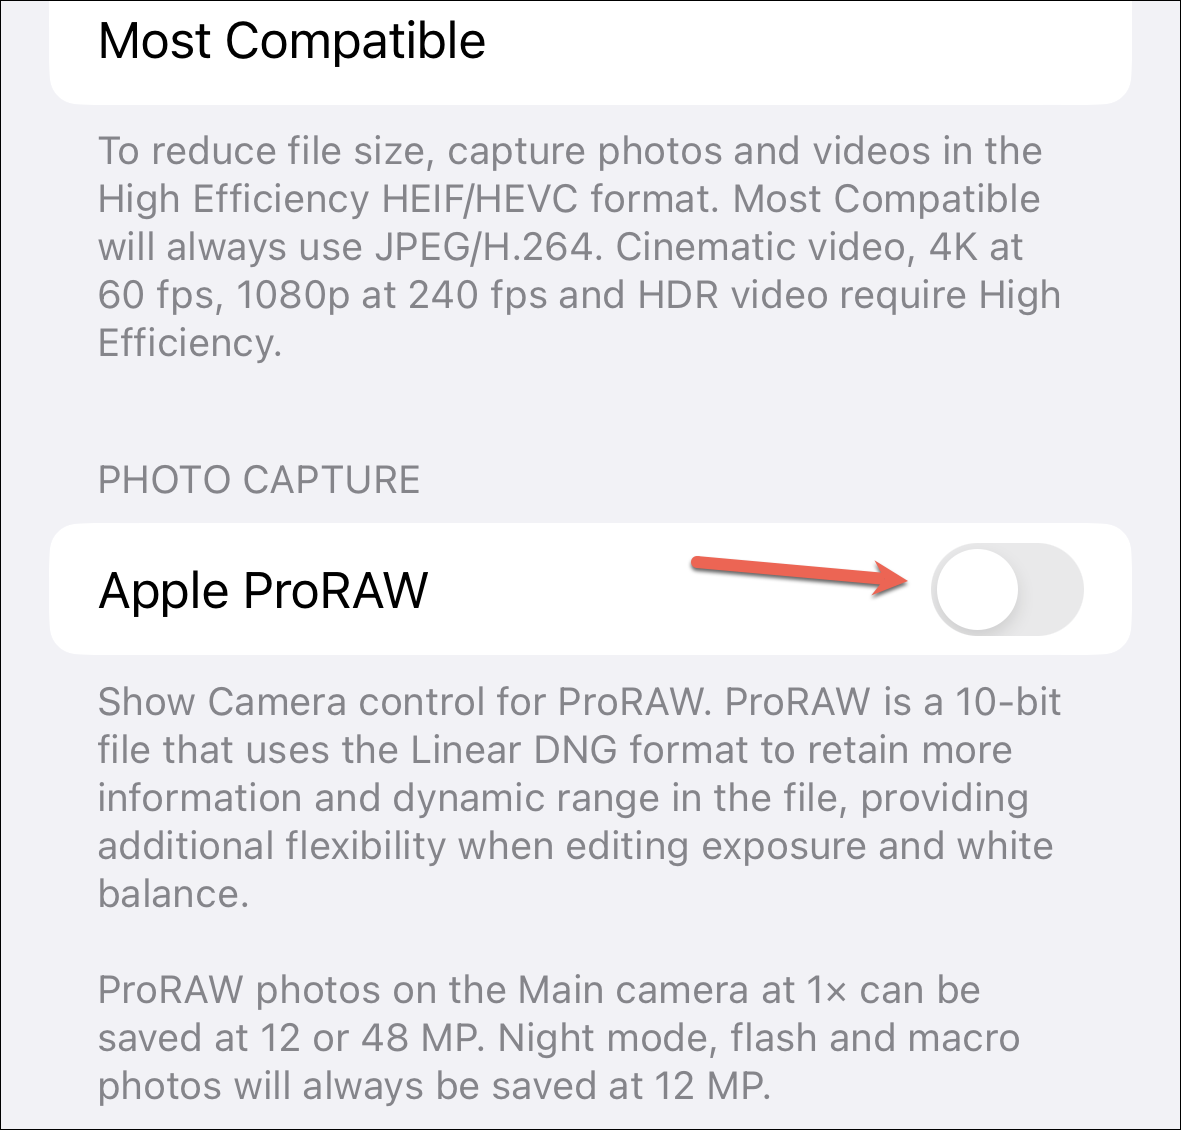
As soon as you enable the toggle, a menu for ‘ProRAW Resolution’ will appear underneath it; tap it.
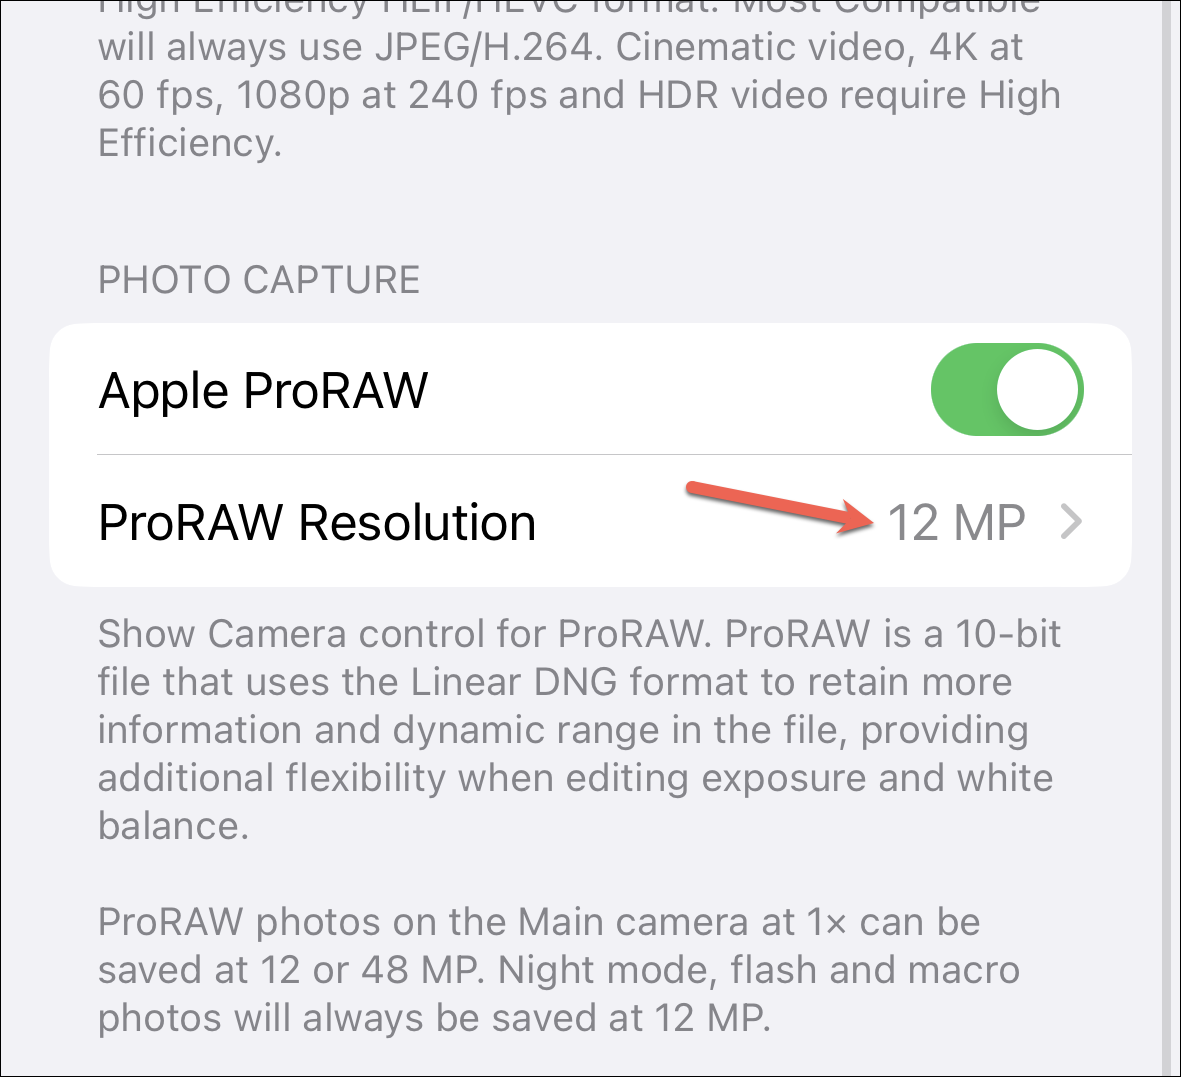
Then, select ’48 MP’ instead of 12 MP.
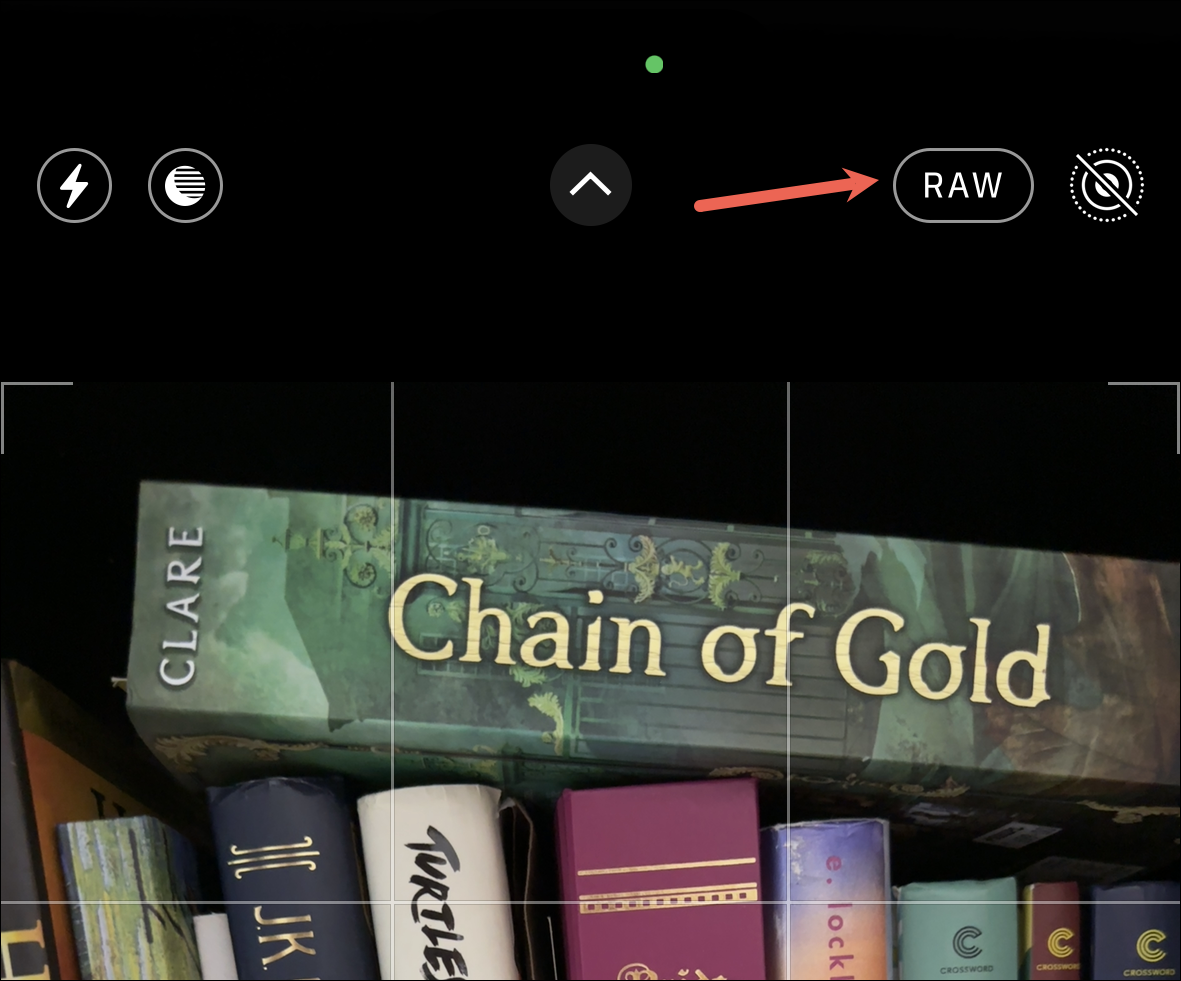
Now, to shoot in ProRAW, open the Camera app. Then, tap ‘RAW’ in the upper-right corner to enable it. When ProRAW is not enabled, the icon for ‘RAW’ will have a diagonal line across it.
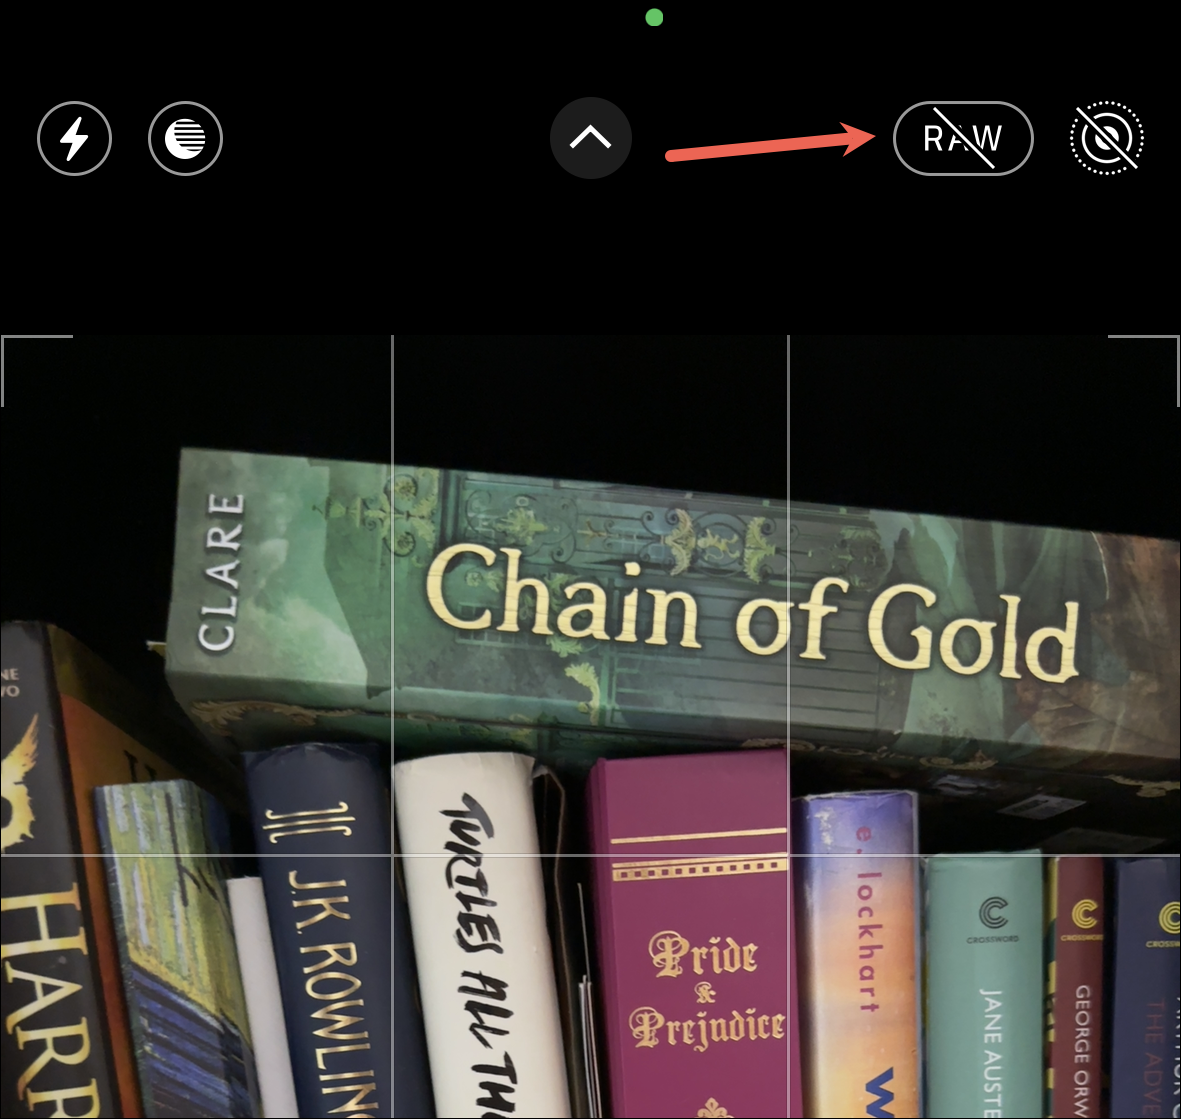
To disable it, tap it again.
You can use ProRAW with any of the cameras and even when using Smart HDR, Deep fusion, and Night Mode. ProRAW isn’t available in Portrait mode. But you can only use the 48 MP sensor when shooting in 1x with the main cameras.
When using other options, like Ultra-wide or Telephoto cameras, Night Mode, Flash, or Macro, photos will automatically be captured in 12 MP.
RAW will be automatically disabled the next time you open the Camera app so you don’t accidentally shoot in ProRAW without meaning to. You’ll have to enable ‘RAW’ from the upper-right corner whenever you want to use it.
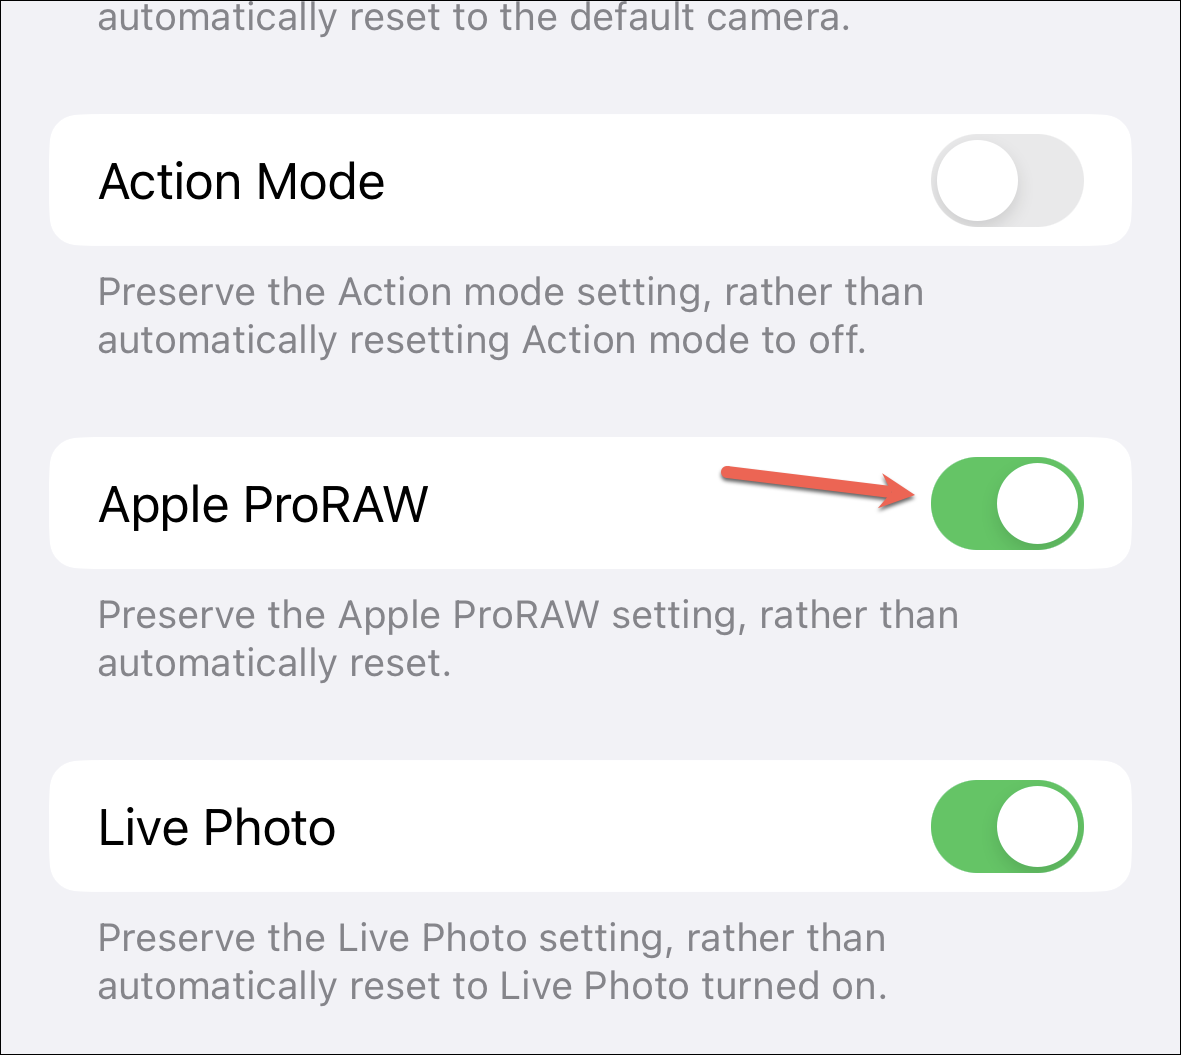
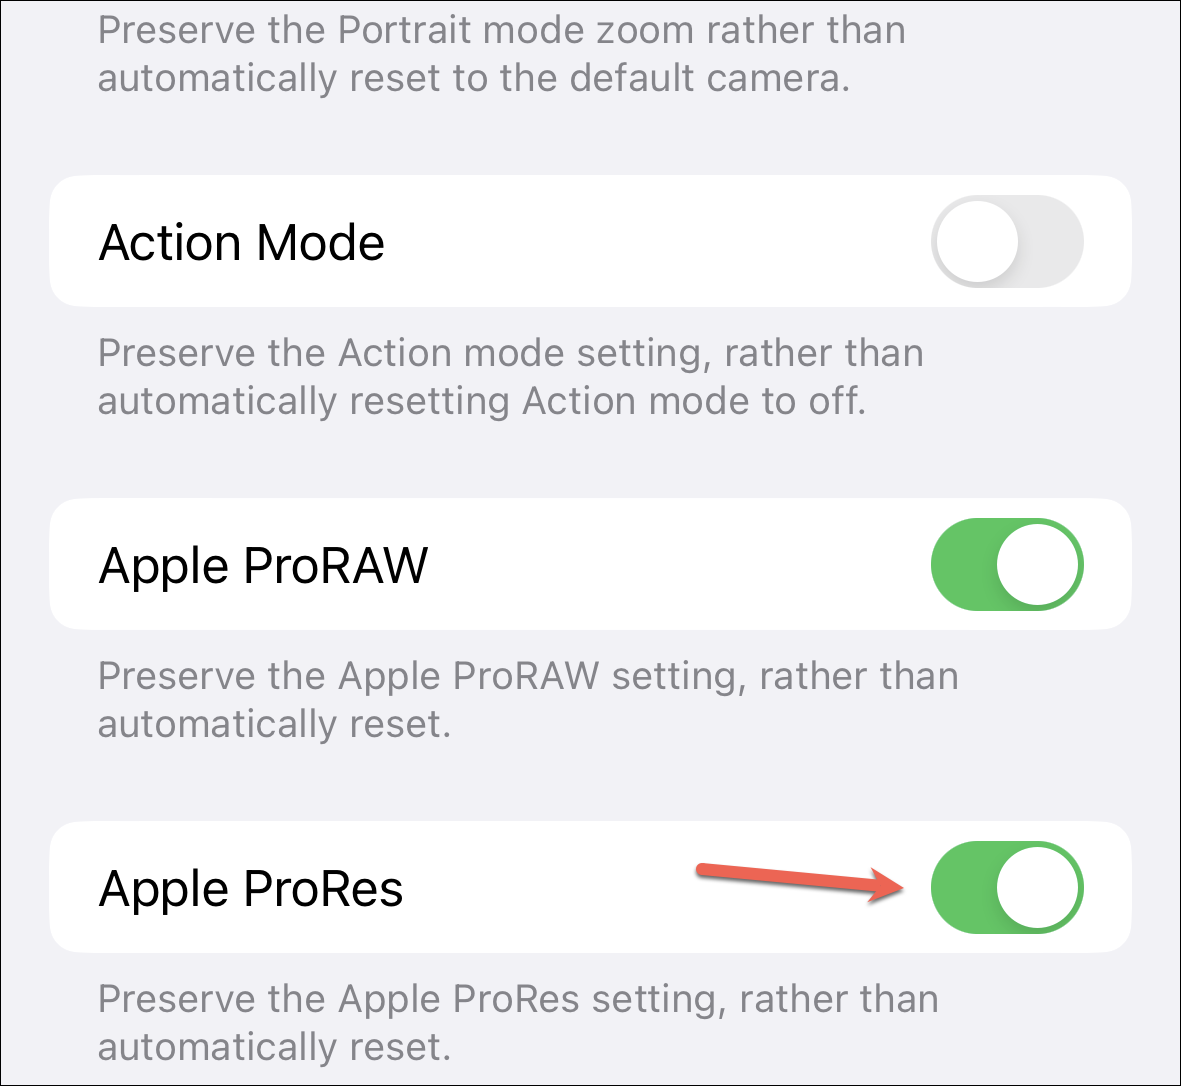
If you don’t want it disabled every time, you can change it from the settings. Go to ‘Camera’ from the Settings app and tap the option for ‘Preserved Settings’.
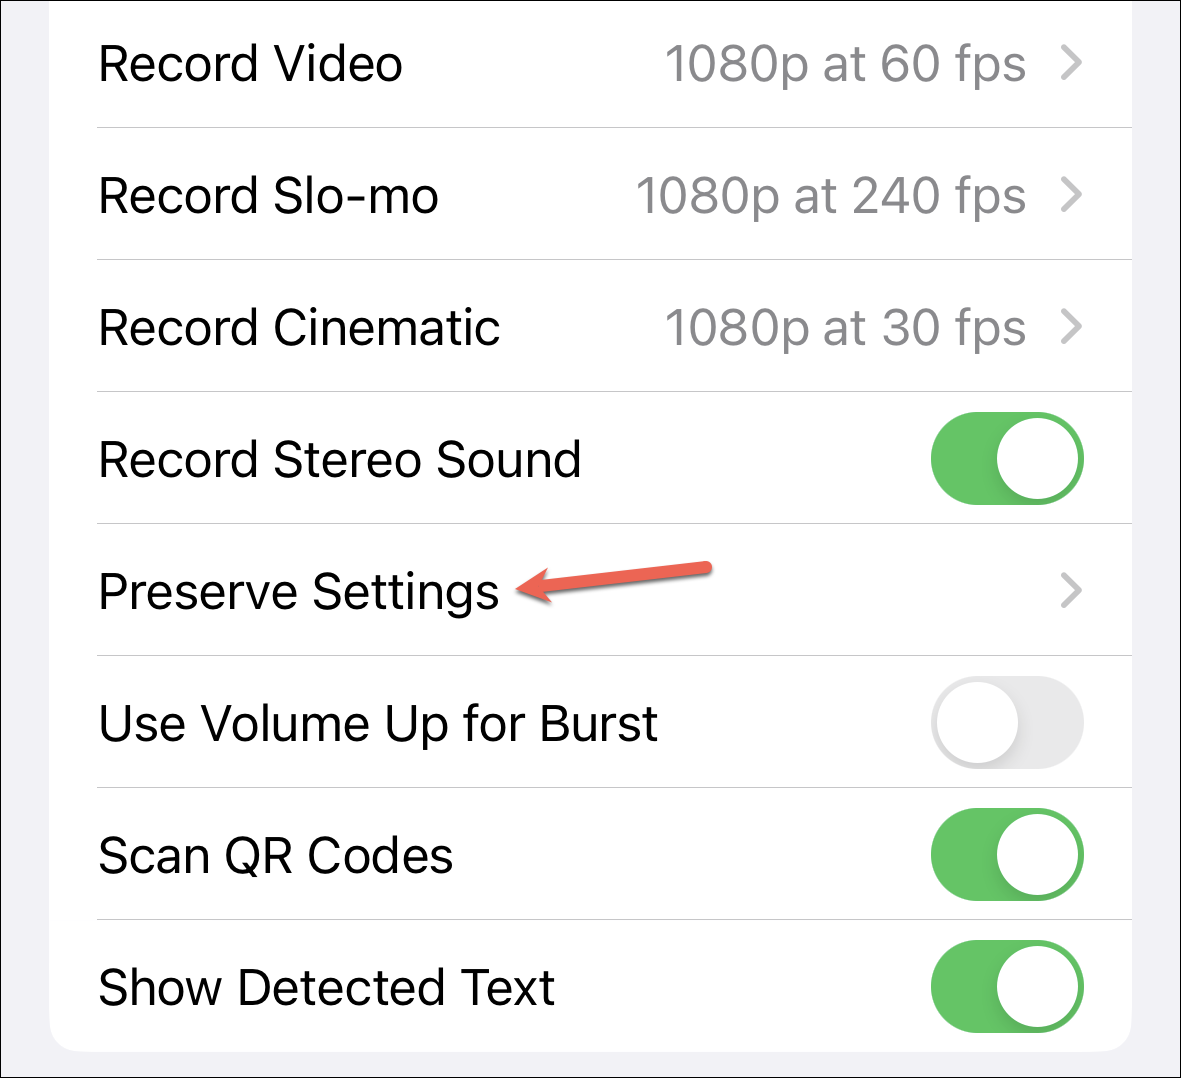
Then, scroll down and enable the toggle for ‘Apple ProRAW’.
Recording Video on iPhone 14 Pro
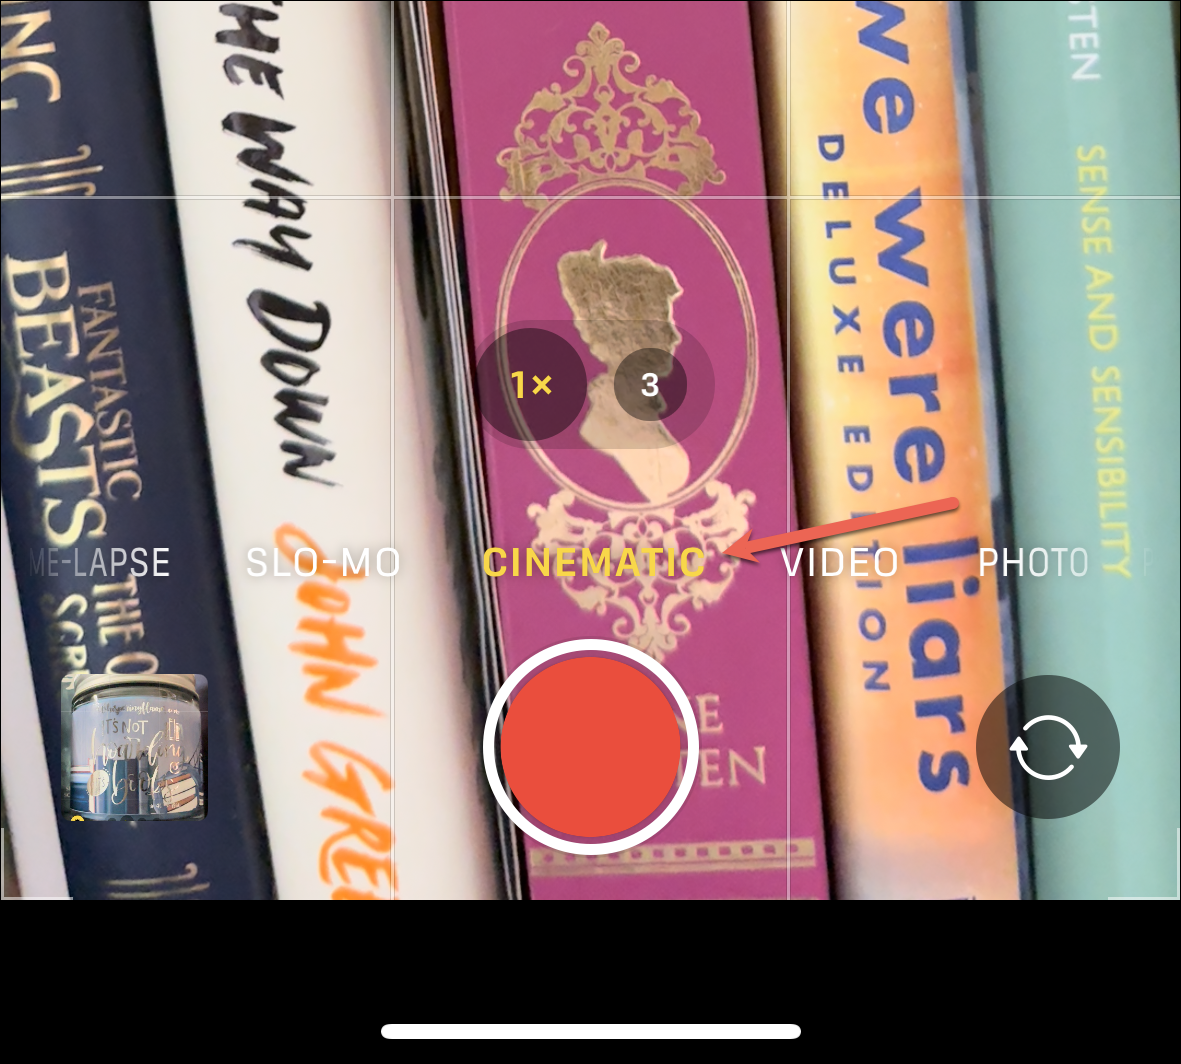
Apart from the standard video recording, there are three other modes on iPhone 14 Pro that you can use – Cinematic, Slo-mo, and Time Lapse. Time Lapse and Slo-Mo have been around for quite some time, but Apple added Cinematic last year with the 13 Pro series.
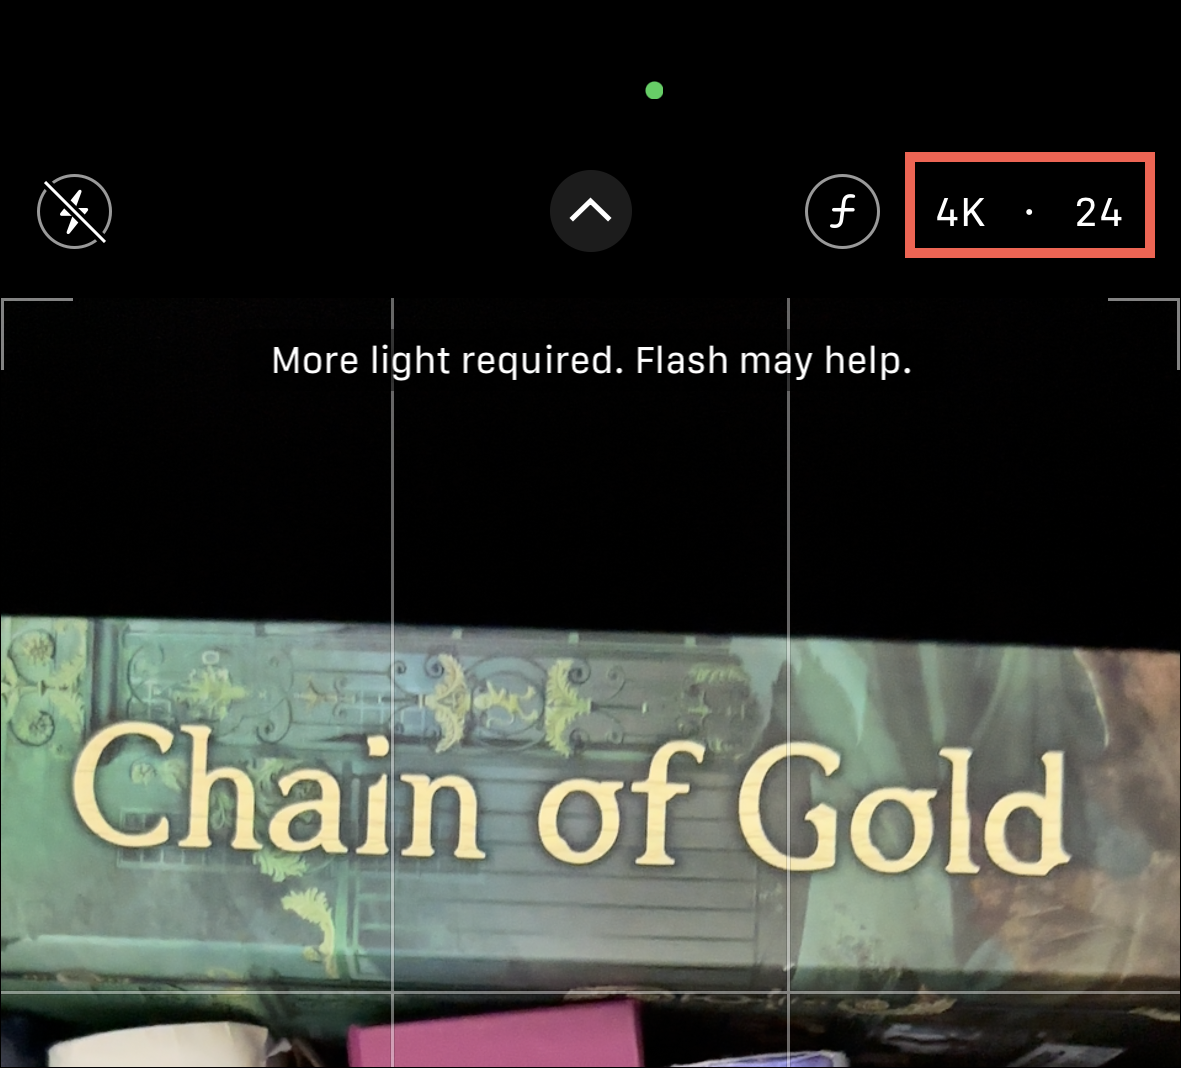
This year, Cinematic has got an upgrade where you can shoot videos in 4K at 24 or 30 fps. Switch to ‘Cinematic’ from the camera modes.
To change the resolution or frame rate, tap the numbers in the upper-right corner of the screen. That is, tap ‘HD’ to switch to ‘4K’ while shooting in Cinematic mode and tap the frame rate number to switch between supported fps.
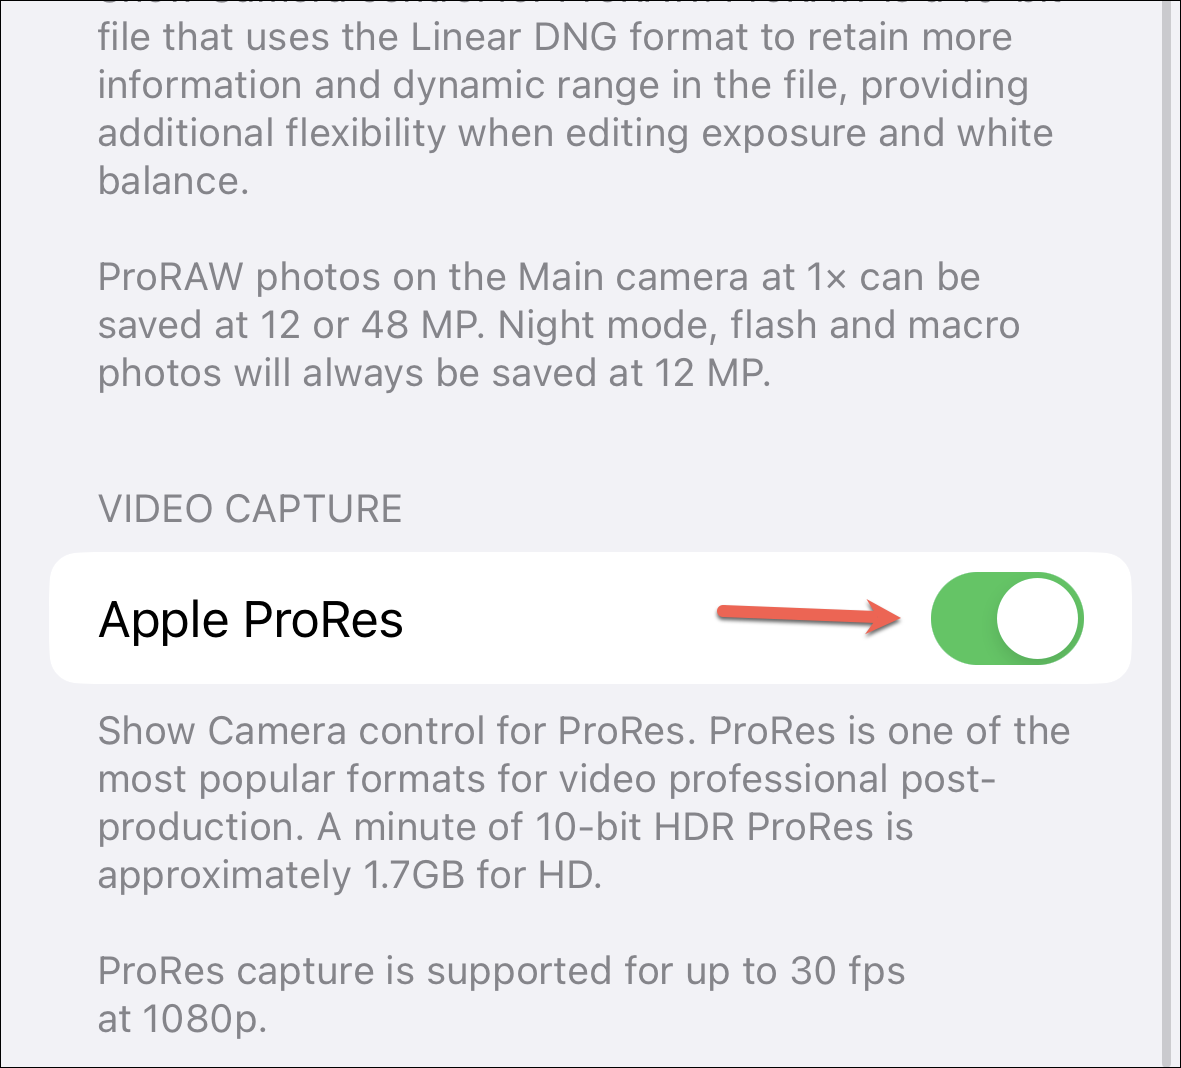
Apple has also introduced ProRES for standard video in the 14 Pro series. ProRES video format is popular among professionals because it provides greater creative control in the post-production stage. But to use the feature, you must first enable it. Go to ‘Camera’ from the Settings app and tap the option for ‘Formats’.
Then, enable the toggle for ‘ProRES’.
Now, to shoot in ProRES, open the Camera app and switch to the ‘Video’ mode.
Then, tap ‘ProRES’ in the upper-left corner.
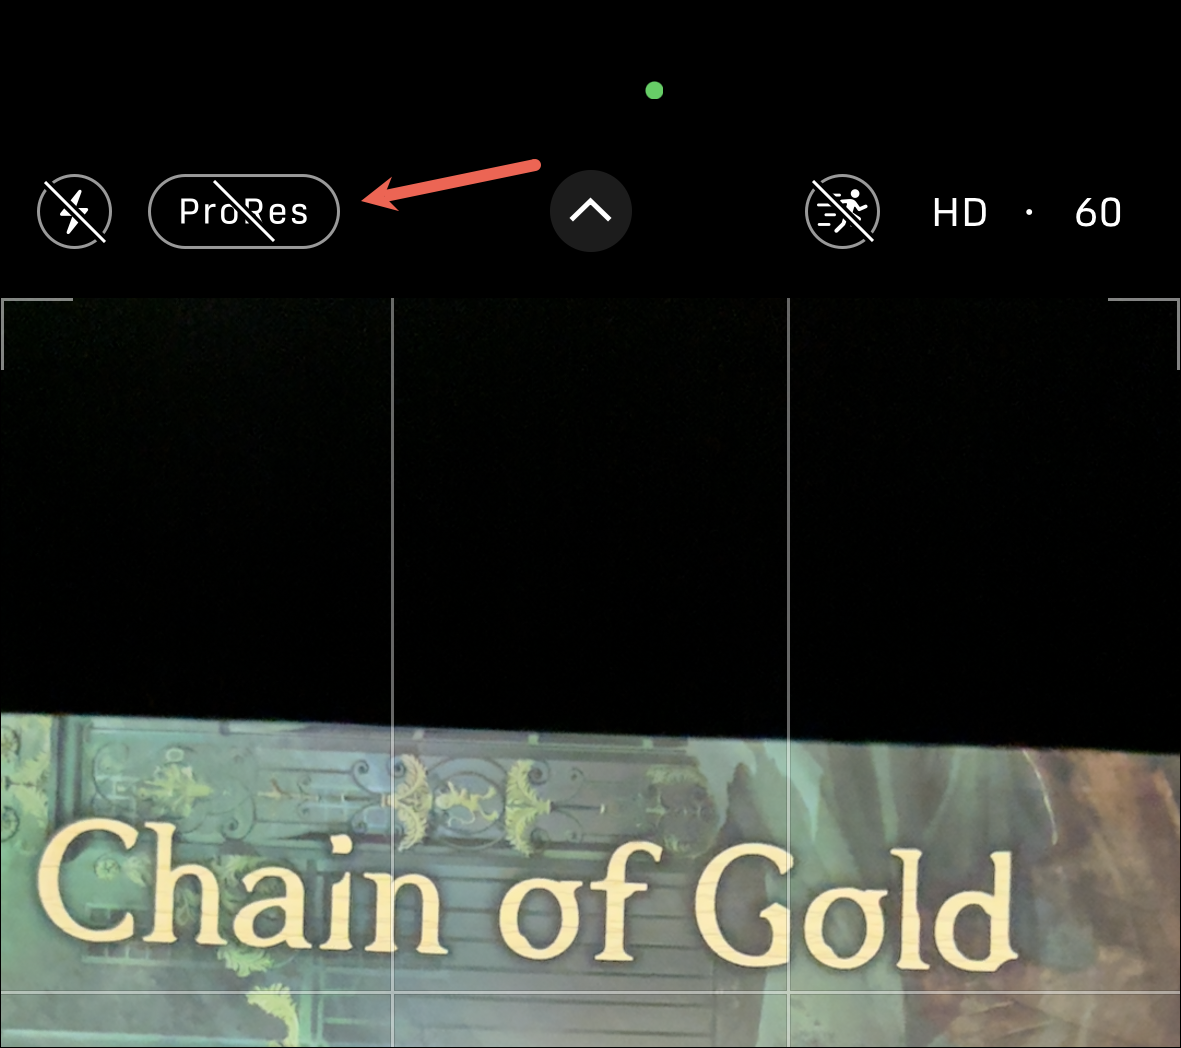
If you can’t enable ProRES, change your resolution and fps as ProRES is only available for 1080p for up to 30 fps. You can change the resolution and frame rate by tapping the numbers in the upper-right corner, similarly to the Cinematic mode.
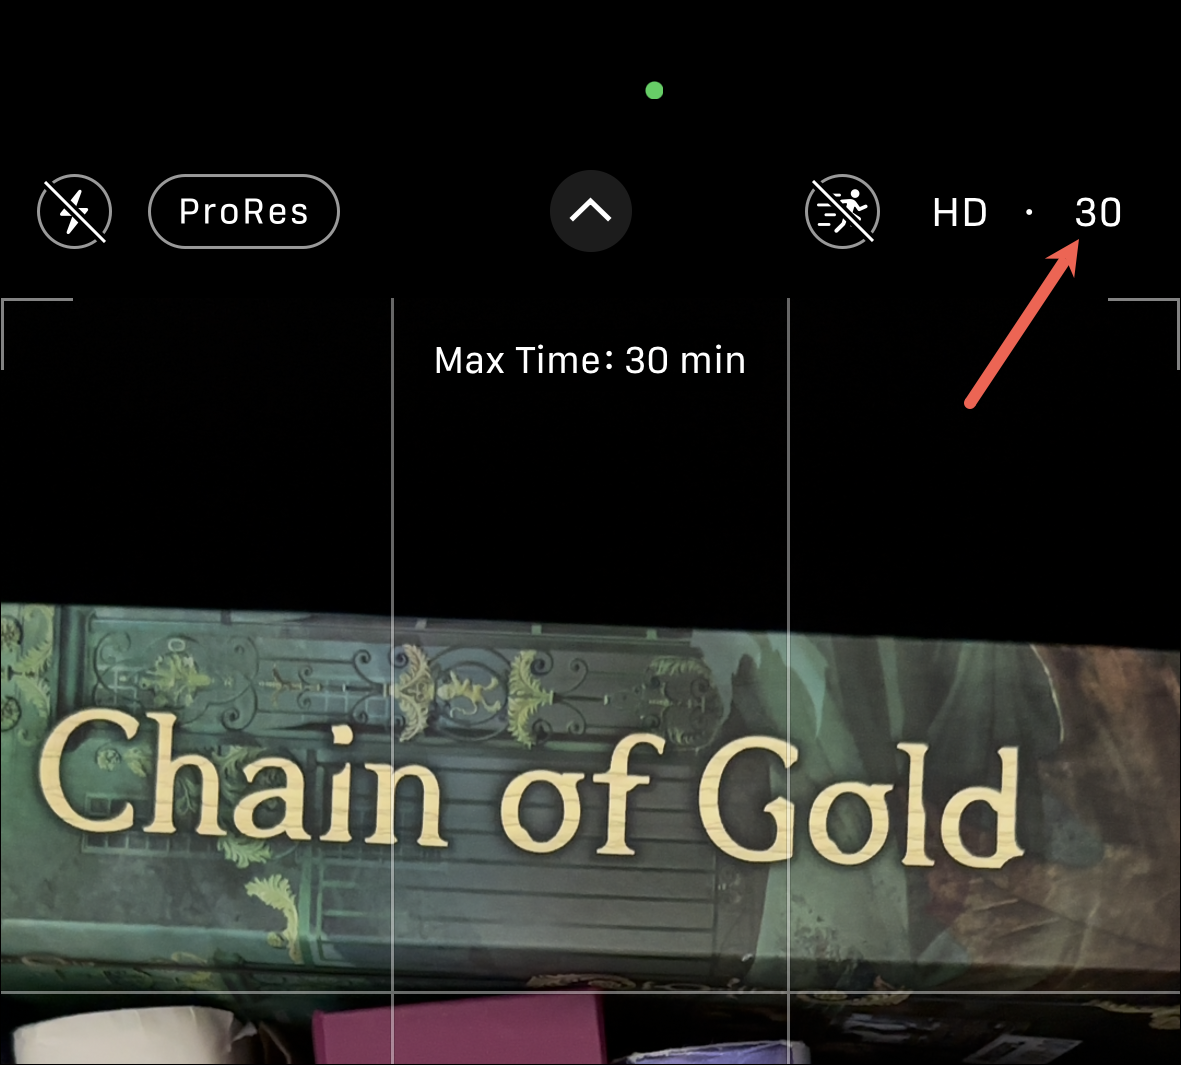
You can also shoot for a maximum of 30 minutes in ProRES since ProRES files are rather large. ProRES is also automatically disabled whenever you exit the Camera app but you can change this behavior from settings, just like ProRAW. Go to Preserve Settings from the Camera option in the Settings app and enable the toggle for ‘Apple ProRES’.
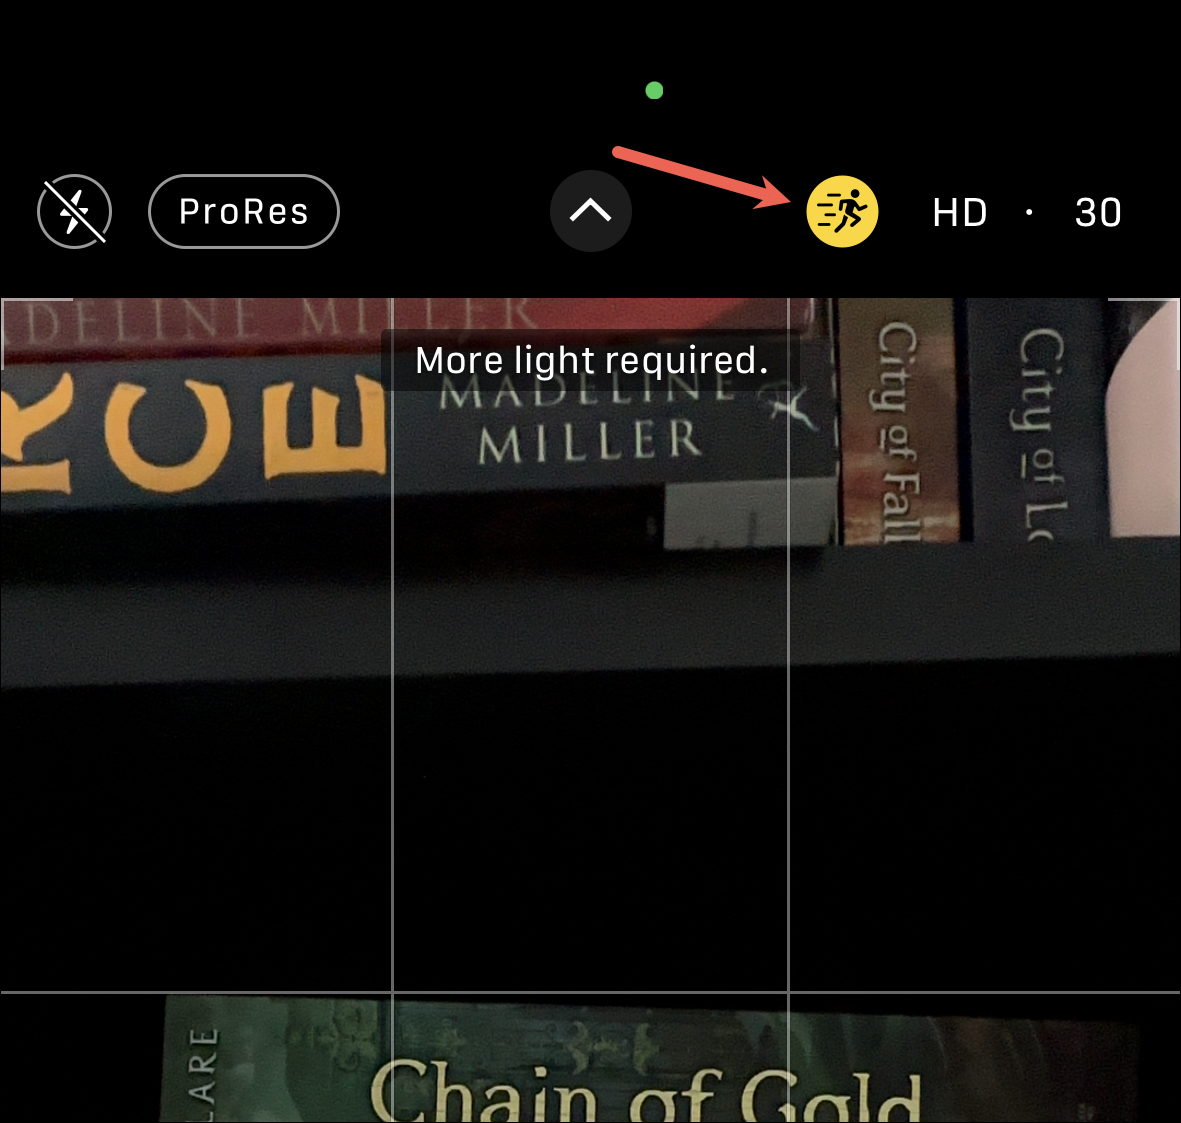
Another prominent addition to the video system in the iPhone 14 series this year is the Action Mode. You can enable the Action Mode by tapping the icon of the running person in the upper-left corner of the screen.
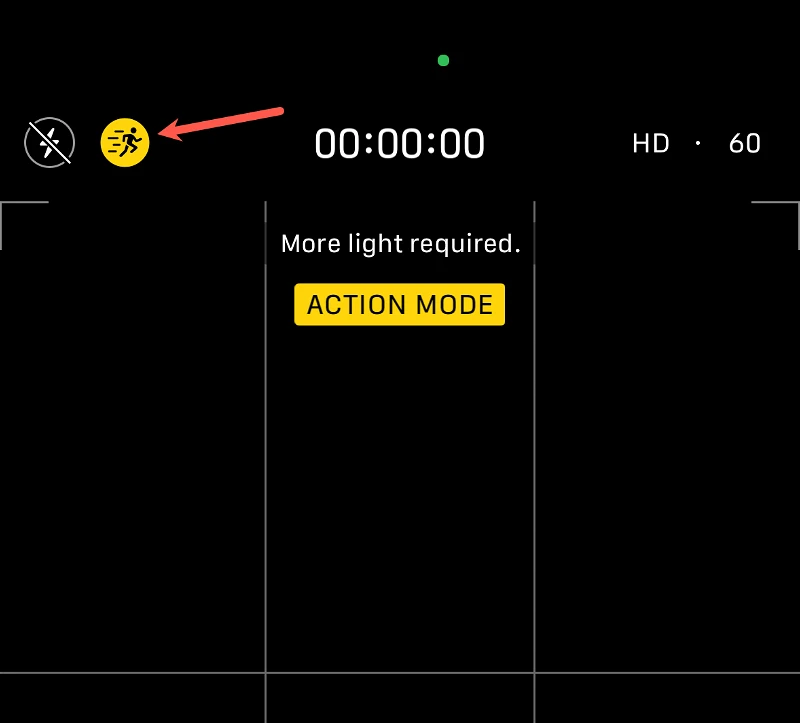
If you have ProRES enabled, you’ll find this option on the right side instead. We have covered the feature in detail in a separate guide here.
Switching to the 14 Pro Camera system, especially when you have no experience with Apple’s Pro camera system, can be daunting. Hopefully, this guide will help you navigate your way around it, even if you’re a complete newcomer to the iPhone.


