Iron Nest puts you alone inside a 5,000-ton walking artillery fortress, surrounded by valves, dials, levers, and pull-cords with no obvious order of operations. The game is a first-person heavy turret simulator where you read orders, find targets on a map, run ballistic math, load the gun by hand, then fire. Once you understand the loop, the wall of controls becomes a simple sequence you repeat for every target.
Quick answer: Read your orders, mark known points on the war table, draw bearing or distance lines to triangulate each target, enter the range and bearing into the Ballistic Calculator to get an elevation, load the matching shell and powder charges, rotate the turret to the bearing, set the elevation, then arm and pull the central handle to fire.
Iron Nest controls and movement
You move through the machine in first person with WASD, and almost everything else runs through a small set of interaction keys. Most stations work the same way. You press E to start interacting with a part, then hold the left mouse button to physically move levers, turn valves, or draw lines.
| Input | Action |
|---|---|
| WASD | First-person movement |
| Space | Jump |
| Left Shift | Sprint |
| Ctrl | Crouch |
| E | Start interacting with a station or component |
| Left Click (hold) | Move objects, pull levers, turn valves, draw lines |
| Right Click | Remove items, such as clipboard notes or drawn lines |
| Caps Lock | Toggle Clipboard visibility |
| Tab (hold) | Bring Clipboard into full focus with a movable cursor |
| G | Equip or unequip the Gasmask |
| Escape | Open menu or stop the current interaction |
Tip: Keep the Clipboard visible with Caps Lock at all times. It covers a chunk of the screen, but having your numbers in front of you saves constant trips back to the typewriters.
The core firing loop in Iron Nest
Every mission follows the same six stages. You handle one target fully before moving to the next, and the same stations come into play each time.
Using the Clipboard to store mission data
The Clipboard is the single most useful tool in the machine. When you read a High Command directive or a field report, click any line of text and it copies straight onto the Clipboard. That means you never have to memorize spotter coordinates or run back and forth between stations while measuring.
Once a line is no longer needed, right-click it to remove it. Keeping the Clipboard tidy matters, because the calculator and gun consoles also push values onto it, and stale numbers cause mistakes.
Reading High Command orders and field reports

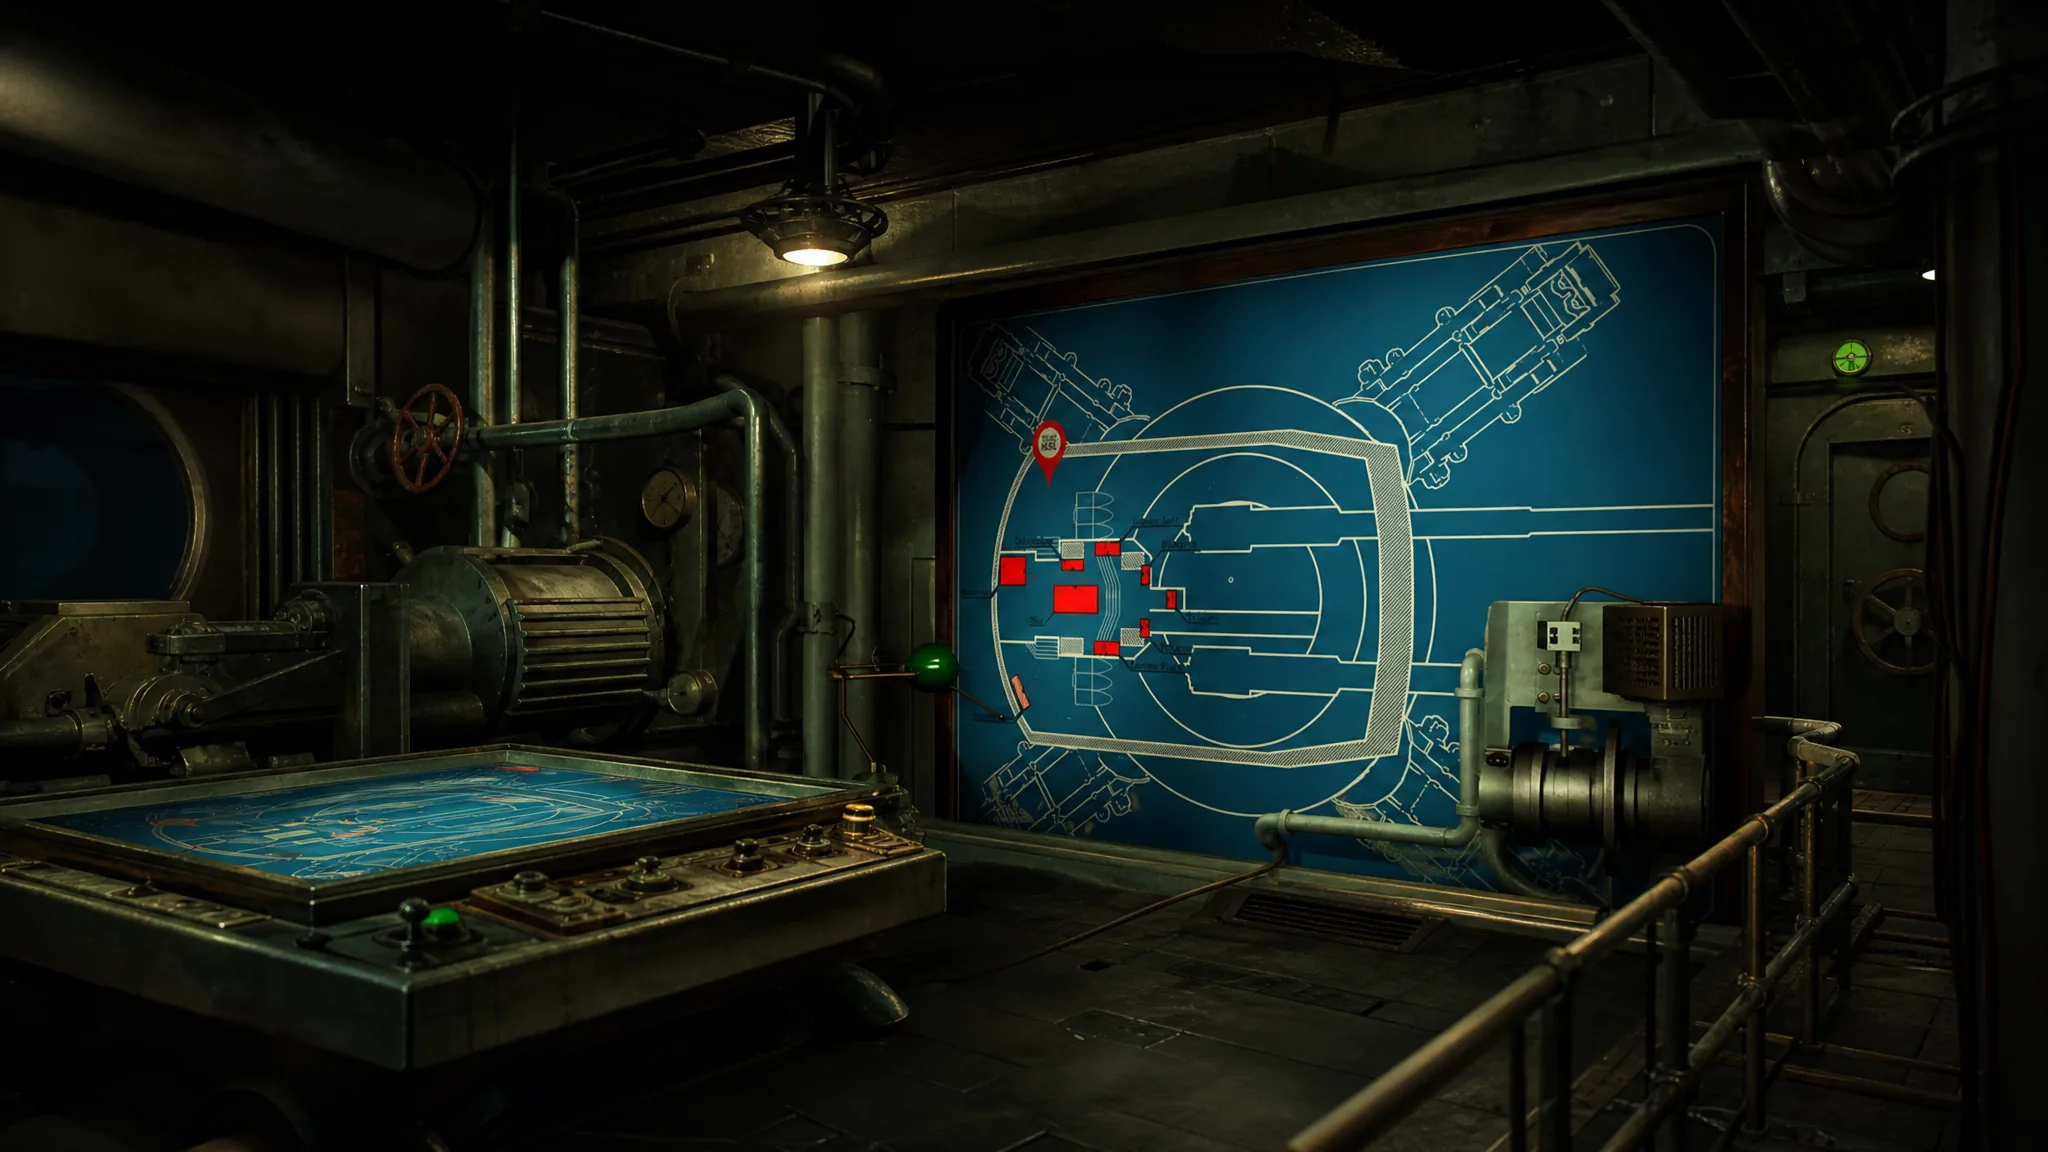
Each mission begins at the High Command typewriter, the one labeled “High Command” with the large rolling sheet of paper. When the mission starts, it types out the directive. You can read it live or wait for the full transmission. The brief covers the objective, the ordnance type, target information, your current Iron Nest position, relevant map data such as observation assets, and any extra notes.
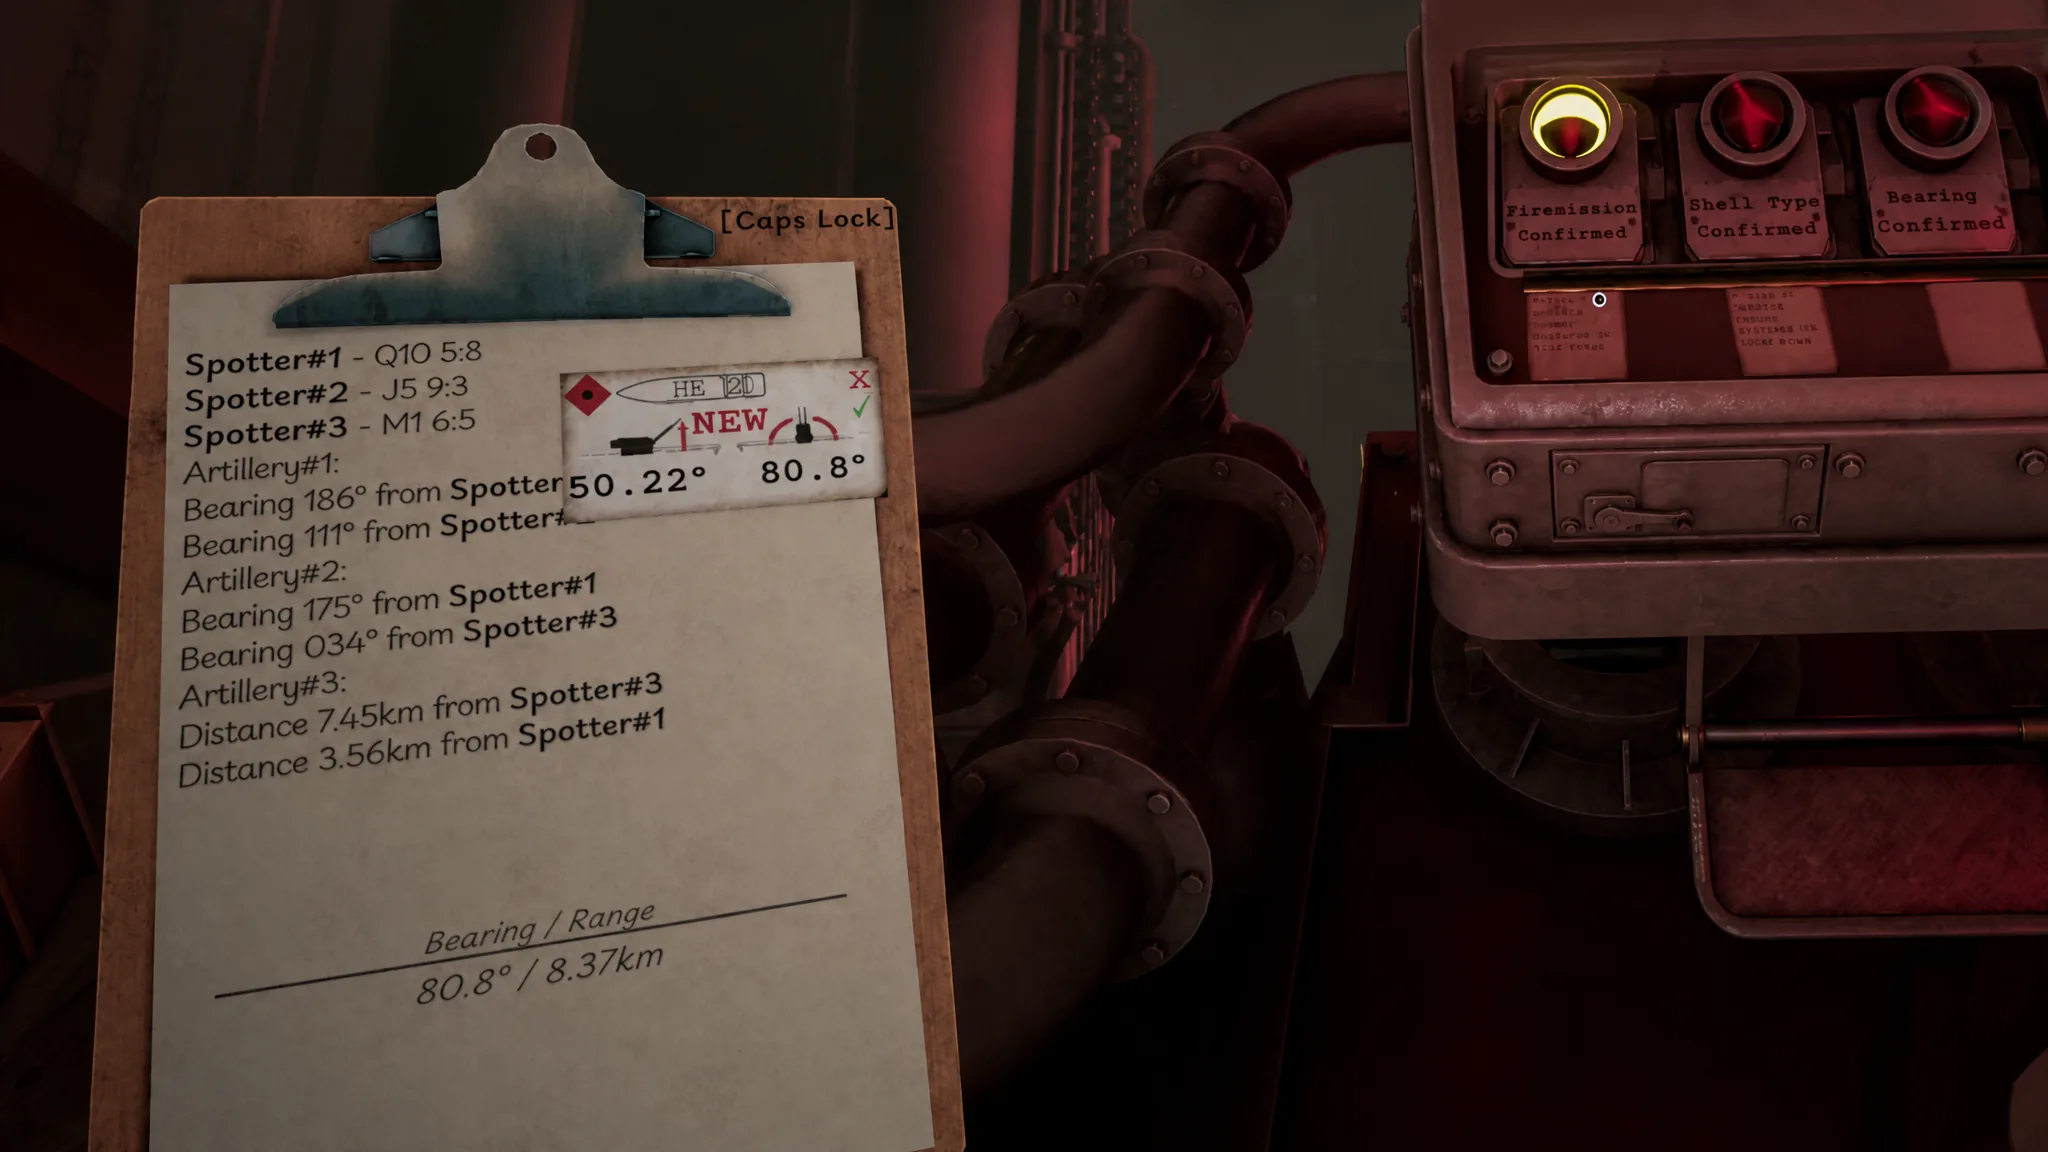
Just to the left sits the Field Intelligence typewriter, which is arguably more important for actually hitting things. This is where recon teams and spotters report target types, bearings, and distances. Expect several targets per mission, so copy the details for one target, finish that target, then move to the next.
Reading the tactical map grid and tokens
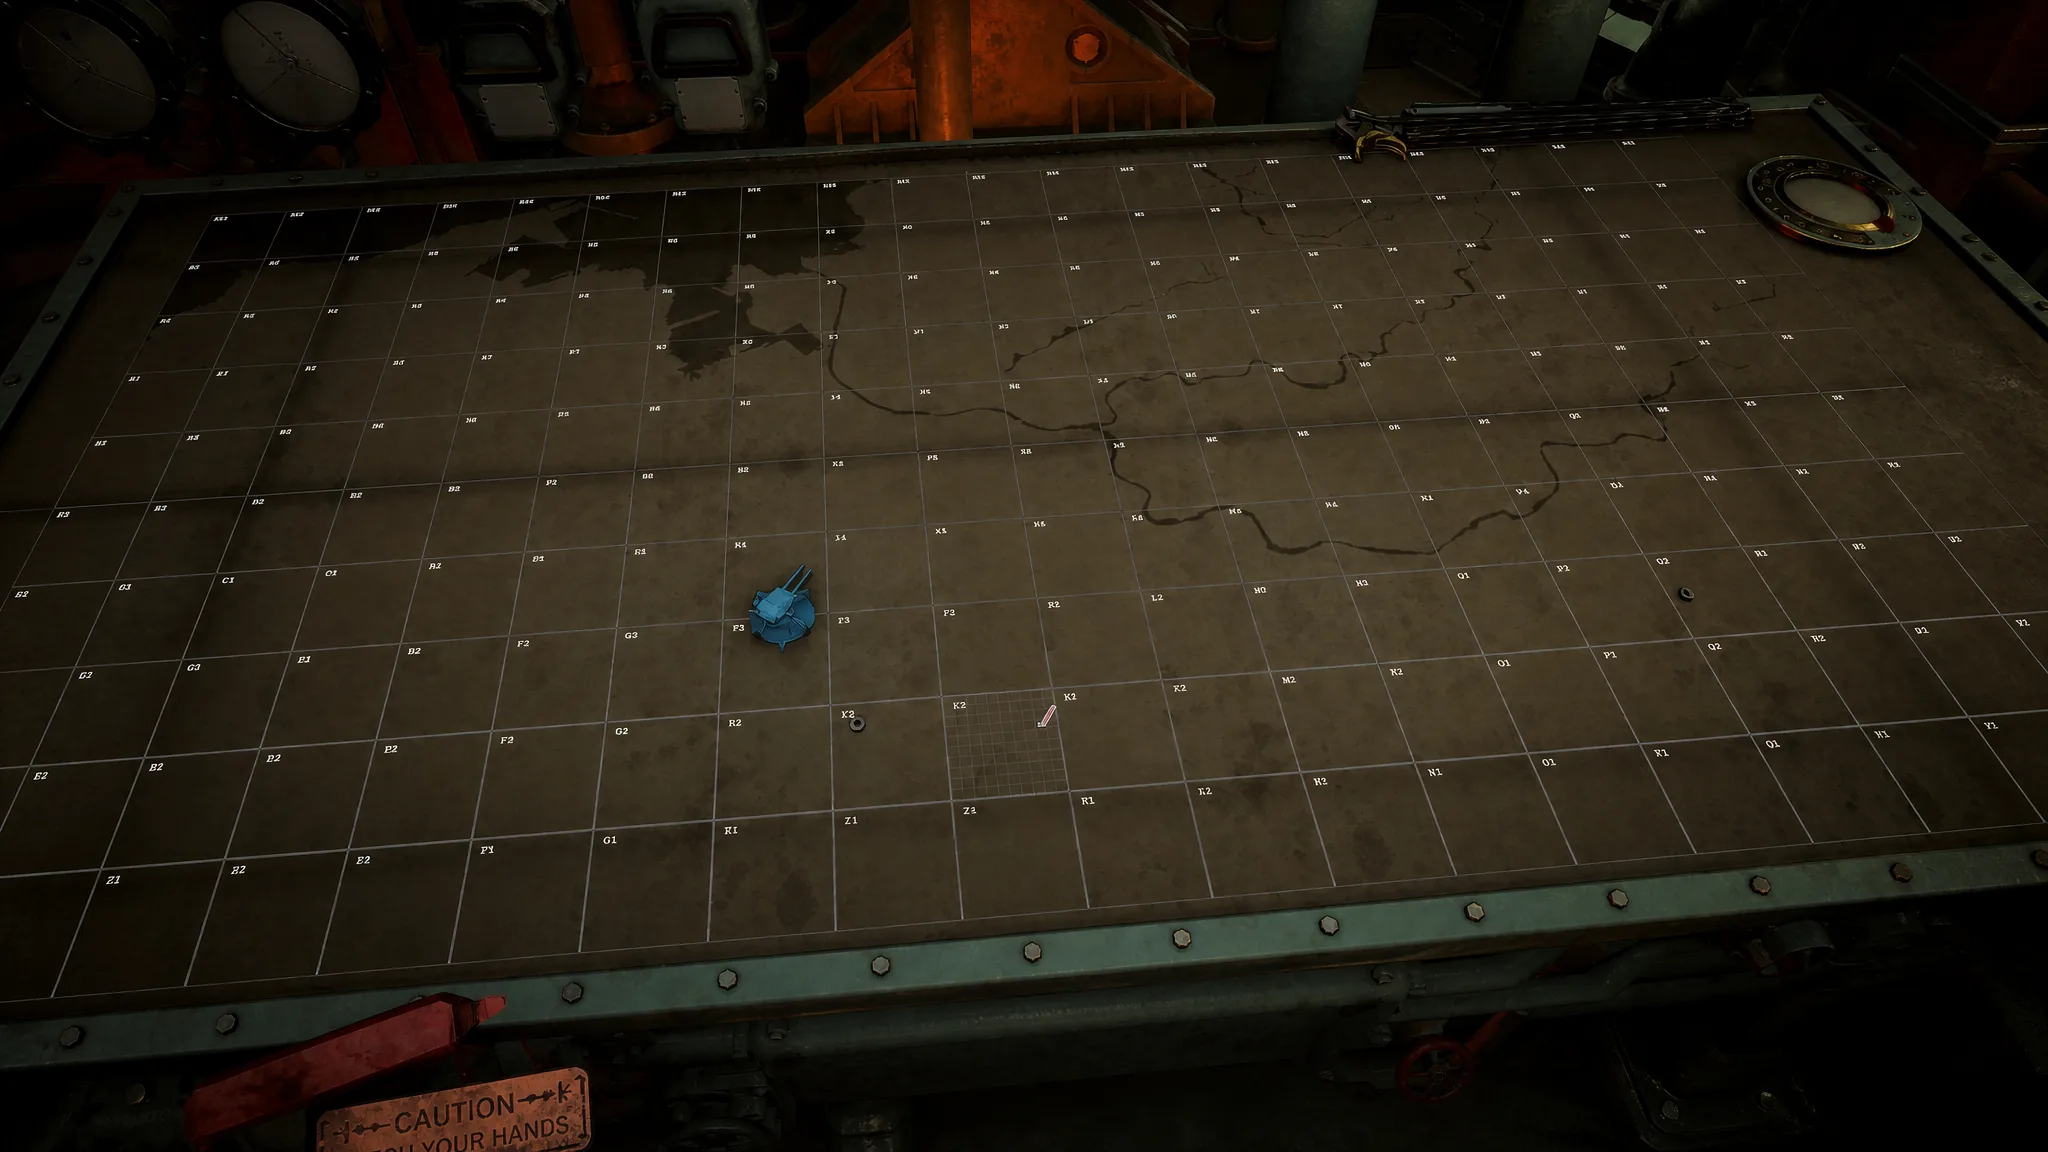
The war table is a 20×10 grid. Columns run A to T from left to right, and rows run 1 to 10 with row 1 at the bottom, so each cell reads like a spreadsheet reference such as K5 or R8. Every cell is then split into its own 10×10 sub-grid, but those sub-coordinates start from 0 rather than 1. That gives you precise points written as F10 8:0 or I7 2:4.
To plot positions, you place physical tokens on the map. Each token type has a fixed role.
| Token | Use |
|---|---|
| Iron Nest Token | Marks your own position |
| Blue Number Tokens (1-4) | Mark spotter (observation asset) locations |
| Green Letter Tokens (A-C) | Mark reference points |
| Red Number Tokens (1-8) | Mark targets once located |
Skull tokens appear above targets after you fire. A red skull confirms an eliminated target, while a blue skull means you also hit a friendly unit. Loose nuts and bolts are scattered on the map too, and you can move them around freely as personal markers.
How to triangulate targets on the war table
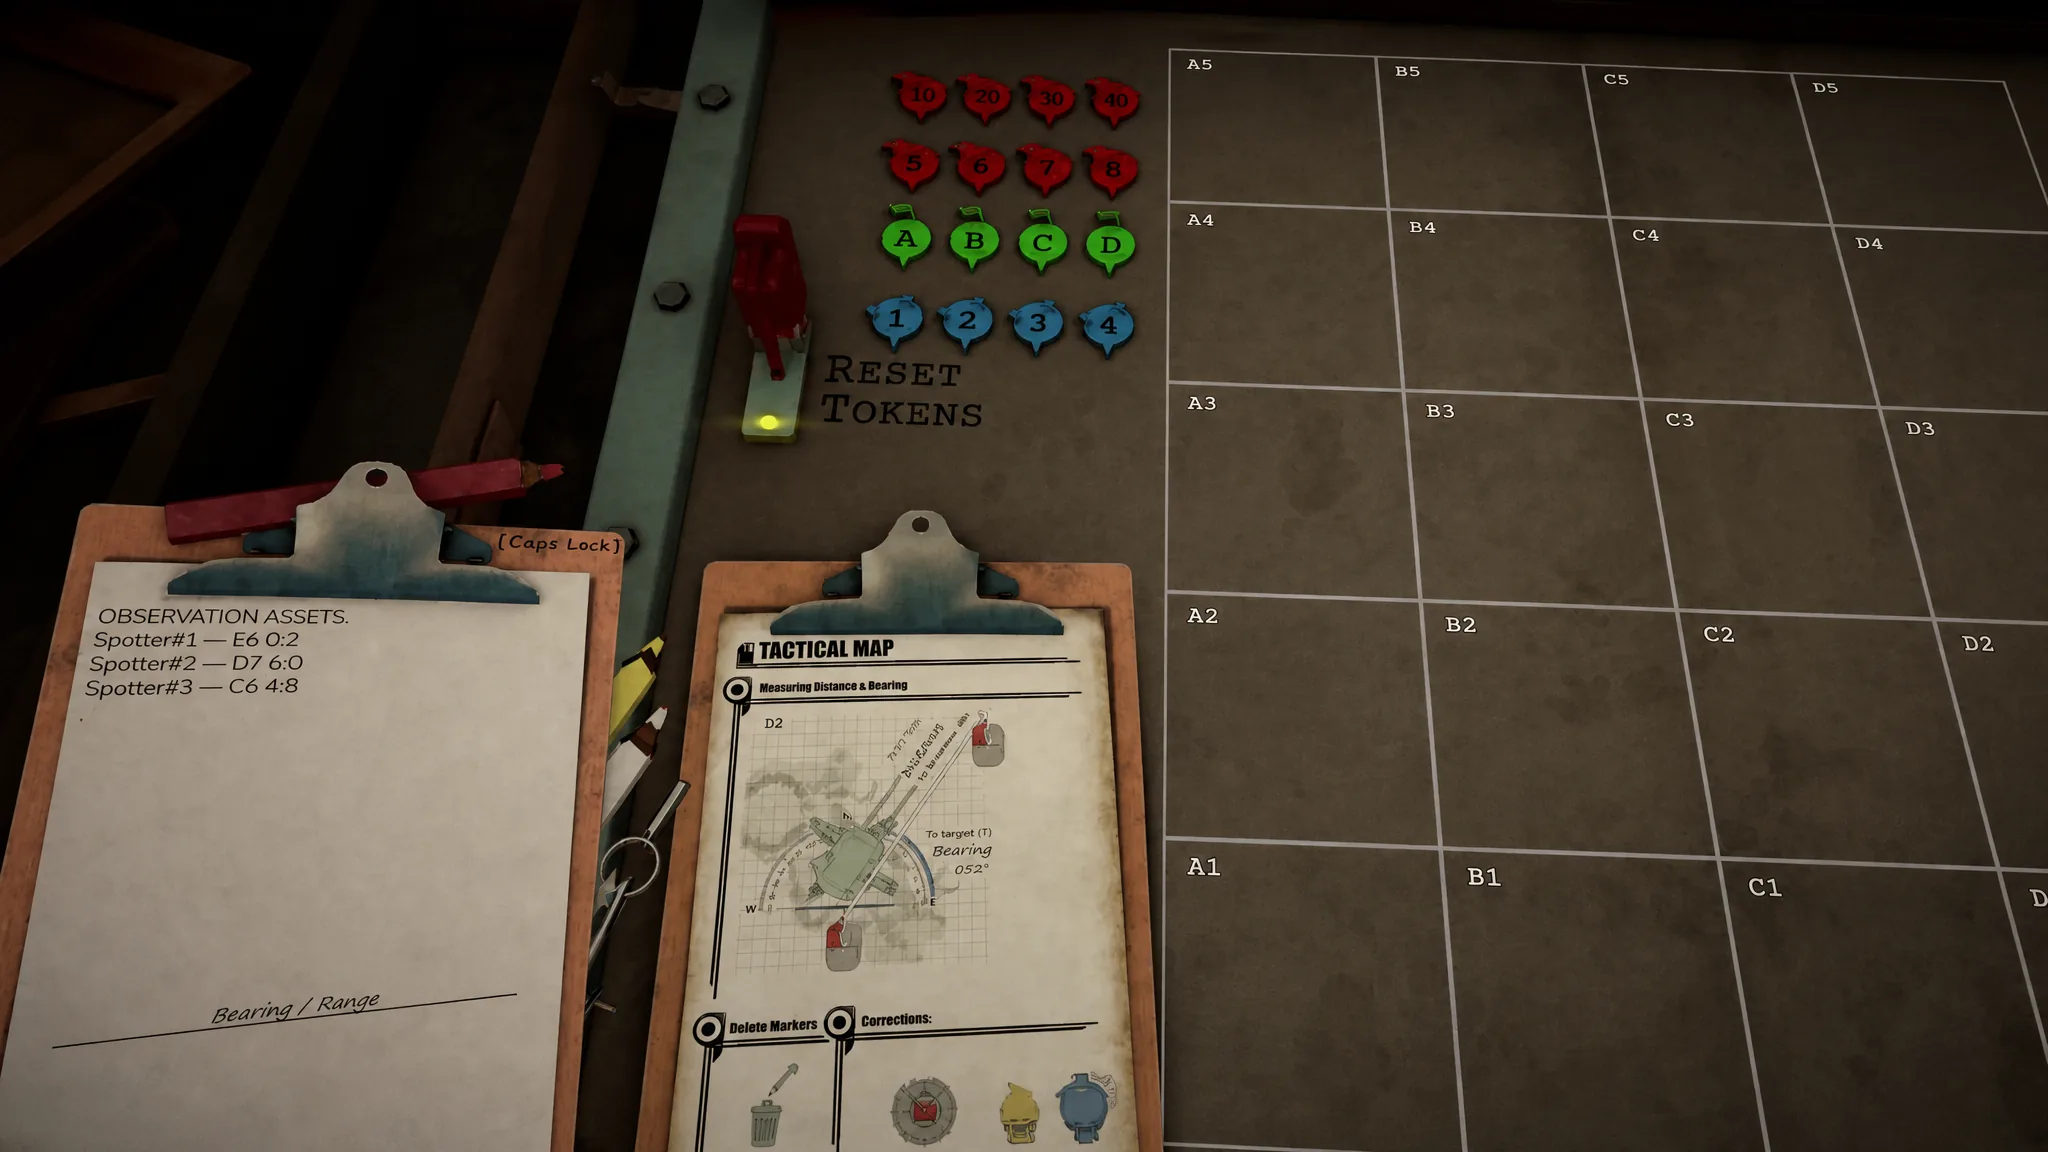
Finding targets is the heart of the game and plays like a precise game of Battleship. Start by placing what you already know, then use bearing and distance lines to find where targets sit.
Place your known points first
Bearing and distance data
Targets are described using two data types, and you combine them to pin down a location.
| Data type | Meaning |
|---|---|
| Bearing | Direction to the target relative to a spotter, reference point, or the Iron Nest |
| Distance | How far the target is from a spotter, reference point, or the Iron Nest |
A typical report might read “Target #1, Bearing 186° from Spotter#1, Bearing 111° from Spotter#2.” Some intel is vaguer, like “across the river” or “somewhere around” a landmark, and you estimate from there.
Draw the lines and find the intersection
When you open the Clipboard at the map, you get three colored wooden pencils (red, yellow, and white) and a drawing compass. The pencil colors are only for visibility. The game shows the bearing and distance automatically as you draw, so there is no manual math at this stage.
Tip: Unless your targets are artillery, mark and engage them one at a time so the map stays readable. If they are artillery, find and mark all of them first, because the counter-battery timer starts the moment your first shell lands.
Using the Ballistic Calculator
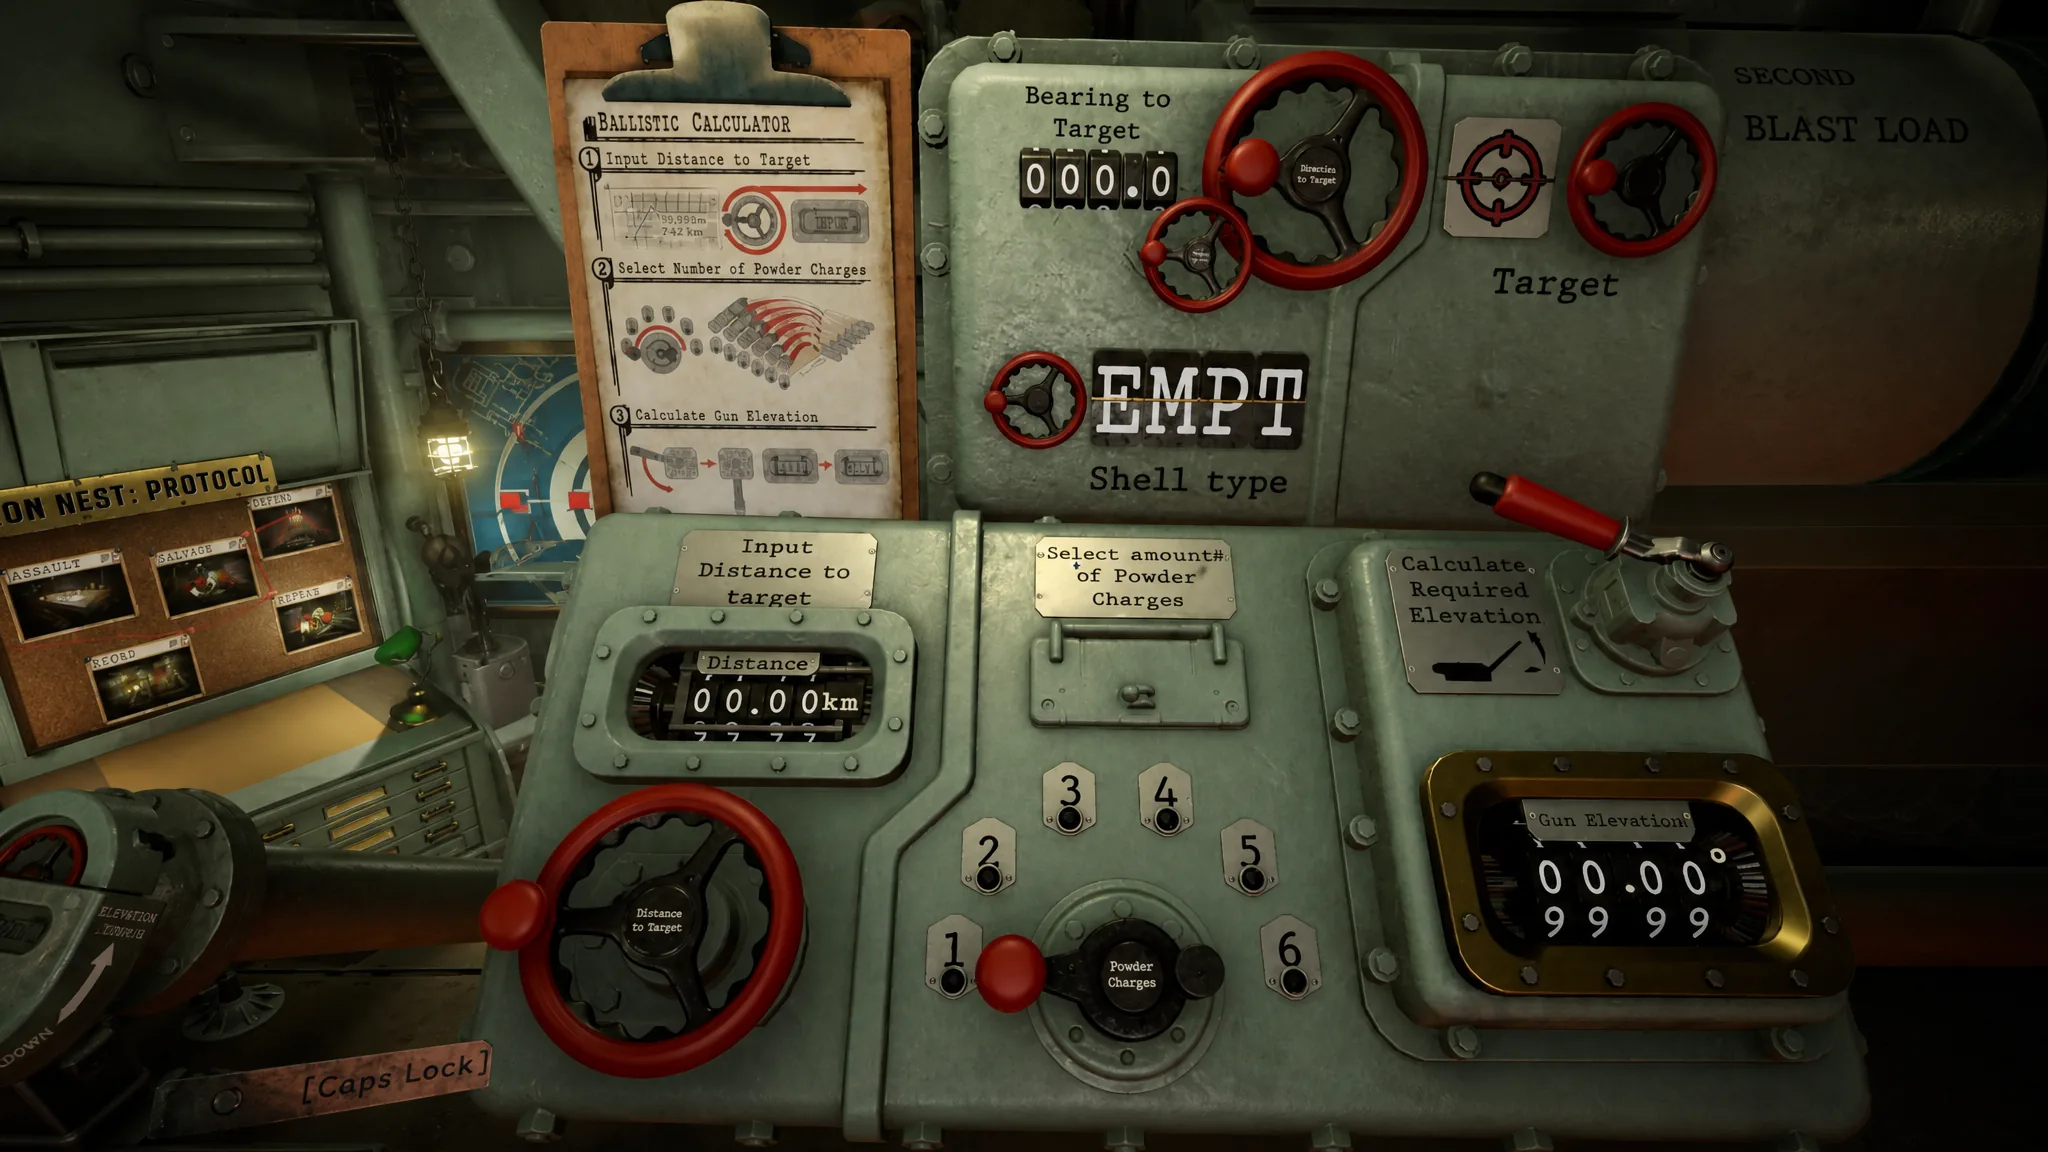
With the target located, the Ballistic Calculator turns your range and bearing into firing settings. Work through it in order.
How to load the shell and powder charges
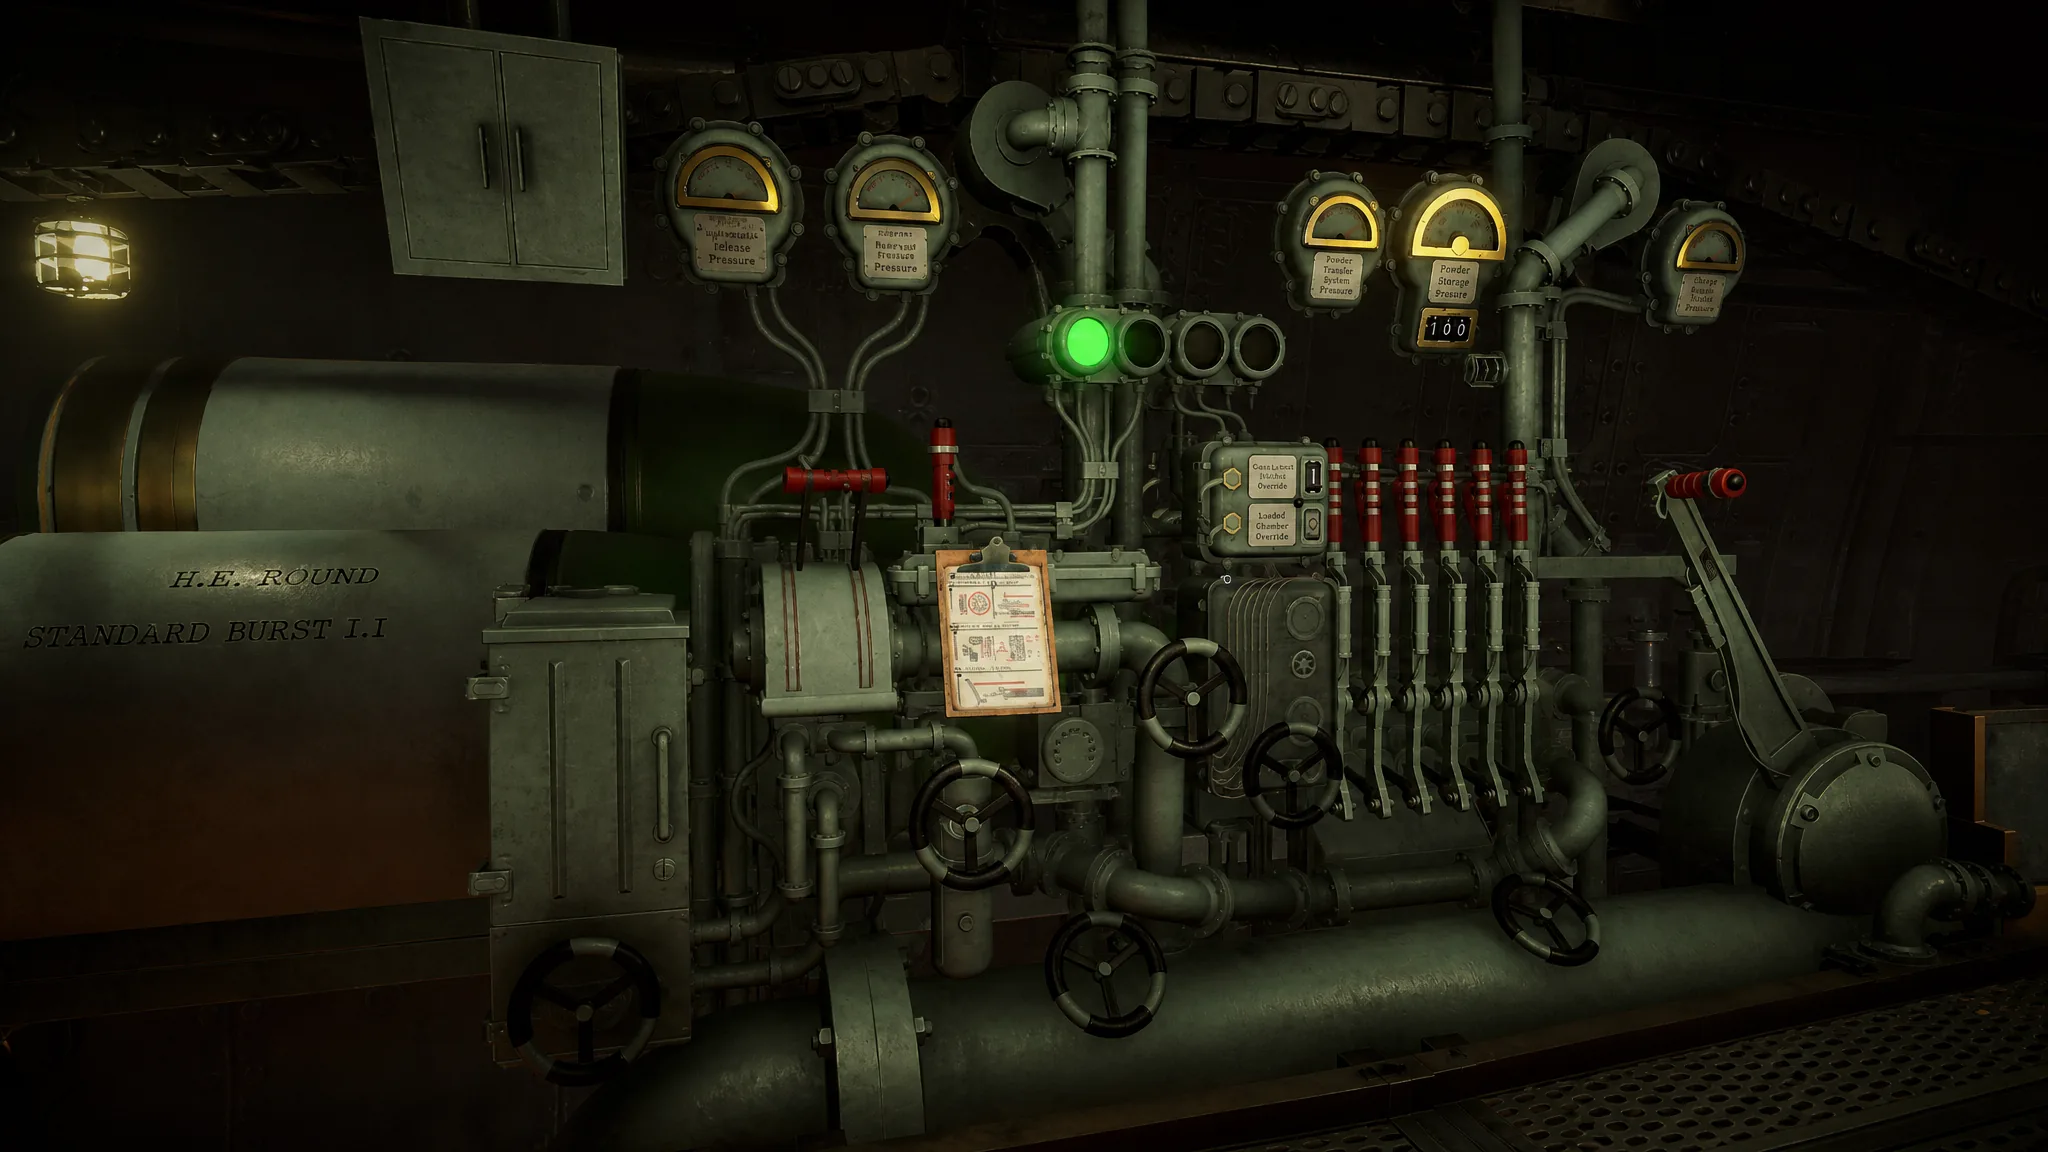
The Gun Loading Platform sits to the right of the Ballistic Calculator. Work from left to right and the sequence is short.
Tip: The elevation console stays locked until the shell is fully loaded, and loading takes time. Use that wait to start rotating the turret toward your bearing.
Setting turret rotation and gun elevation
The note from your ballistic calculations holds both final values. The gun elevation is in the lower-left corner, and the gun rotation is in the upper-right corner. Your job is to match those numbers on the two consoles.
Turret rotation
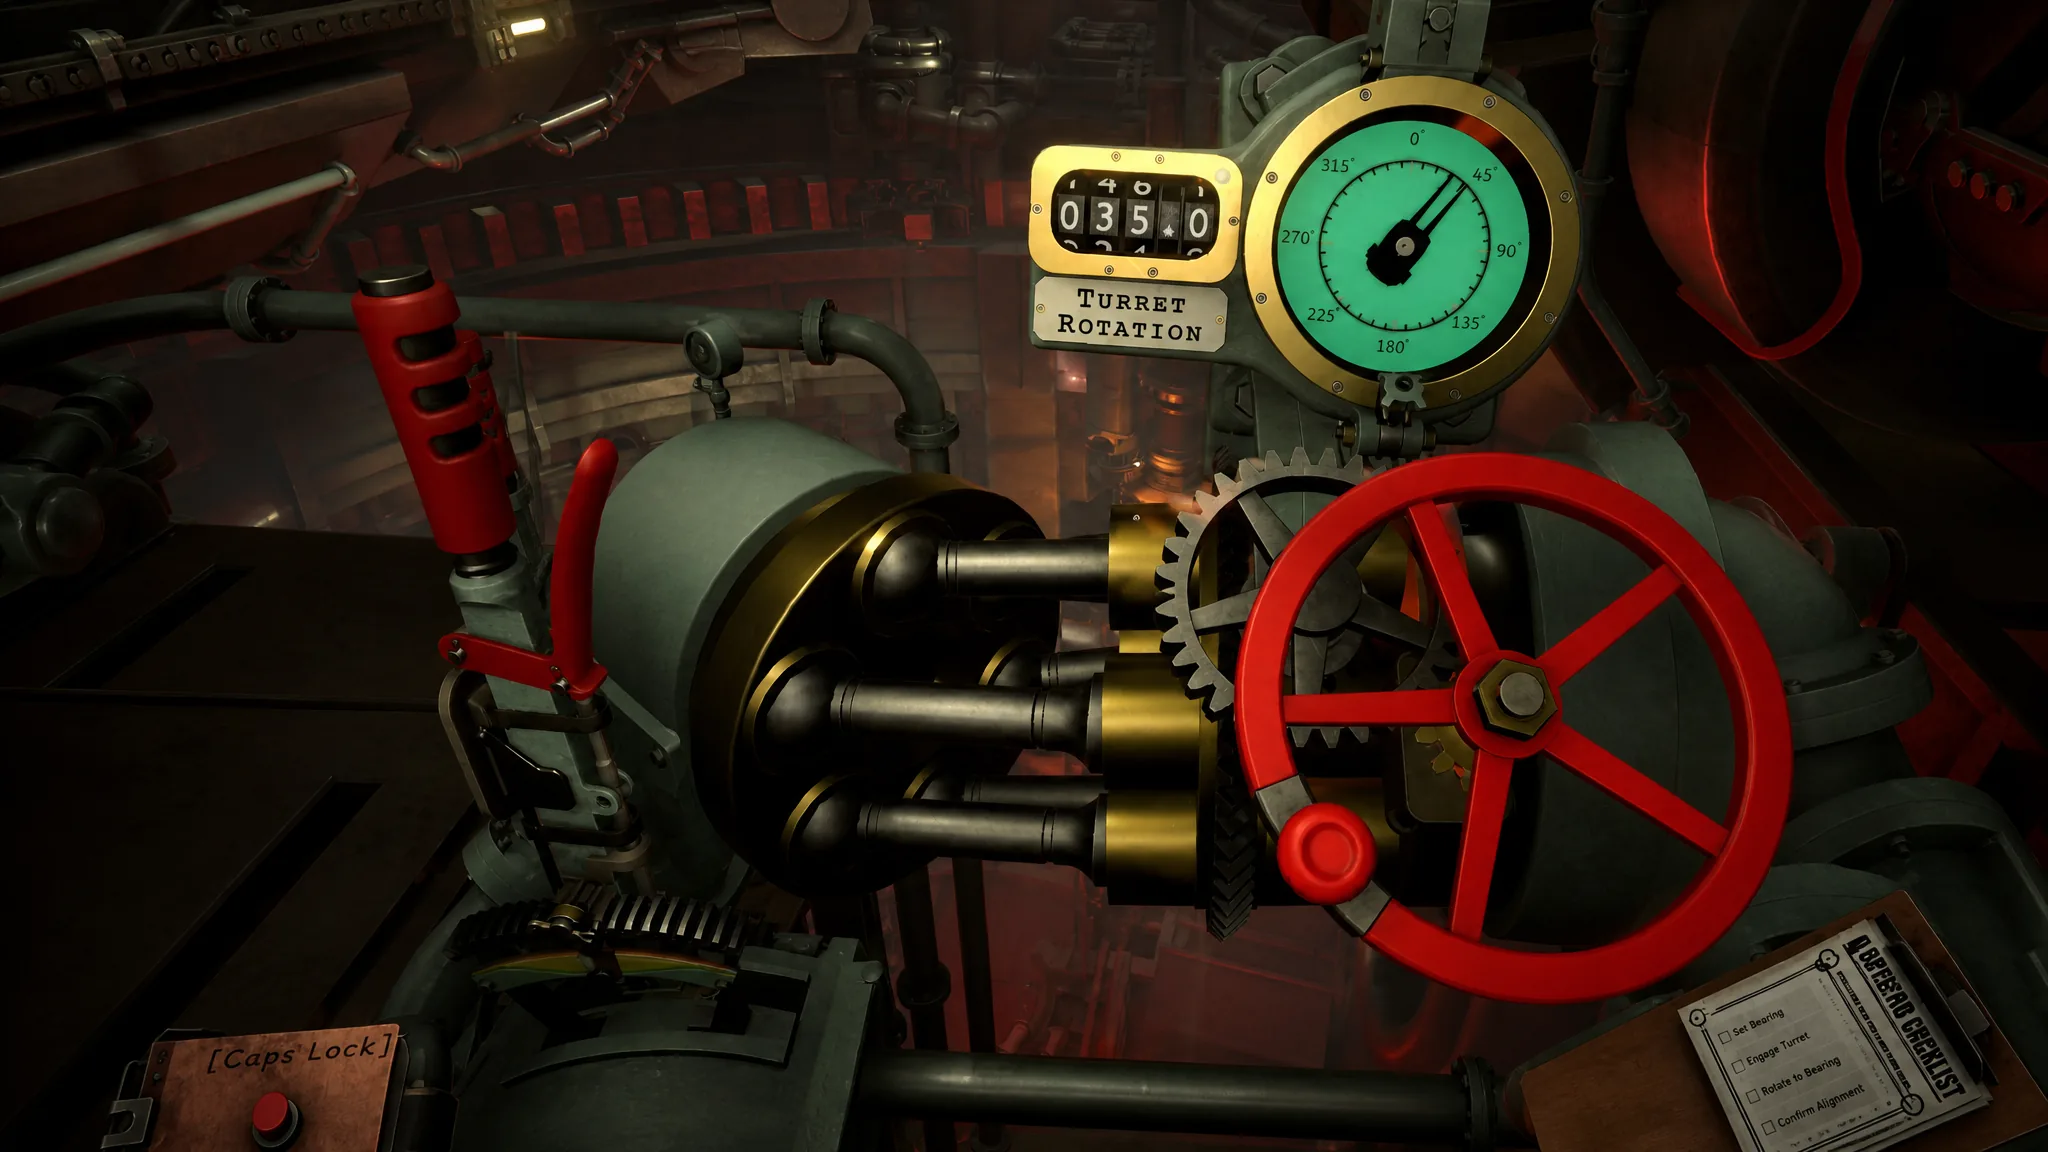
Start with rotation, since swinging the turret takes time and may travel a large part of its 360-degree arc. Yank the pull-cord toward the direction you want, then let the mechanism do the work while you handle other tasks.
- The Heavy Lever drives the rotation left or right. When you reach the approximate position, ease the lever back to center to stop.
- The Wheel fine-tunes the rotation. The Turret Rotation counter must exactly match the bearing value from your Clipboard, which is the same rotation number on your note.
Note: Return the Heavy Lever smoothly. Sudden movements can damage the machinery and force repairs, usually done by turning a few valves before you continue.
Gun elevation
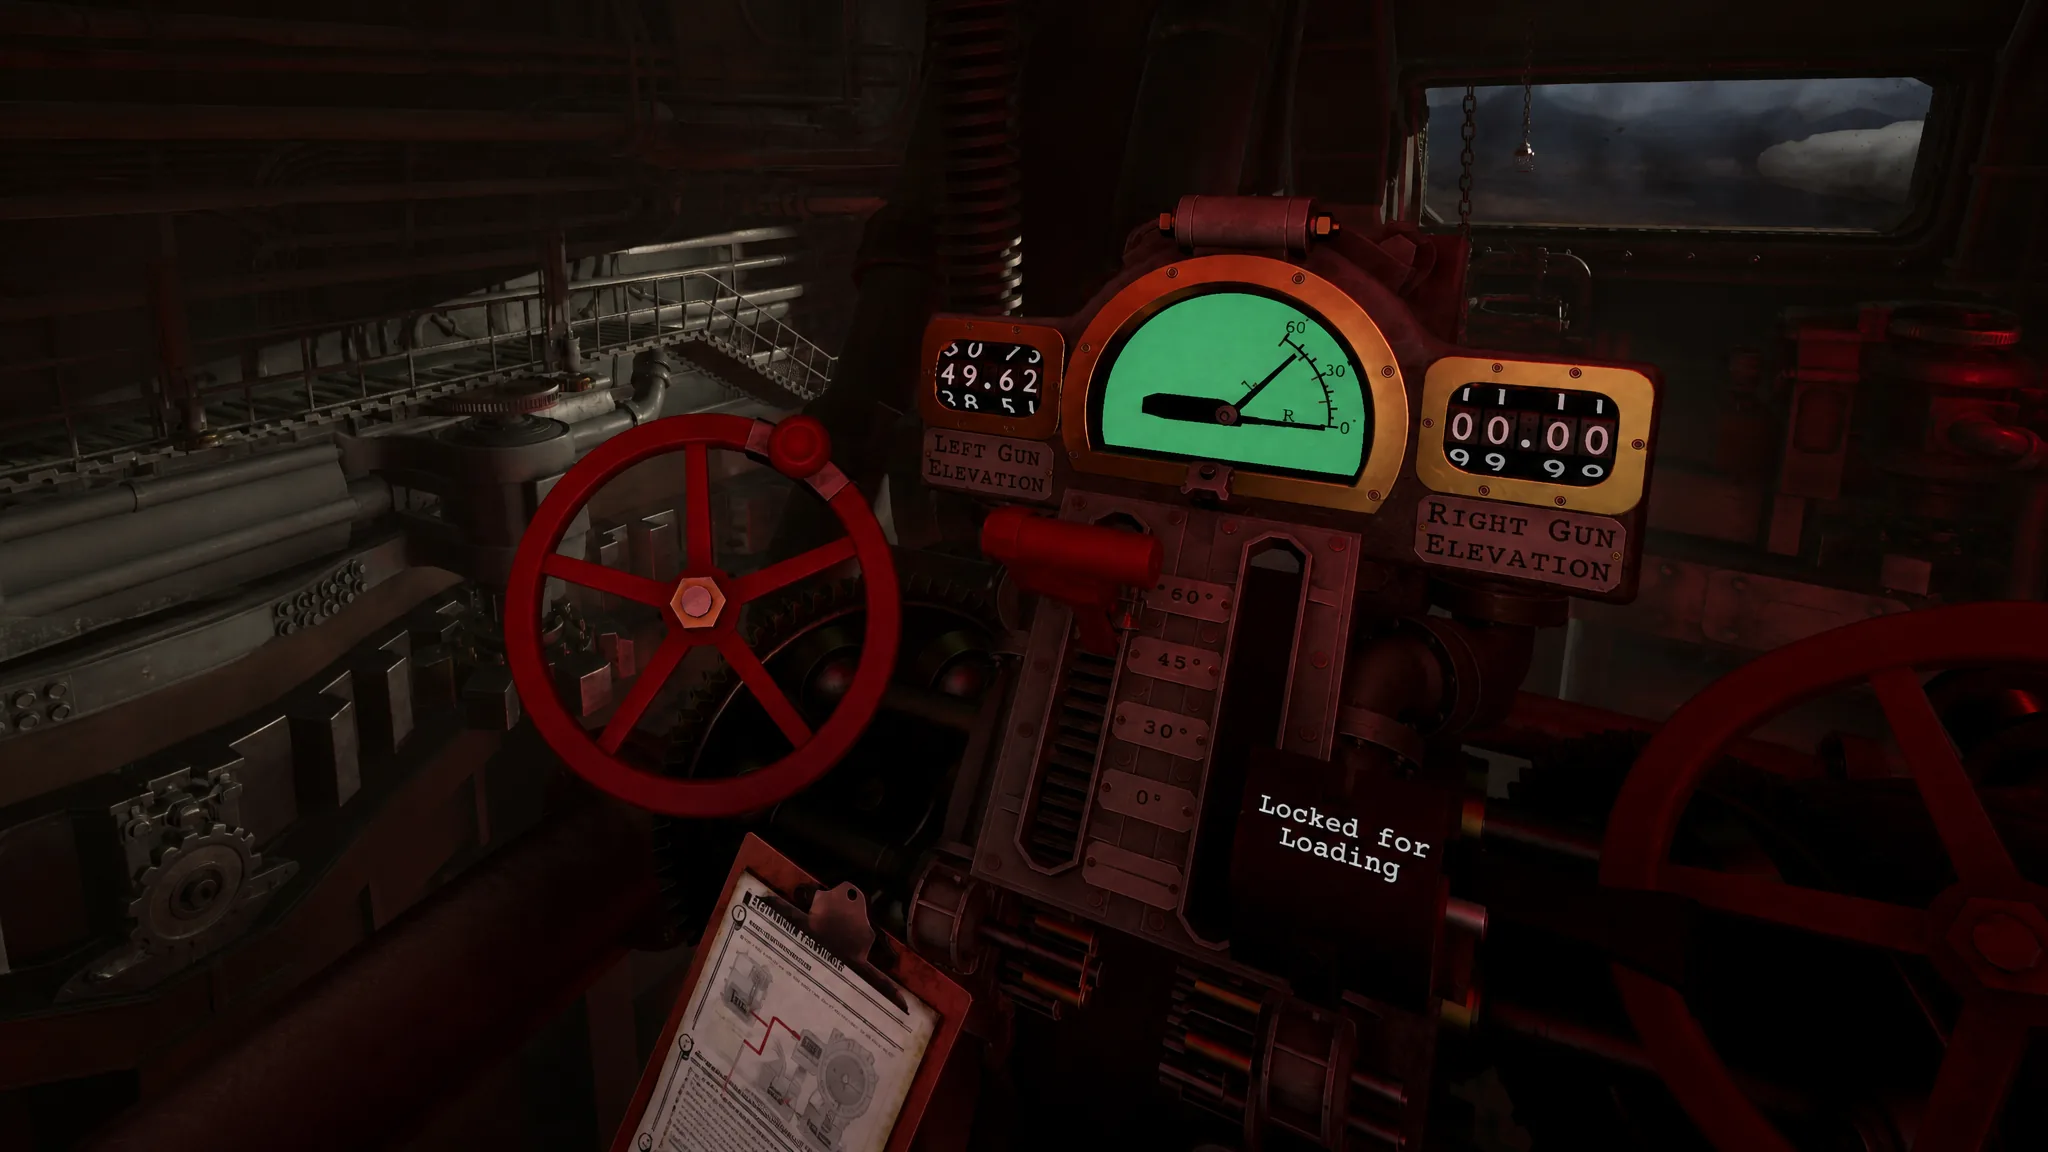
The Gun Elevation Console sits next to the left gun and has two wheels, two levers, and two counters, one set per gun. Early missions use only the left gun, so you usually adjust just the Left Gun Elevation. The console stays locked until loading finishes, the elevation always starts at zero for loading, and it resets to zero and locks again after each shot.
Firing the gun
With the shell loaded and both rotation and elevation matched, go to the Trigger Station. First arm the gun by pulling the lever on the left side of the station, which arms the left gun in the early game. As more guns unlock, arm each one separately.
Confirm all systems are ready, flip all five switches, then pull the large central pull-cord to fire. You will feel the structure recoil as the shell launches.
After the shot: results, new orders, and requisition
Right after firing, return to the tactical map if the game does not move you there automatically, and watch the shell travel to its target. When it lands, you learn whether it hit and whether the strike was lethal. A red skull token confirms a kill, while a blue skull means you also hit a friendly.
Check the High Command console next. It may confirm the strike, hand you new intel, set a new objective, or issue further instructions. If nothing prints, move on to your next target.
The Requisition Console lets you order more shells to the loading dock and call in support such as Scout Planes, Forward Observers, and Emergency Moves. These cost Requisition Credits. You start each mission with a set amount and earn more by destroying high-value targets and completing objectives, so spend carefully on ammo and on actions that help you find targets or dodge enemy fire.
Common questions about Iron Nest
| Question | Answer |
|---|---|
| How do you find targets? | Use spotter data, bearings, and the map tools, including tokens, pencils, and the drawing compass. |
| What is the Clipboard for? | It stores data copied from field reports and High Command so you can use it in calculations. |
| What does triangulation mean here? | Locating a target by drawing bearing lines from spotters and finding where they cross. |
| What do skull tokens mean? | Red skulls confirm kills, blue skulls mark friendly-fire hits. |
| What does the counter-battery timer do? | When enemy artillery is on the map, your first shell reveals you and starts a timer before they strike back. Destroying artillery or taking other actions adds time. |
| Are distance and range the same? | Yes, the game uses both terms interchangeably. |
| Is bearing the same as gun rotation? | Yes, the bearing from the Iron Nest to the target is the rotation value you set on the turret. |
Run this loop a few times and the intimidating control panels start to feel routine. Read, measure, calculate, load, aim, and fire, then repeat for the next target. You can try the whole sequence yourself on the IRON NEST: Heavy Turret Simulator Steam page.