Smert the Apostate is the strangest thing you can wear in Mortal Shell 2, and also one of the strongest. The shell pays half its own health to stop time, then spends that frozen window punching Chaos into whatever is standing in front of you. Everything detonates the moment the clock starts again. It is an S-tier pick, but it hands you almost nothing defensively in return.
Quick answer: Equip Smert with the Black Needle and Caged Hystrix, spend shell points on Novertime, Striker, and Last Vow first, then activate Miracle, stack Chaos with unarmed attacks for the full duration, and let time resume to detonate.
How Smert’s Miracle, Chaos, and Faith work
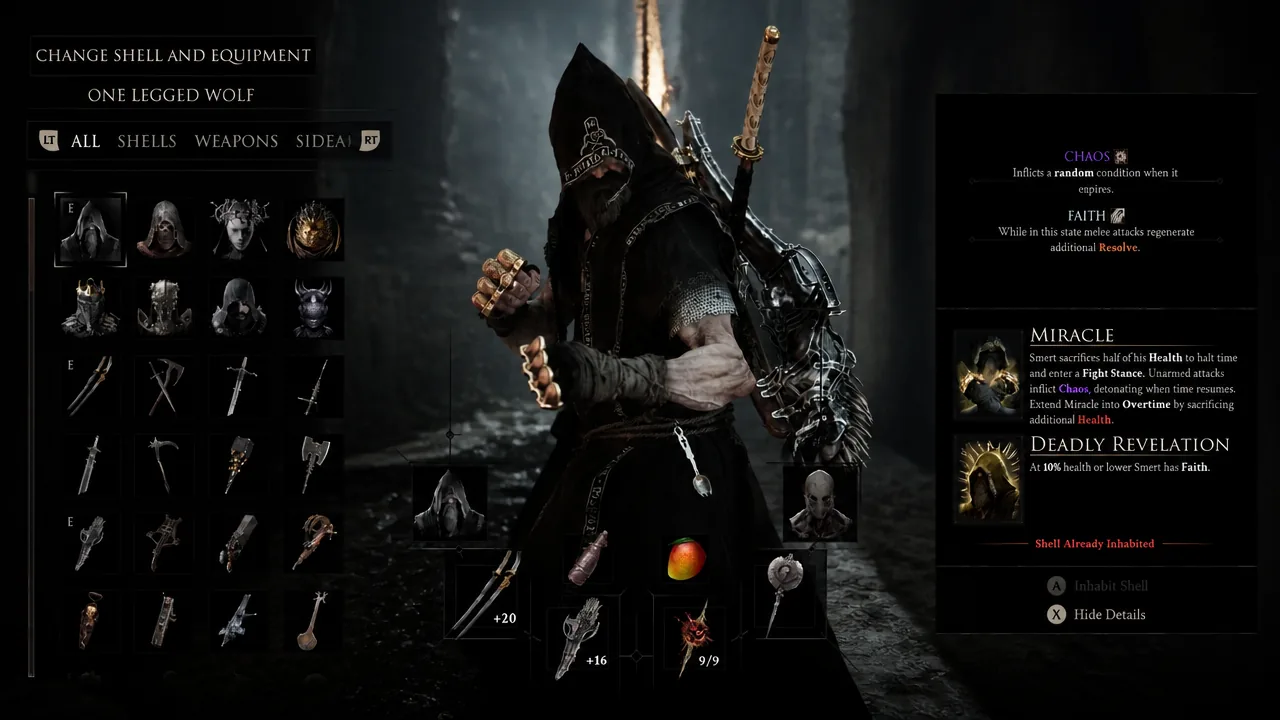
Miracle is the whole shell. Trigger it and Smert sacrifices half of his current health to freeze time and drop into a fight stance. While time is stopped, your unarmed attacks apply Chaos stacks instead of dealing normal damage. Nothing lands until the freeze ends, at which point every stack you piled on goes off at once.
You can stay in that window longer by paying more health, a state called overtime. That is the gamble. More overtime means more stacks and a bigger detonation, but you are burning through the only resource keeping you alive.
The low-health tax comes with a reward. Once Smert drops to 10 percent health or lower, you gain Faith, which sharply increases how fast you build Resolve. That is why the build feels good at the exact moment it should feel terrible, and it is the hook that lets you chain into a stunlock immediately after a detonation.
Best Smert shell abilities and point priority
Every point should go toward holding time open longer or making the unarmed stance hit harder. Take these in roughly this order.
| Shell ability | What it does |
|---|---|
| Novertime (No Overtime) | Extends how long Miracle lasts, so you land more Chaos stacks per activation. |
| Striker | Increases the potency of Chaos stacks applied while time is stopped. |
| Last Vow | Replaces your standard weapon with a stronger unarmed fight stance that has health-on-hit, heavy stagger damage, and critical strike chance. |
| Kicker | Adds a kick that detonates Chaos stacks, with a chance to double the amount applied. |
| Beatdown | Adds a ground-pound finisher that resumes time, cleanly closing out a combo. |
Devotion, Fervor, and Tenacity fill out the rest of the spread once the five above are in. Last Vow is the single biggest damage jump in the tree because health-on-hit partially offsets the health you keep spending on Miracle.
Best weapon, sidearm, Tarstones, and Seal for Smert
Weapon choice matters less here than on other shells, since Last Vow swaps you into the unarmed stance anyway. Still, the loadout below covers the moments when Miracle is on cooldown.
| Slot | Equipment |
|---|---|
| Weapon | Black Needle |
| Weapon Tarstones | Stillblade’s Stone, Arbiter’s Prize |
| Sidearm | Caged Hystrix |
| Sidearm Tarstone | Volatile Fragment |
| Support Tarstones | Auspicious Stone, Headman’s Stone, Berserker’s Stone, Gloombound Stone |
| Seal | Untarnished Seal |
The Untarnished Seal lets you block with your weapon and, if you time it, land a Perfect Guard that deals Break damage. On a shell with this little margin for error, having a defensive option that also builds toward a Riposte is worth more than another raw damage stone.
The Smert combat loop against bosses
How to unlock Smert at the Outskirts of Nochte
Smert sits near the Outskirts of Nochte, and claiming the shell is a repeatable ritual rather than a boss fight. Three blood pools are involved, and you have to interact with all of them.
You will know it worked when Smert the Apostate appears in the Change Shell and Equipment menu, listing Chaos, Faith, and Miracle in its details panel. Equip it there before spending any shell points.
Common mistakes that get Smert killed
Most failed runs with this shell come down to the same handful of errors.
- Buying too much overtime. Each extension costs health, and there is no undo once you are below the threshold you needed to survive the next hit.
- Playing defensively at low health. Faith rewards you for staying in, and backing off wastes the Resolve window the build depends on.
- Delaying Last Vow. Without the upgraded unarmed stance and its health-on-hit, the health you spend on Miracle never comes back.
- Activating Miracle at the wrong time. Losing half your health right before a boss combo lands usually ends the attempt on the spot.
Note: Smert has no safety net. The correct answer to a dangerous situation with this shell is almost always more aggression, not less, because Chaos has to be spent before your health pool runs out.
Played well, Smert turns boss fights into a rhythm of frozen windows and huge detonations, with Faith carrying you between them. Played carelessly, it is the fastest way to lose a run in Mortal Shell 2.