
Automatic locking on Windows 11 interrupts active work, gaming, or long-running tasks by requiring a PIN or password after short periods of inactivity. This behavior persists even when display and sleep settings are set to "Never," causing frustration for users who want uninterrupted access to their PC. Addressing this issue involves changing sign-in requirements, adjusting sleep and screen saver settings, and, if necessary, modifying the Windows Registry for a more permanent solution.
Adjust Sign-In Options to Disable Automatic Lock
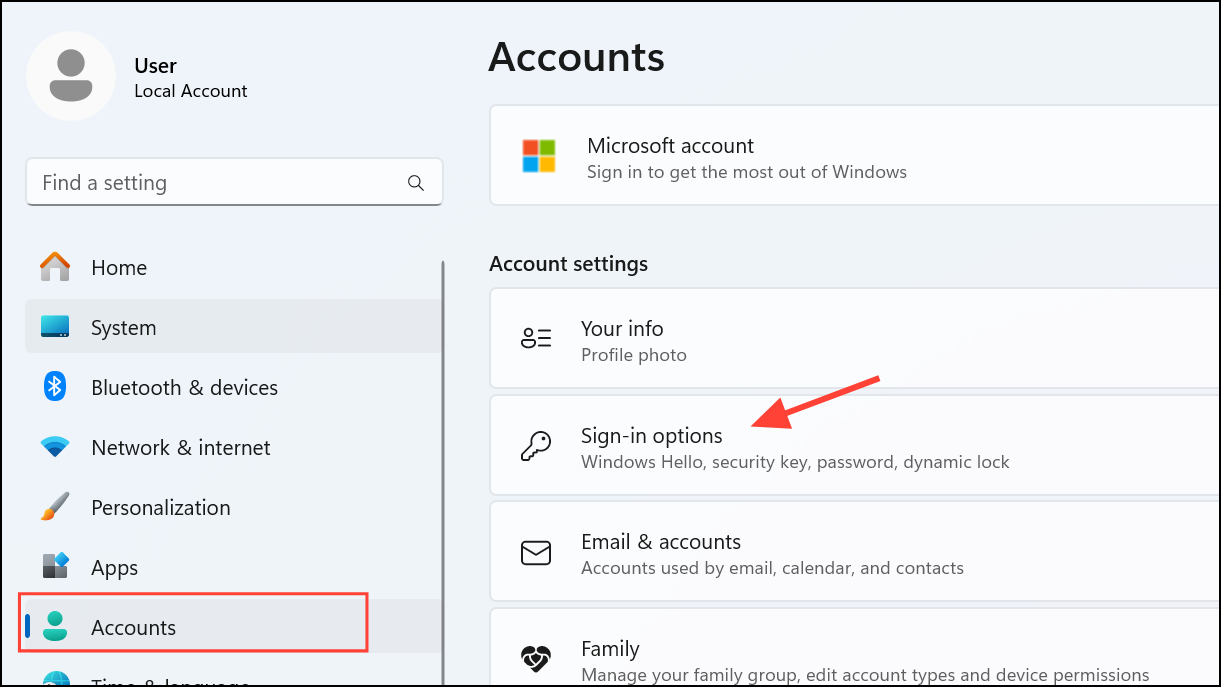
Step 1: Open the Windows Settings app by pressing Win + I. Navigate to Accounts and select Sign-in options from the menu.
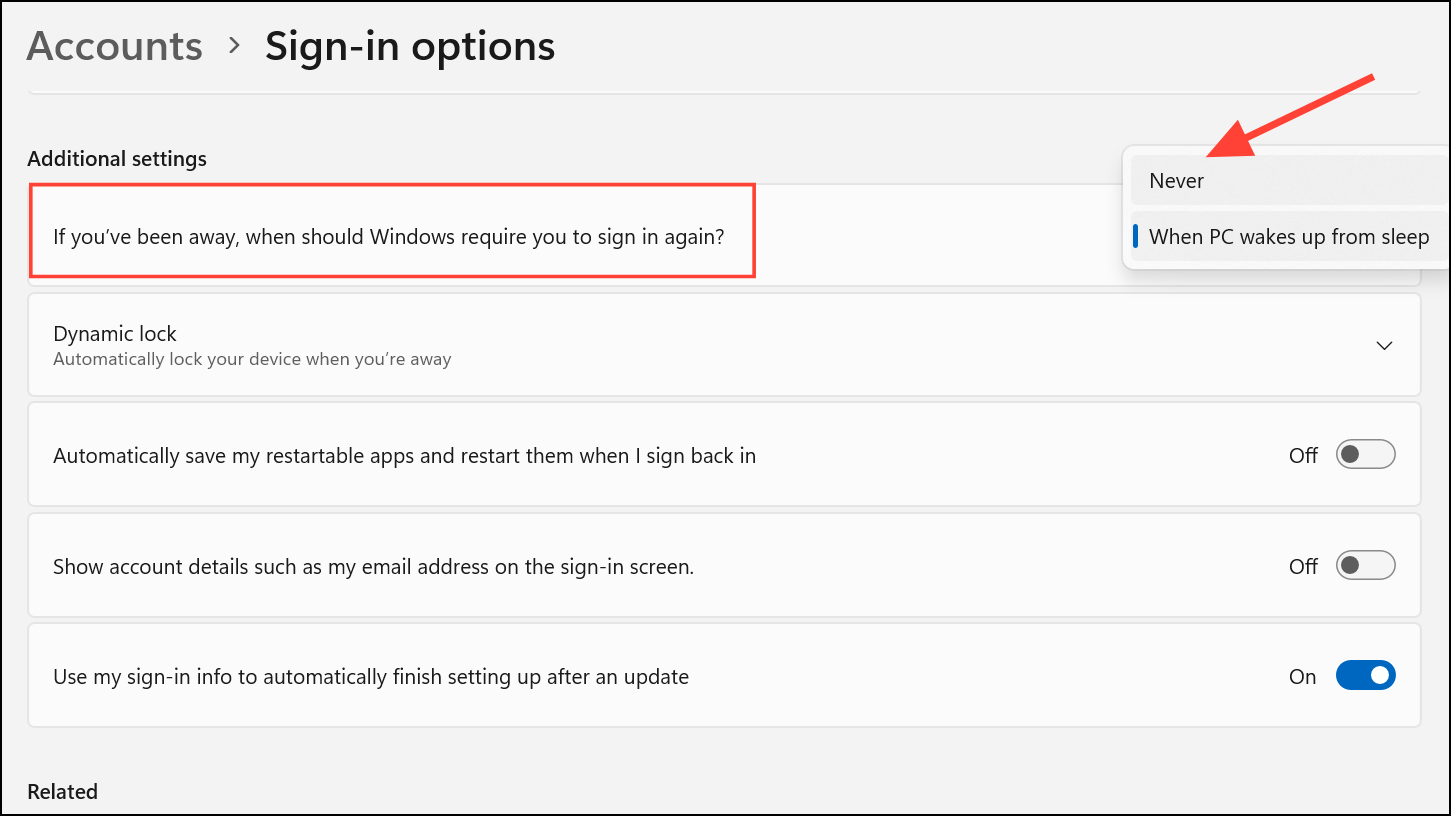
Step 2: In the Additional settings section, find the option labeled If you've been away, when should Windows require you to sign in again? Set this dropdown to Never. This setting prevents Windows from asking for your credentials after inactivity, even if the screen turns off.
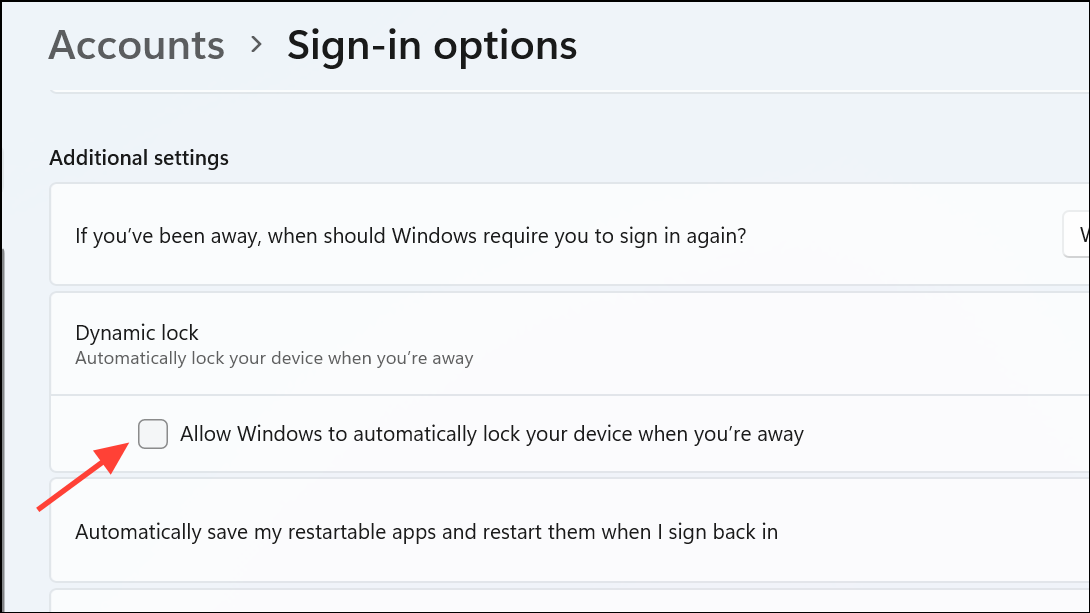
Step 3: Scroll down to the Dynamic lock section. Make sure the box for Allow Windows to automatically lock your device when you're away is unchecked. Dynamic Lock uses Bluetooth proximity to trigger the lock screen, so disabling it ensures your PC stays unlocked unless you manually lock it.
Change Sleep Mode and Screen Saver Settings
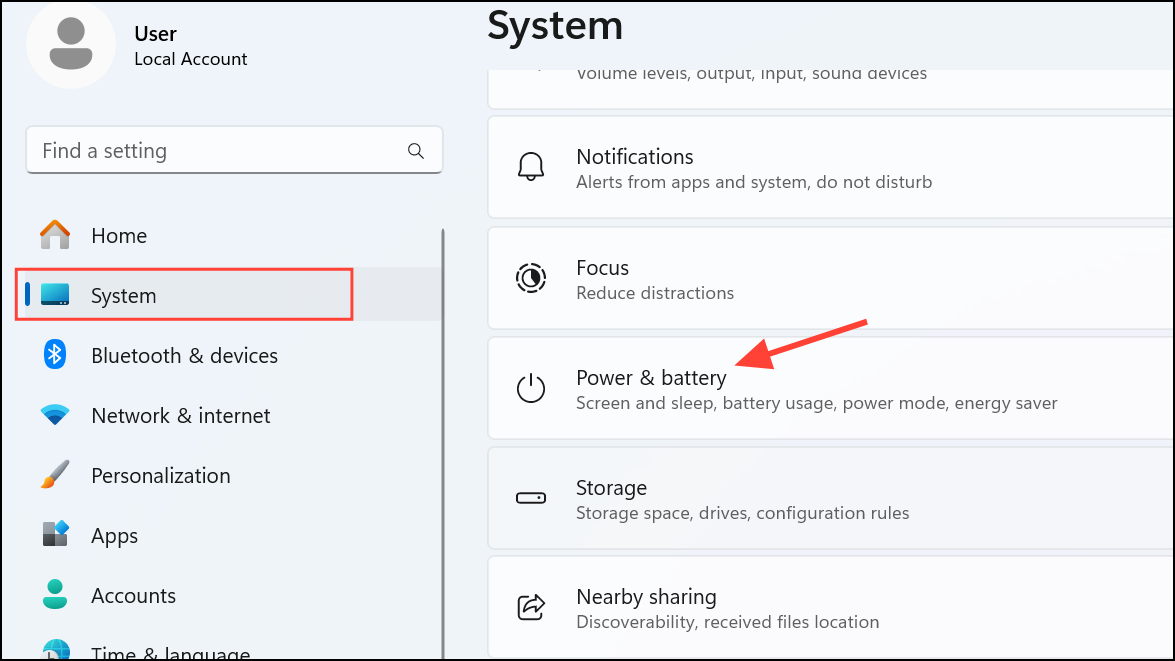
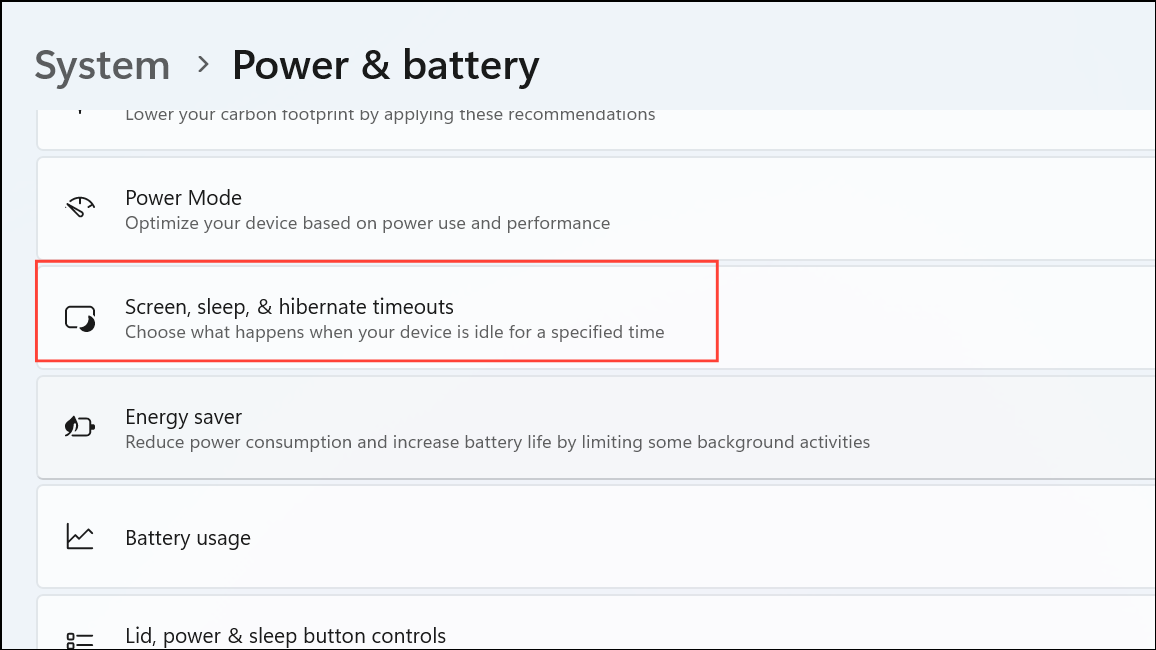
Step 1: In the Settings app, go to System and select Power & battery.
Step 2: Click on Screen, sleep. & hibernate timeouts to expand the section.
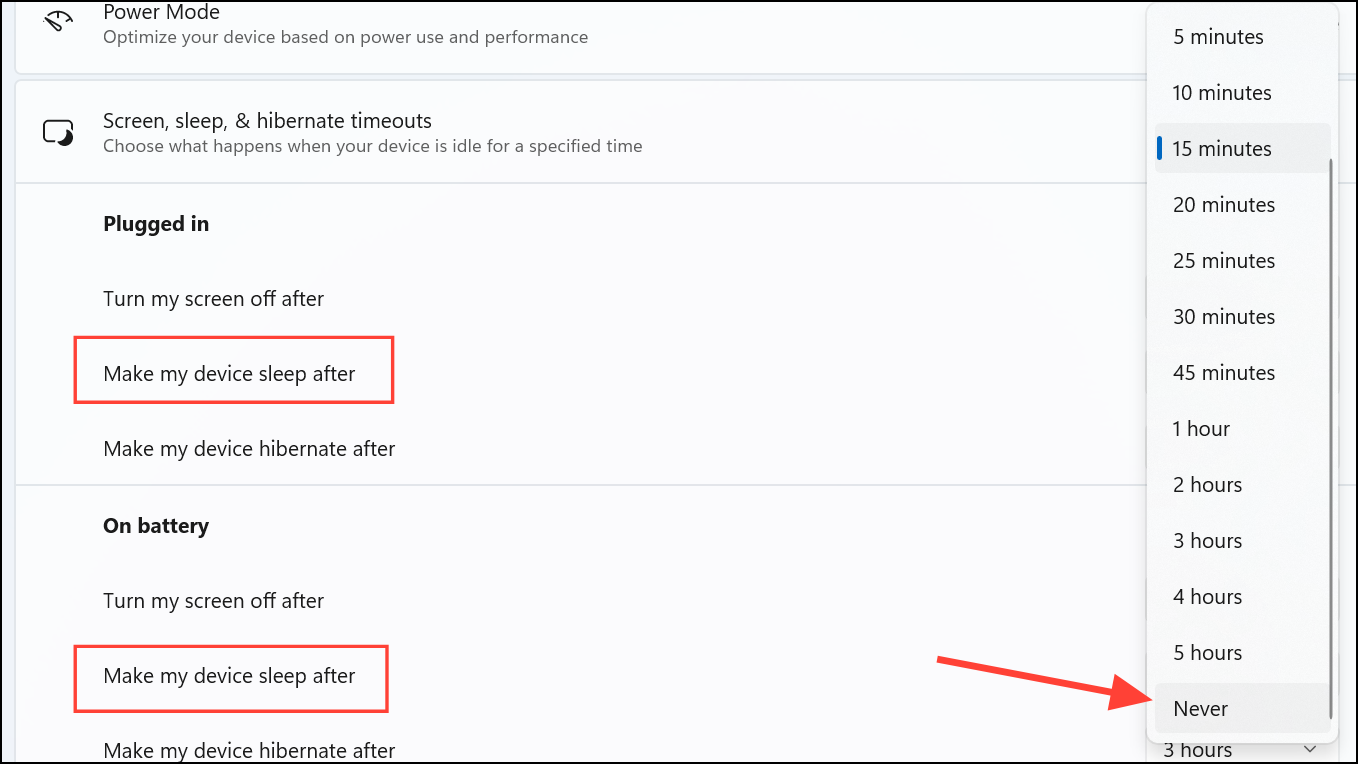
Step 3: Set both On battery power, make my device sleep after and When plugged in, make my device sleep after to Never. This prevents Windows from entering sleep mode, which often triggers the lock screen.
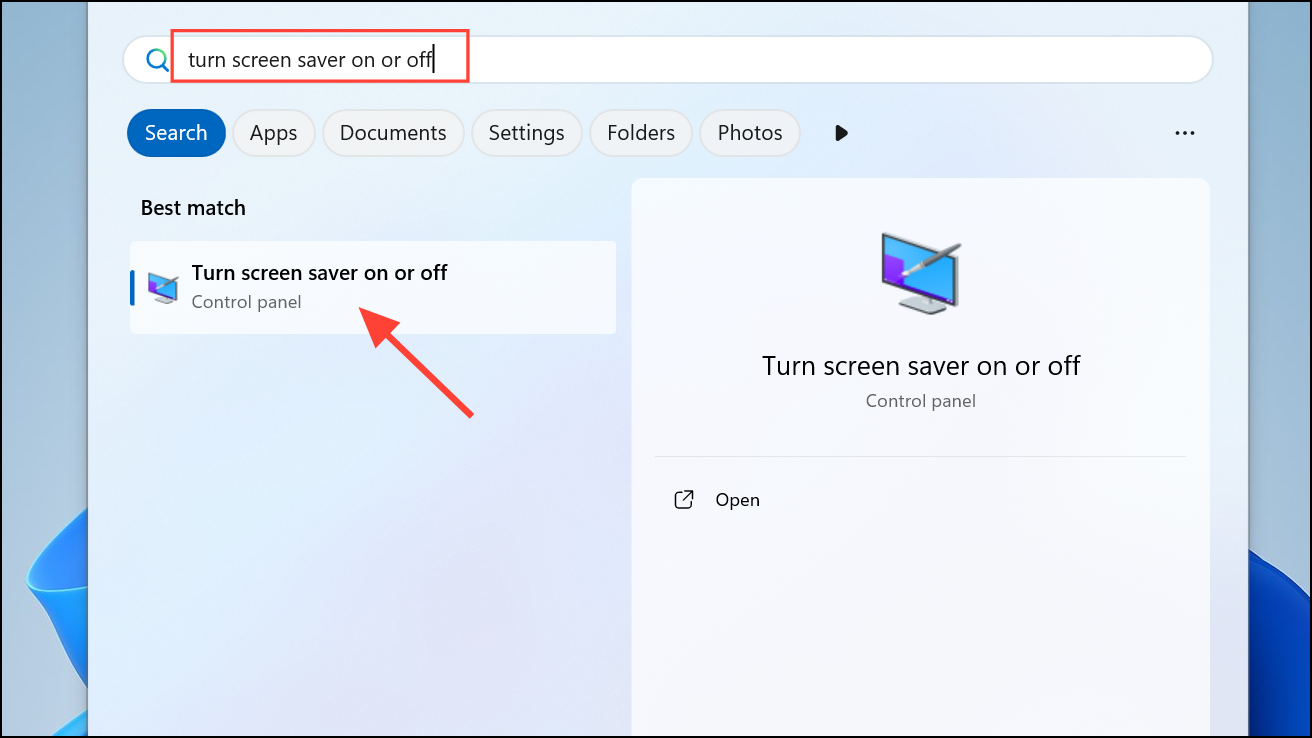
Step 4: To disable the screen saver, press Win + S and search for Turn screen saver on or off. Select it when it appears in the search results.
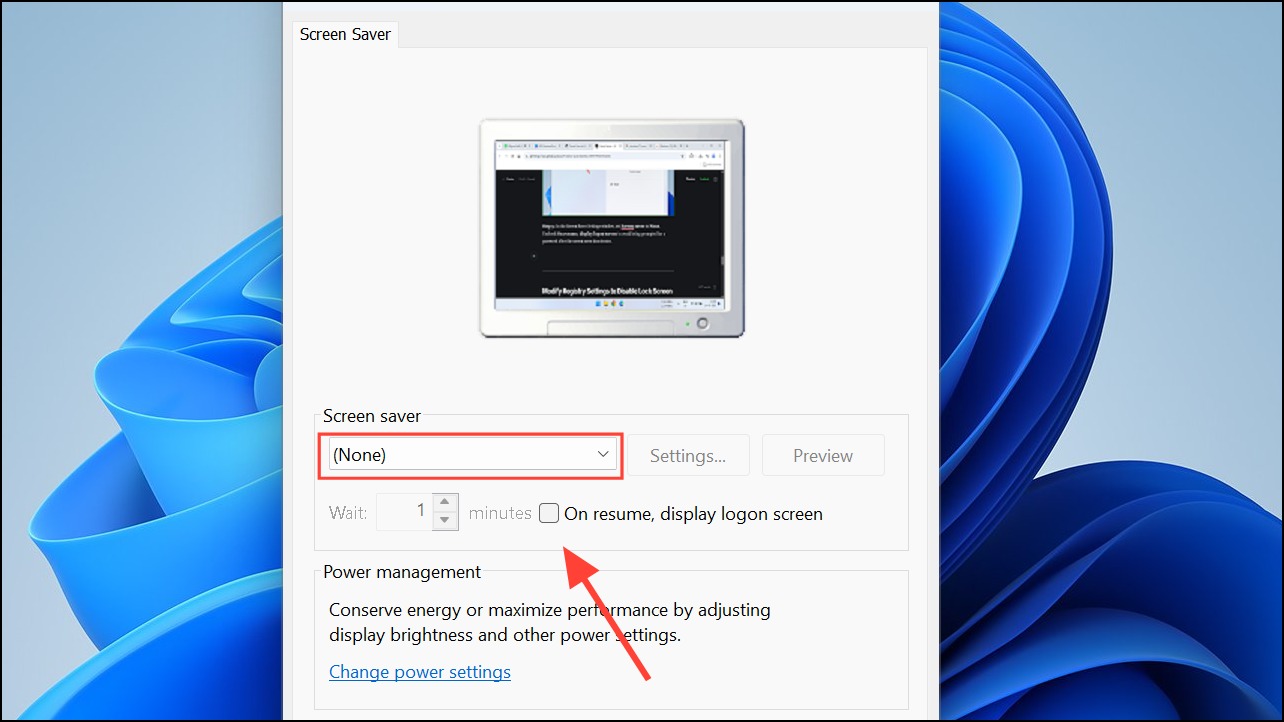
Step 5: In the Screen Saver Settings window, set Screen saver to None. Uncheck On resume, display logon screen to avoid being prompted for a password after the screen saver deactivates.
Modify Registry Settings to Disable Lock Screen
Editing the Windows Registry offers a deeper solution, especially if standard settings don't prevent automatic locking. However, modifying the registry can cause system issues if not done correctly. Always back up your registry or create a restore point before making changes.
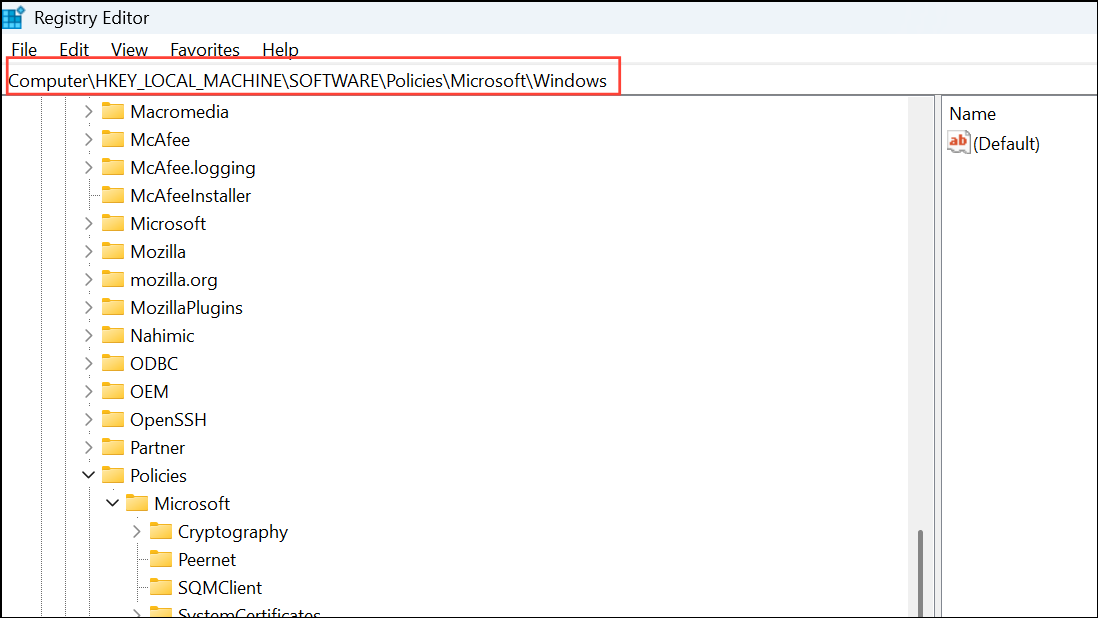
Step 1: Open the Run dialog by pressing Win + R, type regedit, and press Enter. If prompted by User Account Control, click Yes to allow Registry Editor to open.

Step 2: In Registry Editor, navigate to:
HKEY_LOCAL_MACHINE\SOFTWARE\Policies\Microsoft\Windows
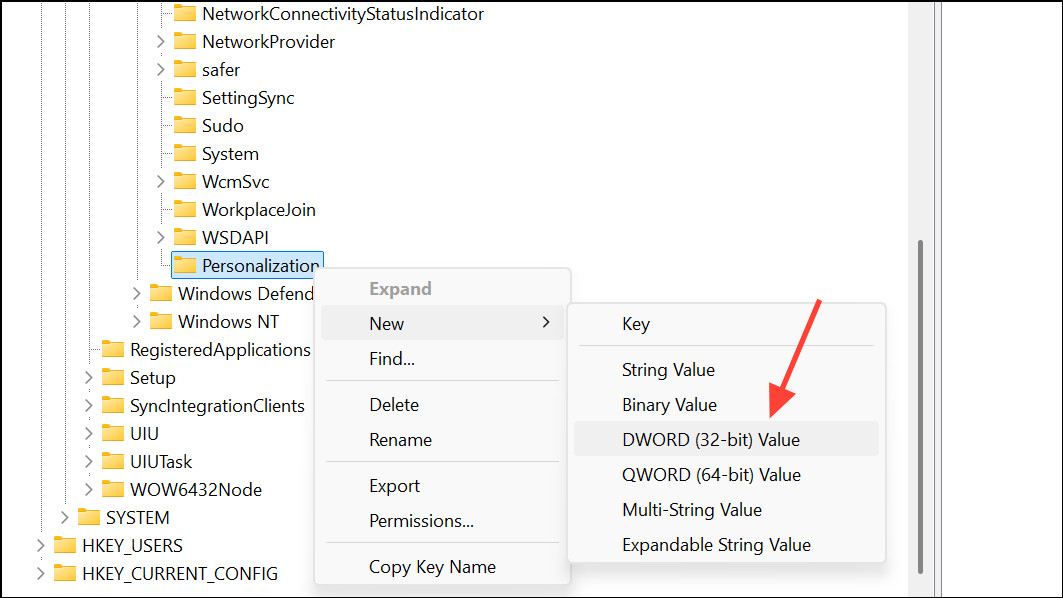
Step 3: Right-click the Windows folder in the left pane and select New > Key. Name the new key Personalization (spelled with a "z," not an "s").

Step 4: Right-click the Personalization key, select New > DWORD (32-bit) Value, and name it NoLockScreen.
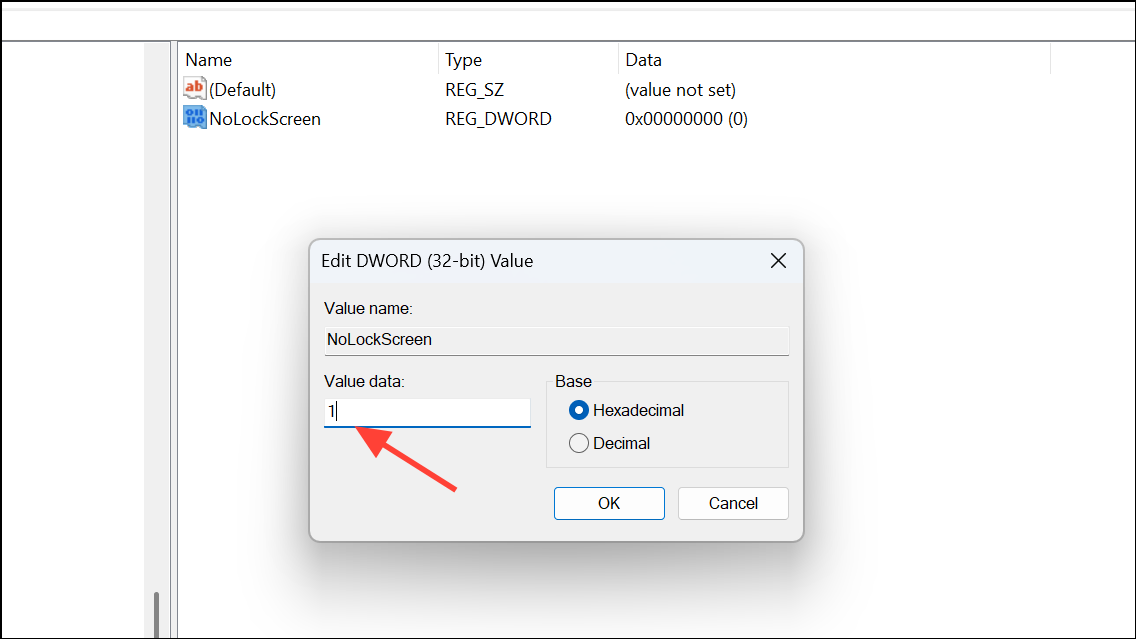
Step 5: Double-click NoLockScreen, set its Value data to 1, and click OK.
Step 6: Close Registry Editor and restart your computer. The lock screen should now be disabled, and your PC will remain accessible after periods of inactivity.
Check for Group Policy or Netplwiz Options (Pro Editions)
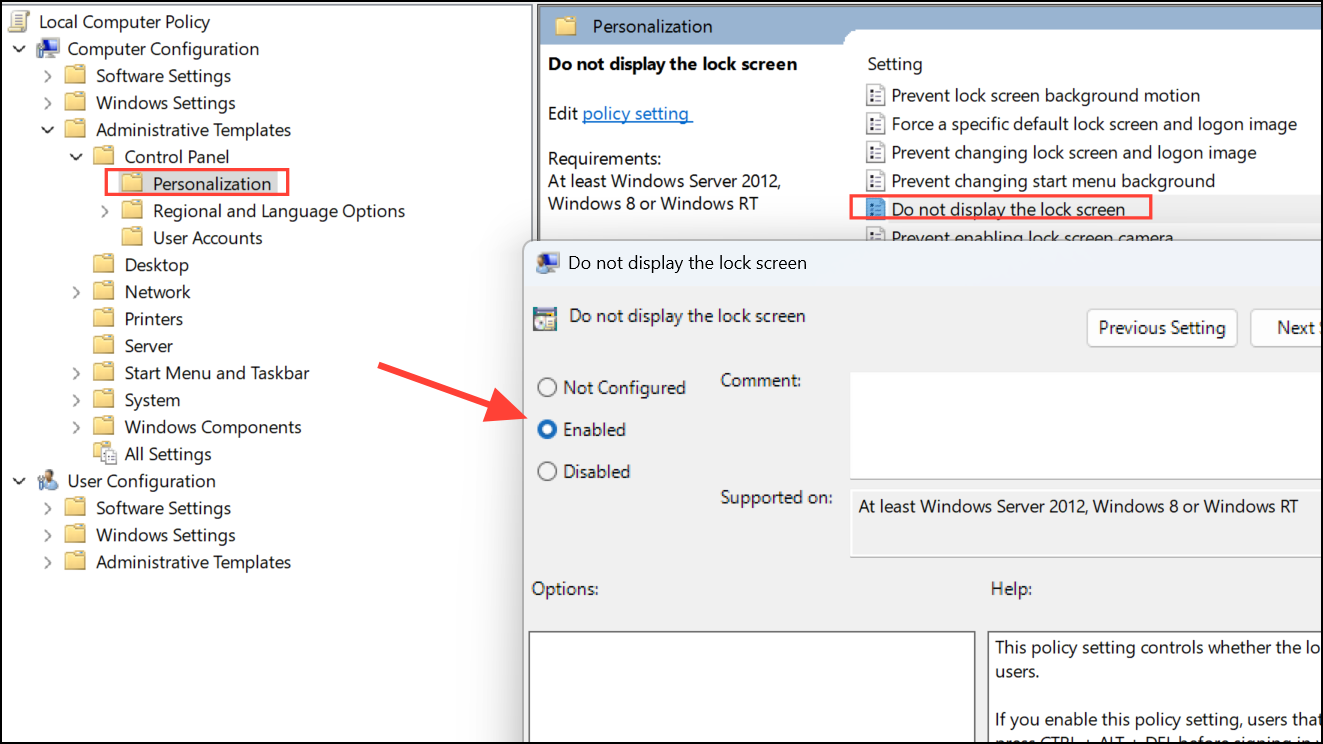
On Windows 11 Pro, you can use the Group Policy Editor to manage lock screen behavior.
Step 1: Press Win + R, type gpedit.msc, and press Enter.
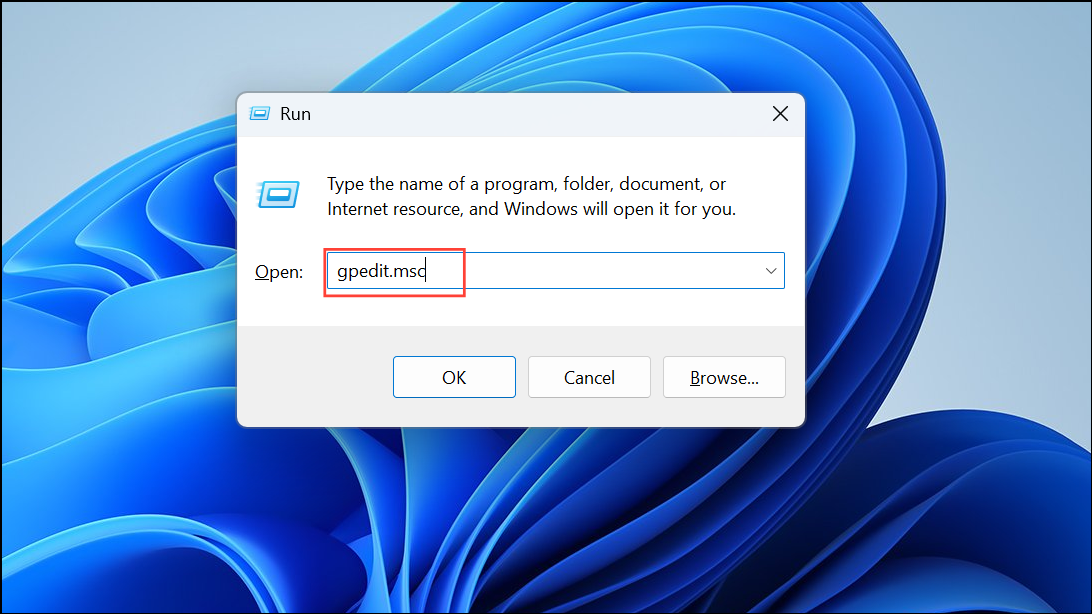
Step 2: Navigate to Computer Configuration > Administrative Templates > Control Panel > Personalization, and set Do not display the lock screen to Enabled. Restart your PC for changes to take effect.
Step 3: Alternatively, use netplwiz to disable password prompts at sign-in. Search for netplwiz using Windows Search and hit Enter.
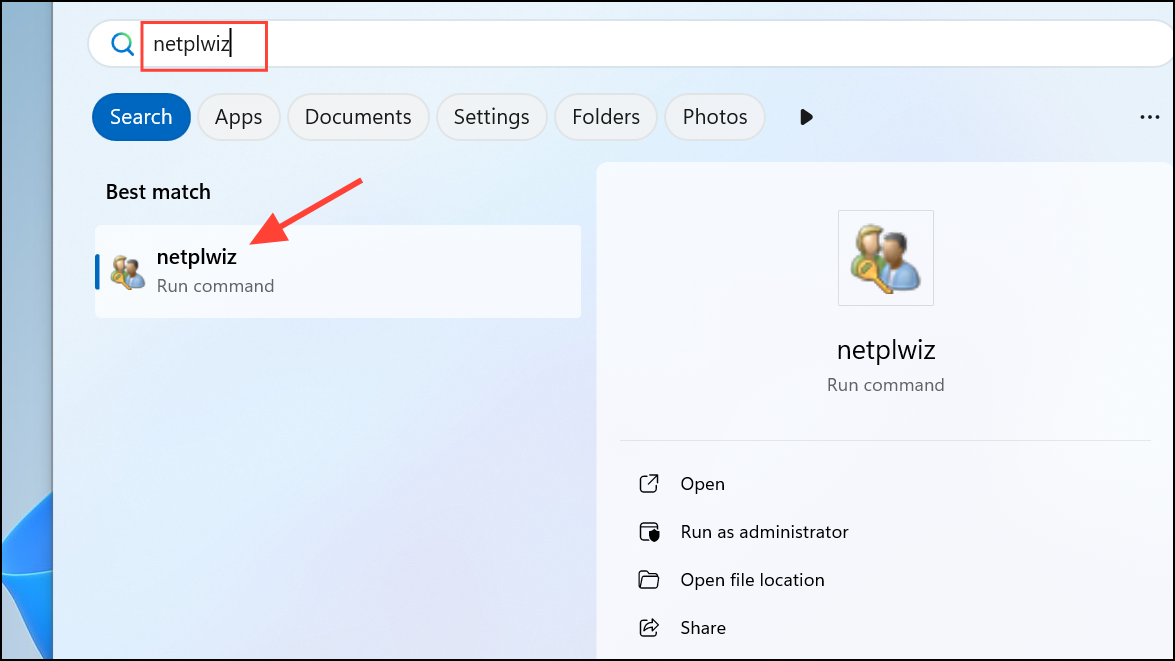
Step 4: Uncheck Users must enter a user name and password to use this computer, and confirm your password when prompted. This step streamlines access but does not always affect inactivity-based locking, so combine it with other methods for best results.
Disabling automatic locking on Windows 11 requires adjusting sign-in, sleep, and registry settings. Confirm each change takes effect by waiting through your usual inactivity period and verifying the lock screen no longer appears.